Terminate a Workflow with One Click via Button
When a running workflow needs to be terminated immediately, administrators can manually end the instance in History.
Alternatively, you can add a “Terminate” button to a record. When clicked, the button calls the corresponding API to directly end the workflow instance.
API Information
Organization-level API documentation:
https://apidoc.mingdao.com/
For HAP Server:
Go to [Organization Admin Console] > [Integration] > [Misc.] > [Open API] > [View Docs]. The Host will automatically display your own server address.
API Details for Terminating a Workflow
-
API:
https://api.mingdao.com/workflow/v1/instance/endInstance -
Request Method:
GET(parameters appended to the URL) -
Required Parameters:
appKeysigntimestampaccountIdinstanceId
-
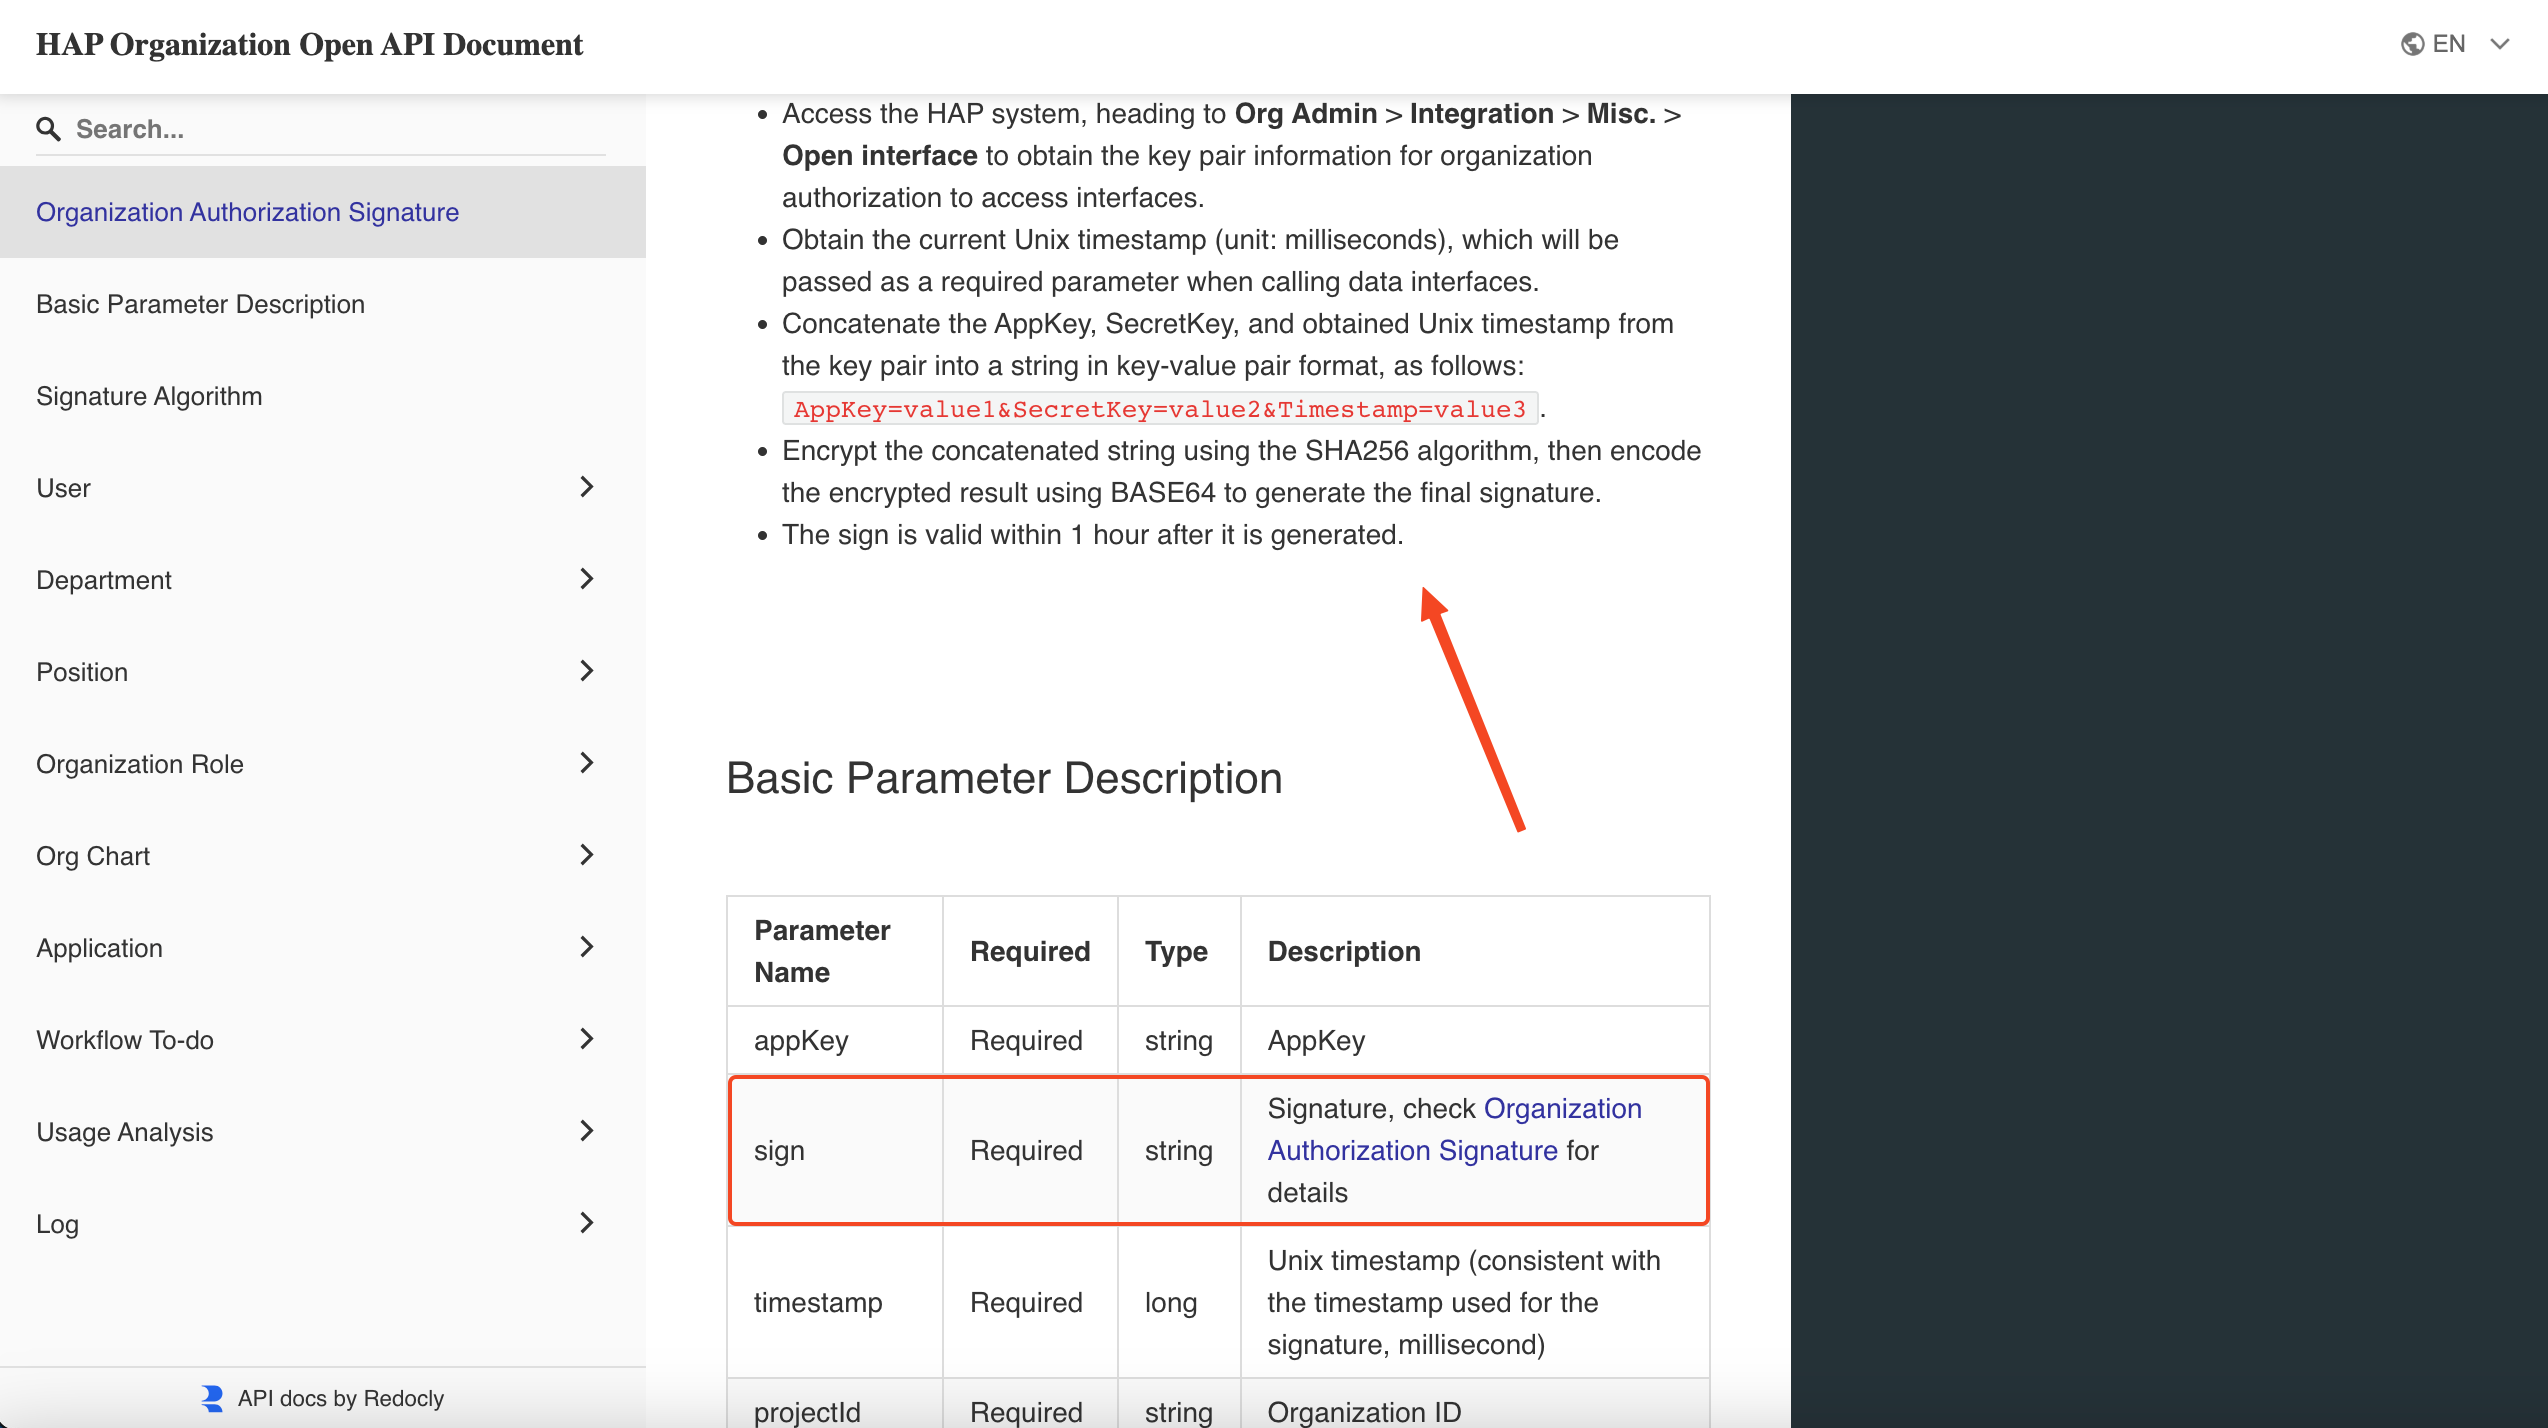
Signature (sign) Rule – Key Points:
ConcatenateAppKey + SecretKey + Timestamp,
then generate a SHA256 hash,
and finally encode the result using Base64. For detailed implementation, refer to the sample code in the following section.
Implementation Steps
We will walk through the required parameters step by step, starting with the simplest ones.
1. Obtain accountId
-
Only administrators can terminate workflows:
Administrators can click their profile picture, go to Manage My Account, and directly copy theaccountId(User ID). This can be used as a static value. -
Multiple users can terminate workflows:
In a workflow, you can use the Get Single Member Info node to retrieve the operator’saccountId(User ID).
In this example, we use a static value. Record the obtained accountId:
| Parameter Name | Value |
|---|---|
| accountId | 0ff1aa56-9a86-41a6-a7d9-e47b80d24474 |
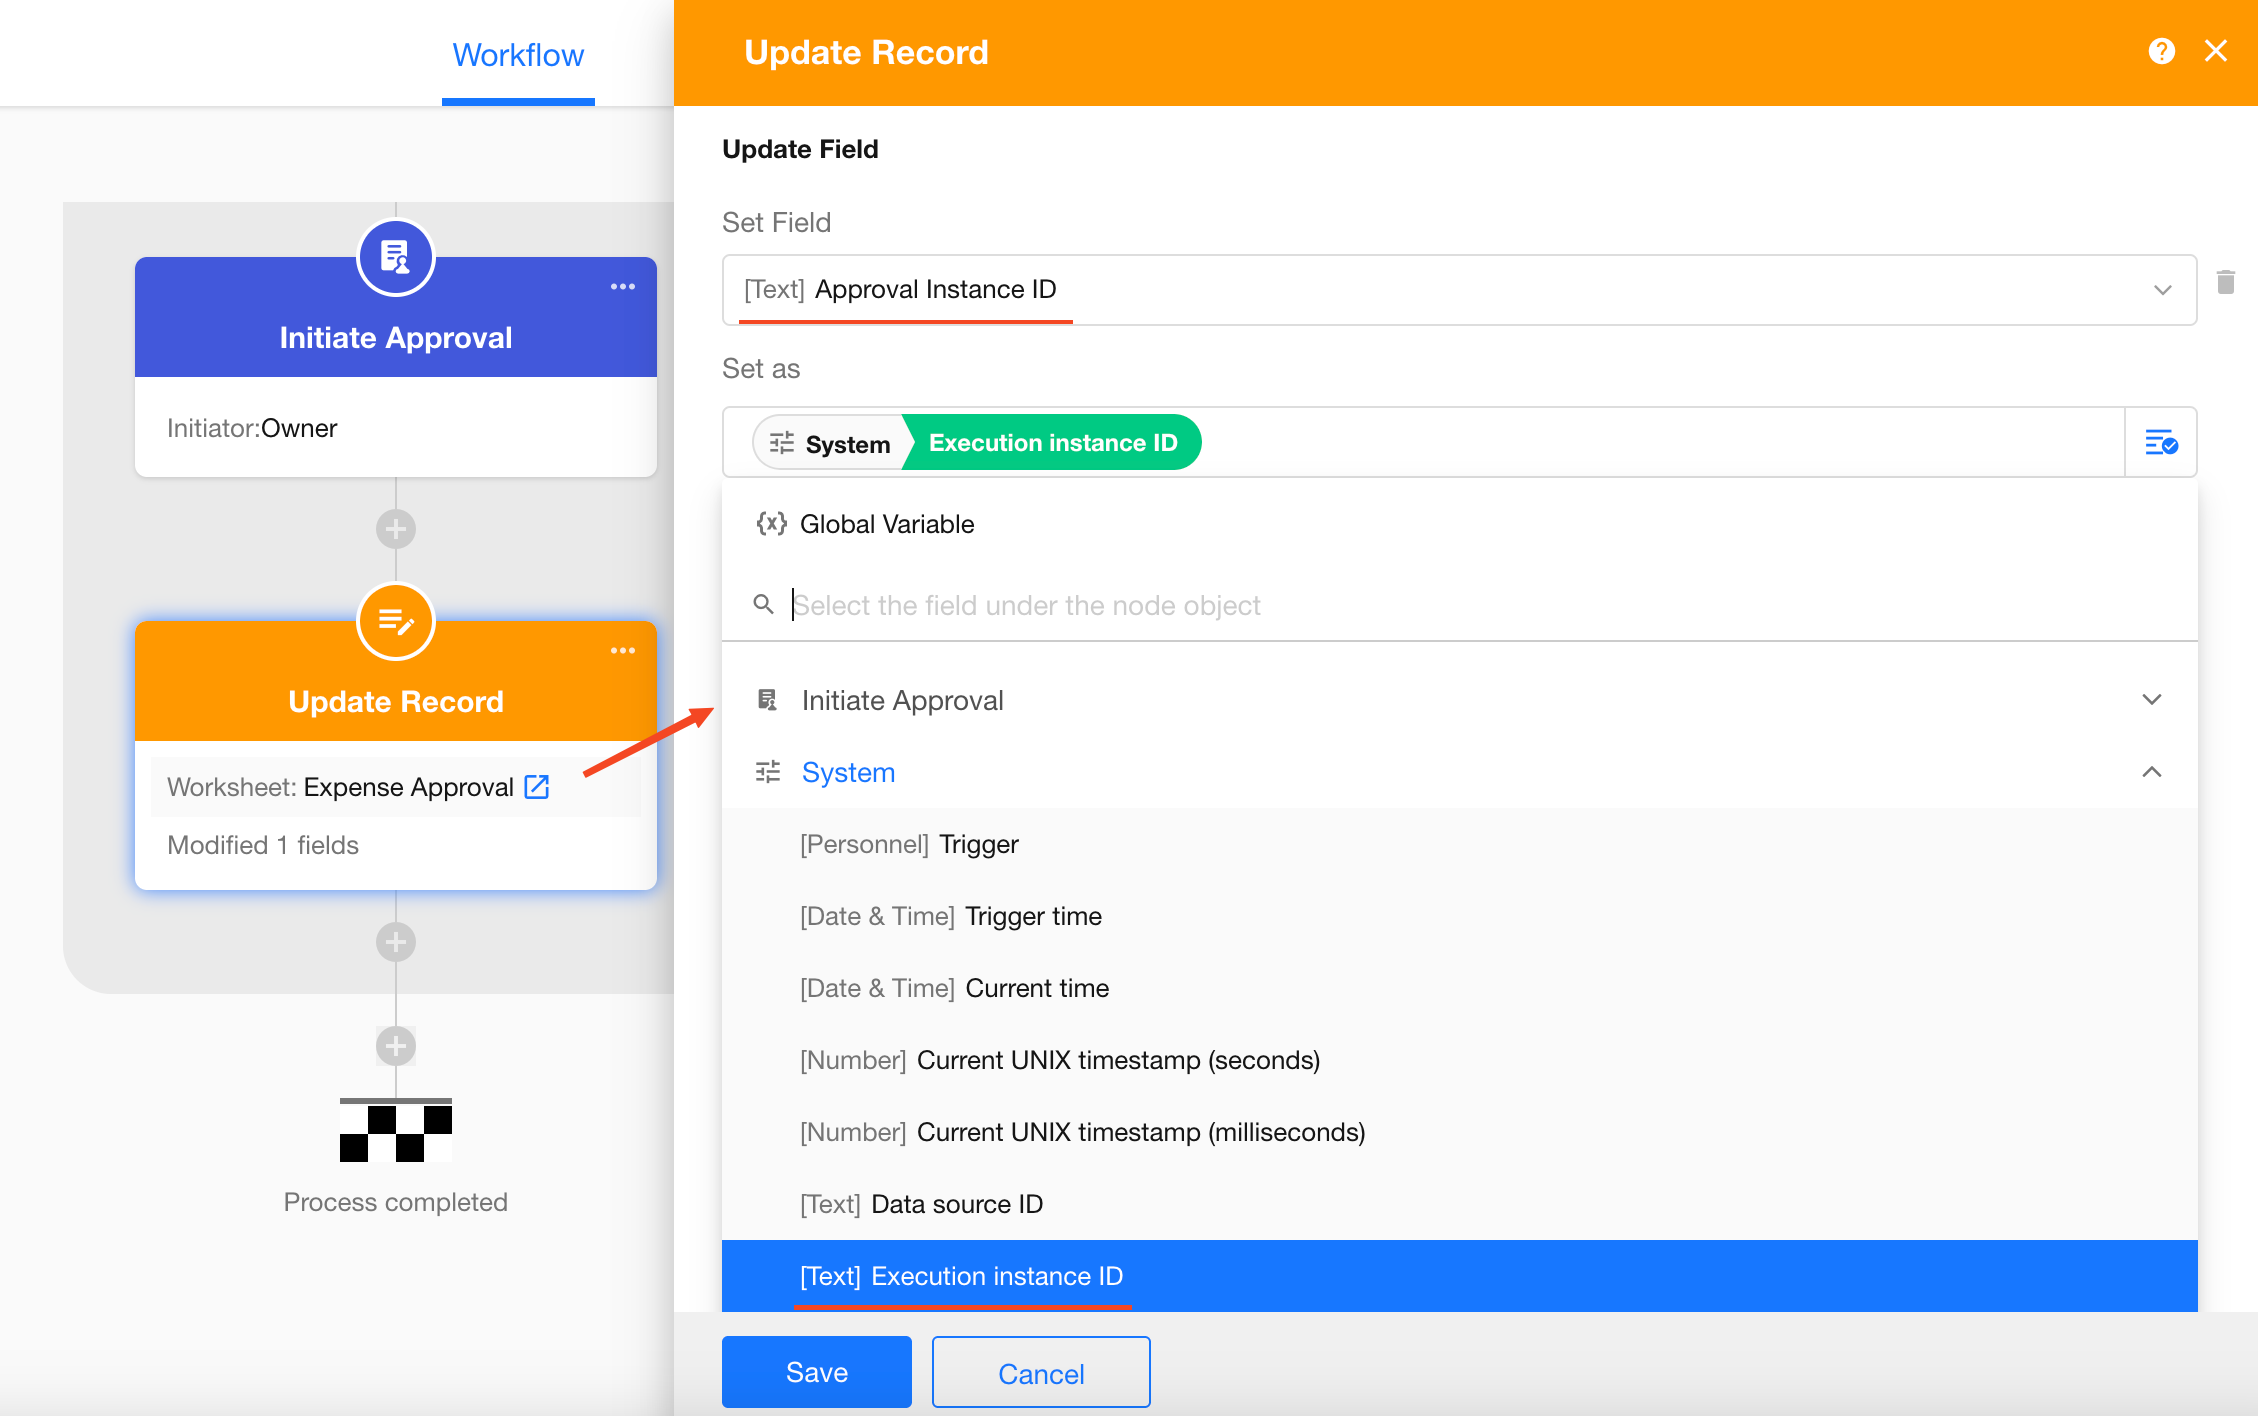
2. Obtain instanceId
The instanceId (workflow execution instance ID) is the unique identifier for each workflow run.
It is recommended to add an Update Record node immediately after the Initiate Approval Flow node, and write the current instanceId into a field in the record (e.g., “c”). This allows the value to be used later when calling the workflow termination API.
Configuration example:
Now trigger the workflow once and record the generated instanceId:
| Parameter Name | Value |
|---|---|
| accountId | 0ff1aa56-9a86-41a6-a7d9-e47b80d24474 |
| instanceId | 699ed1739c92de5d028f31be |
3. Obtain appKey, sign, timestamp
How to Generate sign
The API documentation explains how to generate the organization-level sign in the introduction section.
To generate sign, you need:
AppKeySecretKeytimestamp
Obtain AppKey and SecretKey
Organization administrators can go to the Organization Admin Console, then navigate to [Integration] > [Misc.] to view the organization’s key information, including AppKey and SecretKey.
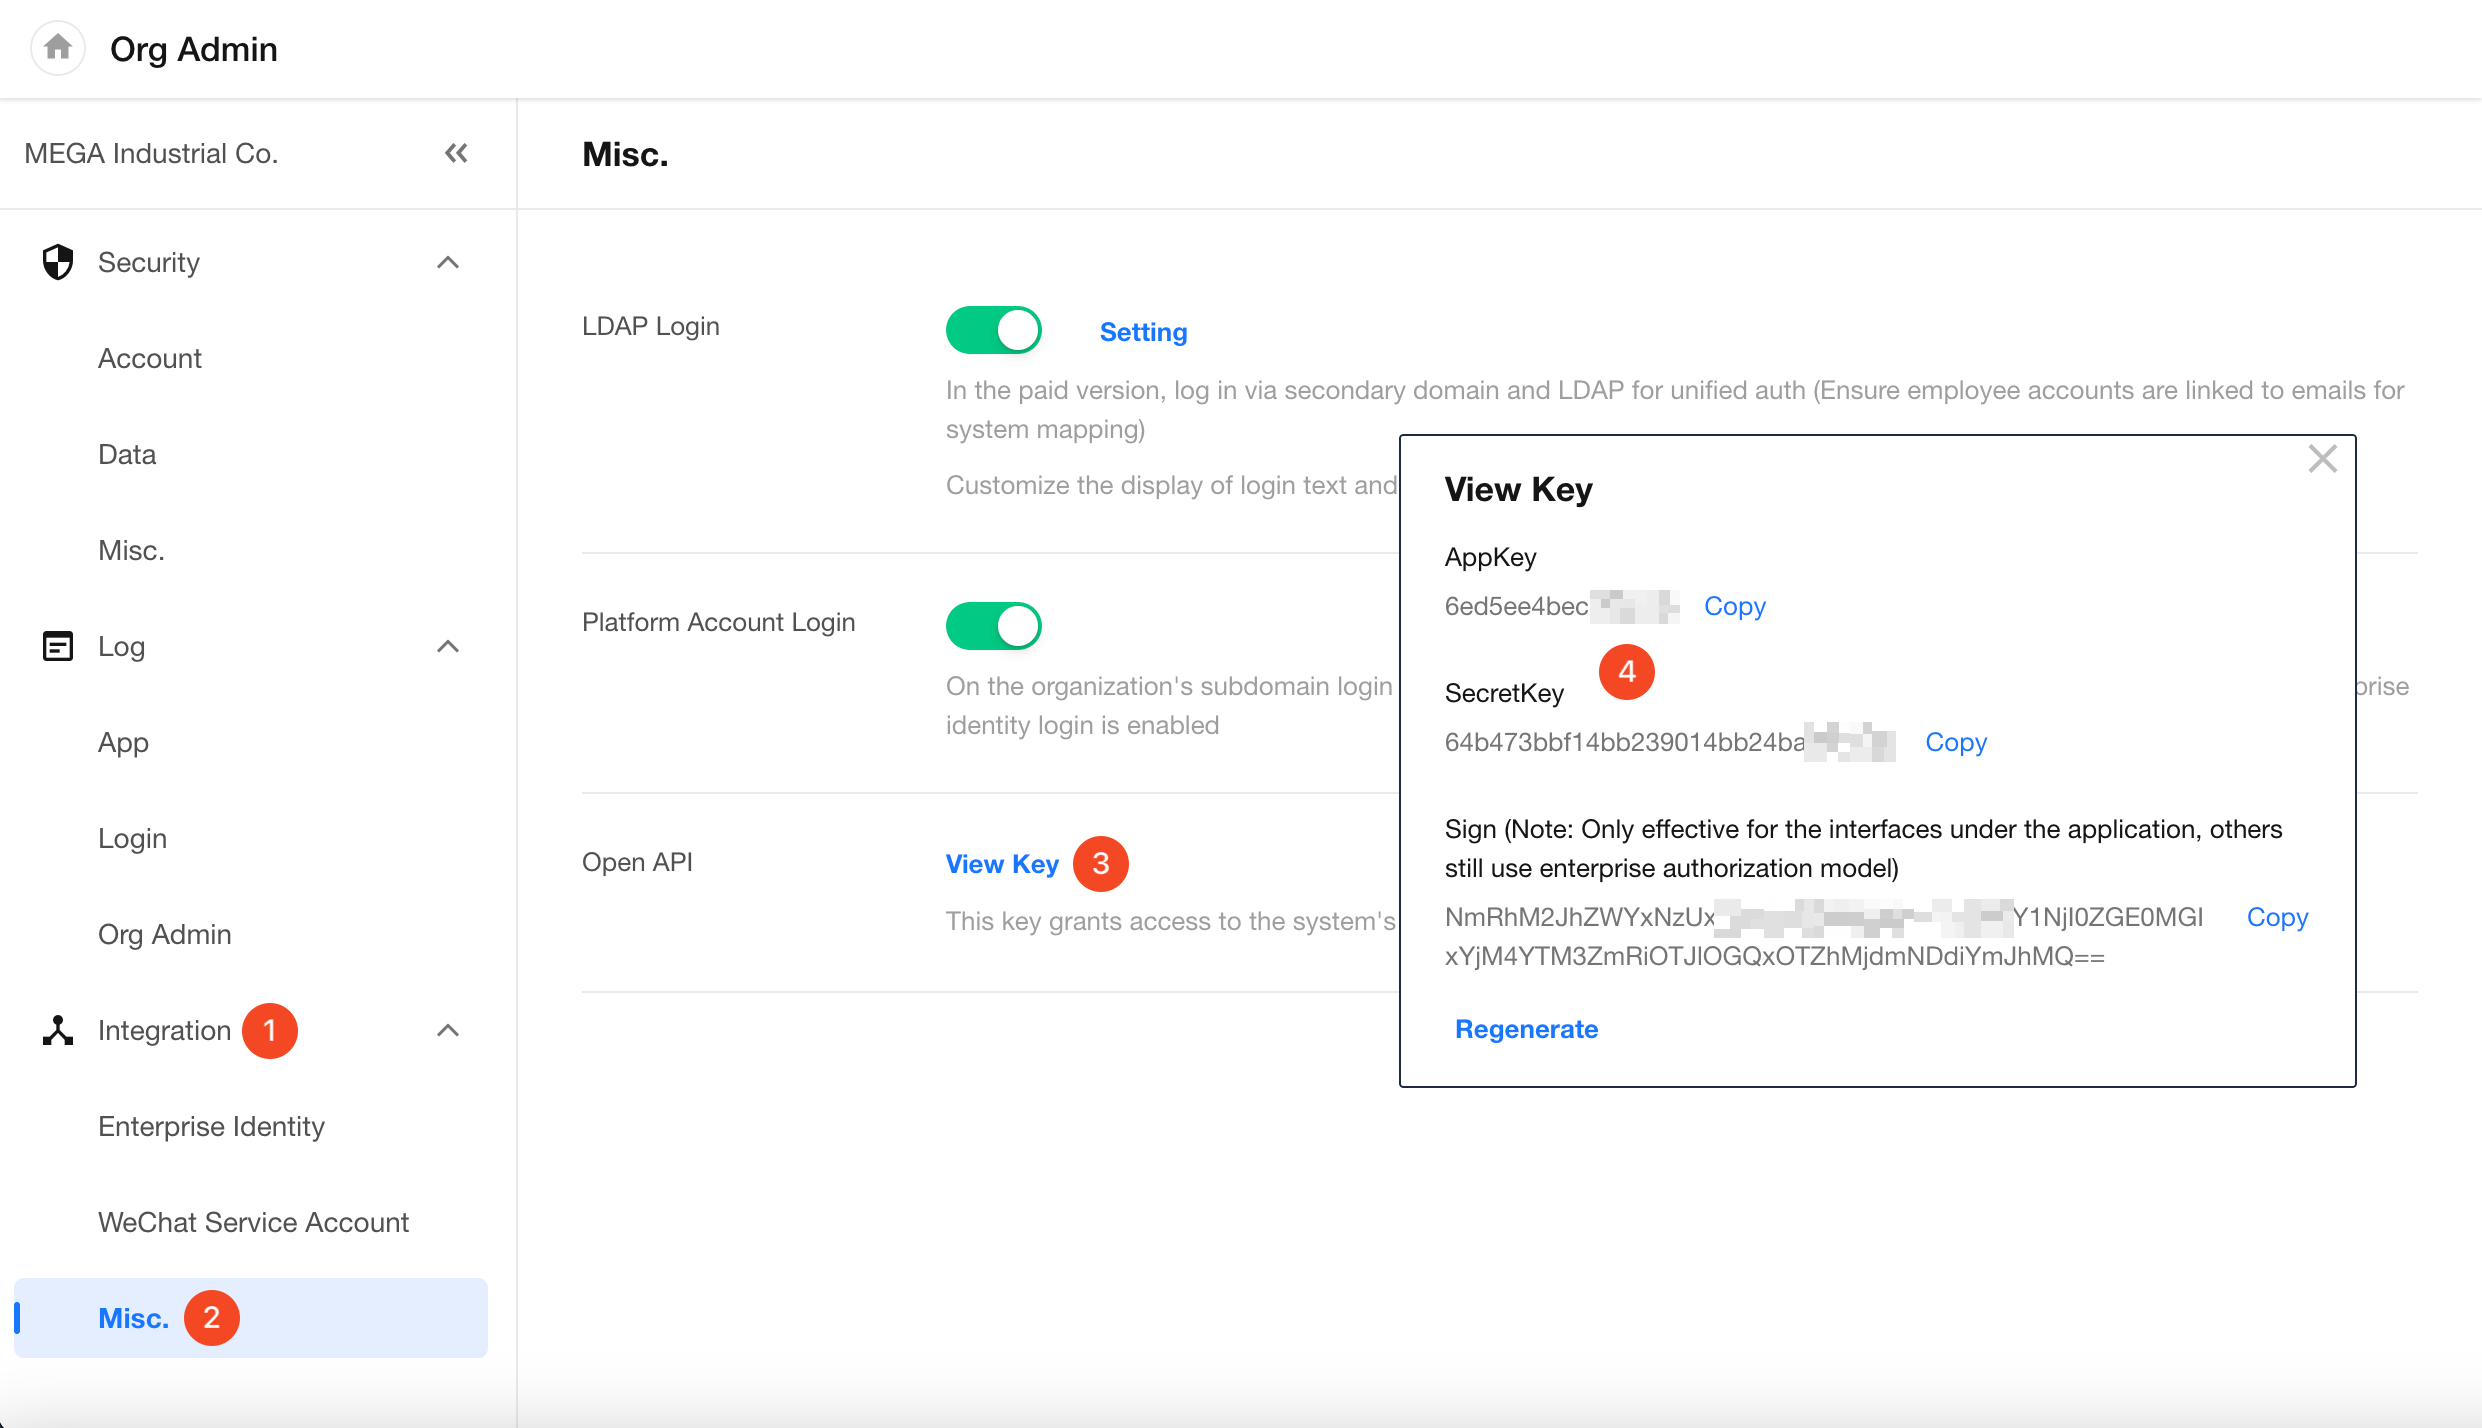
Record the retrieved values:
| Parameter Name | Value |
|---|---|
| accountId | 0ff1aa56-9a86-41a6-a7d9-e47b80d24474 |
| instanceId | 699ed1739c92de5d028f31be |
| AppKey | 6ed5ee4bec7xxxxx |
| SecretKey | 64b473bbf14bb239014bb24ba2xxxx |
Use a Code Block Node to Generate sign and timestamp
Add a “Terminate” button and configure the associated workflow.
After the workflow starts, add a Code Block node to generate sign and timestamp based on the existing parameters.
Copy and paste the following code into the Code Block node, and replace AppKey and SecretKey with your actual values.
var crypto = require('crypto');
var _ = require('lodash');
var date = new Date();
var timestamp1 = date.getTime().toString();
var appKey='6ed5ee4bec7exxxx';// your actual appKey
var secretKey='64b473bbf14bb239014bb24ba2xxxx'; //your actual secretKey

function getSignature() {
        var signstr = 'AppKey='+appKey+'&SecretKey='+secretKey+'&Timestamp='+timestamp1;
        return base64(sha256(signstr))
};

function sha256(s) {
    var hash = crypto.createHash('sha256');
    hash.update(s, 'utf8');
    return hash.digest('hex').toLowerCase();
}

function base64(s) {
    var result = new Buffer.from(s, 'utf8');
    return result.toString('base64');
}
output = {sign:getSignature(),timestamp:timestamp1}
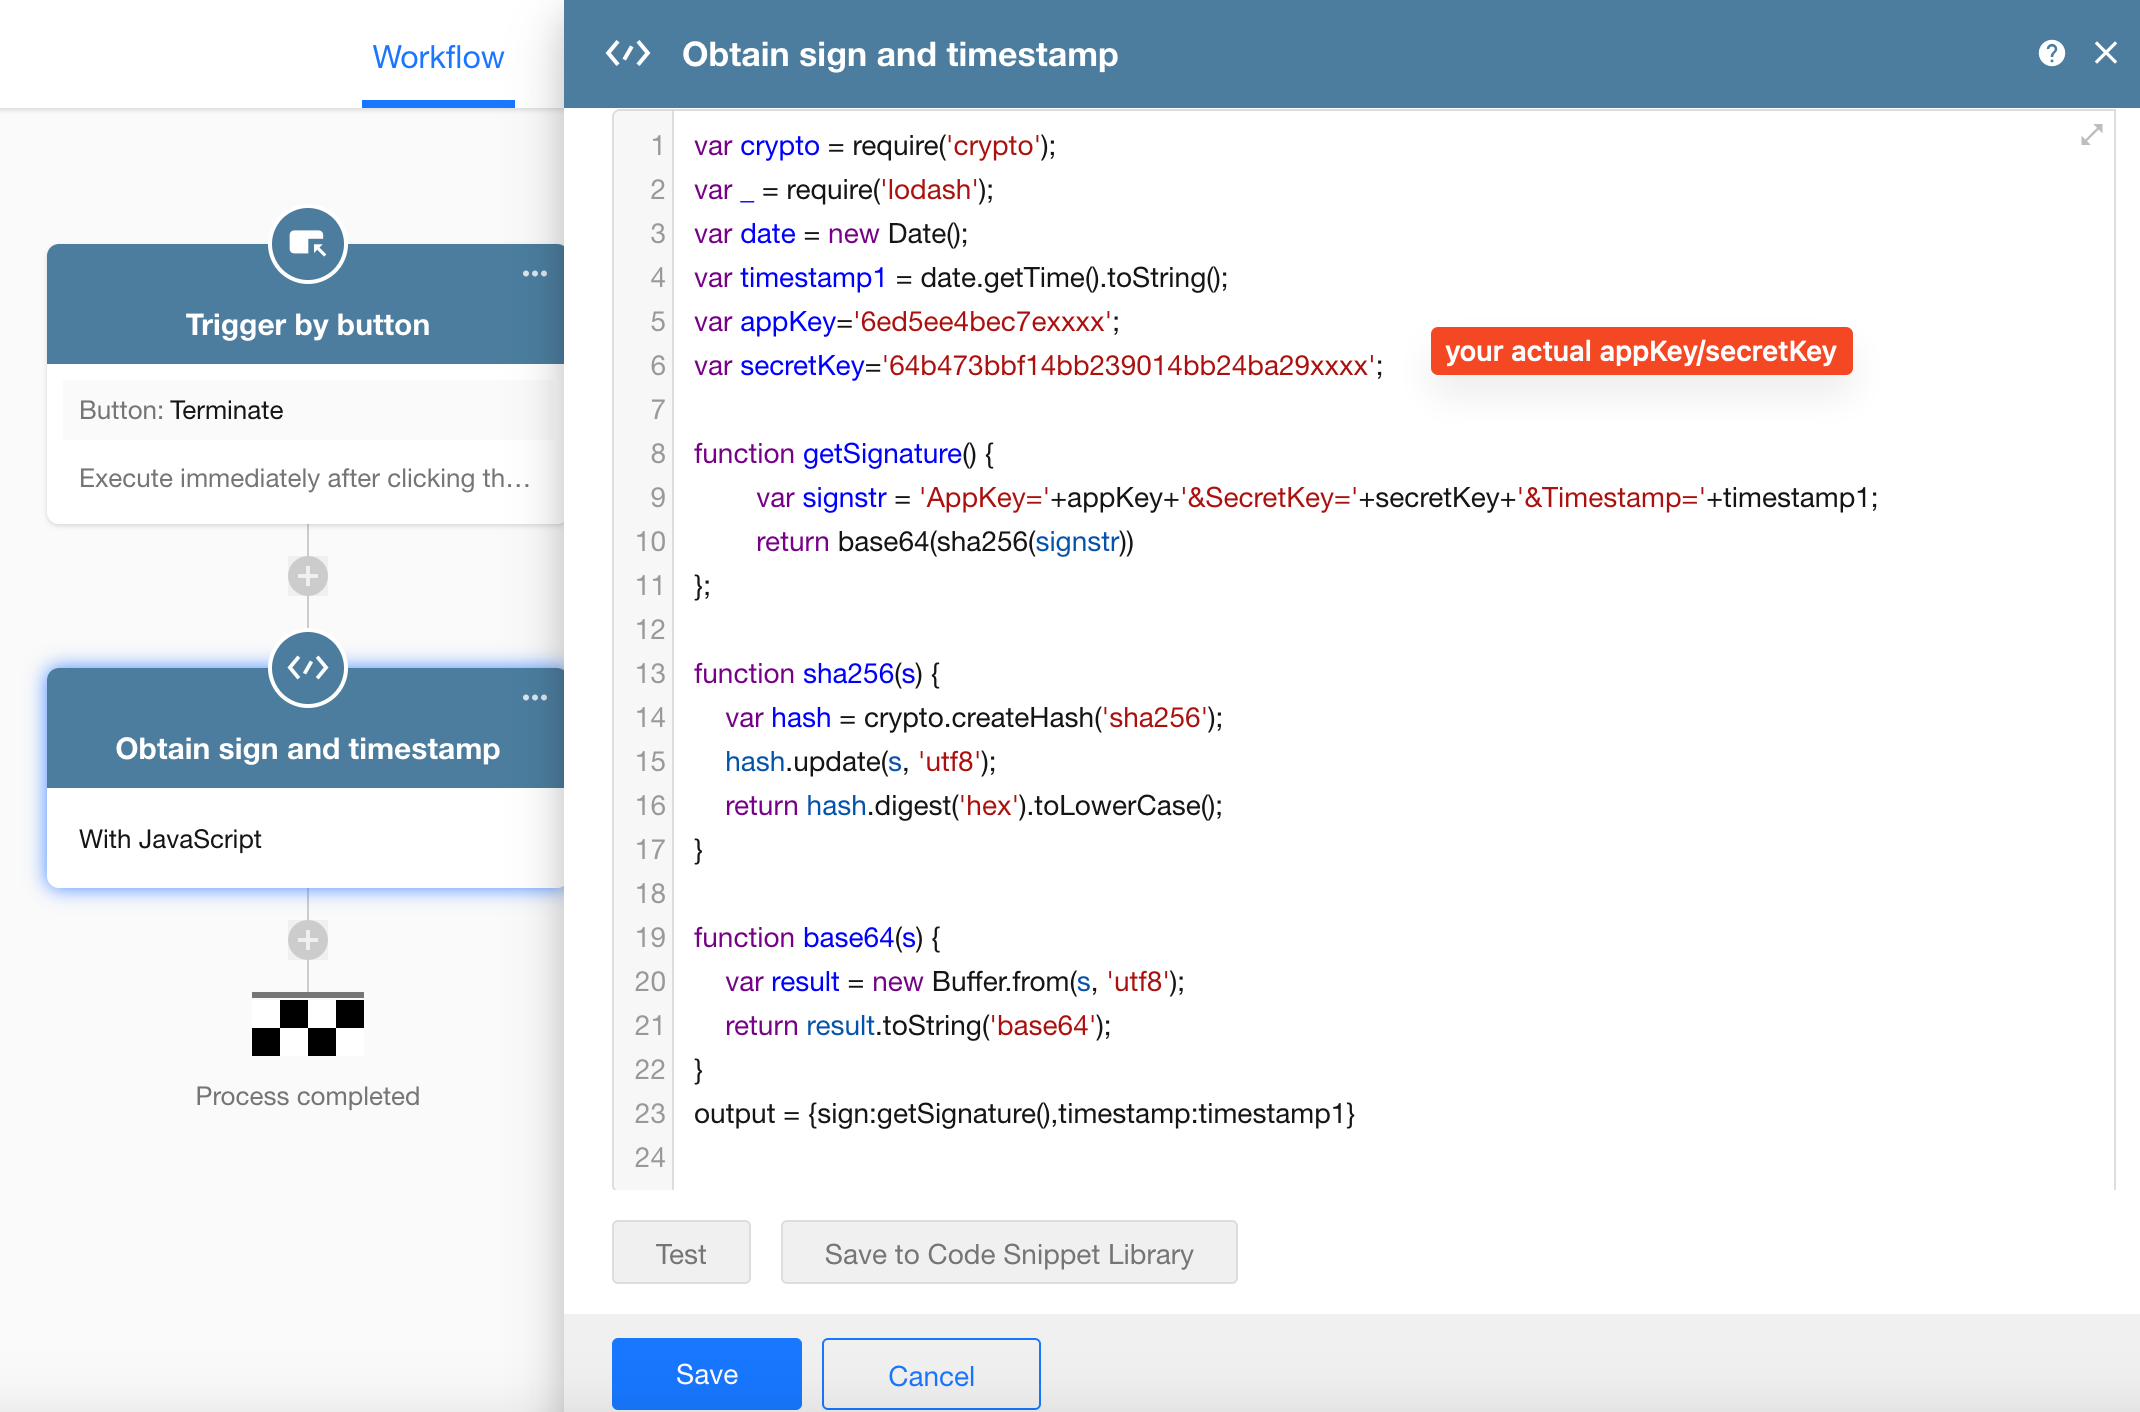
Click the Test button in the Code Block node to output the generated sign and timestamp, then save the node configuration.
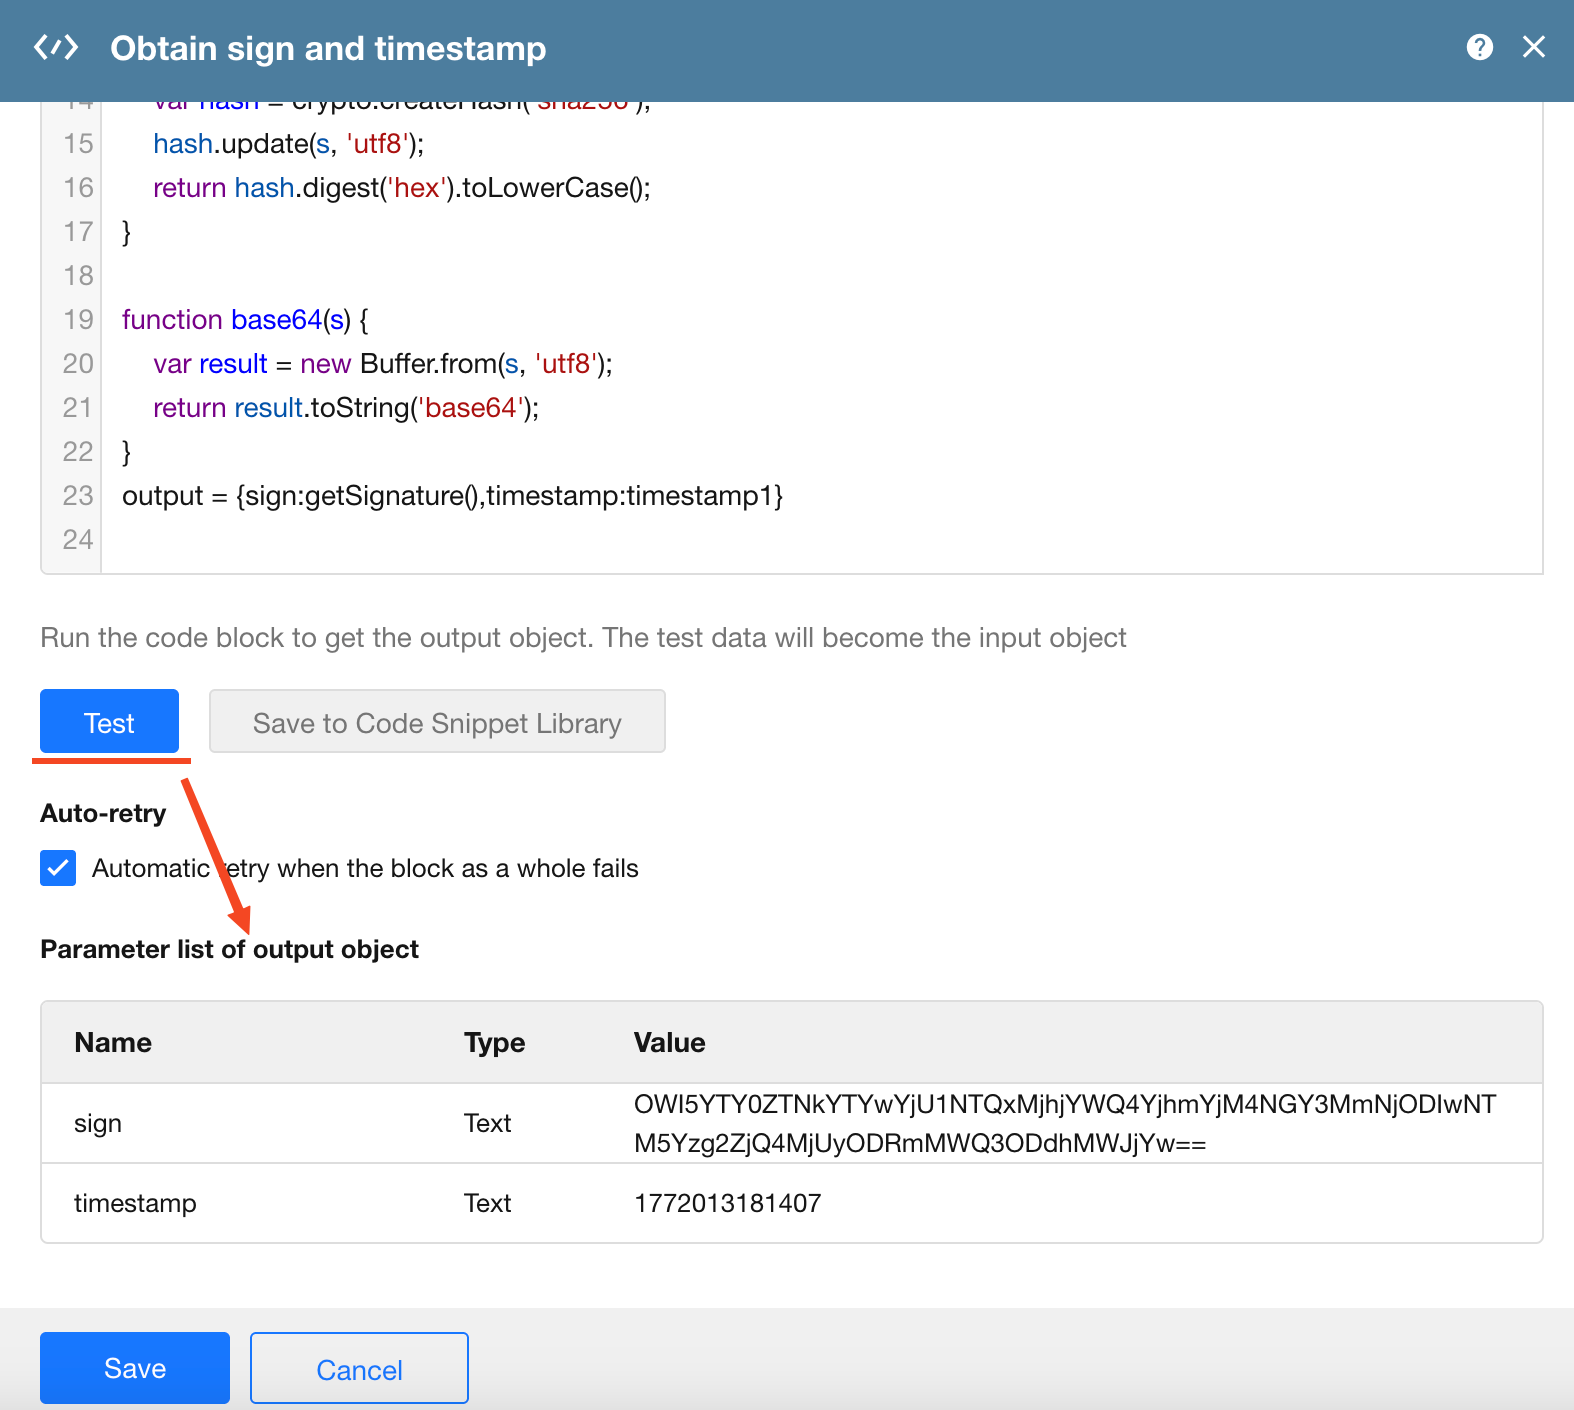
Record the final parameters:
| Parameter Name | Value |
|---|---|
| accountId | 0ff1aa56-9a86-41a6-a7d9-e47b80d24474 |
| instanceId | 699ed1739c92de5d028f31be |
| AppKey | 6ed5ee4bec7xxxxx |
| SecretKey | 64b473bbf14bb239014bb24ba2xxxxx |
| sign | OTlmMWYyOWMxYTQ4YWEyNzEwYjFkYTg3ZTc3NTU5MTk3YzIwMGU0YjJiN2QwYjFlYTRhNDEyMDJhODY3OWE4Ng== |
| timestamp | 1772014338334 |
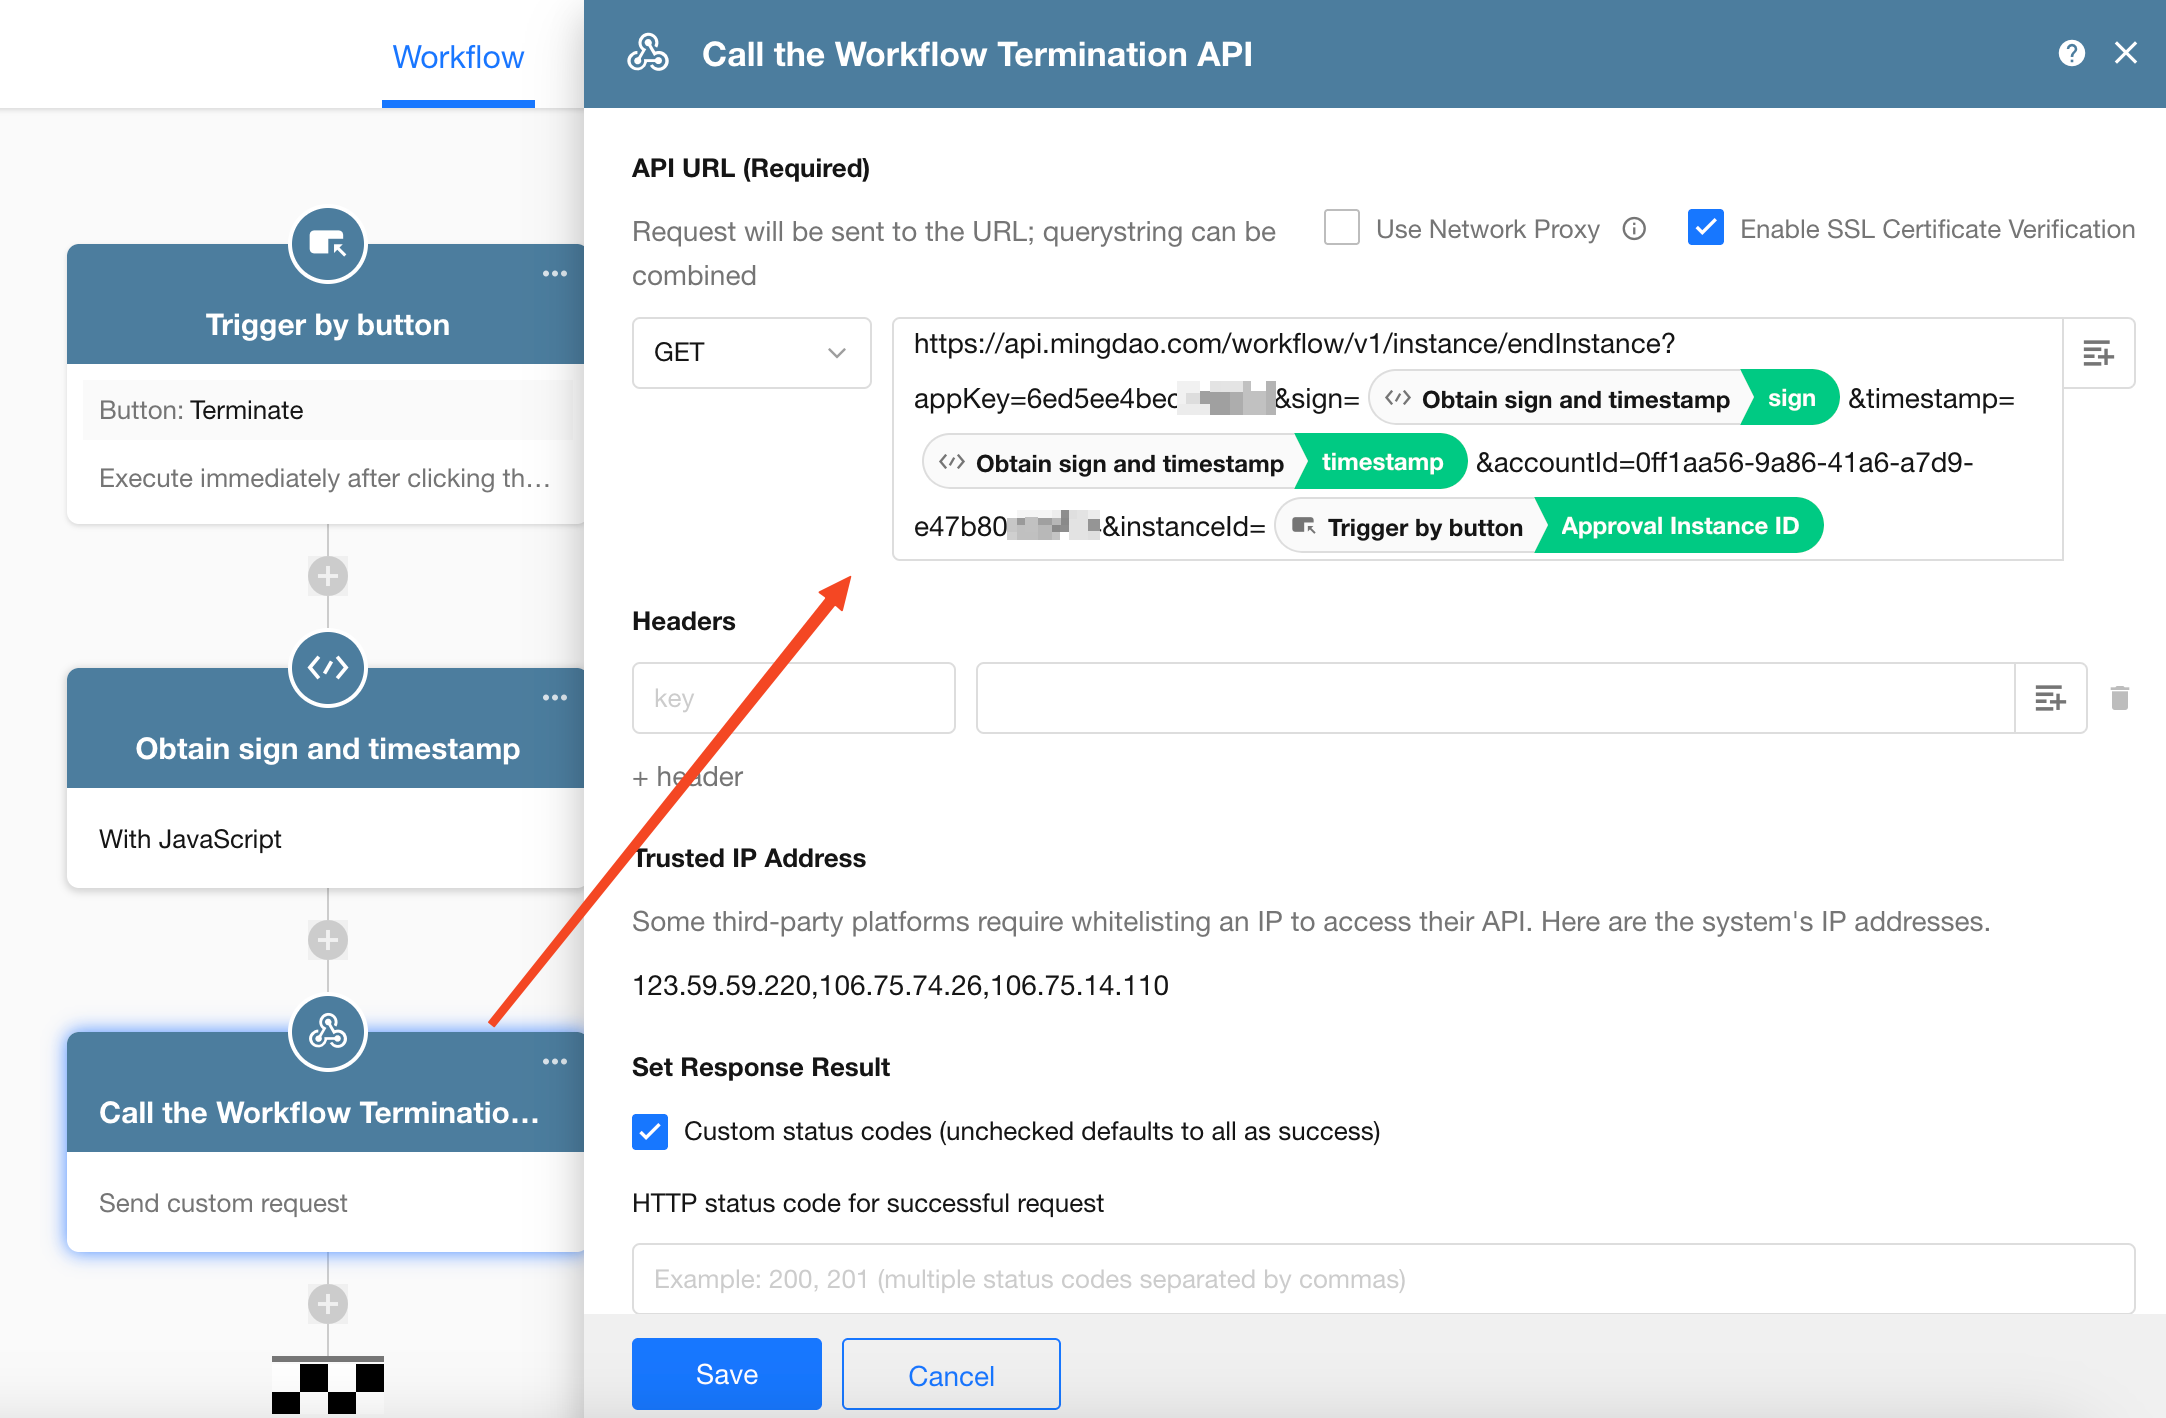
4. Call the Workflow Termination API
In the workflow associated with the “Terminate” button, add a Send API Request (custom) node and configure the request URL.
Copy the following URL template into the request URL field.
Set the request method to GET, and replace the parameter values with the retrieved static values or node fields.
https://api.mingdao.com/workflow/v1/instance/endInstance?appKey=parametervalue&sign=parametervalue×tamp=parametervalue&accountId=parametervalue&instanceId=parametervalue
Example:
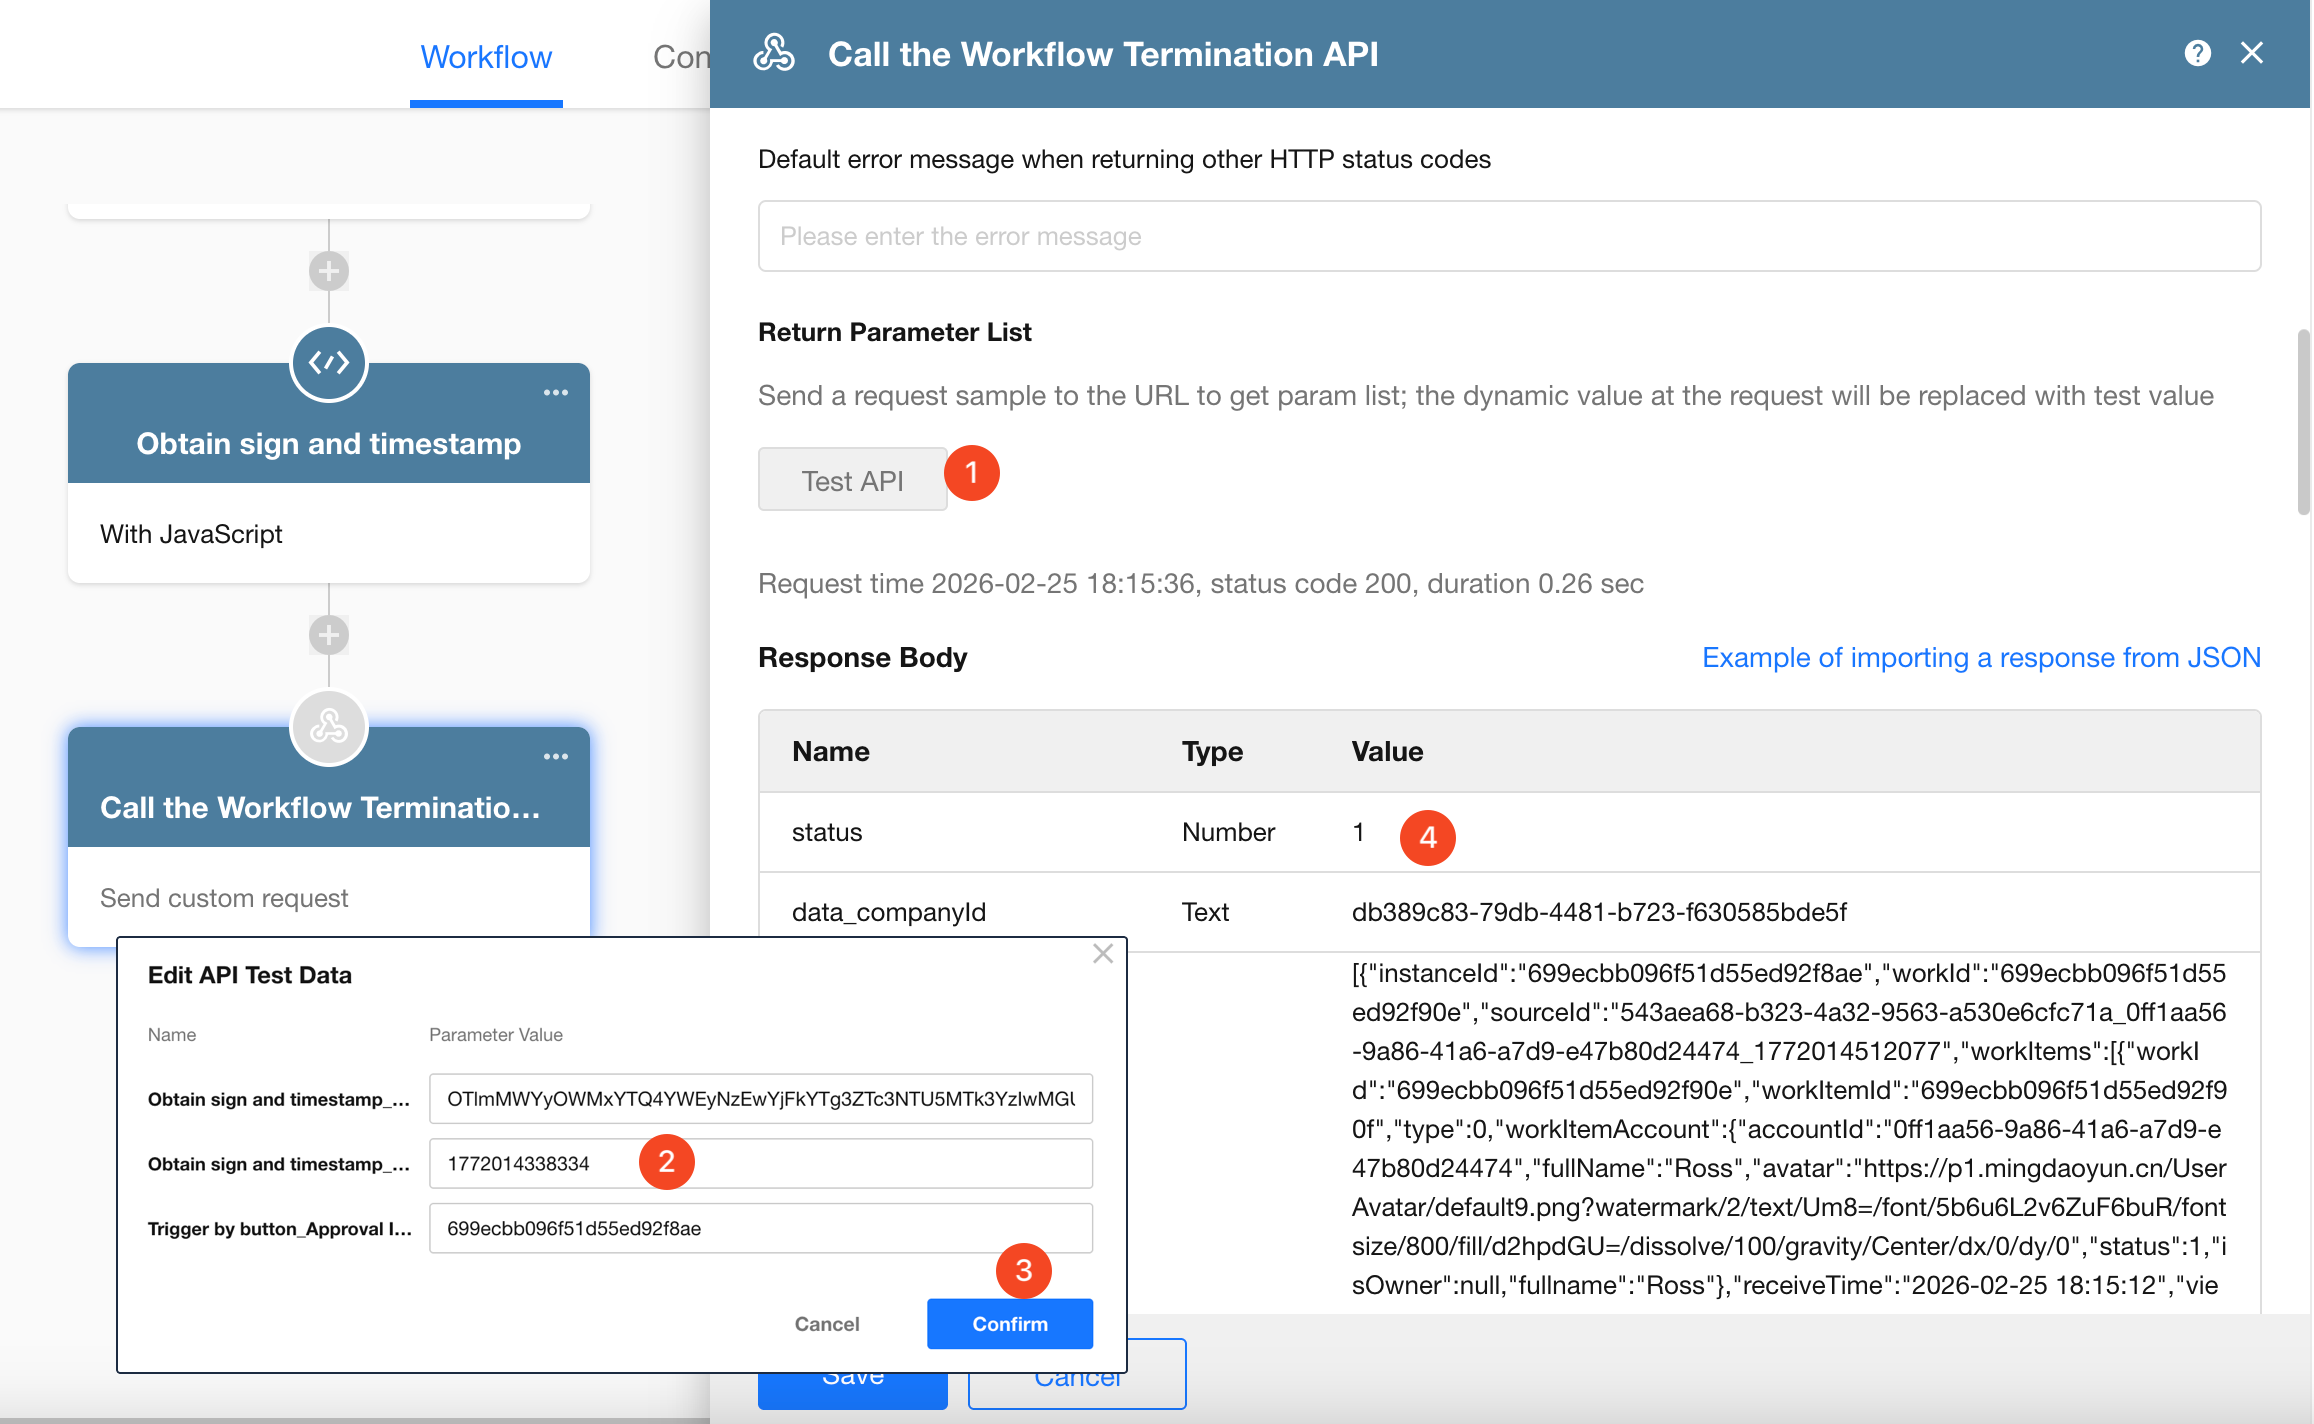
Click the Test API button and enter the retrieved parameter values as test data.
If the request succeeds, it typically returns status = 1. You can also verify in the workflow History that the instance has been terminated.
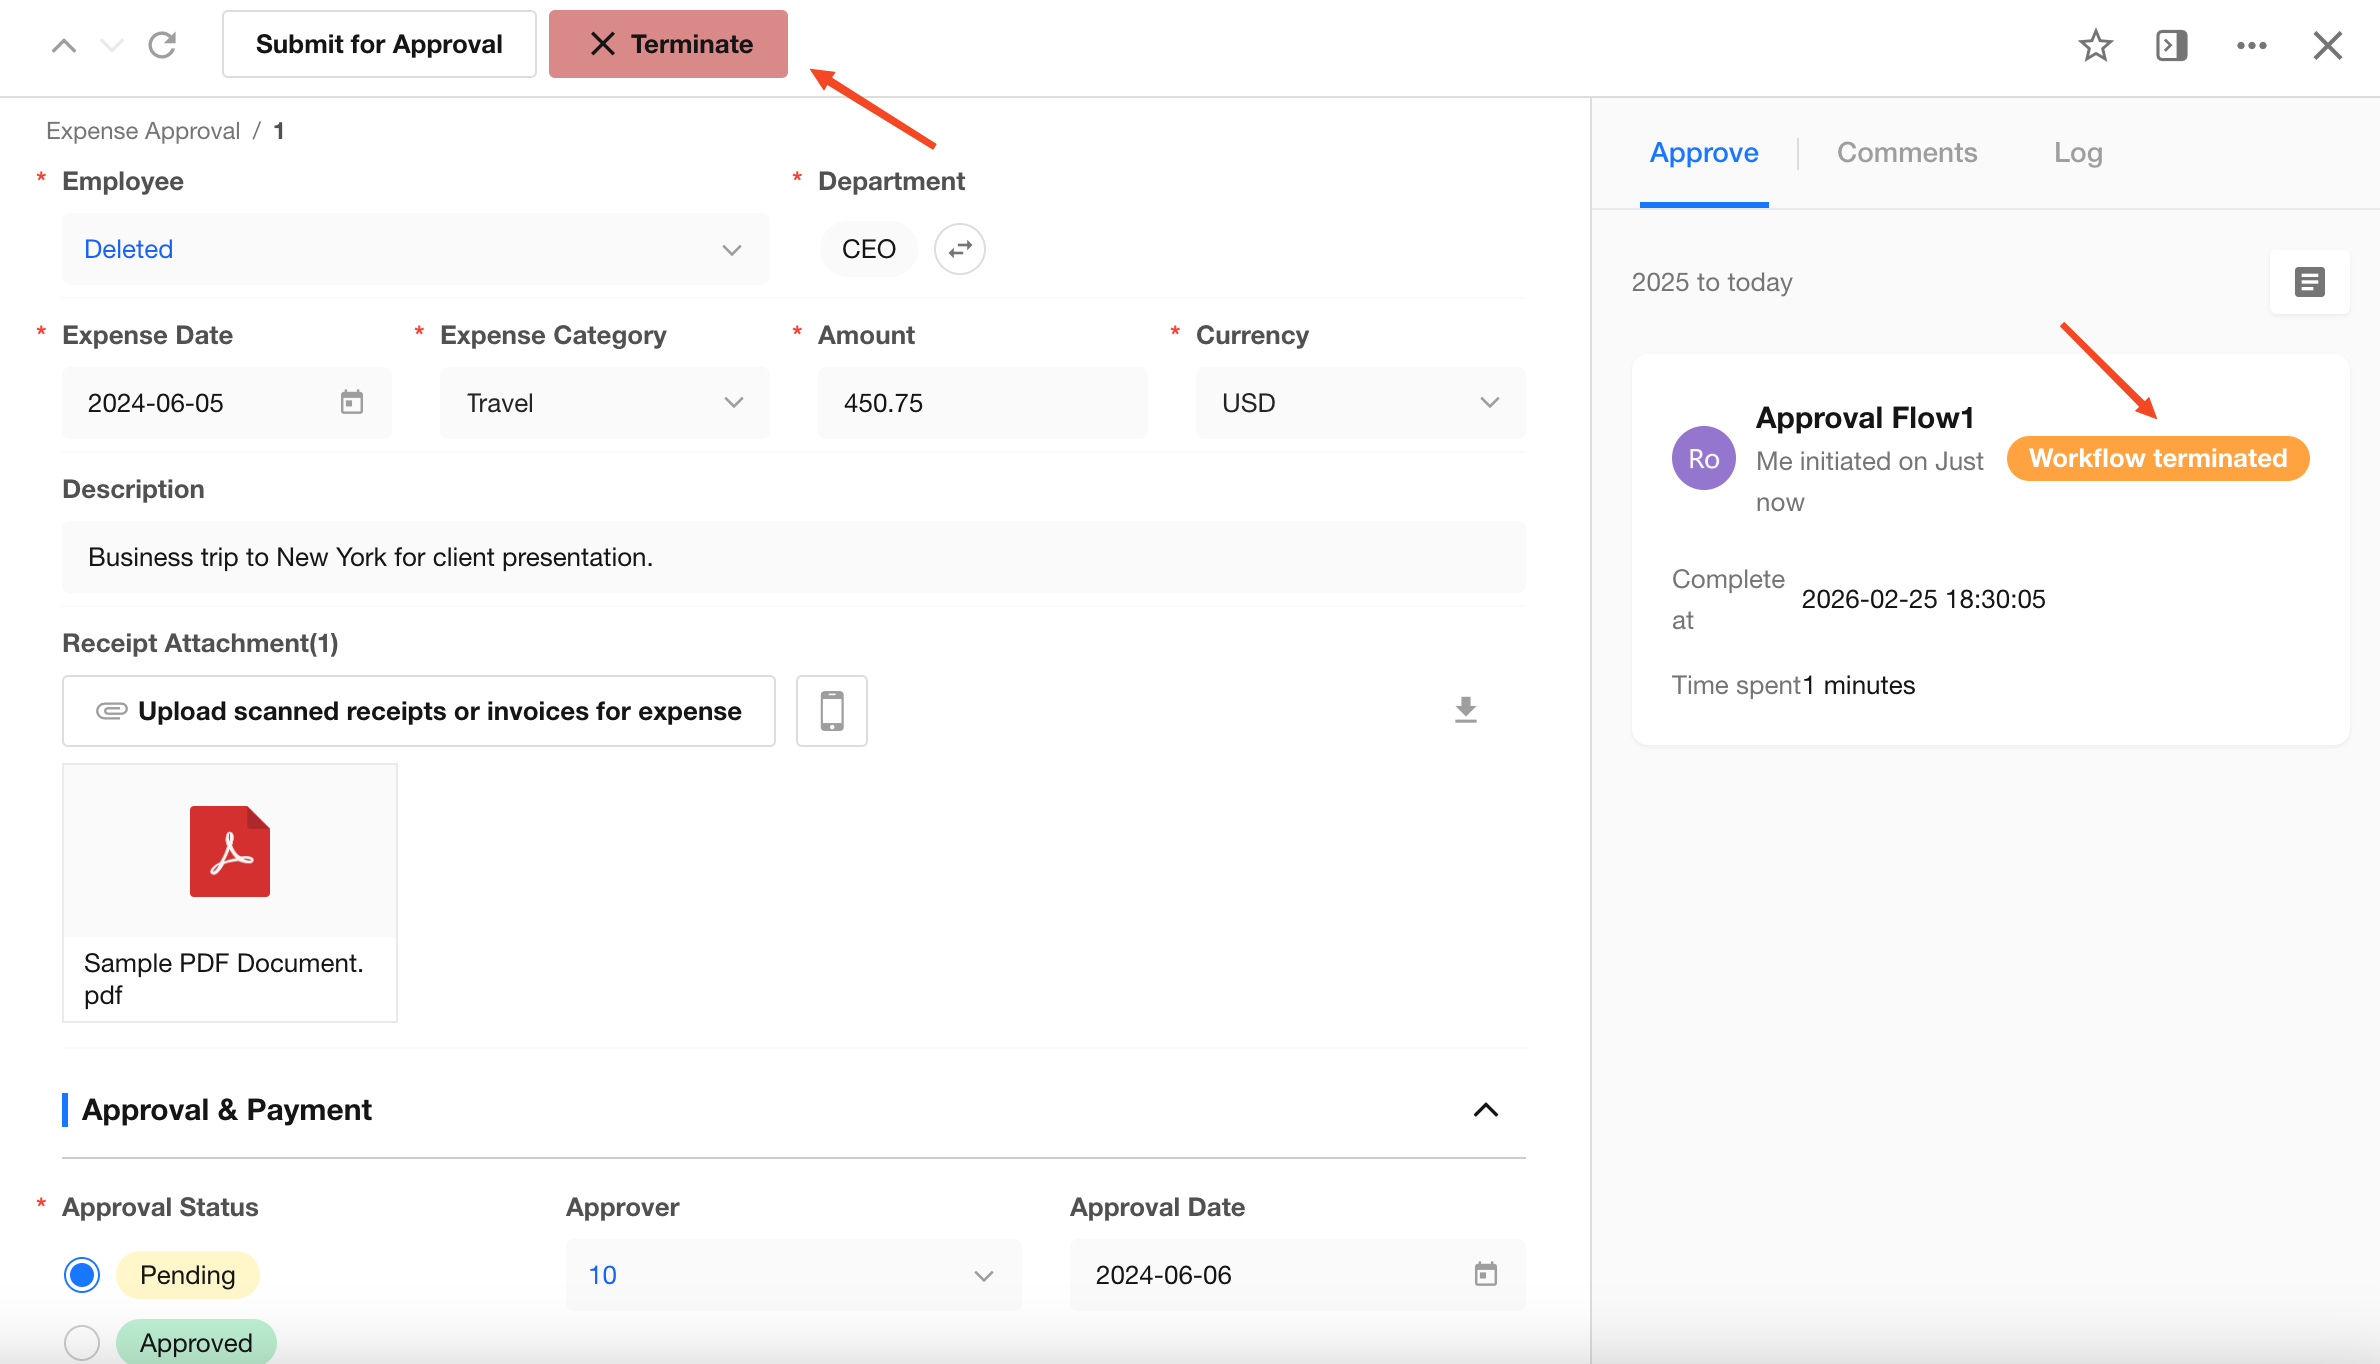
5. Publish the Workflow and Test
Trigger a new workflow instance, then click the “Terminate” button to end the approval workflow.
Frequently Asked Questions
| Error Code | Cause |
|---|---|
| 400 | Invalid signature. Check whether AppKey and SecretKey are correct. |
| 401 | accountId does not exist. |
| 500 | Invalid instanceId. |
Tips
-
As long as you obtain the
instanceId, this API can terminate any workflow instance (not limited to approval workflows). -
It is recommended to standardize fields such as Approval Instance ID, Last Termination Time, and Termination Operator to facilitate auditing and traceability.
-
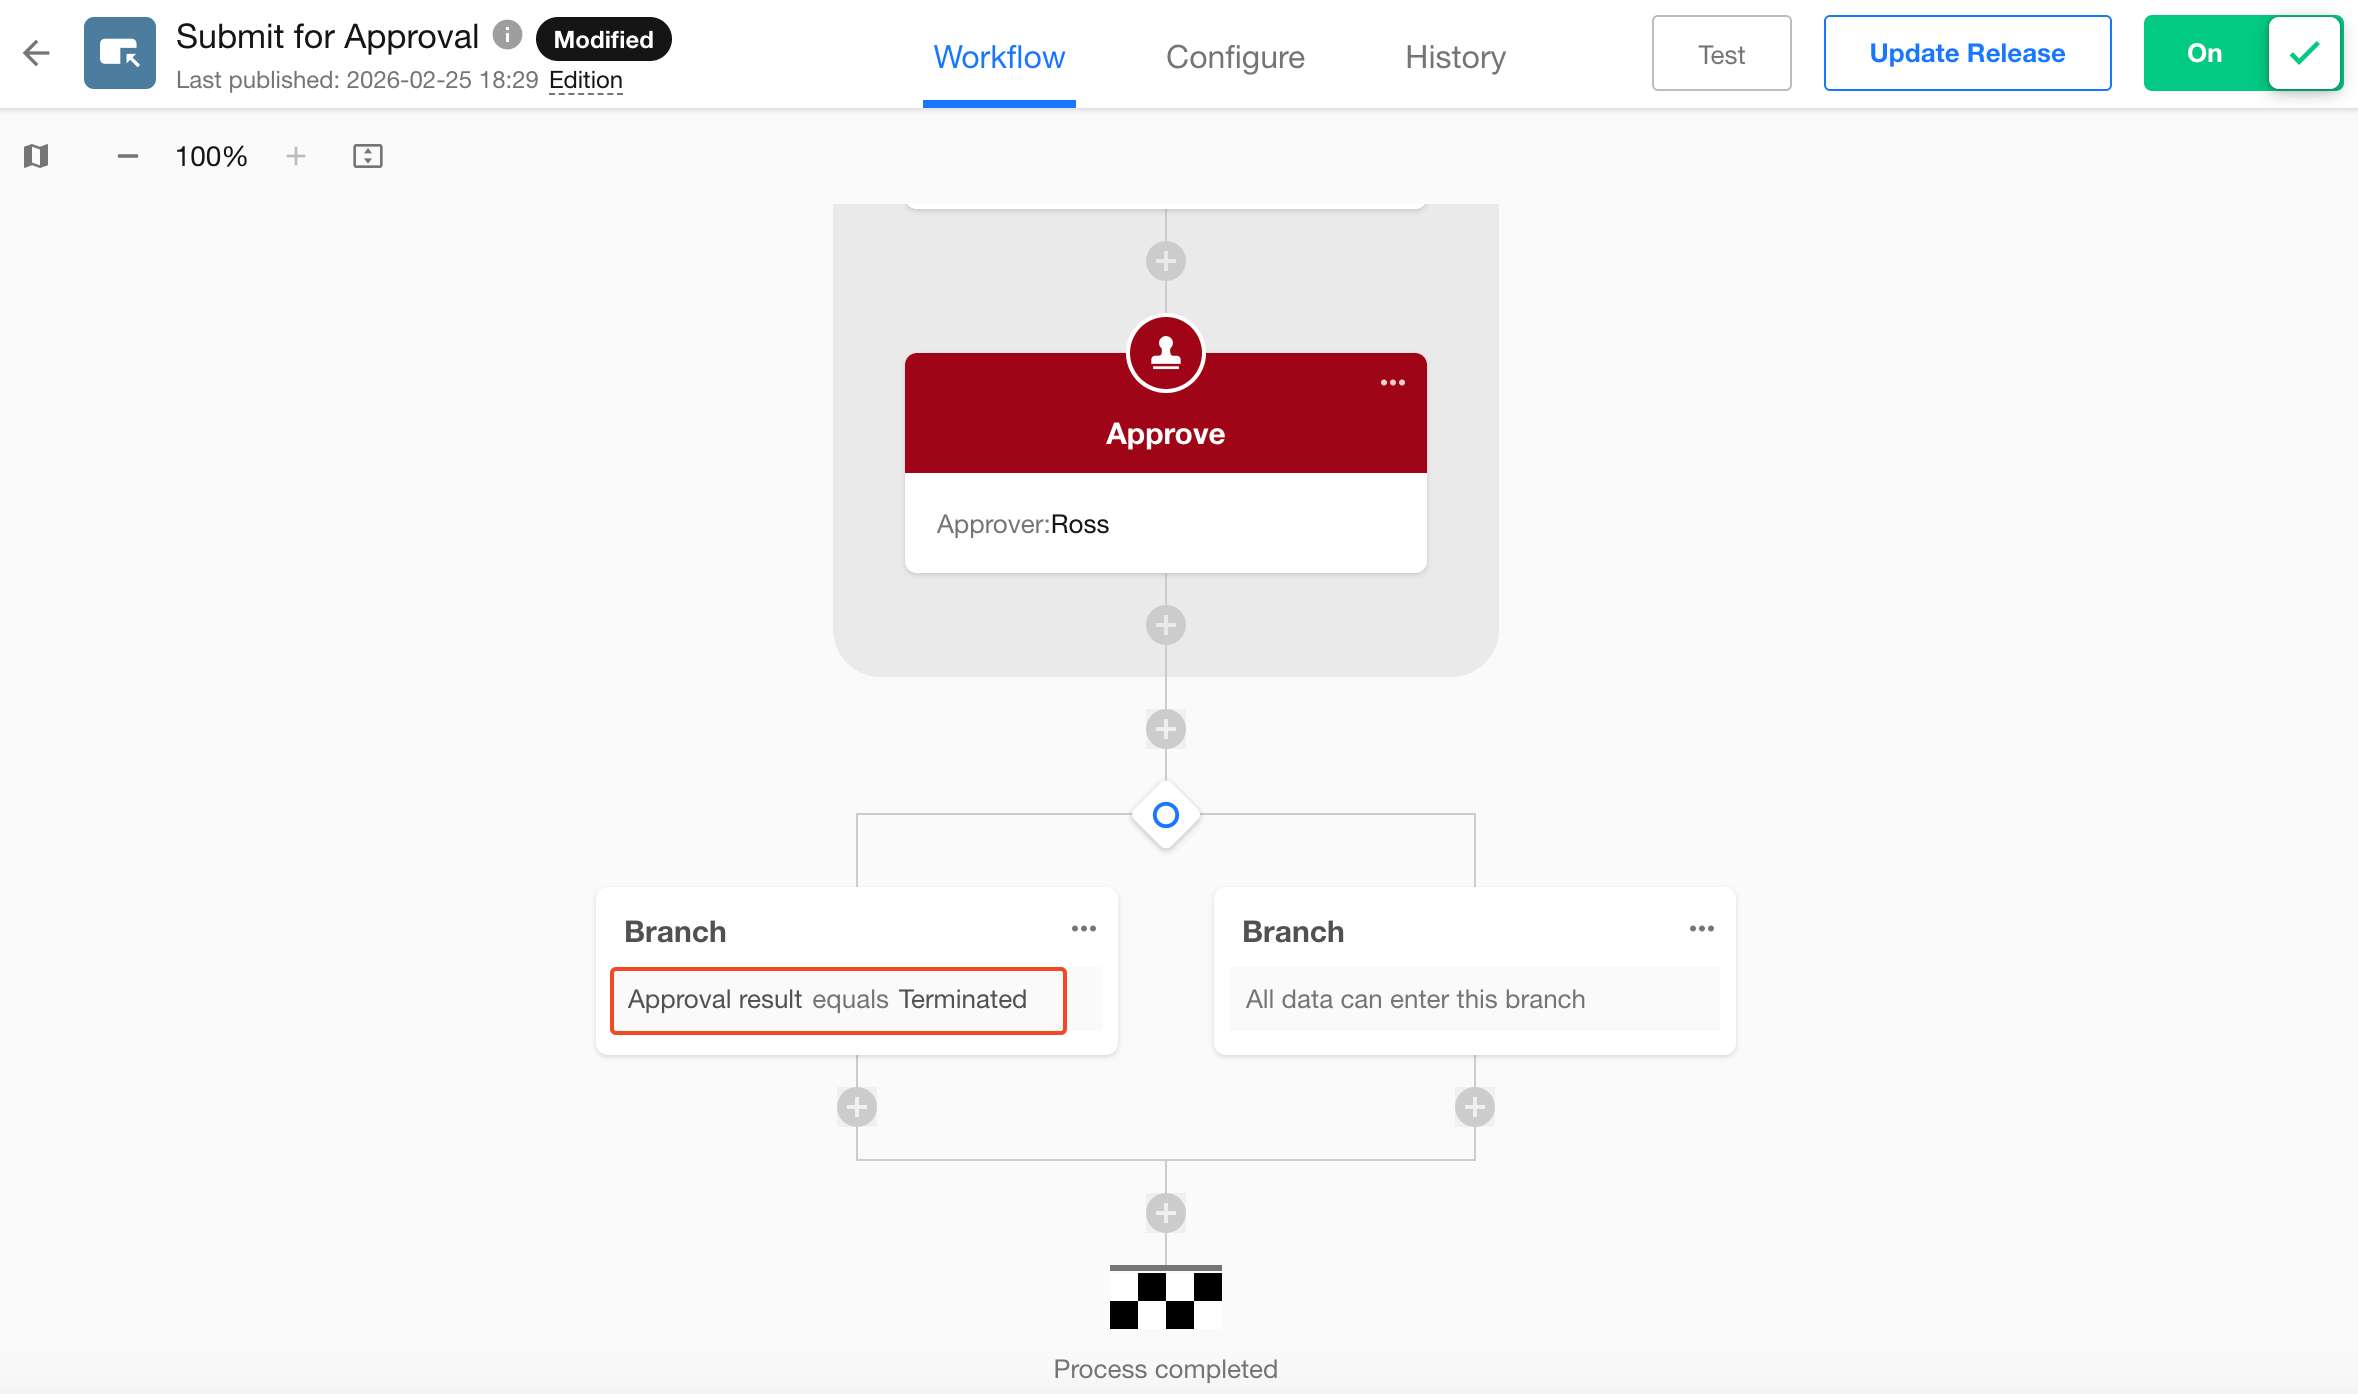
After terminating an approval workflow, the main workflow can branch based on the approval workflow status.
Was this document helpful?