Get Started with HAP
This article will guide you through quickly building a simple hiring system, helping you understand the basic ideas and operations for building applications.
I. Introduction to HAP
HAP is an innovative hyper application platform that empowers users to build enterprise applications with no coding required. This means that users can create core business applications for sales, operations, human resources, and procurement that deliver excellent user experiences, all while seamlessly integrating the organization’s internal data. HAP also has a super automation engine that can fully automate complex and repetitive business processes. With HAP's integration center and complete API capabilities, users can easily integrate HAP with external systems. In addition, HAP has high composability, internationalization support, and supports cloud-native architecture, enabling multi-cloud deployment. Through a plug-in architecture, HAP is gradually establishing a thriving implementation and development ecosystem.
The business systems built on HAP are referred to as applications. Each application can address a specific aspect of a business process, allowing HAP to manage everything from a simple ticket application to a comprehensive ERP solution.
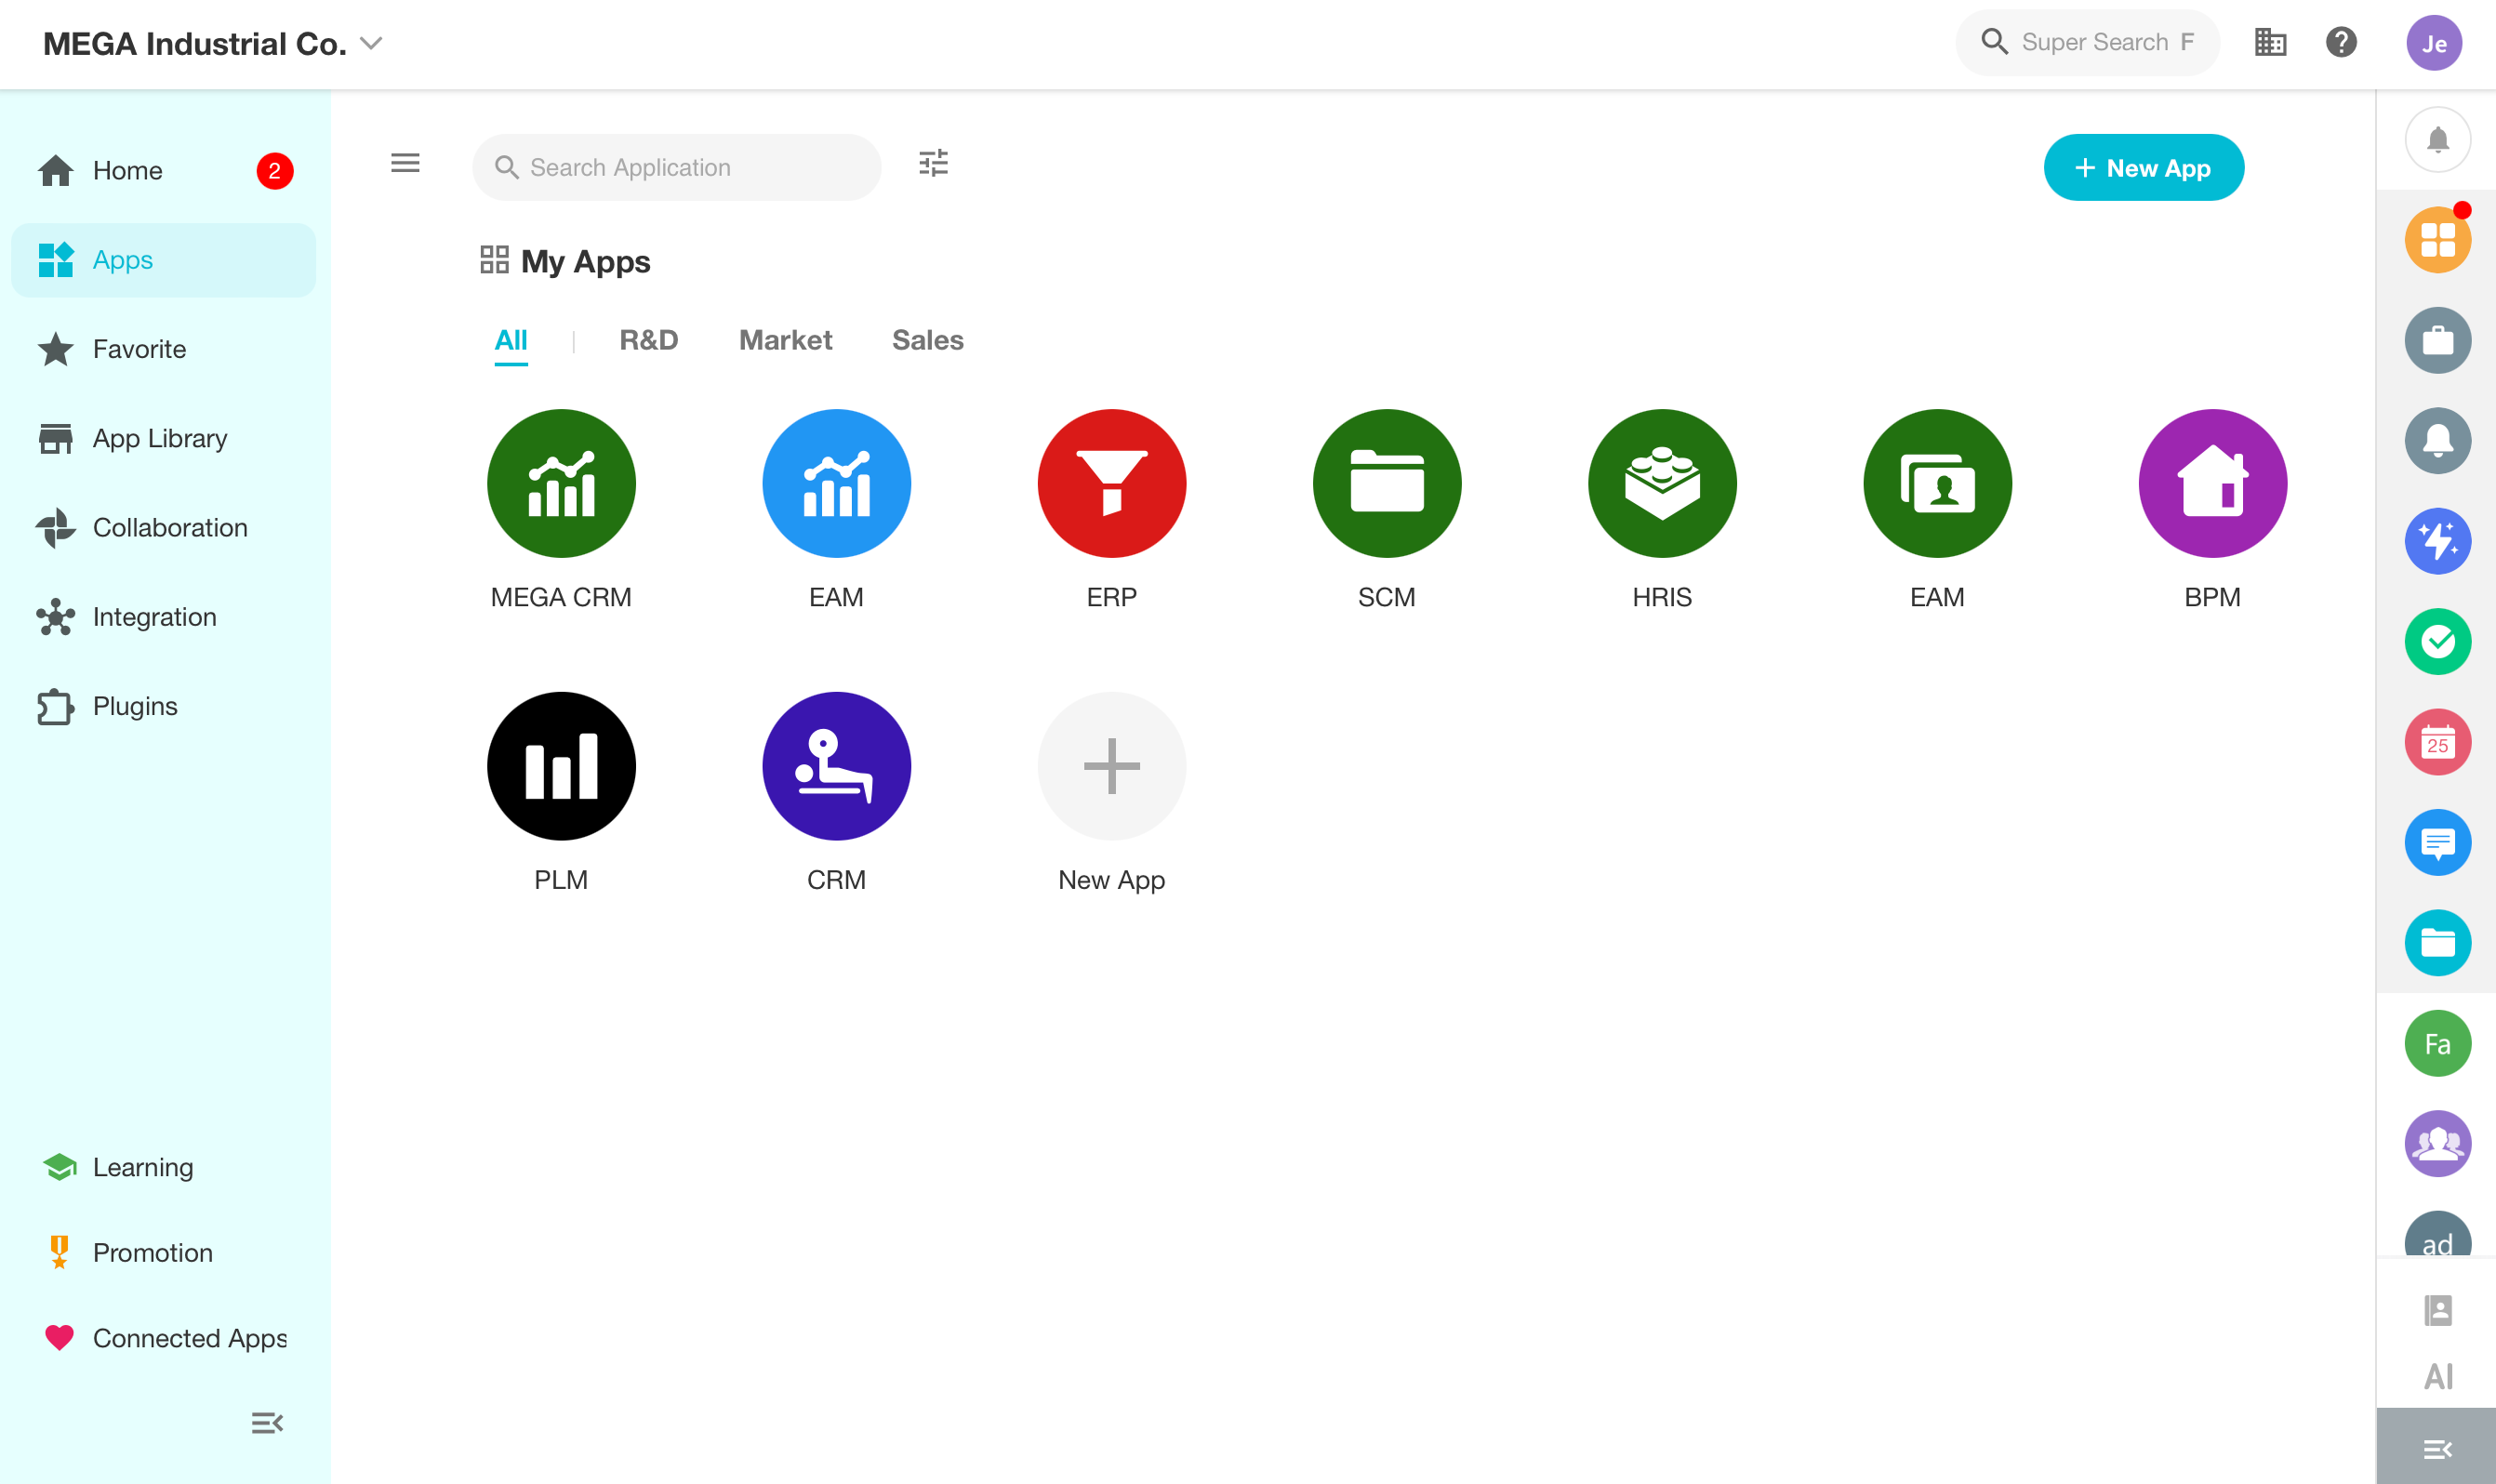
In HAP, the application building relies on a combination of 7 encapsulated functional modules, namely Worksheet, View, Role and Permission, Workflow, Chart, Custom Page and External Portal.
- Worksheet: Collect and store business data. Whenever you want to enter any data, a worksheet is a must, such as employee worksheet, customer worksheet, order worksheet, etc.
- View: Display the filtered data according to different business scenarios or roles.
- Role and Permission: Configure permissions for members to add, delete, modify or query business data.
- Workflow: Support automated processing and flow of business data.
- Chart: Facilitate your decisions with visualized analysis of multi-dimensional data.
- Custom Page: Set shortcut buttons, charts, views, etc. It is usually used to build a dashboard or launchpad.
- External Portal: Invite external users to join, connecting internal and external users.
Now, let's try building an application together.
II. Pre-building
Before starting to build the application, three things need to be clarified:
- What are the required business processes and automation processes?
- What are the business data involved in the processes?
- What are the personnel or roles involved, as well as their operation permissions?
In the following, we'll take the application "Hiring System" as an example, to introduce the basic steps and required functional modules for building the application.
1. Business process
Through analysis and organization, the recruitment process generally has the following core requirements:
- Job candidates submit their resume information directly
- Recruiters manage all candidates information
- Recruiters schedule interviews
- Notify the hiring manager to prepare 15 minutes before the interview time (automated)
- Hiring manager modifies interview results
- Synchronize the interview result to the candidate record (automated)
- Create a dashboard for recruiters to easily track the progress of all candidates
2. Business data
This application mainly manages candidate information (resumes) and information related to scheduling interviews.
3. Roles involved
The roles involved in the application are candidates, recruiters, and hiring managers.
4. Solutions
HAP responses to the requirements mentioned above with the following.
| Requirements | Solutions in HAP |
|---|---|
| Candidates submit resume information directly | Create a worksheet Candidate to collect resume information and keep it visible to public |
| Recruiters manage the information of all candidates | Create views to display candidates of different statuses |
| Recruiters schedule interviews | Create a worksheet Interview |
| Notify the hiring manager 15 mins before an interview | Create a workflow to monitor the interviews when to start |
| Update the interview result, pass or fail | Set a role of hiring manager and configure operation permissions for it |
| Sync the result to the candidate record | Create a workflow to automatically sync the interview result |
| A dashboard for recruiters to tracck the hiring progress | Create a custom page to add charts and views |
III. Application Building
1. Create an application
After logged in to HAP, we create an application named "Hiring System", in which several worksheets can be created for data input and management.
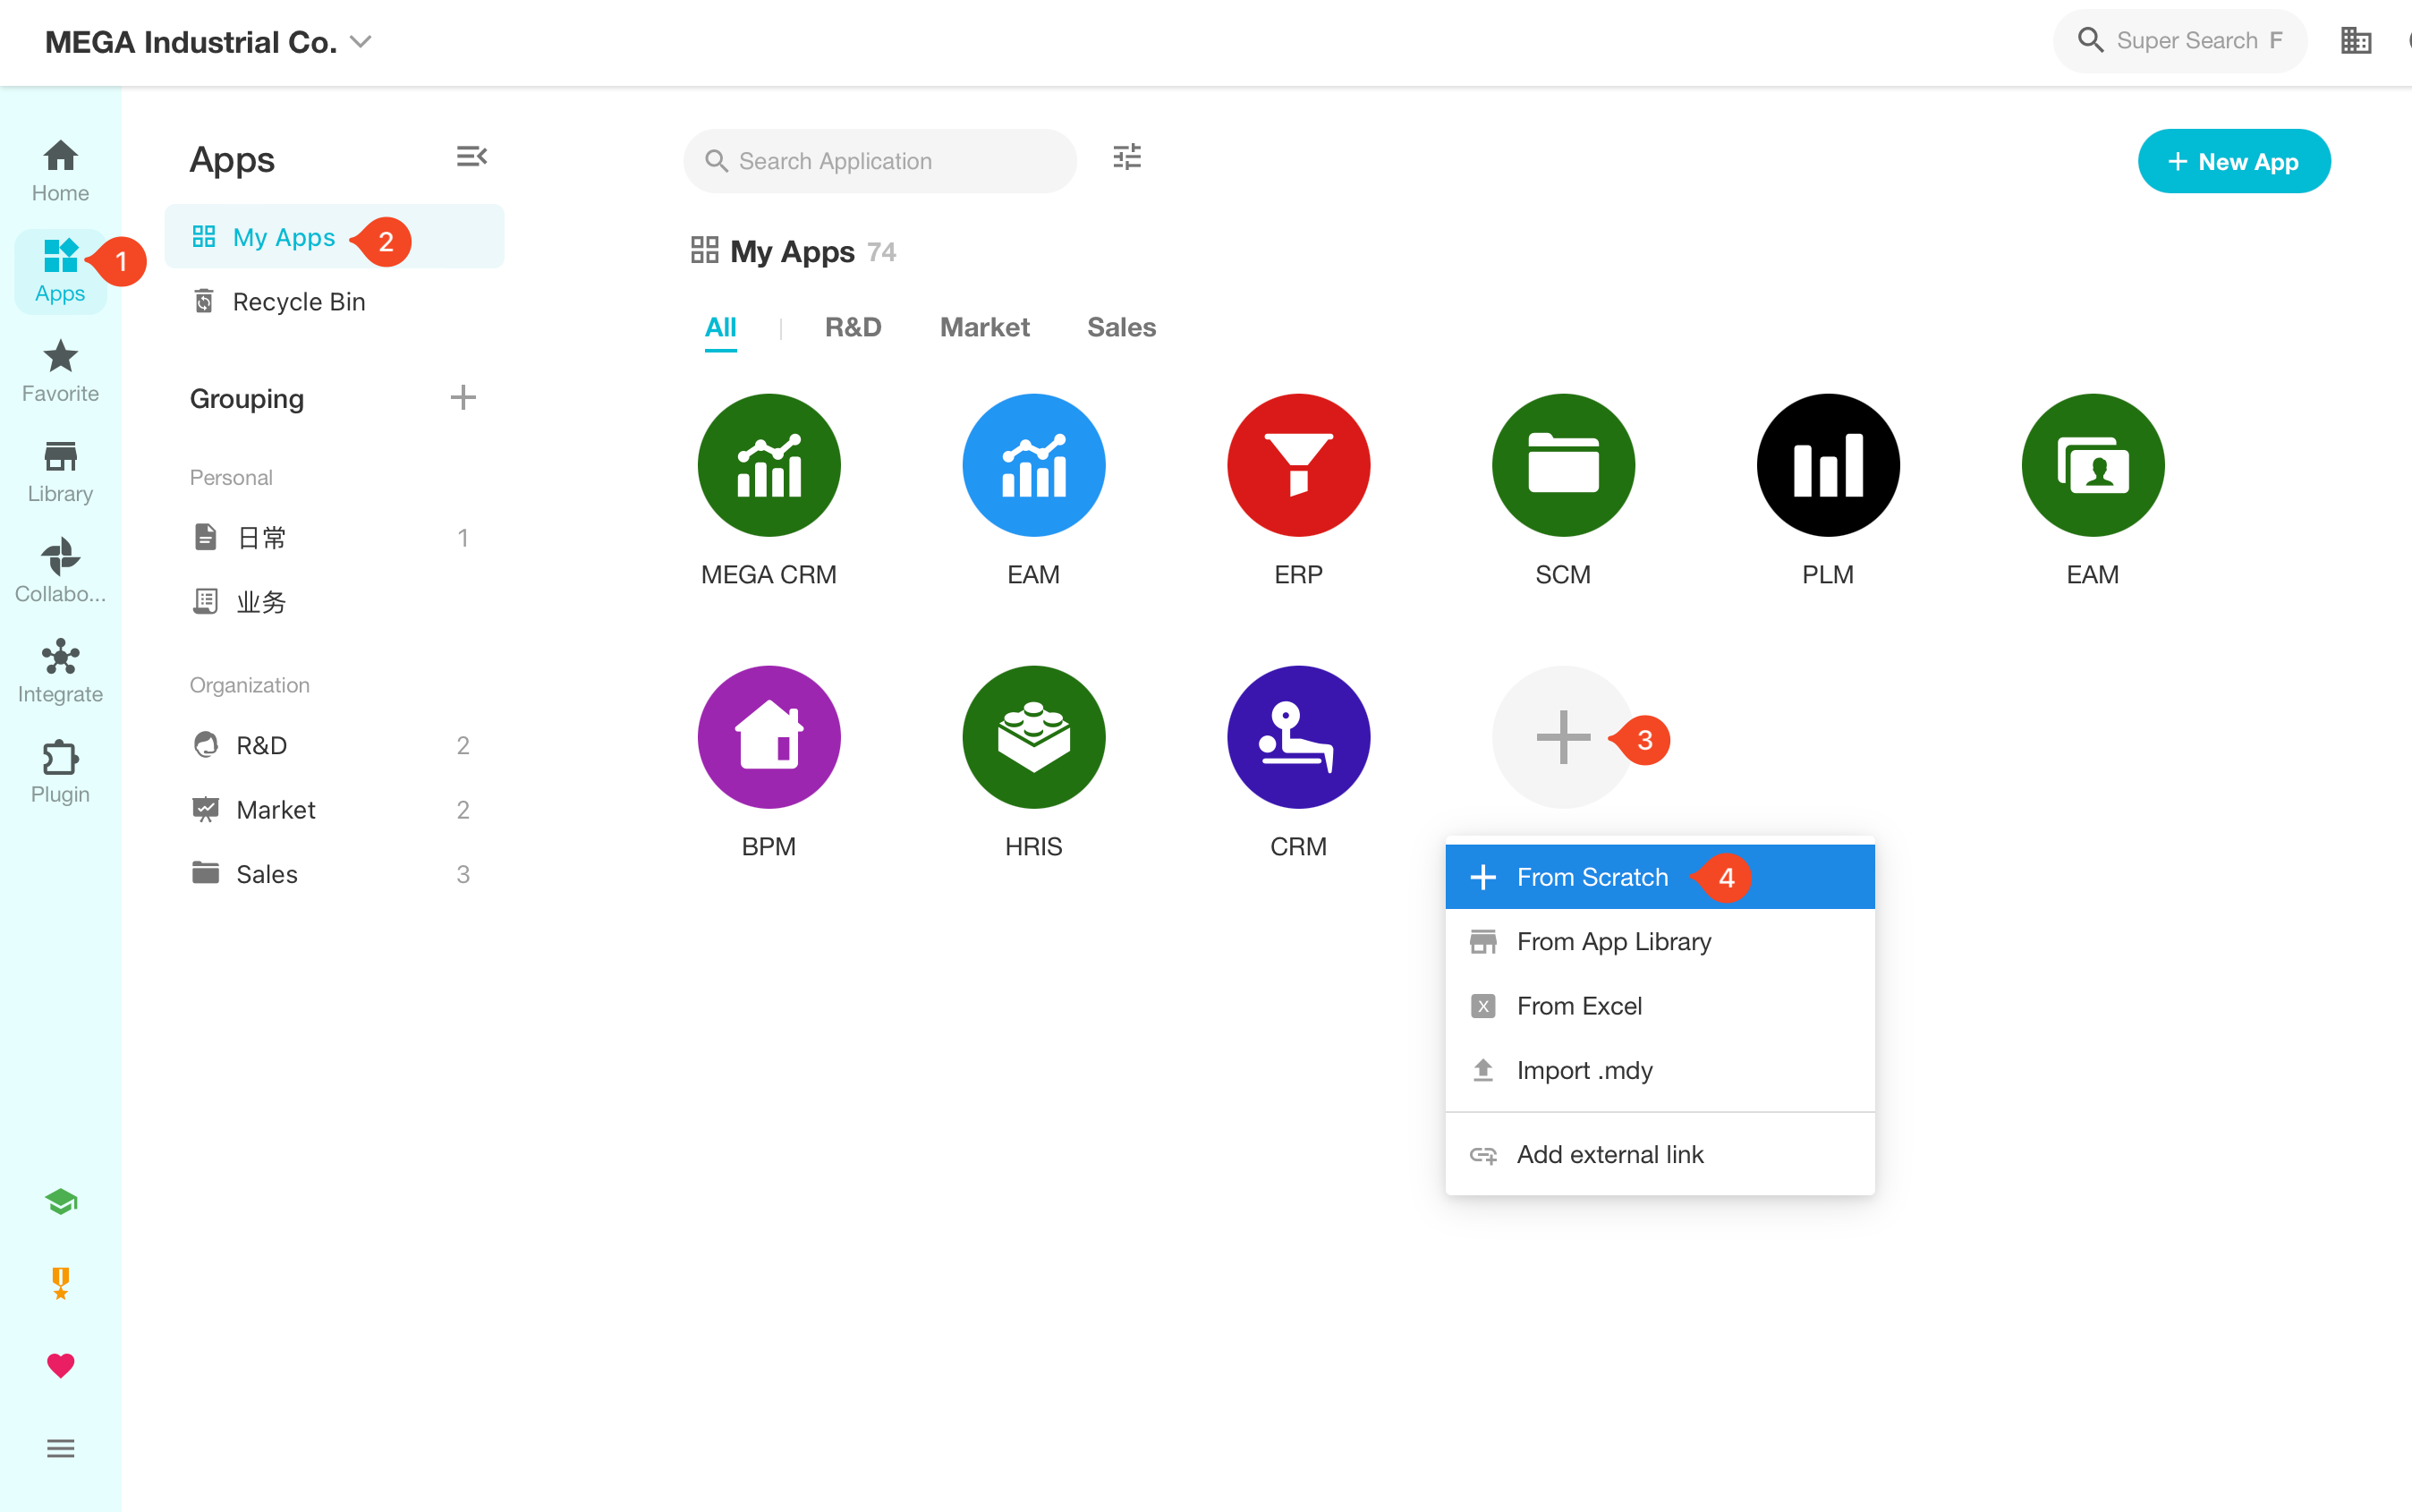
This step represents the foundation of an application. Later, we will enrich and complete it with worksheets, views, roles and permissions, charts, custom pages and workflows.
2. Create worksheets
Worksheets are the most core and basic modules in the application. We can think of worksheets as an online Excel, used to store and manage business objects in enterprise activities. The fields of the worksheet record various attributes of these objects, such as customers, employees, and job seekers, all of which are typical business objects. Attributes of these objects include customer location, order number, job seeker name, and phone number.
Here, we need to create two separate worksheets for candidates and interviews.
2.1 Create a worksheet - Candidate
Let's first take a look at what the candidate table looks like in Excel. The required candidate information includes name, date of birth, gender, email, the applied position, etc.
| Name | Gender | Applied Position | Source | |
|---|---|---|---|---|
| Ethan Thompson | Male | ethan.thompson@email.com | Accountant | Indeed |
| Lauren Miller | Female | lauren.miller@email.com | Graphic Designer | ZipRecruiter |
| Michael Wilson | Male | michael.wilson@email.com | Project Manager | |
| Samantha Davis | Female | samantha.davis@email.com | Software Developer | Monster |
| Ryan Brown | Male | ryan.brown@email.com | Sales Representative | Glassdoor |
| Amanda Jones | Female | amanda.jones@email.com | HR Specialist | ZipRecruiter |
| Alex Johnson | Male | alex.johnson@email.com | Software Engineer | Indeed |
We need to create a corresponding worksheet to manage these information.
Worksheet:
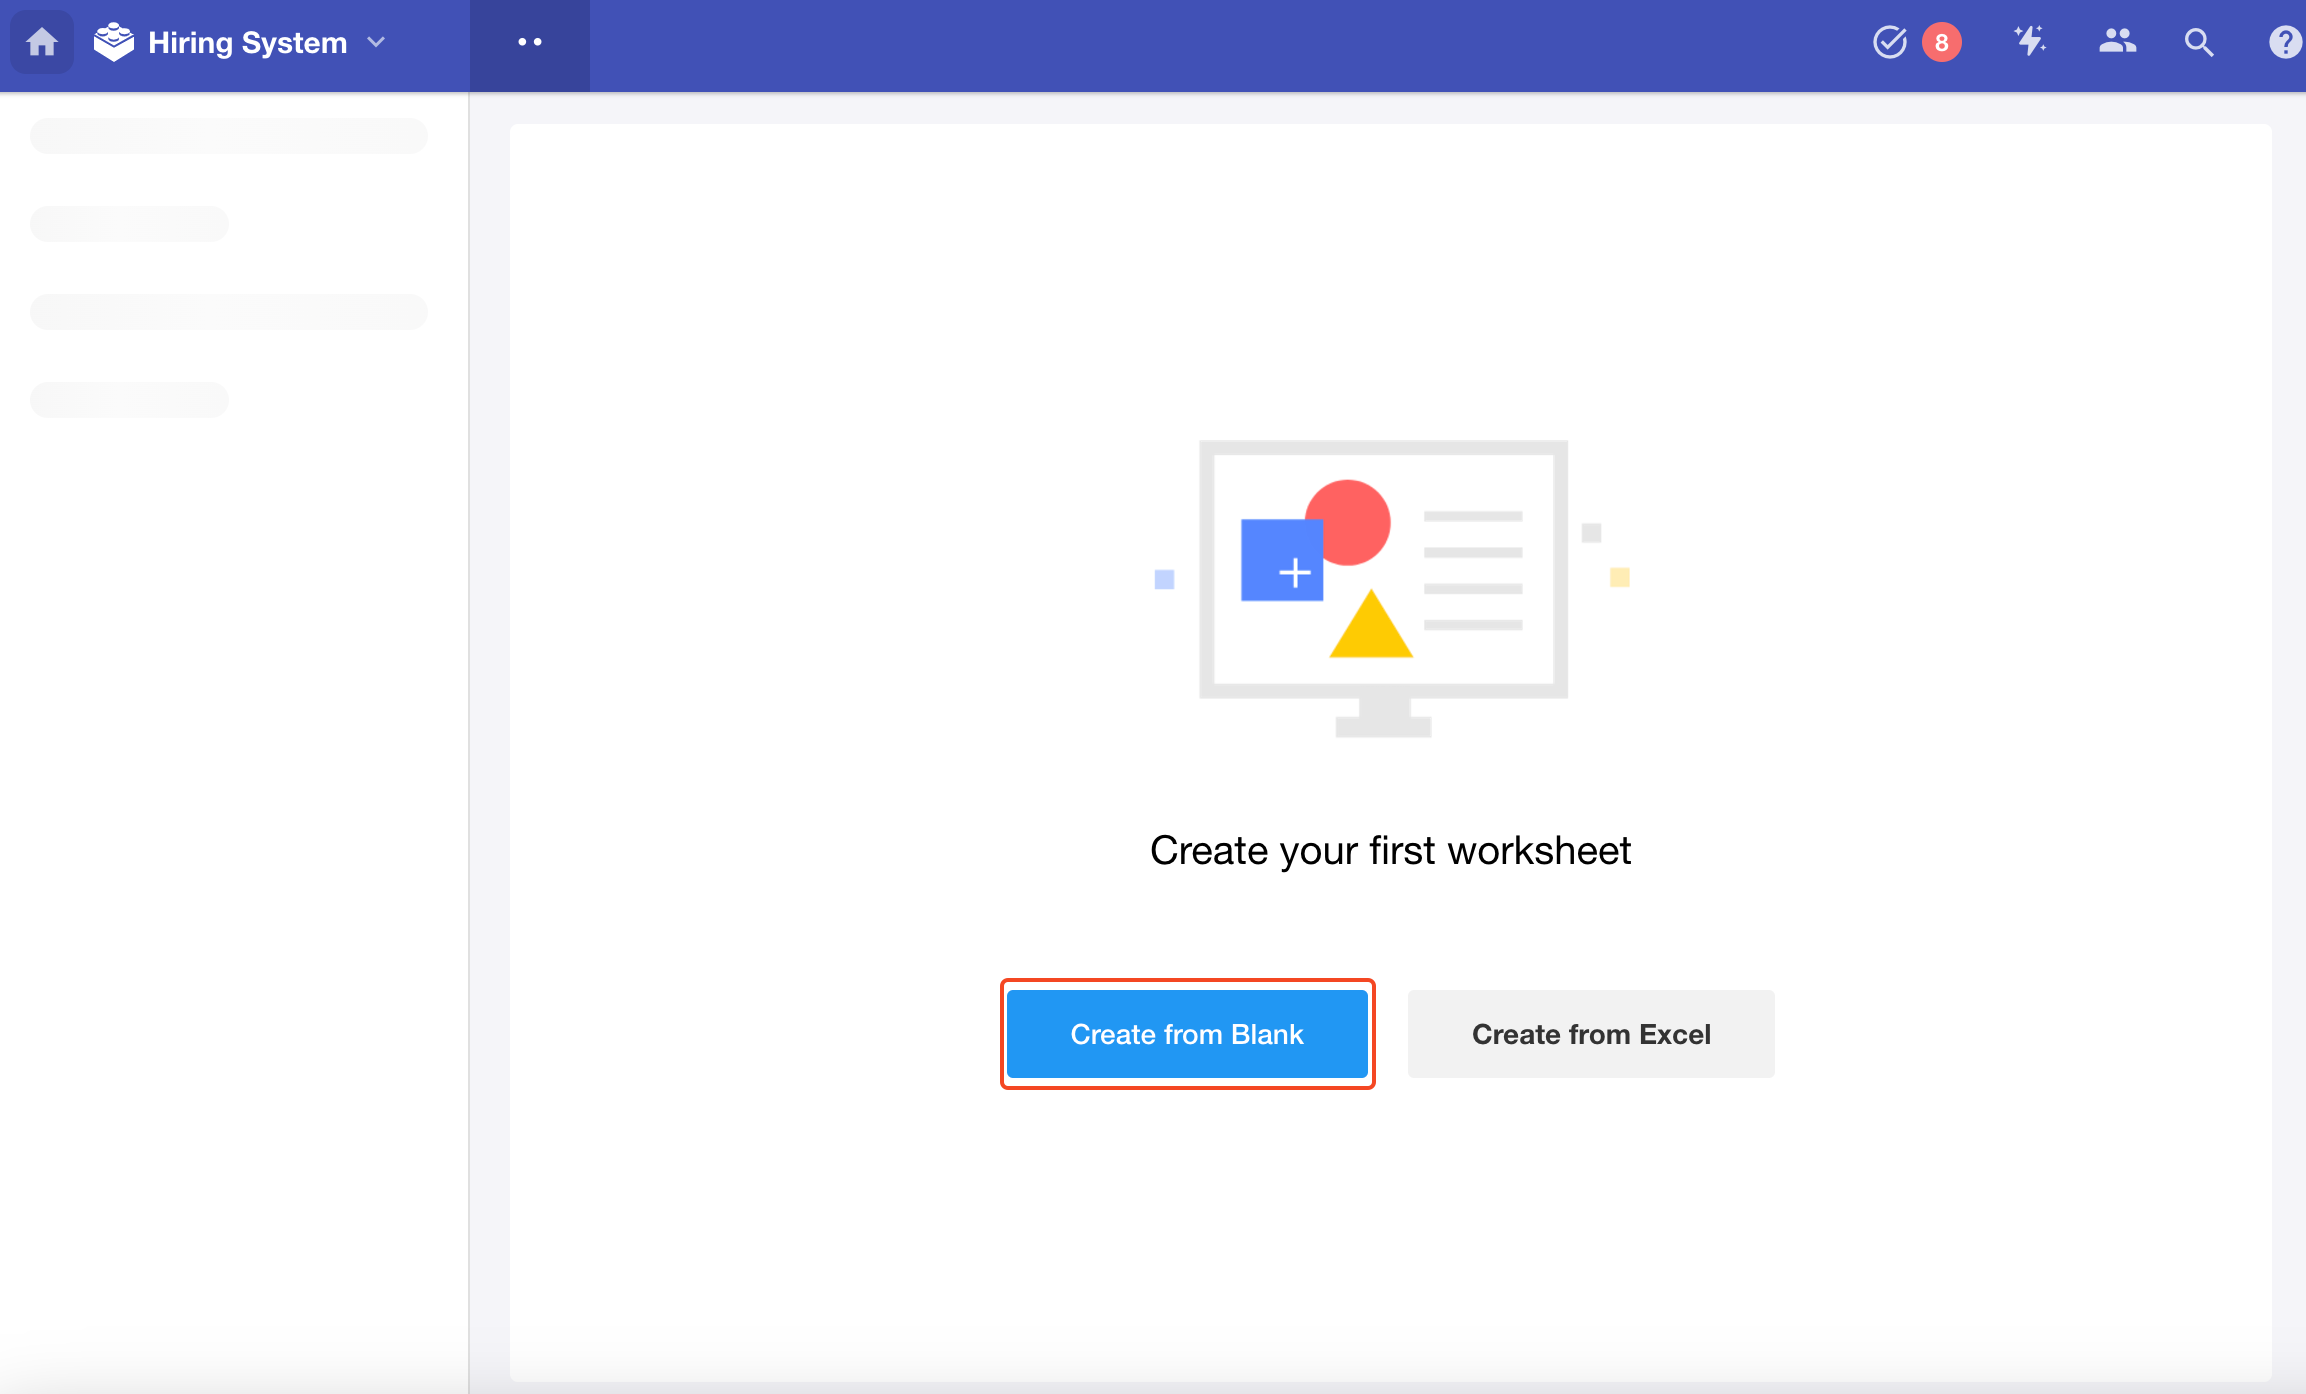
Click [Create from Blank], and it will automatically enter the worksheet design page (canvas).
Select the appropriate controls from the left control area and add them to the middle form design area (canvas), then modify their properties (name, width, required or not, etc.).
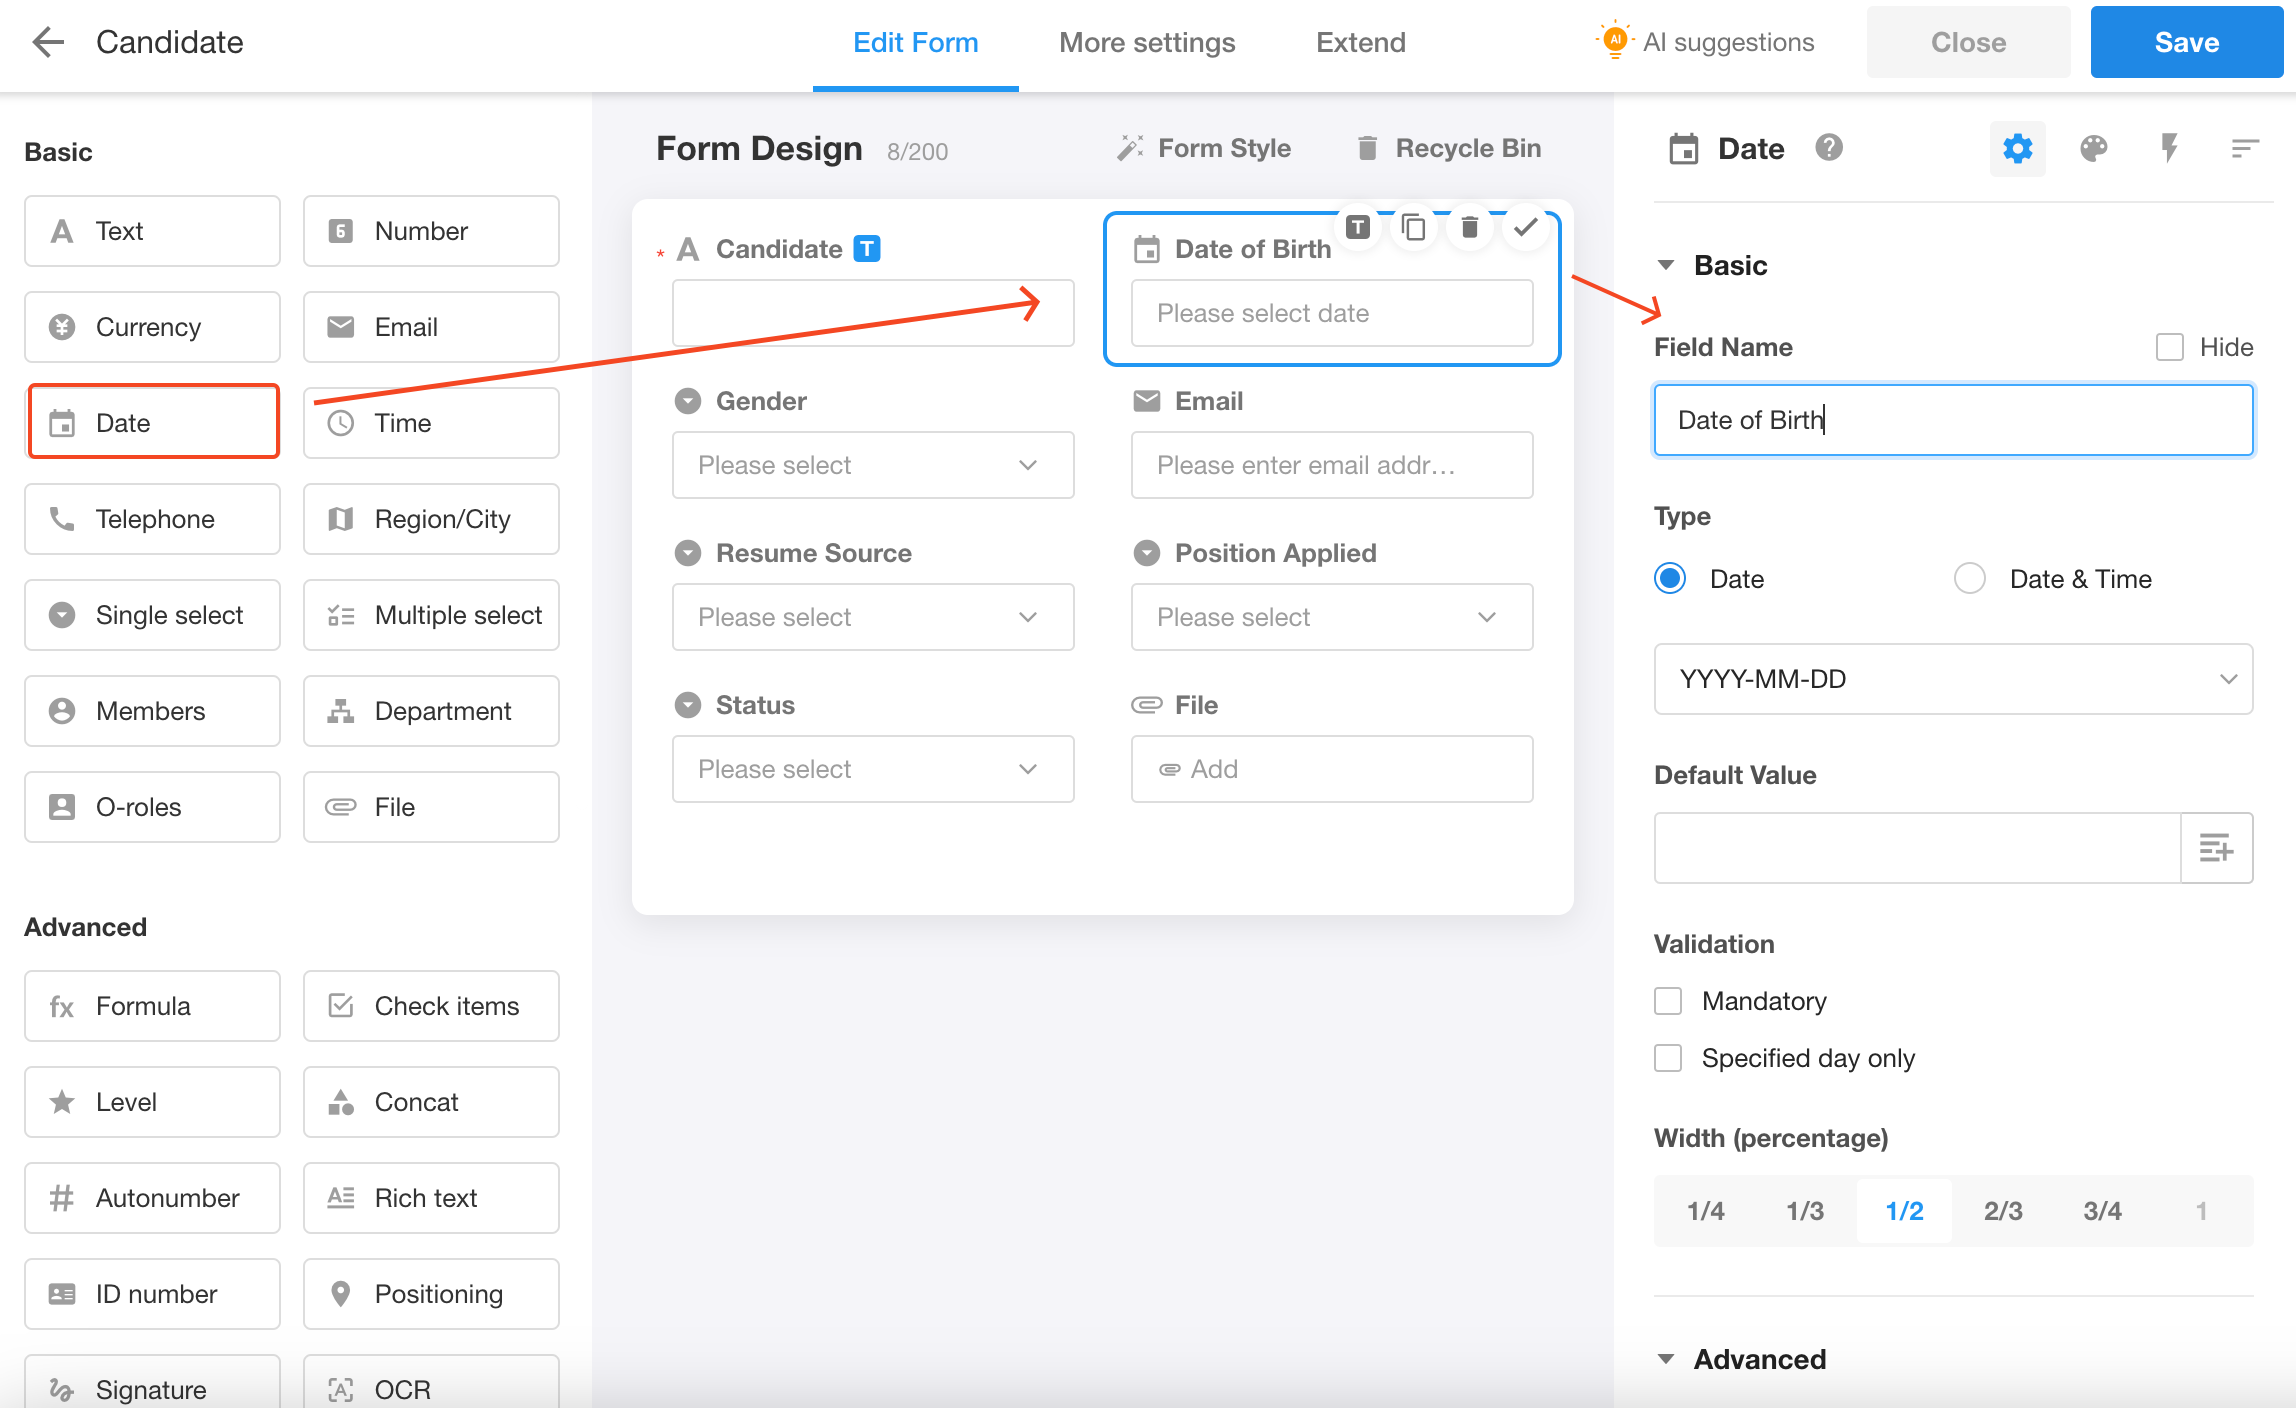
| Required Field | Control |
|---|---|
| Name | Text |
| Gender | Single select |
| Date of birth | Date |
| Applied position | Single select |
| Resume source | Single select |
| Status | Single select |
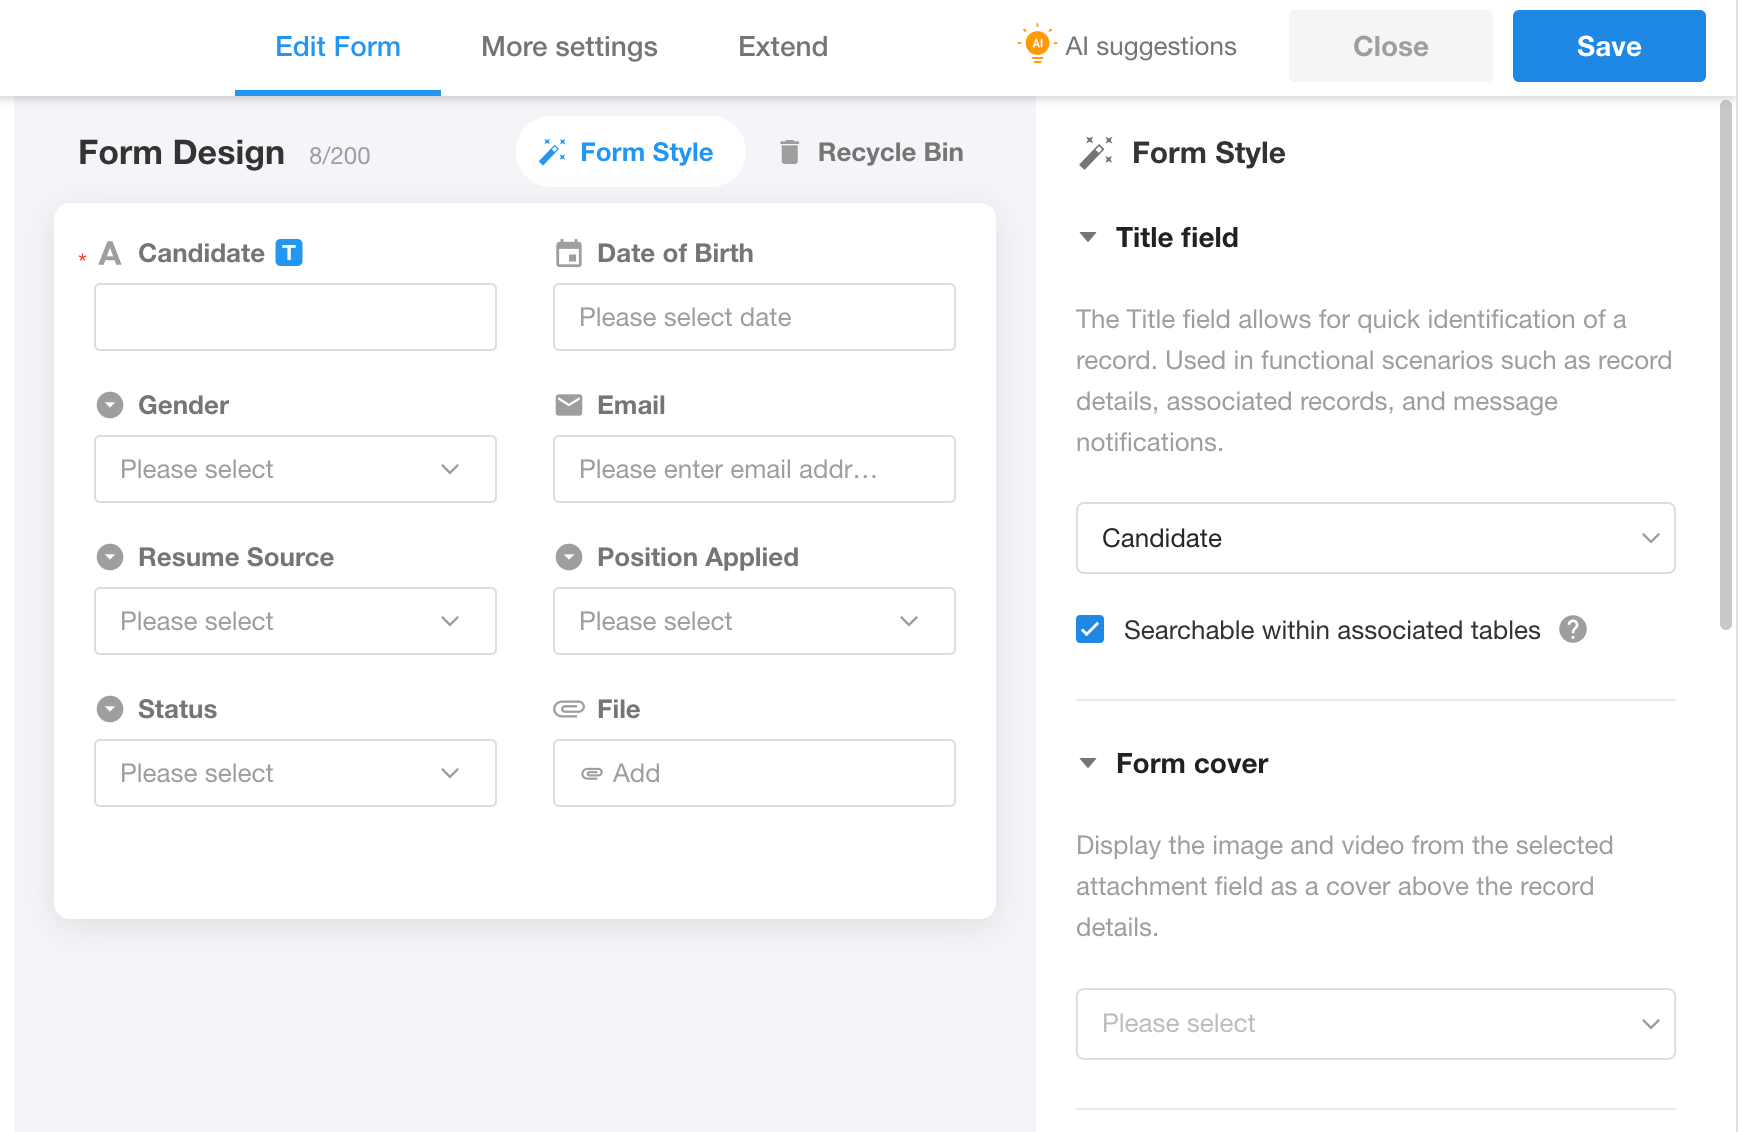
The completed candidate worksheet design is as shown in the image below.
1) Enter candidates information
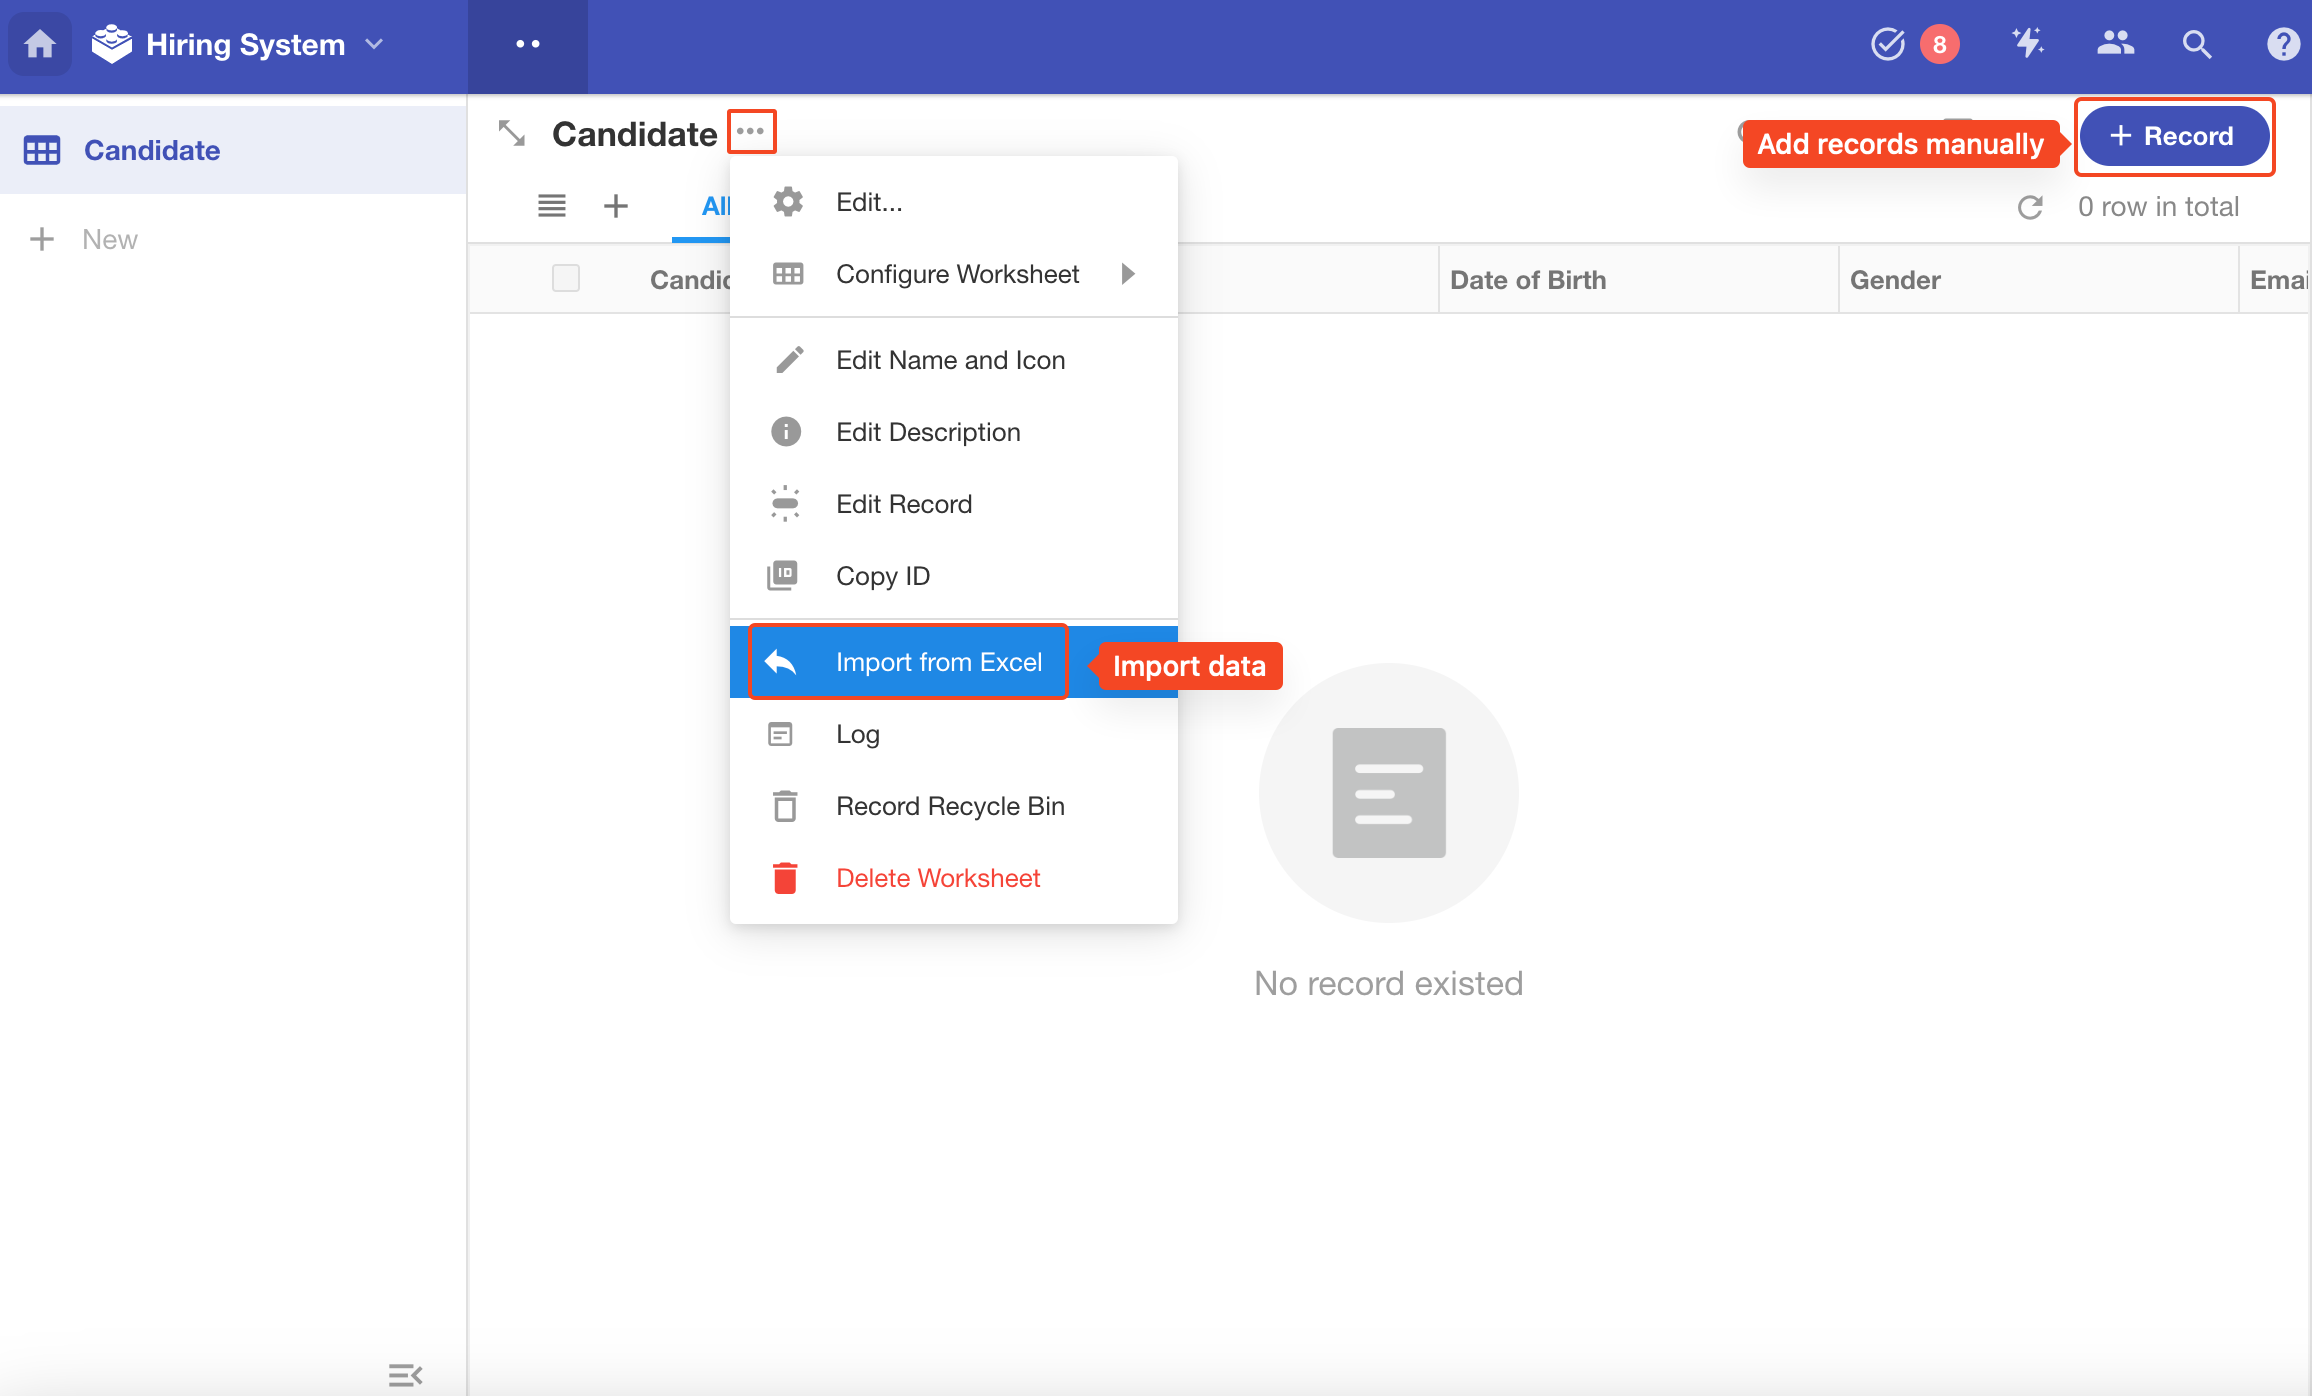
We can manually add a record or import an Excel file. Here, we choose to import data.
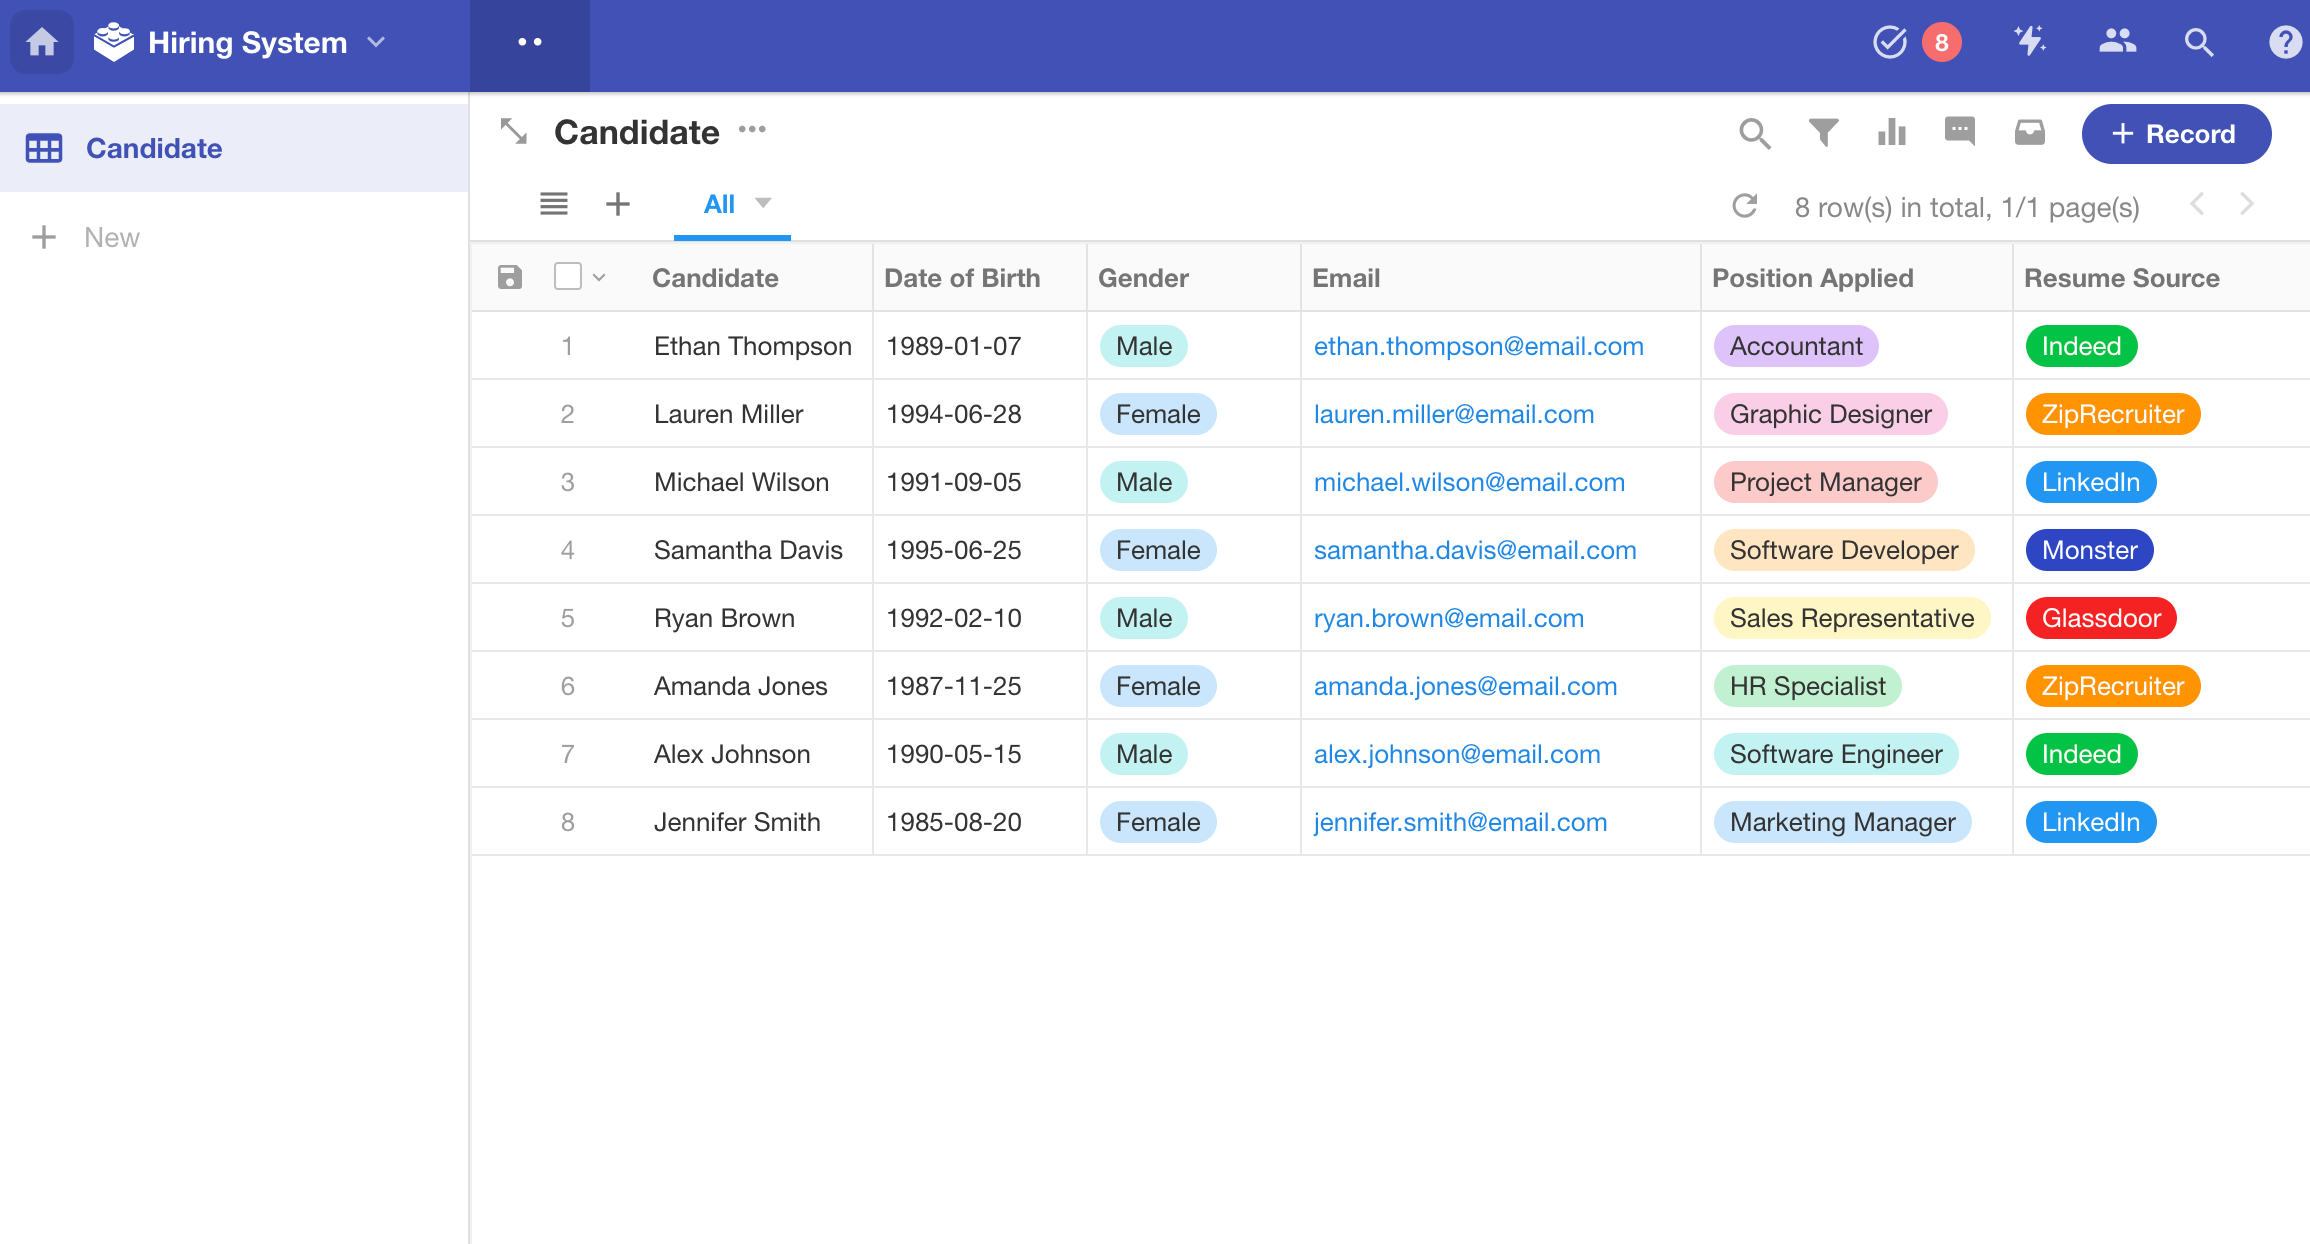
After importing, below is the worksheet Candidate with multiple rows of records.
2) Operations on a single record
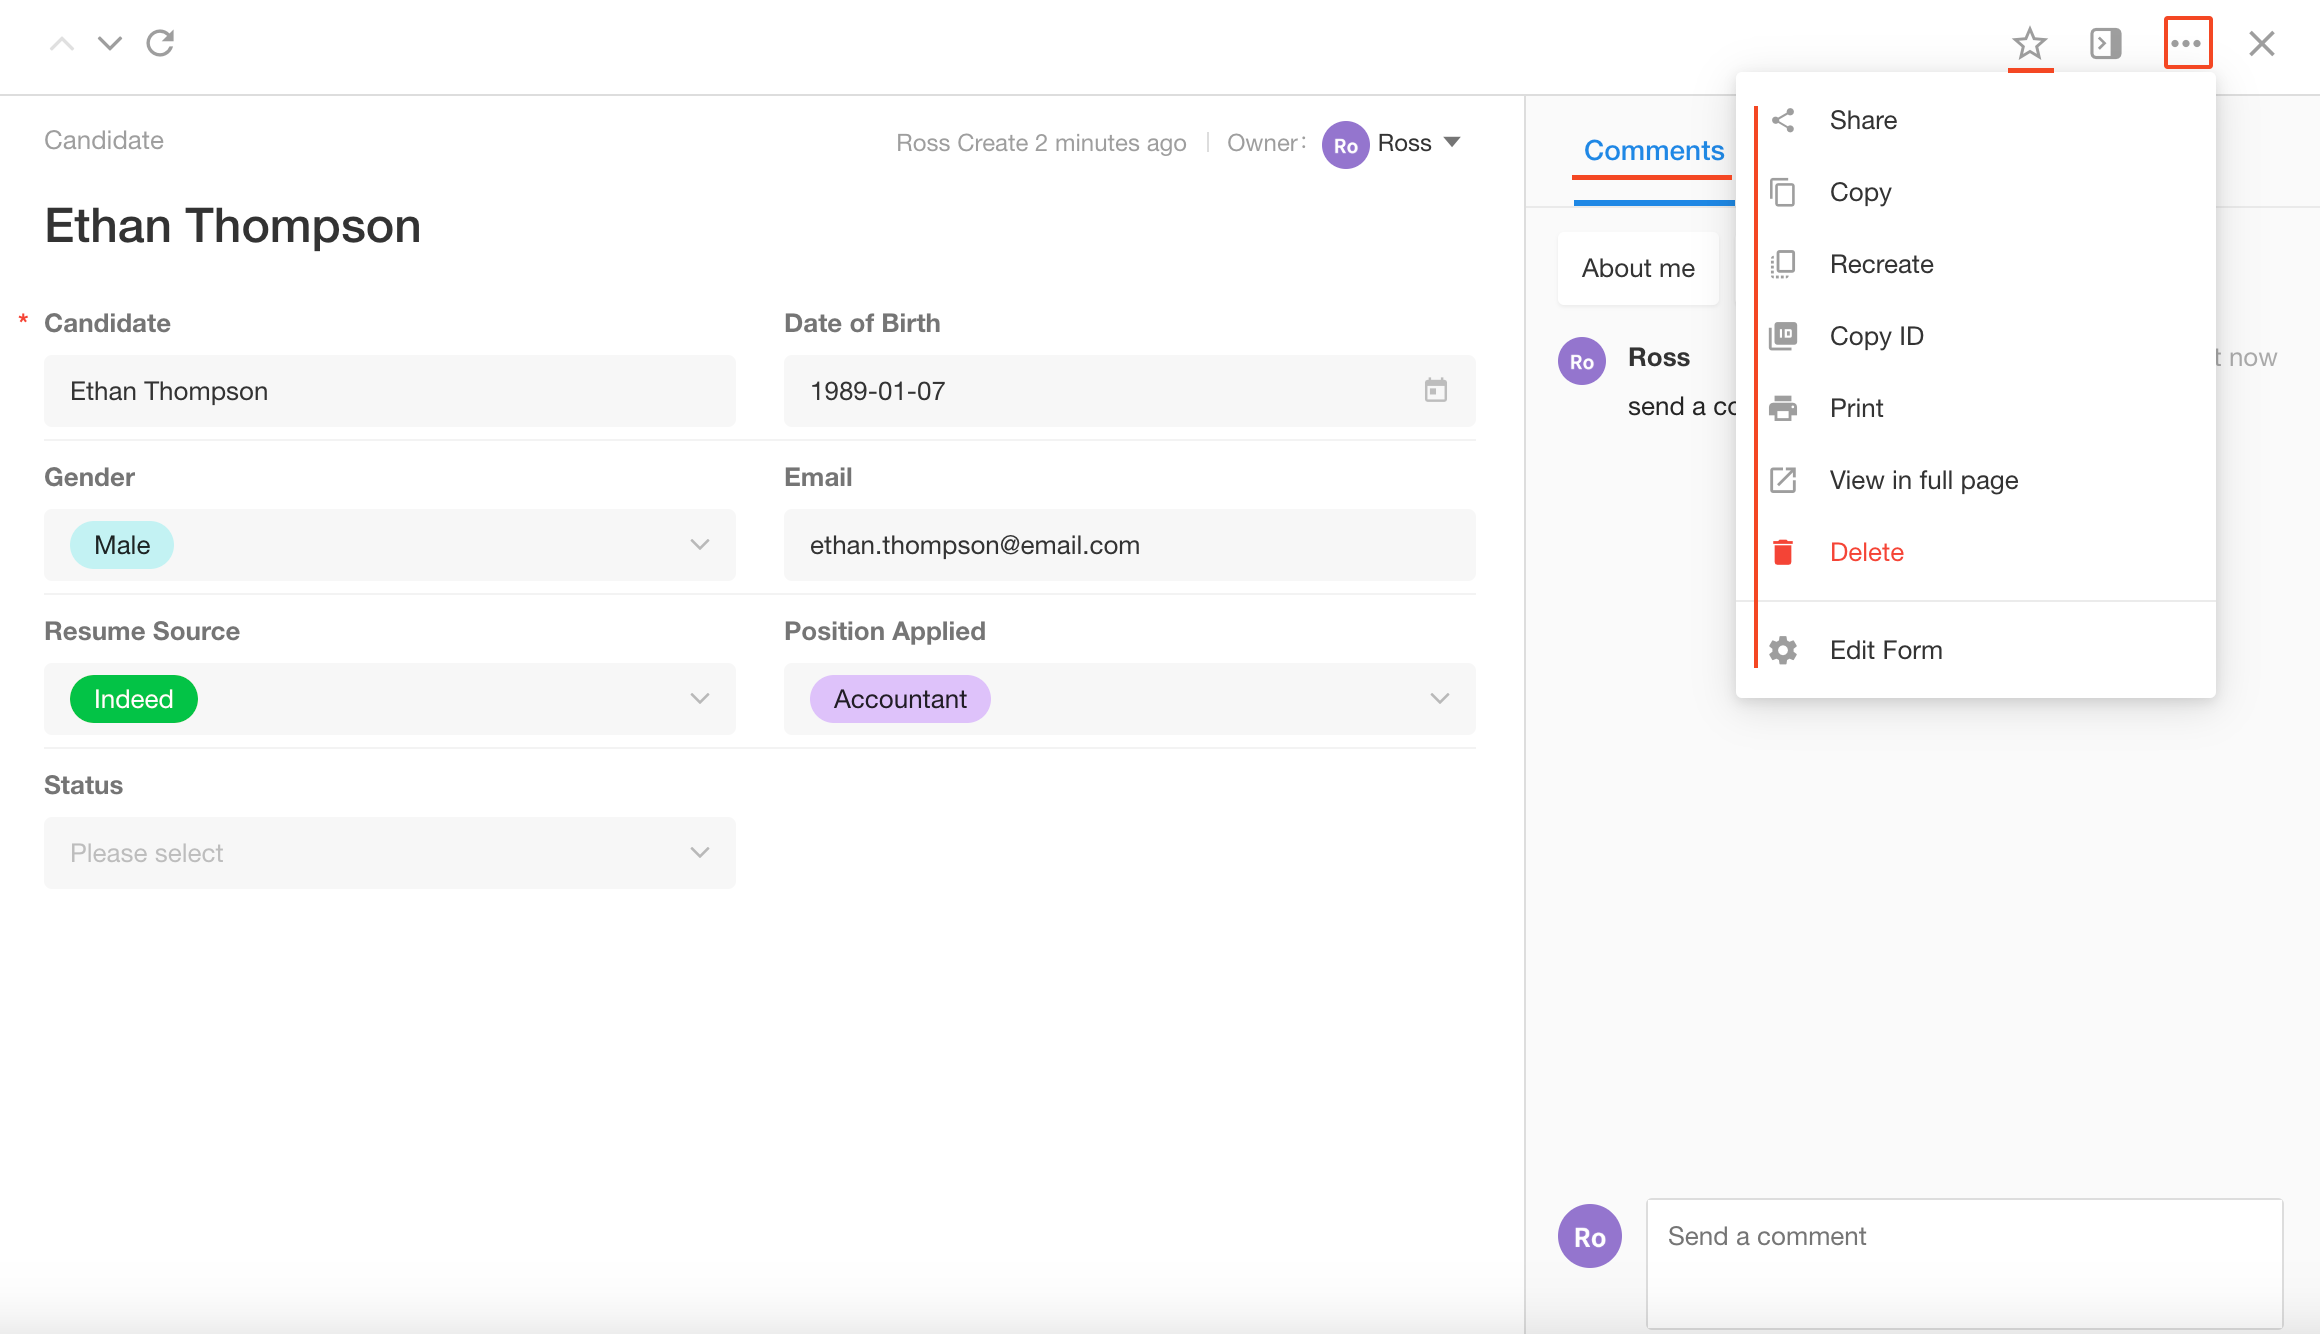
Clicking on a record will open the record details page, where we can perform actions such as modifying, sharing, discussing, printing, or deleting.
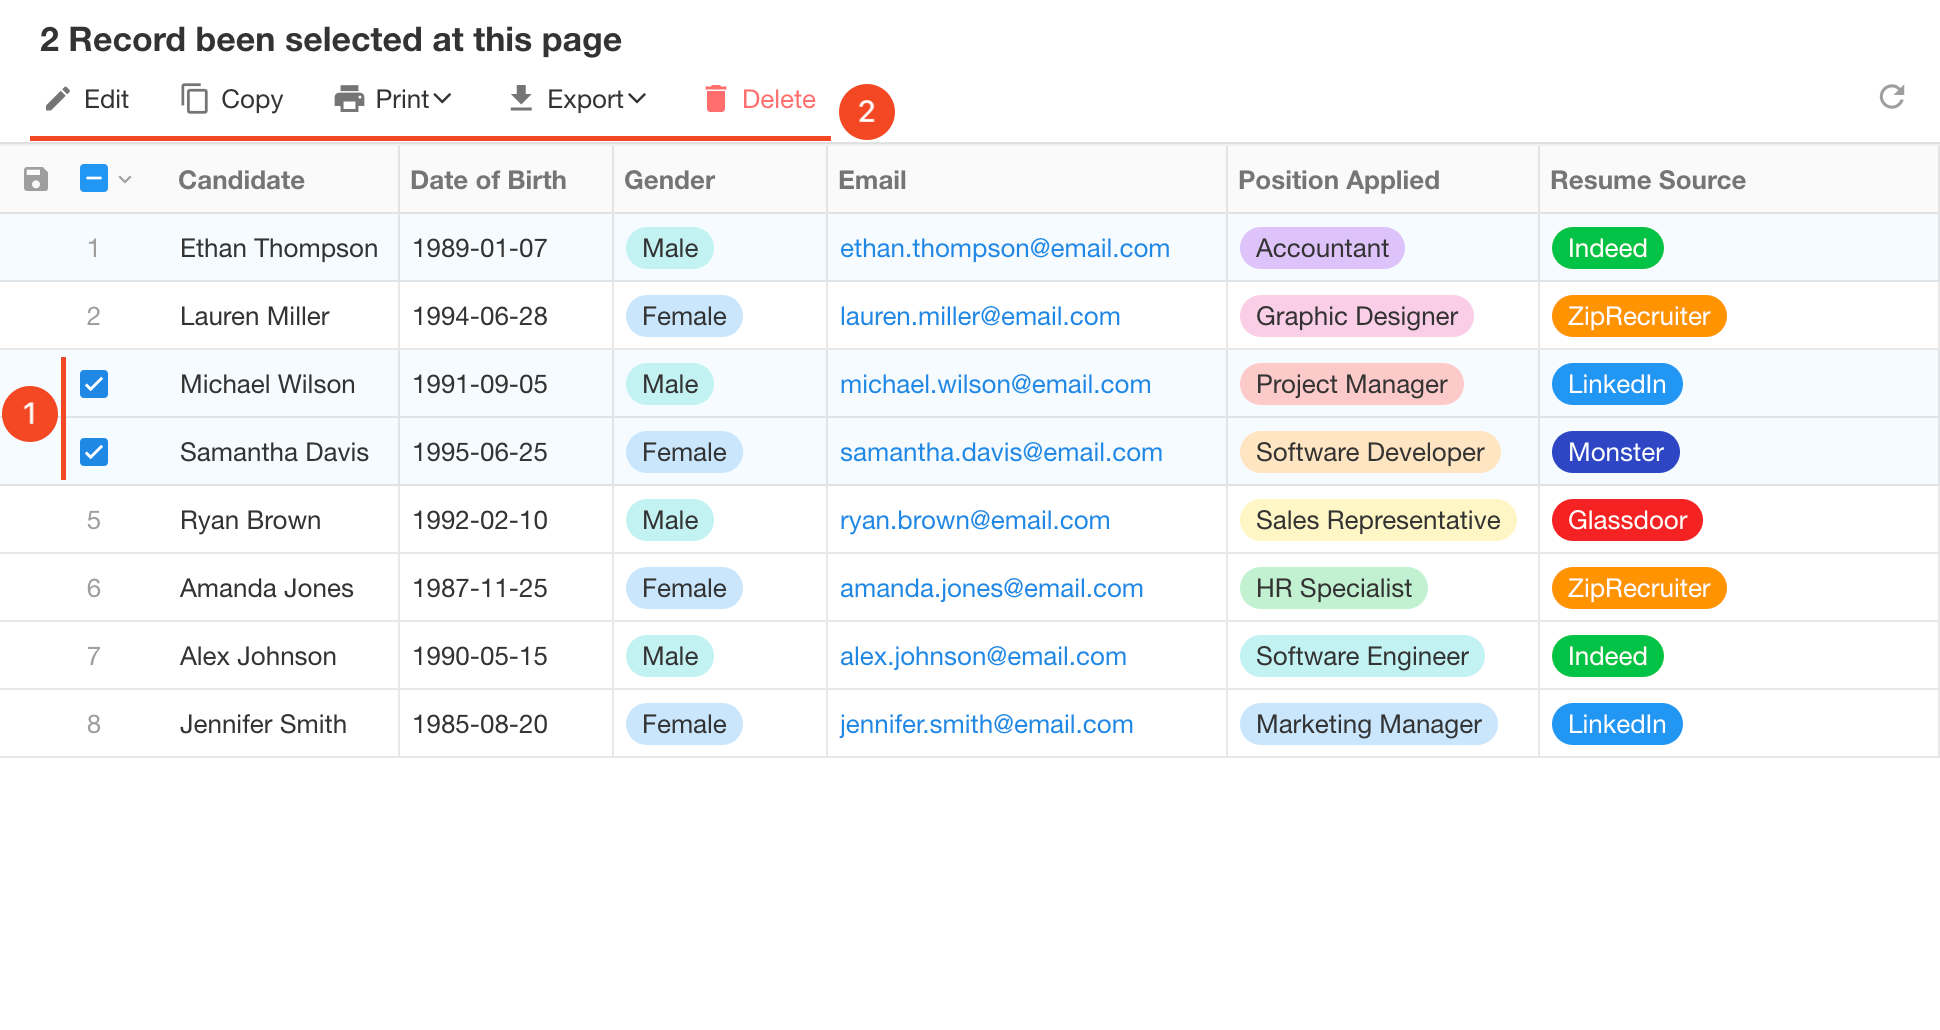
3) Bulk edit records
4) Public form
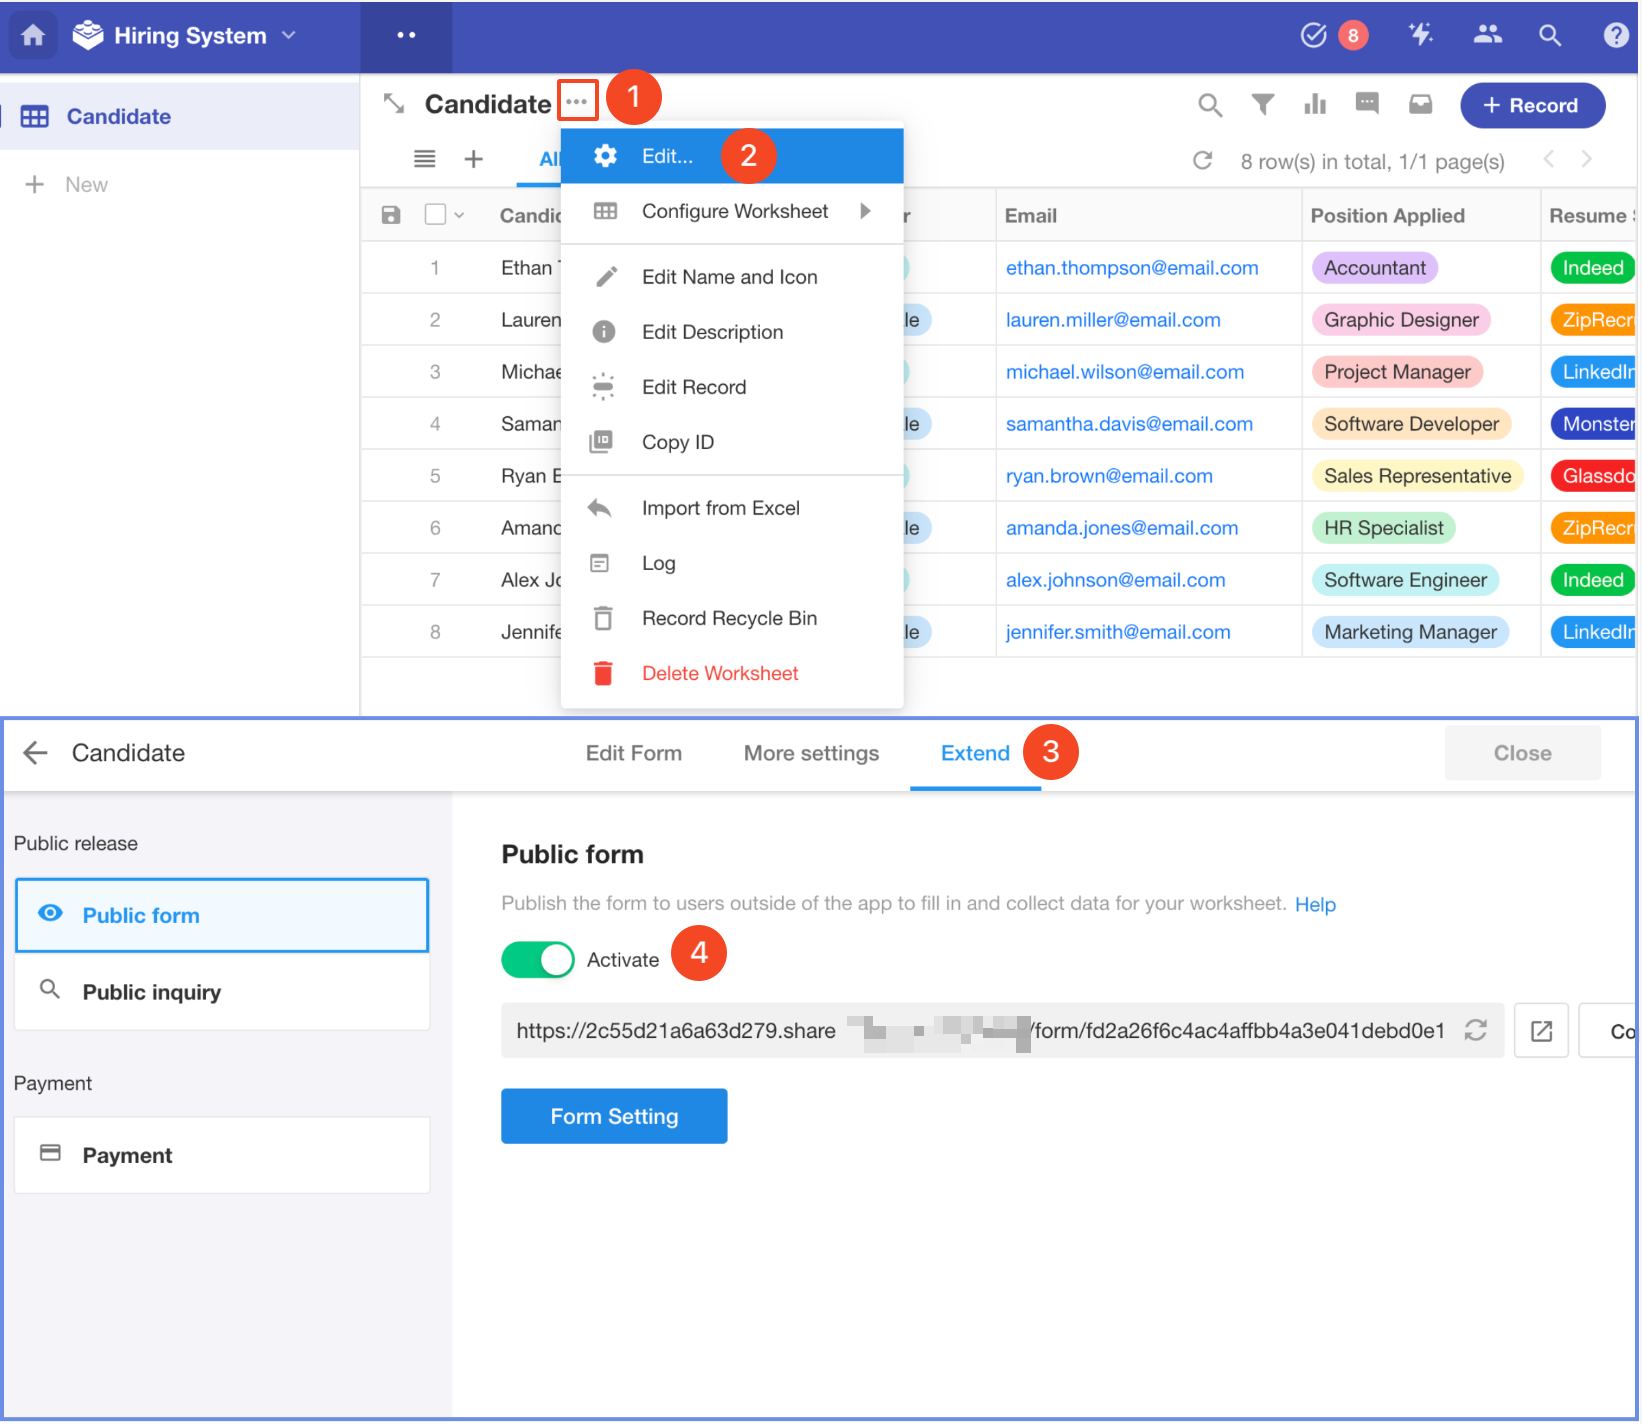
Go to [Edit Worksheet] > [Extend] > [Public Form] to enable public form access for job seekers to directly fill in their information.
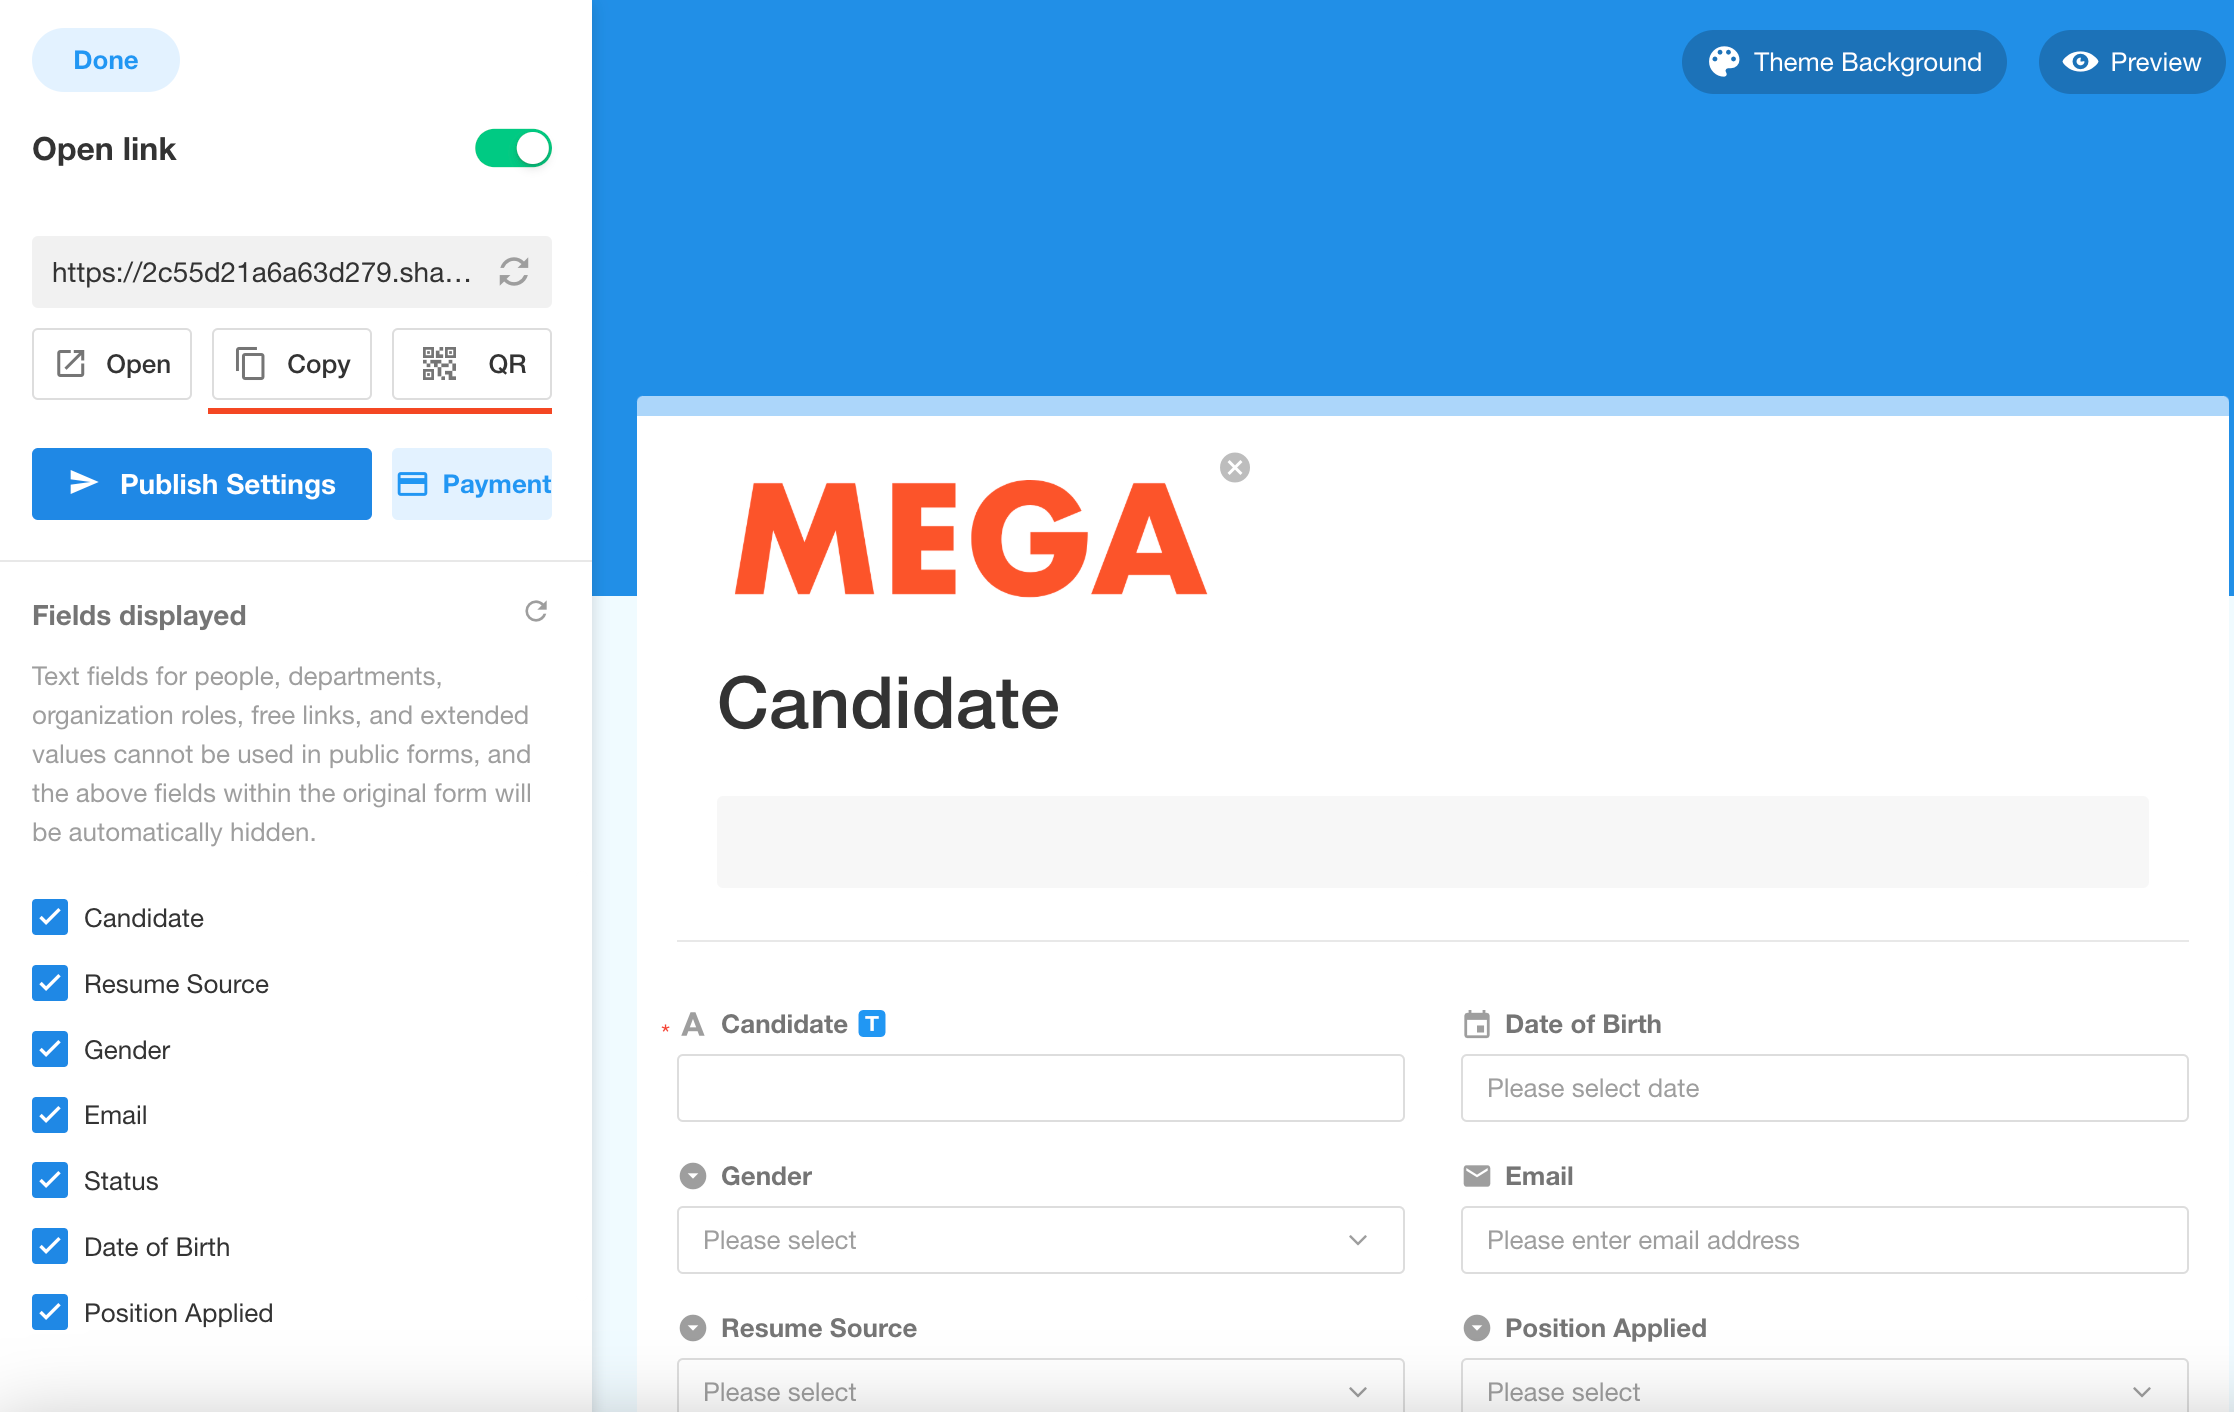
In addition, the interface for public data collection can also be customized, such as uploading a logo, setting a background color, adding a description, or choose which fields to make public to users. After completing the design, we can share the QR code or link.
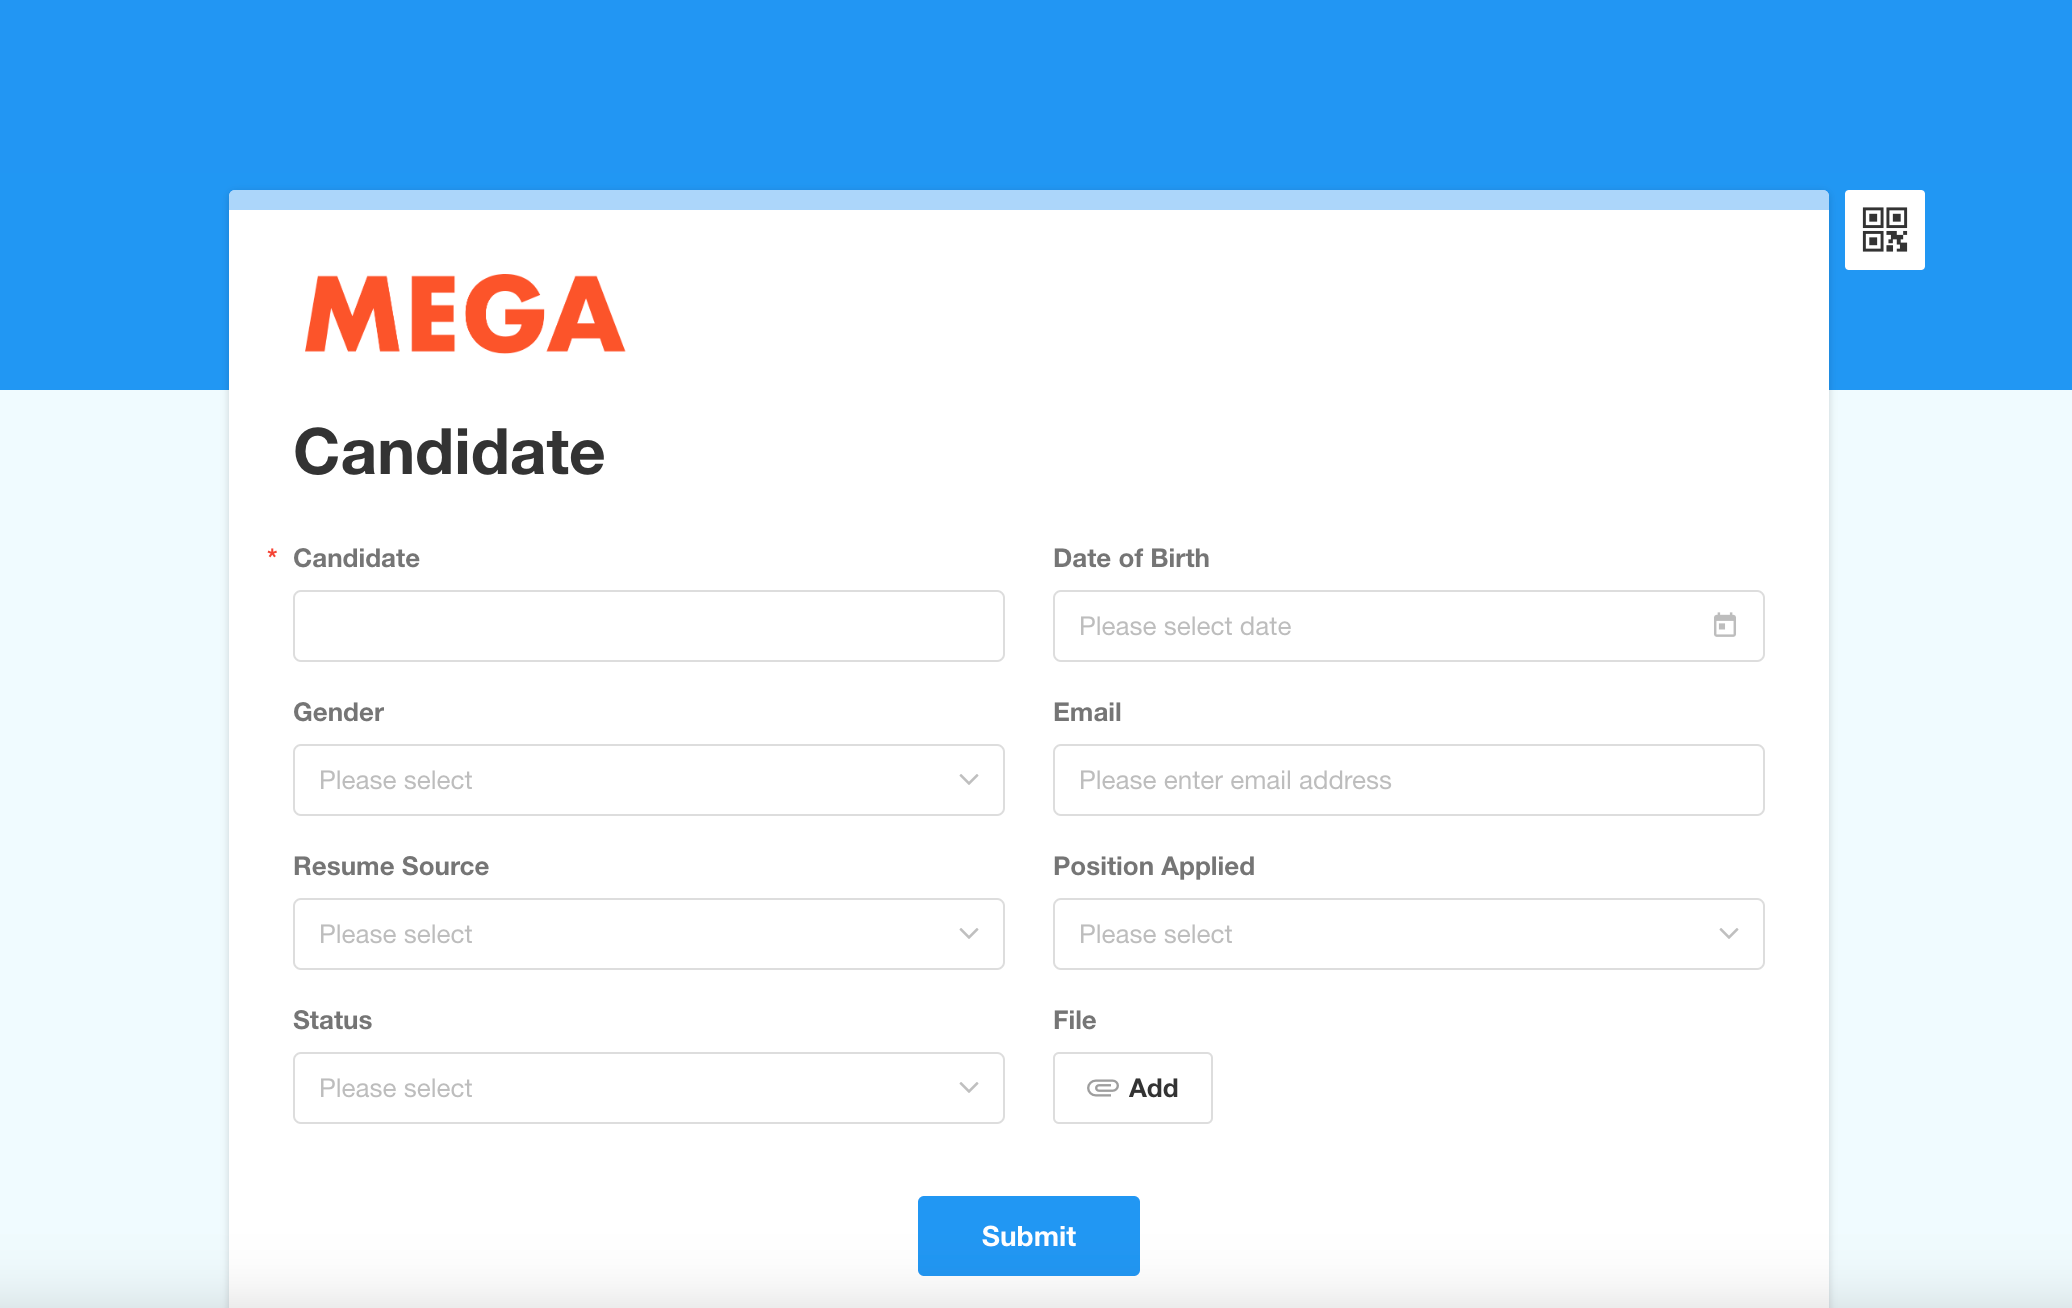
The QR code or link can be shared on the official website or other channels. Job seekers do not need to log in, instead, they can scan the code or click the link directly to fill in their job application information.
5) Other features
- Business Rule: If the value of field A meets the certain condition, the other fields will be hidden or displayed, or will not be editable.
- Custom Action: It is also possible to add buttons that, when clicked, prompt a window for filling in the specified fields, which will be more scenario-oriented.
- Printing Template: Edit printing formats in Word and upload it as templates.
To learn more about these features, please check out relevant articles in our help center.
2.2 Create a worksheet - Interview
When scheduling interviews, it is necessary to know some key information such as the candidate, gender, applied position, resume, interviewer, start time, comments, result, etc. The designed interview worksheet is as follows.
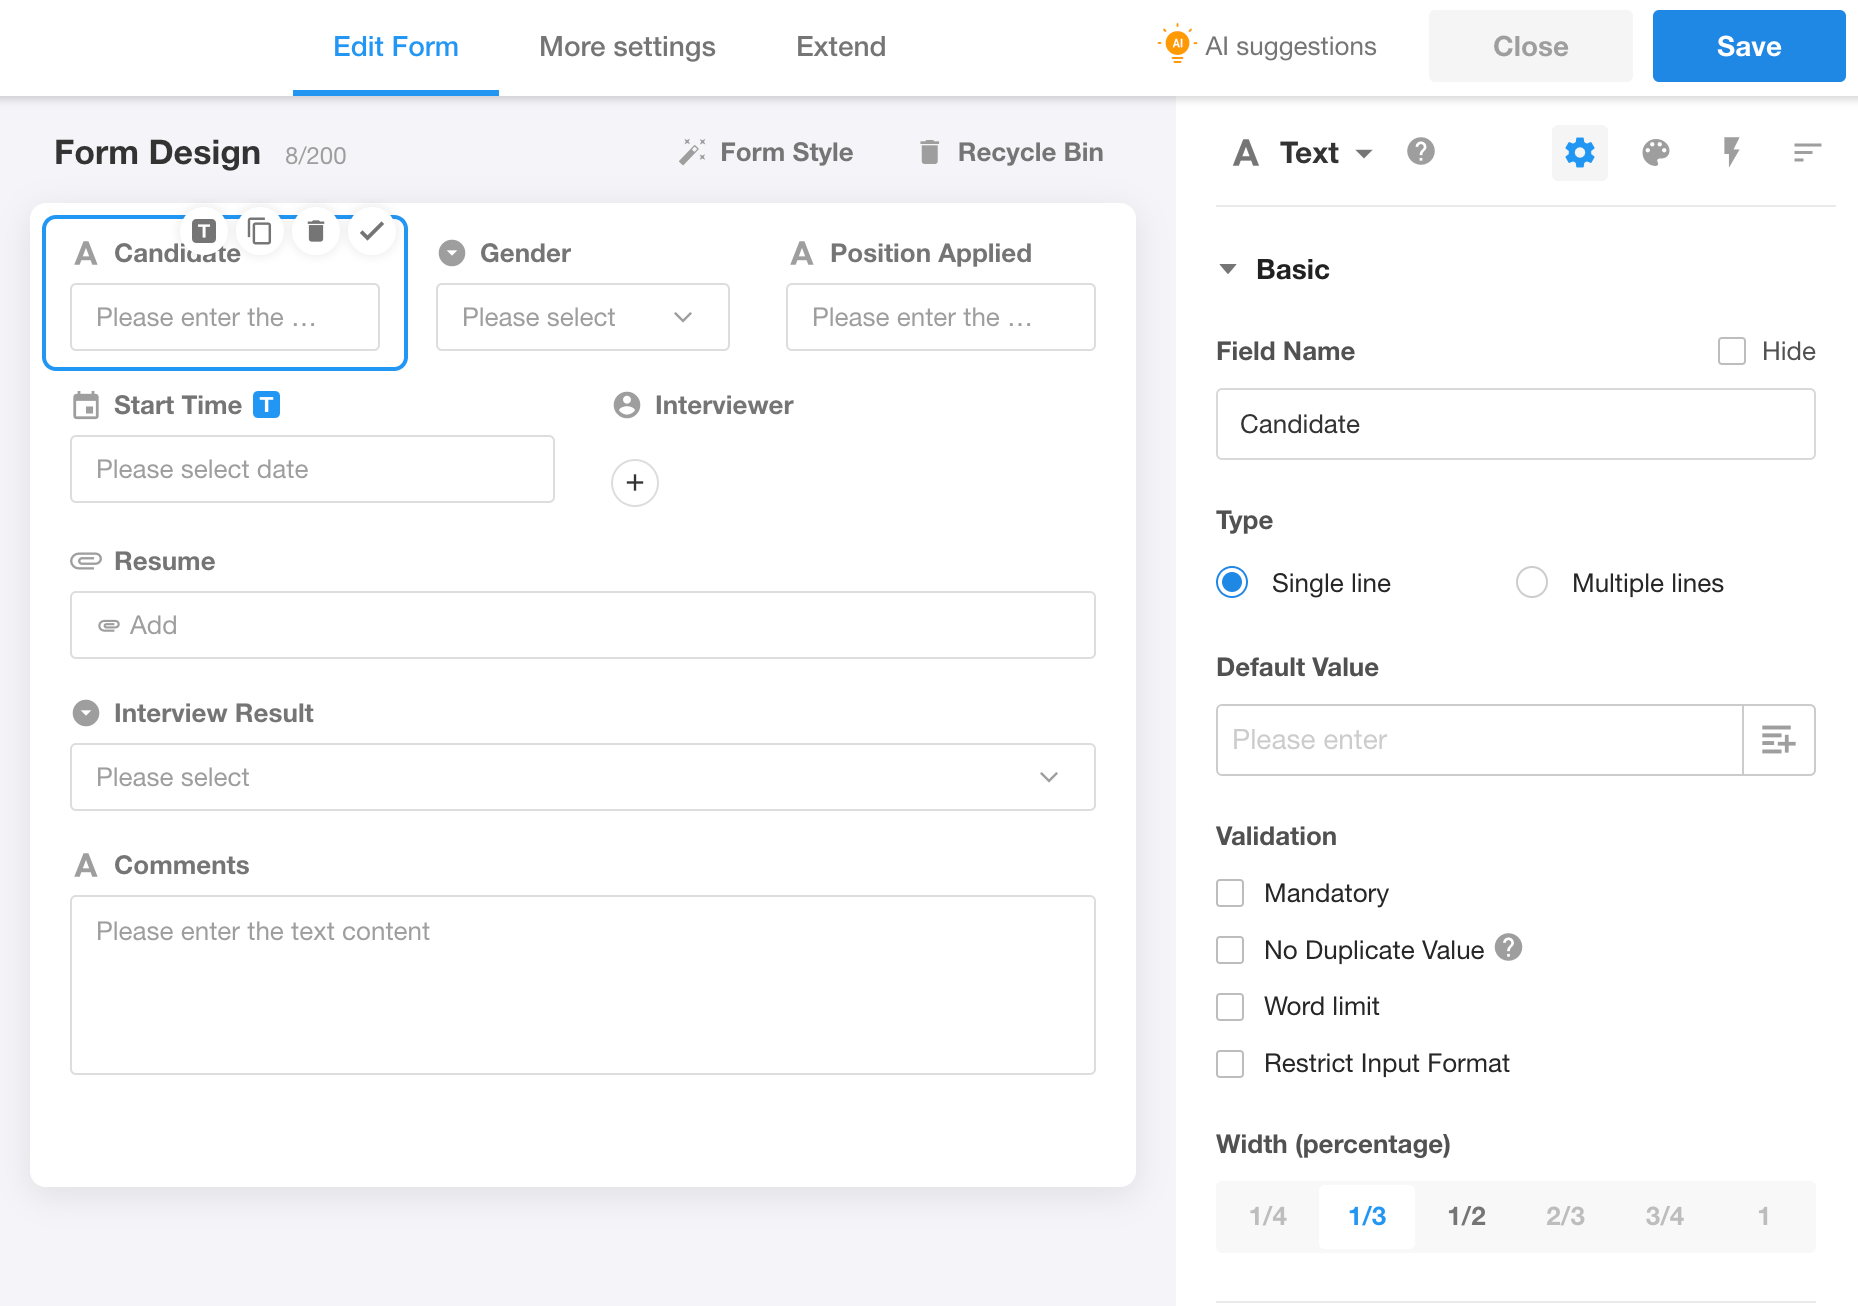
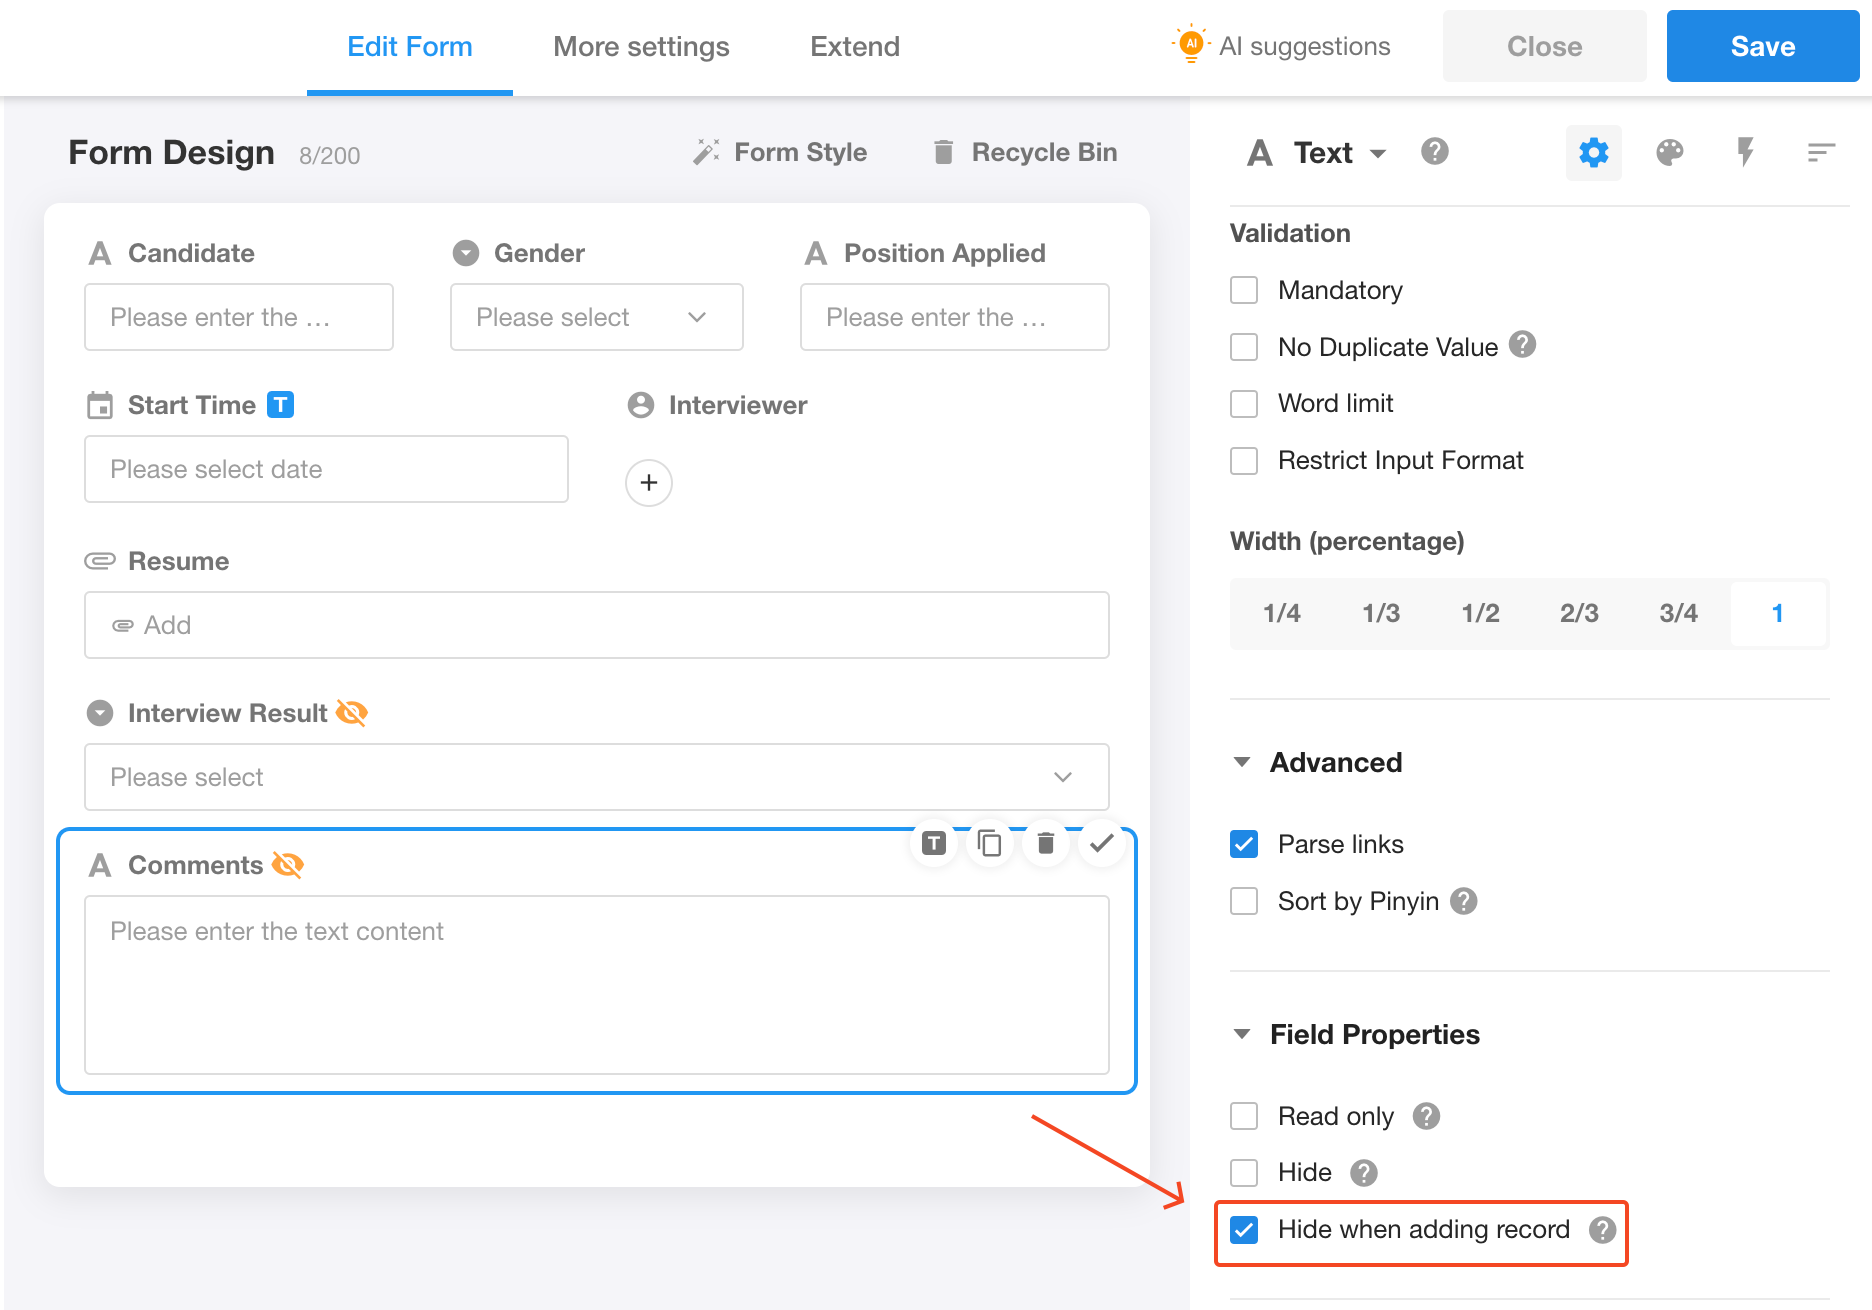
During interview scheduling, interview comments and results are not required to be entered, we can check [Hide when adding record].
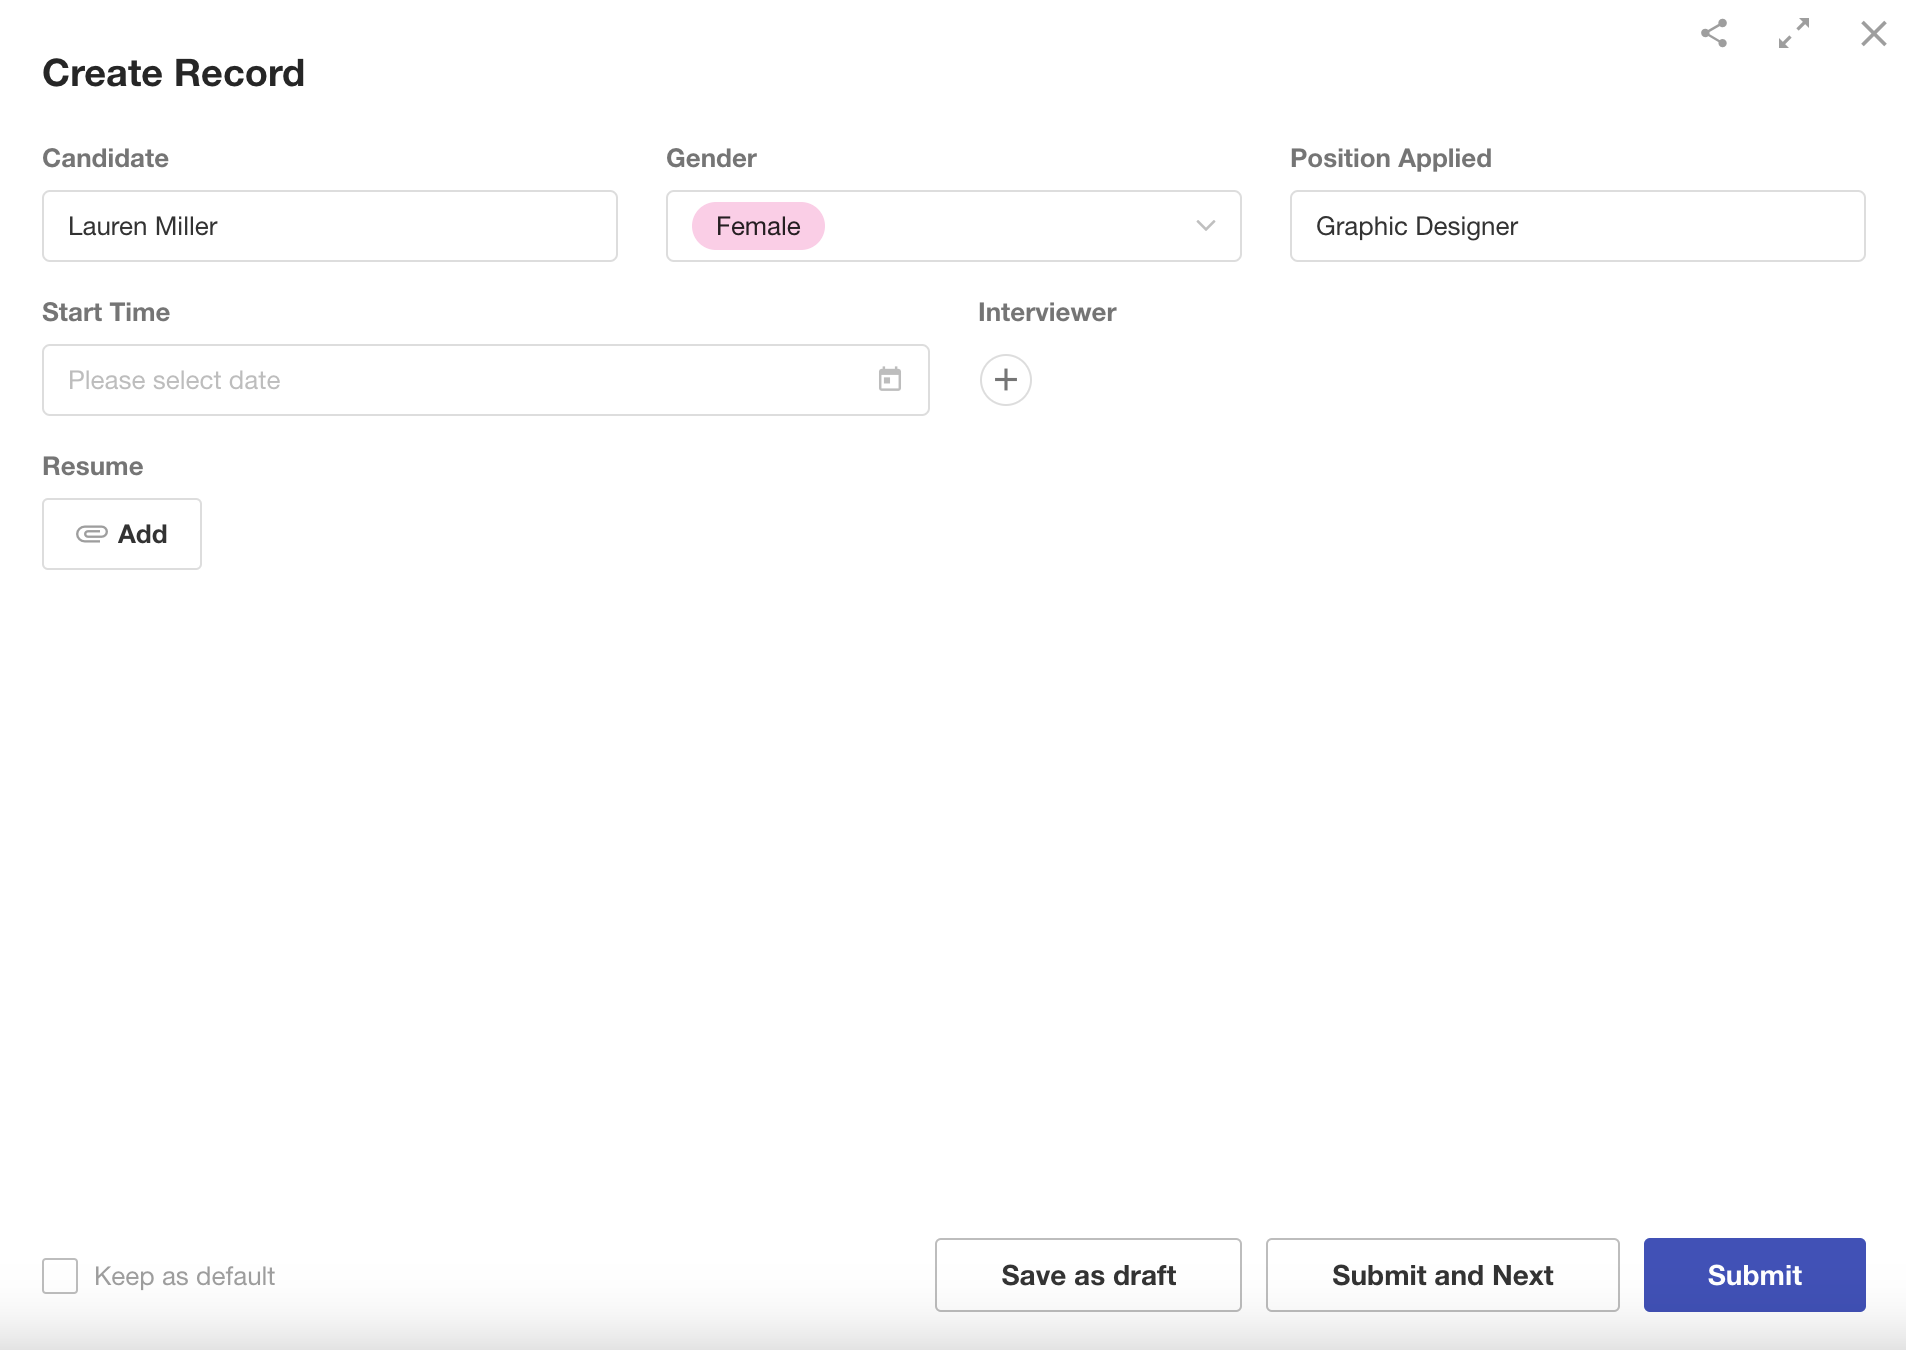
Then, let's try creating an interview record.
2.3 Relate worksheets
When creating the interview record, you may have noticed that Lauren Miller's basic information already exists in the worksheet Candidate. Can we use this information directly when scheduling the interviews to avoid duplicate entries? The answer is yes! This is, in fact, the most reasonable design choice.
1) Add the Relationship control
Go to the editing page of worksheet Interview, select the [Relationship] control, and relate the current worksheet to the worksheet Candidate.
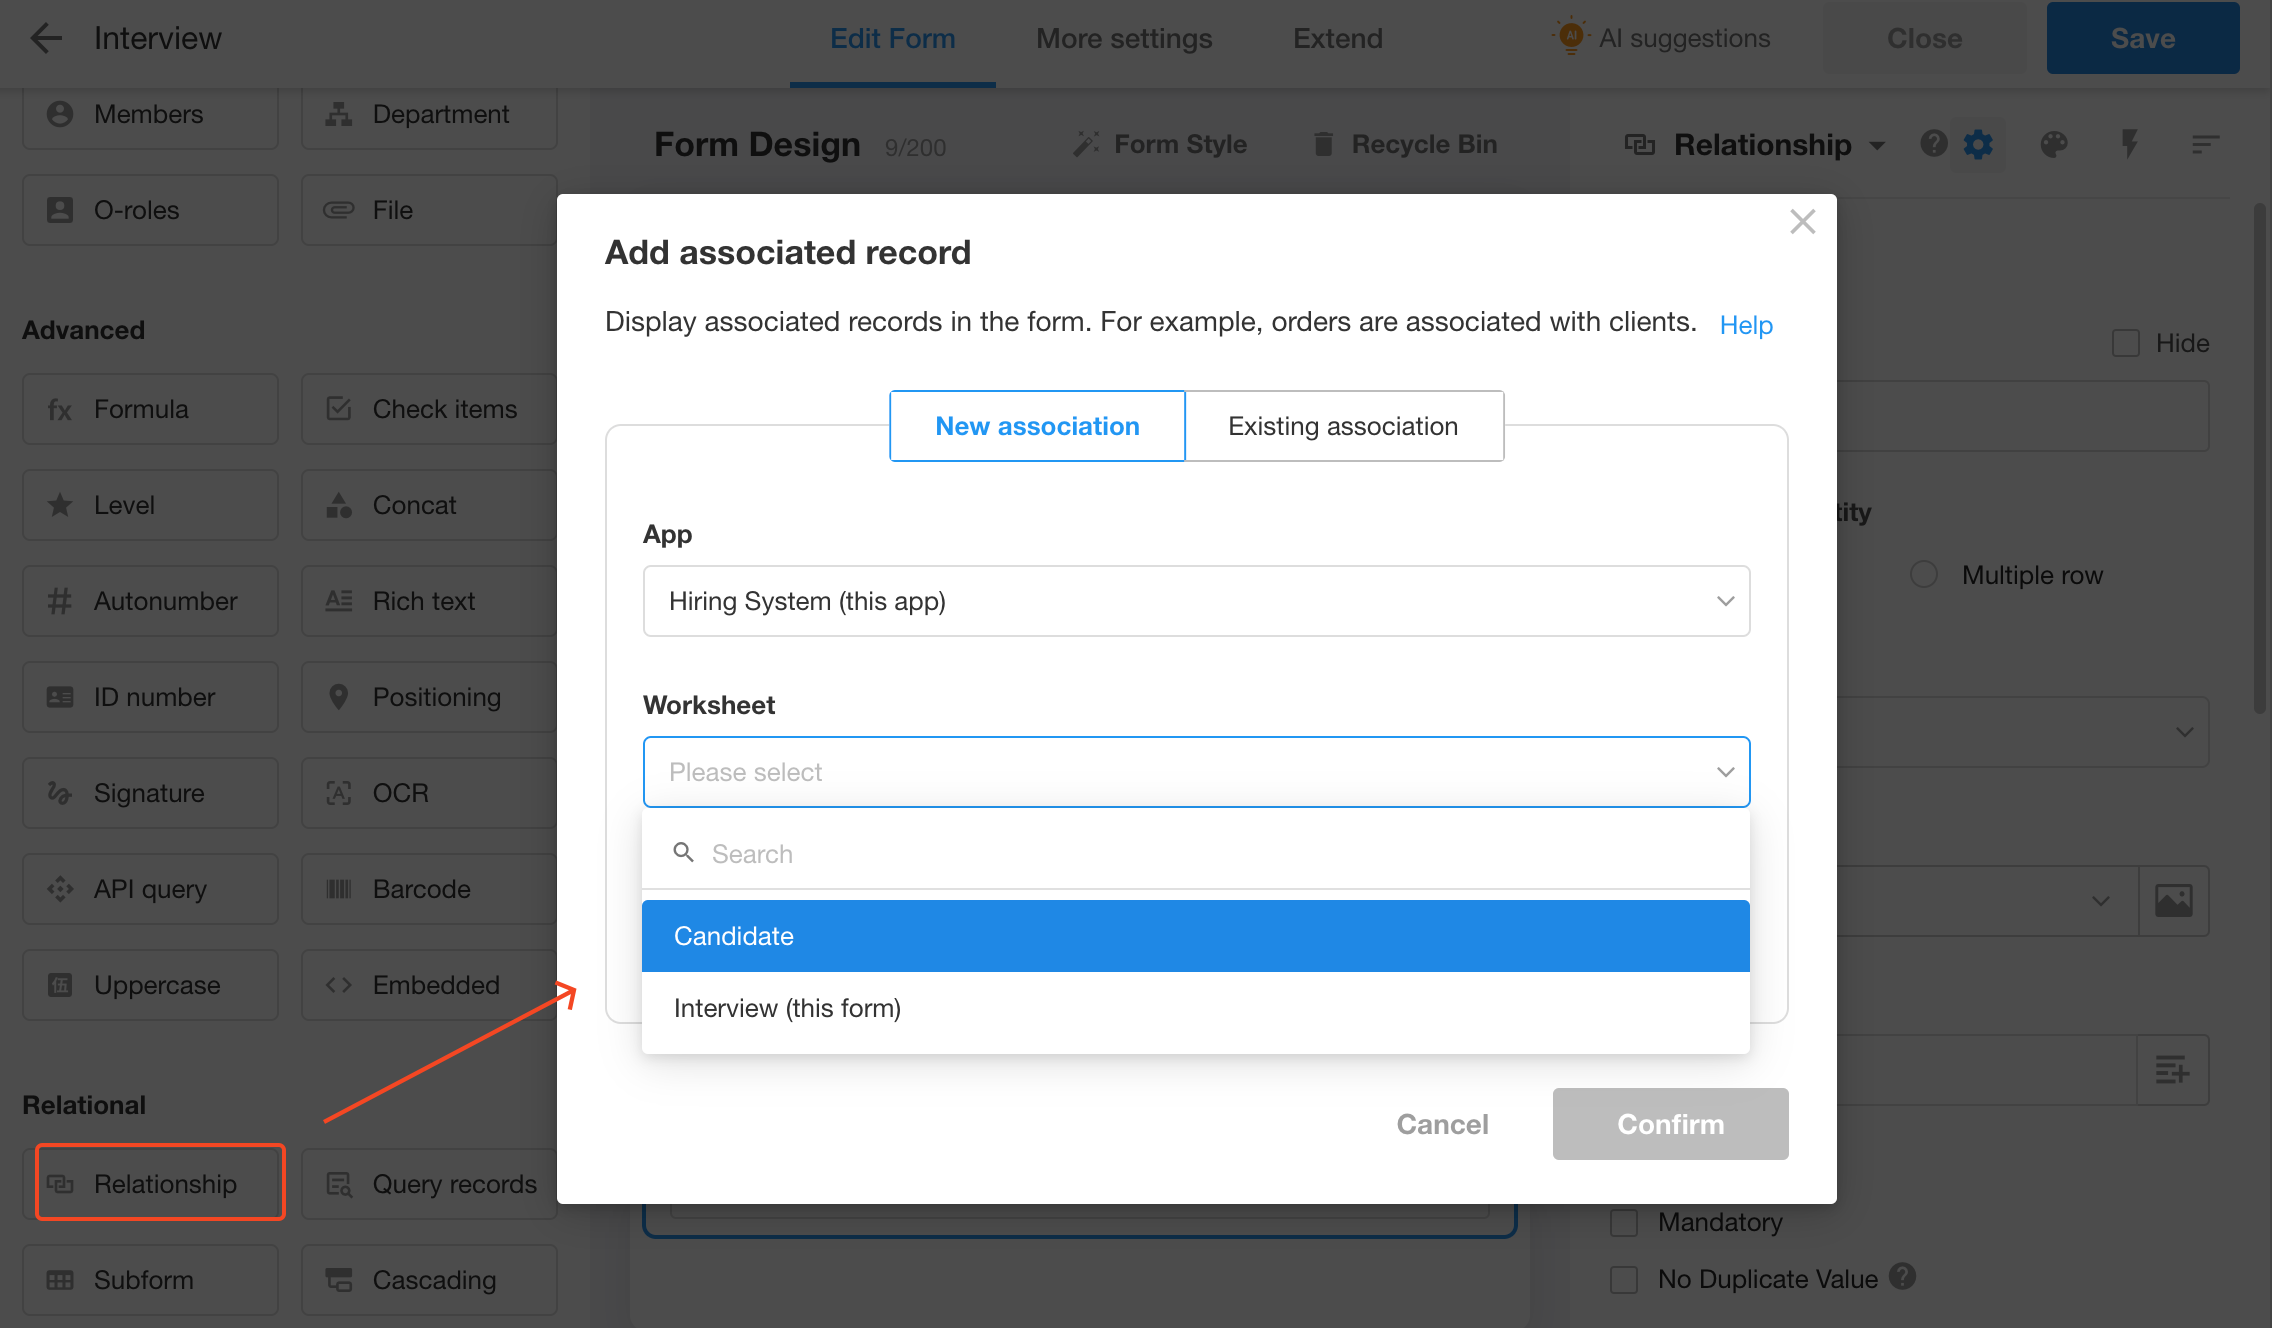
2) [Relationship quantity]
Relationship quantity determines if multiple candidates can be related to one interview. In this case, there should be only one candidate for each interview. Thus, here check [Single row], which means you can relate one candidate if necessary.
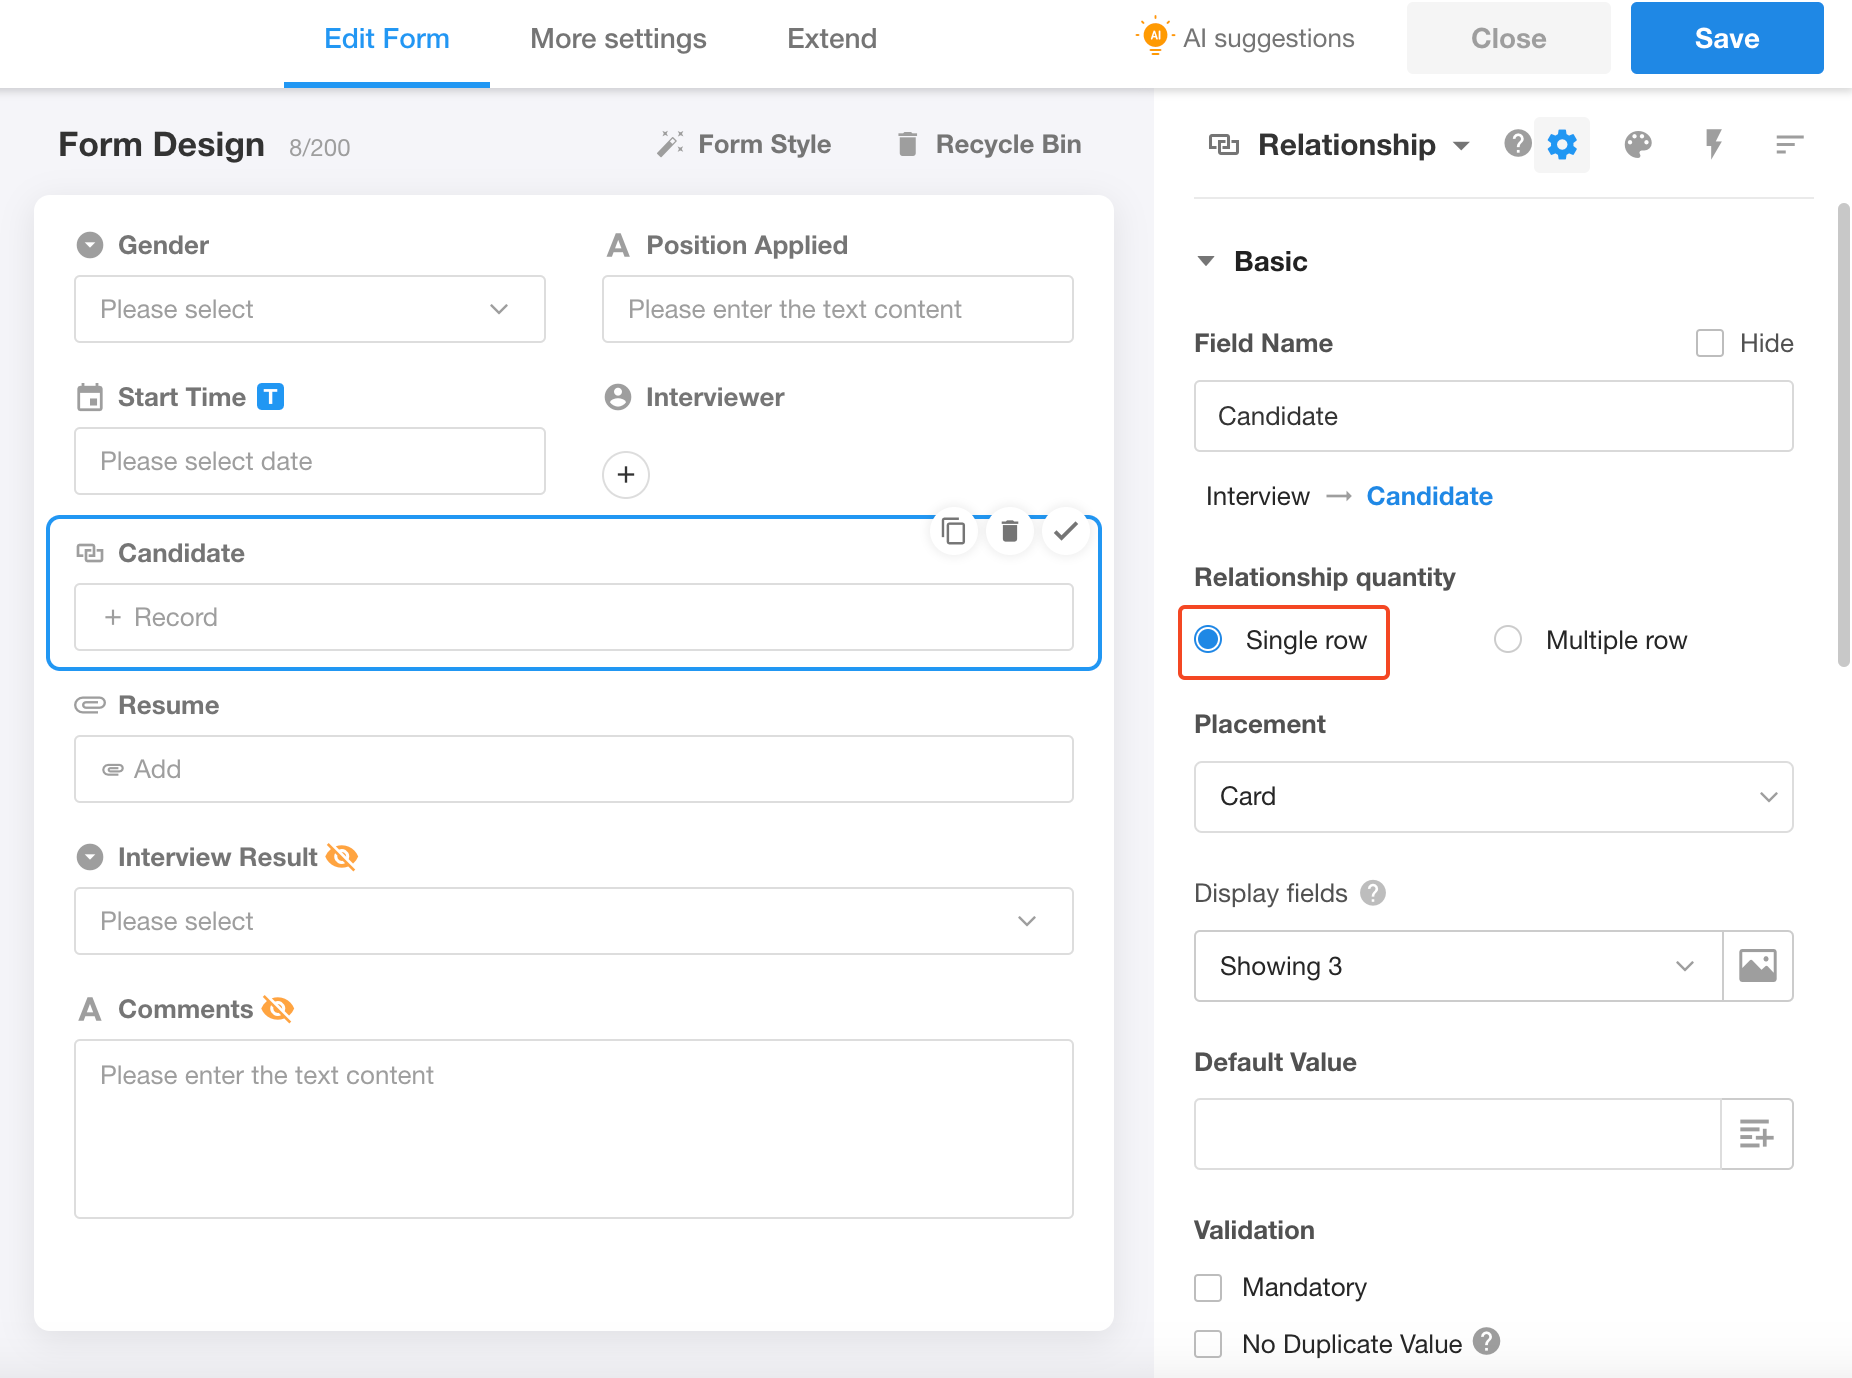
But on the contrary, when to relate the worksheet Interview on the editing page of the worksheet Candidate, the relationship quantity should be [Multiple row], that is a job candidate can be scheduled for more than one interviews.
Or you can directly check [Bi-directional relationship].
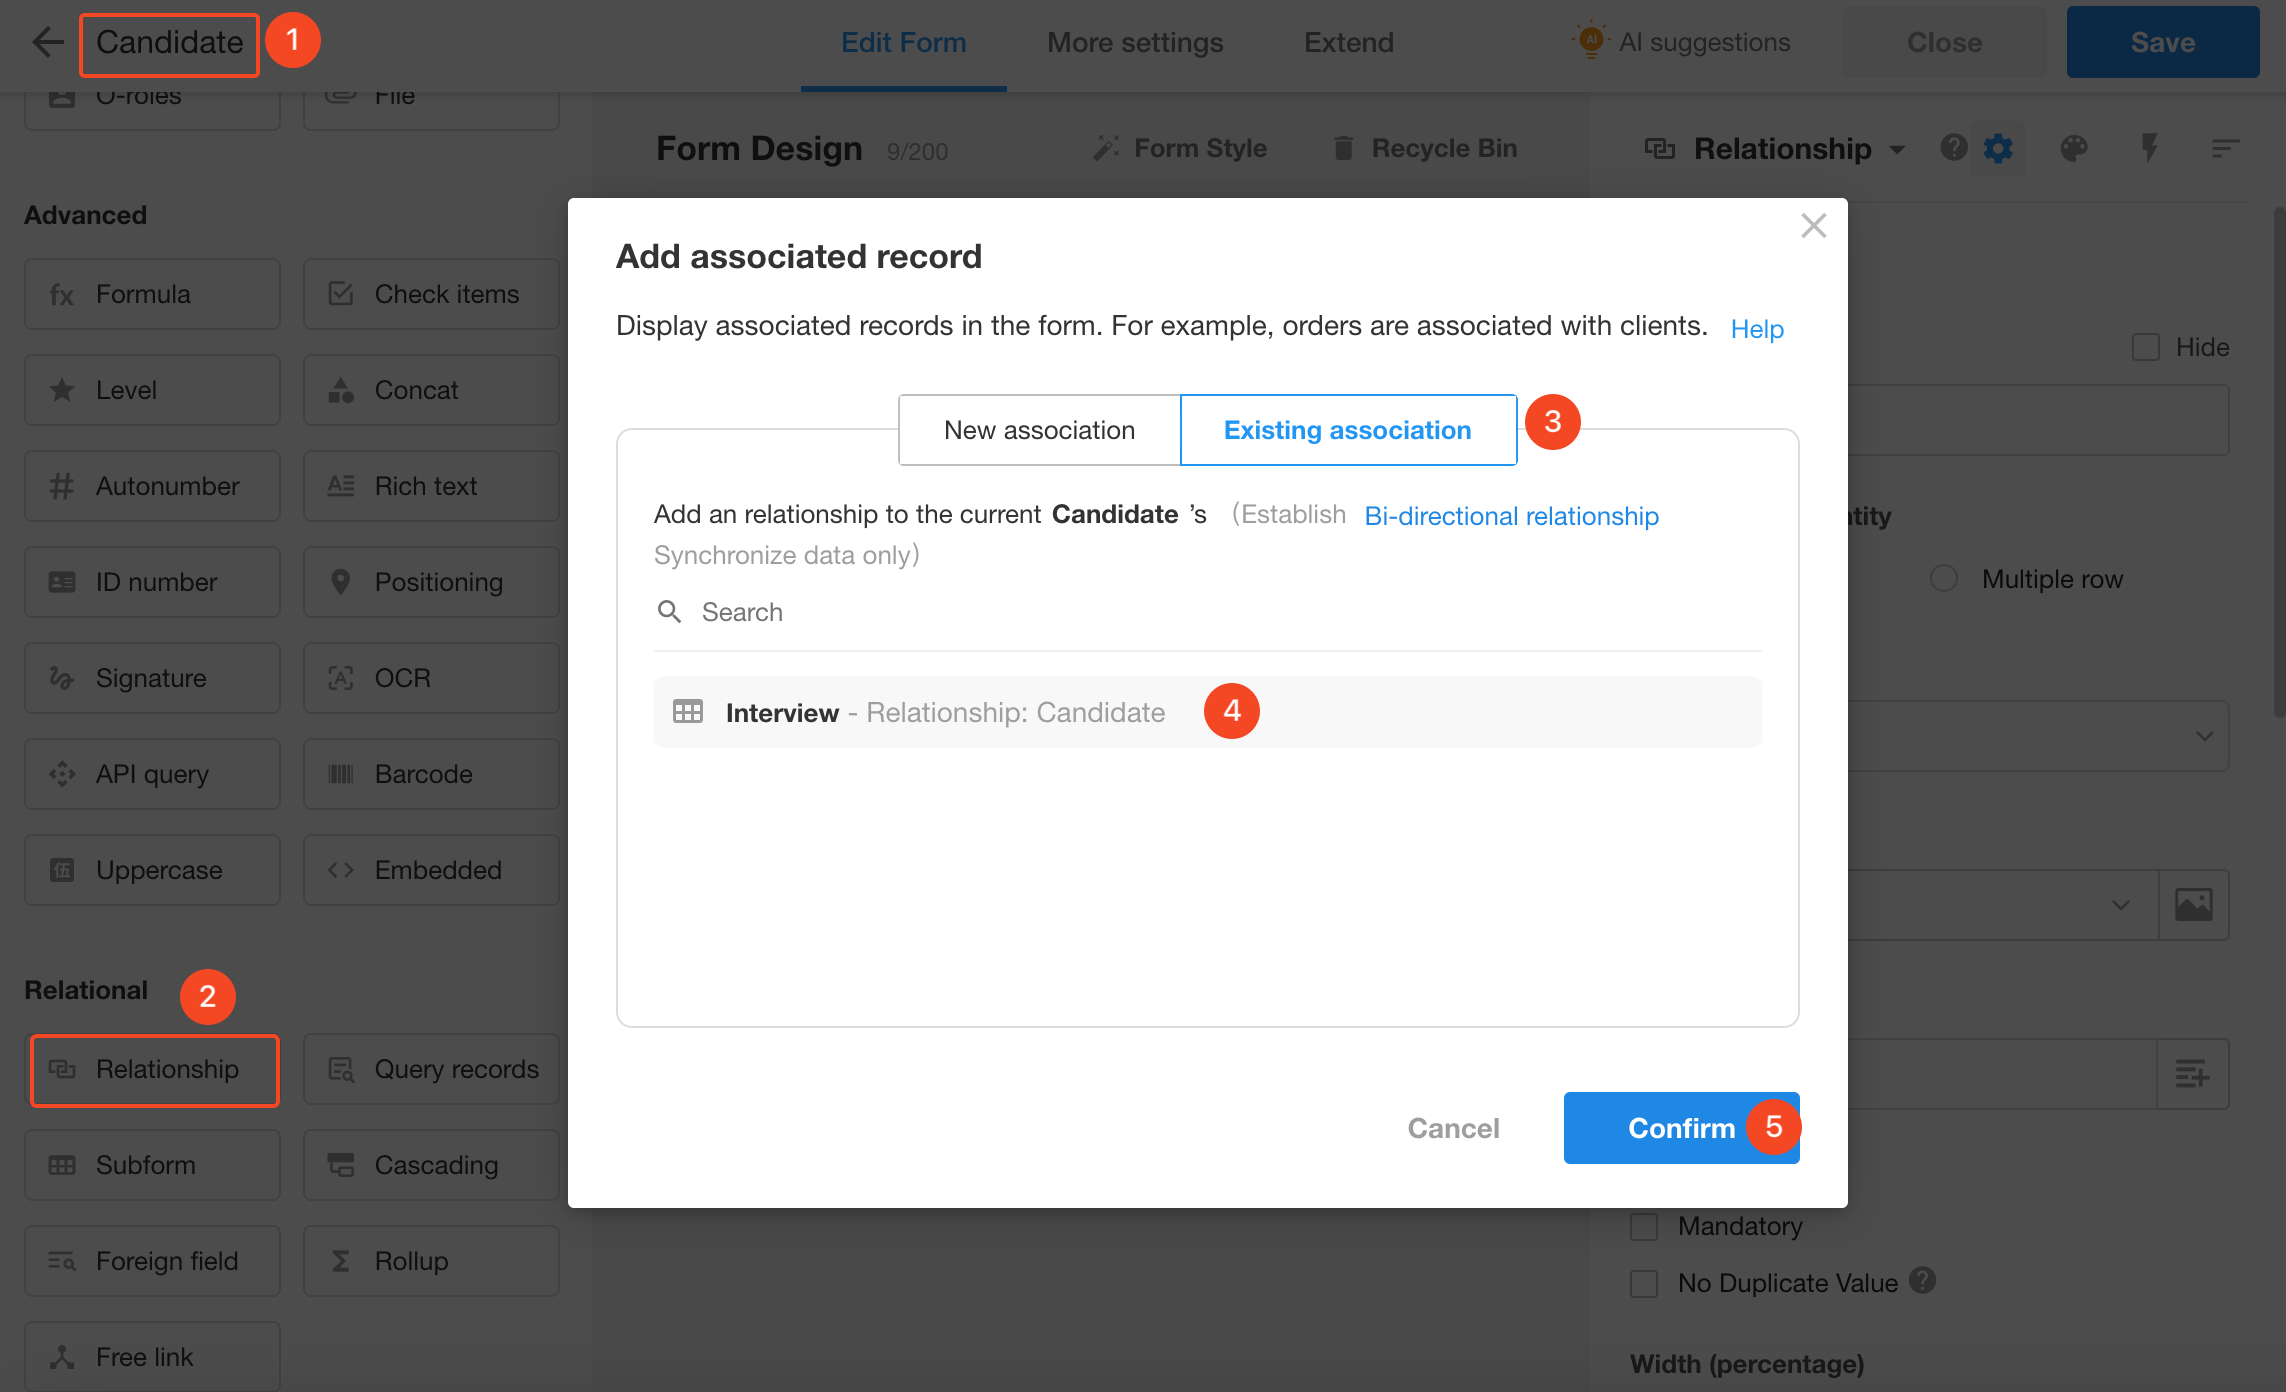
At this point, the text field of the candidate is no longer necessary, just delete it.
Now, let's try again creating an interview record. As shown below, we can select the candidate record directly.
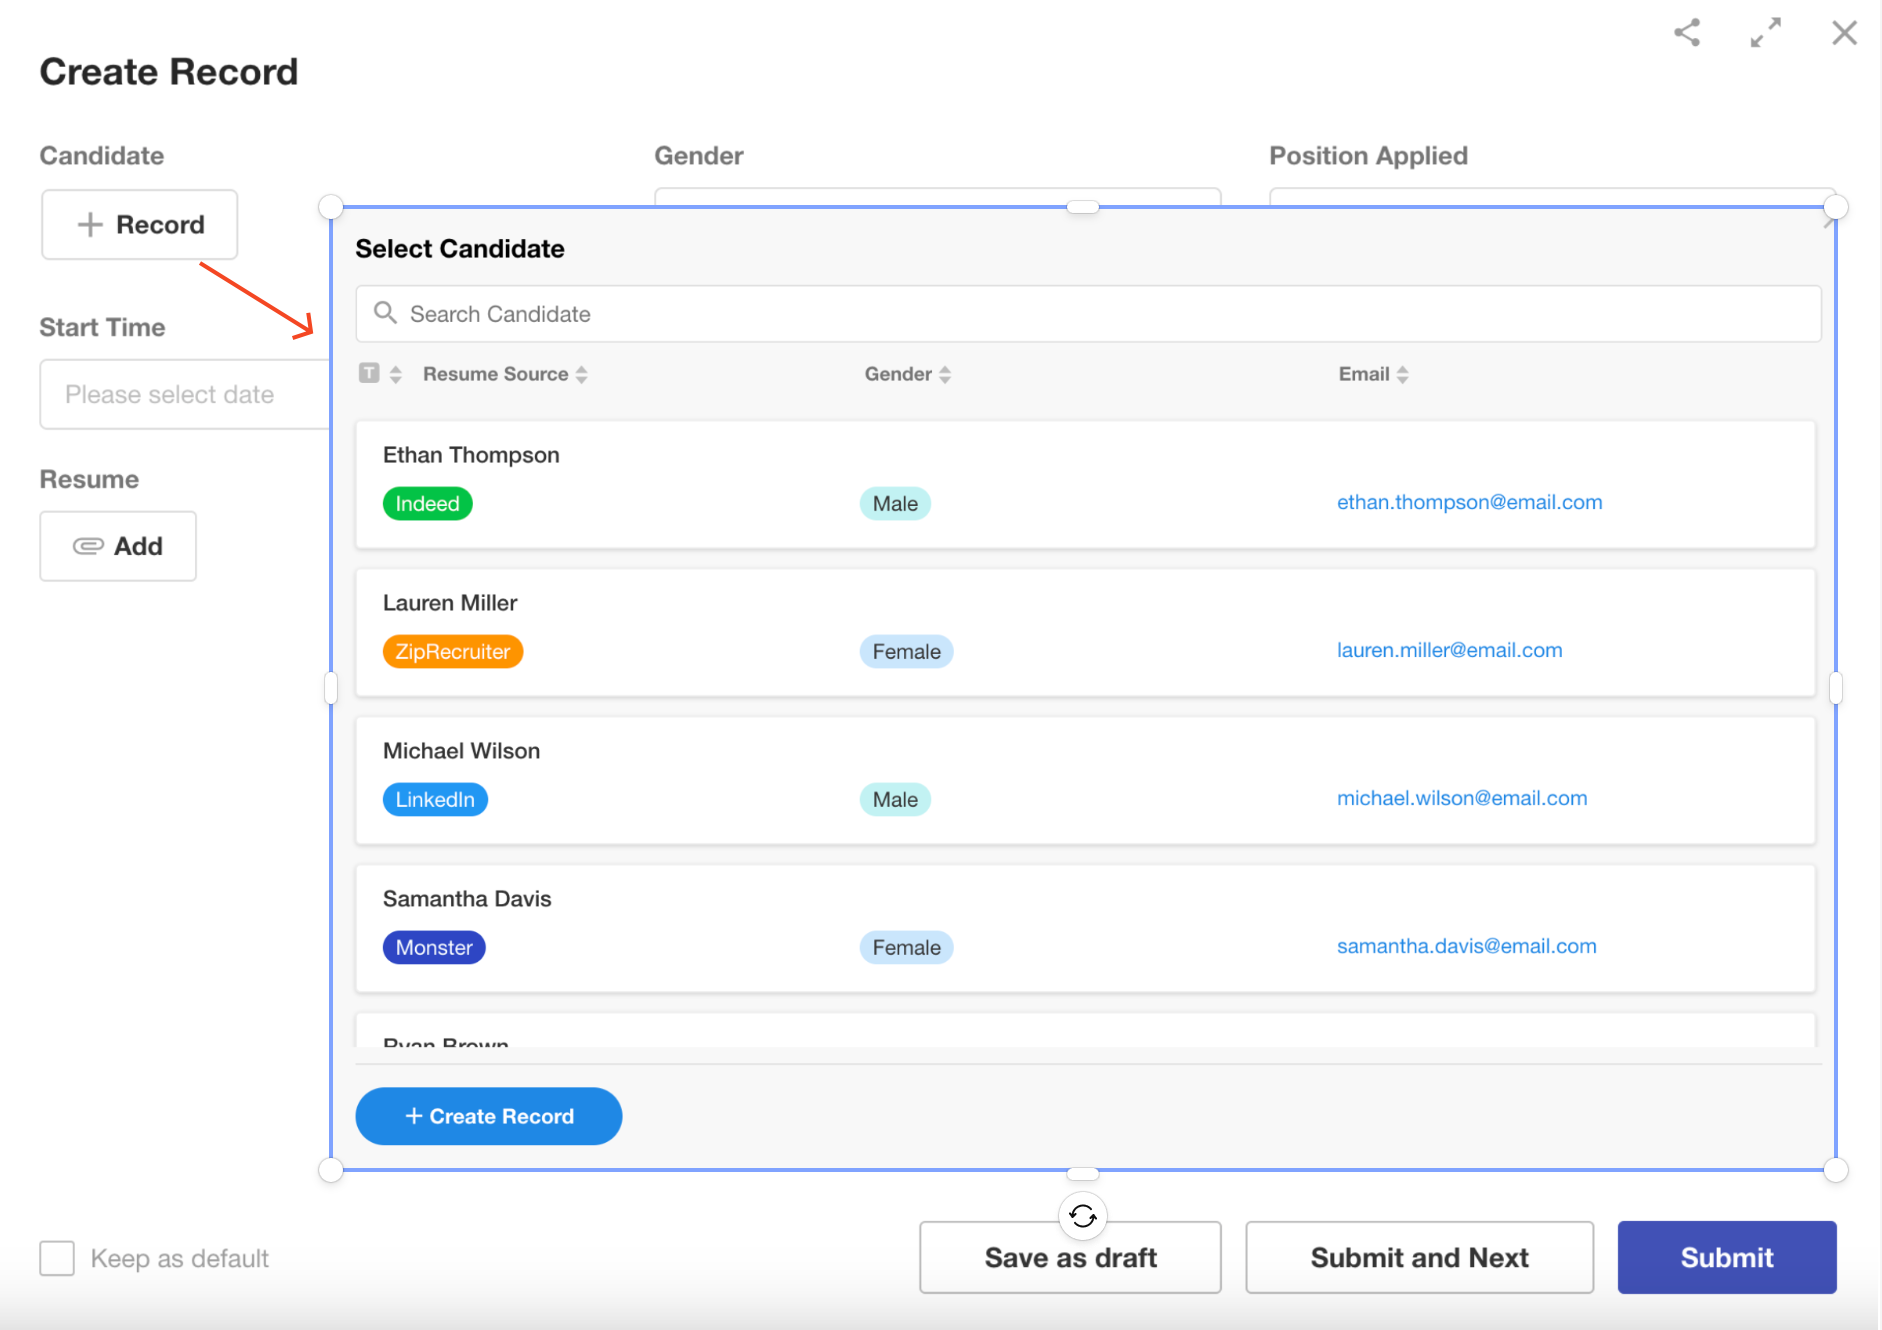
When relating worksheets, whether to select [Single row] or [Multiple row] depends on the relationship between business objects. Later you can go to read the corresponding section to learn more about these three kinds of relationships in our help documentation.
3) [Foreign field]
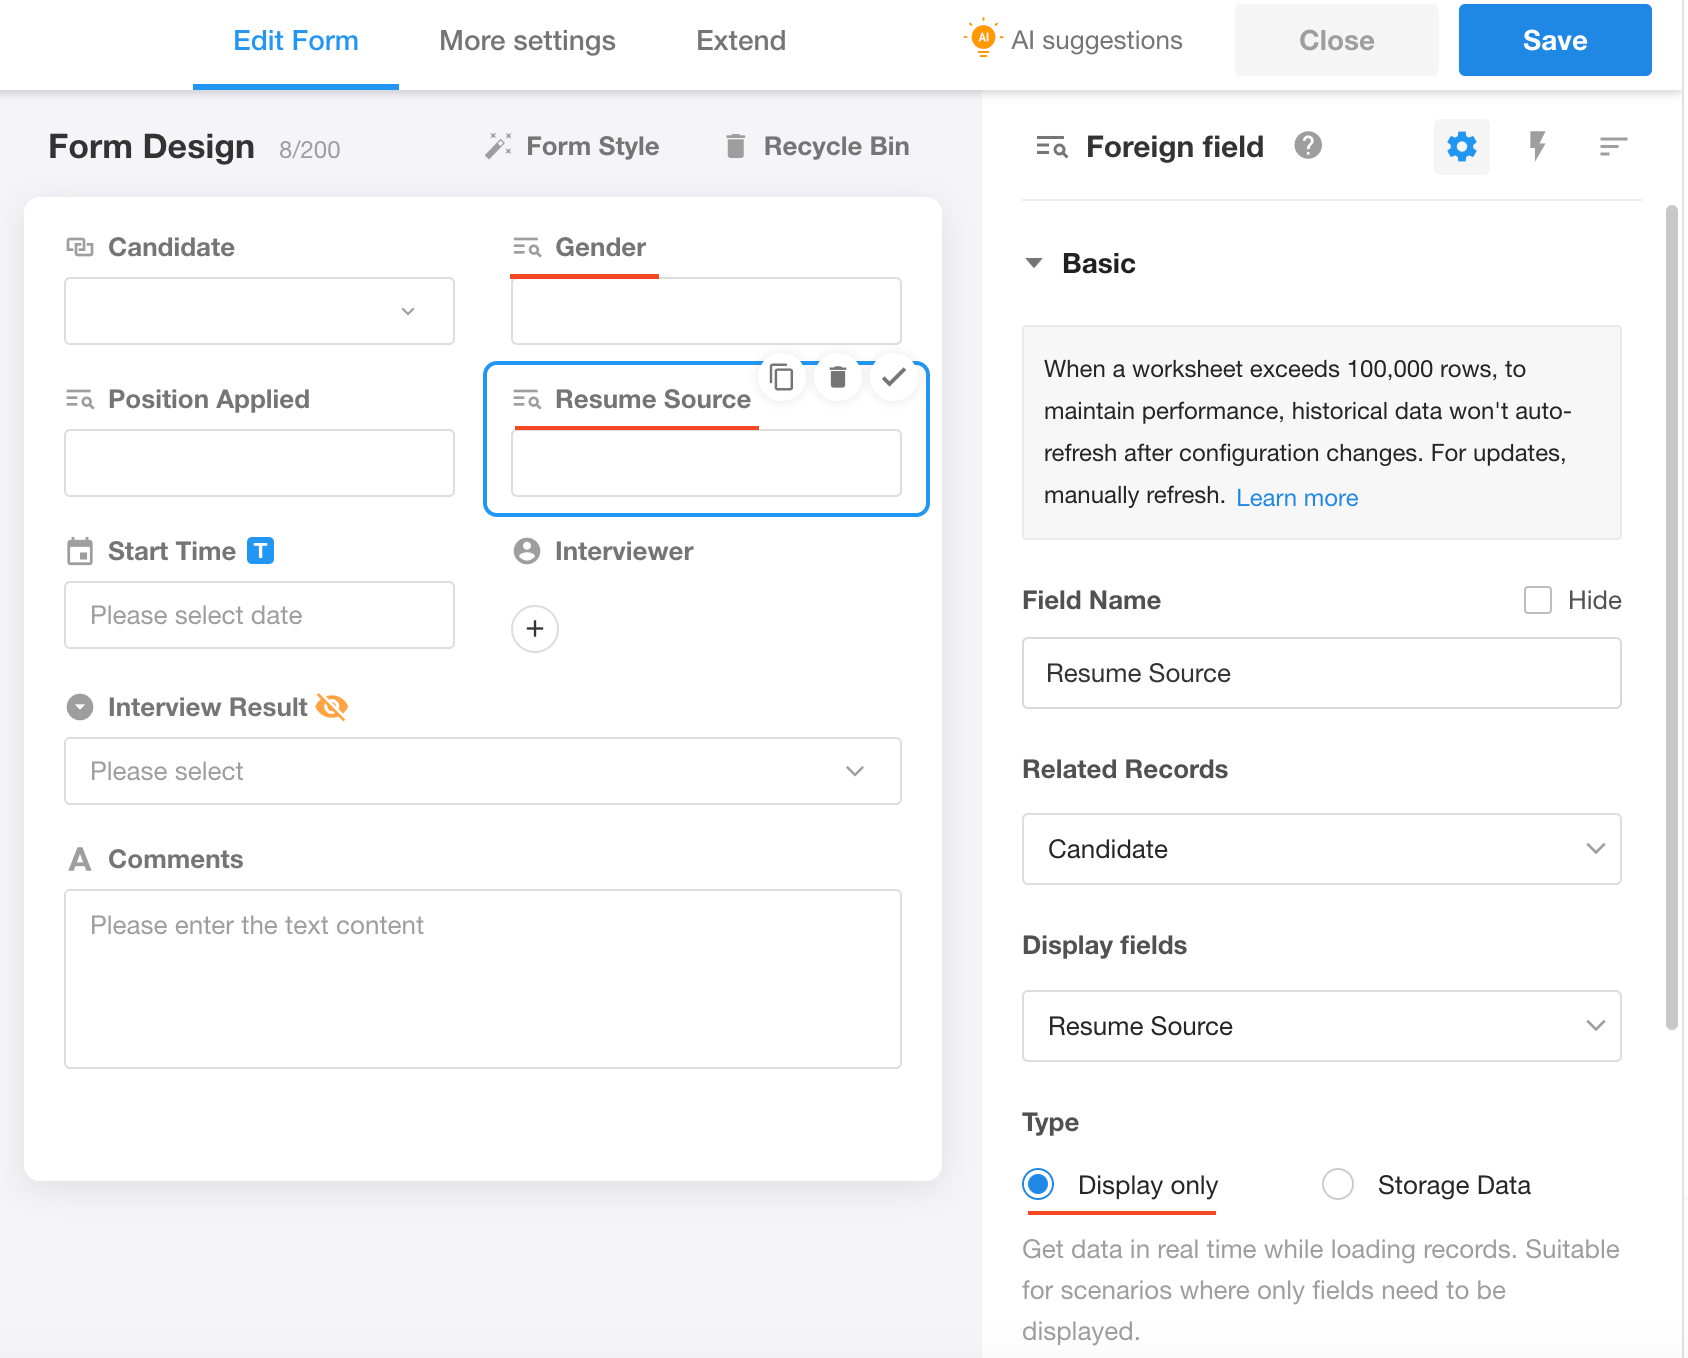
Previously we have related the worksheet Interview to worksheet Candidate, and the candidate can be directly selected from the existing data. For convenience, we can add the [Foreign field] control, which literally means that the fields in other worksheets can be displayed in your current worksheet, to display the gender, position, or resume source information.
As shown below, we add the foreign field to directly display the applied position of the related cadidate.
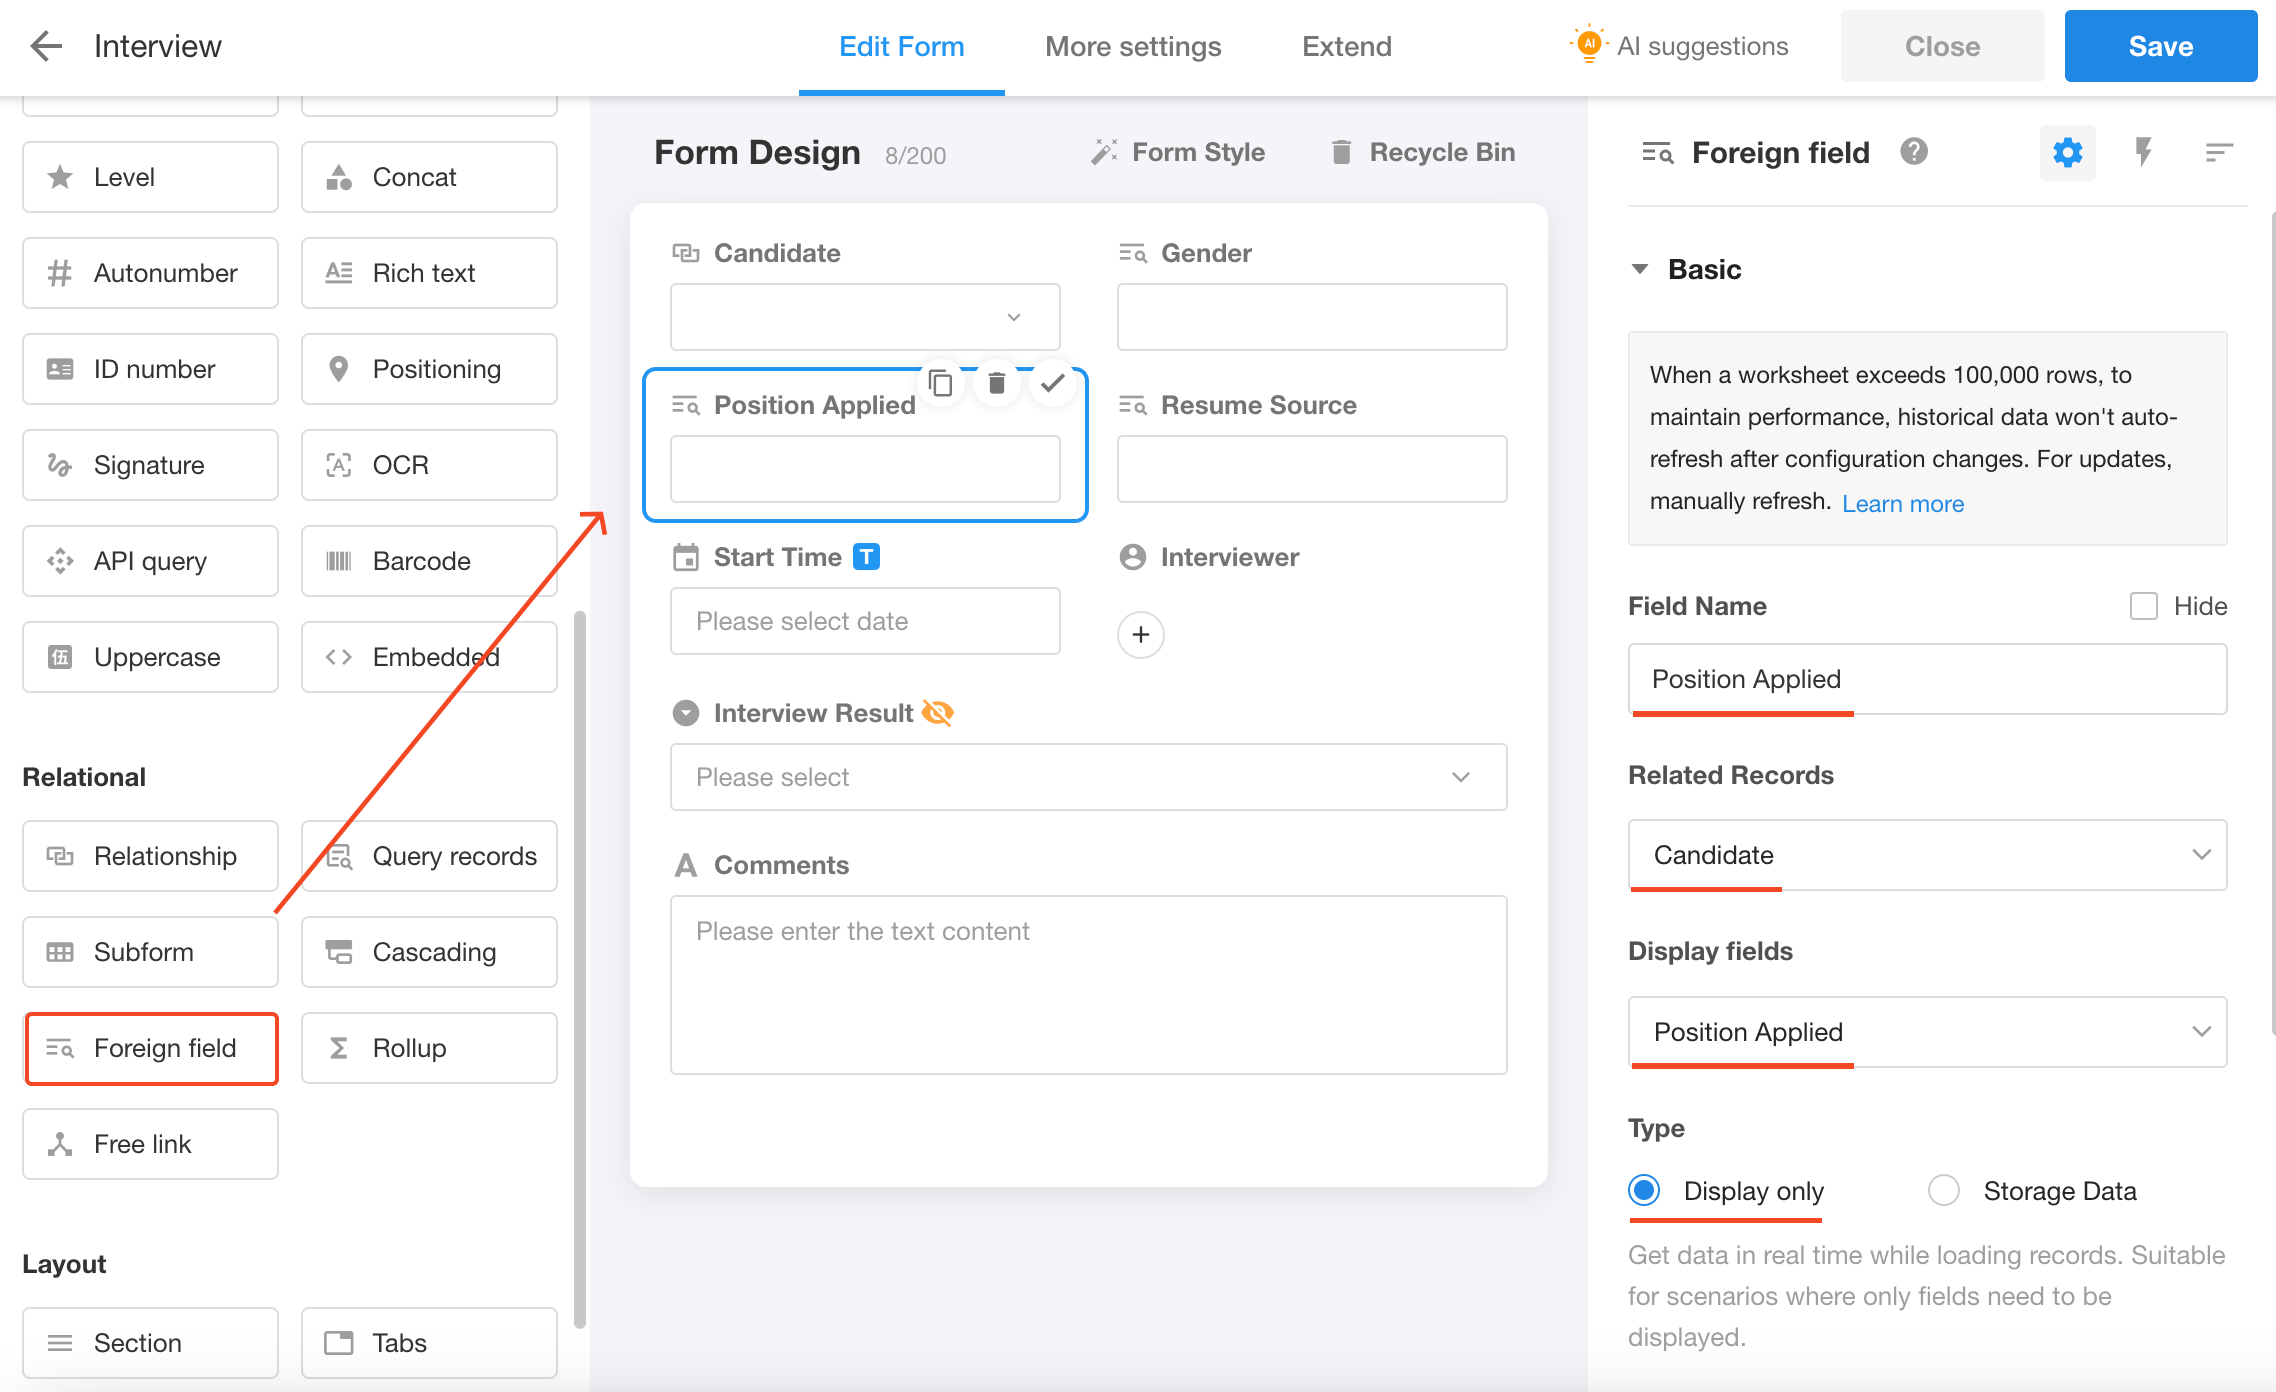
Select the [Foreign field] control, and configure it on the right side to ensure information is clear and accurate.
- Field name: Applied position
- Related records: Related to Candidate
- Display fields: Applied position
- Type: Display only for viewing the latest data; Storage data for further operation like searching, filtering, etc.
Similarly, the field gender and resume source can also be displayed in this interview worksheet.
4) Set the title field
The title field is usually identifiable and unique, identifying the main content of a record. Without a title field, the form cannot be saved.
In the candidate worksheet, we can set fields such as name, phone number, and email as title fields, but we generally differentiate between different candidates by name. In the interview worksheet, we can also set the candidate or applied position as the title field, but it is better to use a combination of name and applied position as the title field, like Lauren Miller-Graphic Designer.
Add a [Concat] field, which combines the candidate and applied position, and then set it as the title field.
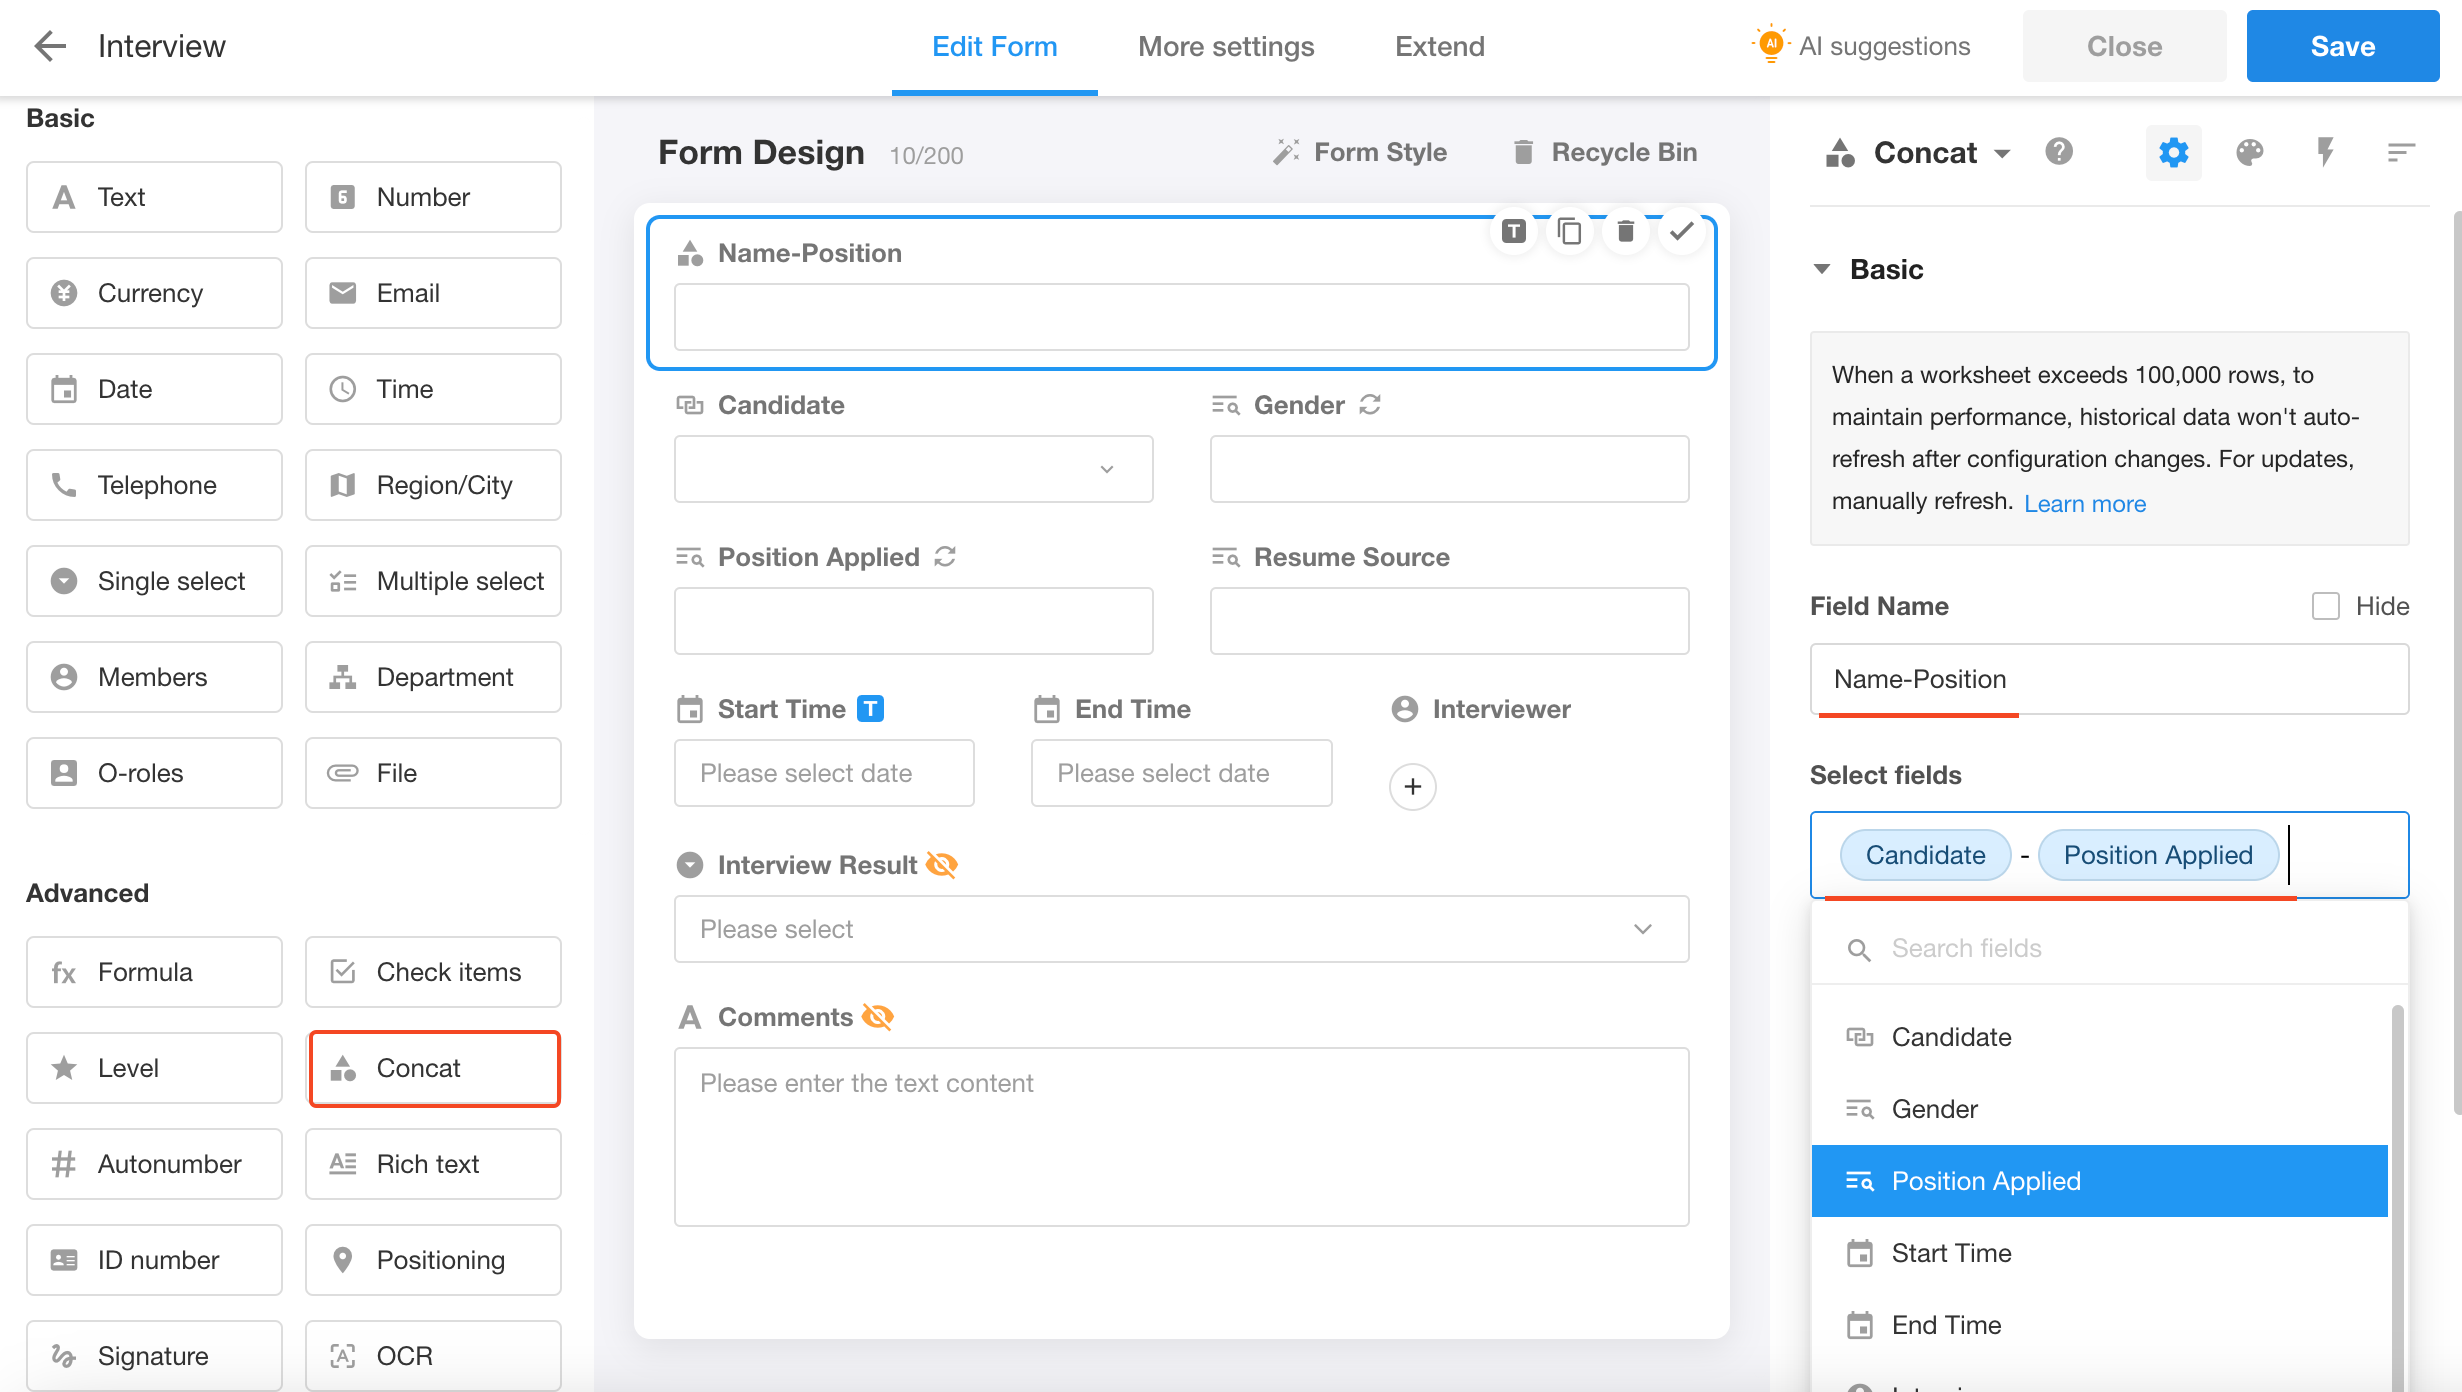
The fields set in the interview worksheet are shown as below.
| Field | Control | Note |
|---|---|---|
| Title | Concat | Name-Position |
| Candidate | Relationship | Single row |
| Gender | Foreign field | Storage data |
| Applied position | Foreign field | Storage data |
| Interviewer | Members | |
| Start time | Date | |
| End time | Date | |
| Resume source | Foreign field | Display only |
| Comments | Text | |
| Result | Single select |
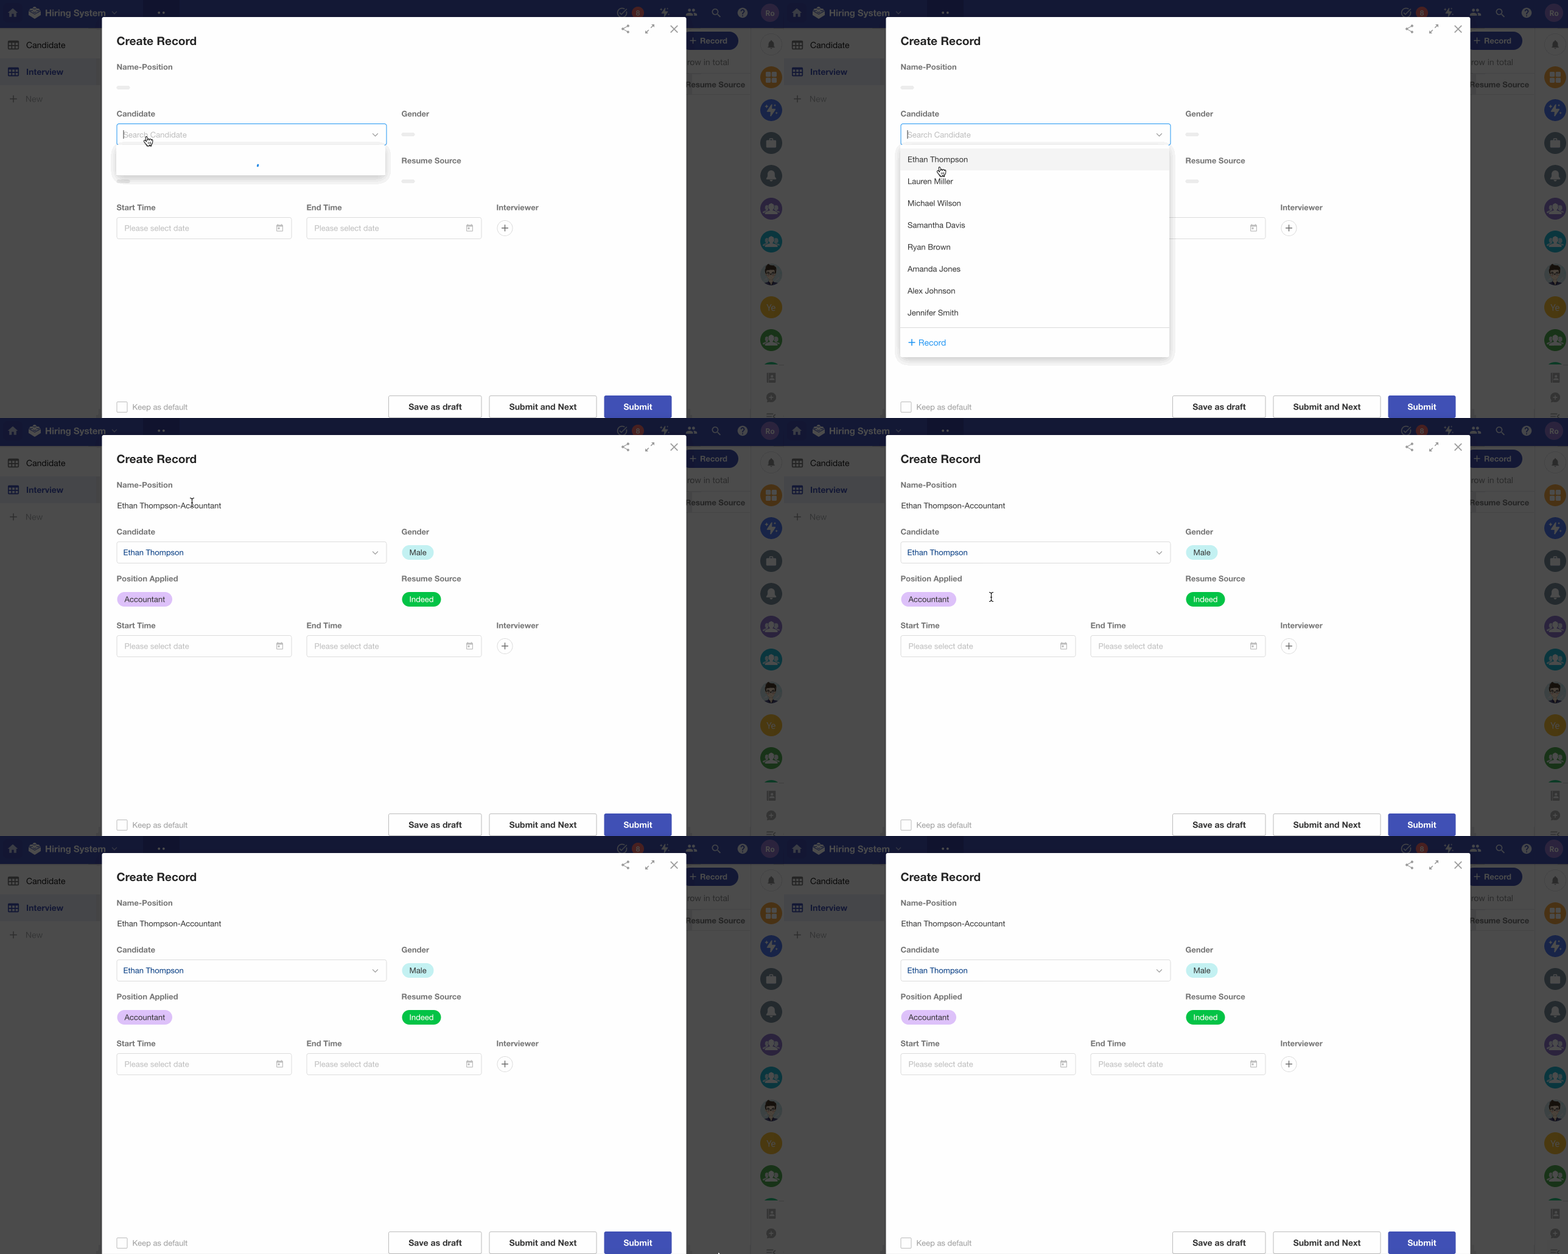
Here is the improved form settings.
3. Create views
When managing business data, there are times when it is necessary to view certain data. For example, when dealing with candidates, it may be necessary to classify candidates based on different statuses such as interviewed, offer sent, etc. For interview scheduling, interviewers may only need to view interviews they are involved in; moreover, each interview has a start and end time, and there may be interviews scheduled every day, so displaying the interview schedule through a calendar view makes it easier to manage. Both of these requirements can be addressed through views.
A view is a window that allows users to view and interact with certain business data. It consists of display styles, field displays, data filtering, and default sorting. There are ten types of views in HAP, namely Table, Board, Calendar, Gallery, Org, Gantt, Map, Details, Resources and view plugin. When creating views, you can set the data filter, display order and data field. By default, there is a grid view named [All] in each worksheet, displaying all the data.
3.1 Manage candidates by status
1) Create table views to display candidates in different stages
Create table views to display candidate information based on their status. For example, create a "New" view that only displays candidate records with the status "New", sorted by creation time.
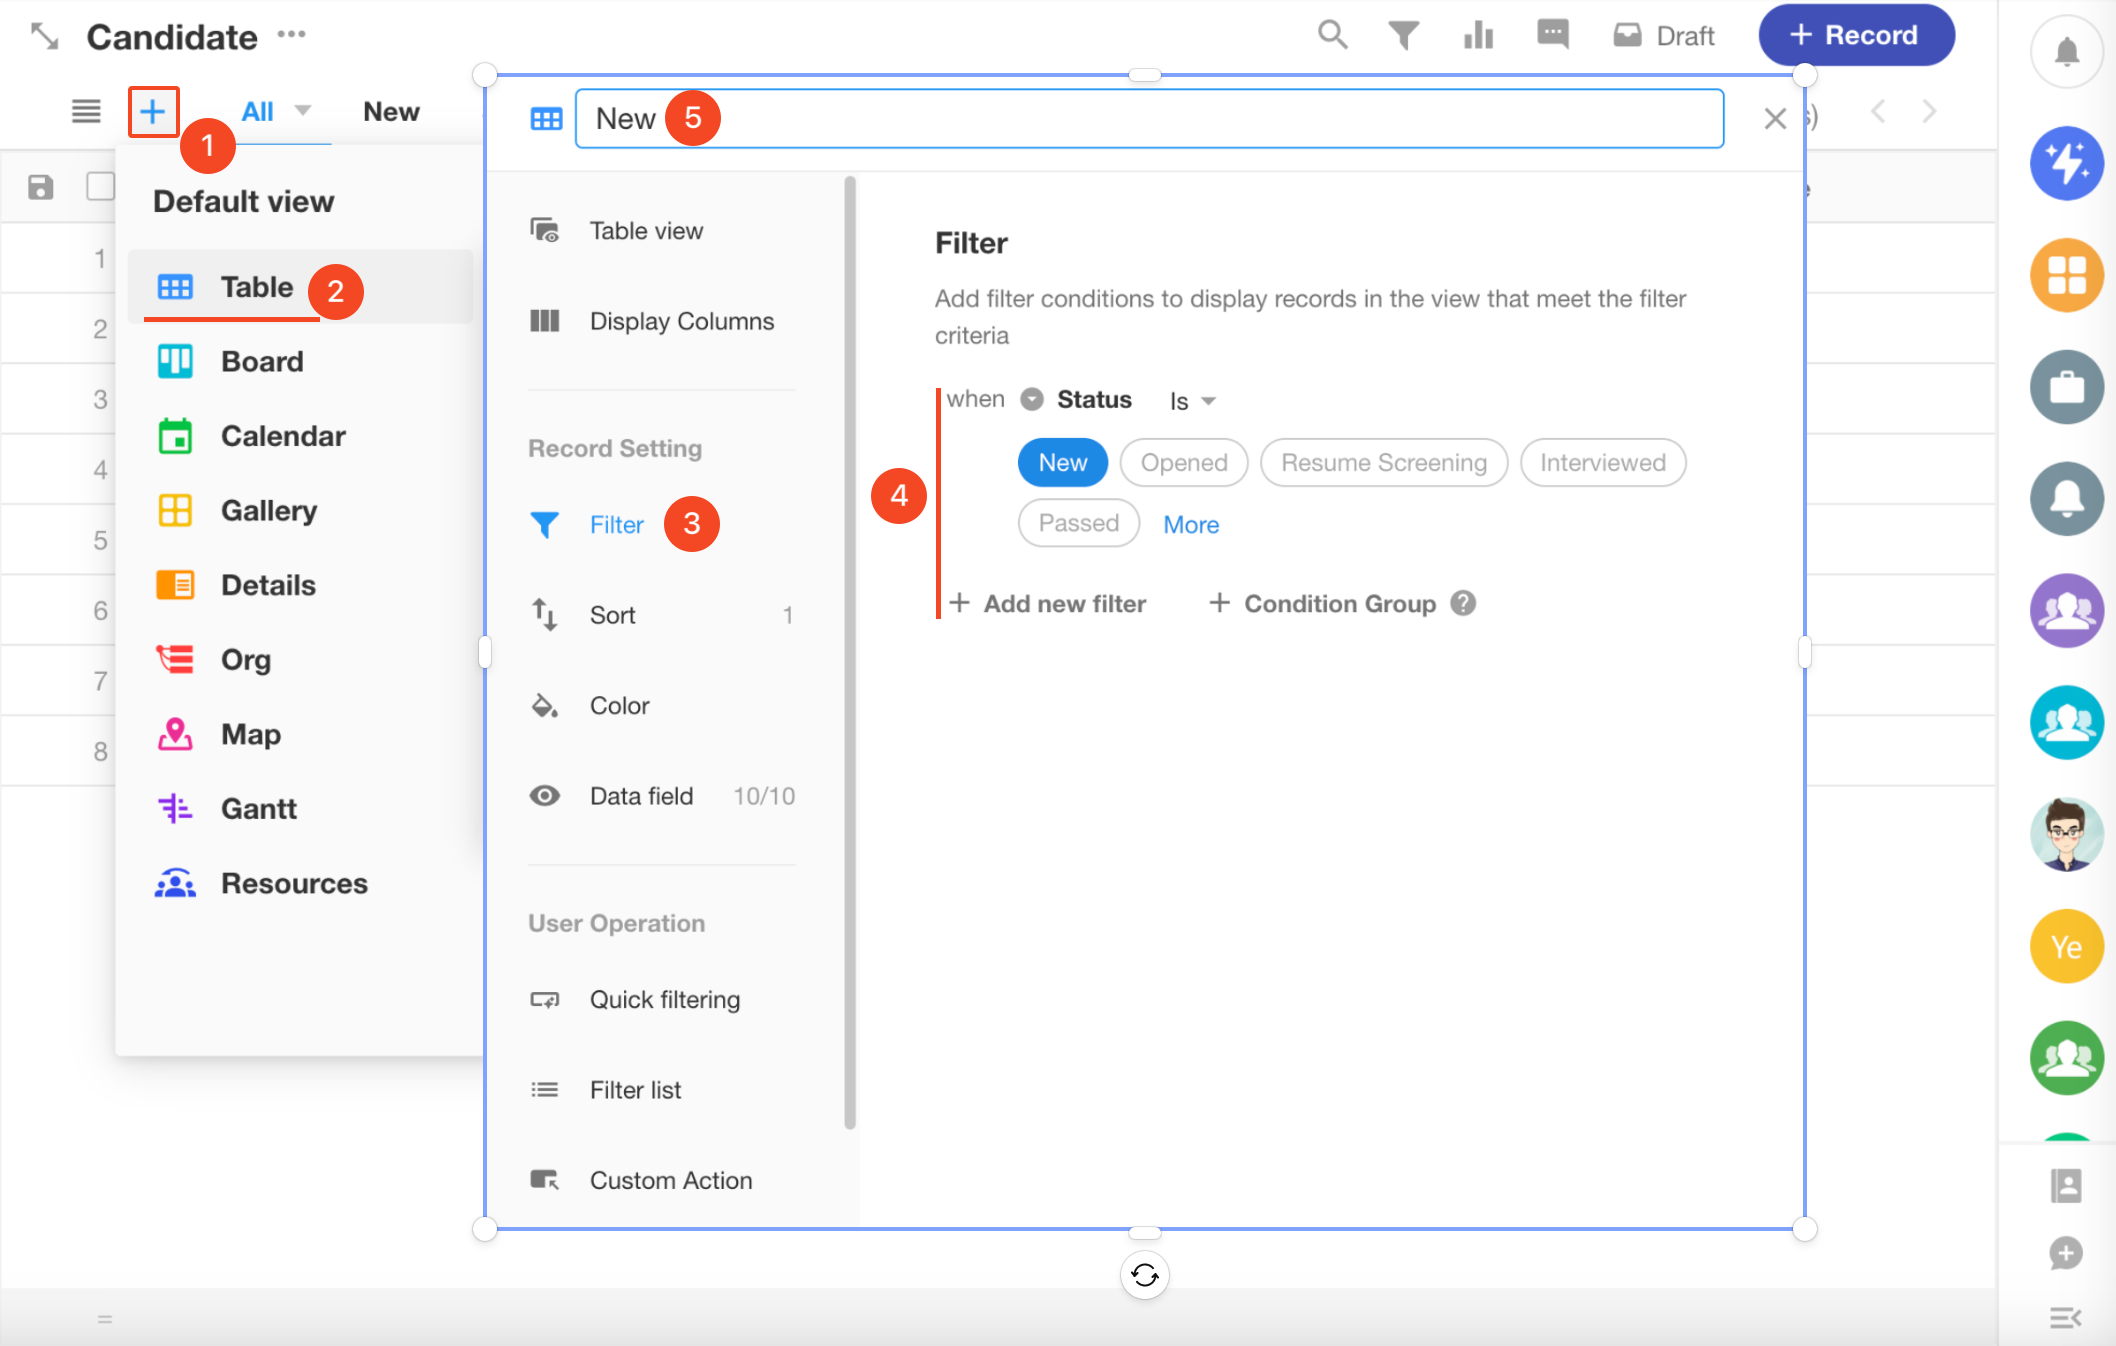

We can create more views in the same way to display candidates in other statuses.

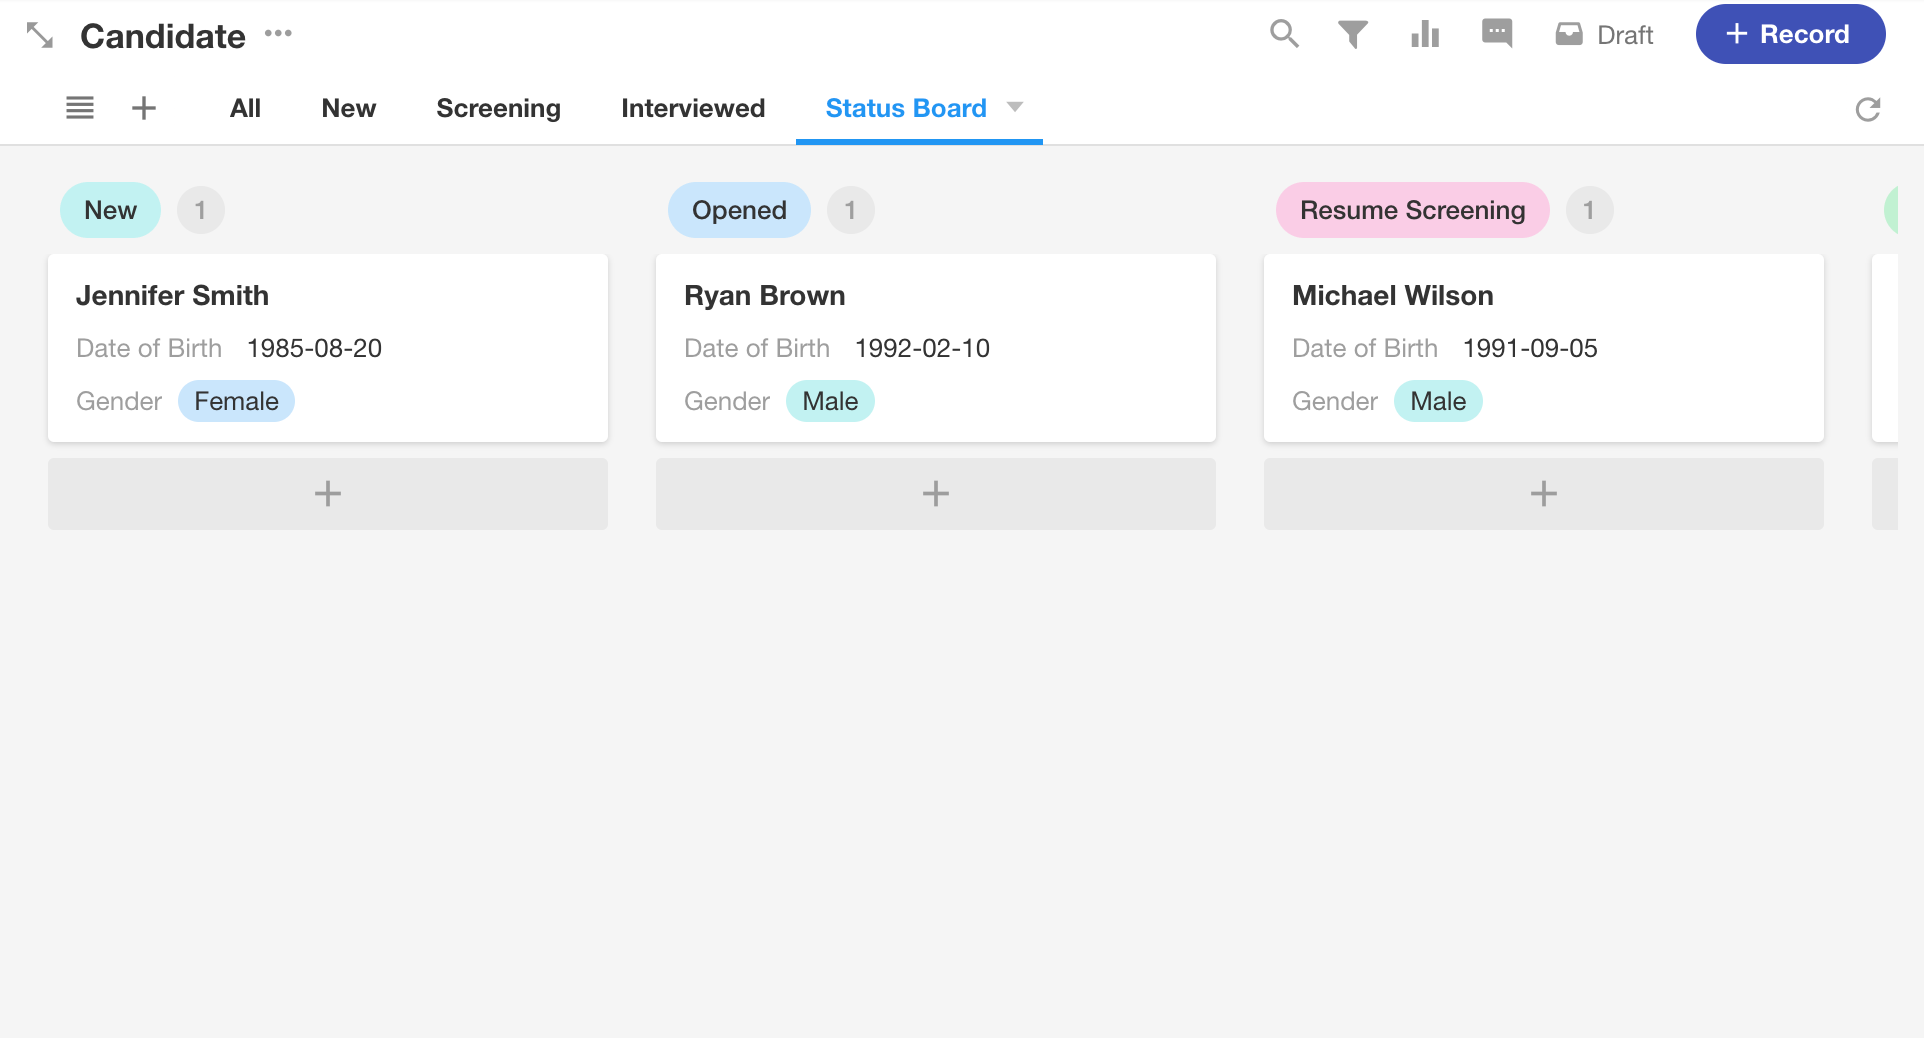
2) Create a board view to display candidates in different stages
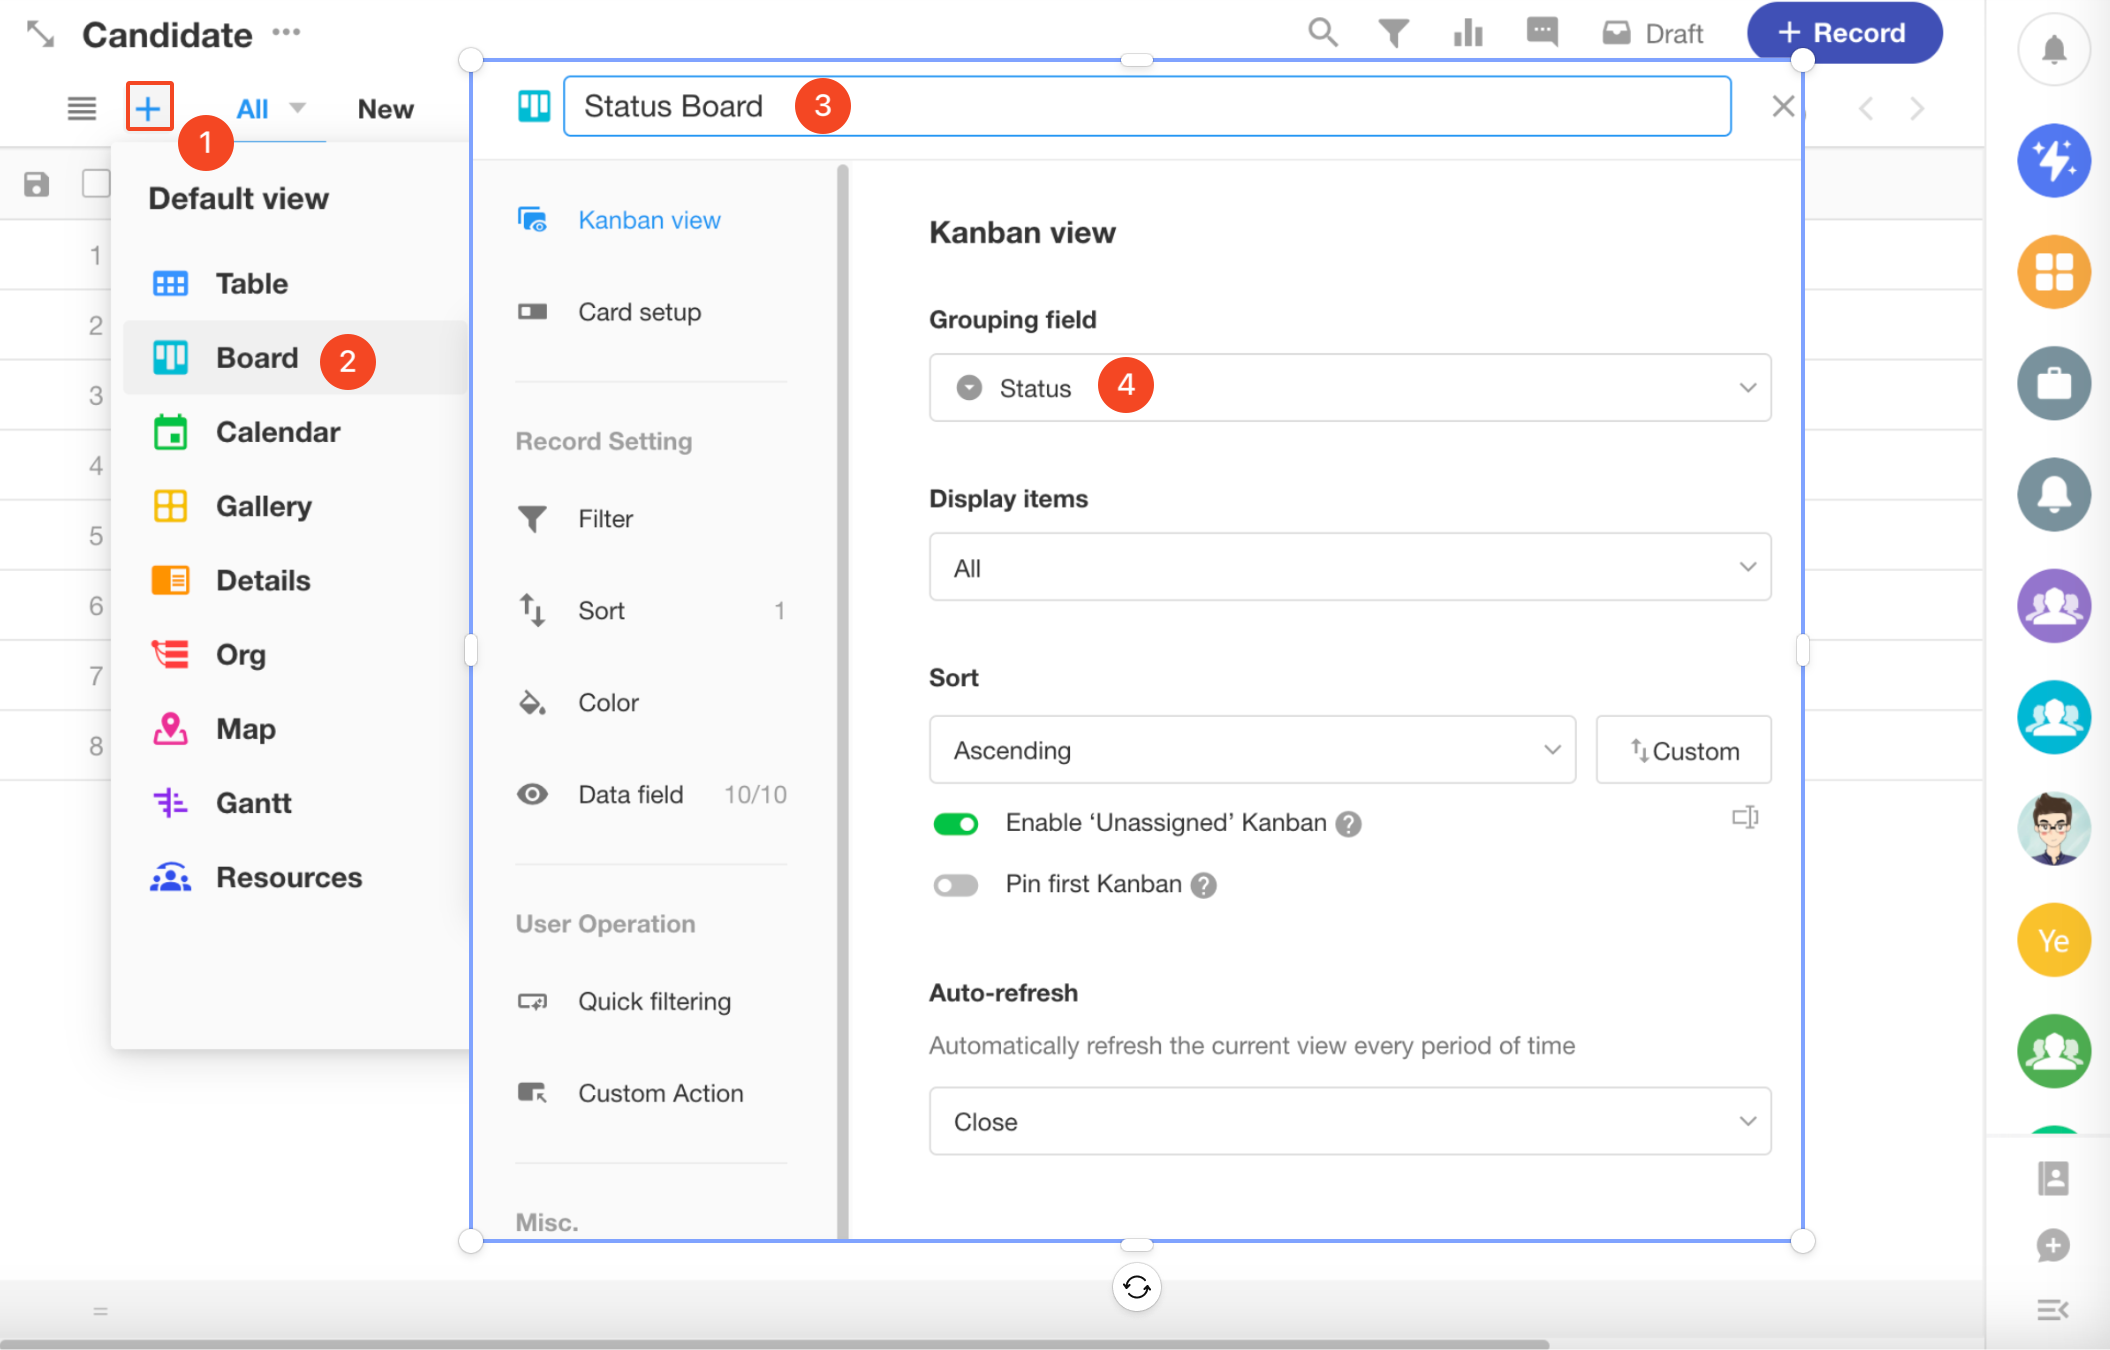
In this board view, data filtering is not needed. It displays all candidate records, grouped by different stages.
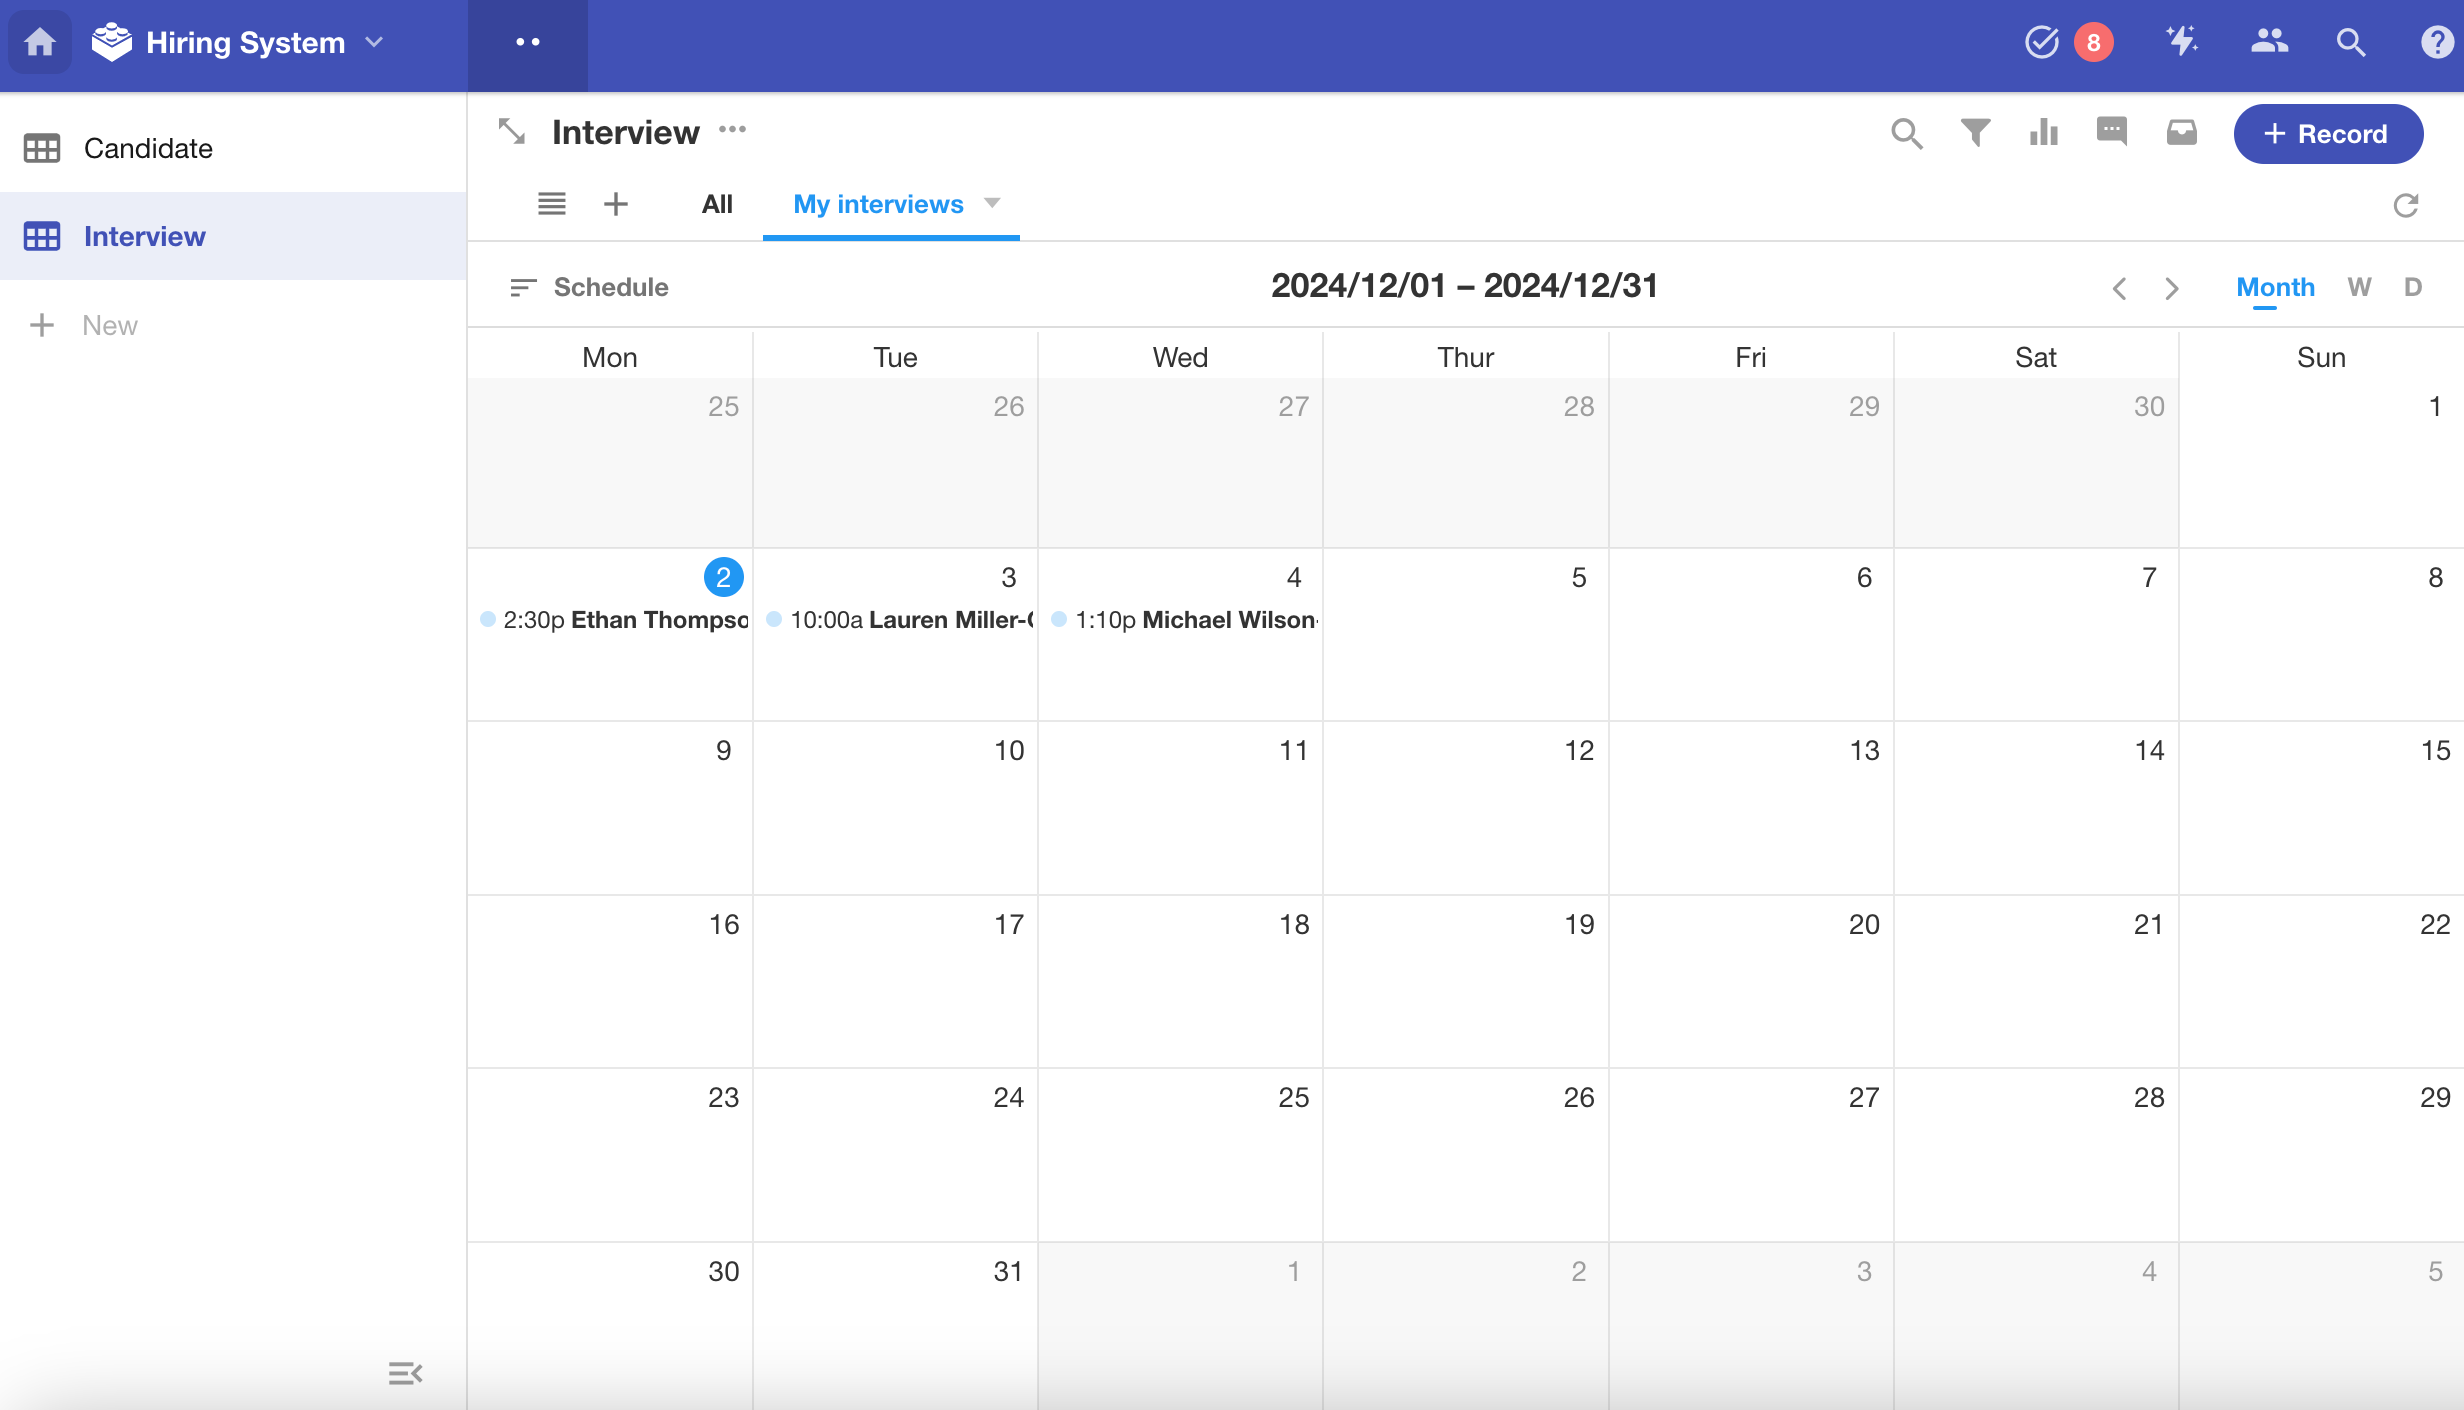
3.2 Create a calendar view to display interview schedules
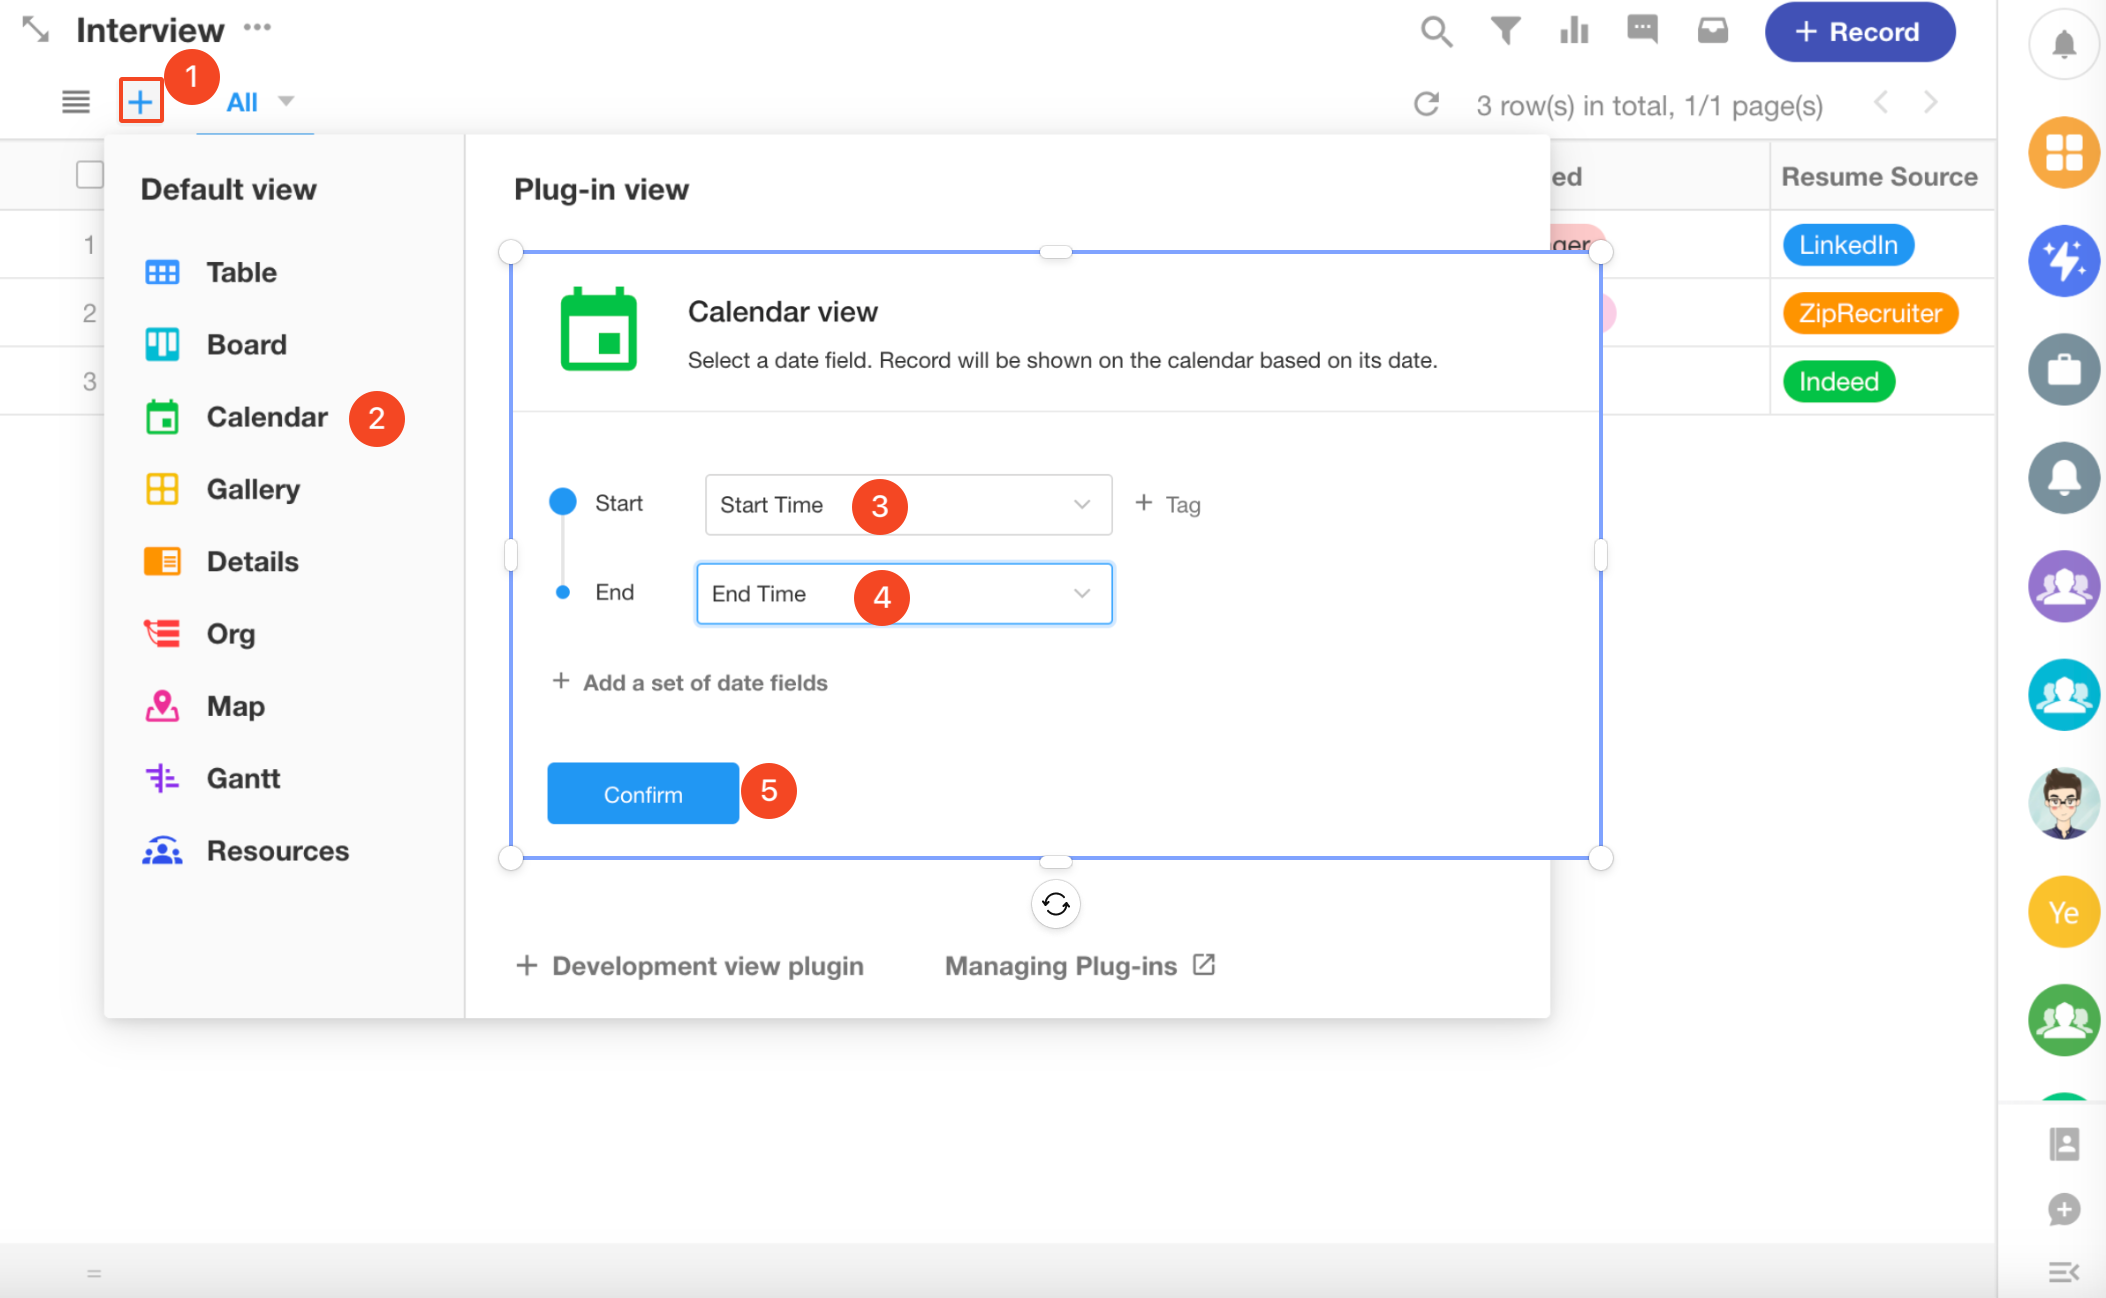
Each interview has specific start and end times, aligning with the concept of schedules, making it suitable to display to interviewers through a calendar view.
Create a new calendar view, selecting the interview start and end times as the calendar's start and end times.
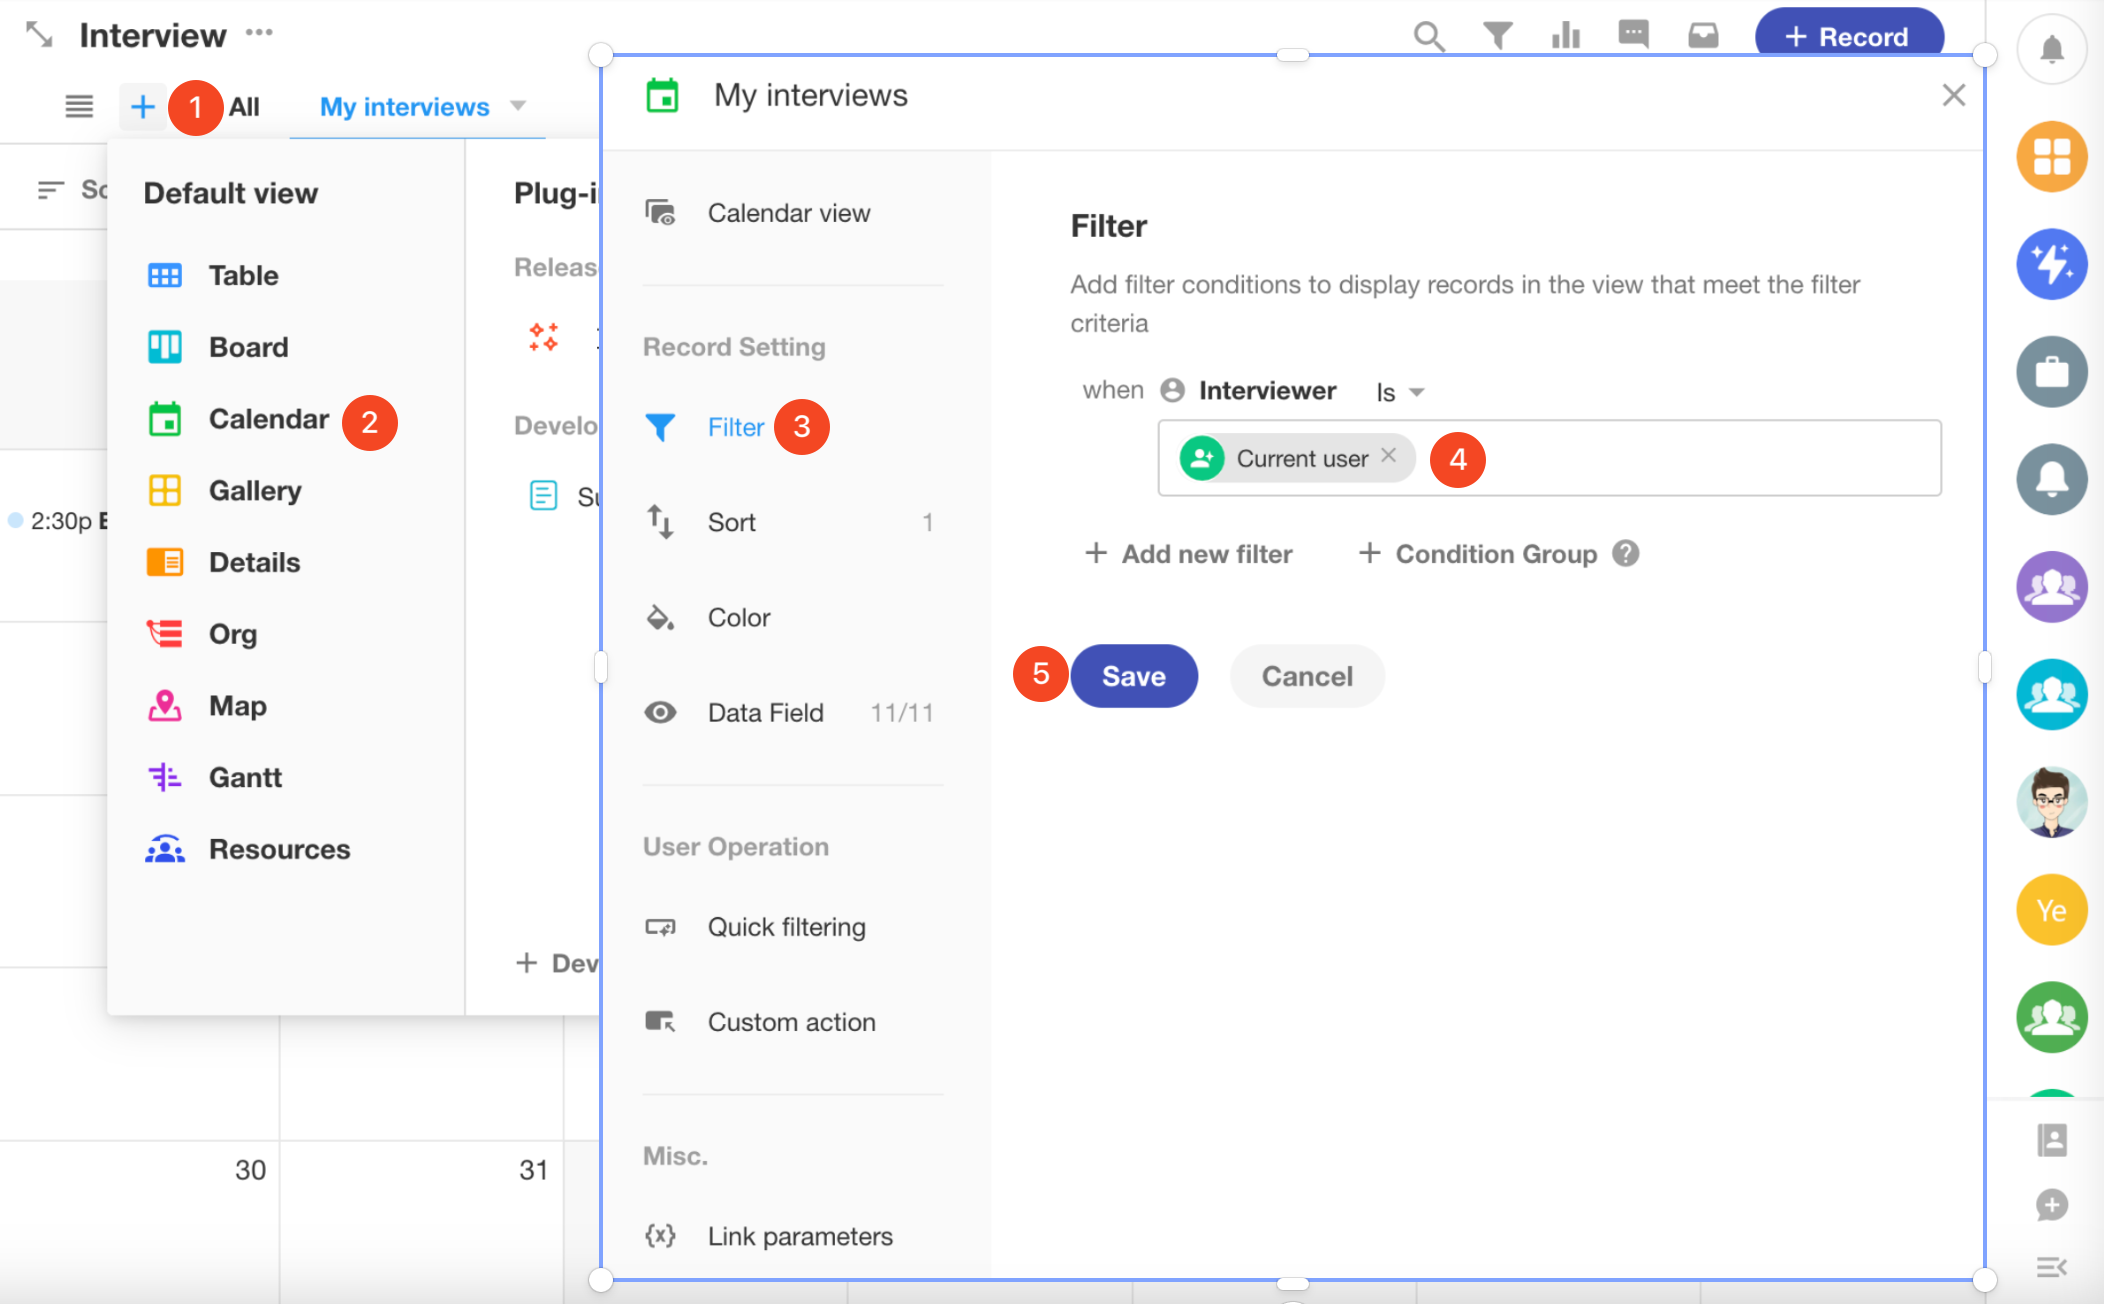
It's important to note that each interviewer only needs to see interviews they are involved in. Therefore, this calendar view requires data filtering, with the filter condition being "When interviewer equals current user." This way, whoever views this view will only see interview records where they are the interviewer.
As we can see, a complete calendar view will significantly contribute to the work and time management of hiring managers and interviewers.
For more details on other views, please go to read the corresponding section in our help center.
4. Roles and permissions
Once the application is set up, we can invite colleagues to join and use this application.
Roles in an application include application administrators and custom roles.
- Application Administrators: They can build and adjust the application structure and functionalities, add other application roles, permissions, and members. The permissions of application administrators cannot be modified.
- Custom Roles: They can only use the built application and perform operations on business data within their permissions.business data.
We often configure custom roles.
In this application, candidates can submit resume information through a public form, so there is no need to assign roles to them. Recruiters are the creators and managers of the application, acting as application administrators. We only need to assign roles to hiring managers.
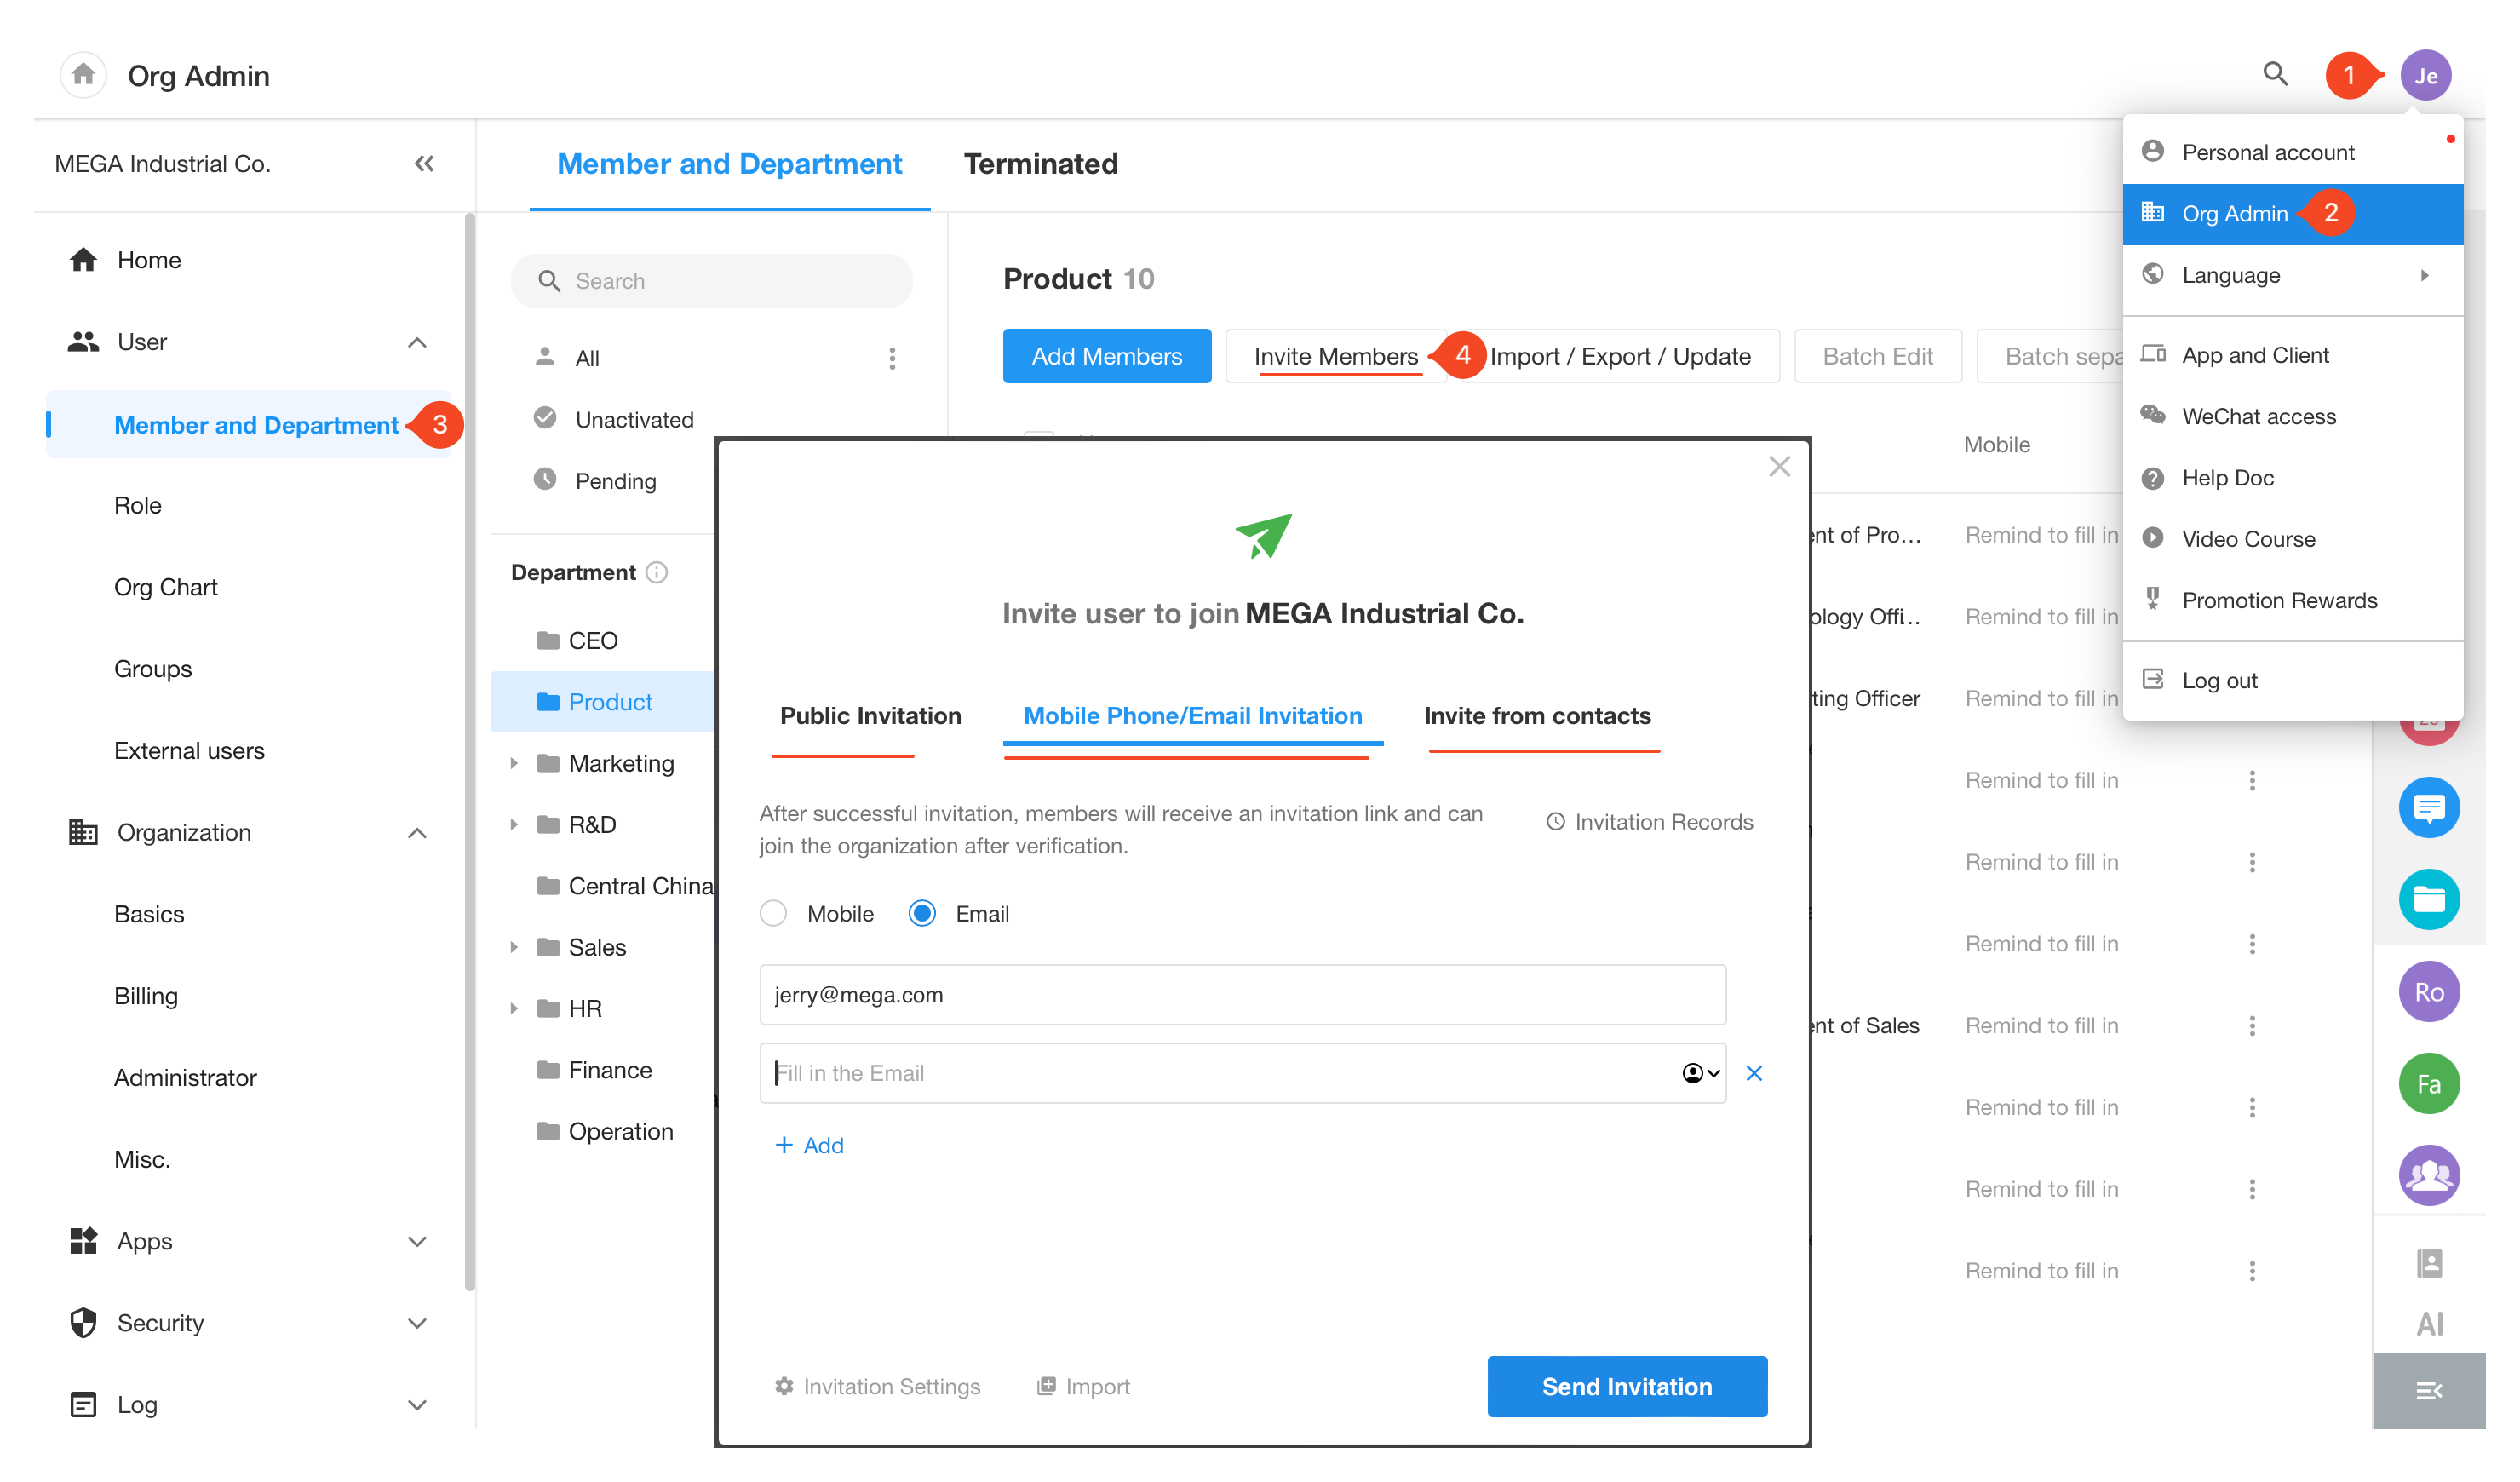
4.1 Invite colleagues
You can invite colleagues to join your organization by email or phone number.
4.2 Assign roles and permissions
1) Assign roles to hiring managers
Each application will be pre-configured with two roles, member and read only. Here we can modify the member role directly. The operations after creating a new role are the same as modifying a role.
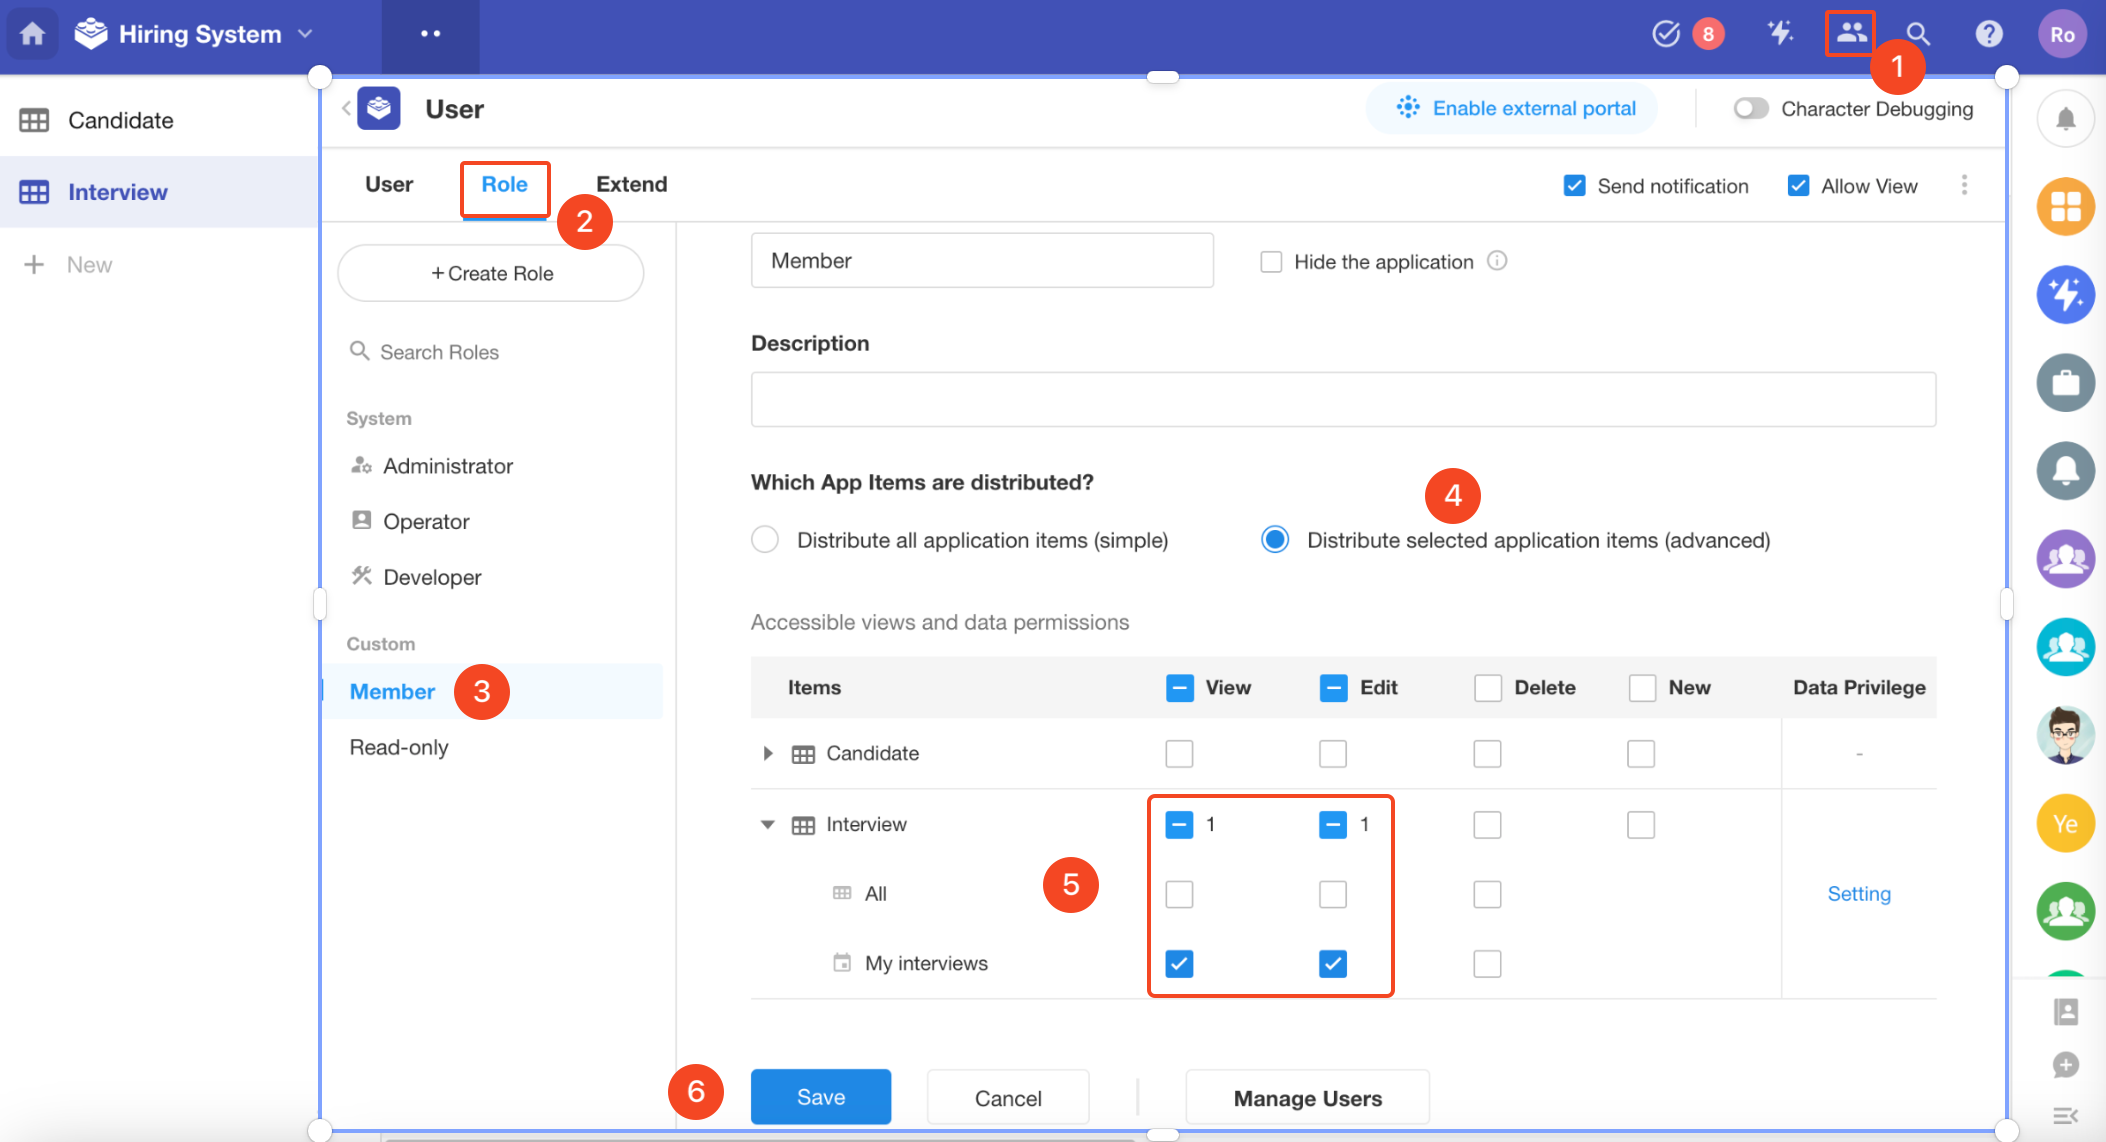
For the interview worksheet, set the "My Interviews" view to be visible to hiring managers.
Set the hiring managers to have the permissions to edit records in the "My Interviews" view.
We have not set all views in the candidate worksheet and the "All" view in the interview worksheet to be visible to hiring managers. Therefore, hiring managers will not see these views.
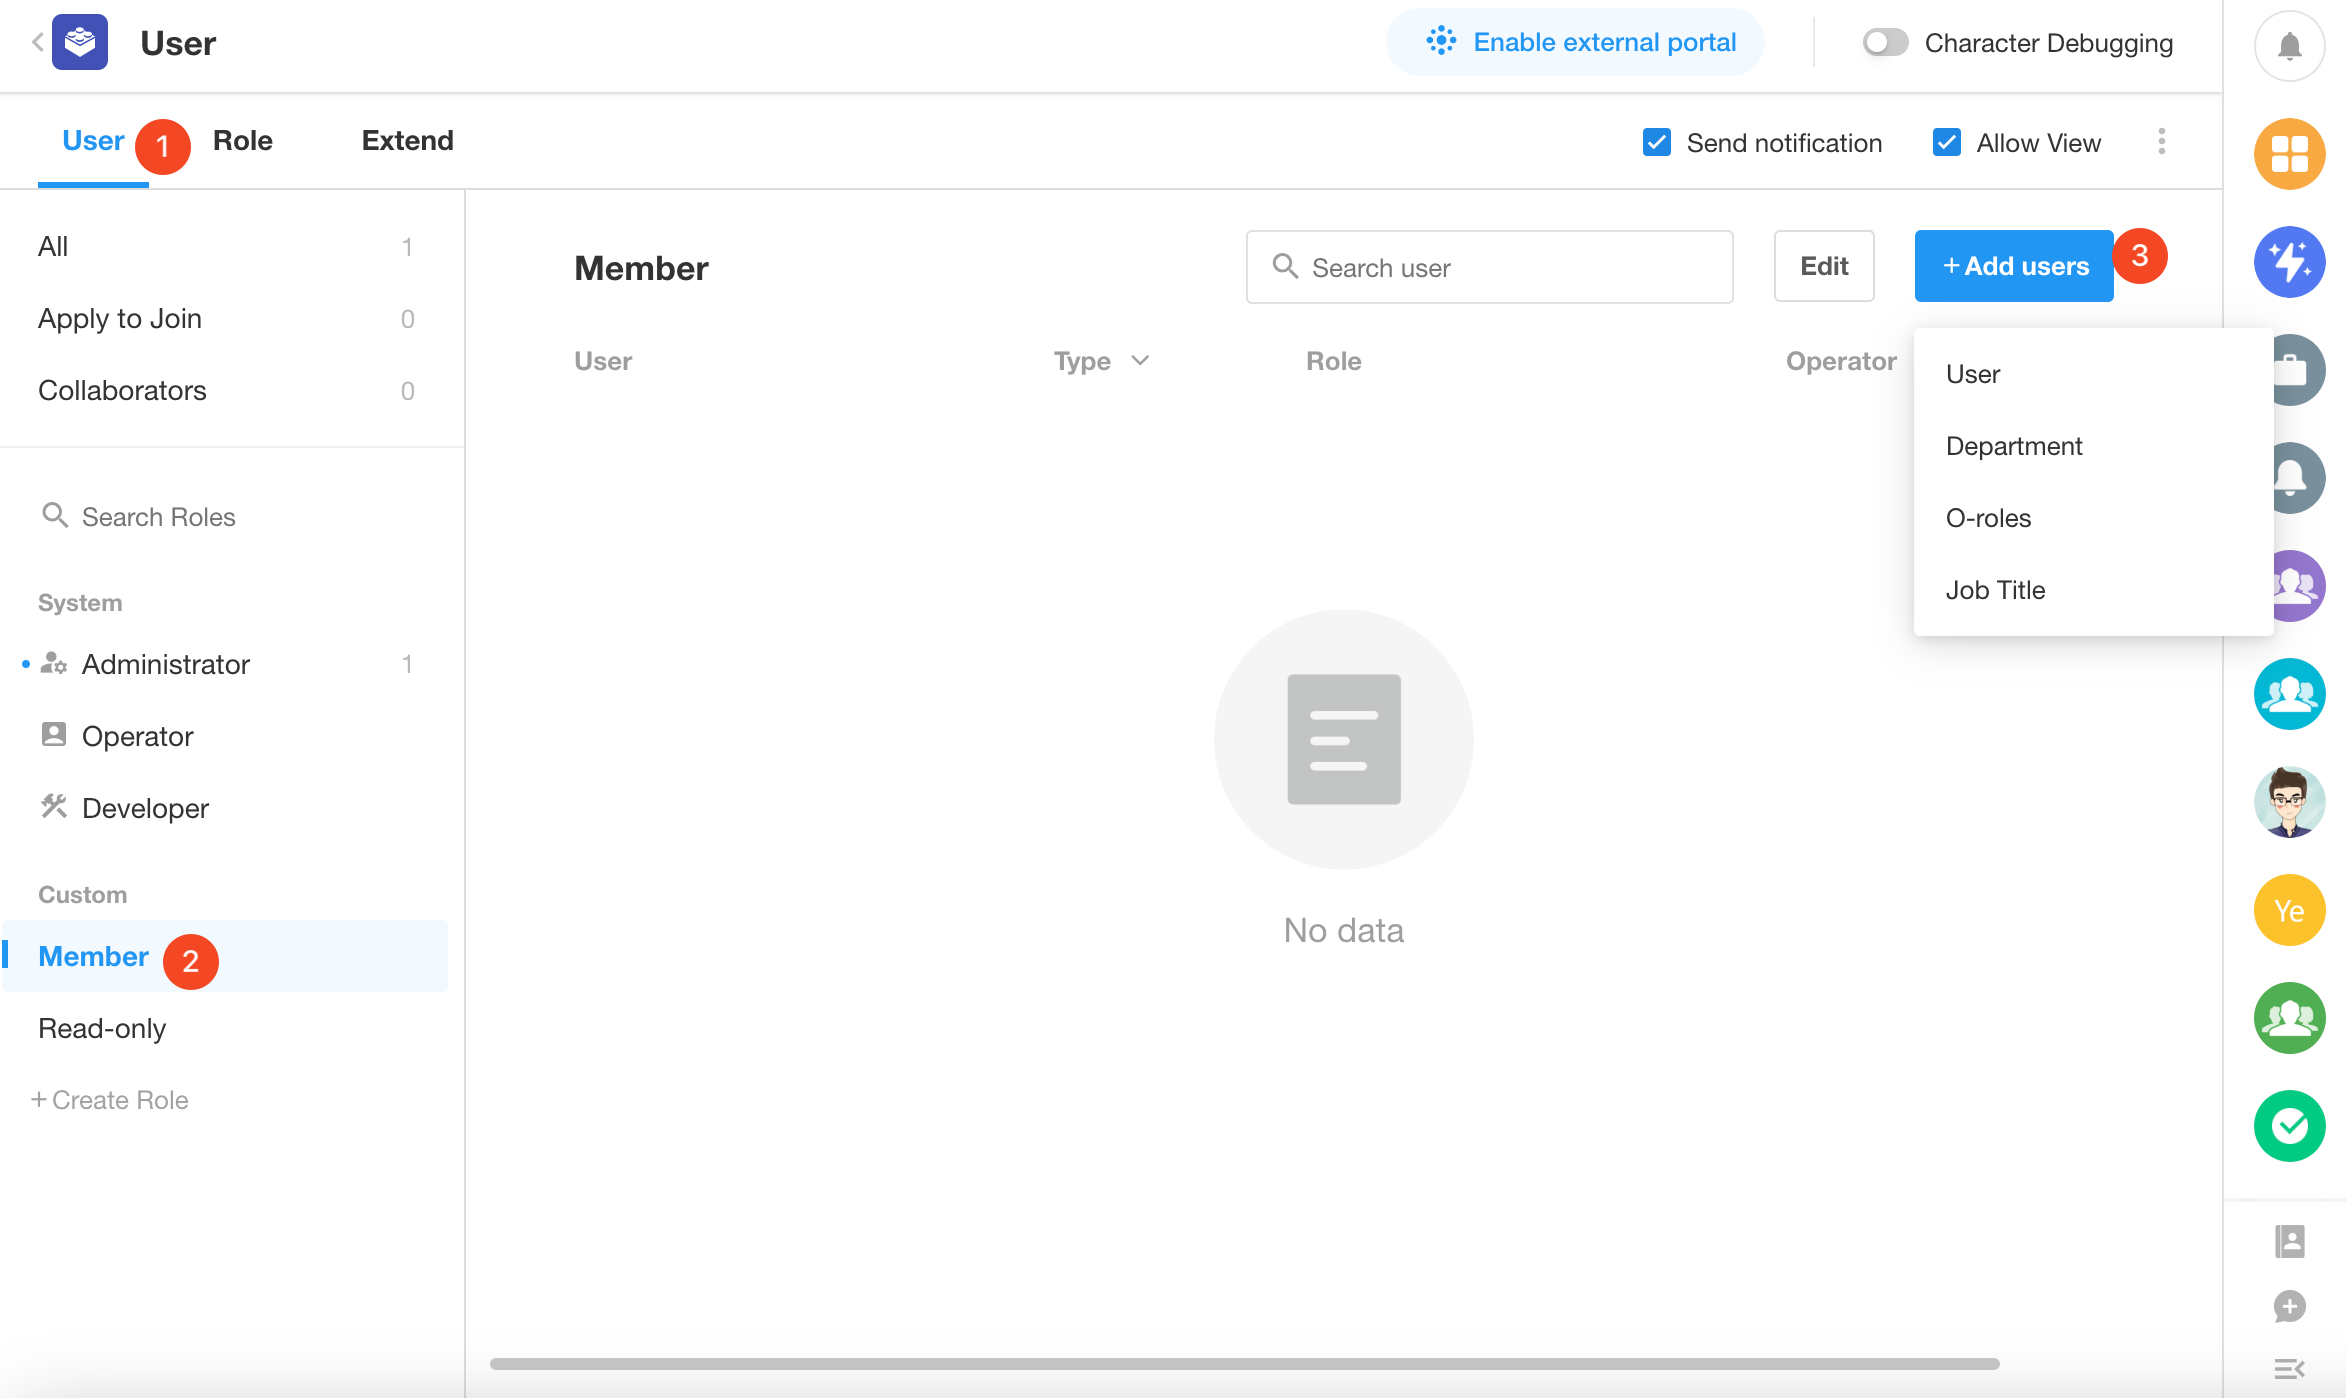
2) Add users to the role
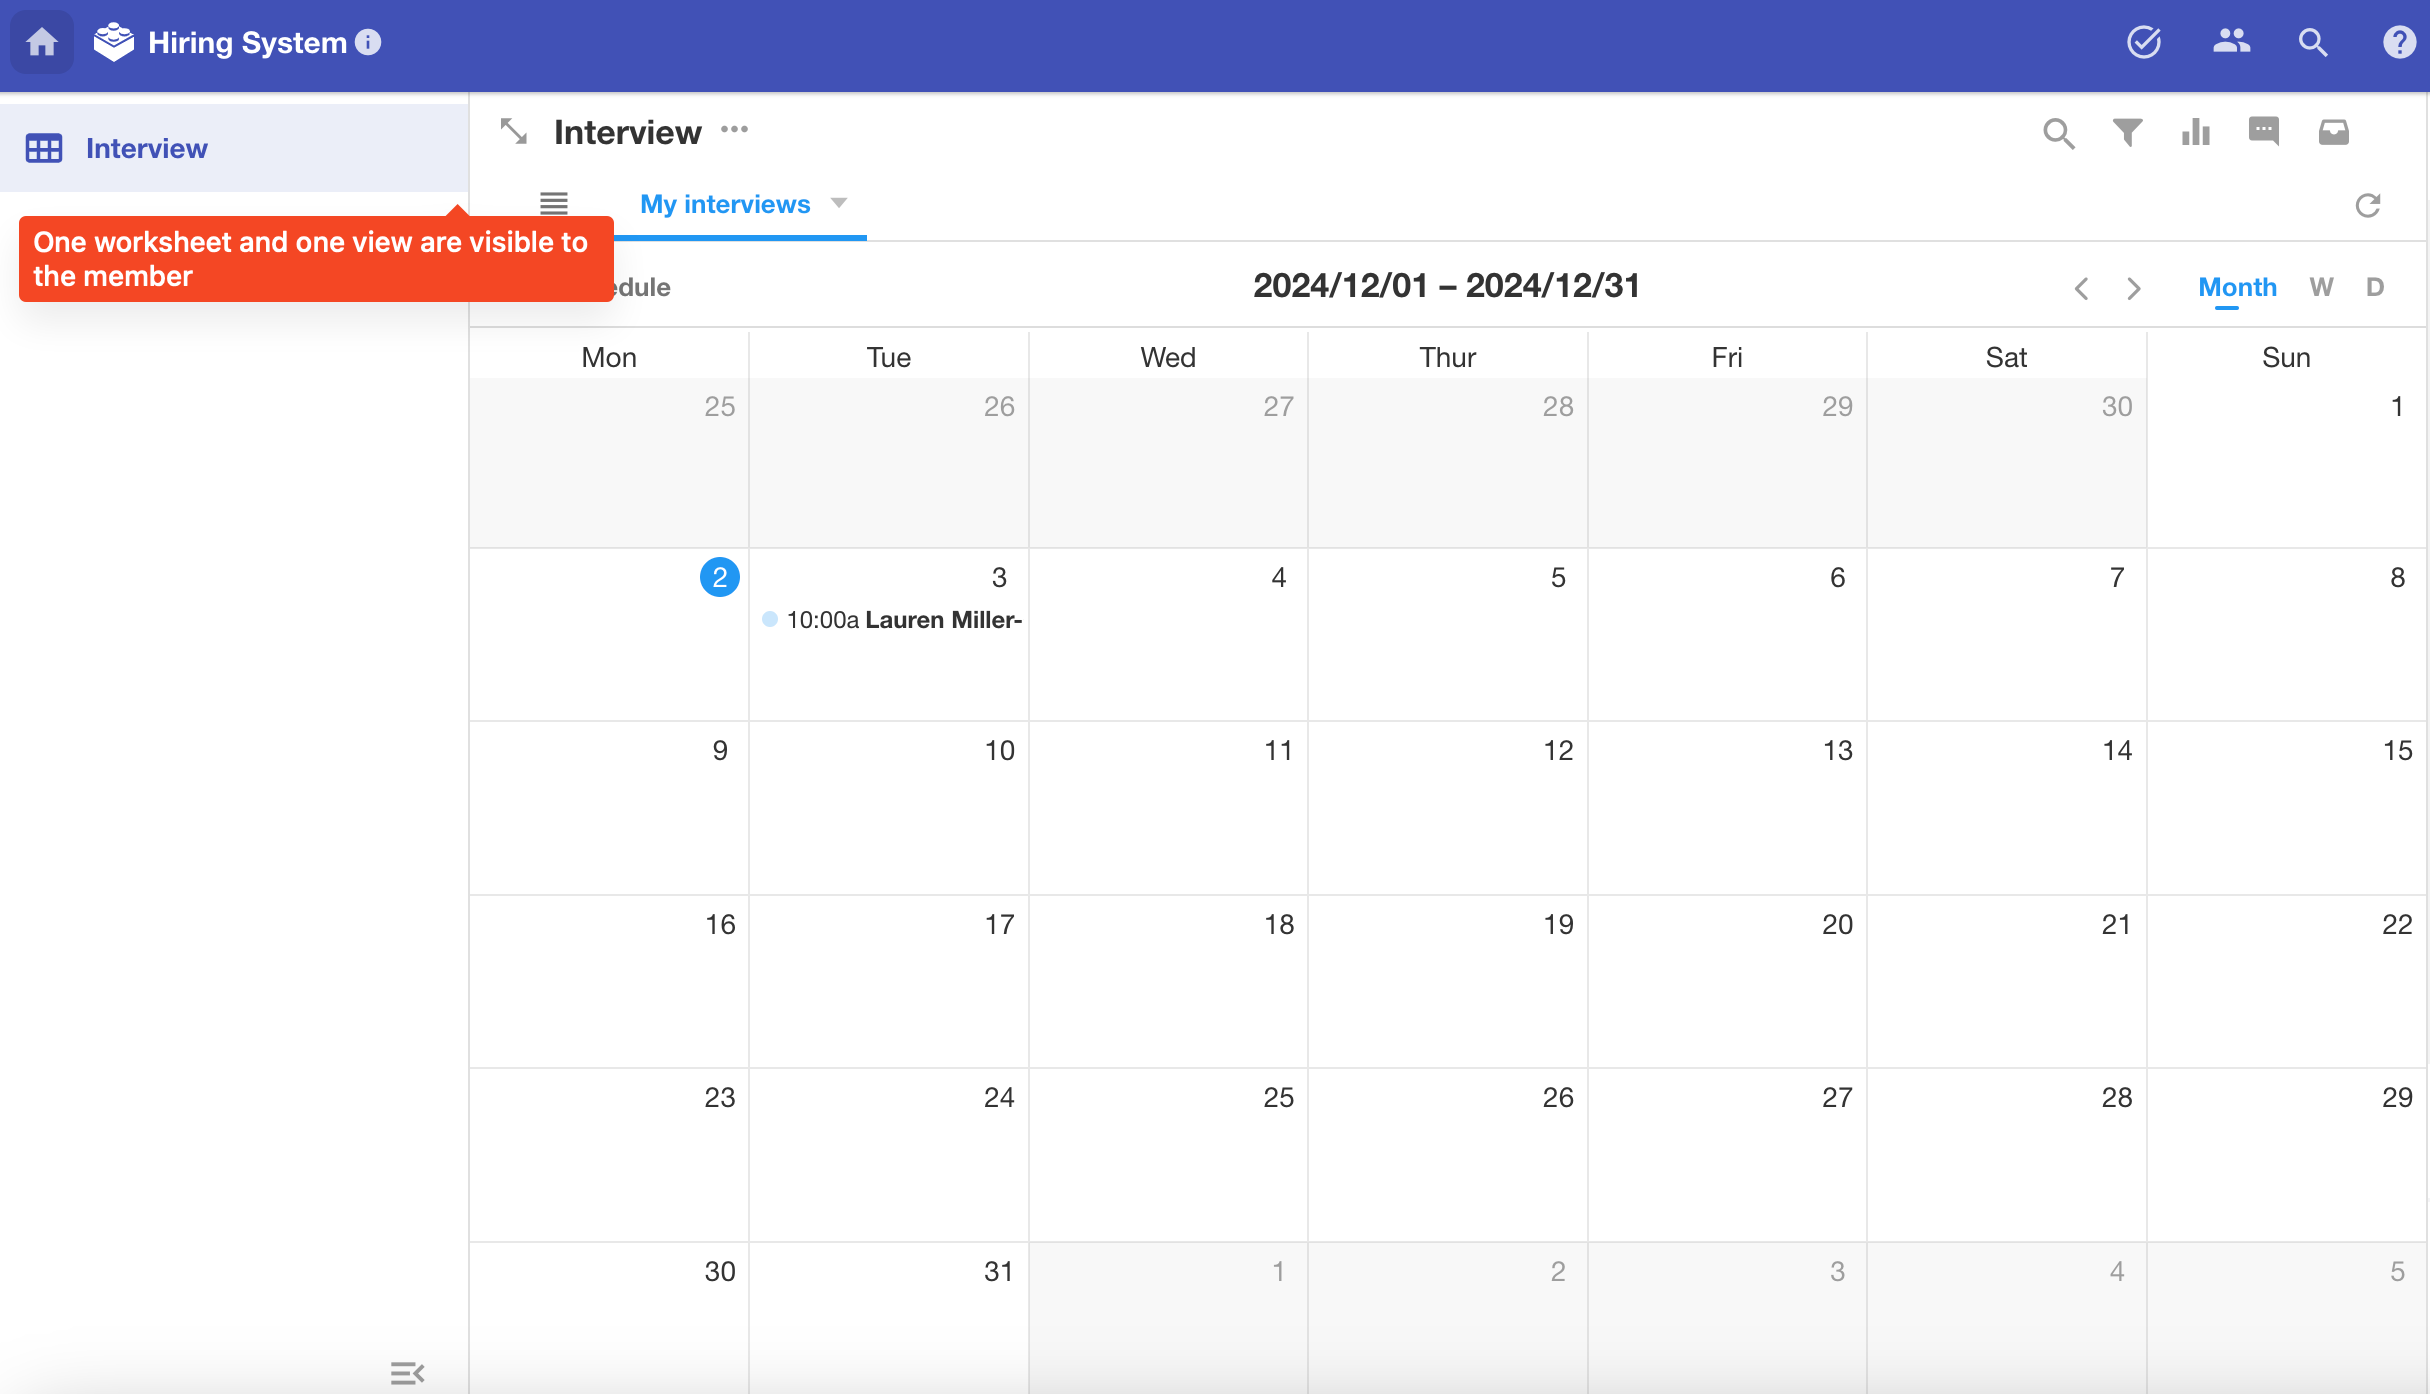
3) Member’s view
Hiring managers can only see data in the "My Interviews" view.
4) Modify interview results
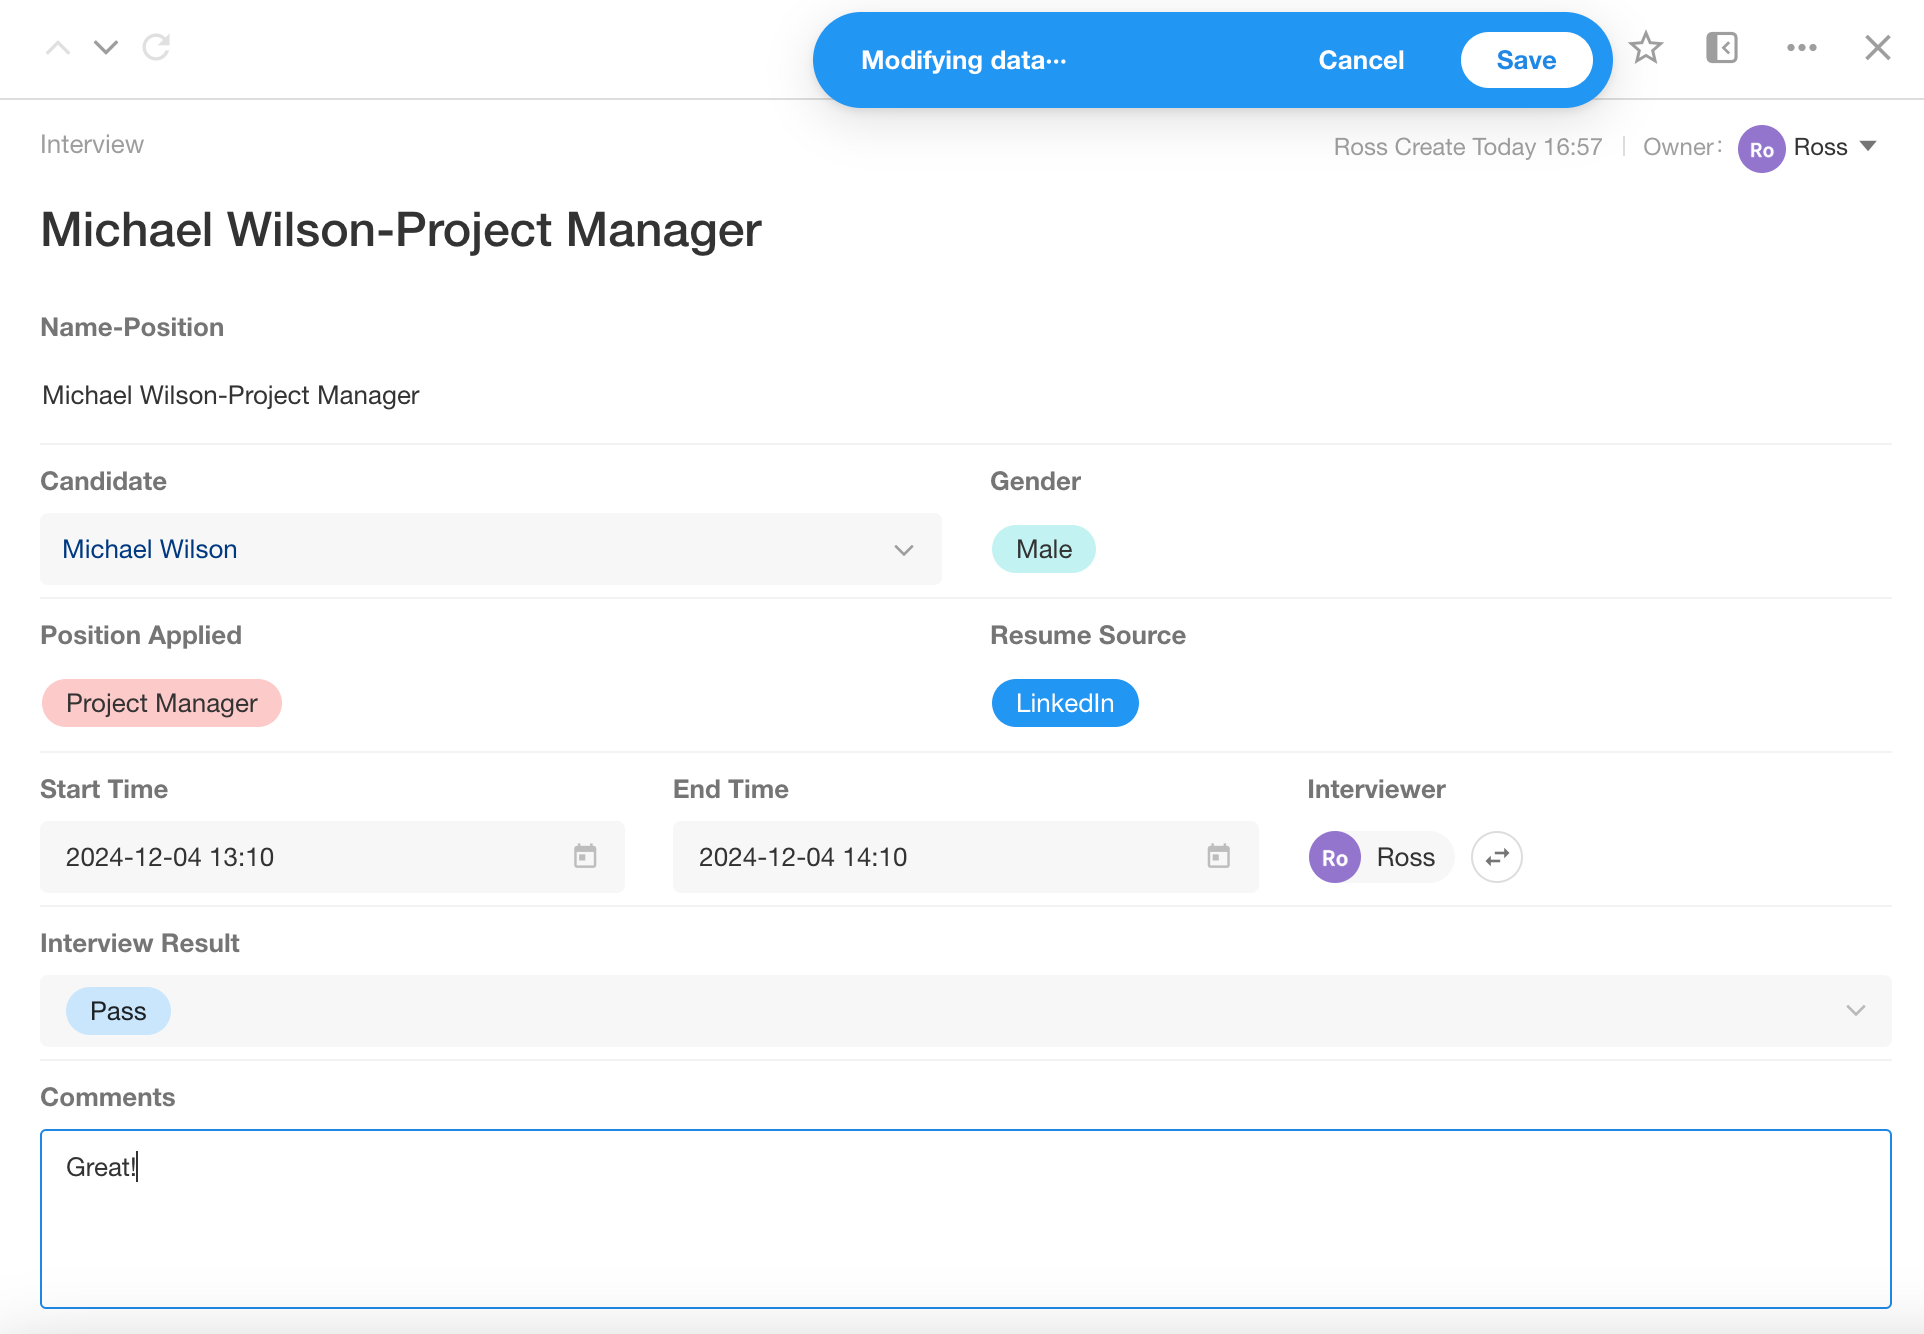
After the interview, the interviewer opens the interview record to modify the interview comments and results.
5. Cerate workflows
What is a workflow? It consists of a trigger and multiple task nodes. Set a trigger condition, and when the data changes meet the condition, a set automatic task or a series of tasks are automatically executed. The entire process is an automated workflow.
Manual operations with certain rules can be mostly automated through workflows, saving on manual operation costs.
In this application, there are two automated processes:
- Notify the interviewer to prepare 15 minutes before the interview starts
- Synchronize the interview result to the candidate's record
We create the corresponding workflows respectively.
5.1 Workflow - Notify the interviewer 15 minutes before the interview
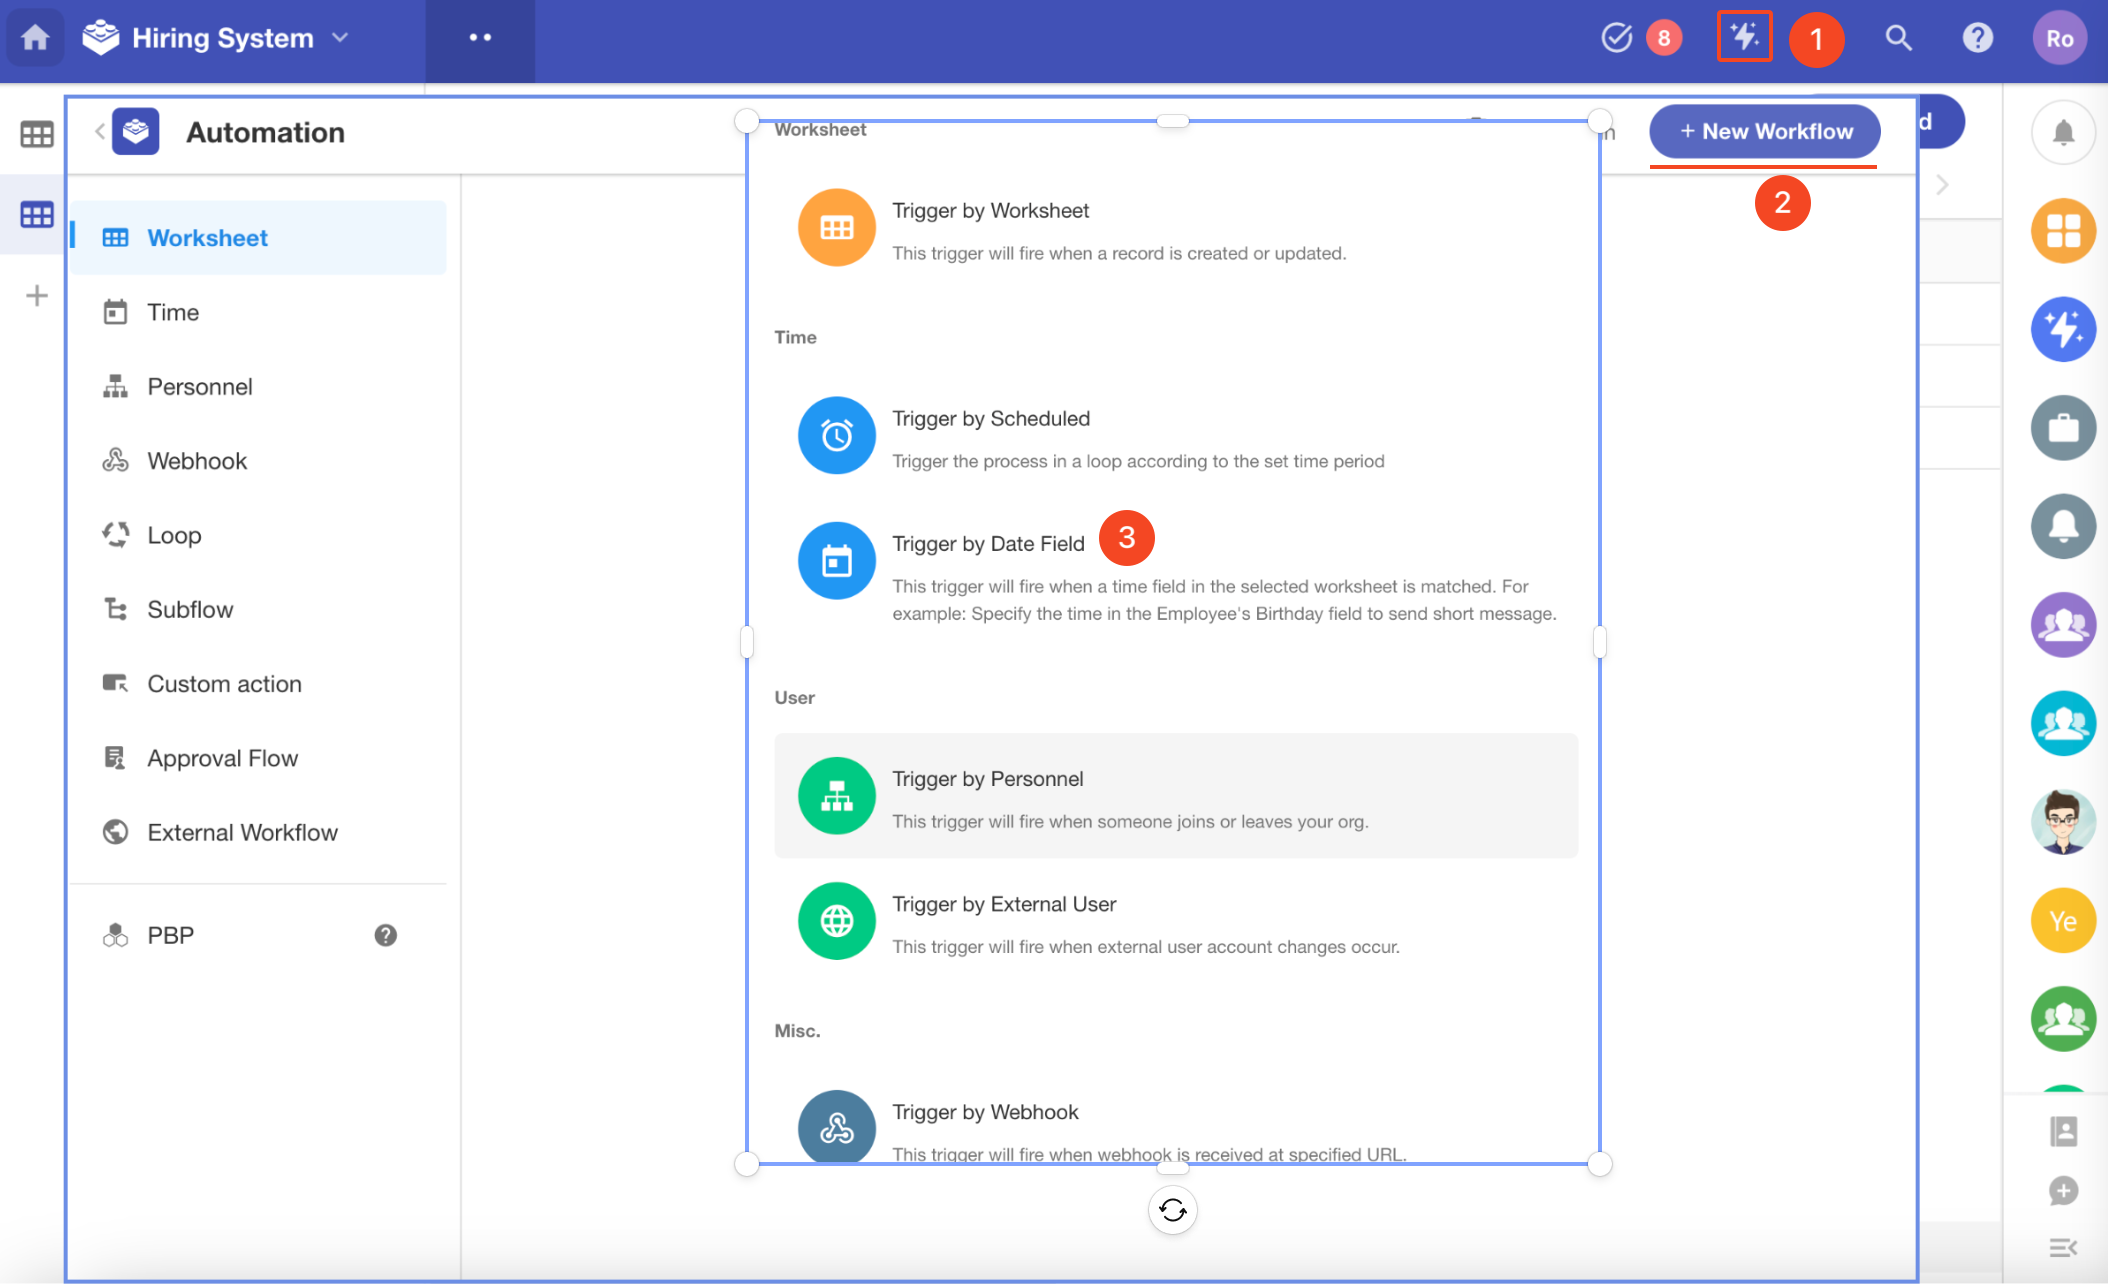
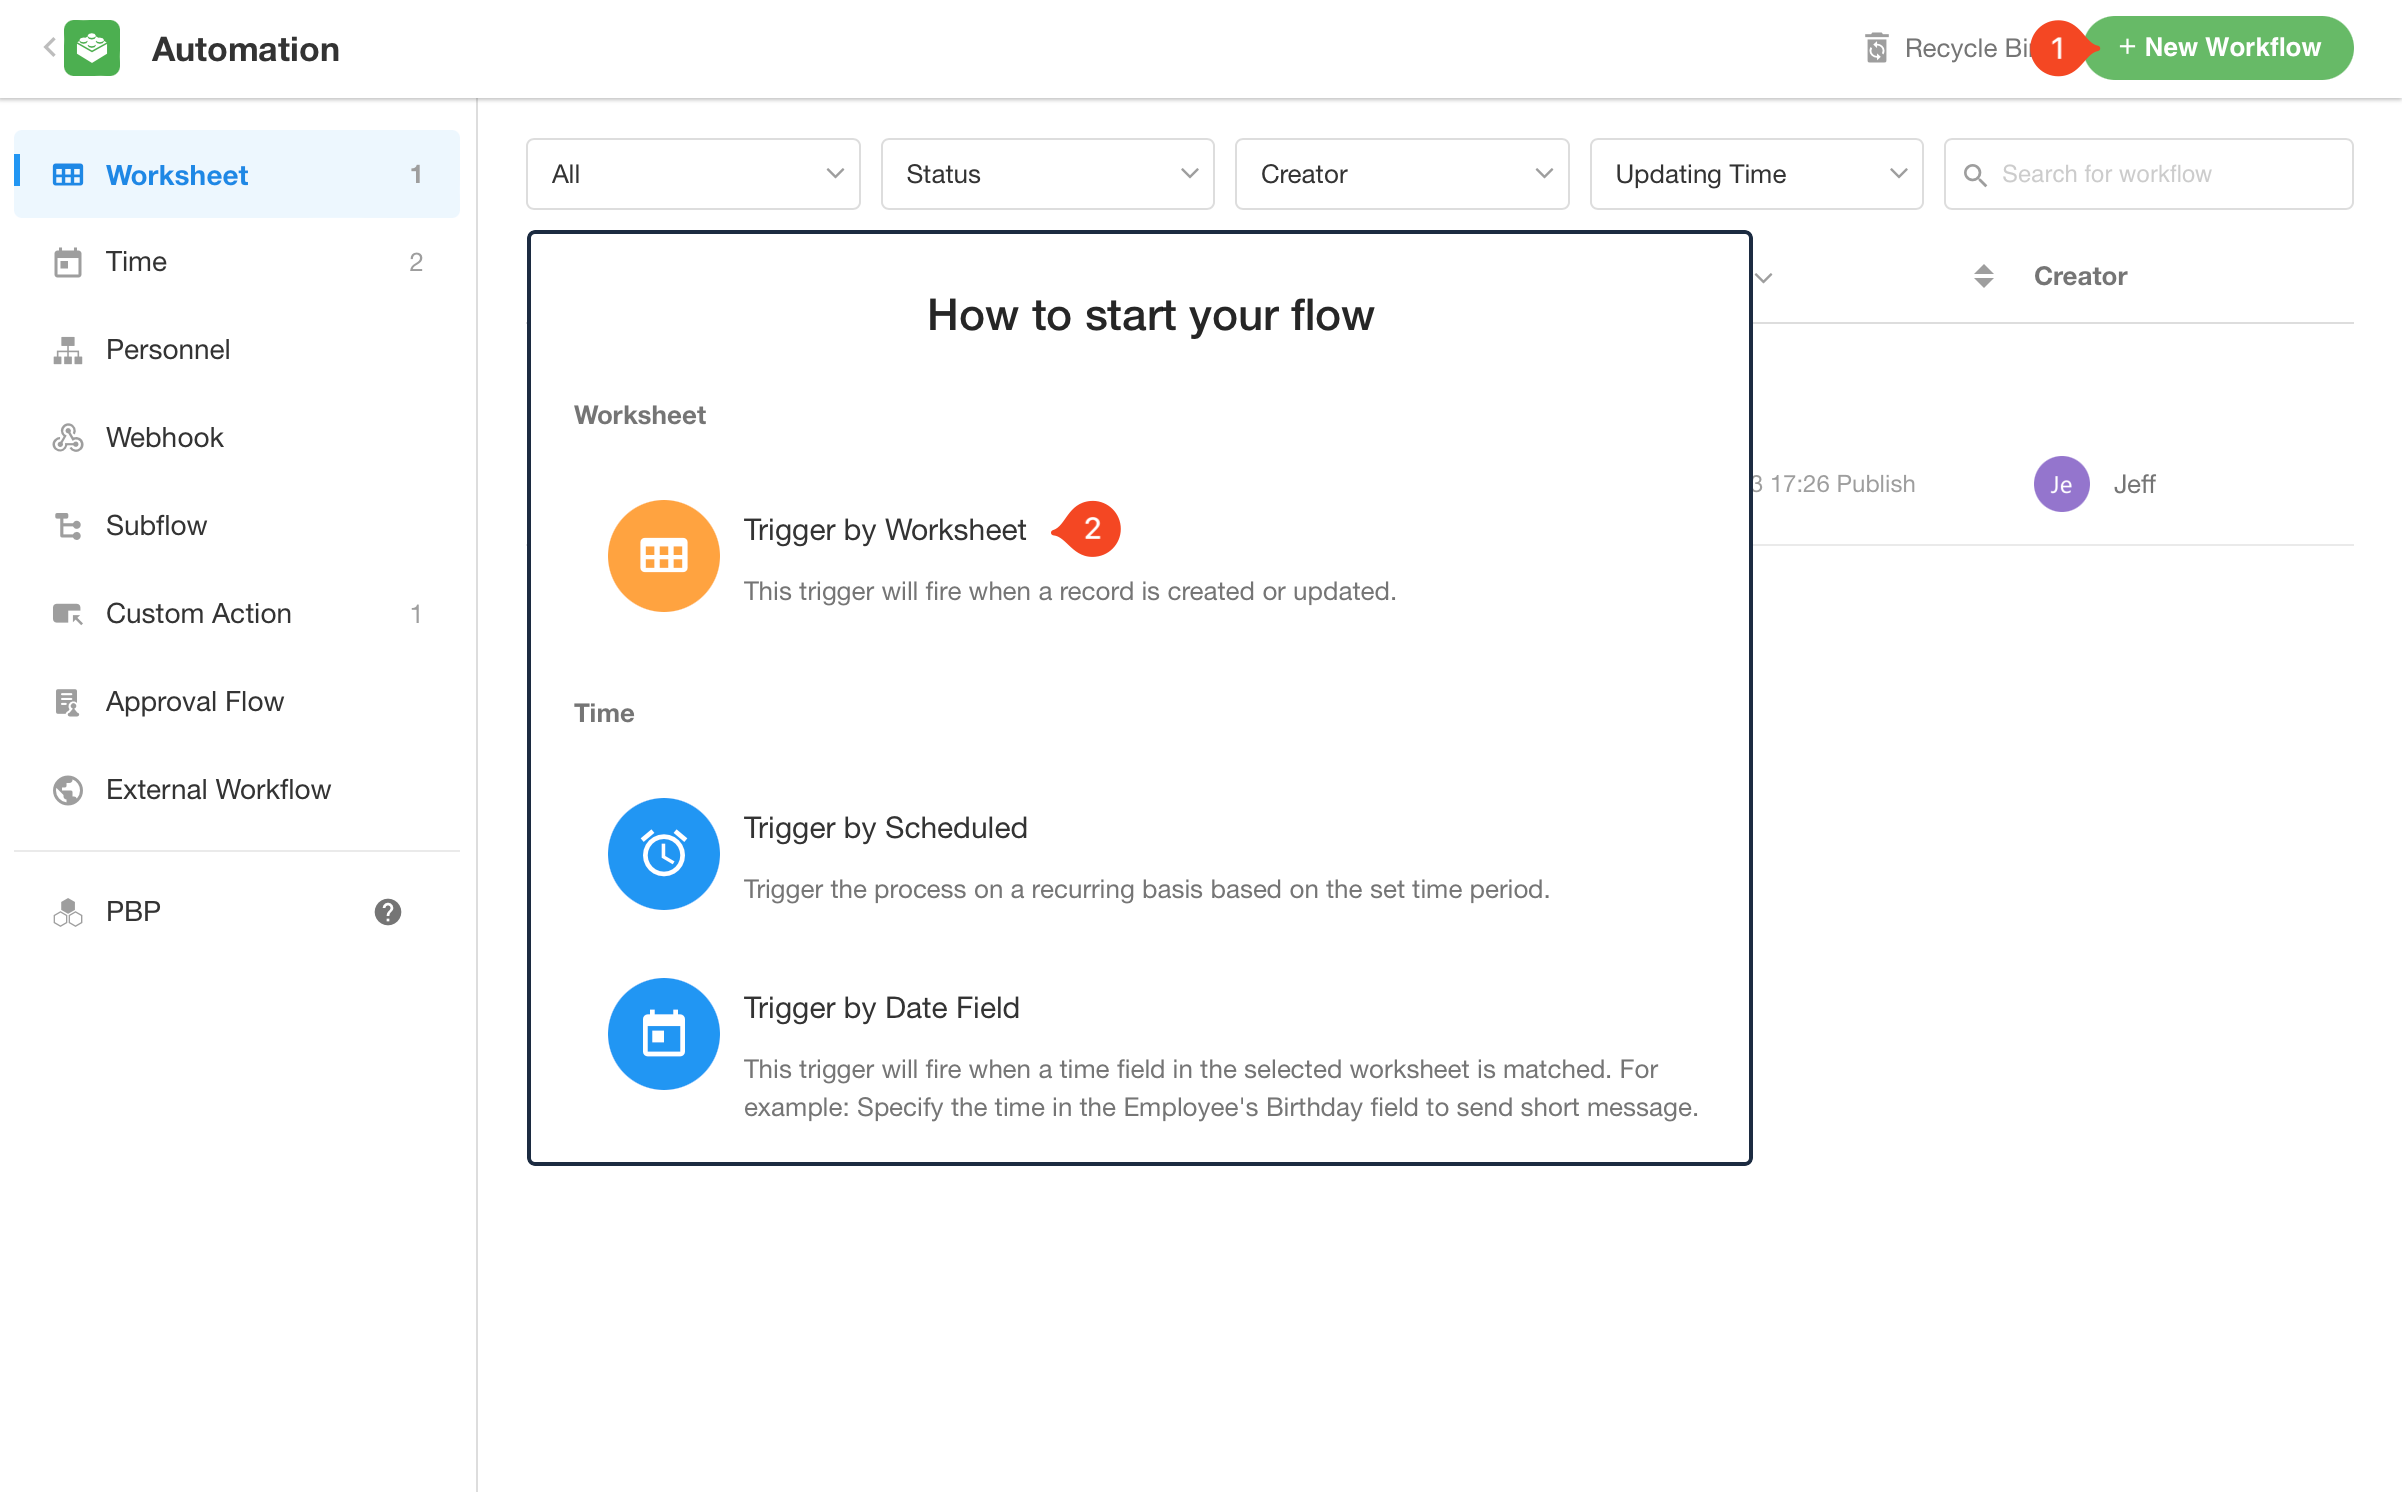
1) Create a workflow triggered by date field
There are 5 trigger modes in workflows.
-
Trigger by worksheet: Triggered when creating or updating records in the worksheet, including adding, modifying, deleting, etc.
-
Trigger by scheduled: Triggered on a time.
-
Trigger by date field: Specify a date field to trigger the workflow.
-
Trigger by Webhook: Data from other information systems can be pushed to HAP. Once receiving, the process will be triggered for data integration.
-
Trigger by custom button: Click the button to trigger the workflow.
According to the requirements, we need to cerate a workflow triggered by date field.
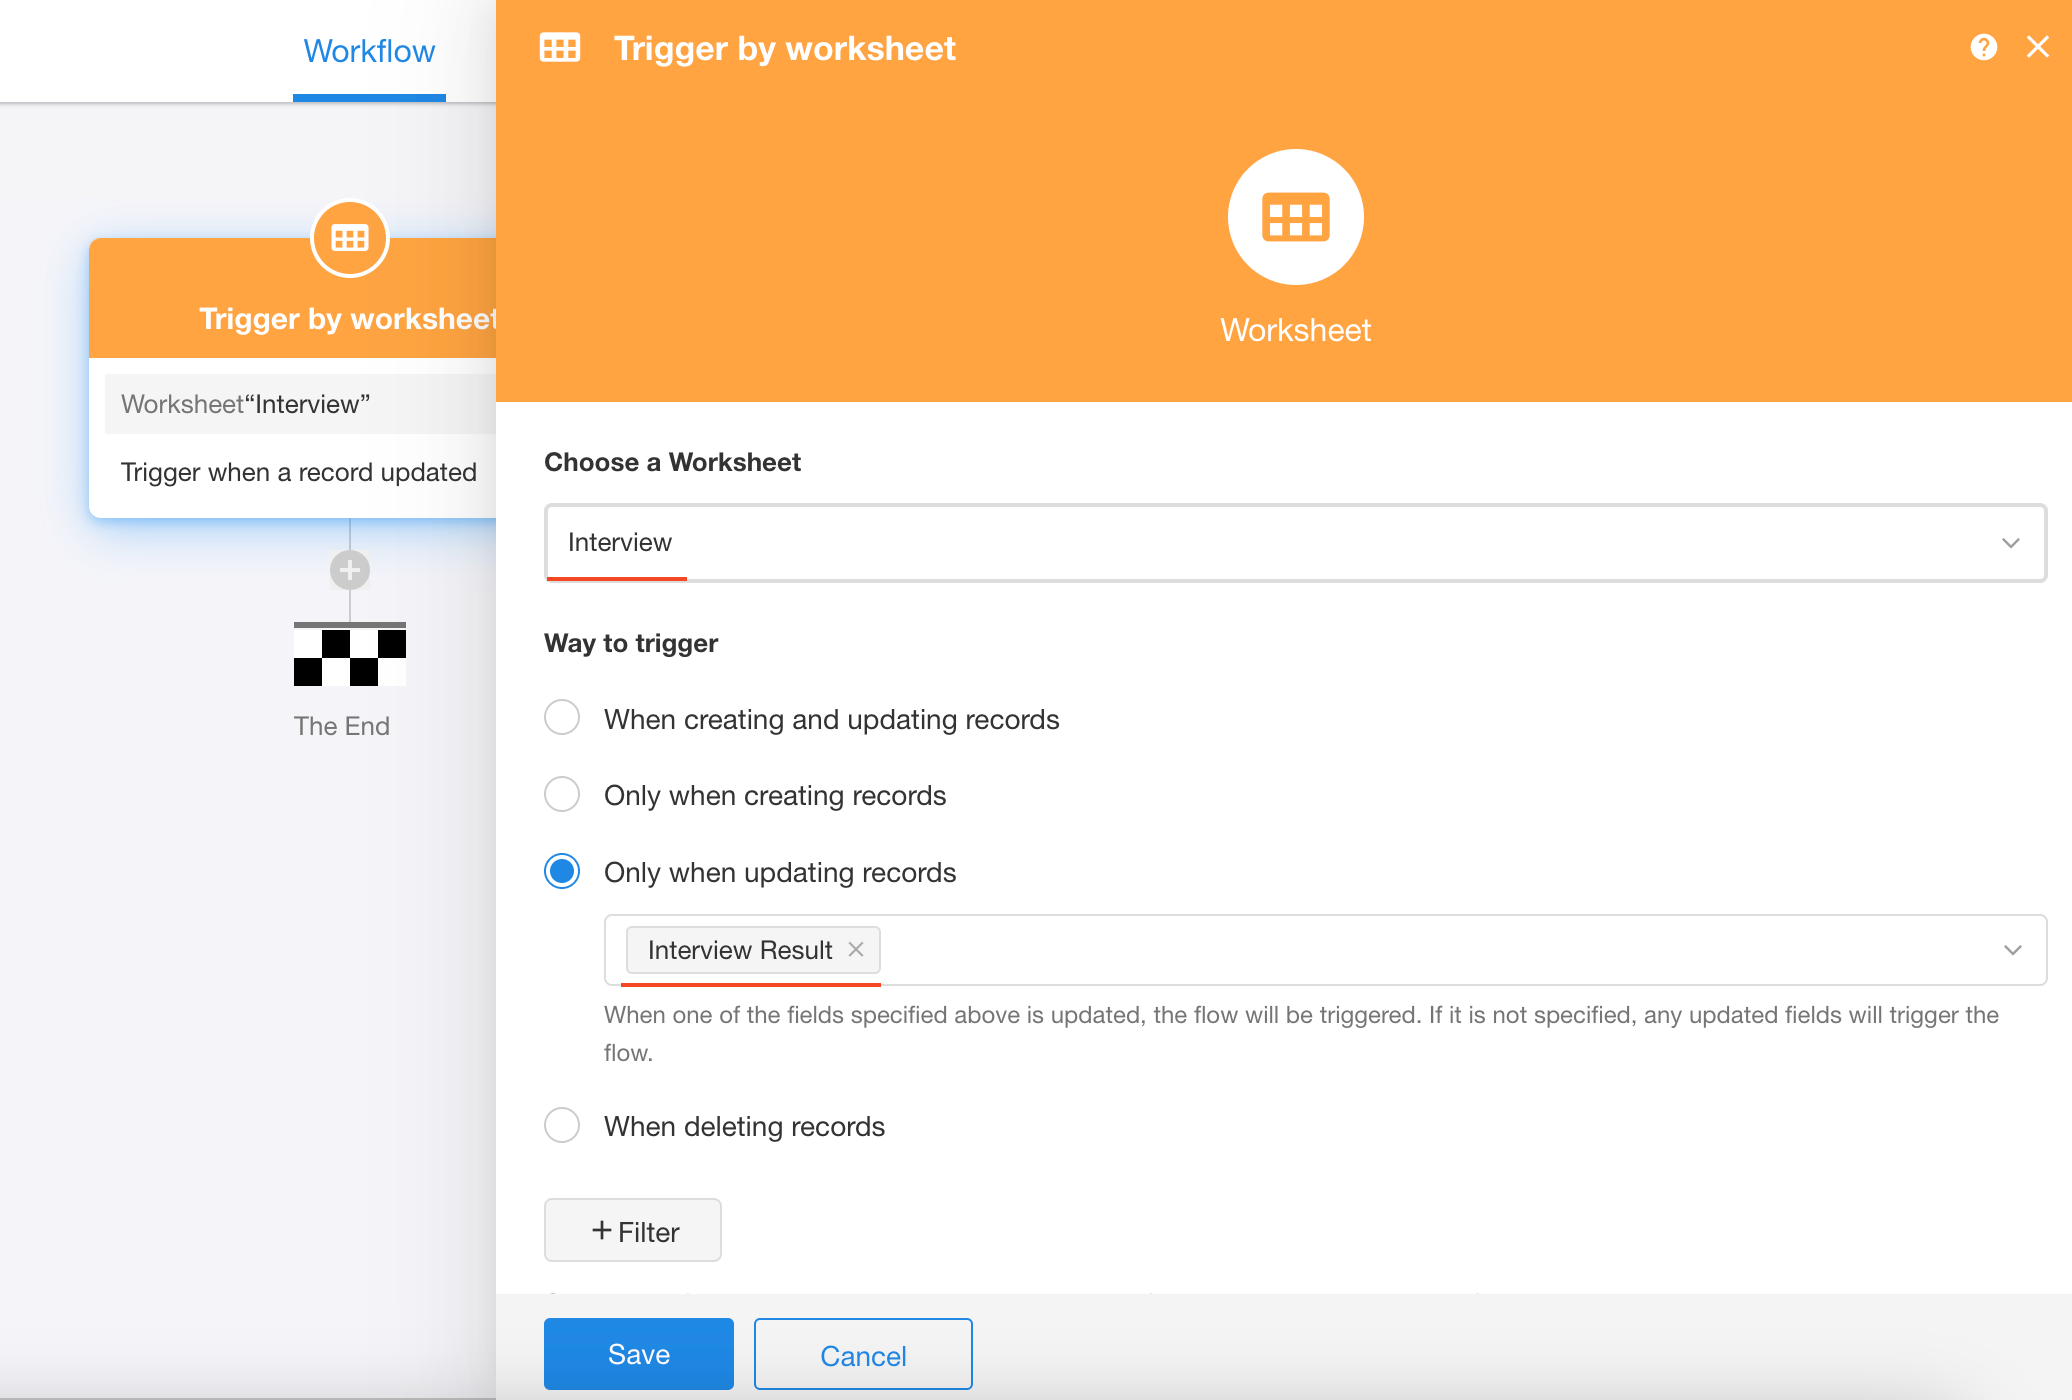
2) Set the trigger node
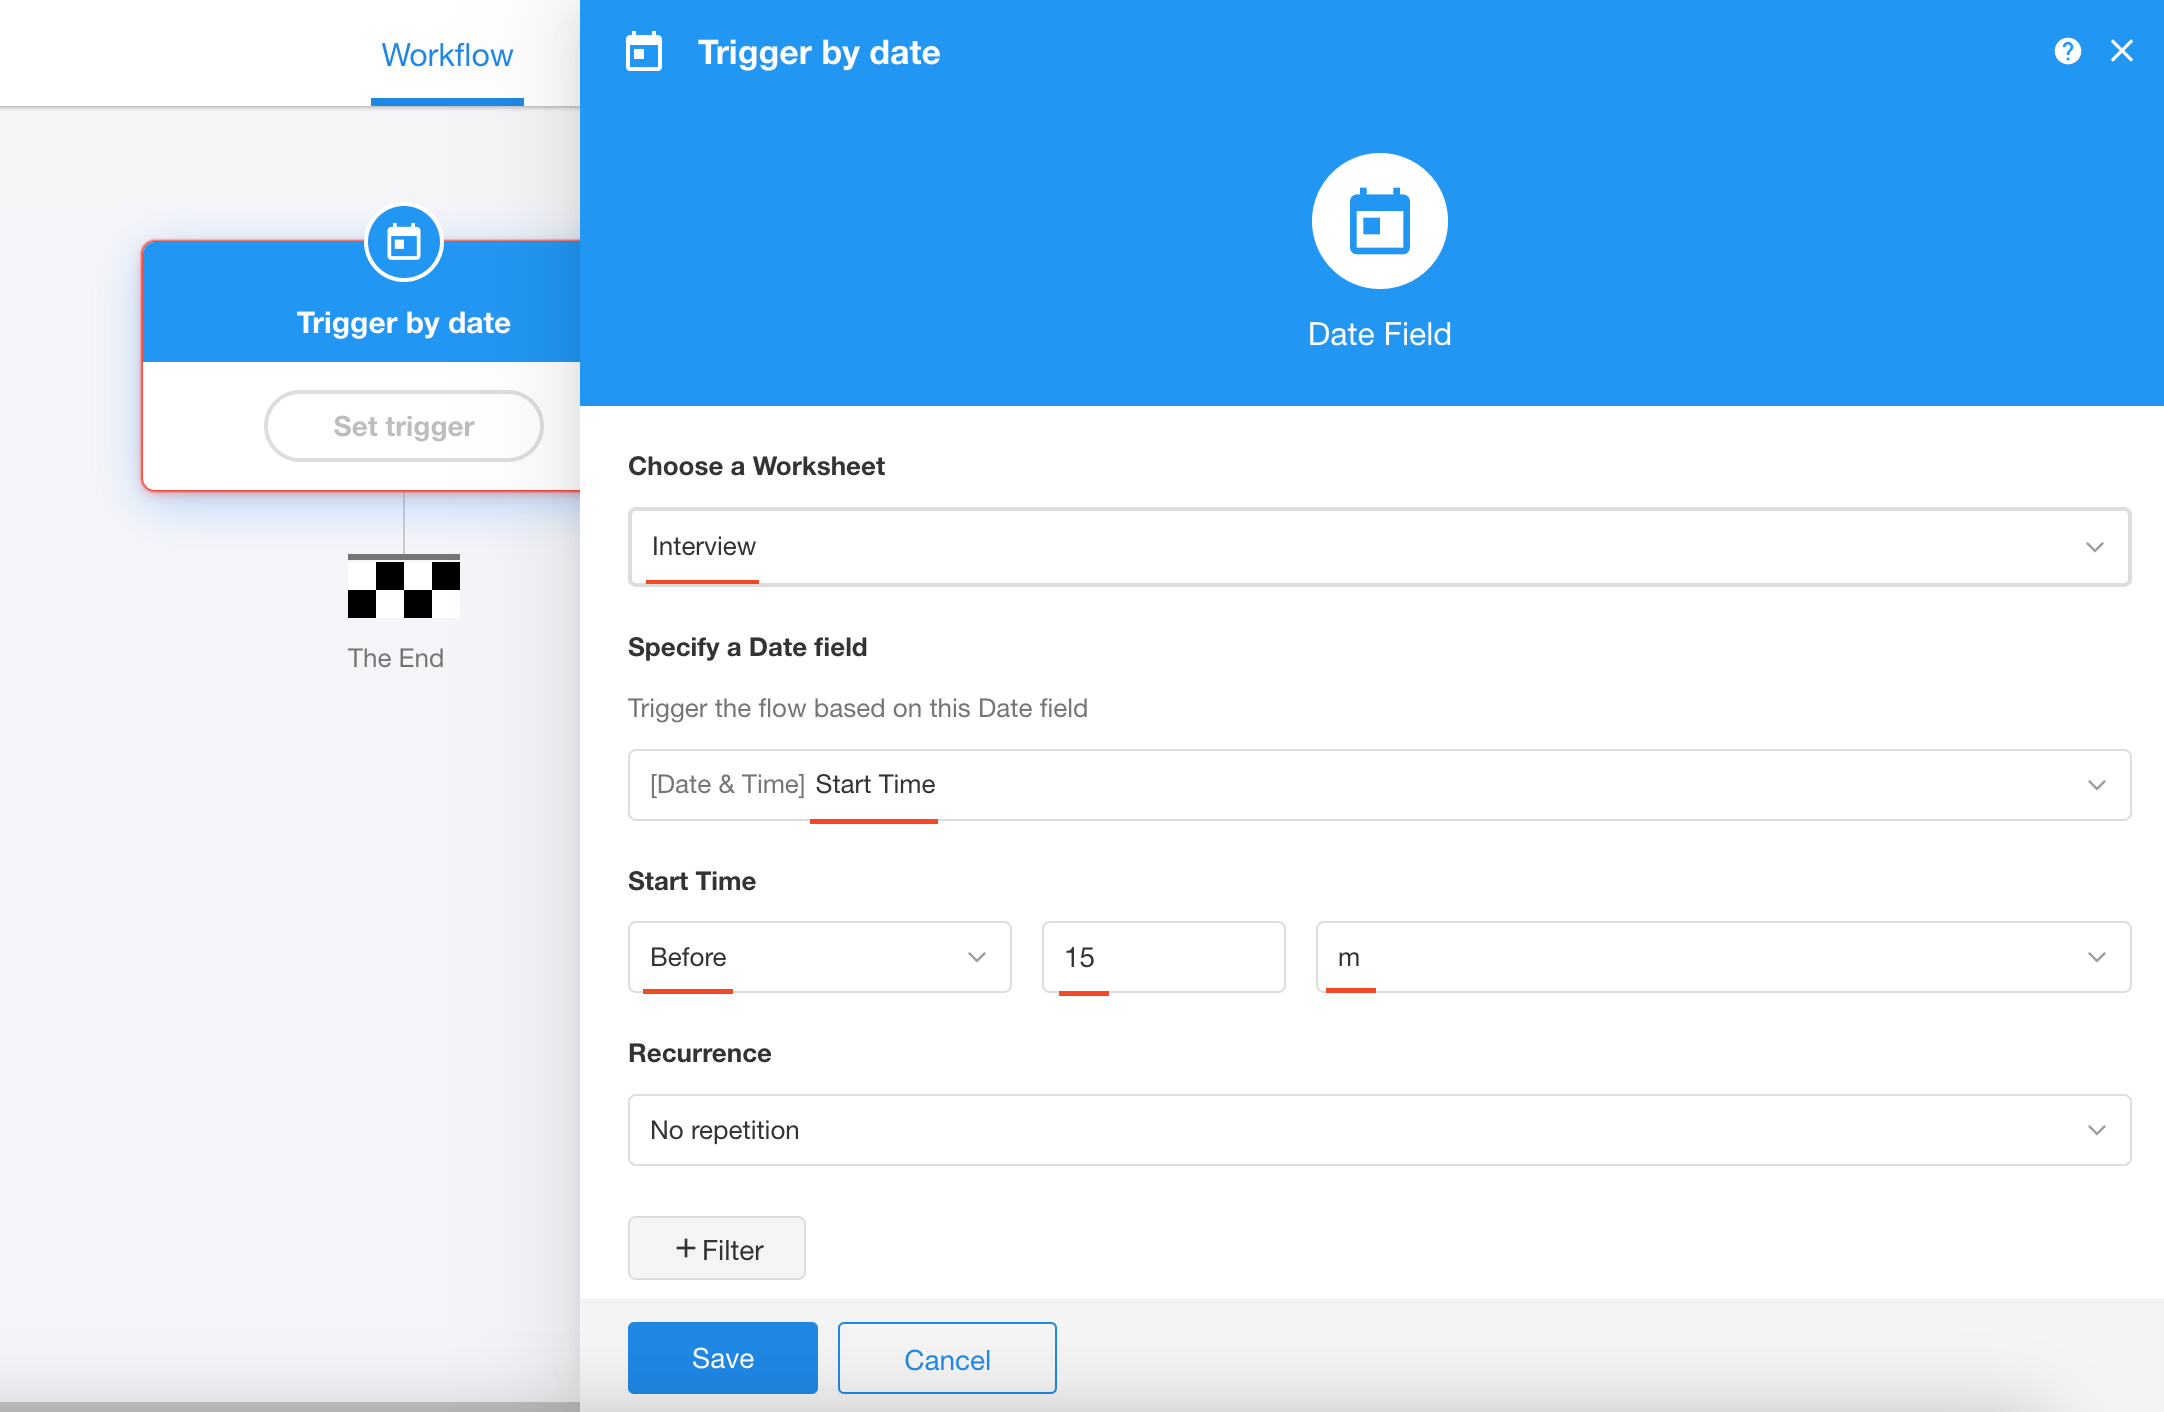
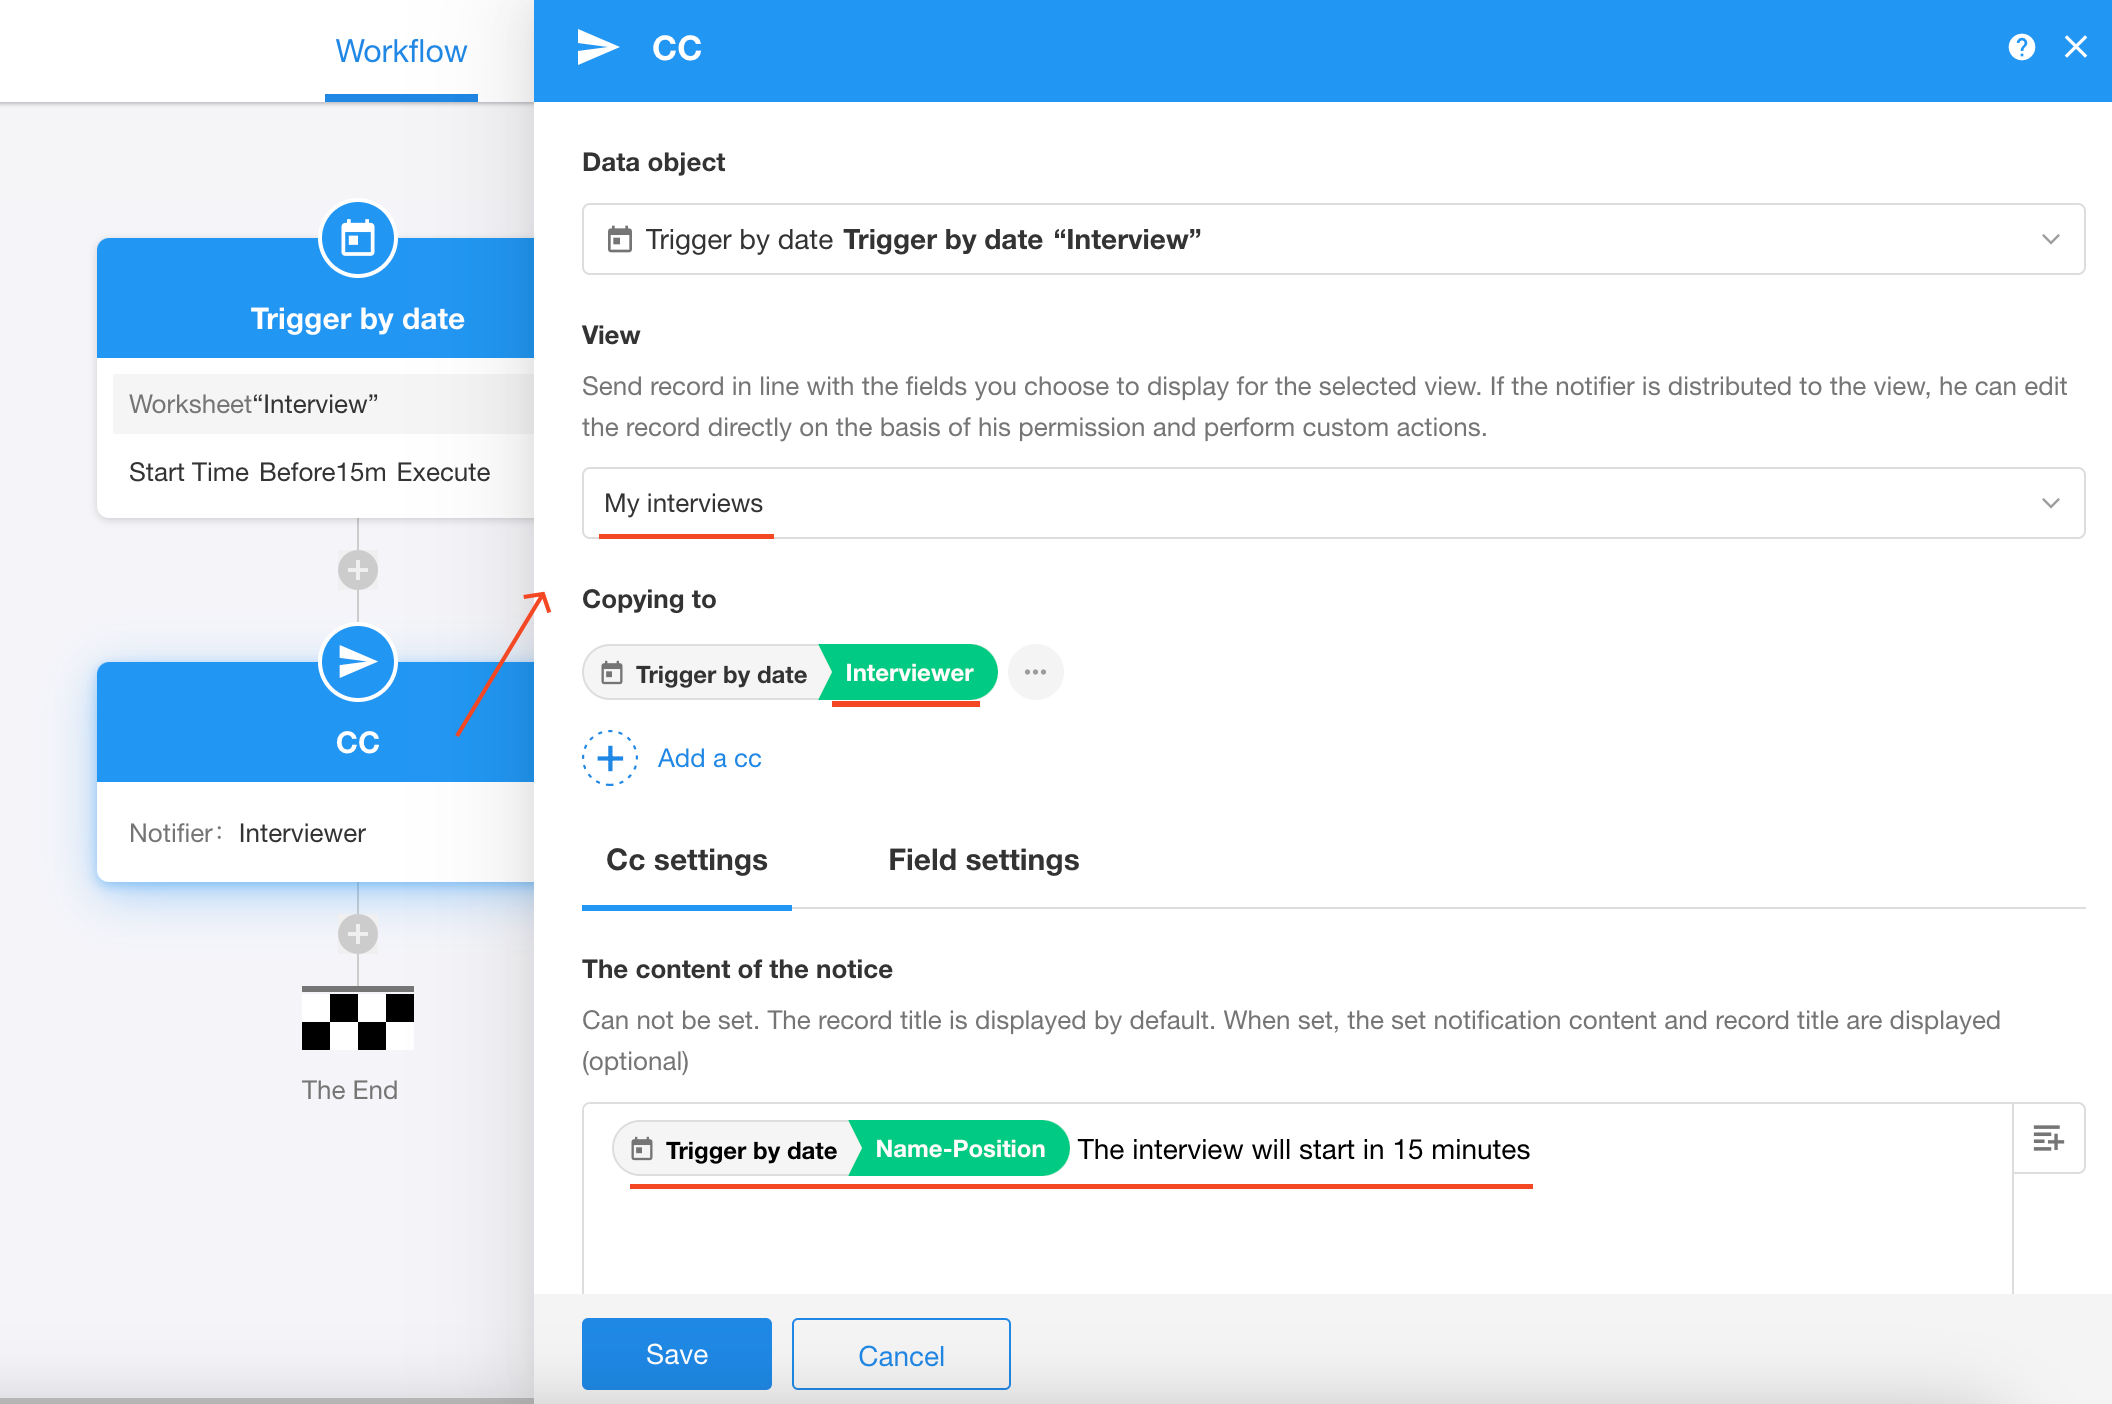
Select the interview worksheet, date field is the start time of interview, 15 mins before each interview.
It will extract start time of all interviews in the interview worksheet. Each start time will trigger the workflow.
3) Send notification message to interviewers
Add a [CC] node, set up the notification messagge and the notifier.
-
Notification messagge: select the field content or enter fixed content.
-
Notifier: Select the field of interviewer.
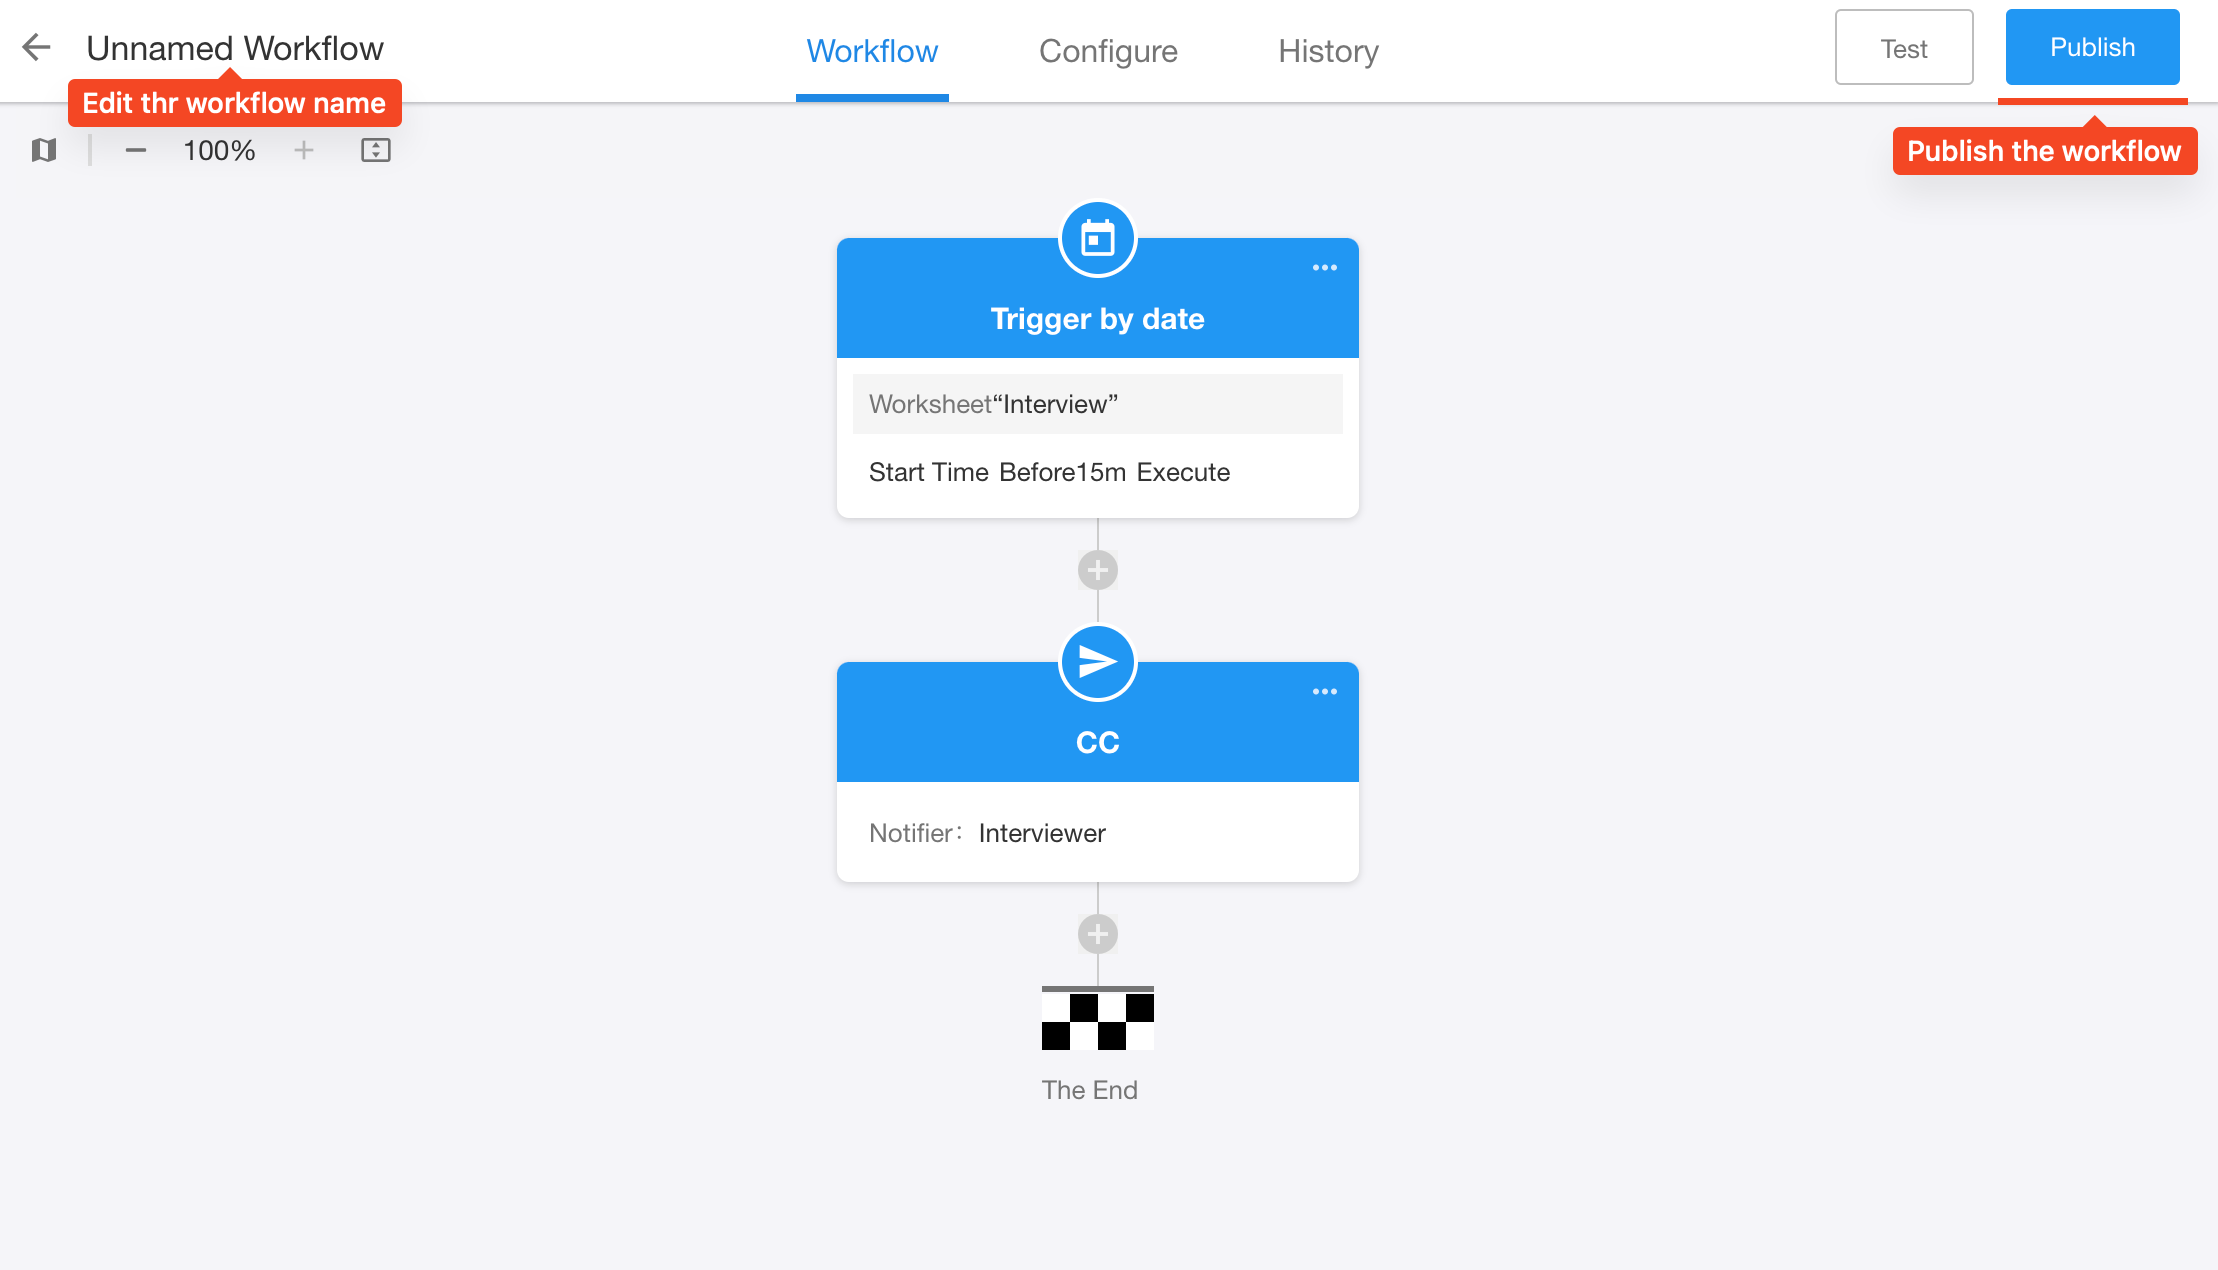
4) Publish the workflow
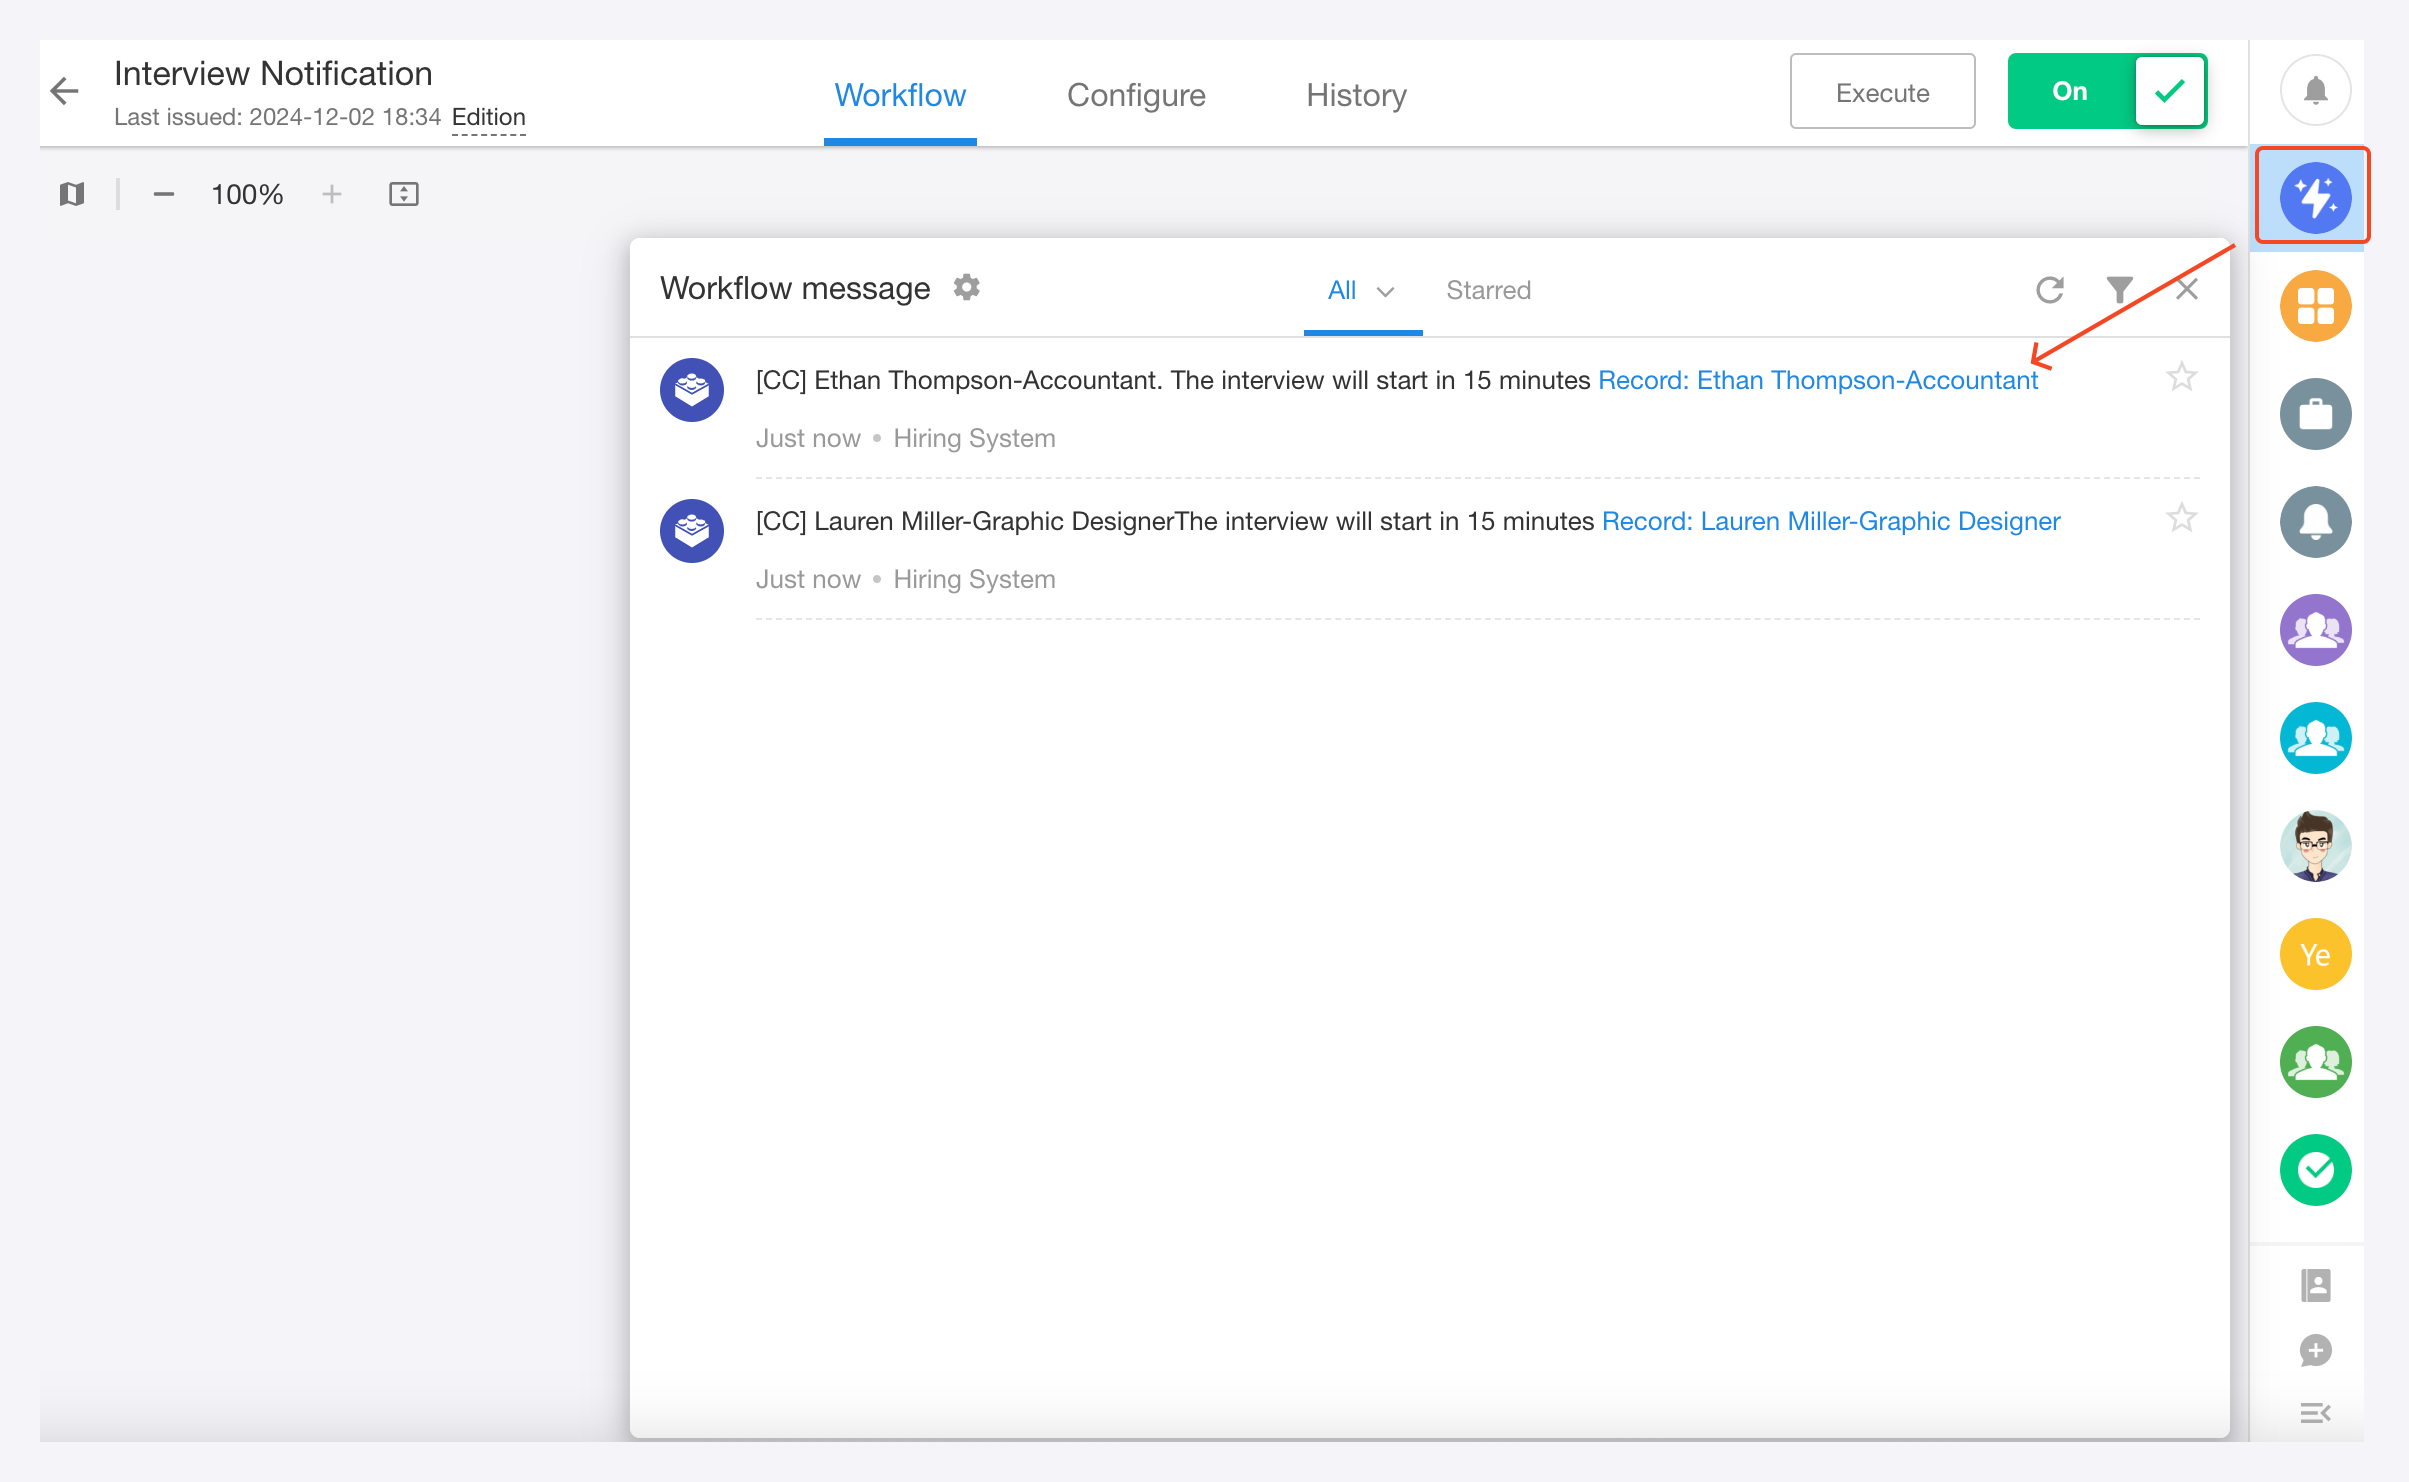
5) Workflow message
5.2 Workflow - Synchronize the interview result to the candidate's record
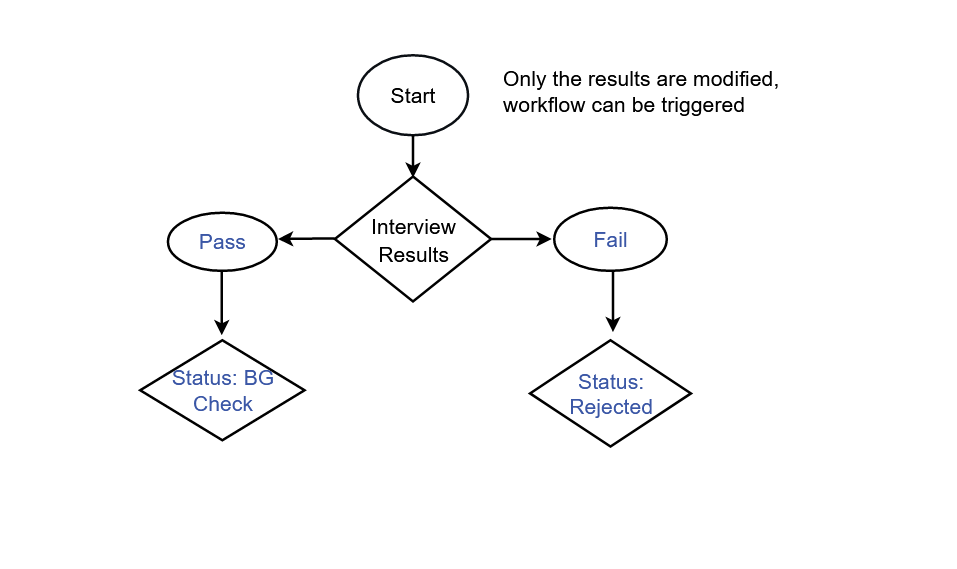
There are interview results in the interview record, pass or fail or, which is also needed in candidate records. After modifying the results, it will be better if the results can be automatically synced to the candidate record.
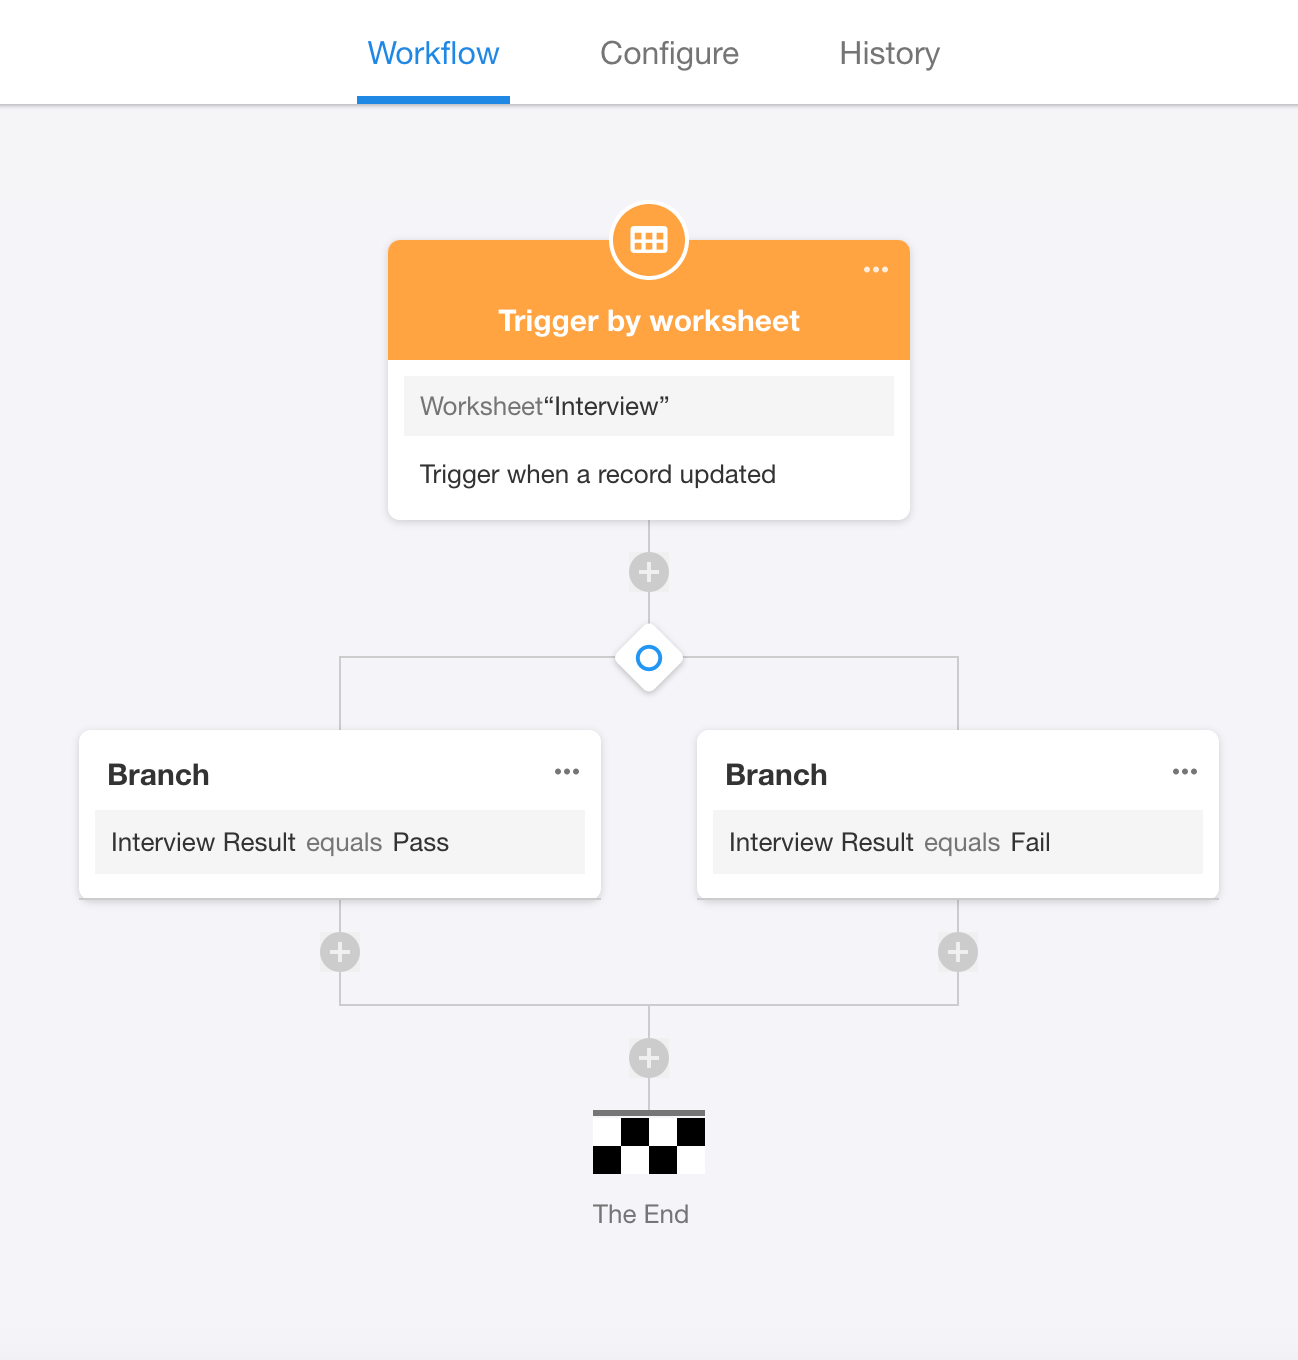
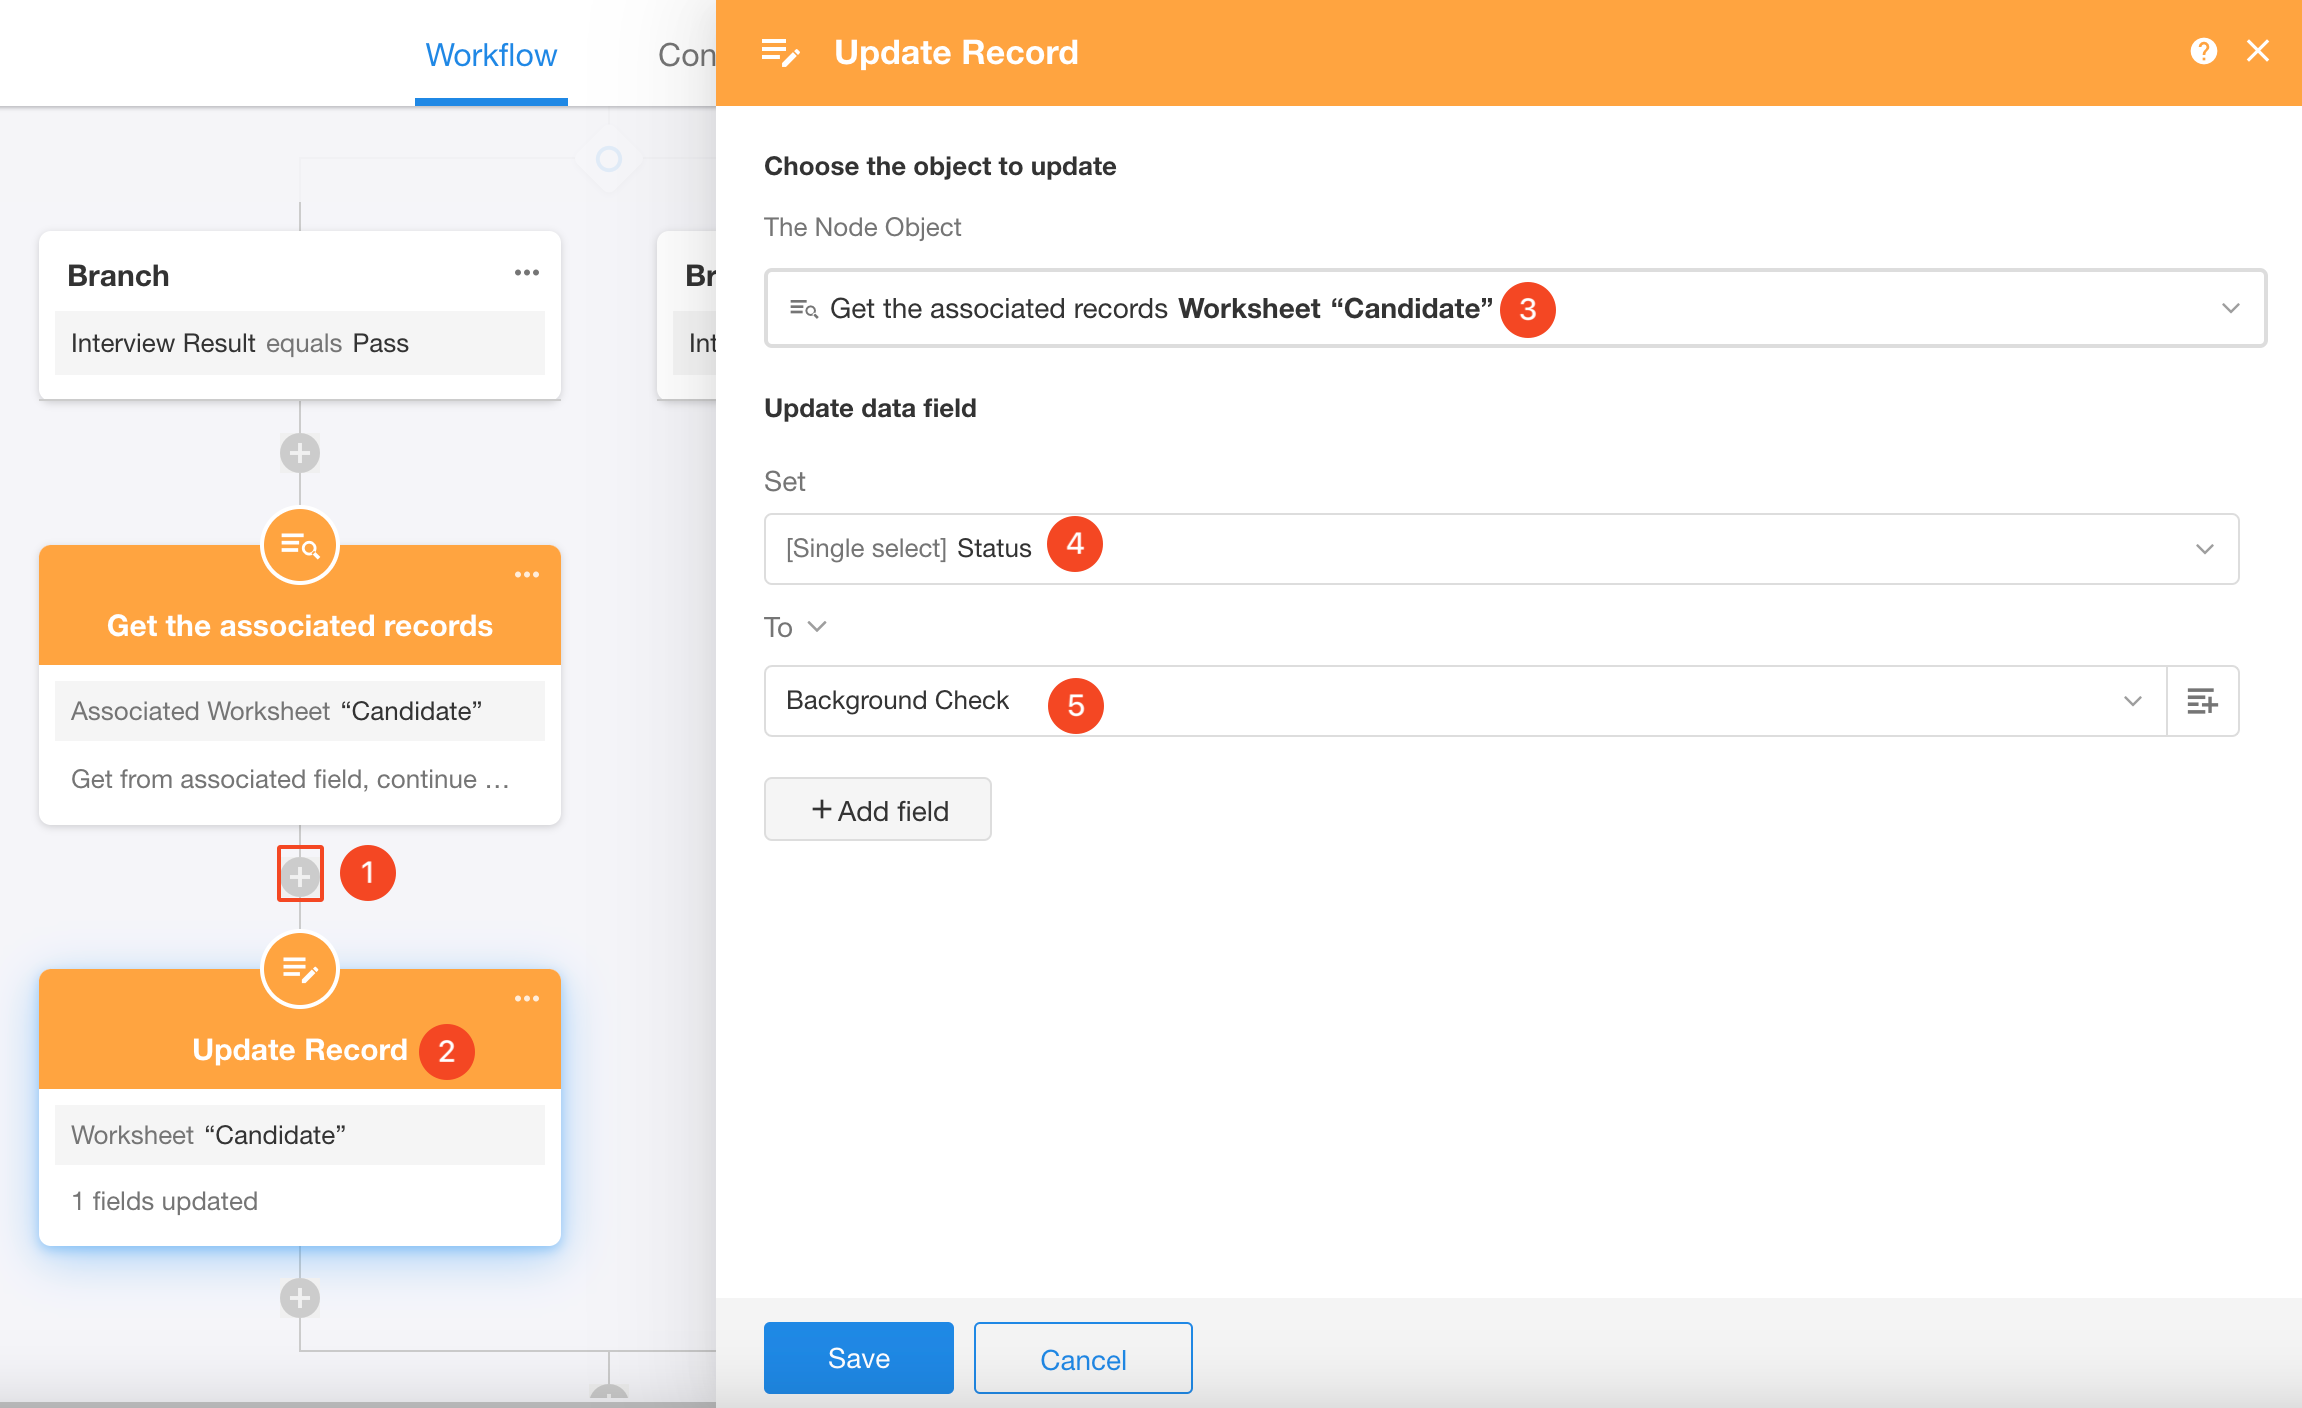
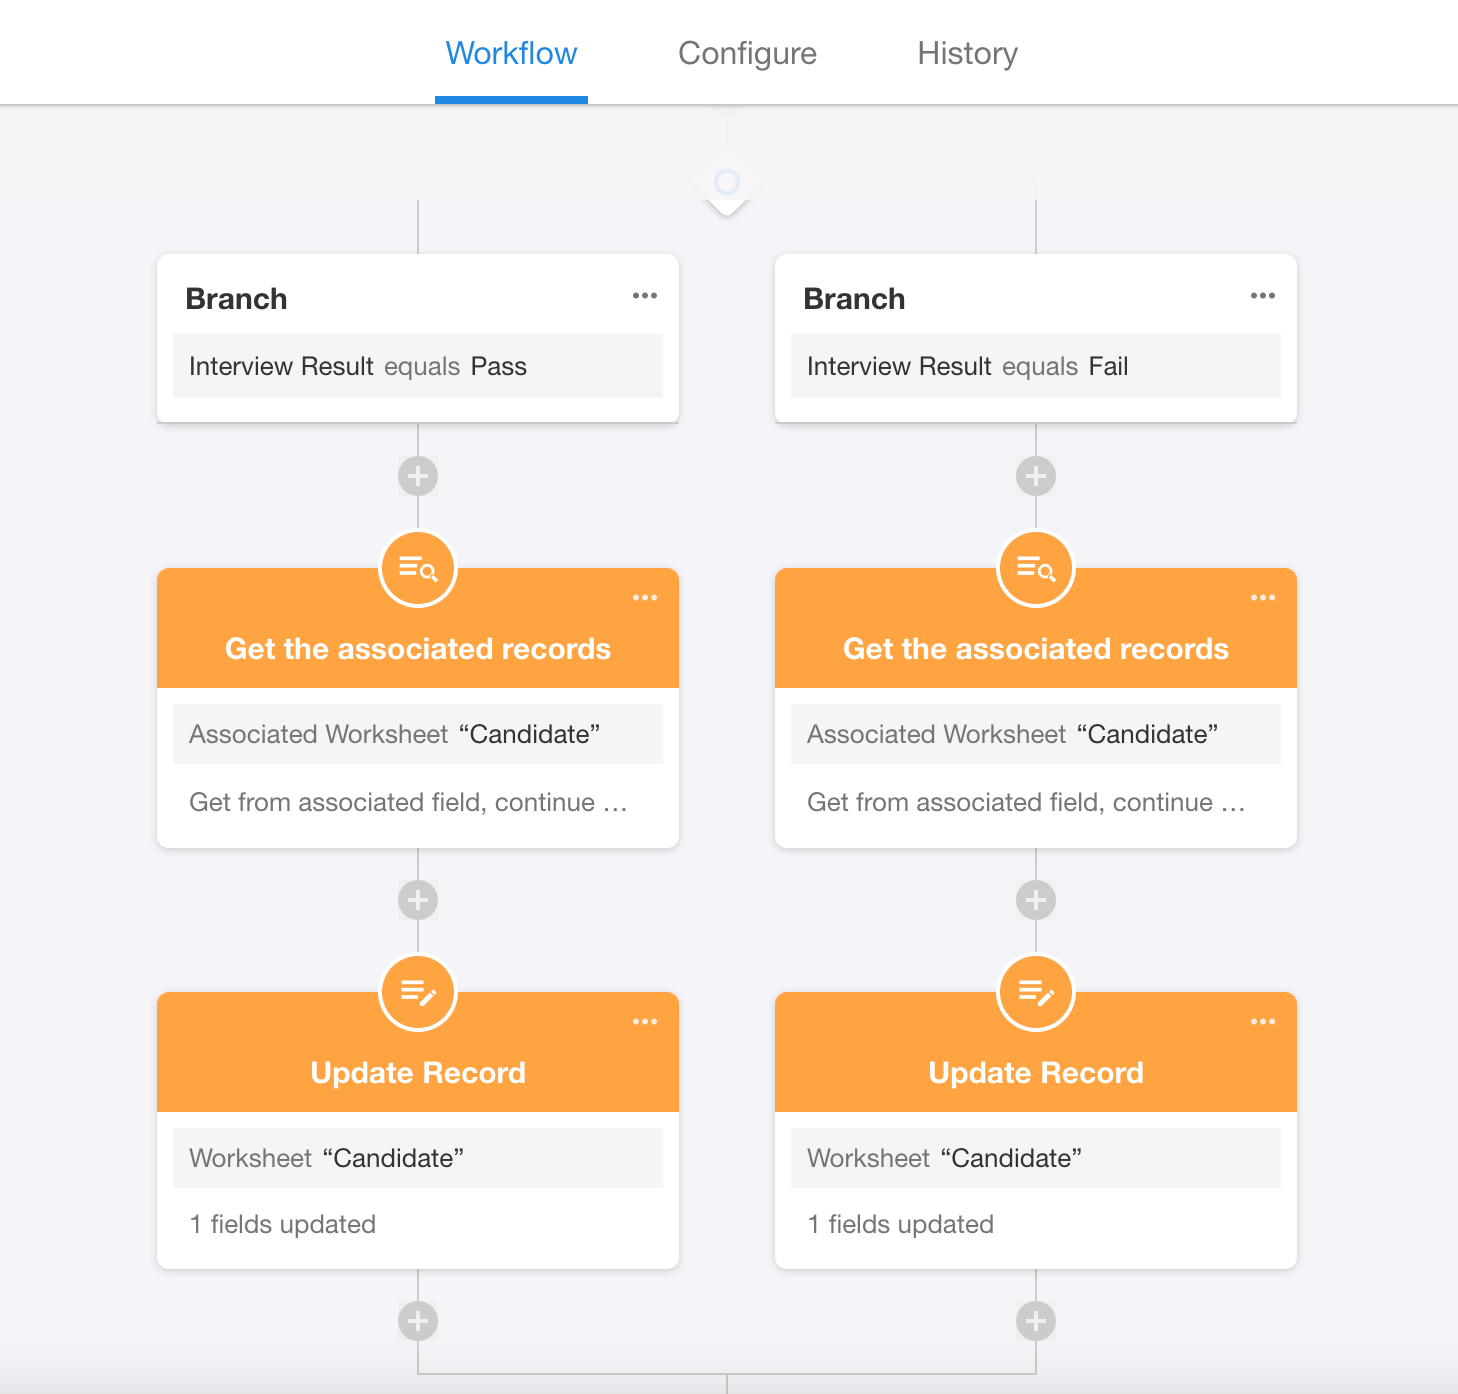
The process is that when the interview result is pass, the status field in cadidate record should be updated to background check; if the result is fail, the status field in cadidate record should be updated to rejected.
The flow chart is as follows.
1) Create a workflow triggered by worksheet
2) Set the trigger node
Select the interview worksheet, check [Only when updating records] and select the field of interview results.
3) Add branches
Different interview results require different processes. Therefore, a branch node needs to be added.
The configured branch node is shown below.
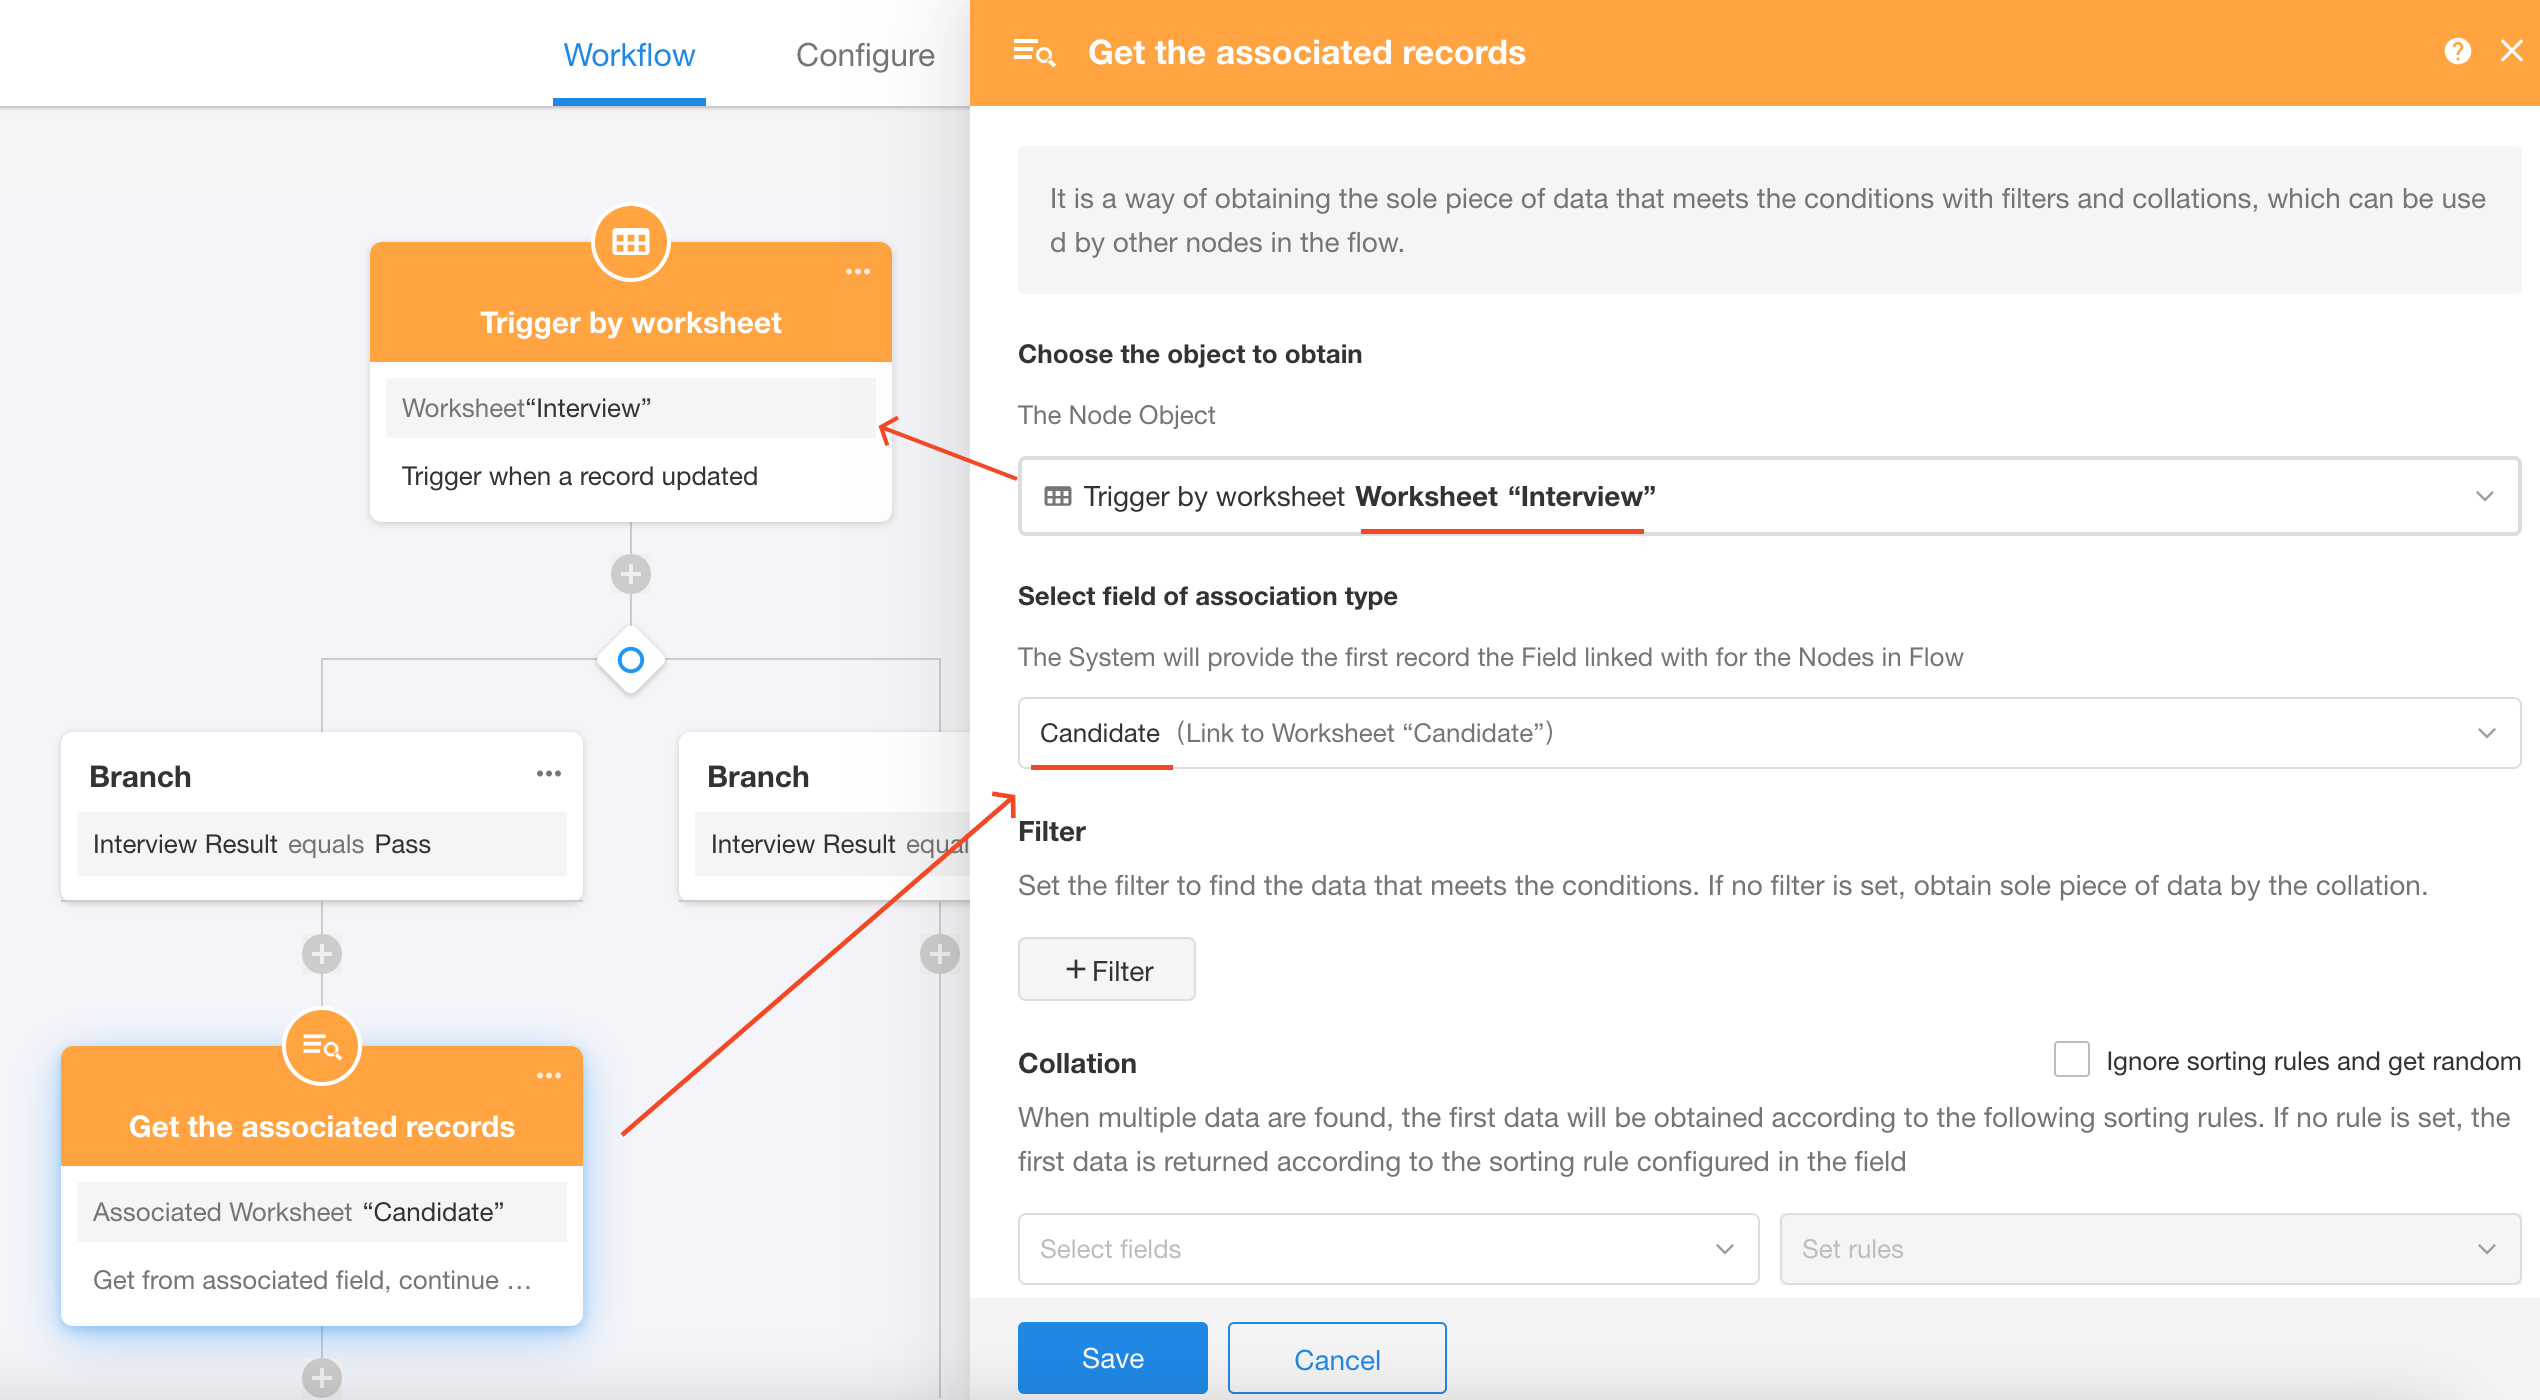
4) Get the candidate record
If the result is pass, the status field in candidate record should be updated to background check. Therefore, we need to get the candidate record first.
Add a [Get single data] node and select [Get the associated records].
Since the interview worksheet has been related to the candidate worksheet, the candidate record can be obtained through the relationship.
-
Add the [get single data] node
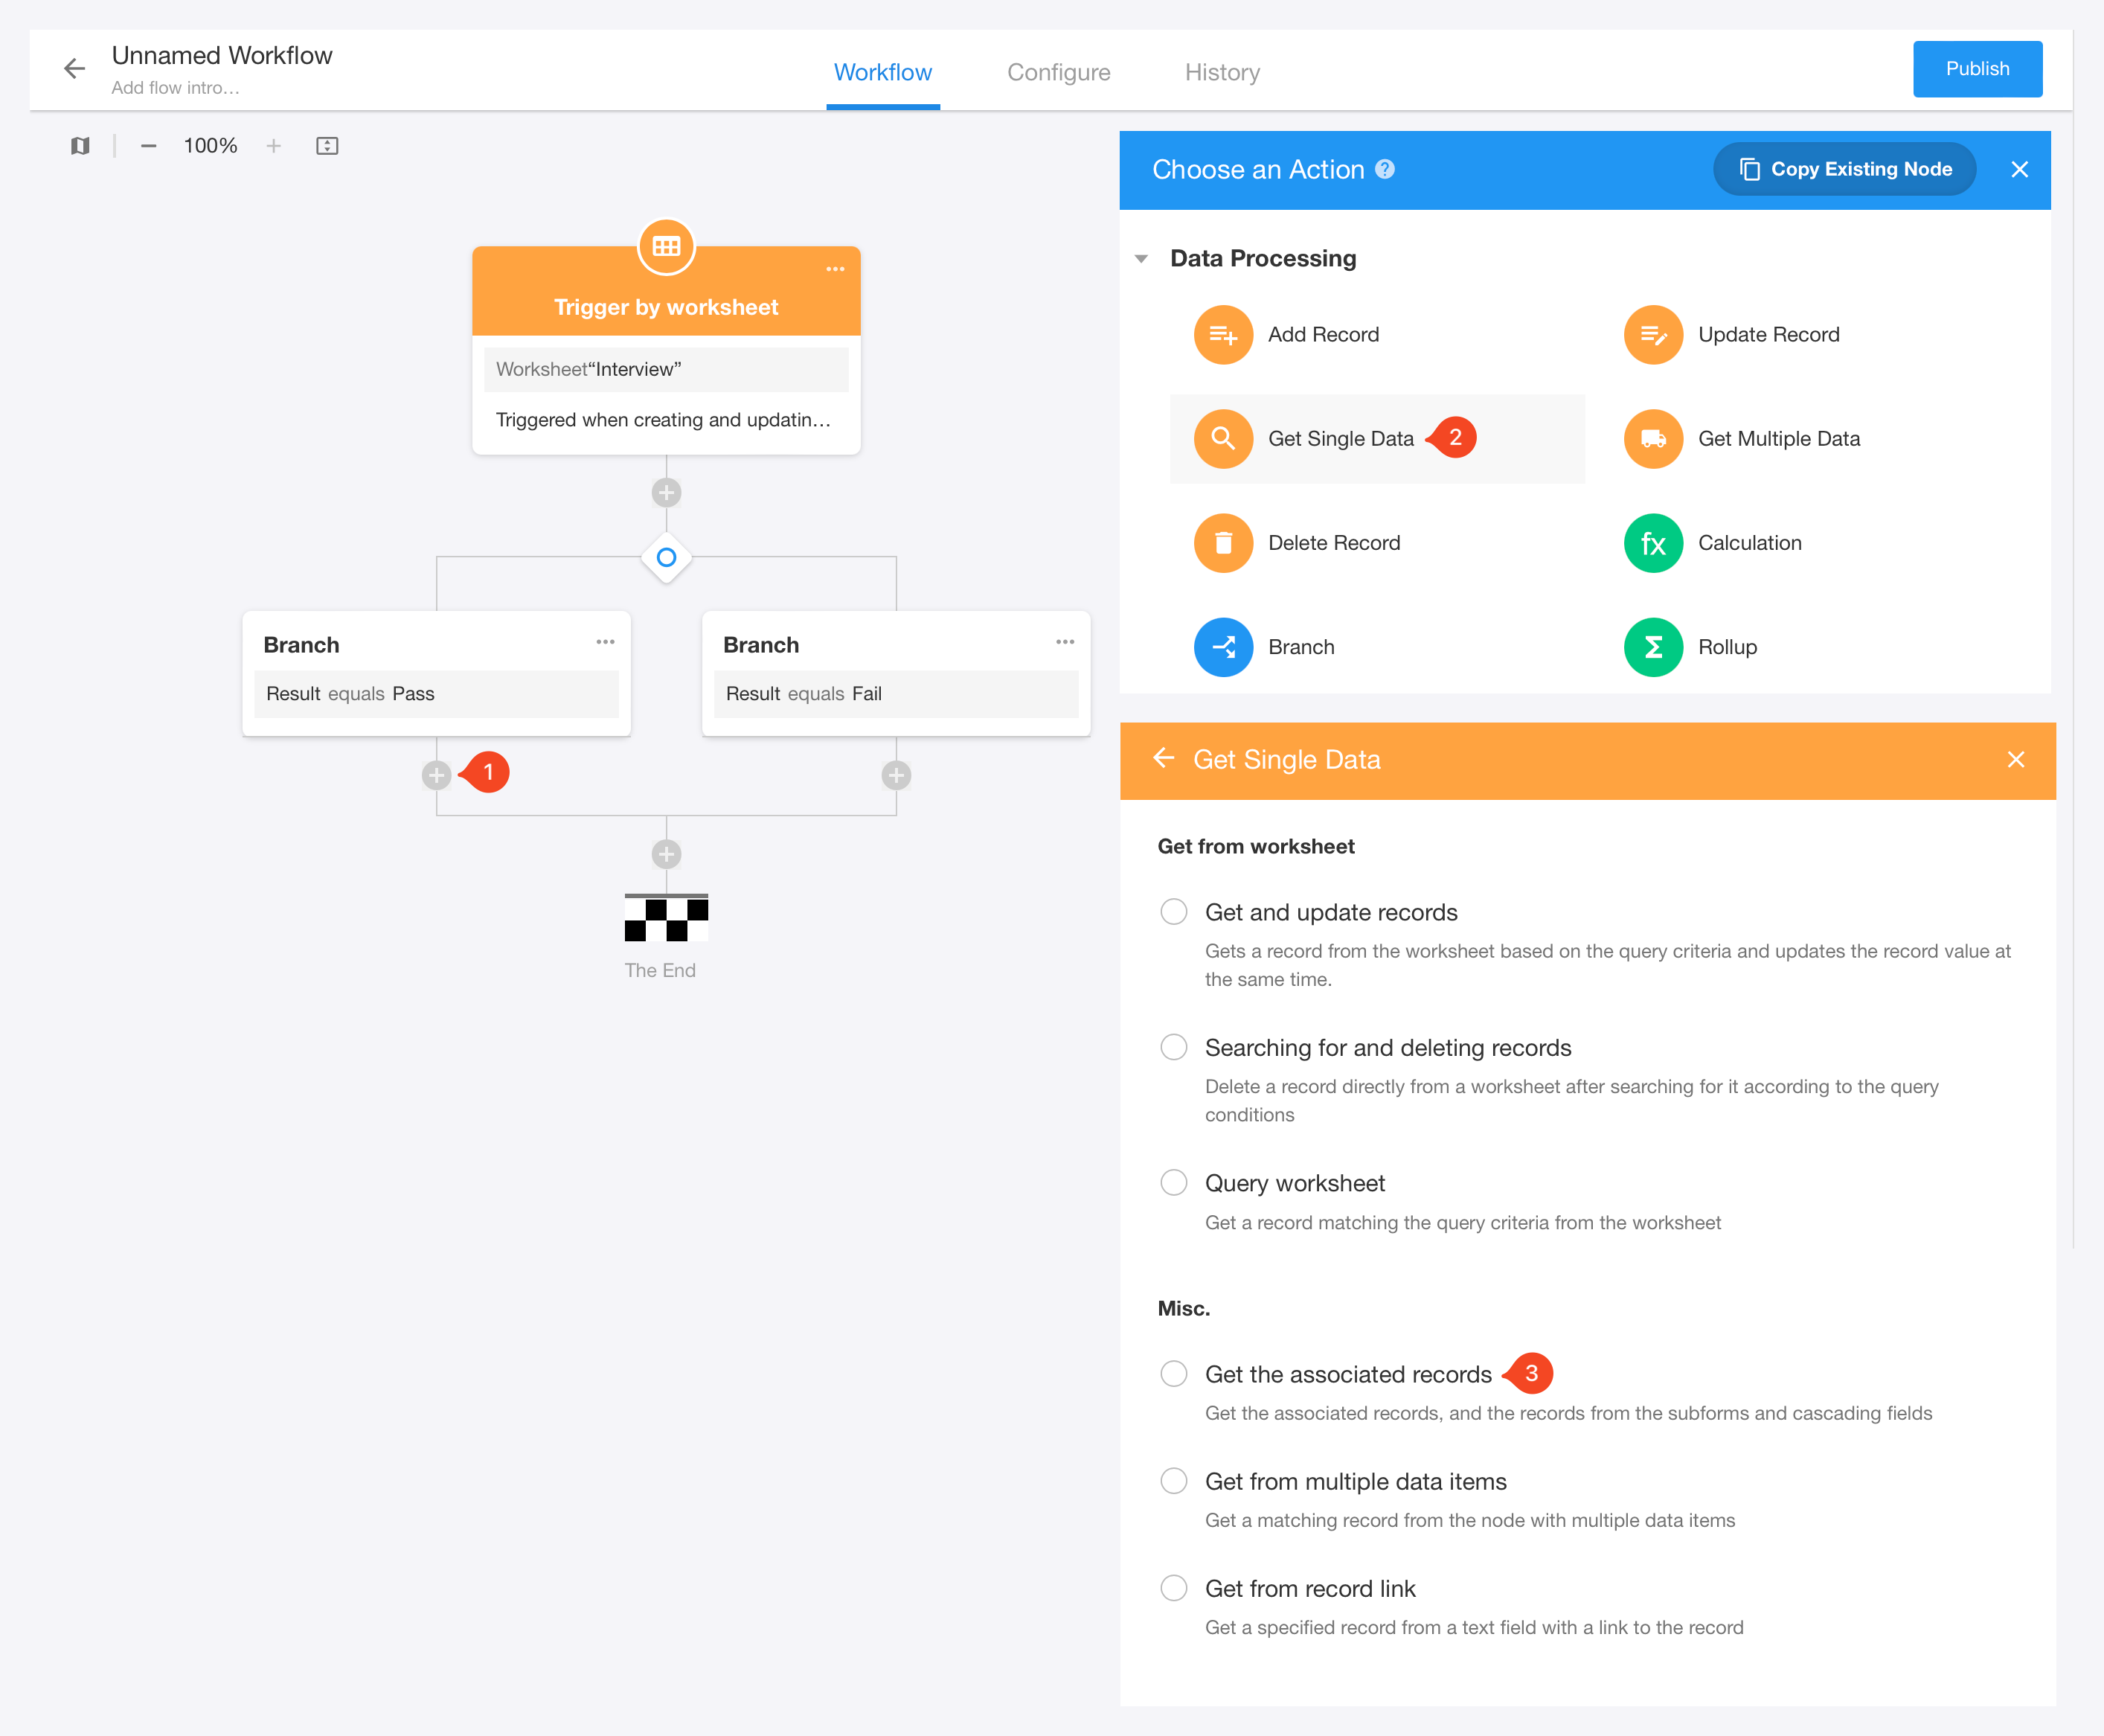
-
Configure the [get single data] node
5) Update the status field
Add the [Update record] node, choose the object to update, and set the updated data field.
6) Set the other branch - If fail
The nodes configuration is similar, details are as shown in the figure below.
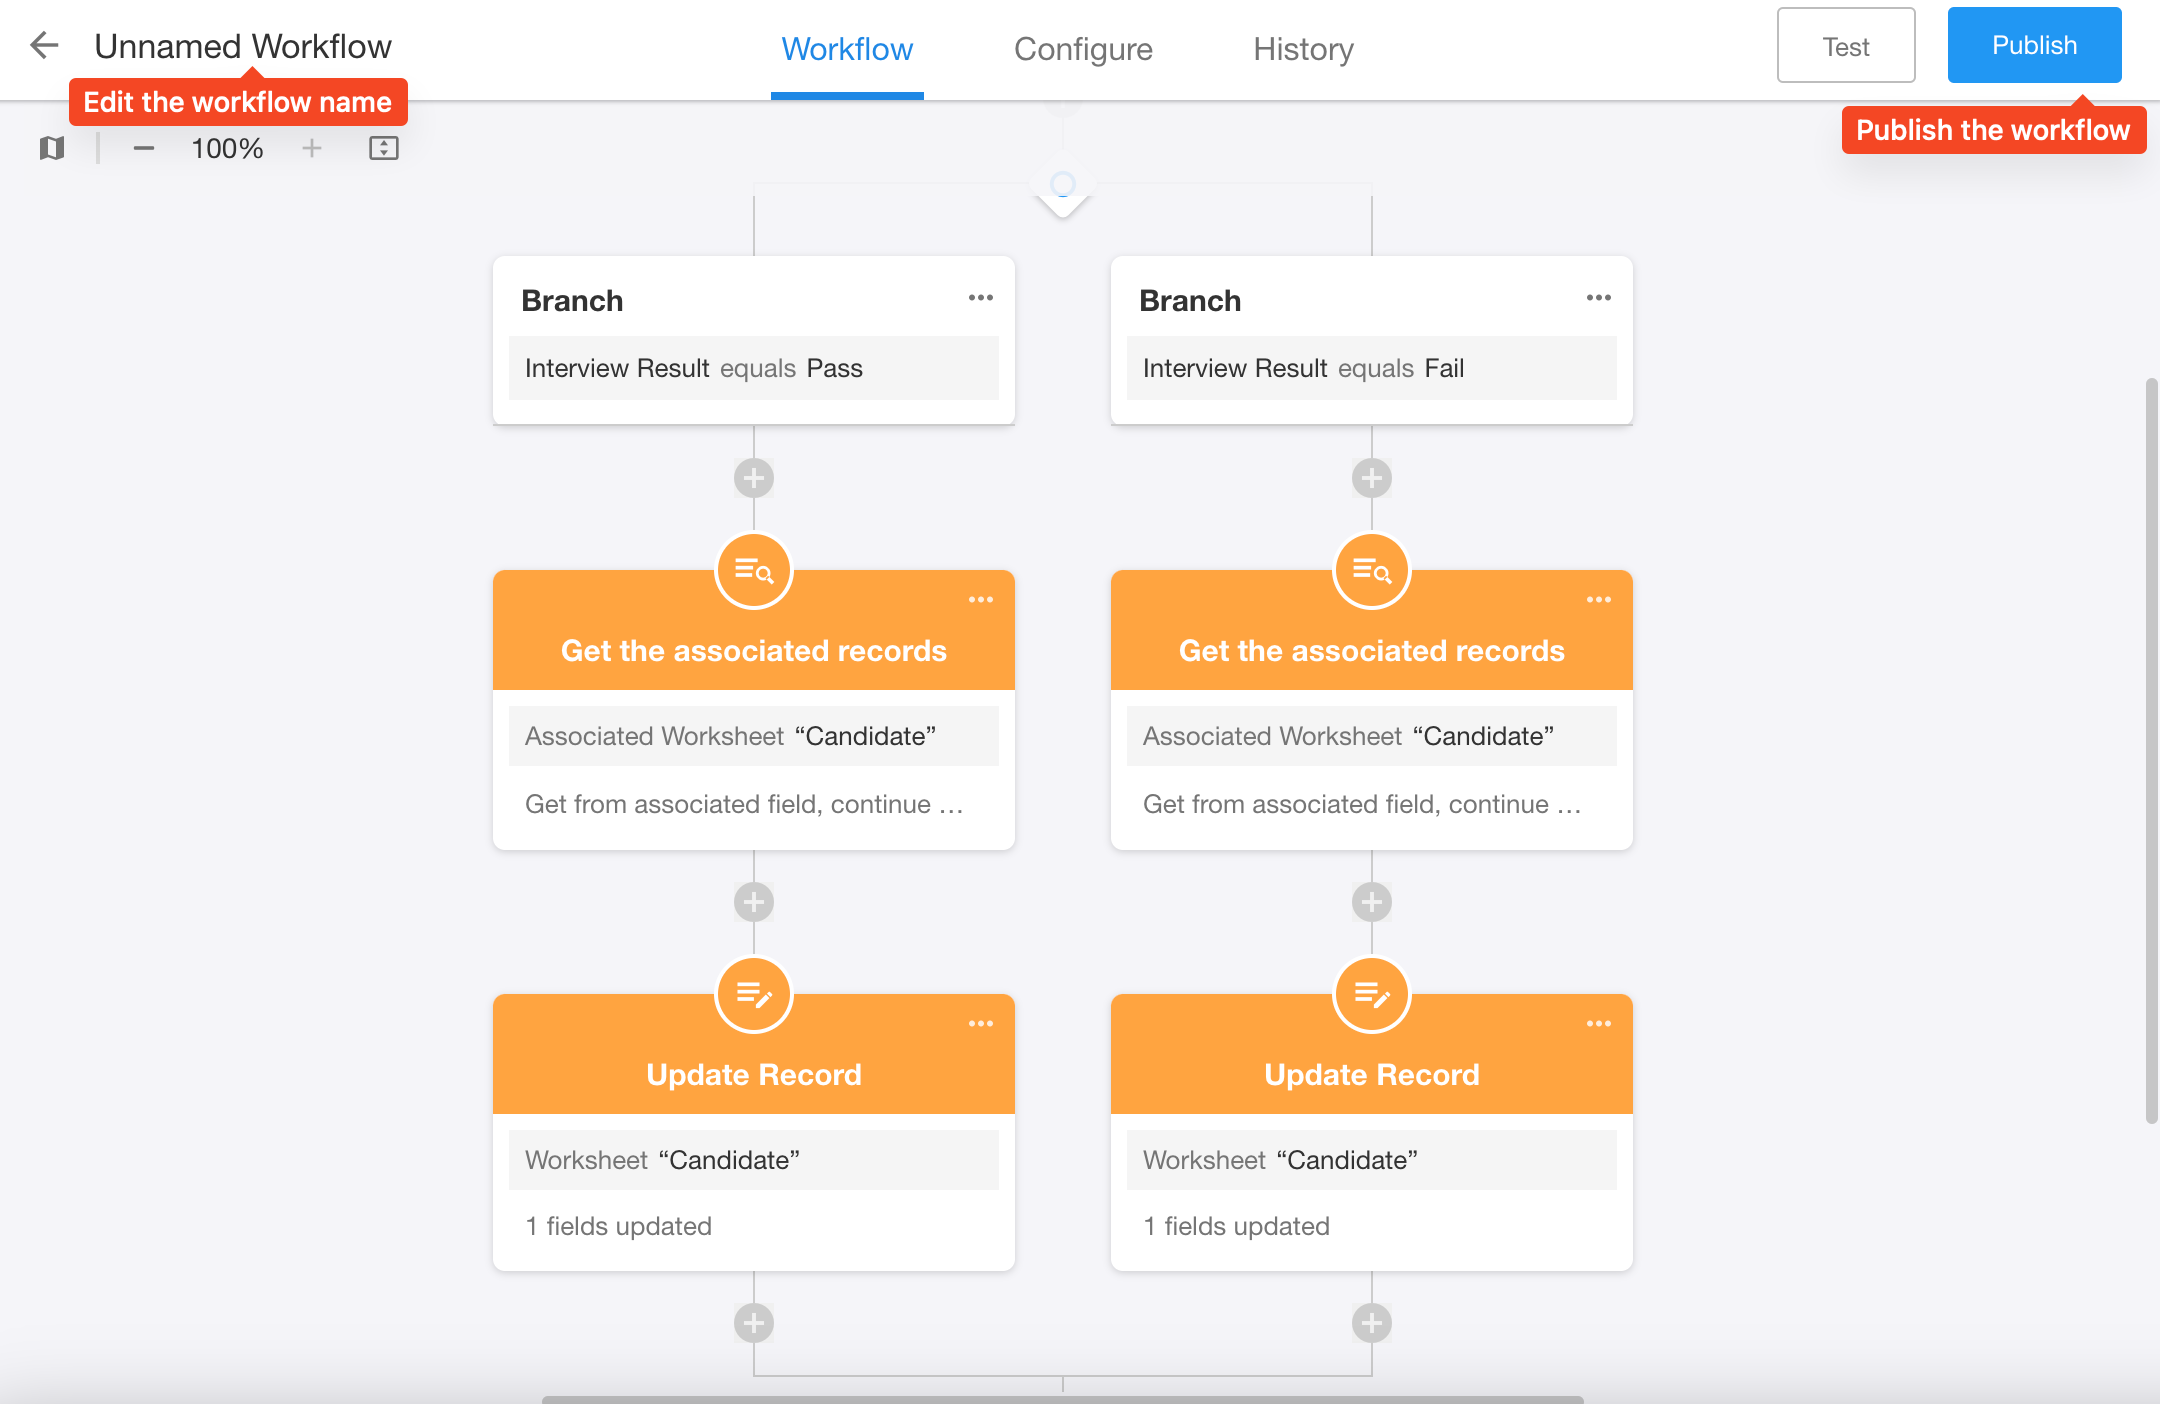
7) Edit the workflow name and publish
8) Test the workflow
Click on an interview record, modify the results to pass, and save it.
We can see the status field in candidate record is automatically updated to background check.
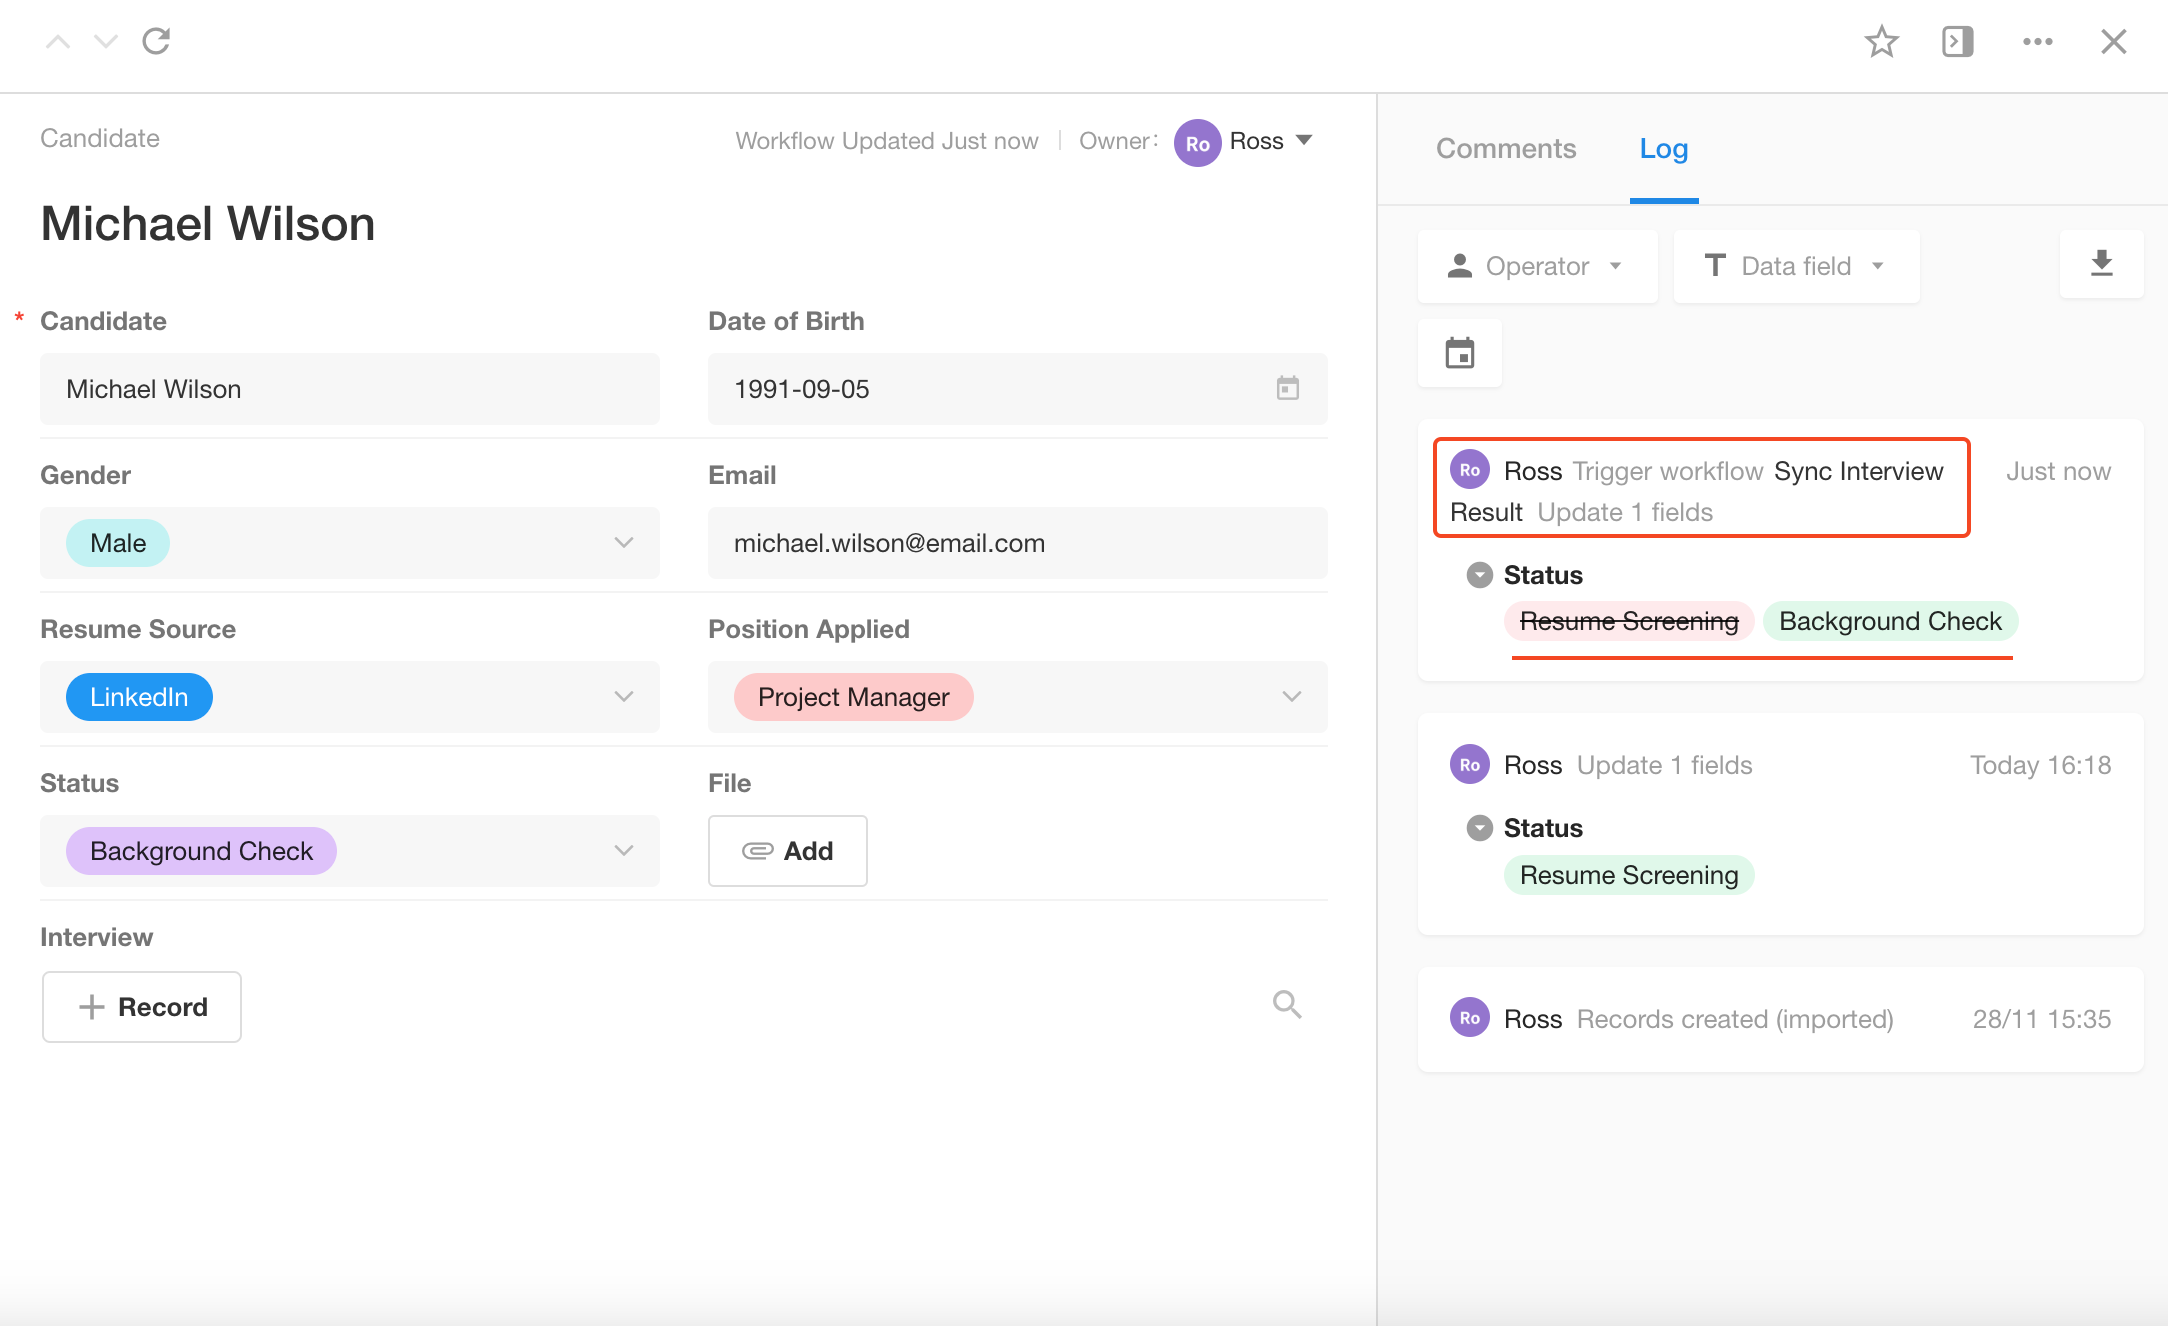
Workflows can facilitate the implementation of many complex processes. For further details regarding nodes and workflows, please go to read the relevant section in our help center.
6. Create charts
Analyzing business data from various dimensions is an essential requirement in operations. HAP supports 9 types of visualization charts: bar chart, line chart, pie chart, number chart, biaxial chart, radar chart, funnel chart, pivot chart, and administrative division.
In this application, we will create a chart to visualize the number of candidates who have been interviewed.
6.1 Entrance to create charts
We will analyze the number of candidates who have been interviewed, so we need to create a chart in the interview worksheet.
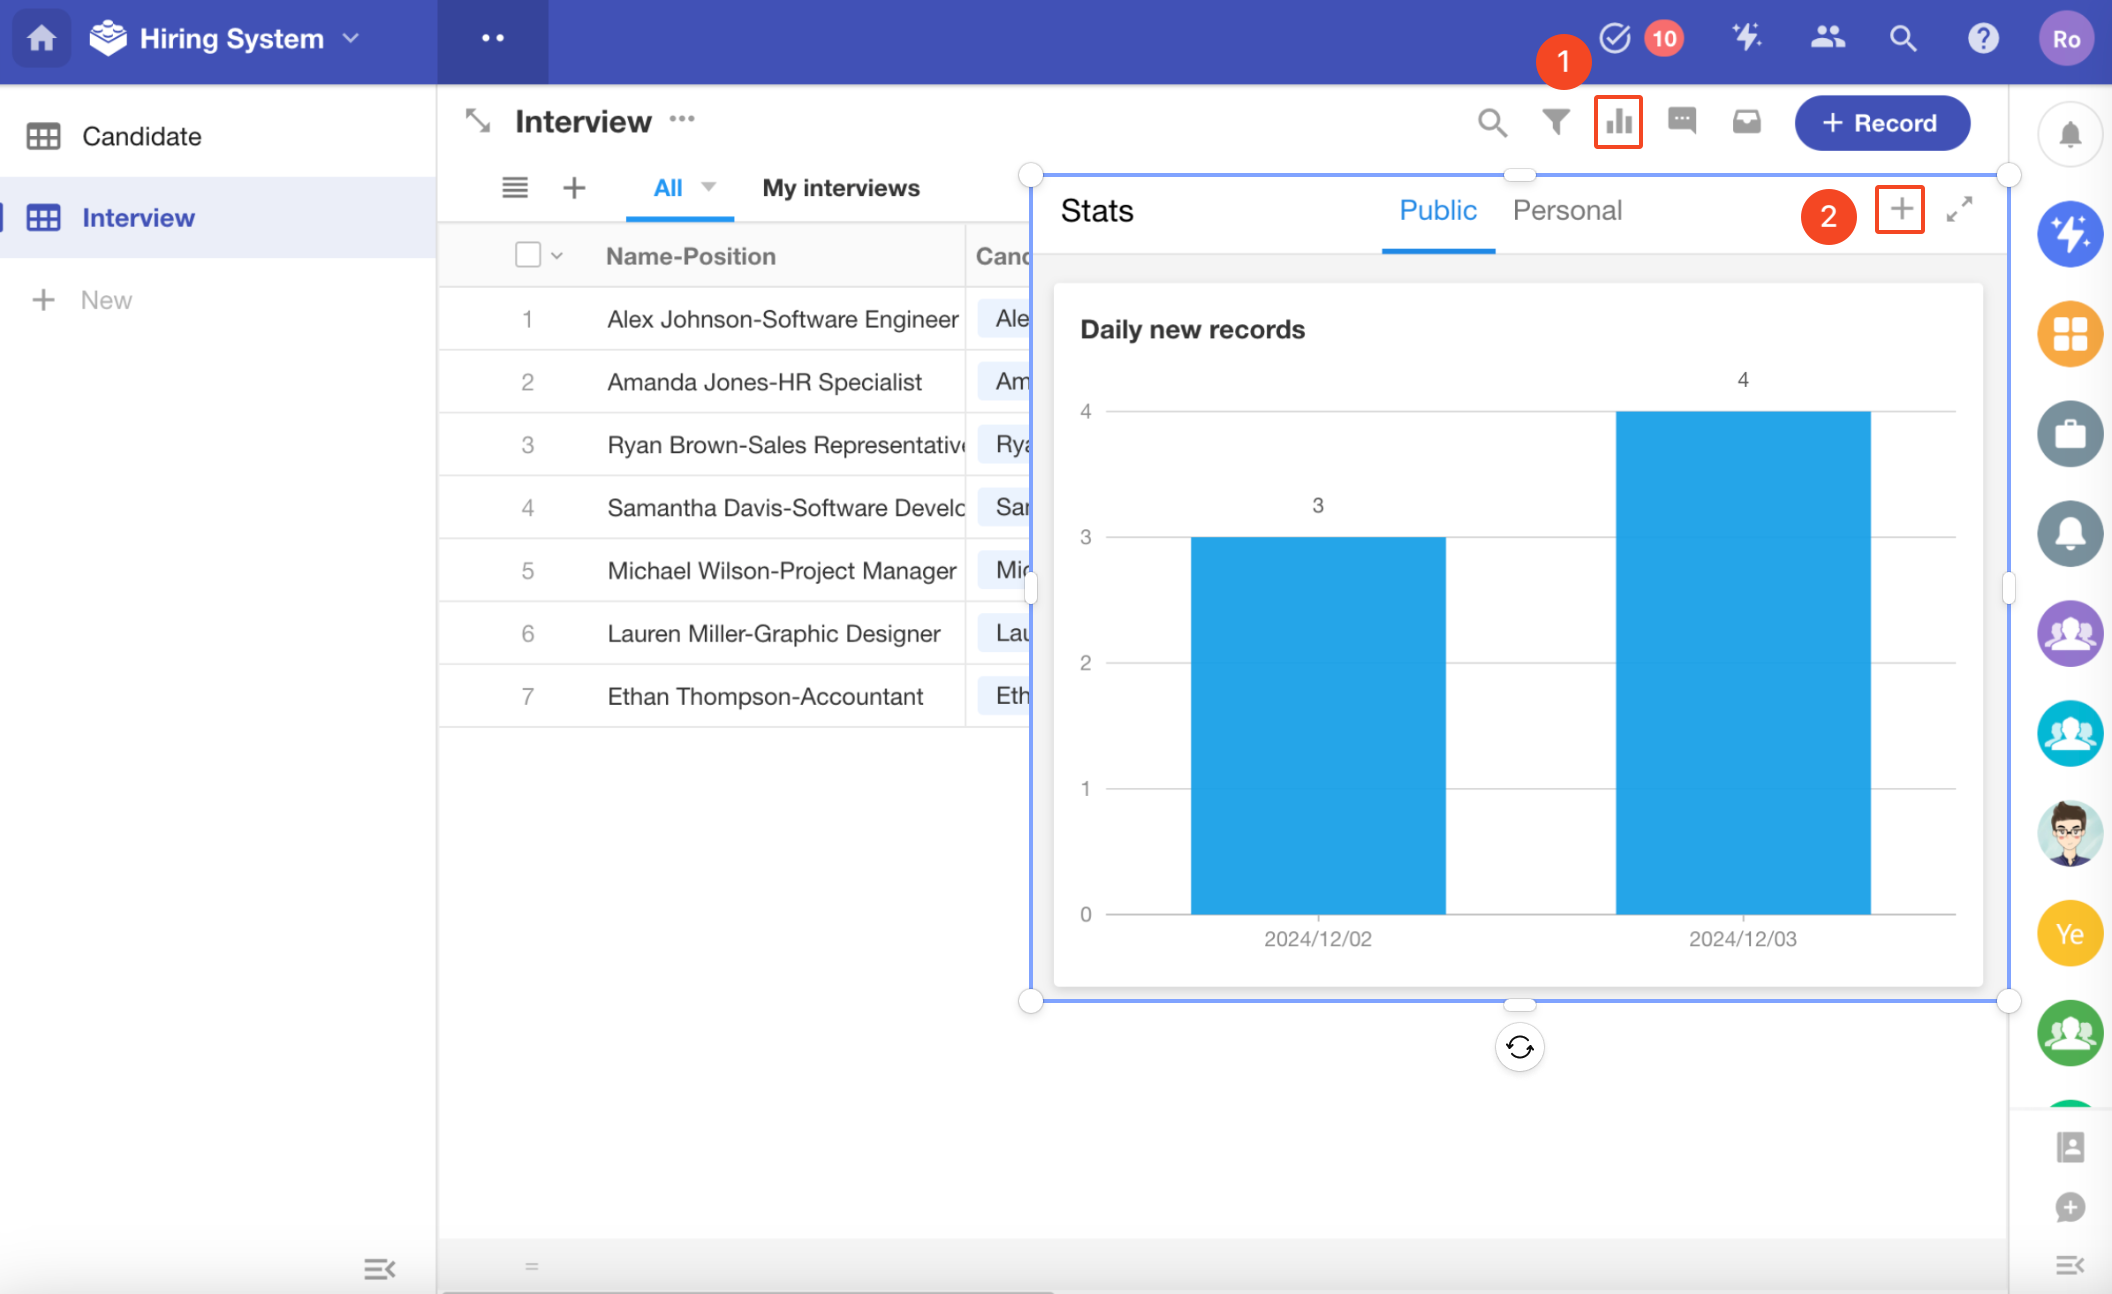
6.2 Configure the chart
The general steps for configuring a chart are as follows:
- Set the data source
- Select the chart type
- Choose the statistical dimensions (drag fields from the left)
- Edit the chart name
- Save the chart
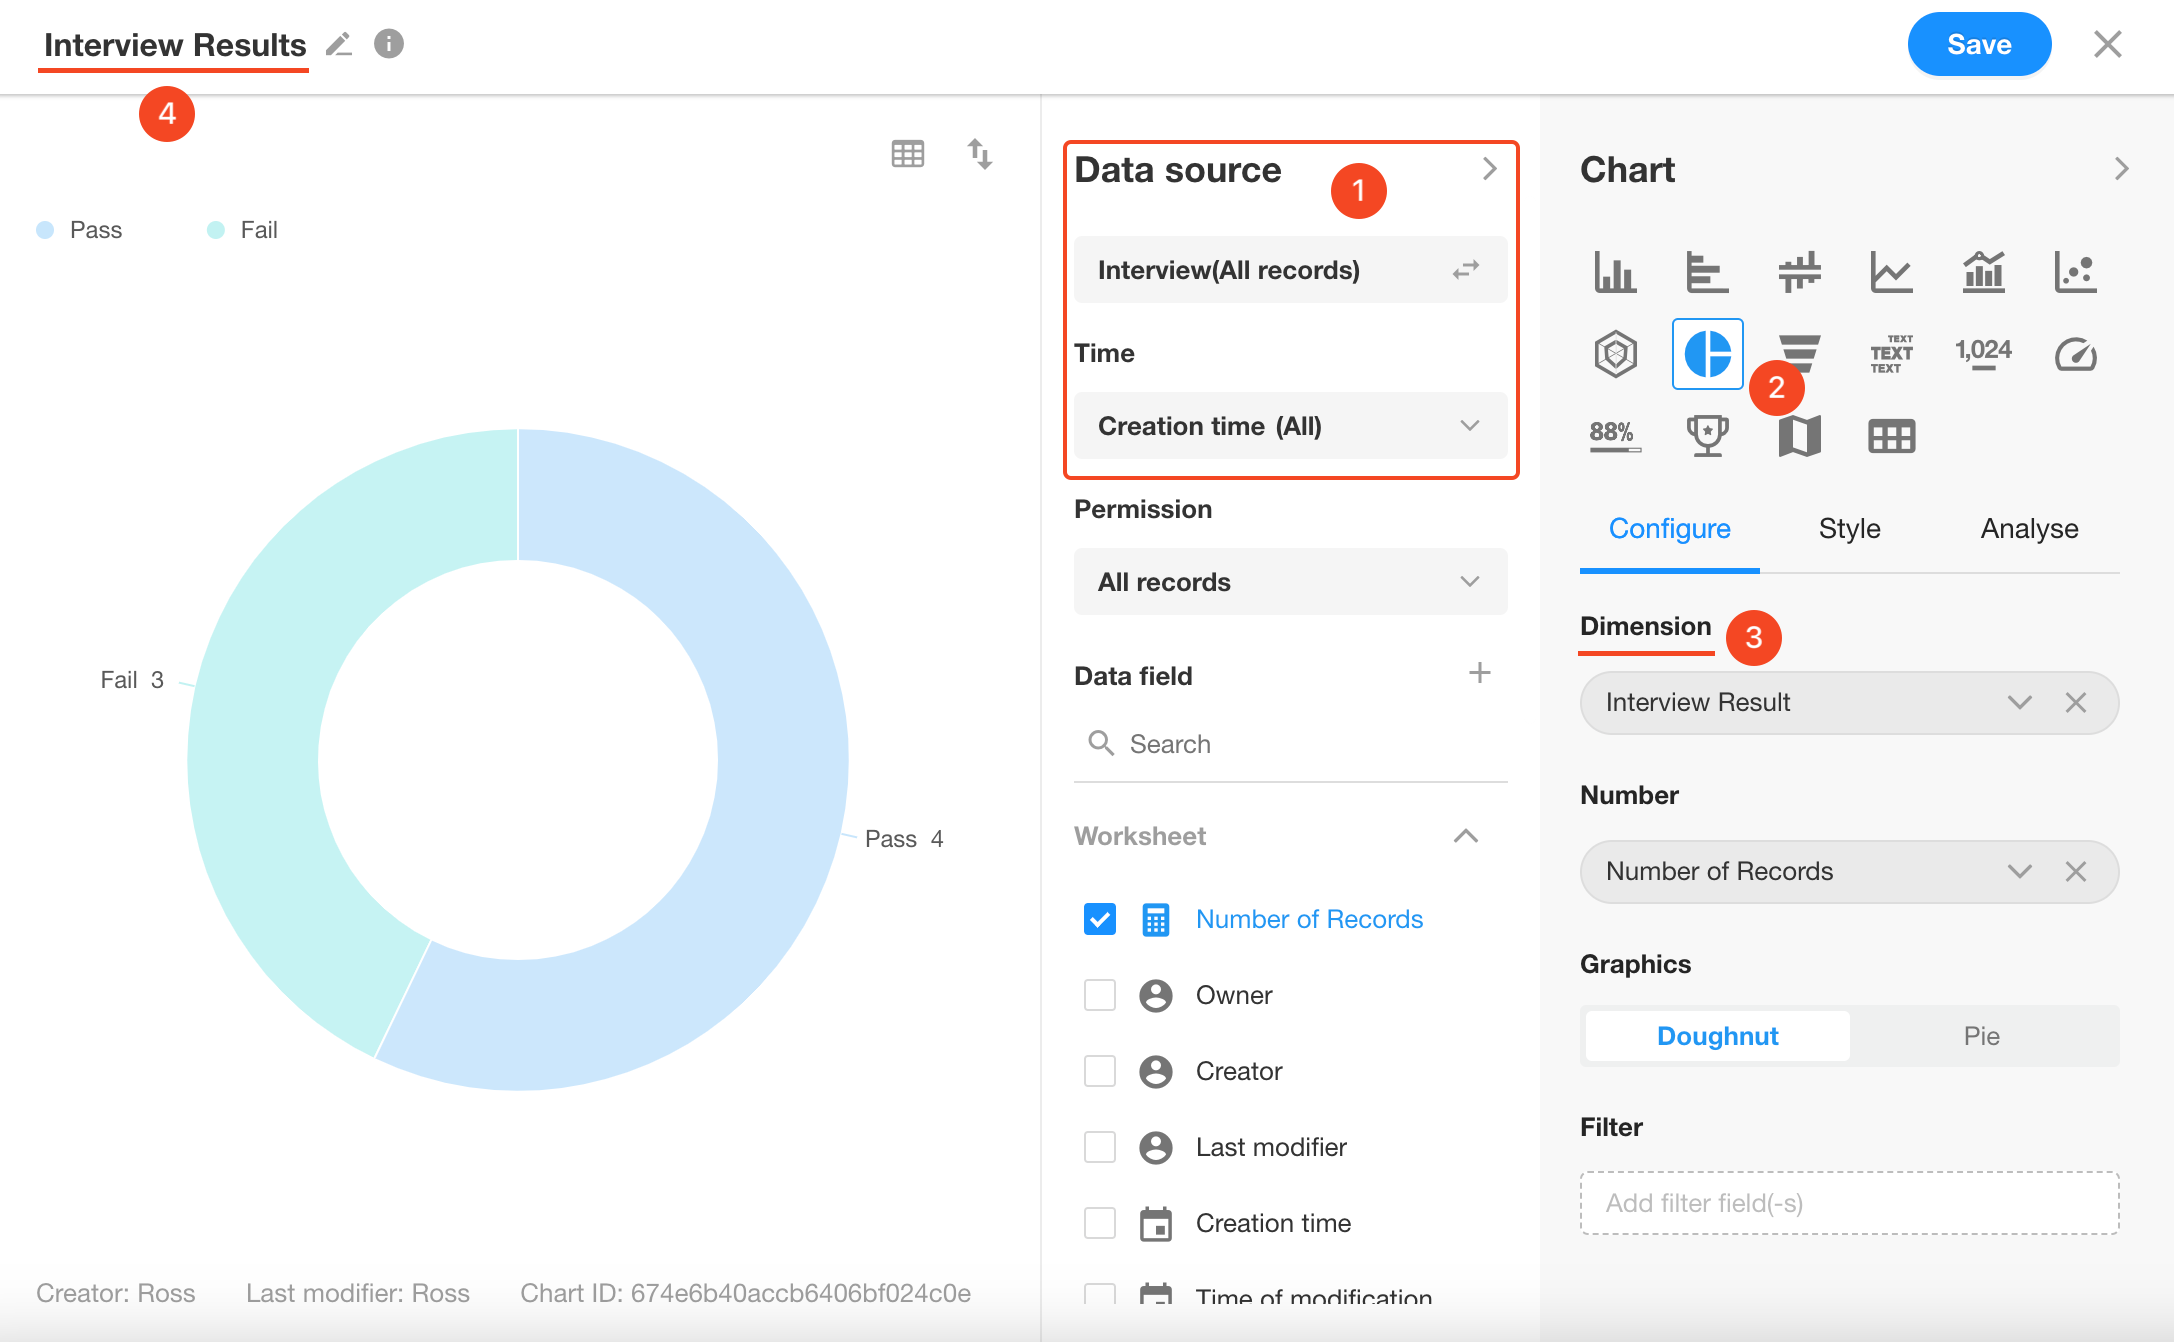
A configured chart:

For configuration of other charts, please go to read the relevant articles in our help center.
7. Custom Page
Most of the systems we commonly use require a homepage to display frequently used data, buttons, or charts. We can display these items on a custom page, serving as a dashboard or launchpad.
Currently, the custom page supports quick buttons, charts, rich text, and embedded external pages.
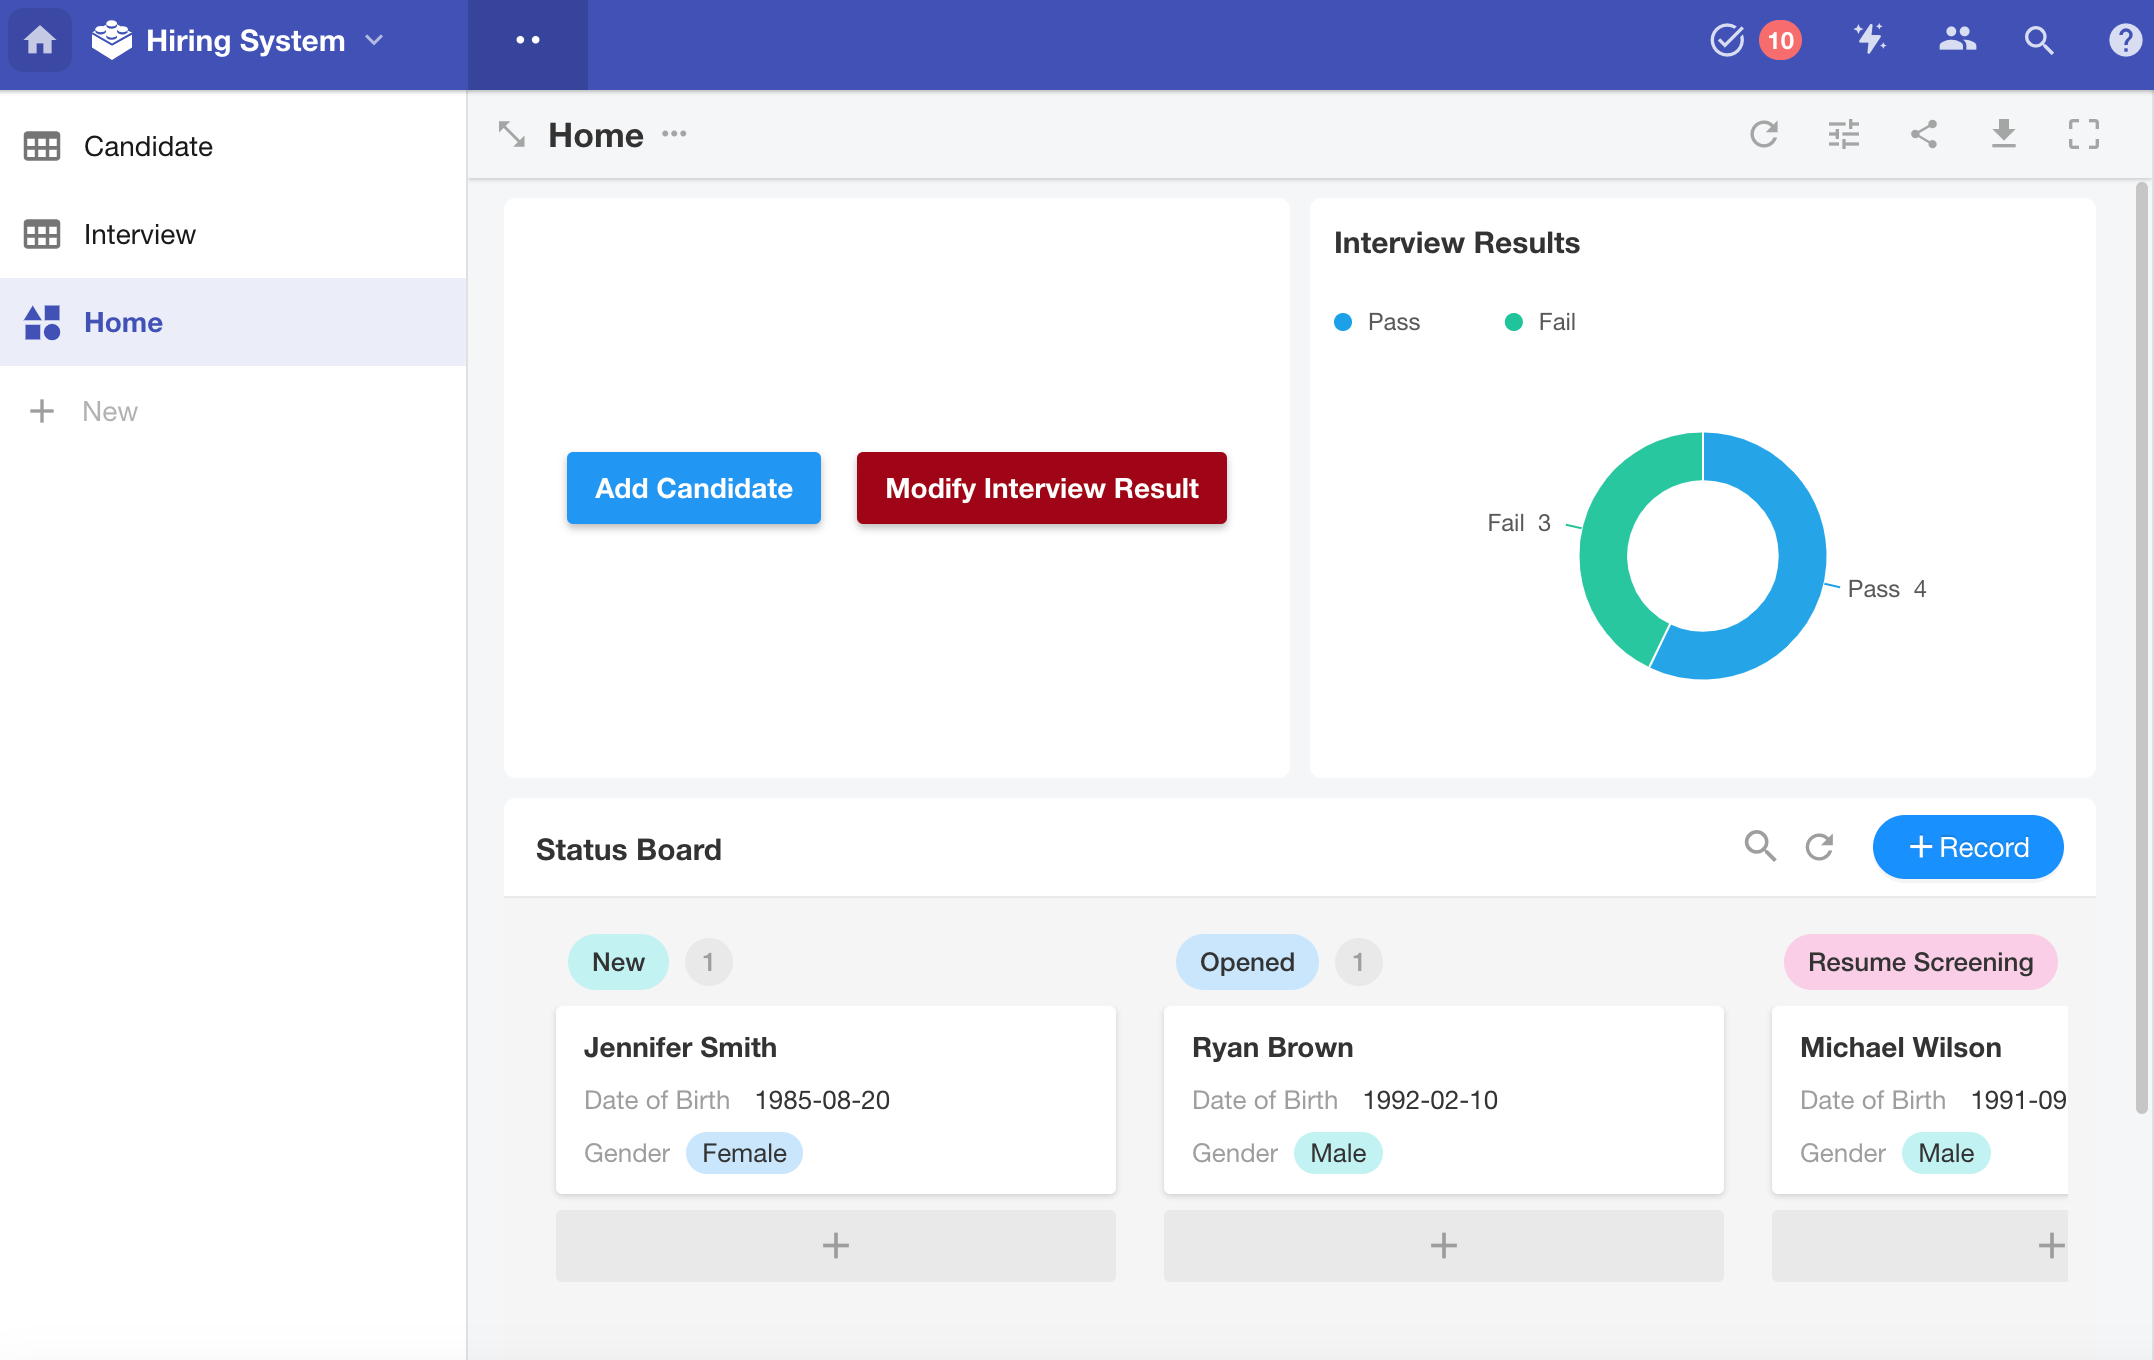
In this application, we will create a custom page to display various statistical charts, such as the number of candidates awaiting interviews, and the number of candidates with different interview results.
7.1 Create a custom page
Create a custom page and name it "Home".

7.2 Add charts
Select the chart component, configure the chart, and save it.
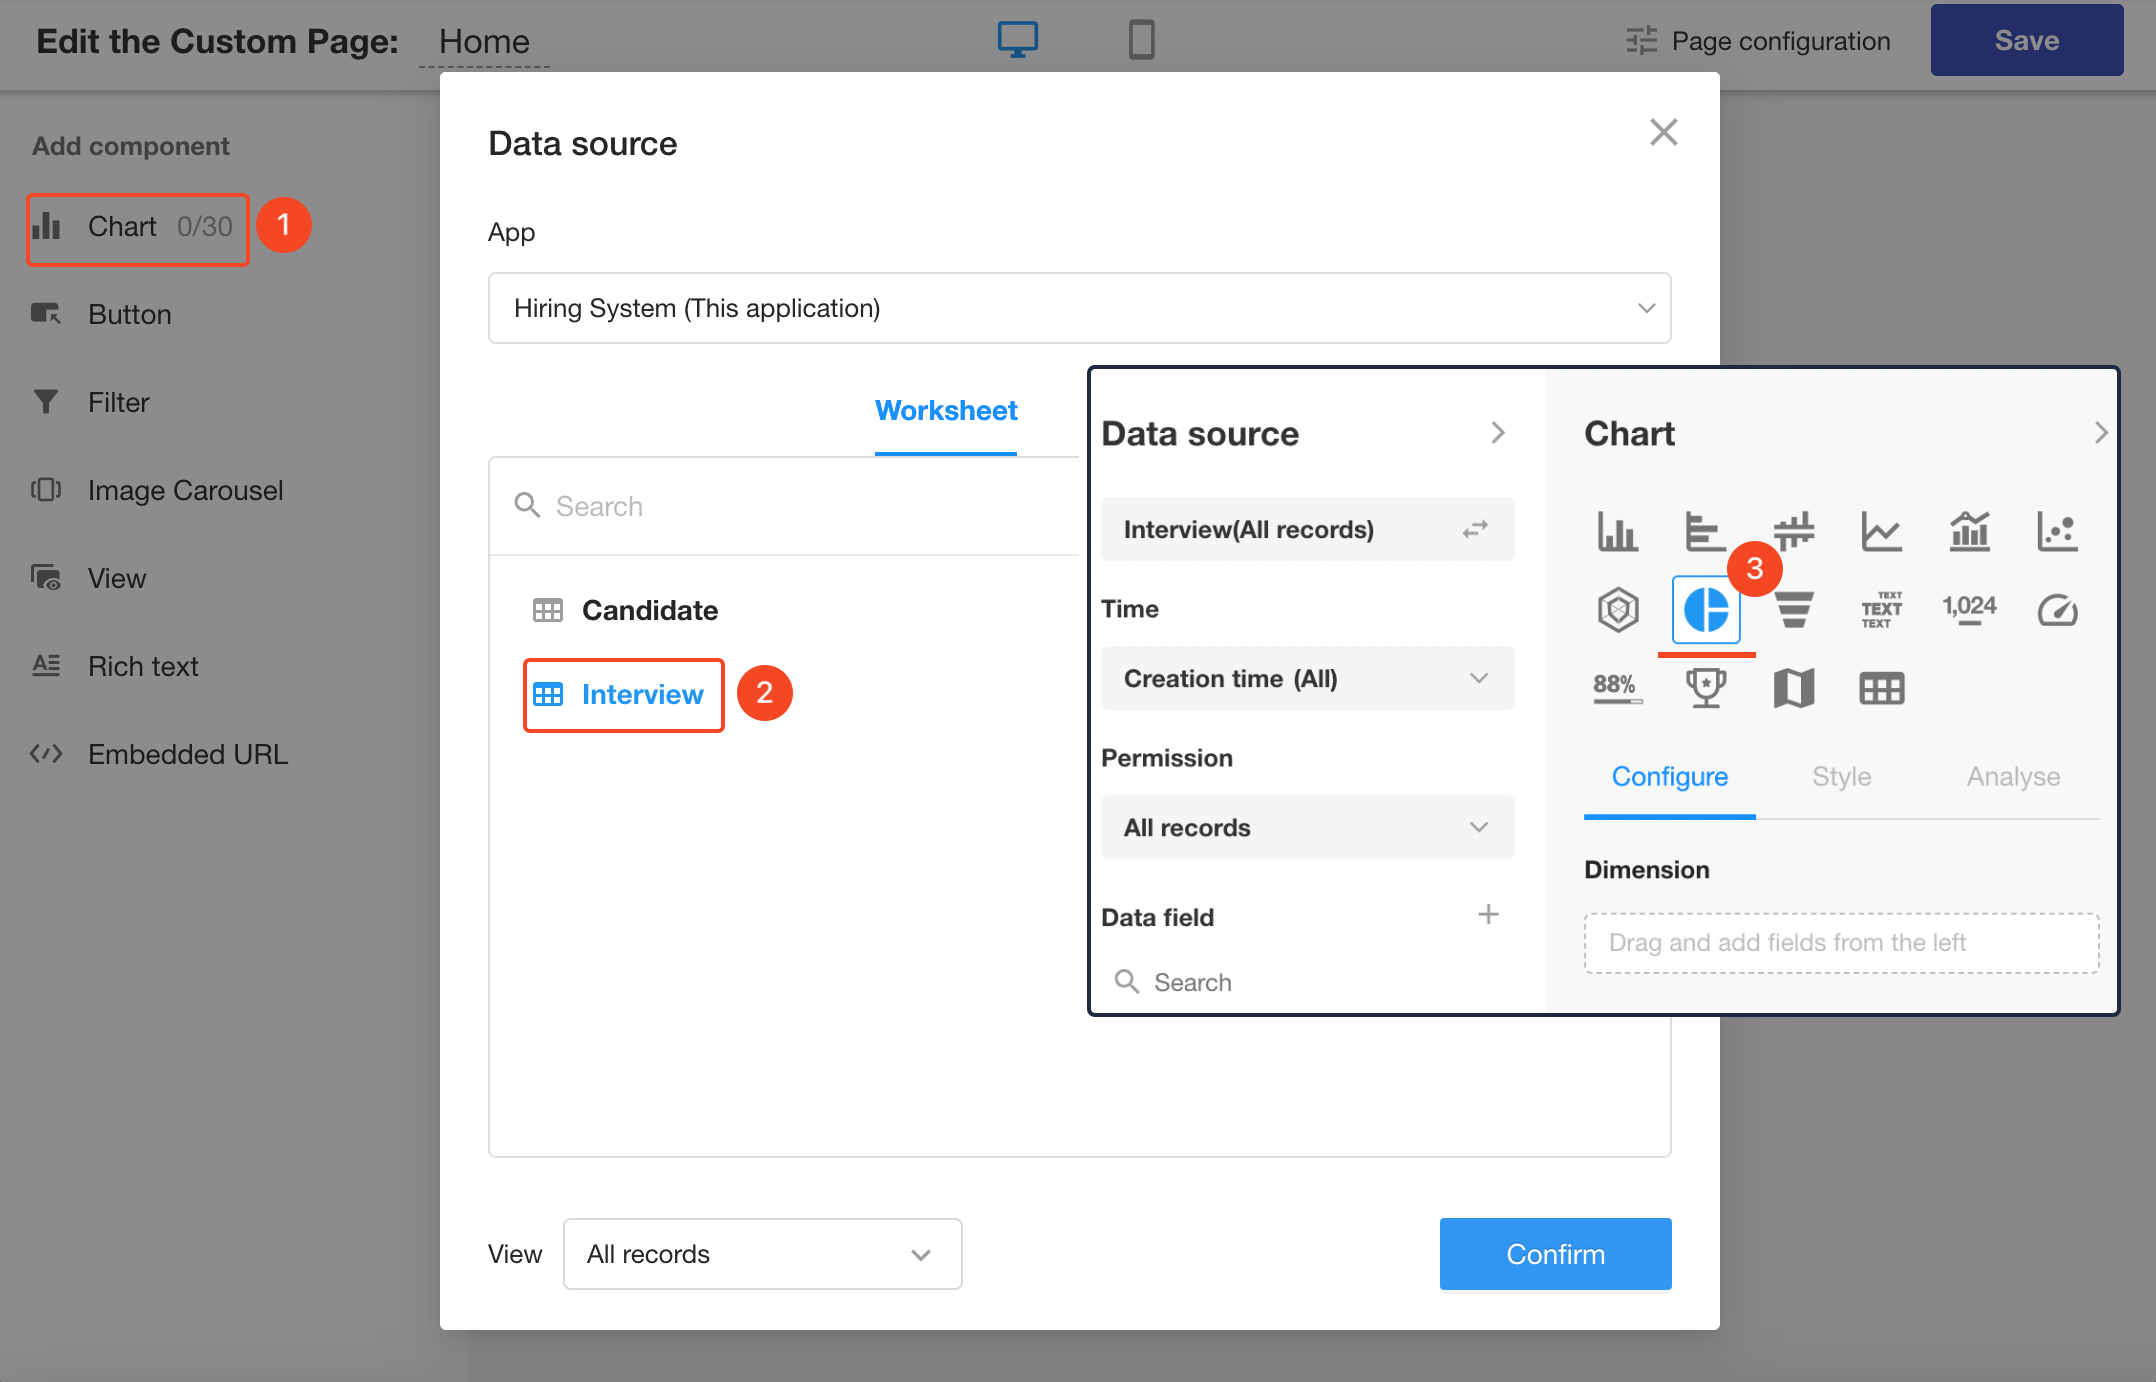
7.3 Adjust the size of charts
Drag to adjust size of each chart.

For adding and configuring other components, please go to read the relavant articles in our help center.
7.4 Save the page
8. Summary
Through the six functional modules above, we have built a simple hiring system that meets the expected requirements. It is an enterprise application that can be analyzed and statistically evaluated, including data management, configuration of operation permissions to users, and automated business processes. Even more complex applications cannot do without these functional modules and can be built through a no-code approach. Now, start building the application that meets your actual needs.
IV. Other Features
In addition to the core application building, other essential features are also provided.
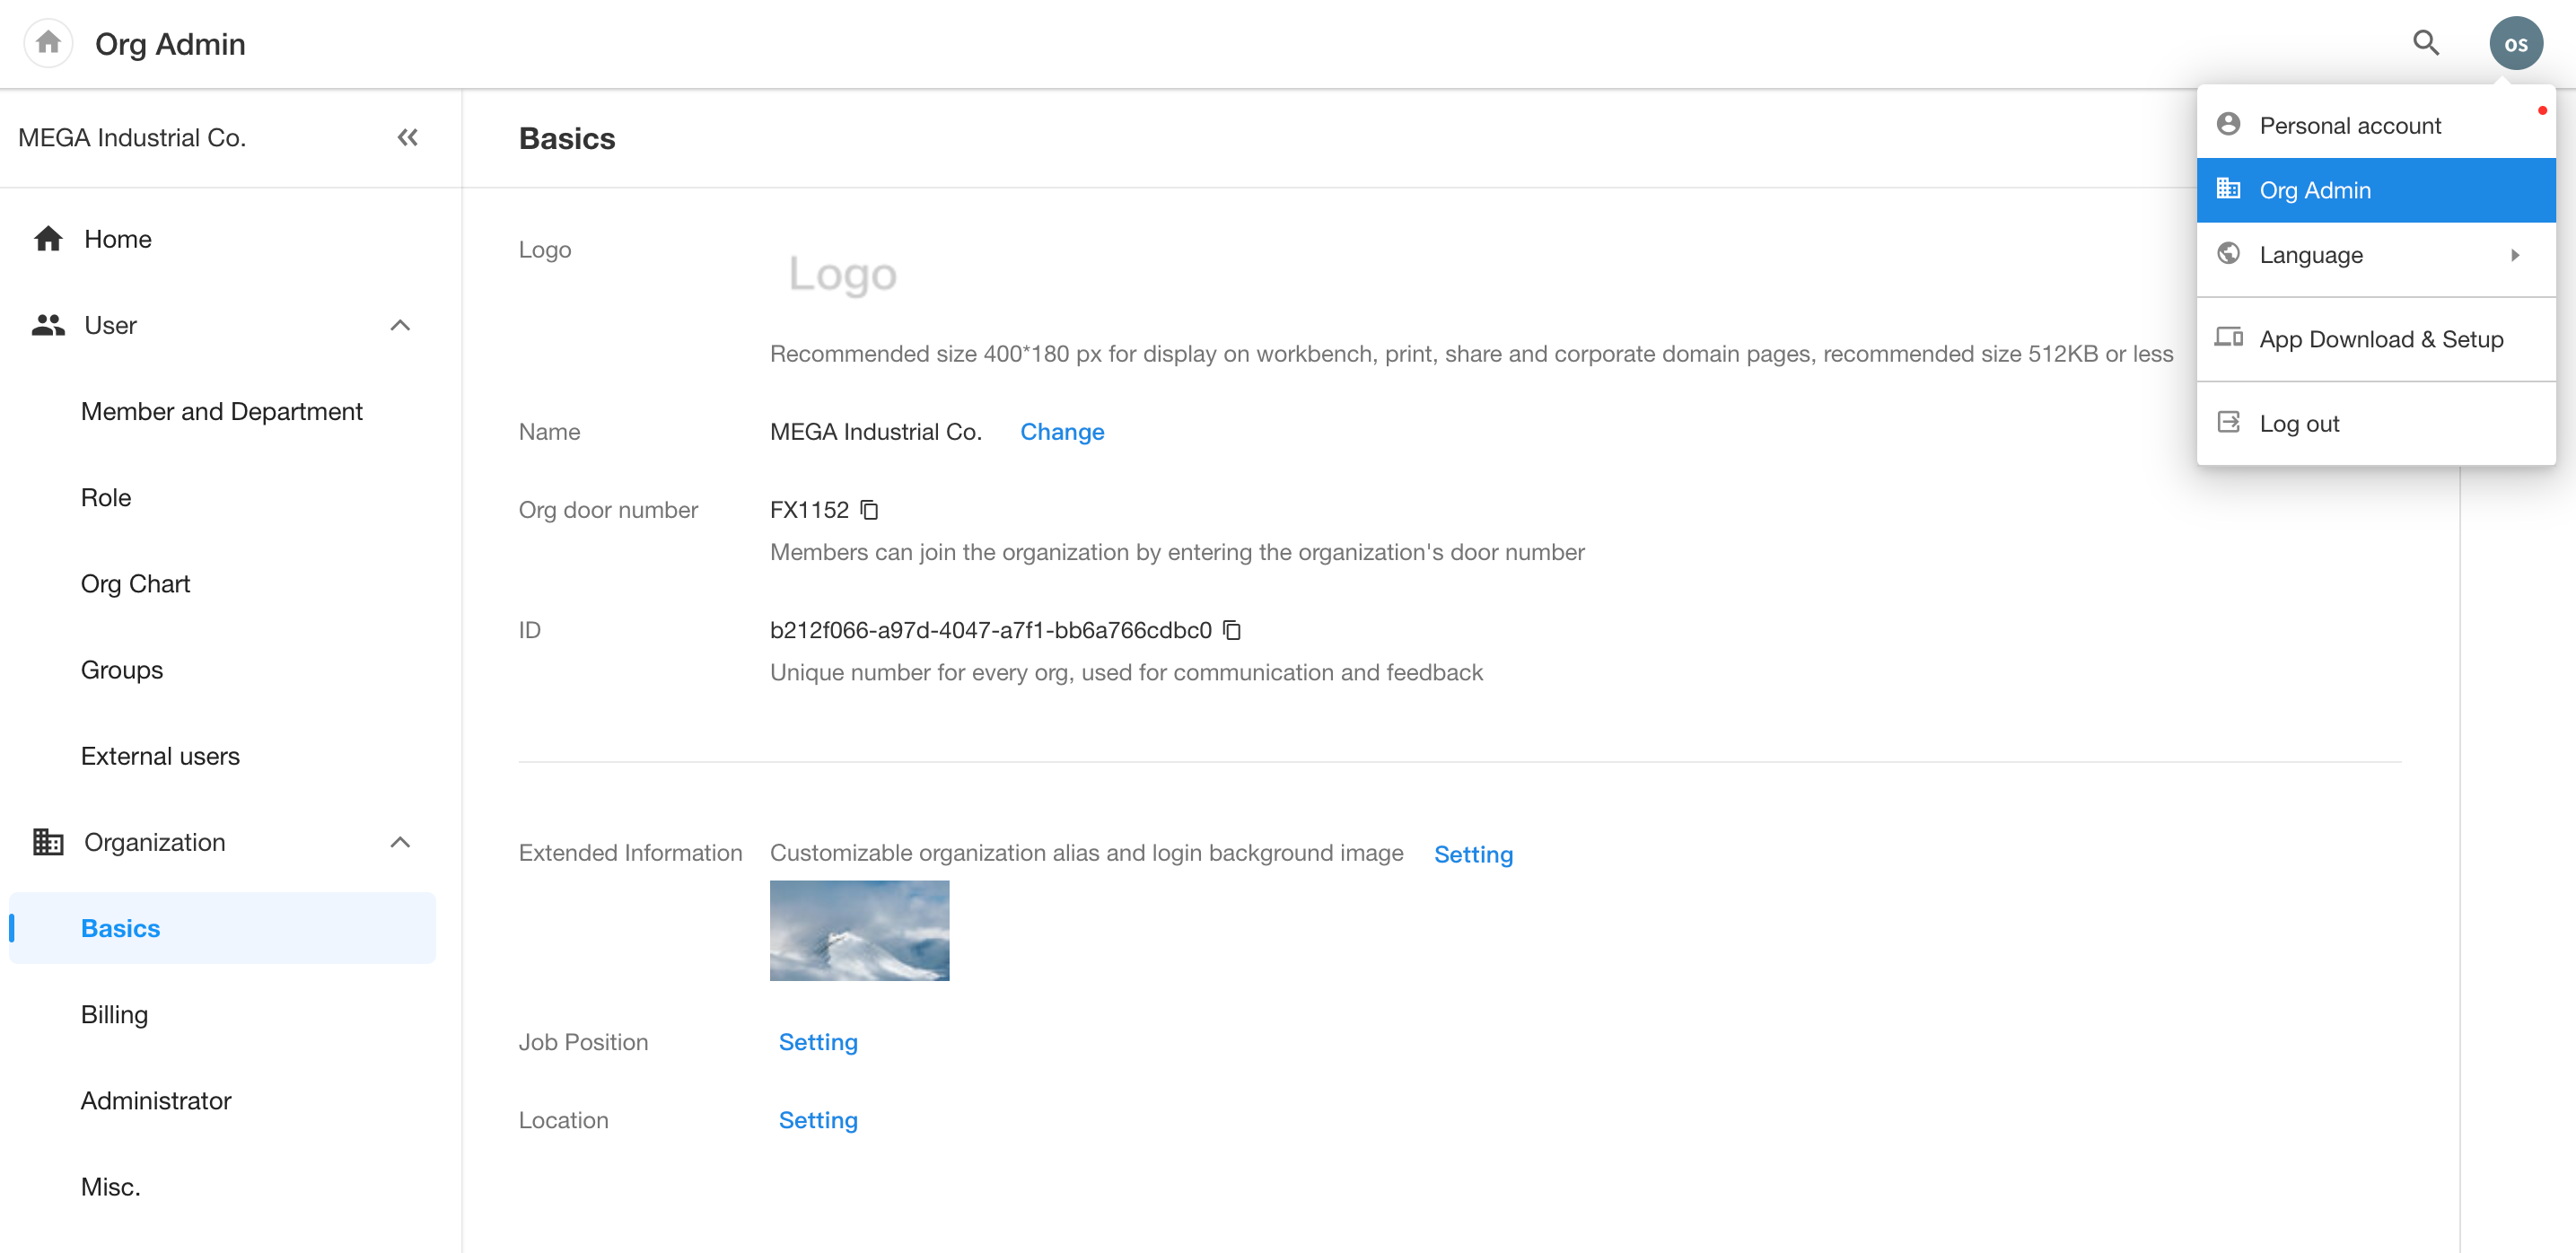
1. Organization management
In the organization management page, organization administrators can further customize the organization, manage users within the organization efficiently, and conduct some other management settings.
2. Integration
In digital operations, various data transmission and information sharing between different business systems are necessary to achieve more efficient business processes and improve user experience. At this point, integration between applications and external systems becomes crucial. HAP can achieve integration with external systems through API integration, data integration, and platform integration.
-
API
In the integration center, API connections and authorizations with external system can be established, which can then be directly reused in worksheets and workflows.
In workflows, connections with external systems can also be established through the "Send API Request" node.
-
Data Integration
Data integration in the integration center can achieve direct connection with external databases, synchronization between external databases and HAP, as well as tools for ETL processing. Through data integration, users can not only synchronize integration between HAP and external databases but also use HAP as an intermediary tool to synchronize data between two external databases.
-
Third-party Platform Integration
DingTalk, WeCom, and Feishu are leading products in the domestic enterprise office software sector. HAP supports integration with these three platforms, enabling account connectivity, one-click login to HAP, unified management of contacts, and message synchronization.