Node - Approval
Node Function: When approval is involved in a workflow, the approval node needs to be added. After approval or rejection, corresponding data processing operations can be executed, and notifications can be sent. Users can choose between Co-Sign (requiring approval from multiple approvers) or Or-Sign (requiring approval from any one approver) based on their needs, while also supporting multi-step approval processes.
I. Details of Approval Node
Configuration steps:
-
Add the approval node;
-
Select the object to be approved (specify the record that needs approval);
-
Set approvers and approval methods (Co-Sign or Or-Sign);
-
Set the operation permissions of the approvers;
-
Set different branches based on the approval results.
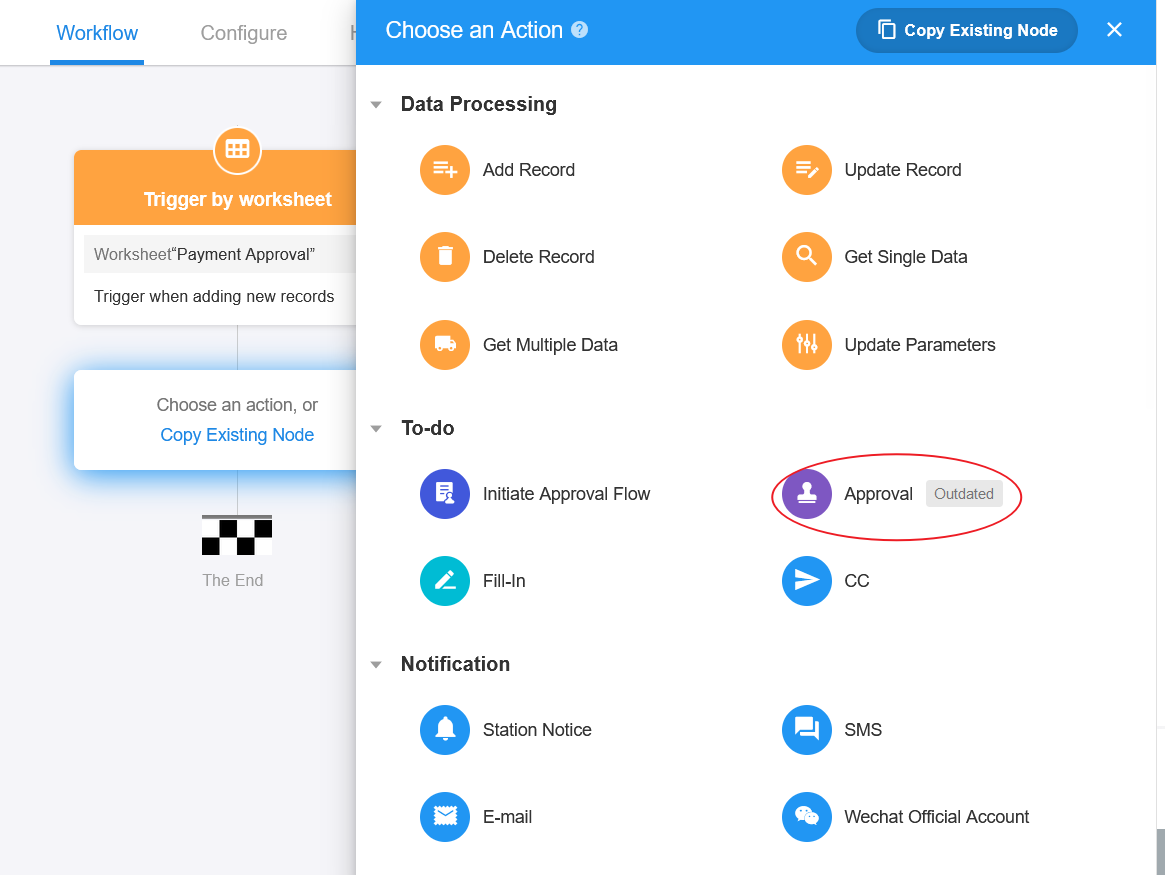
1.1 Add the Approval node
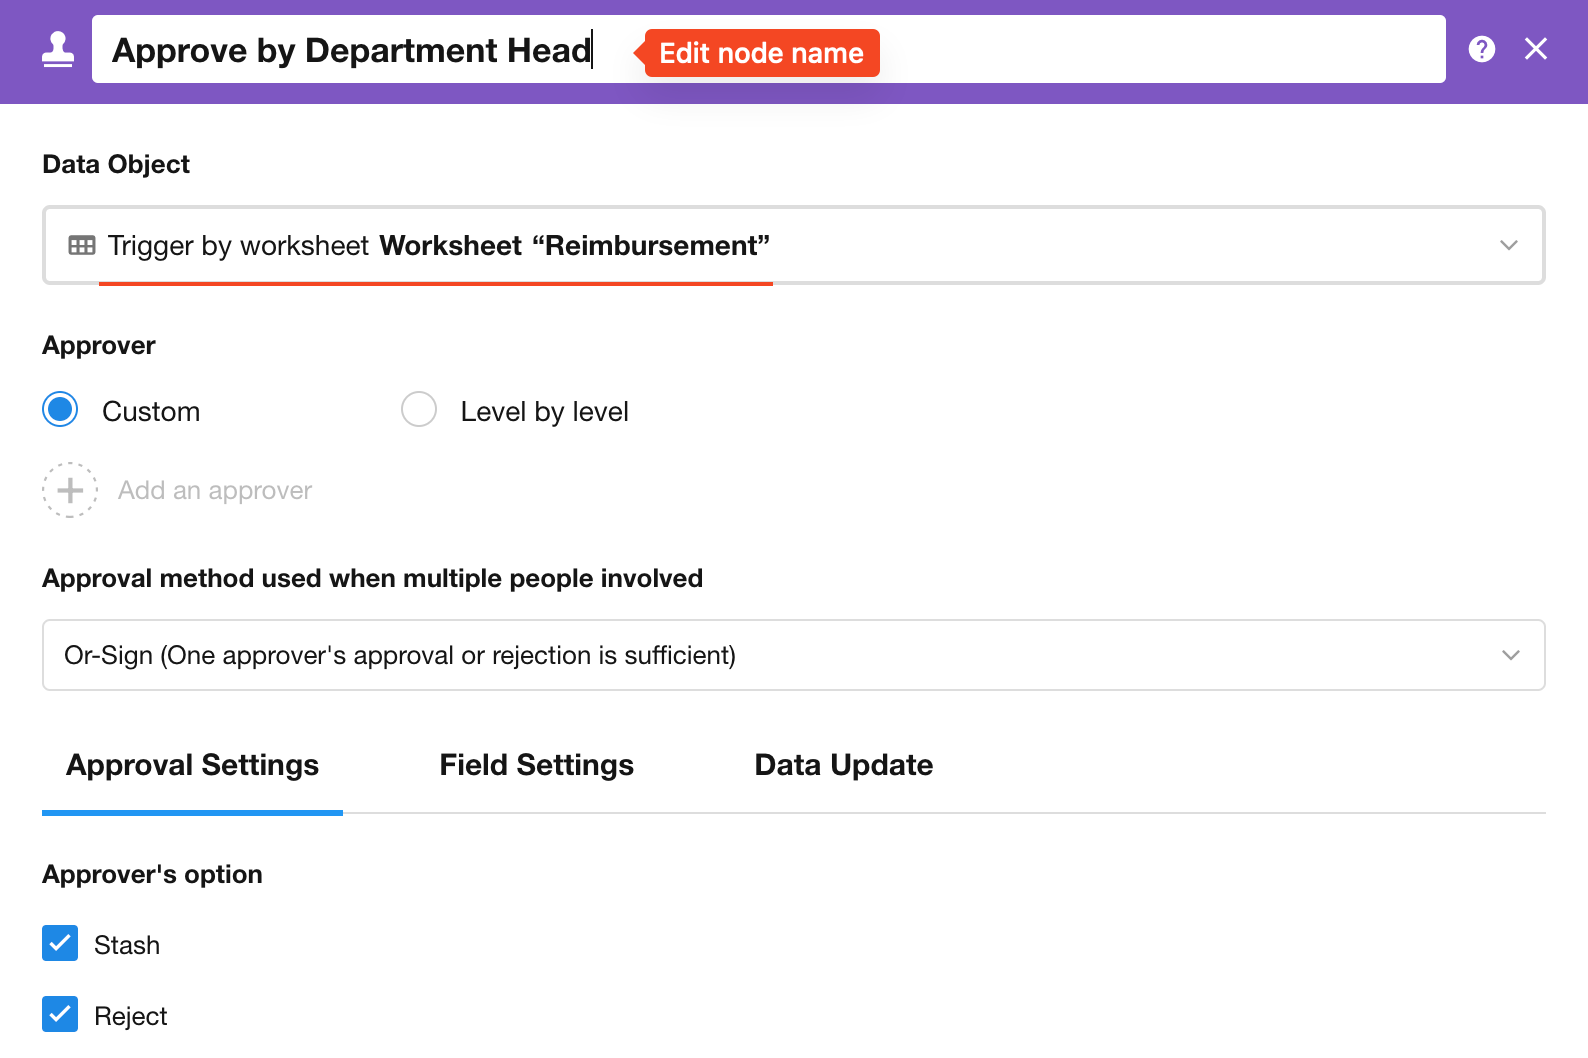
1.2 Select the approval object
This involves determining which record needs approval, simply by selecting the node representing that record.
It is recommended to modify the node's name so that the current progress and status of the workflow can be quickly understood when viewed later.
1.3 Add approvers
There are two ways to set approvers:
When setting the approvers, you can choose from the following two methods:
-
Customize the approvers for each stage.
-
Set fixed approvers based on department structure, with applications being approved step by step according to department structure.

1) Set custom approvers
One approval node typically represents an approver at a certain level. For example, an expense request may first need approval from the department head before being submitted to the general manager for final approval. This is a two-level approval process requiring two approval nodes.
Within an approval stage, there can be either a single approver or multiple approvers.
-
Single approver
Select a specific user from the system's contact list as the approver. Alternatively, choose the applicant's direct supervisor or select a members field as the approver.
-
Fixed approvers
Users can select a fixed approver from the contact list or specify a fixed approver based on roles, positions, and departments. This ensures that the approver remains the same regardless of who submits the request.
-
Dynamic approvers
Dynamic approvers are determined based on the value of the applicant or a members field. For instance, the applicant's direct supervisor or department head can be dynamically set as the approver. This means that different requests may have different approvers for their submissions.
-
-
Multiple approvers
If multiple approvers are needed to jointly handle a particular stage of approval, you can set the approvers based on roles, departments, or positions, or manually select multiple specific approvers.

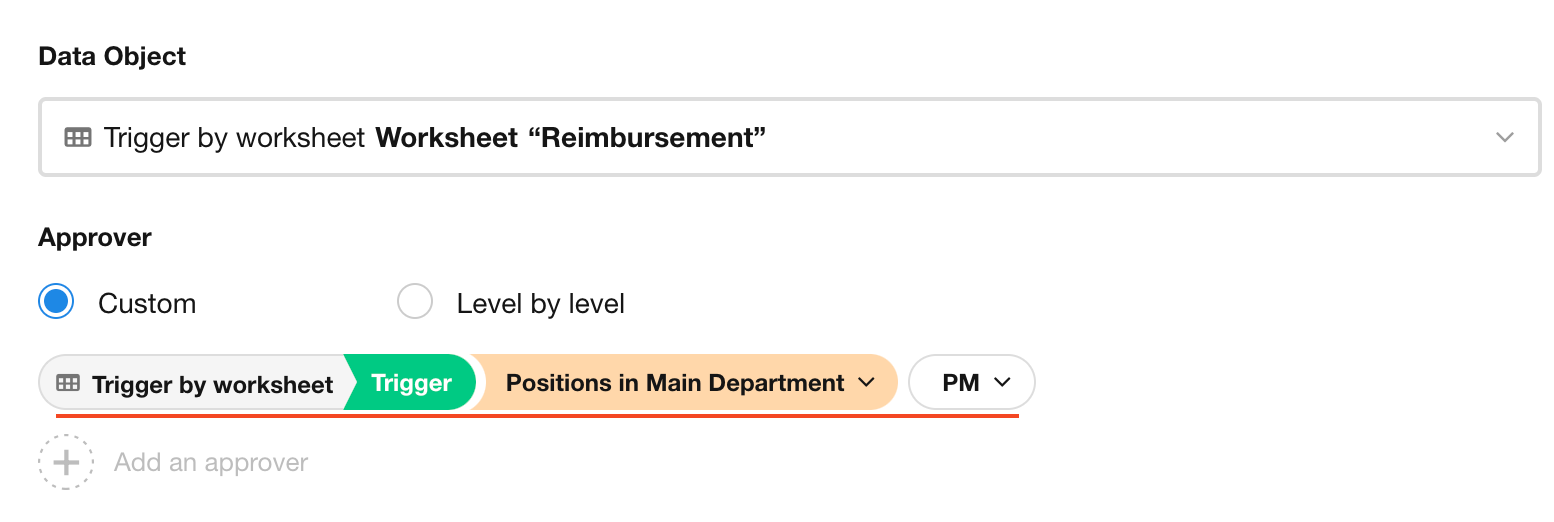
Positions in main department
In the picture below, the approver is a person in the main department whose position is "PM".
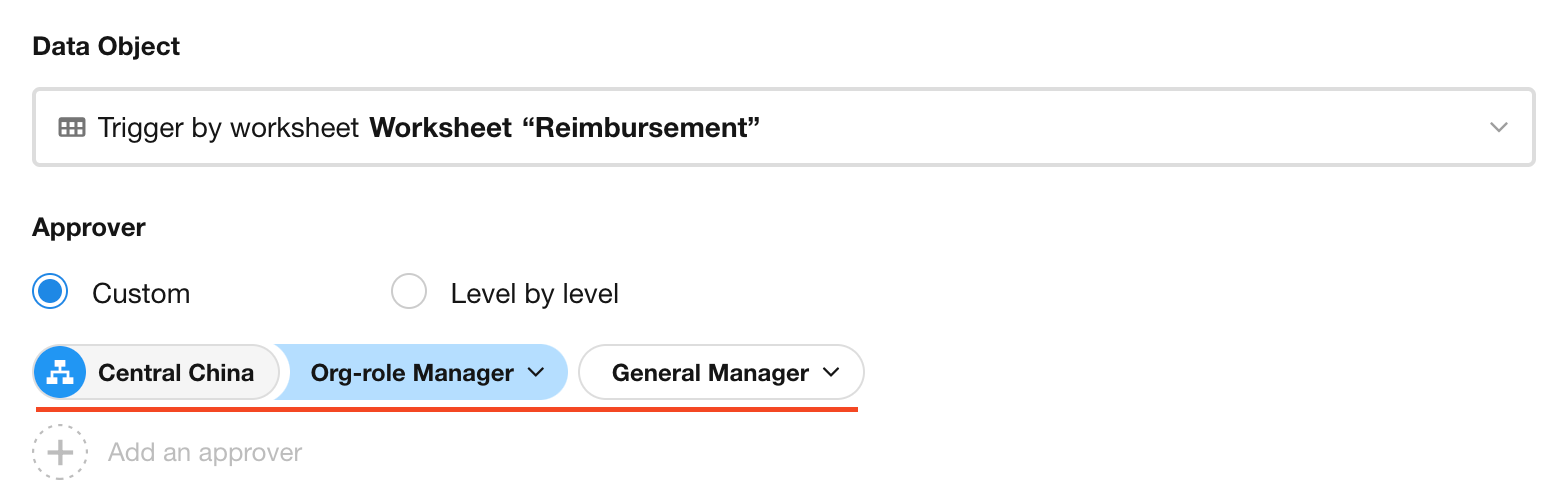
Org-role manager
In the picture below, the approver is the person in the org-role of "General Manager" responsible for a specific department ("Central China").
Priority of org-role managers in approval
In organization roles management, you can set the departments (including all subordinate departments) of which a role member is in charge.
Example: In an organization, there is an organization role of "Vice General Manager." When an employee resigns, approval is required from the corresponding vice general manager. The approver is set as follows: Initiator - Org-role Manager - Vice General Manager. Assuming that under the role "Vice General Manager", there are four vice general managers A, B, C, and D.
-
A is in charge of the Sales Department, B is in charge of the R&D Department, and C and D do not have specific department responsibilities set.
When the initiator is from the Sales Department, the approval is handled by A.
When the initiator is from the R&D Department, the approval is handled by B.
When the initiator is from the HR Department, the approval can be handled by either C or D.
-
A is in charge of the Sales Department, B is in charge of the R&D Department, C is in charge of the HR Department, and D is in charge of the Customer Service Department.
When the initiator is from the Sales Department, the approval is handled by A.
When the initiator is from the Finance Department, there is no assigned approver.
2) Approve level by level
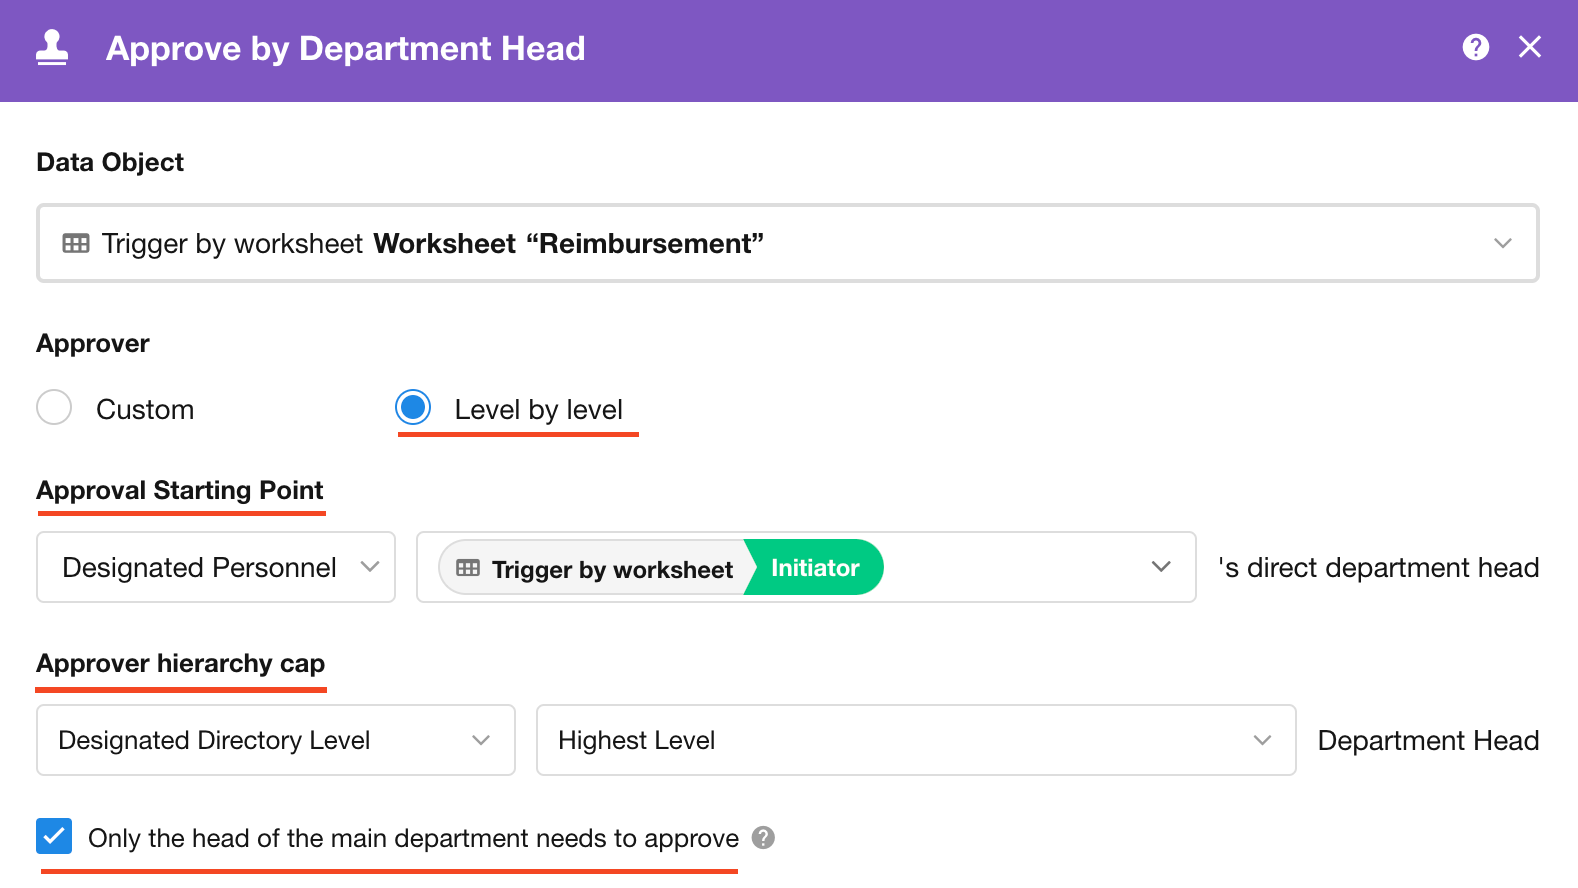
Based on the selected member’s department, approve upward following the department's hierarchical structure.
-
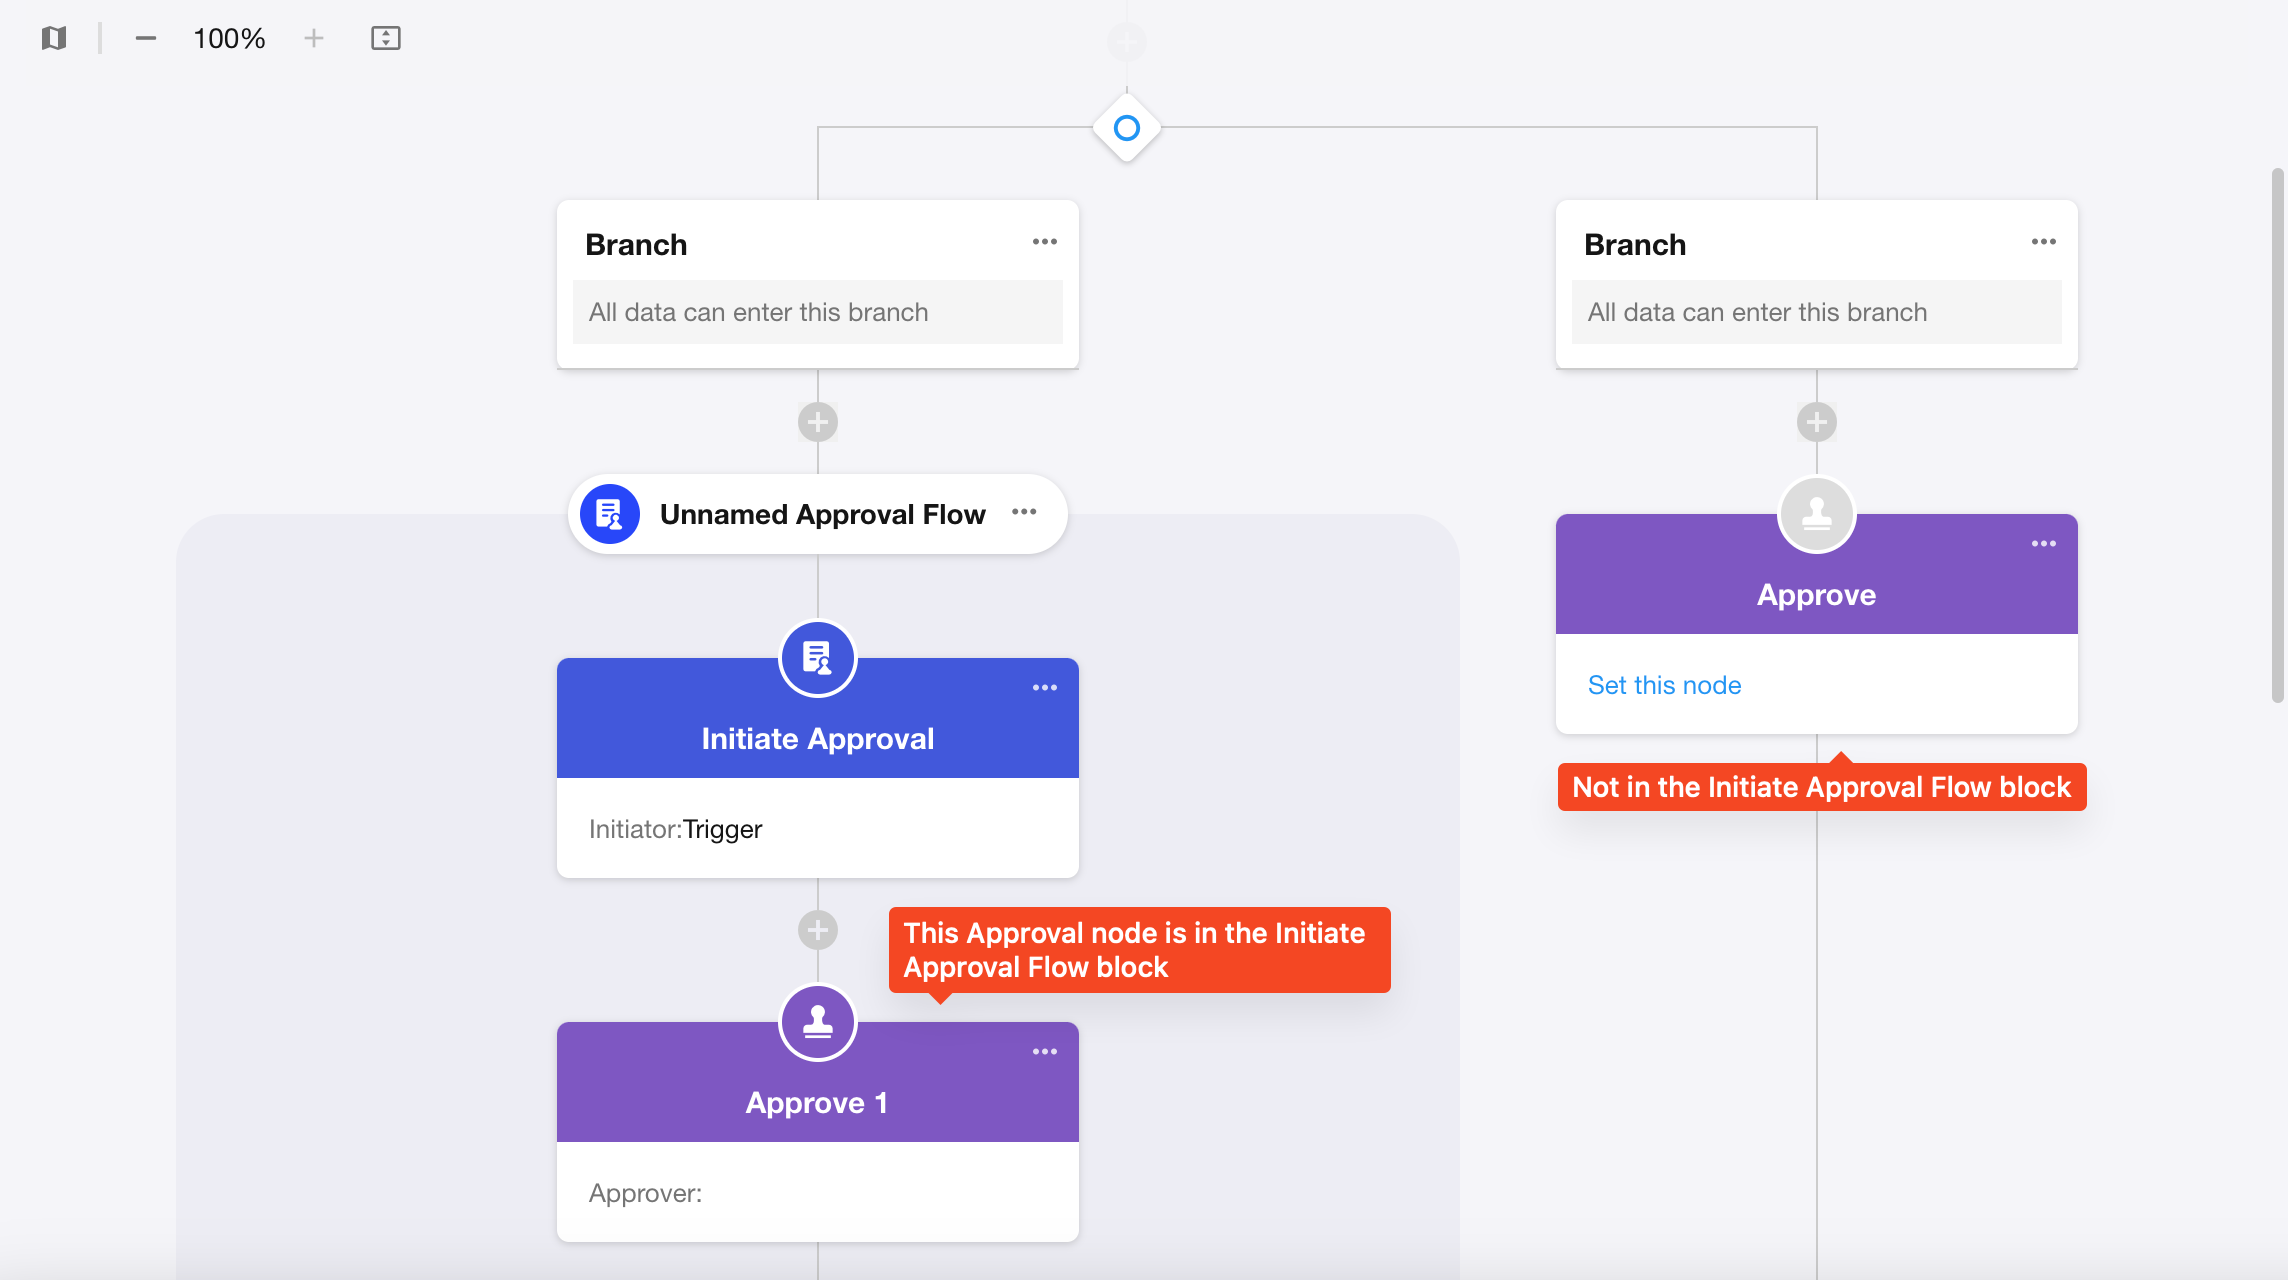
Approval starting point
Select a members field, typically choosing the initiator of the approval process, with their department head as the first-level approver.
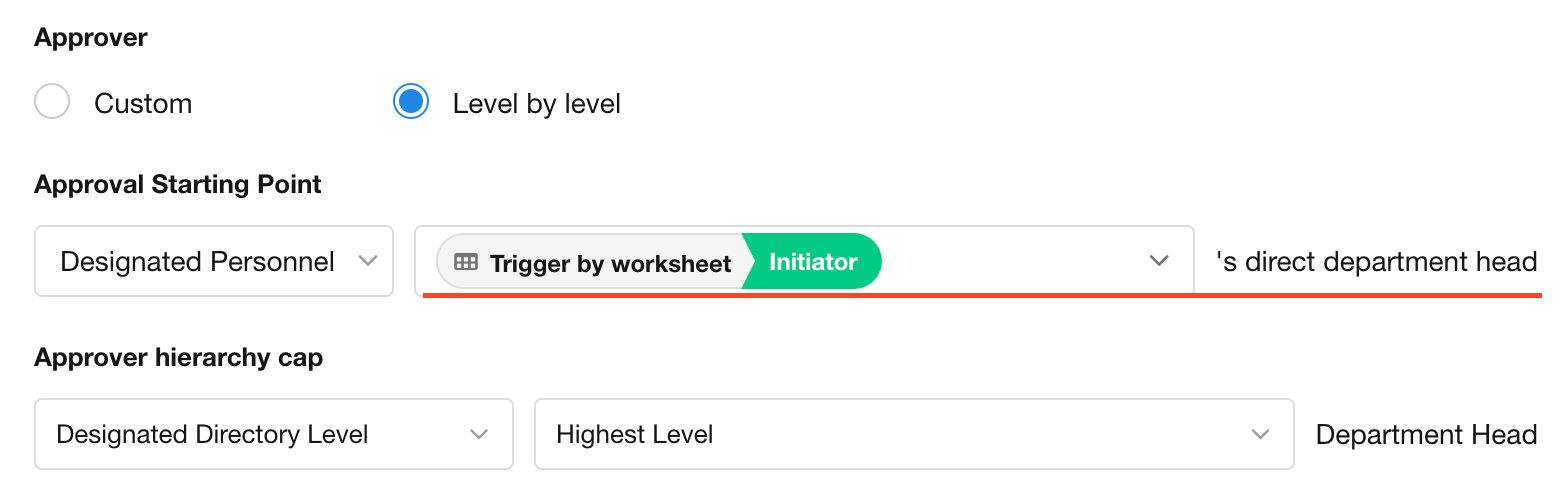
- When submitting an expense reimbursement request, the first approver is often the initiator’s department head. For the "designated personnel", you can select the initiator or creator.
If this approval node is not in the "Initiate Approval Flow" block, this option is not available.

-
Approver hierarchy cap
If there are many departmental levels within the organization, you can set "X level upward" based on the approval starting point or select the designated directory level.
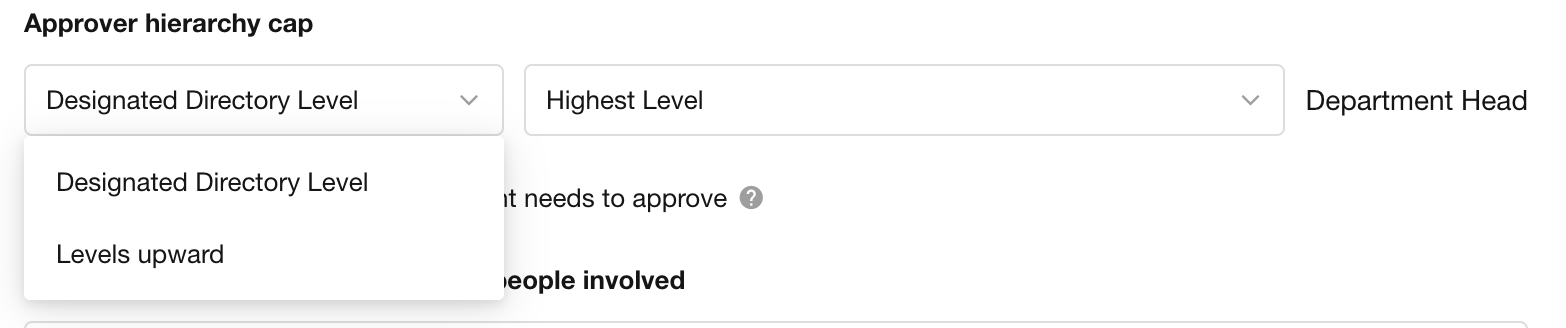
Example: Ross’s department is Sales Group 1. If his request only needs approval from the sales department head, select "Levels upward - 2 level upward".
- General Manager
- Sales Department
- East China
- Sales Group 1 (Ross's department)
- East China
- Sales Department

- General Manager
Approval process:
-
1st step approval: current level approval (Head of Sales Group 1)
-
2nd step approval: 1 level upward approval (Head of East China)
-
3rd step approval: 2 levels upward approval (Head of Sales Department)
If the approval process involves higher levels, such as the General Manager, you can specify the highest level approver.

-
Only the head of the main department needs to approve
In HAP, a member may belong to multiple departments, but only has one main department. During approval, if you check "Only the head of the main department needs to approve", only the head of main department needs to approve; if not checked, all department heads need to be involved in the approval.
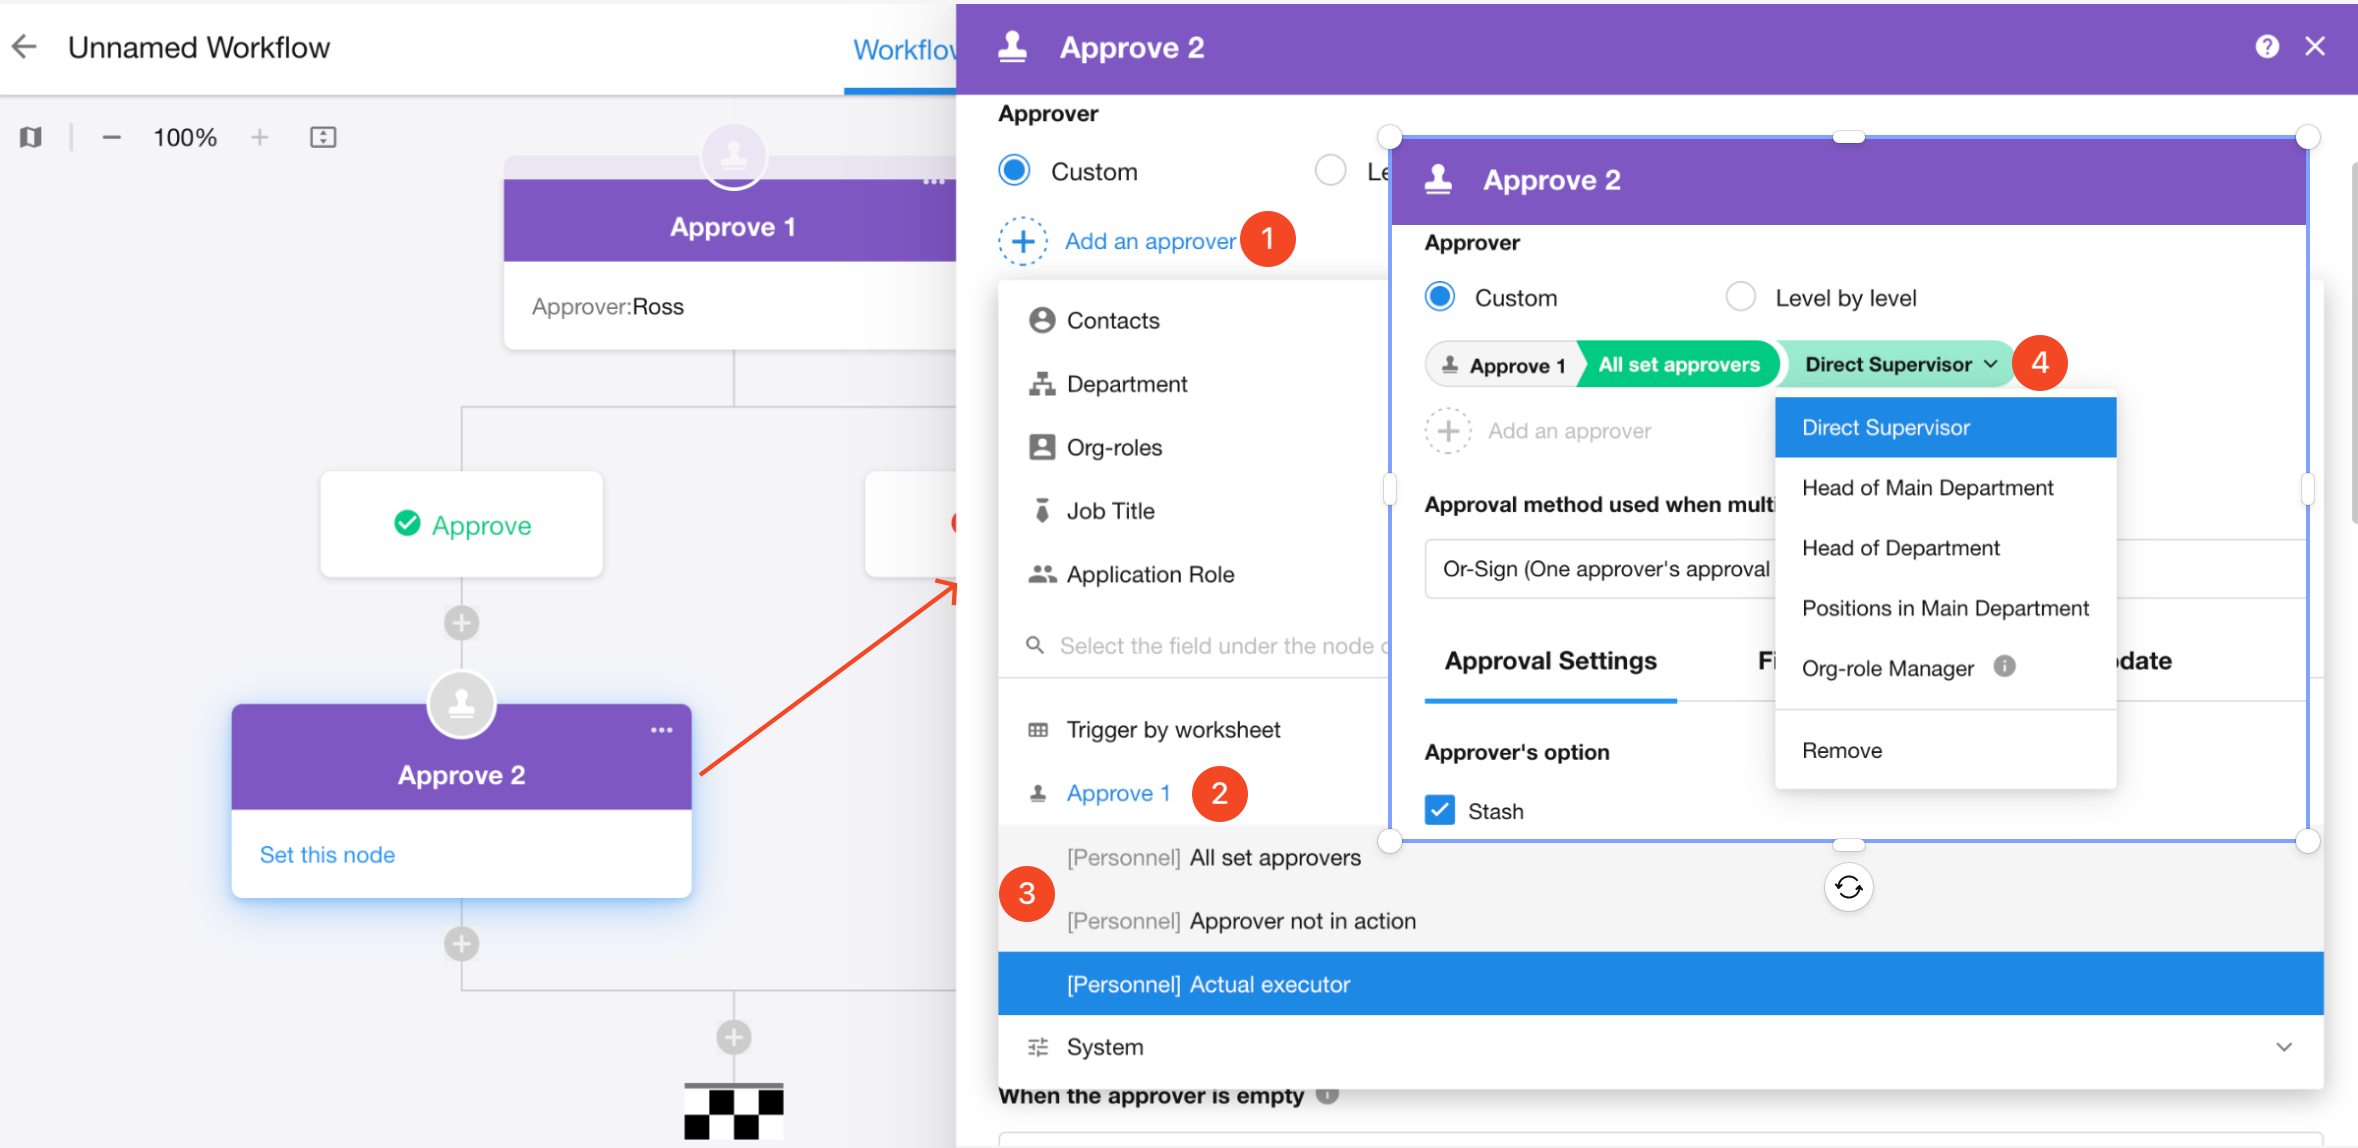
How to set the approver as the direct supervisor of the previous approver
For multi-step approval processes, if you need to set the second-step approver as the direct superior of the previous approver, you can make the selection through the previous approval node as shown below.
Check out this article for more details about deparments management in an organization
1.4 Approval method used when multiple people involved
In the following cases, multiple approvers may be involved:
-
If the approvers are set based on positions or roles, there may be multiple approvers.
-
If the initiator belongs to multiple departments and requires approval from all department heads, there may be multiple approvers.
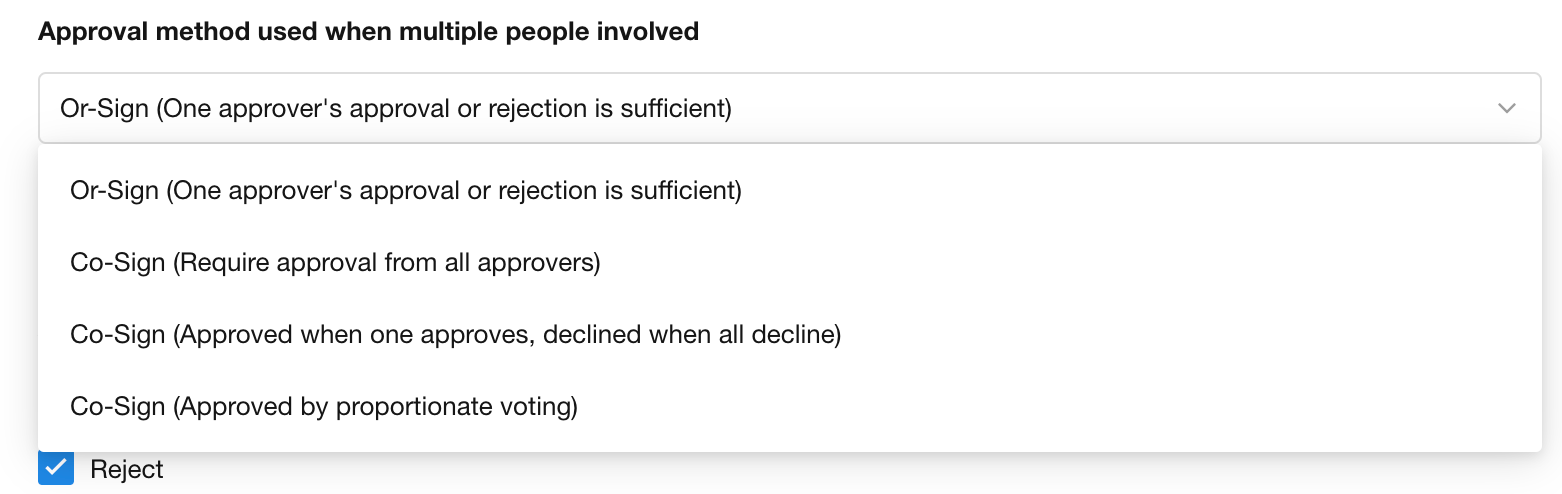
For cases involving multiple approvers, we provide the following four approval methods to clarify how approval is achieved under multiple approver conditions:
Or-Sign (One approver's approval or rejection is sufficient)
Under this method, the approval or rejection of any one approver is sufficient to determine the final result. It depends on which approver acts first, and once an approver makes a decision, the operation of other approvers is no longer necessary.
Co-Sign (Require approval from all approvers)
Approve: The approval is considered successful only when all approvers agree.
Reject: If any one of the approvers rejects, it is considered rejected.
Co-Sign (Approved when one approves, rejected when all reject)
Approve: If any one of the approvers approves, it is considered approved.
Reject: All approvers must reject for the approval to be considered rejected. In this method, even if the first approver rejects, the approval process will not end immediately. If subsequent approvers approve, the approval is still considered successful. Only when all approvers reject is the approval considered rejected.
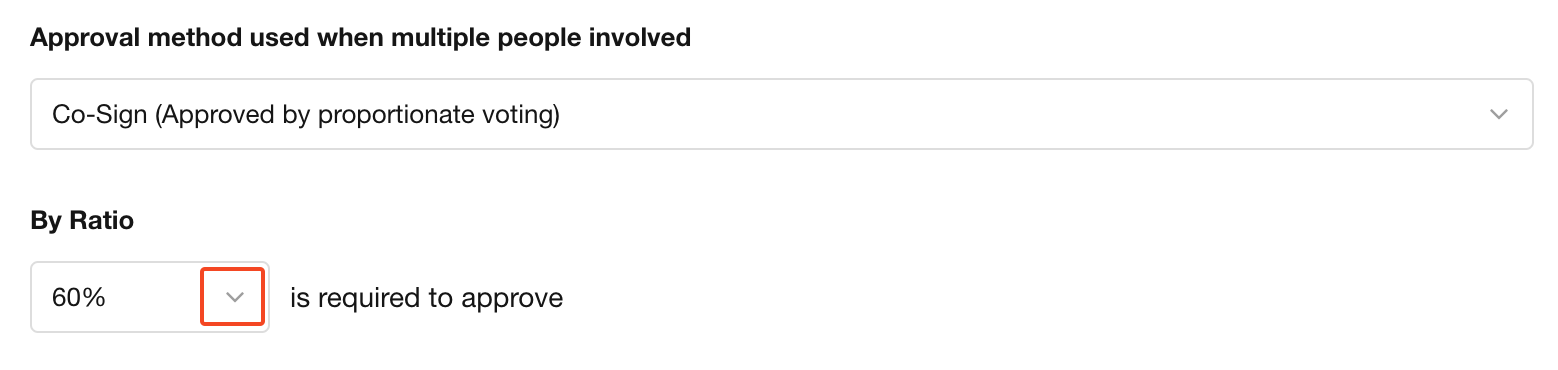
Co-Sign (Approved by proportionate voting)
This is also a common approval method. For example, if there are 5 approvers in a certain approval stage, approval is considered successful if the set ratio exceeds 60%.
Based on the set ratio, calculate the number of approvers required to approve and reject.
-
Number of approvers required to approve = Number of approvers × Set ratio (round up).
For example, if there are 4 approvers and the set ratio is 60%, it requires approval from at least 3 approvers.
-
Number of approvers required to reject = Number of approvers - Number of approvers who approve + 1.
For example, if there are 4 approvers and the ratio is set at 60%, with 3 approvers approving, there would be 2 approvers rejecting.
The above four approval methods can be flexibly selected and configured according to actual business needs.
1.5 Stash/Reject/Return/Forward/Add Approver
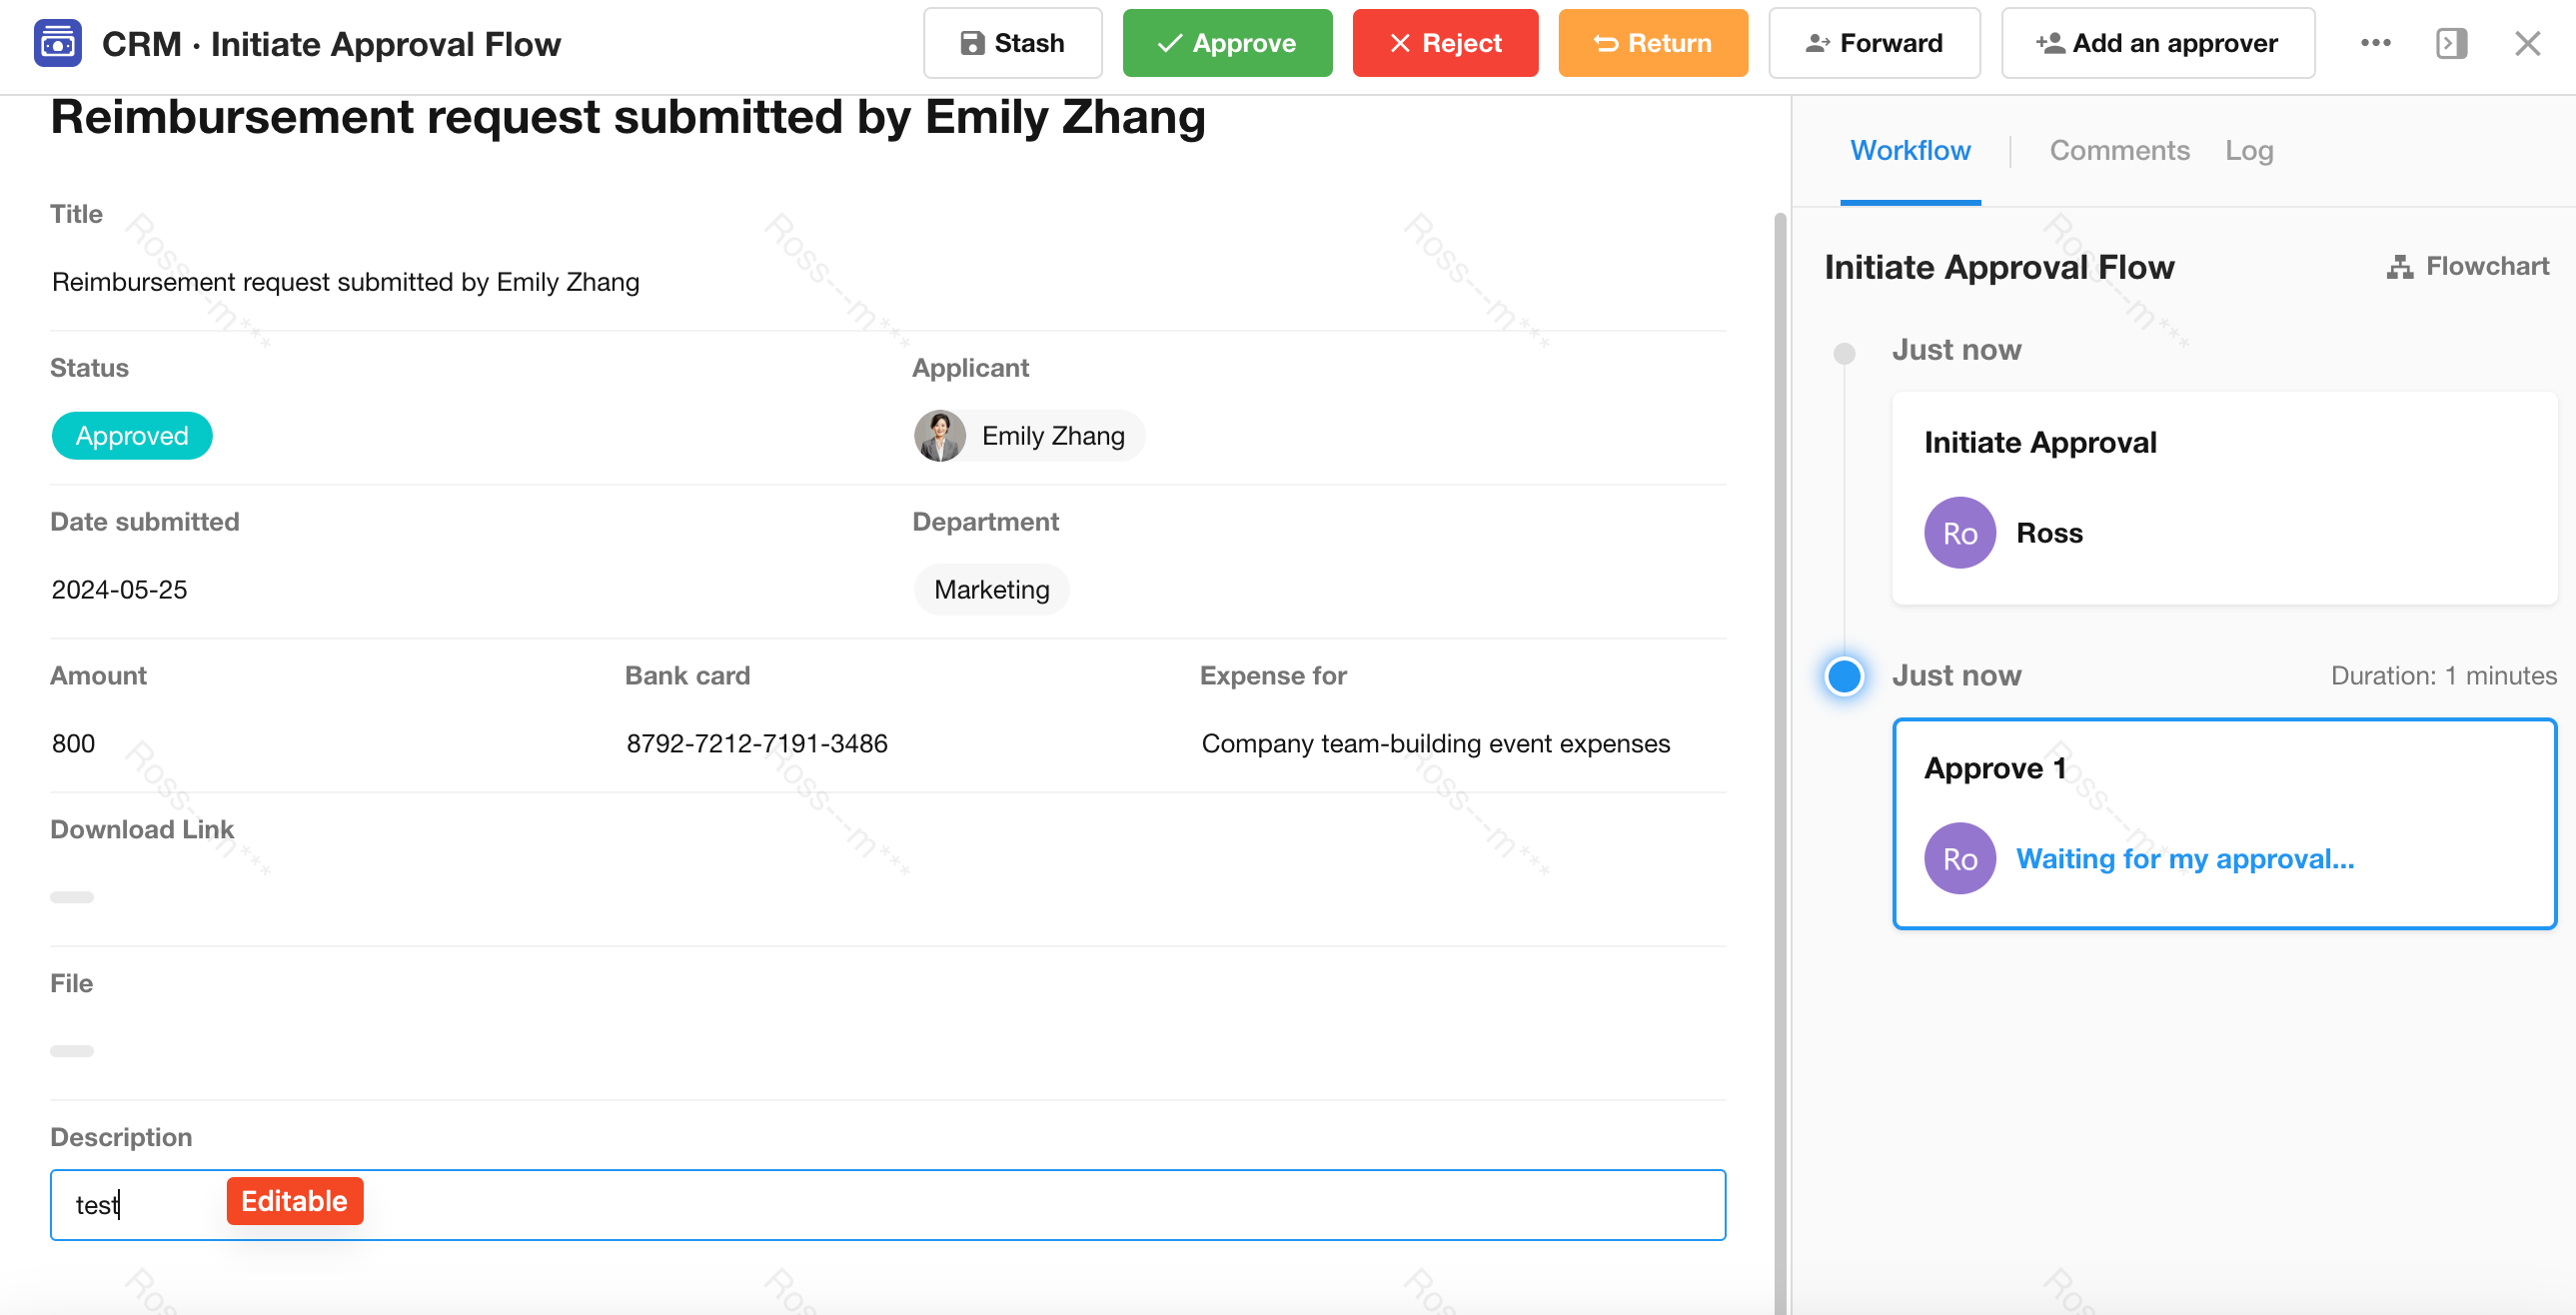
In the approval process, the actions of the approver are not limited to approve or reject. They can also perform actions such as forwarding, adding approvers, returning, and modifying records.
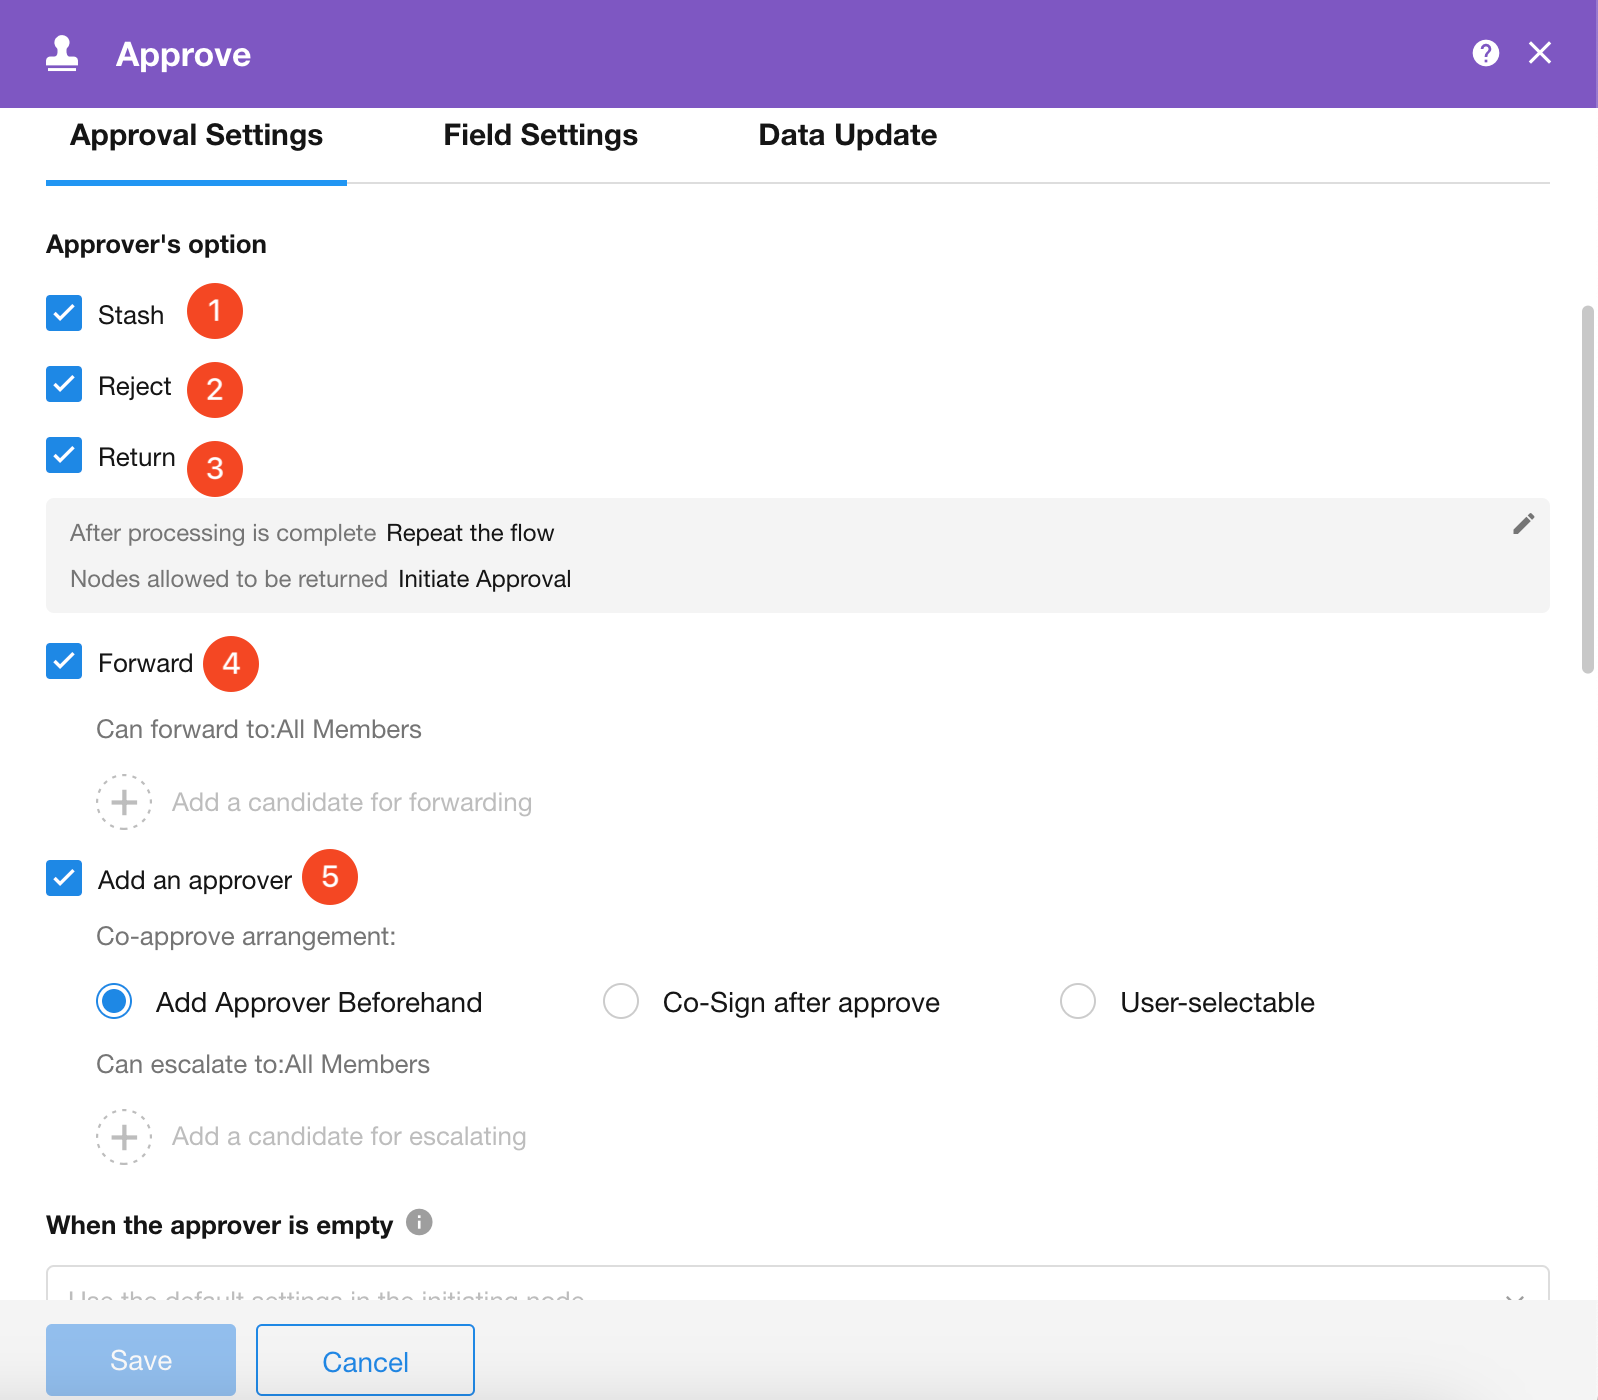
Stash
If "Stash" is checked, the approver can edit fields during the approval process (see section 1.9 below for more details), and after modifying the fields, they can stash them, not making an immediate decision to approve or reject.

It is worth noting that stashing will also modify the data in the worksheet and will be recorded in the approval operation log and the worksheet log.

If "Stash" is not checked, the "Stash" button will not be displayed.
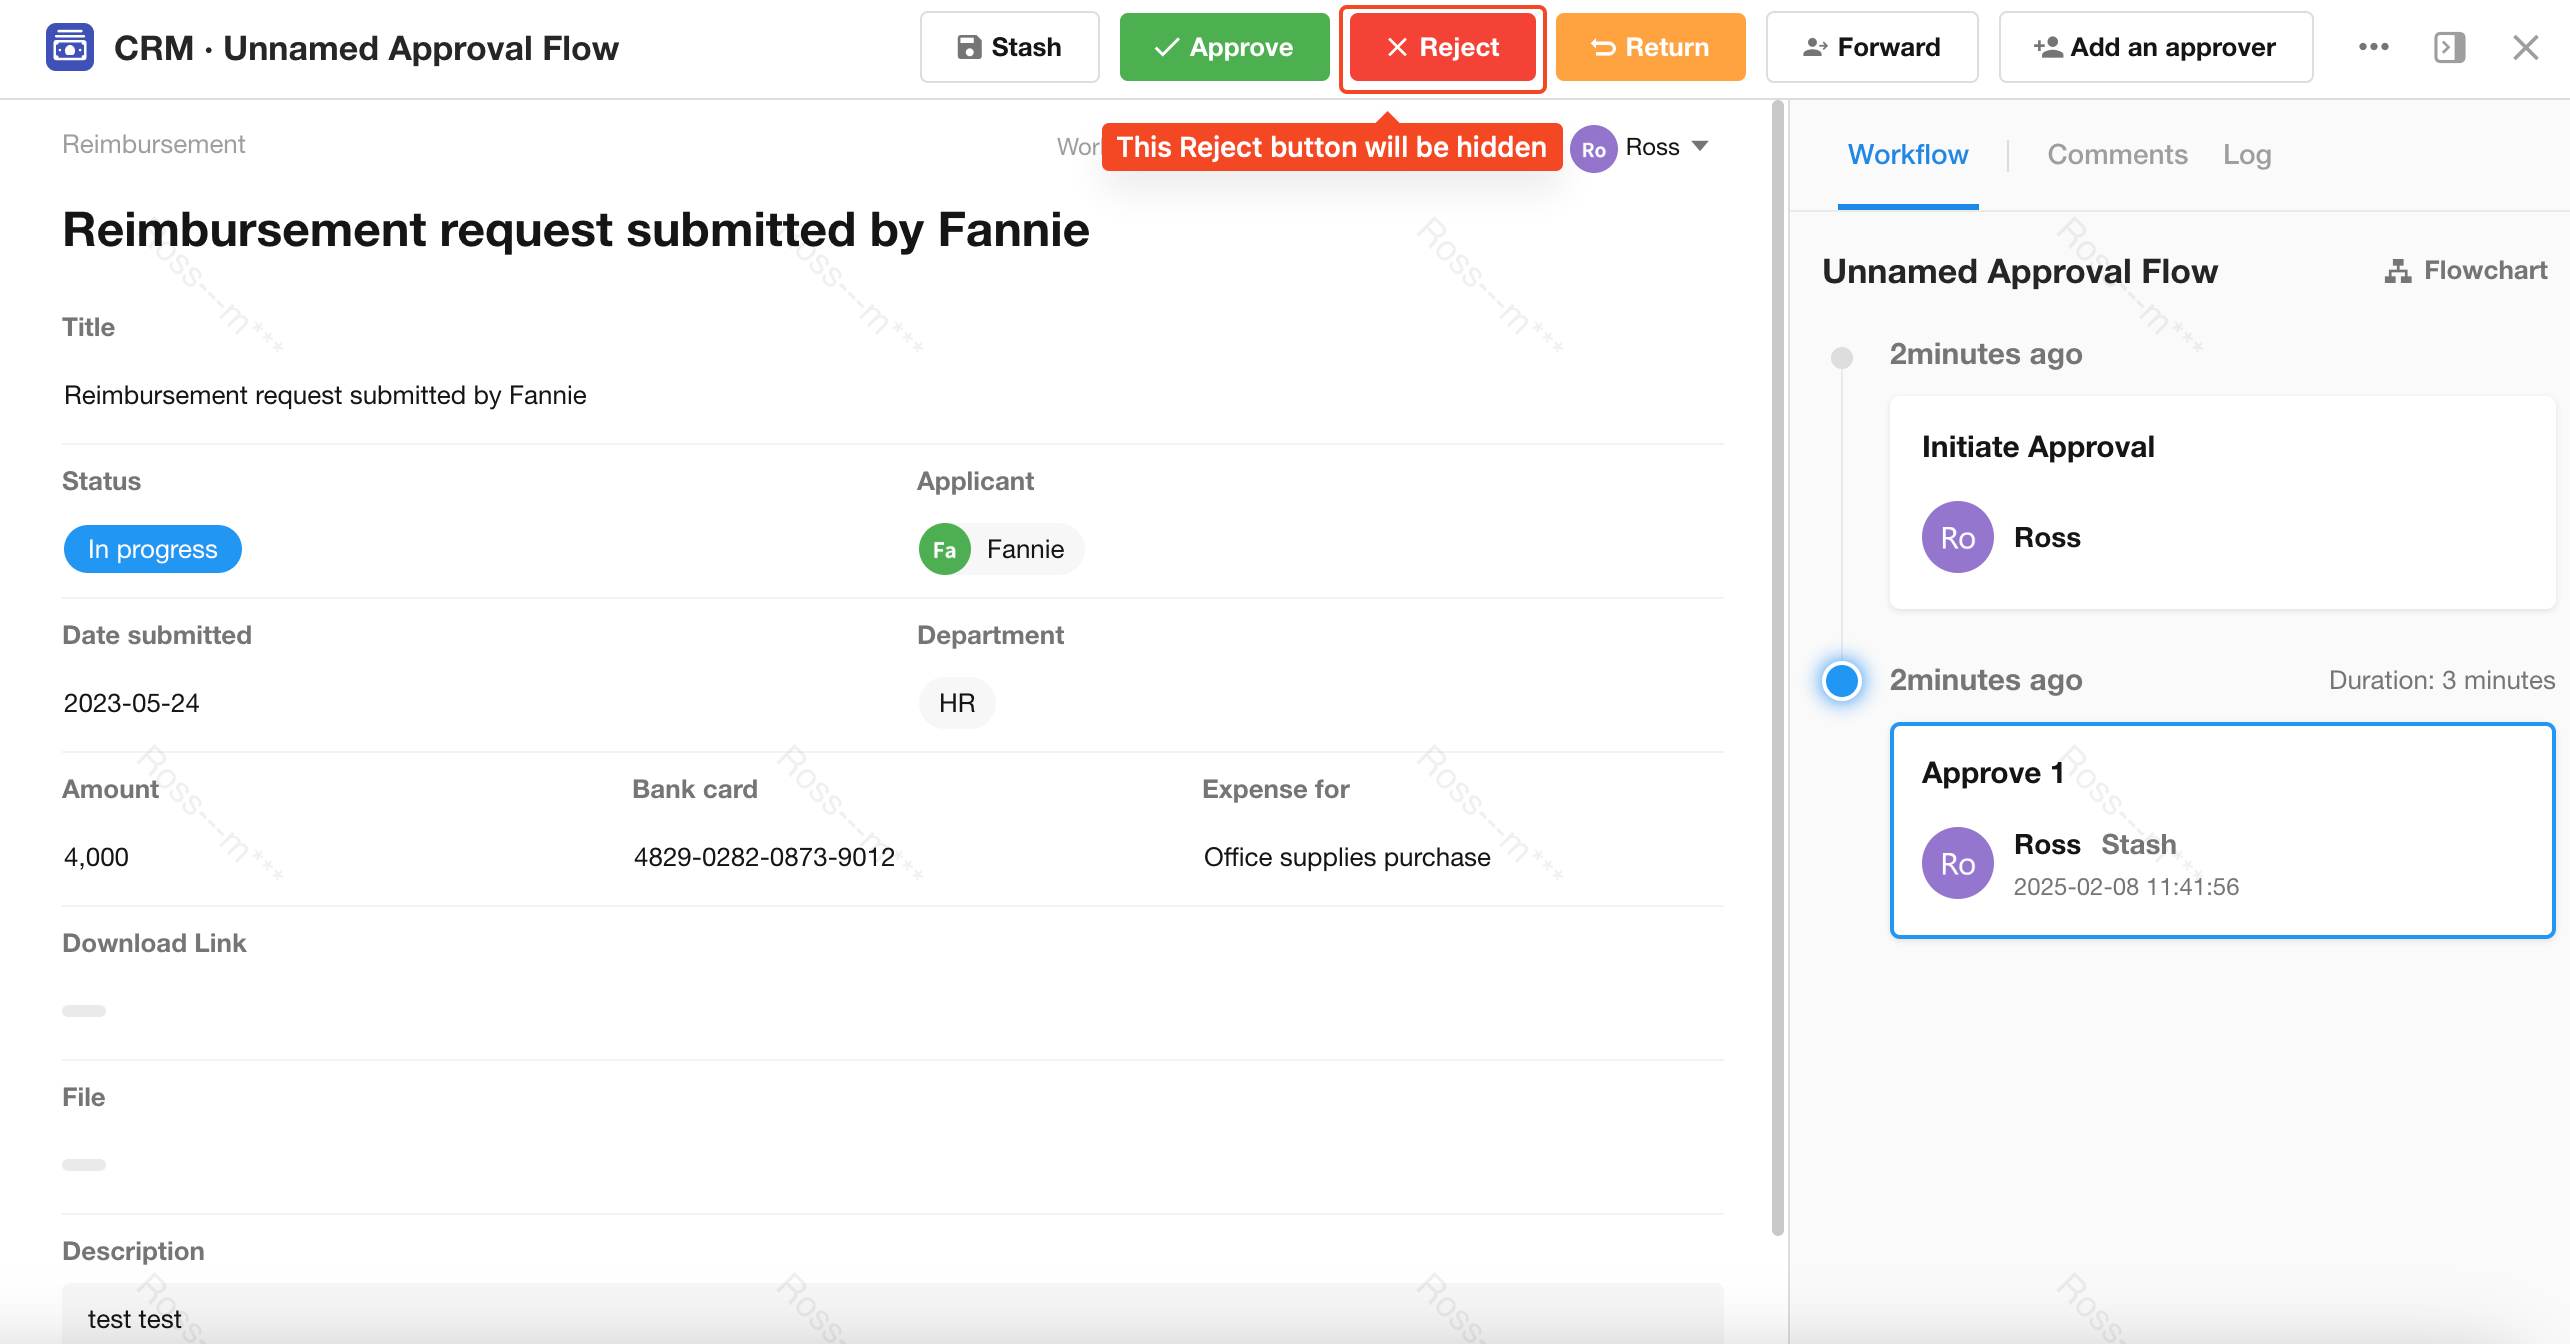
Reject
In some approval processes, the option to reject may not be included, and instead, the process is handled through approval or return. In such cases, when setting up the approval process, you can choose not to check "Reject". As a result, the "Reject" button will not be displayed when the approver at that approval node performs actions.
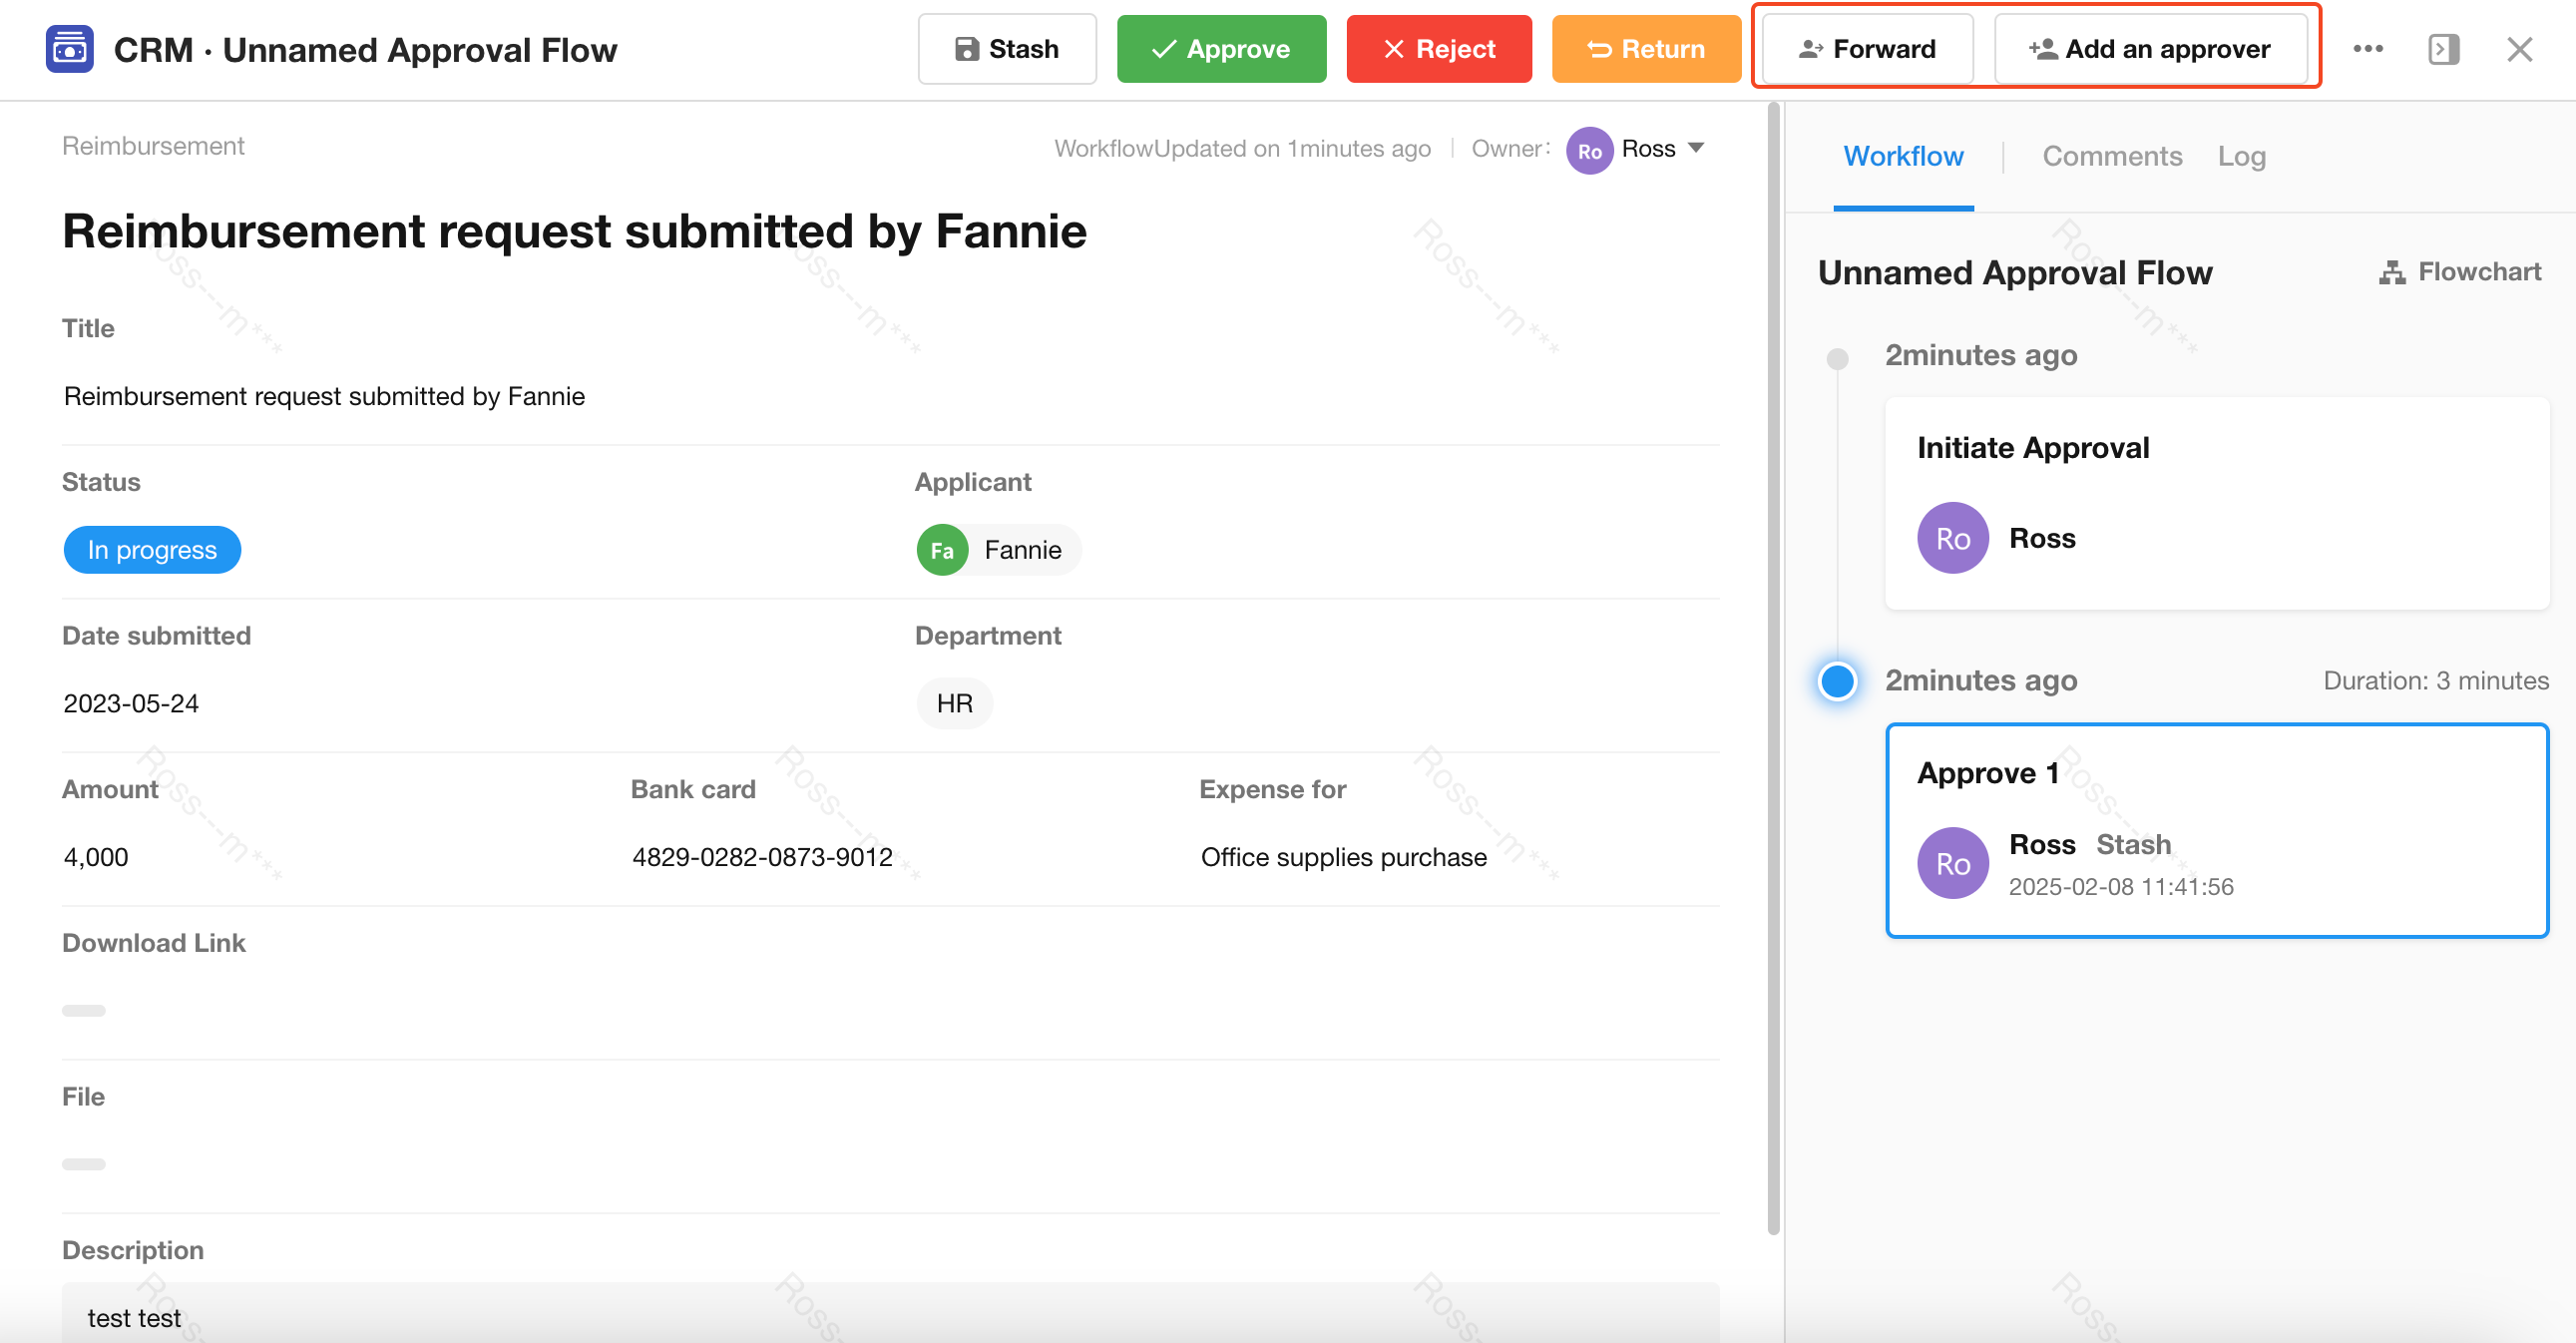
Forward
In order to enhance the flexibility and convenience of the approval process, the current approver can transfer approval permissions to other designated approvers. For example, an approval process is "Approver A > Approver B > Approver C", if Approver A wishes to forward the approval permissions to Approver D, the approval process will adjust to "Approver A > Approver D > Approver B > Approver C".
By selecting "Forward", you can further configure a list of candidate approvers.
Add an approver
If you need assistance from others to make decisions during the approval process, you can choose to add an approver, either after the current approver has completed their approval or before the current approver's approval.
Example: The original approval process is Approver A → Approver B → Approver C.
-
If Approver A chooses to add Approver D after the approval, the approval process will adjust to: Approver A → Approver D → Approver B → Approver C.
-
If Approver A chooses to add Approver D before the approval, the approval process will become: Approver A → Approver D → Approver A (again) → Approver B → Approver C.
In addition, by selecting "Add an approver", the system allows you to set a list of candidate approvers for quick selection from preset options when needed.
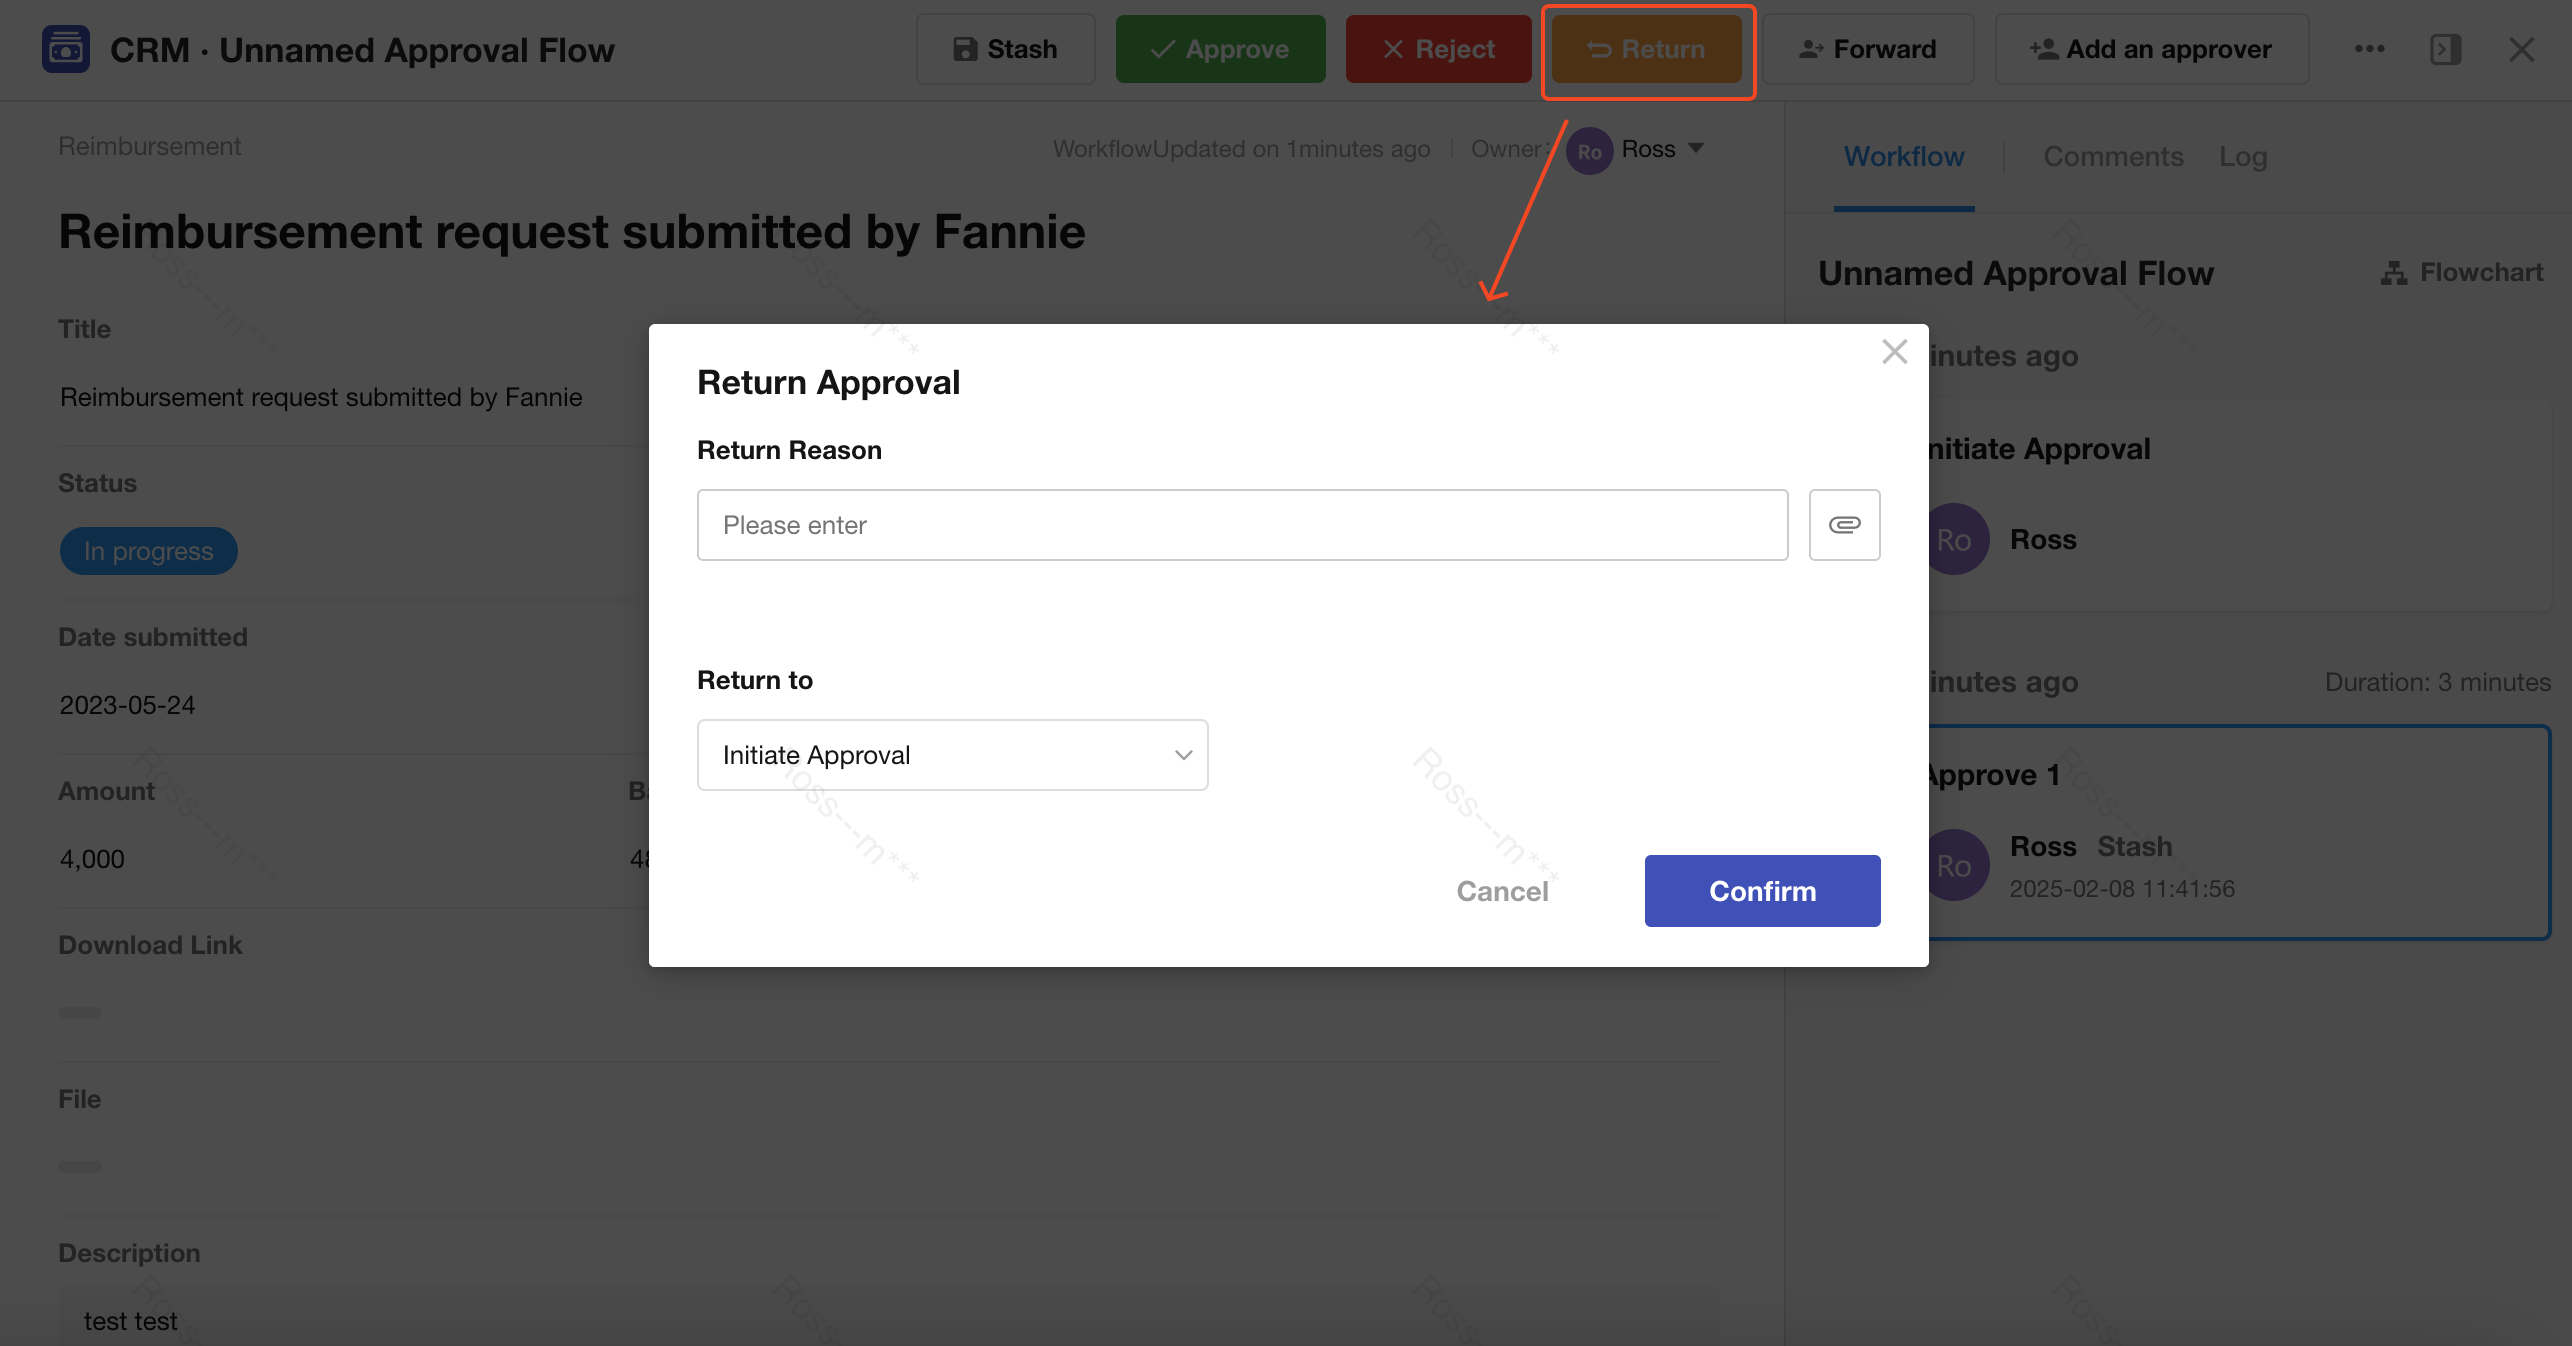
Return and re-initiate approval
During the approval process, if data errors are found or if the submitter or previous approvers need to re-edit the content, a direct rejection would lead to the termination of the approval process, requiring the entire approval process to be re-initiated. To avoid this, the system provides a "Return" function, allowing you to return the approval to a specific previous node while maintaining the continuity of the approval process.
When returning the approval, you can provide comments explaining the reason for the return and the content that needs to be modified. Additionally, you can choose to return the approval to a specific node to ensure that the process can continue in the expected direction. In this way, the approval process not only continues without ending but is also clearly displayed in the entire process flowchart, facilitating tracking and management.
Settings for allowing approvers to choose which node to return the approval to
For returning approvals, to meet diverse business needs, the system allows flexible configuration of the nodes where approvals can be returned. For example, it allows approvers to return approvals to all nodes above, only the previous node, the initiating node, or other specified nodes.
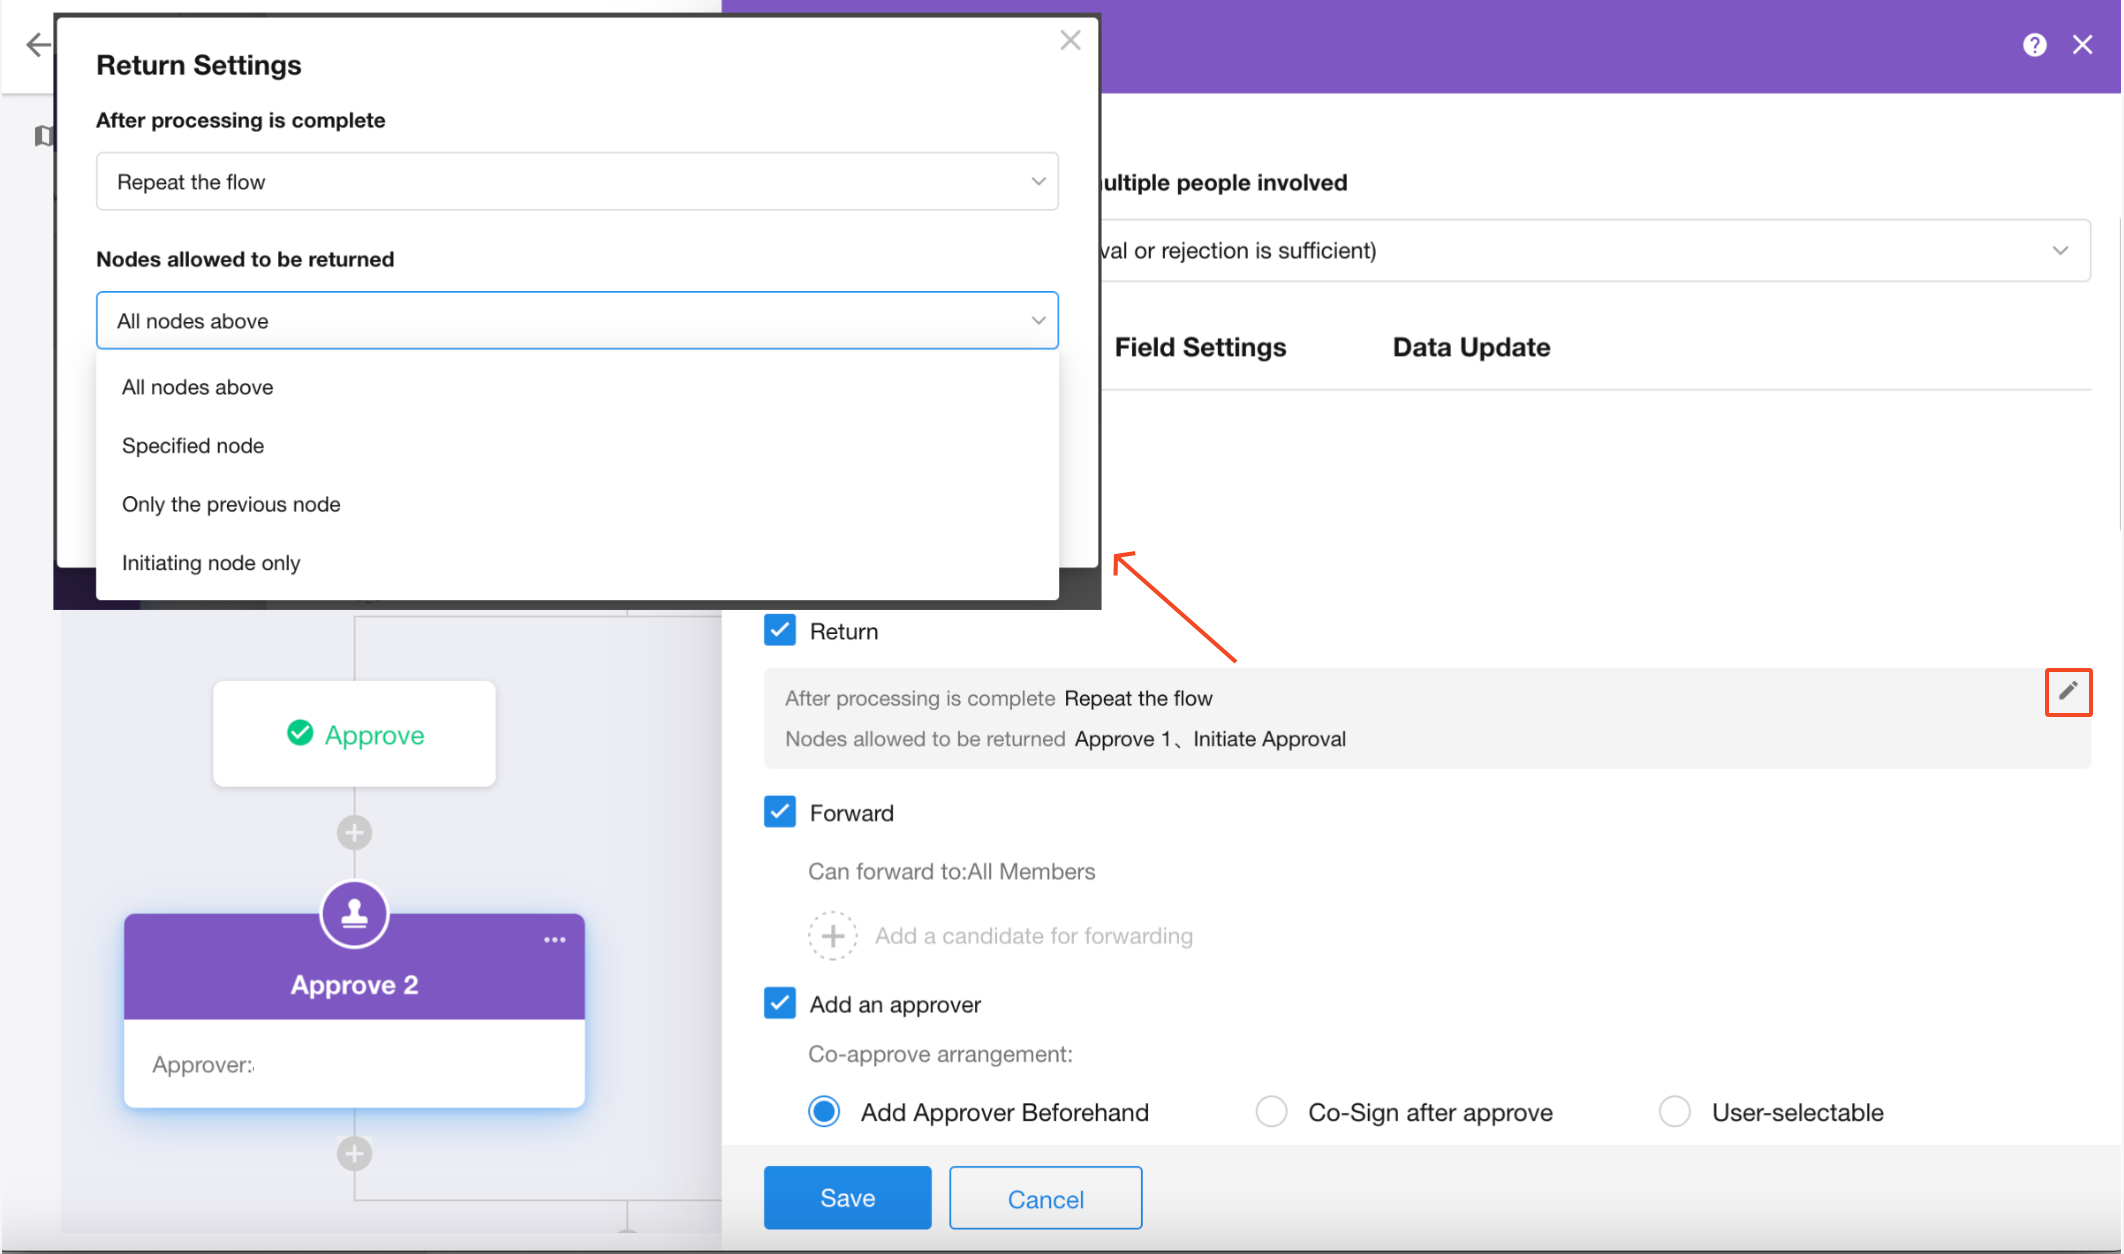
During configuration, the system will automatically filter and display the nodes to which approvals can be returned based on the selected rules.
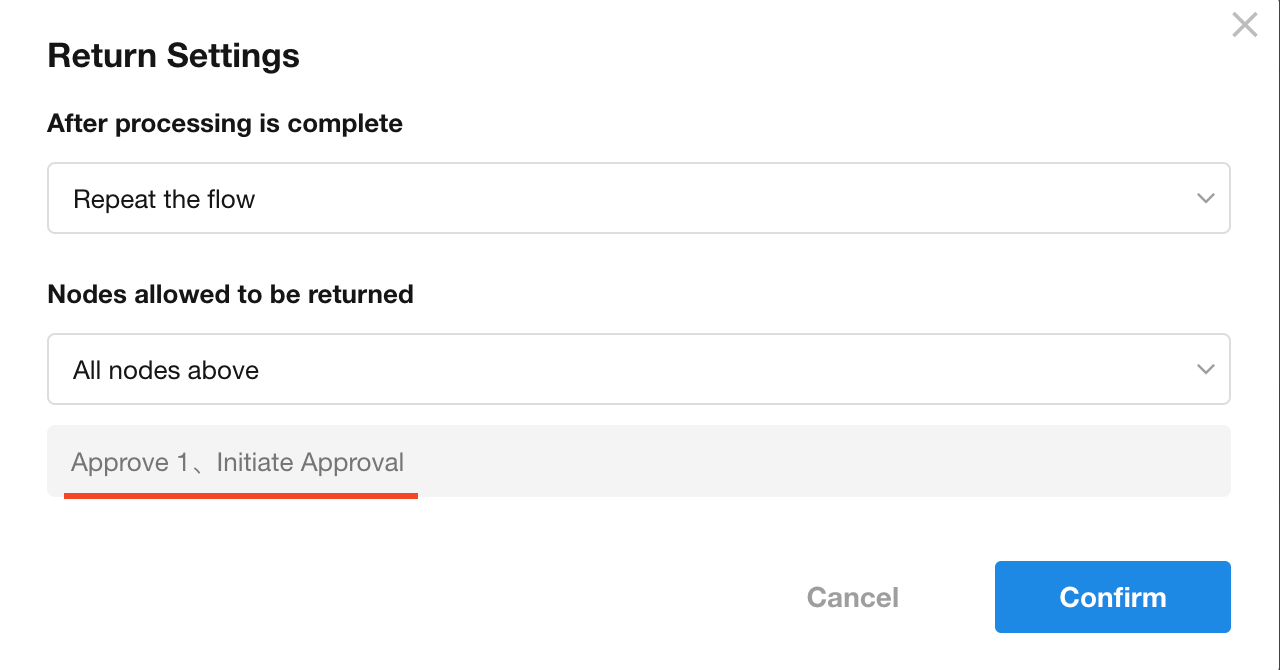
The options for returning to a specified node and only returning to the previous node are available only in the Approval node that is in the "Initiate Approval Flow" block; in an seperate Approval node, the system only offers options to return to all nodes above and the initiating node.
Detailed explanation of which nodes approvals can be returned to
-
Approvals can be returned to Approval node, Fill in node, and the initiating nodes.
-
Between the node an approval is returned to and the current approval node, only Delay node, Calculation node, Approval node, Fill in node, and CC node are allowed to exist.
-
The node an approval is returned to must be on the main path of the approval process, not on a branch process. This means that if retracing from the current approval node, each path should lead directly to the node it is returned to, ensuring the traceability of the process.
-
If the post-processing option is set to "Directly return to approval node", the approval can only be returned to the initiating node or Fill in node.
-
In a co-sign process involving multiple approvers, if the approval method is set to " Approved when one approves, rejected when all reject", the approval process cannot be returned.
Resubmit after being returned
-
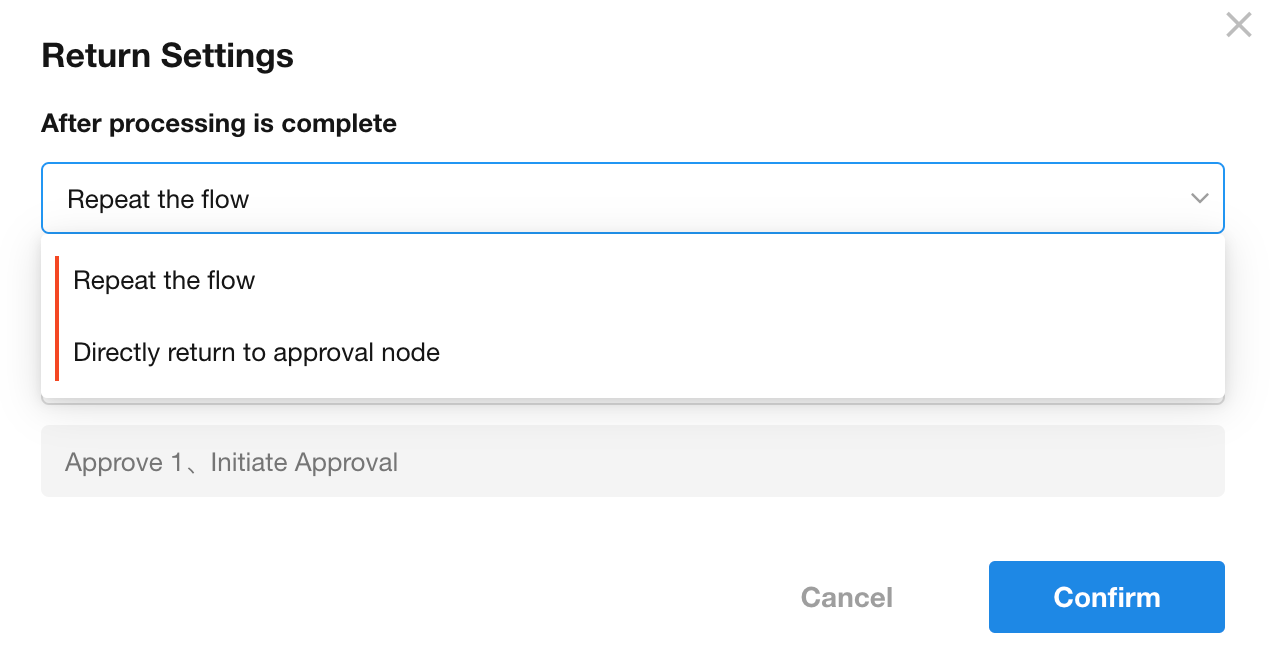
Approve by custom approvers
When an approval process is returned and resubmitted, there are two processing options provided here: repeat the flow and directly return to the approval node.
-
Repeat the flow
Under this approach, the approval process will restart execution from the next node after the node to which the approval was returned.
For example, consider an approval process as follows: Initiating node → Approver A → Approver B → Approver C.
If the approval is returned to Approver A from Approver C, choosing "Repeat the flow" would lead to Approver A reapproving, then the approval moving to Approver B (the next node to Approver A), then approval from Approver C.
-
Return to approval node directly
This method allows the resubmitted approval to directly reach the approval node where it was returned without passing through any previous approval nodes.
Using the previous approval process as an example: Initiating node → Approver A → Approver B → Approver C, if the approval is returned to the initiating node from Approver C and "Directly return to approval node" is selected, upon resubmission, it will directly proceed to Approver C, excluding the participation of Approver A and B in this round of approval.
-
-
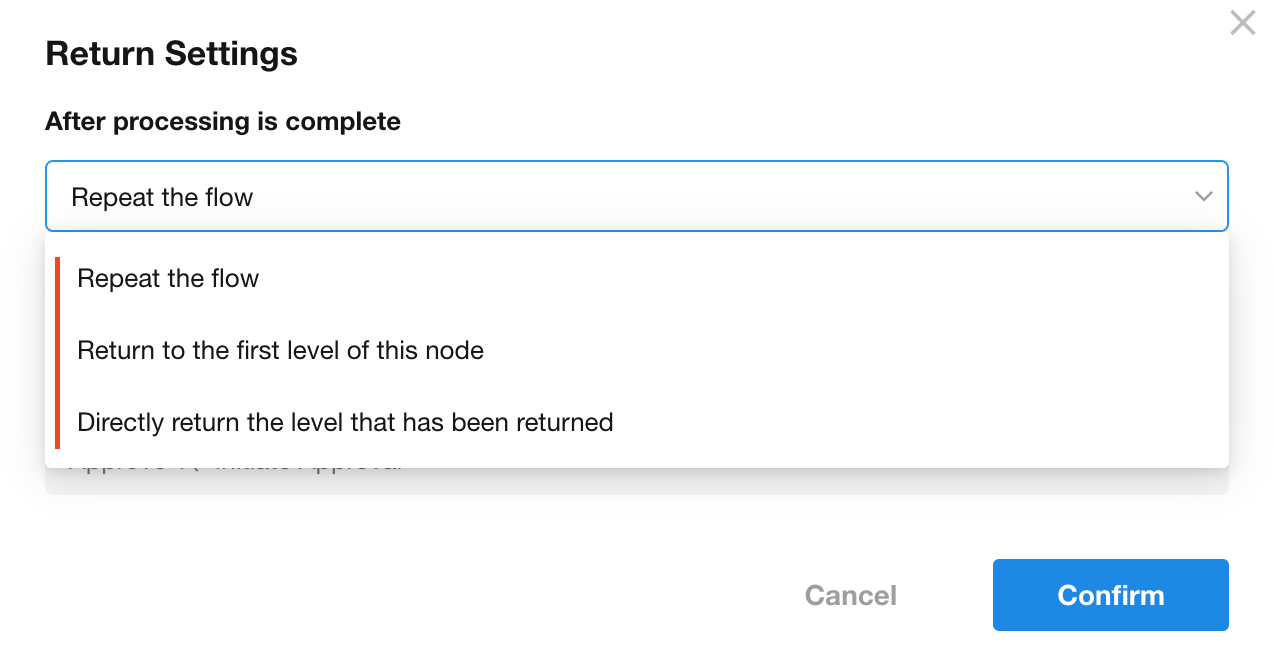
Approve level by level
For the level-by-level approval process, when resubmitting after being returned, there are three processing options available: repeat the flow, return to the first Level of this node, and directly return to the level where it is returned.
-
Repeat the flow
Similar to "Repeat the flow" in "Approve by custom approvers", this method requires the approval process to restart from the node to which the approval was returned.
-
Return to the first level of this node
Under this approach, the resubmitted approval will directly reach the current approval node and begin at the first level of approval.
-
Return to the level where it is returned
This method allows the approval to restart at the level it was at when returned, without repeating previously completed approval levels. For example, in a three-level approval process, if the approval is returned to a previous node at the third level and "Return to the level where it is returned" is selected, after processing, it will move directly back to the third-level approver, excluding the first and second level approvers from the approval.
-
Actions by the operator of the node the approval is returned to
-
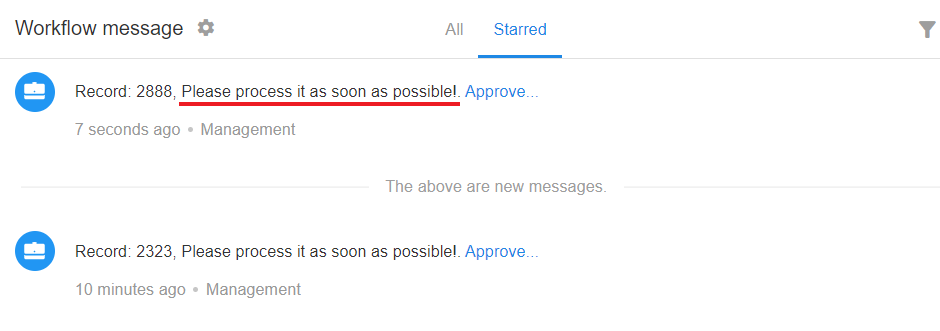
If returned to the initiating node
The initiator can click the link in the workflow message to open the corresponding record page, where they can modify the record and submit it again.
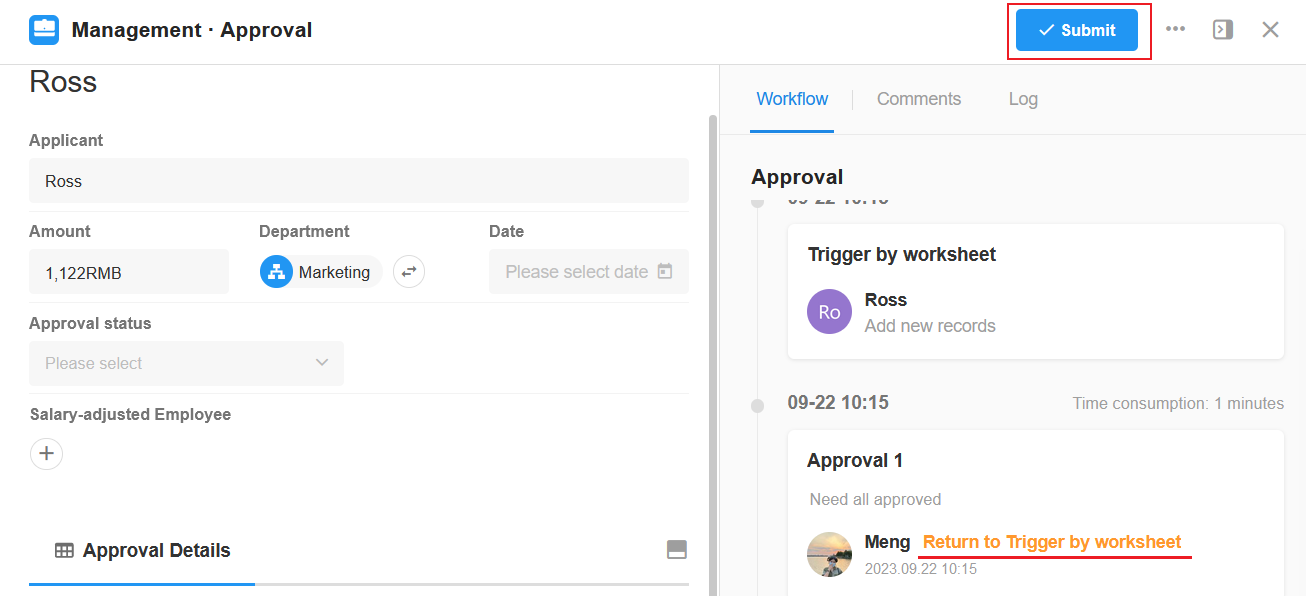
-
If returned to an approval node
The approver at that approval node will receive a workflow message. By clicking the link in the message, the approver can open the record page. On this page, the approver has various operation options, including Approve, Reject, Add an approver, Return, Forward, and other actions.

1.6 When the approver is empty
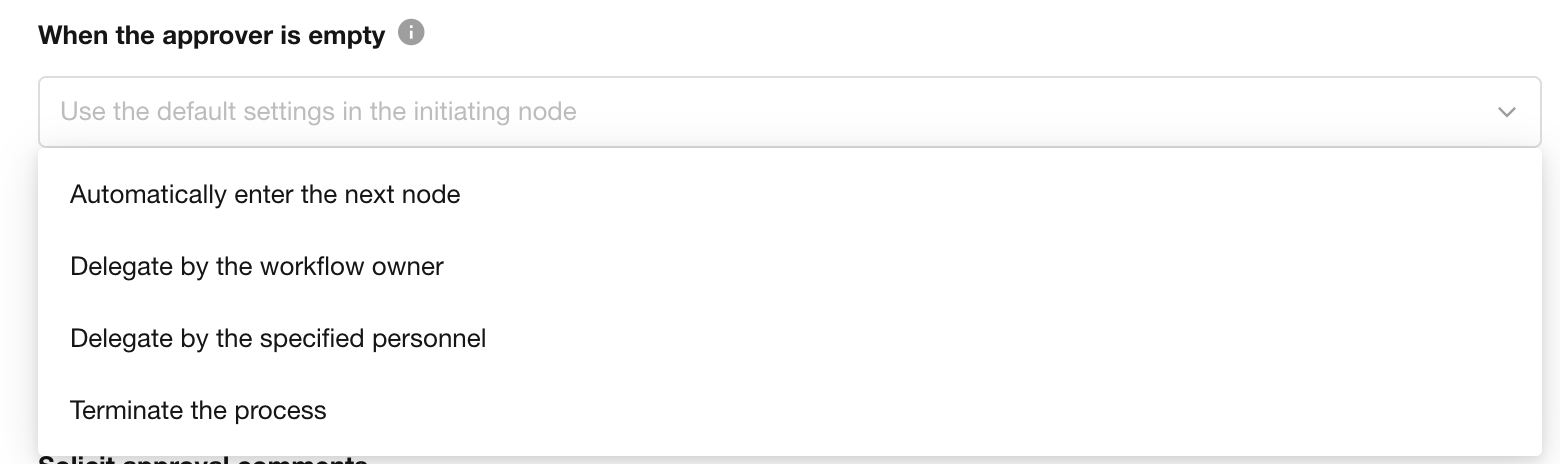
When adding an approver, it is not necessarily a specific person who is assigned, but it could be based on member fields, department heads, organization roles, positions, and more. Therefore, in some cases, there may not be a corresponding member designated as the approver, resulting in an empty approver. For this situation, the system provides the following five ways to flexibly handle the situation of an empty approver:
-
Automatically enter the next node
When the approver is empty and the option "Automatically enter the next node" is selected, the system will automatically skip the current approval node and go directly to the next step. At this point, the approval process cannot be returned to this approval node.
-
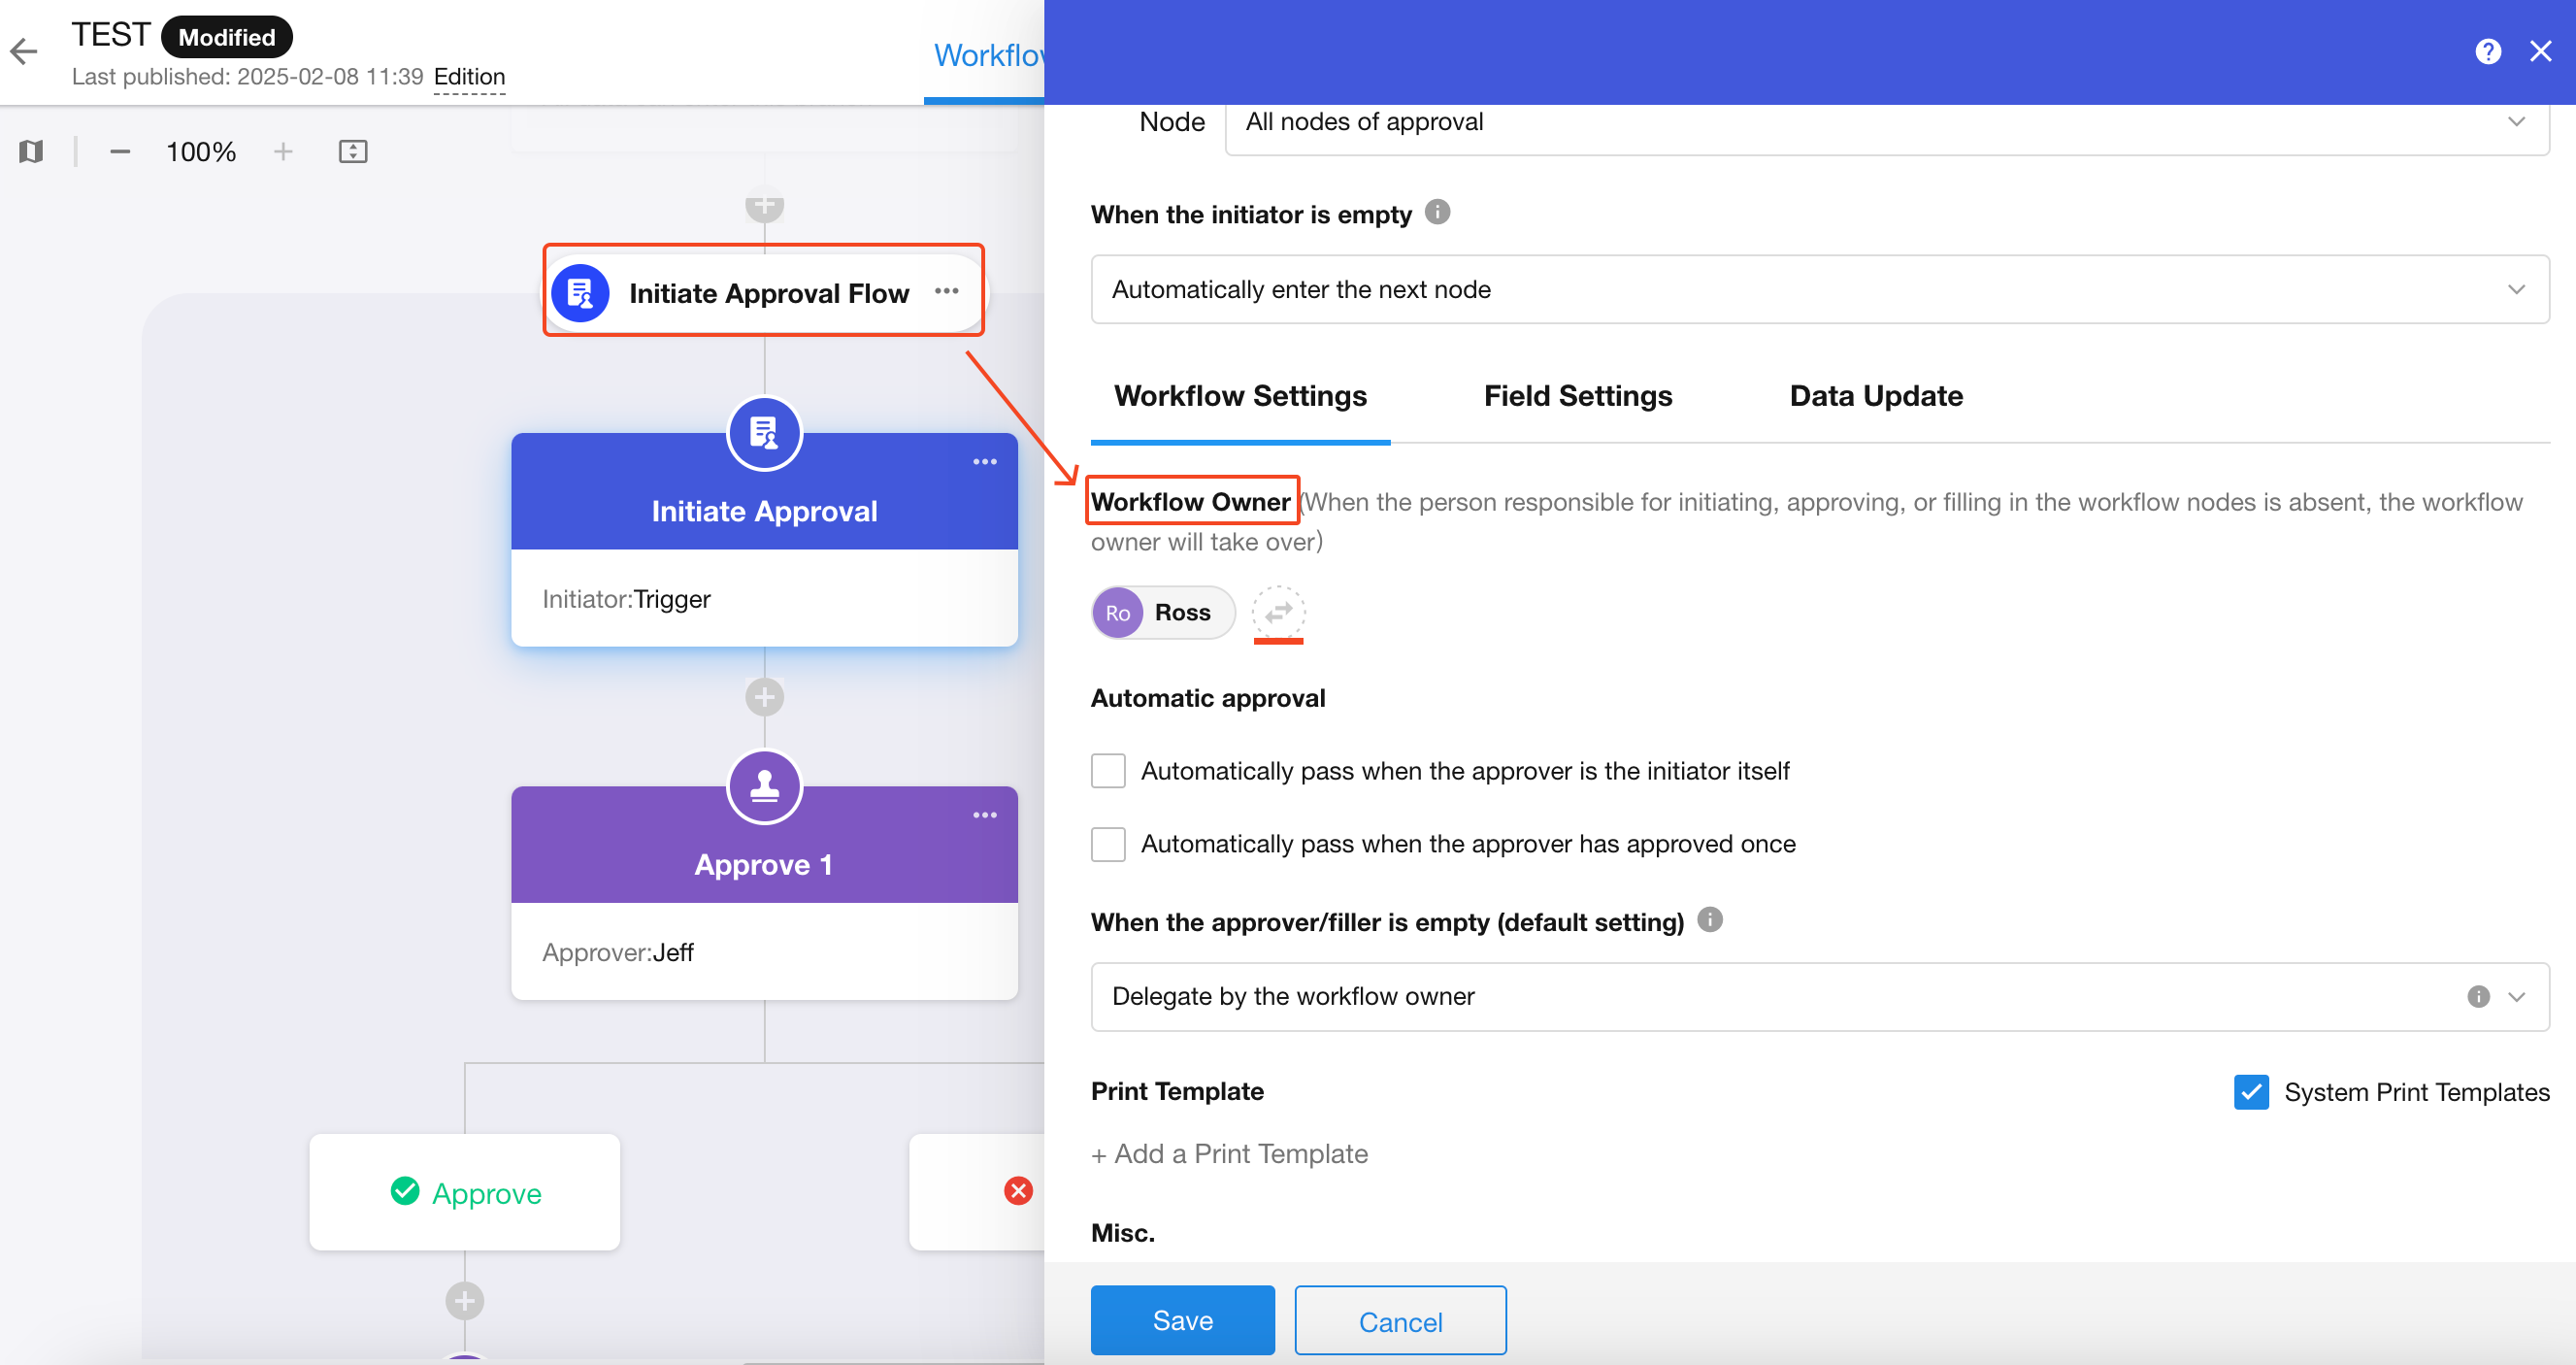
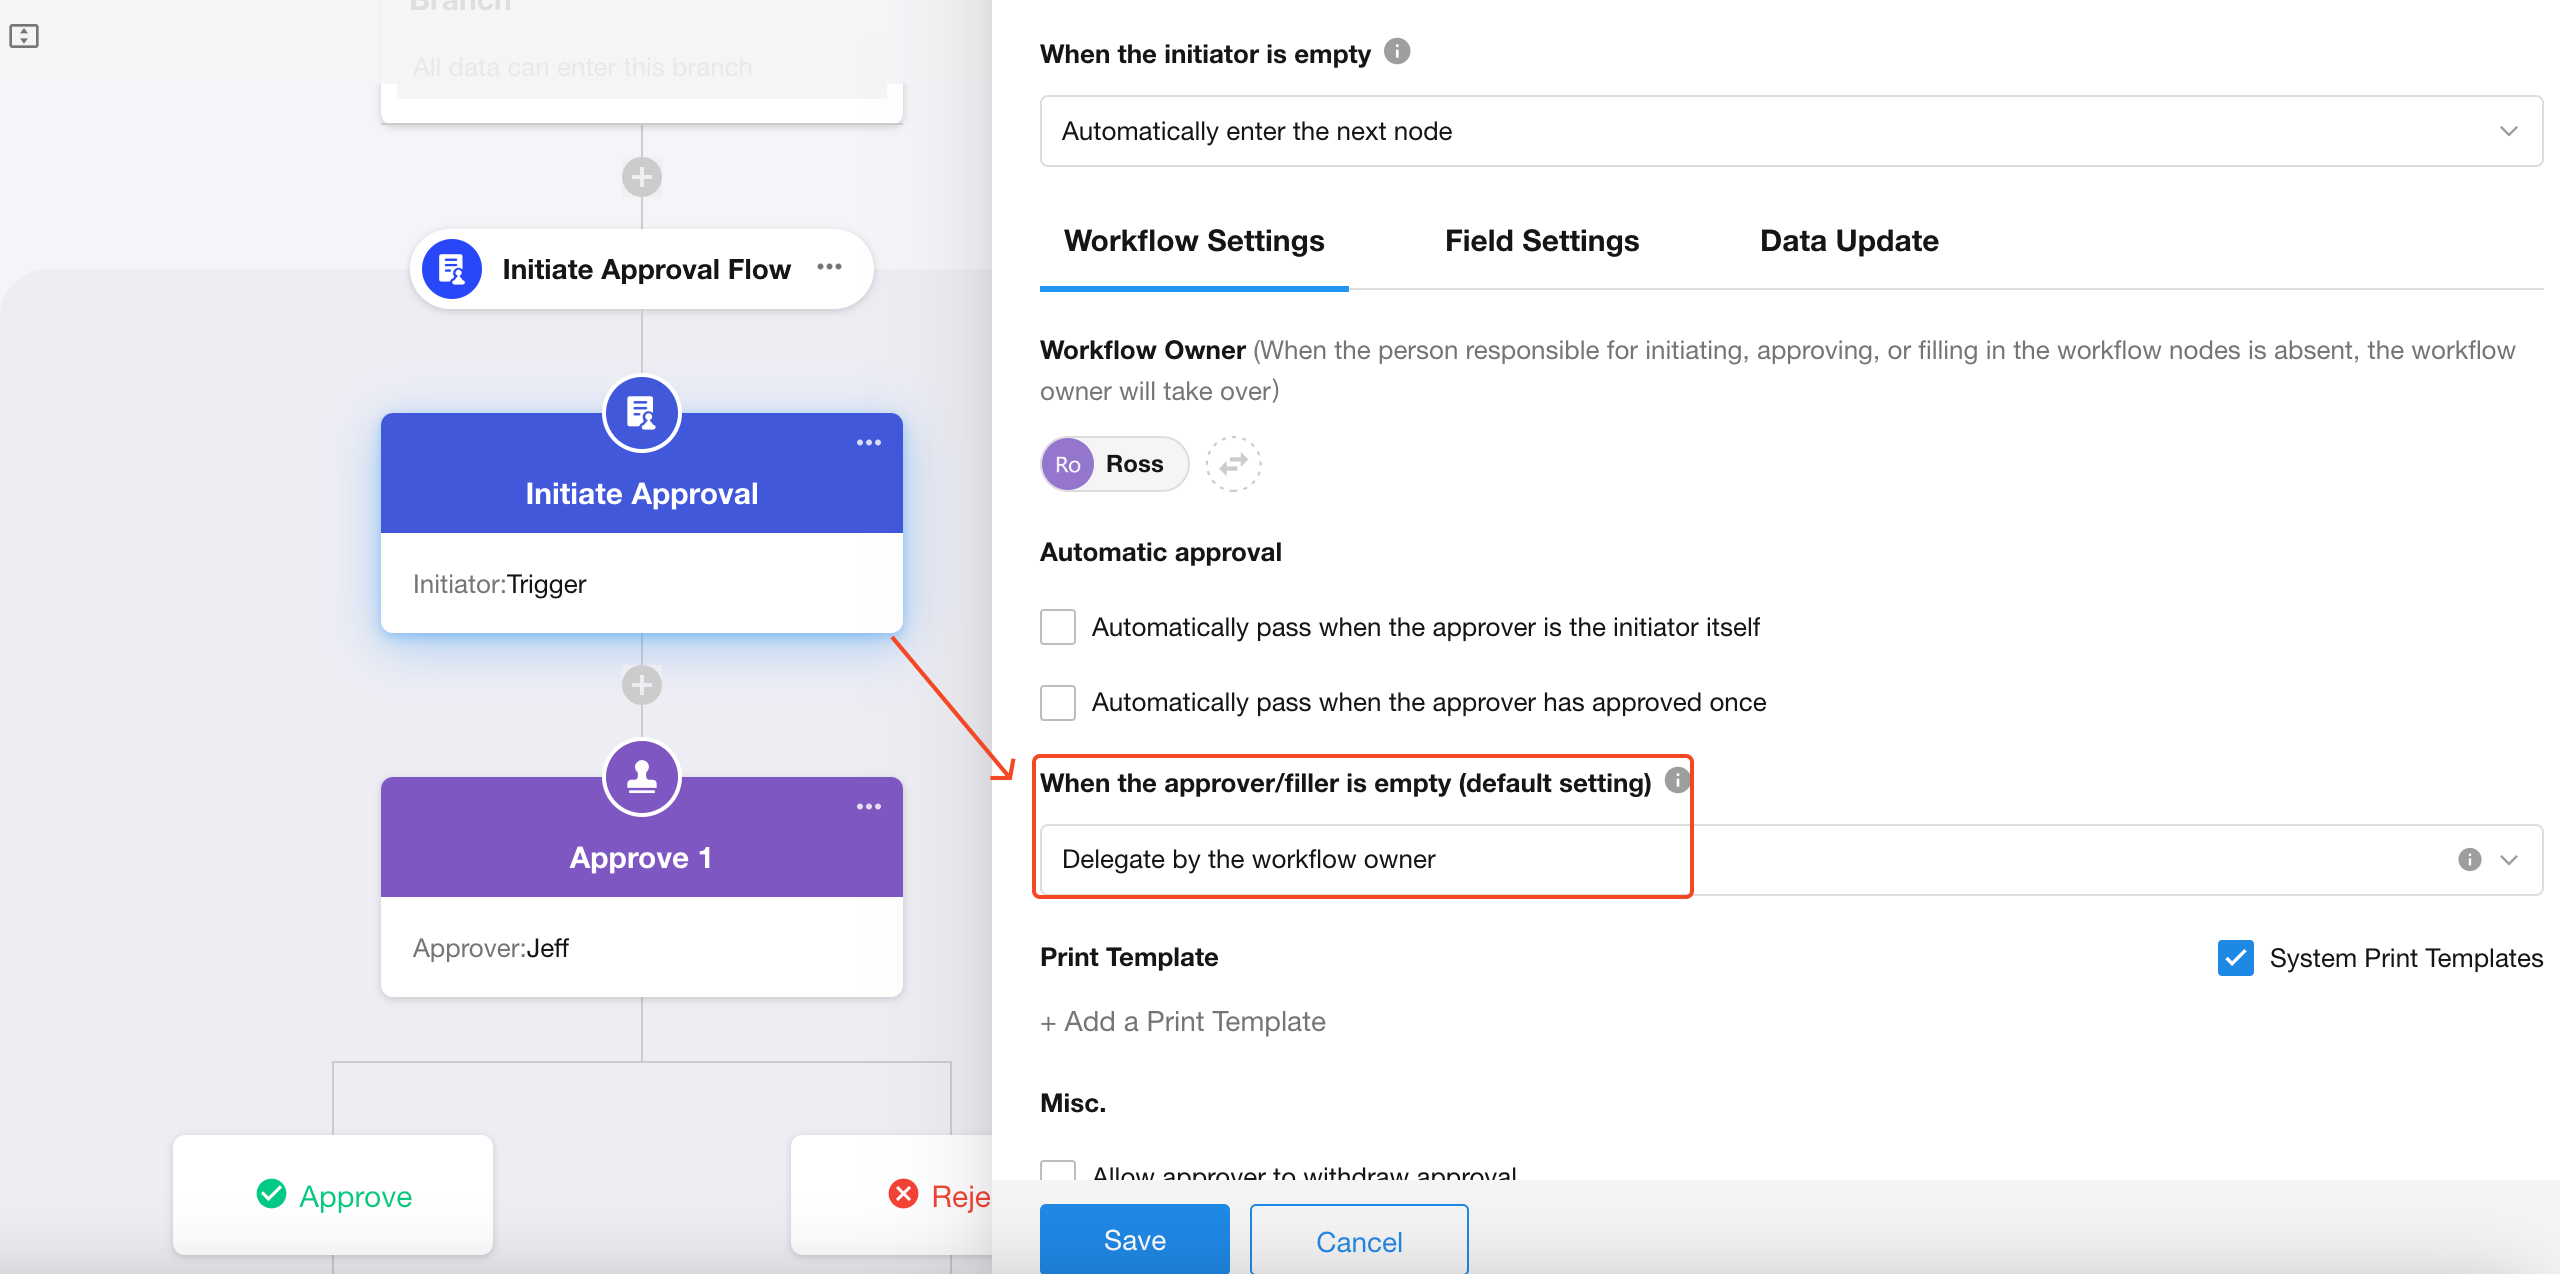
Delegate by the workflow owner
The owner of the workflow is usually the creator of the workflow, but this needs to be determined based on whether the approval node is in the main process or in the "Initiate Approval Flow" block.
-
If the approval node is in the "Initiate Approval Flow" block:
The owner of the workflow defaults to the person who added the "Initiate Approval Flow" node and can be adjusted. (The "Initiate Approval Flow" block can be seen as a subflow, and we set the owner of this subflow).
-
If the approval node is not in the "Initiate Approval Flow" block:
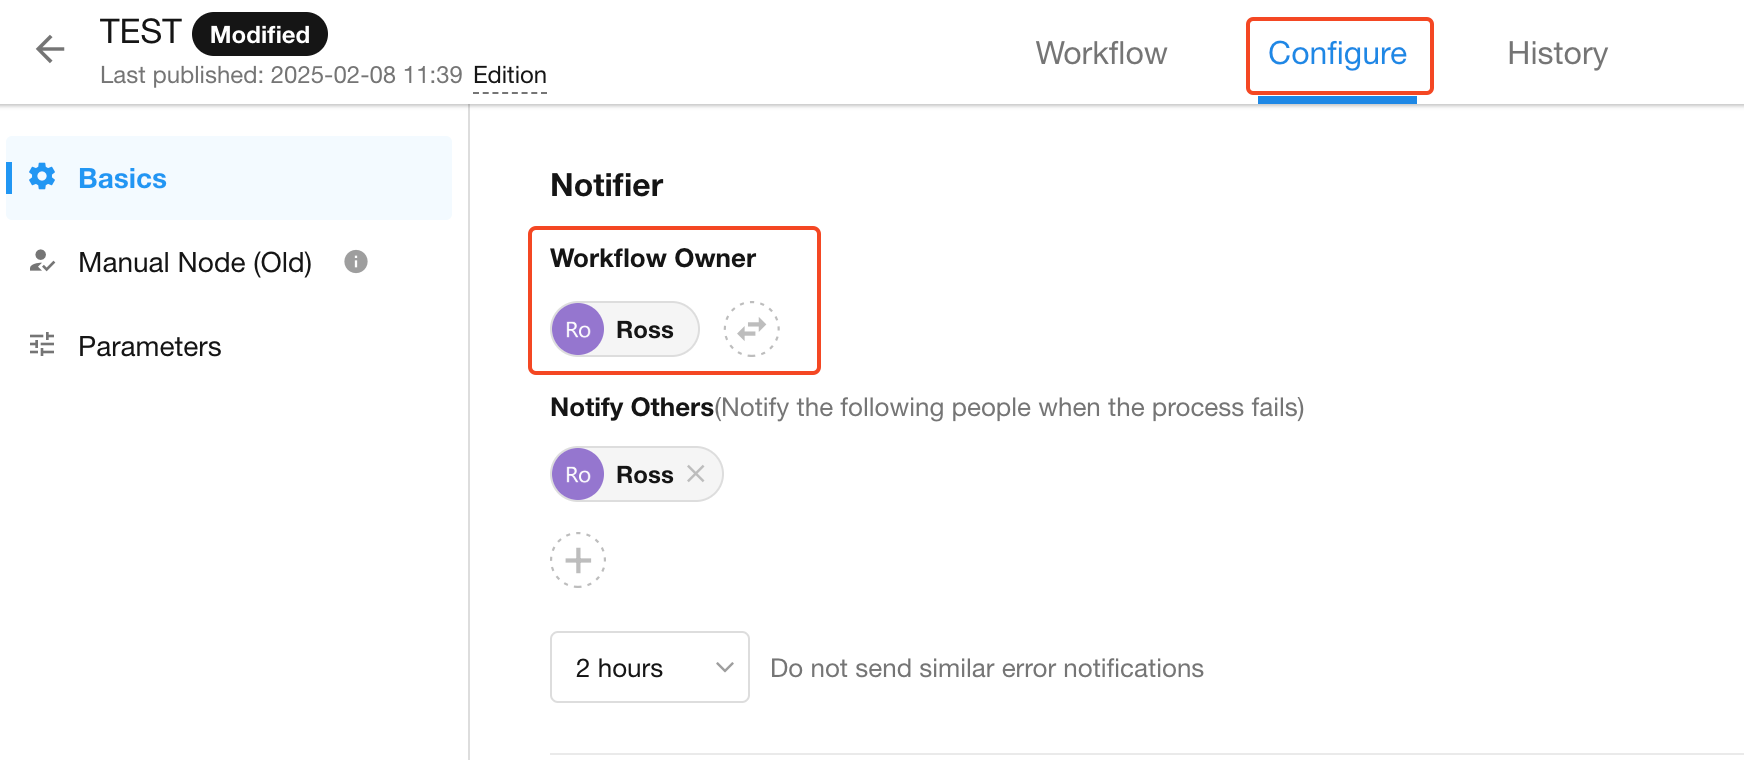
-
-
Delegate by the specified personnel
In this way, one or more alternative approvers can be predefined.
-
Terminate the process
The process ends and a notification is sent to the notifier in the process.
-
Use the default settings of the process
The specific processing method also needs to be determined based on whether the approval node is in the "Initiate Approval Flow" block.
-
If the approval node is in the "Initiate Approval Flow" block:
If there are no specific settings for an empty approver in the approval node, then the settings in the "Initiate Approval Flow" initiating node will be followed.
-
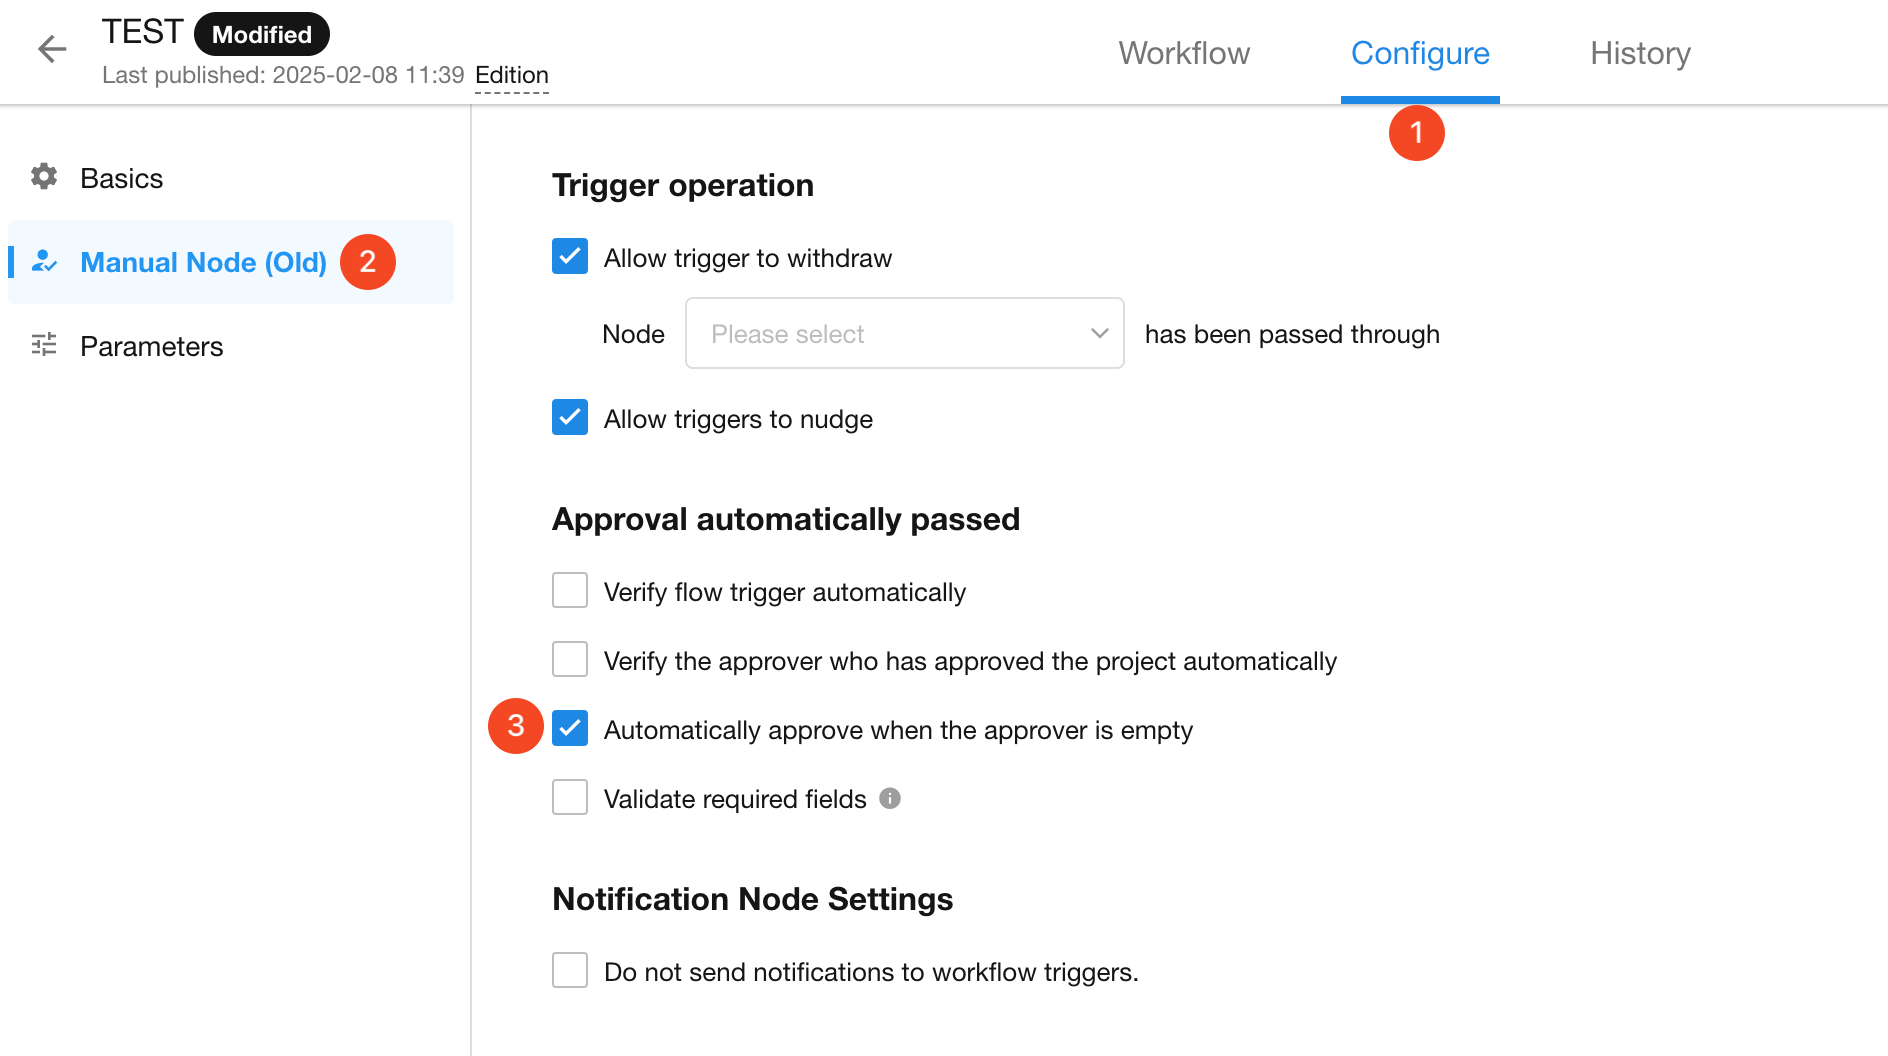
If the approval node is not in the "Initiate Approval Flow" block:
If there are no specific settings for an empty approver in the approval node, then the default settings of the approval process will be followed.
Additionally, if the option "Automatically approve when approver is empty" is checked, then it will automatically approve when the approver is empty; if this option is not checked, the process will be terminated.
-
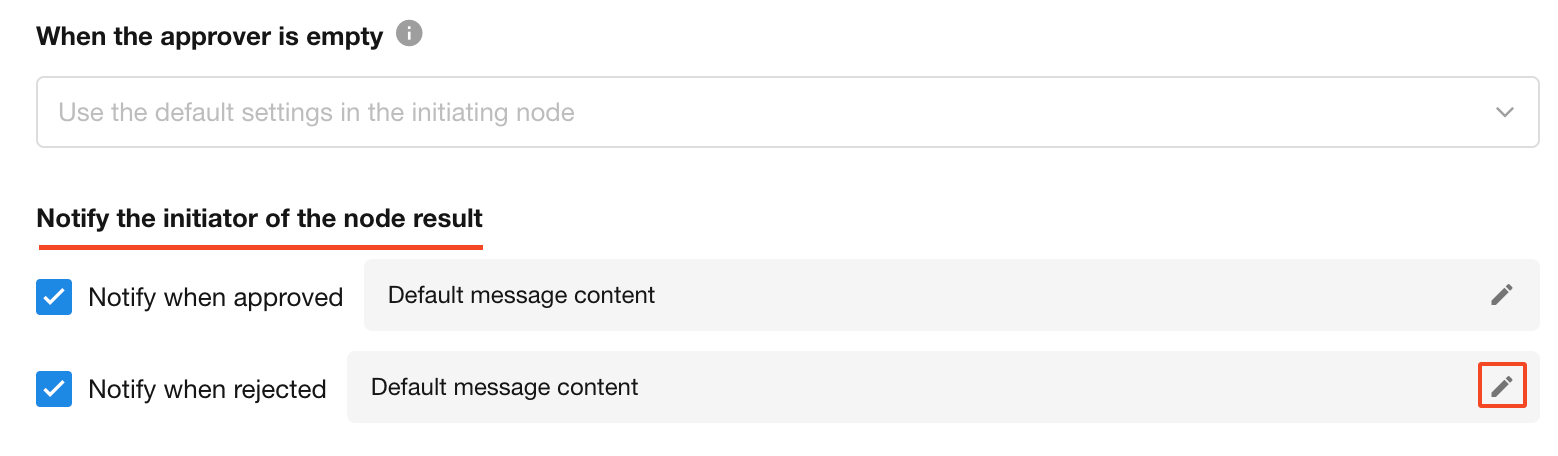
1.7 Notify the initiator of the node result
When approved or rejected, the initiator can be notified, and the notification content can be customized.
1.8 Approval comments/Signature/Password verification
In the approval process, whether to require the approver to fill in approval comments, signatures, and login password verification can be flexibly set. These settings can be configured separately for approval and rejection cases.
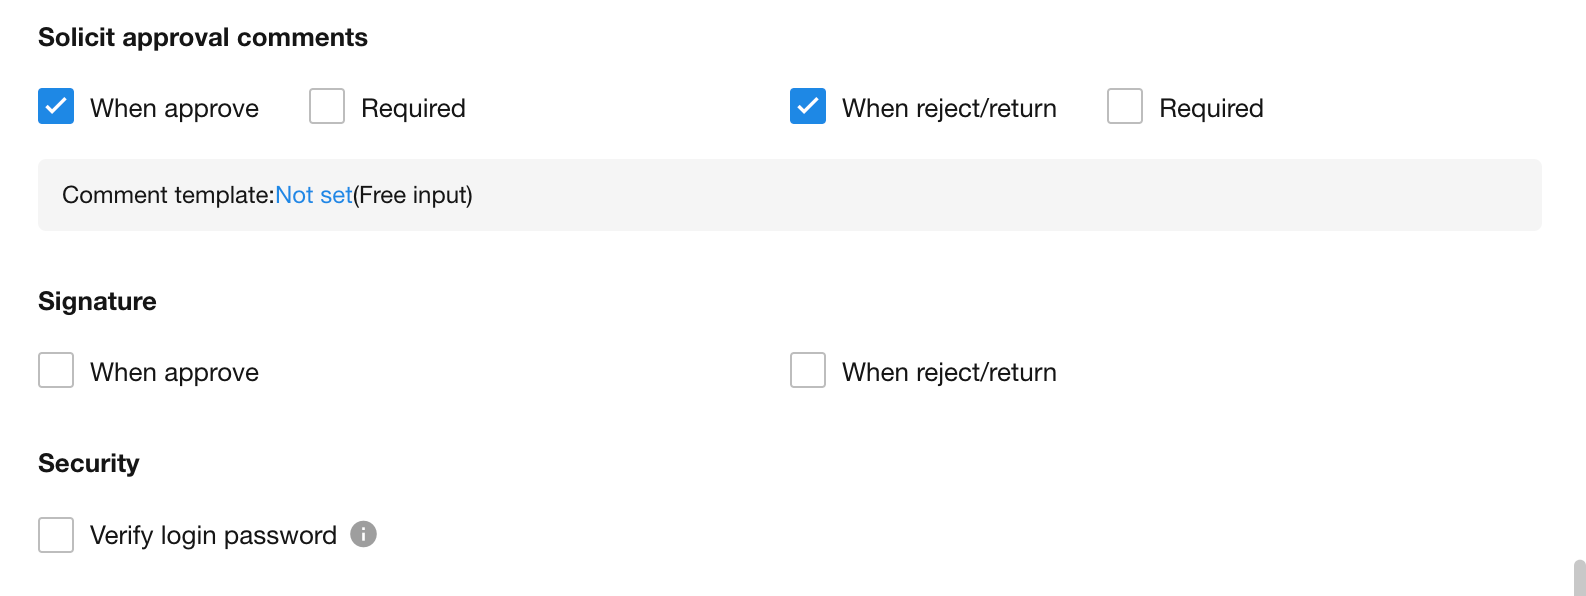
As shown below, it is set that when it is approved, the approver is required to fill in comments, signatures, and verify loggin password.
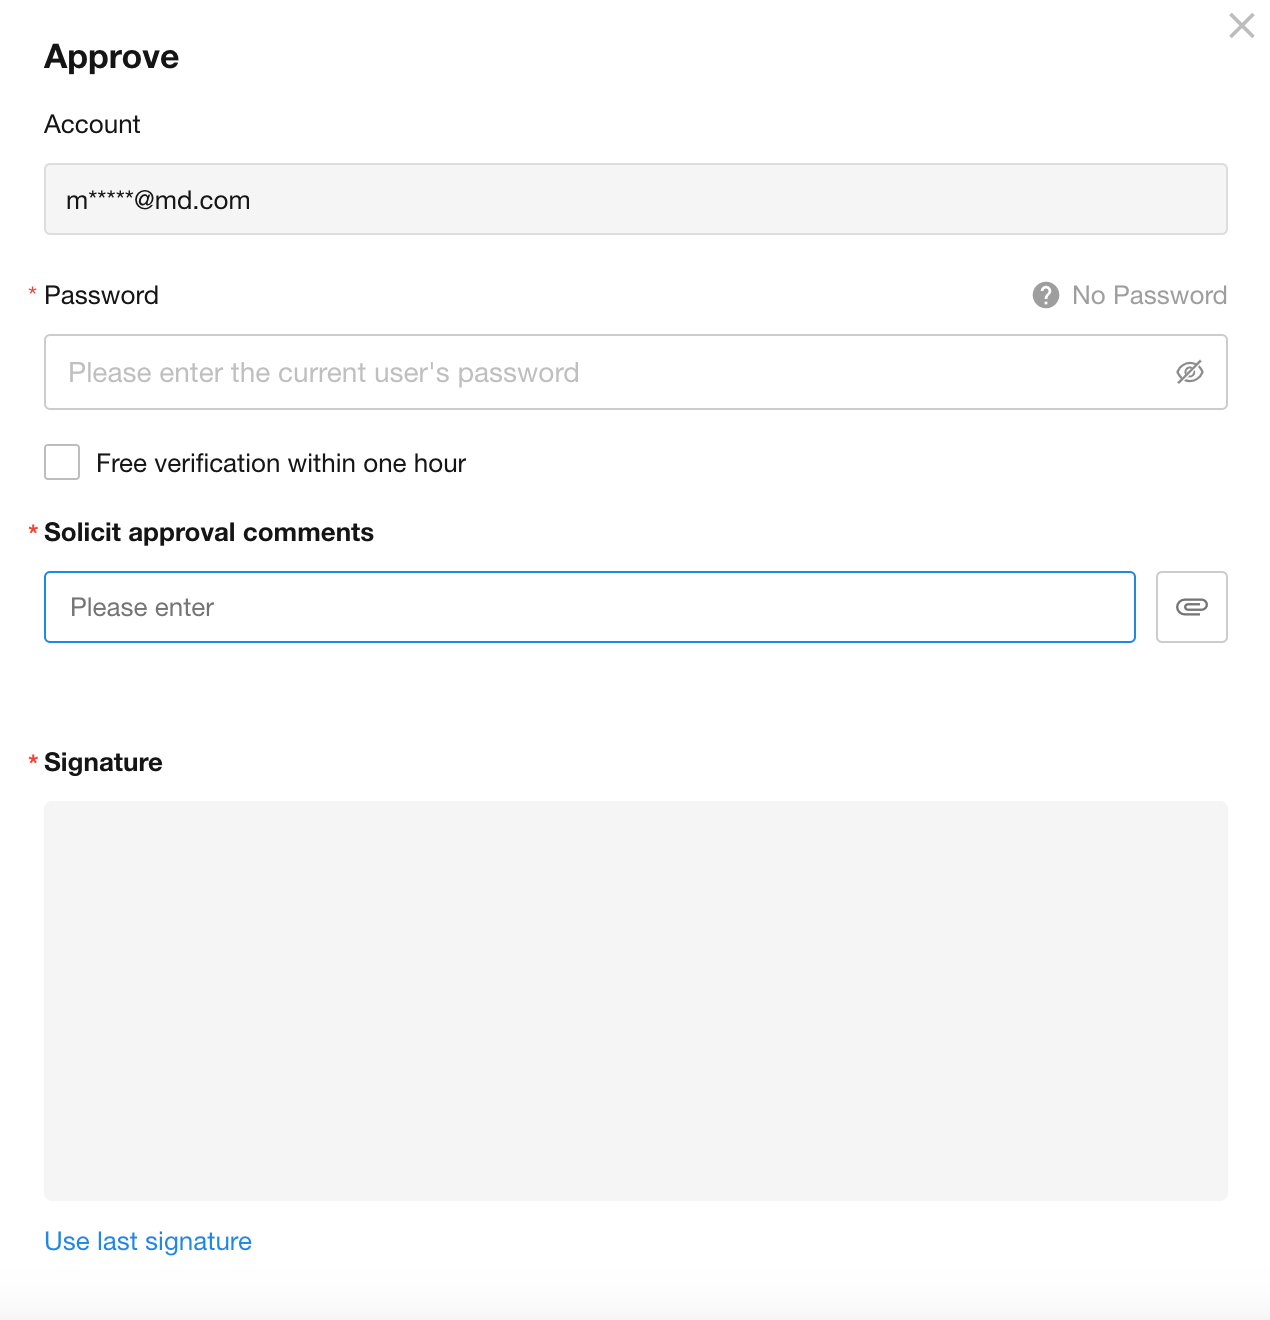
-
If "Approval comments" is not checked, the approver will directly complete the approval operation by clicking the approve or reject button without entering any comments.
-
The system also supports pre-setting comment templates for the approver, so they can directly select comments from the template during the approval process, and also use the last entered comments (up to 5 displayed).
-
If the "Signature" option is not checked, the signature area will be hidden.
-
If the "Verify login password" option is not checked, the account and password input box will be hidden.
- If this option is checked, the organization's super administrator can enable password-free verification within 1 hour to reduce the hassle of frequent password entry. Click here for detailed settings.
Approval comment templates
For commonly used approval comments, the system supports setting them in advance as templates for quick selection during approval.
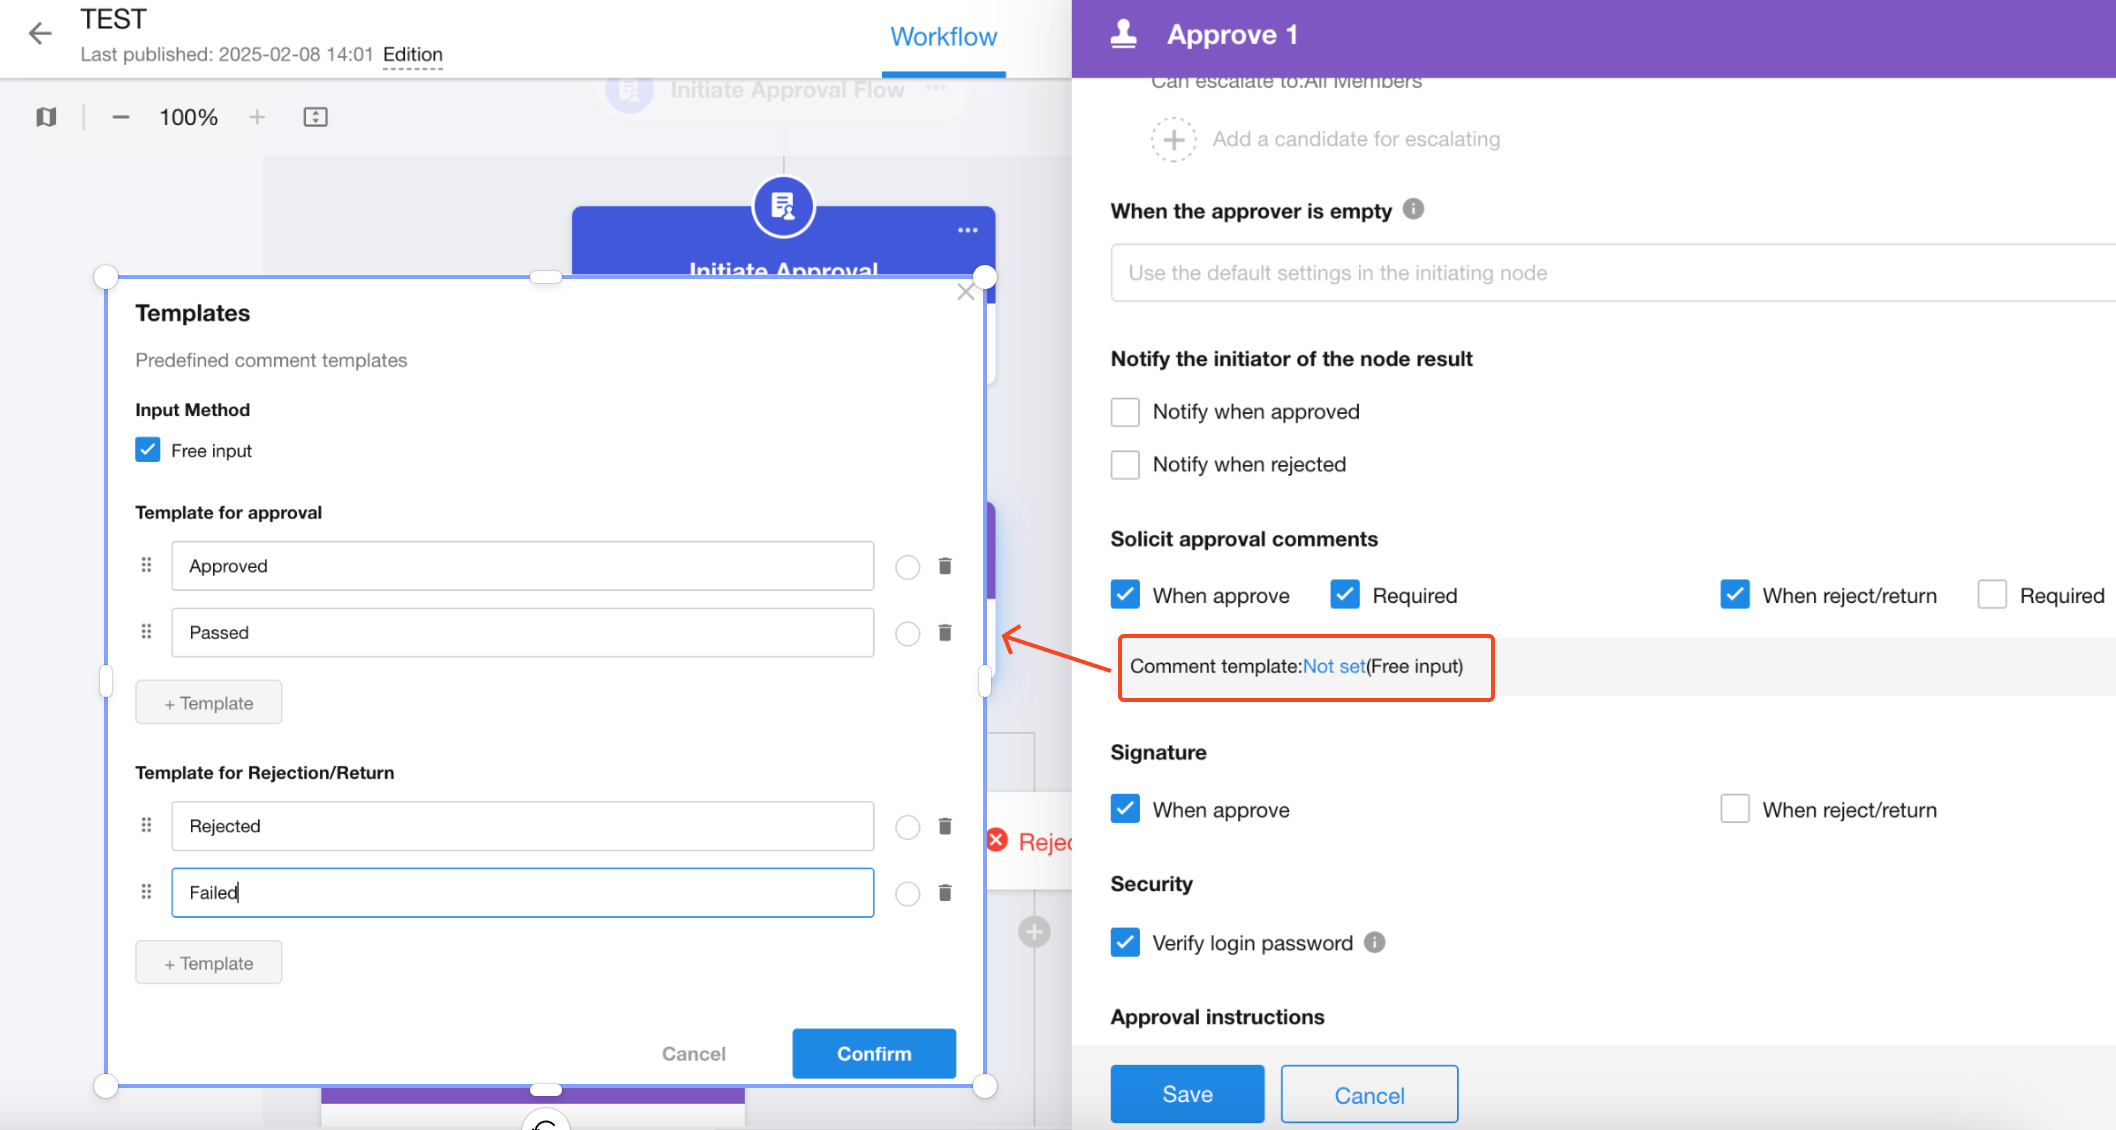
Multiple comment templates can be set for both approval and rejection cases, and default comments can be set.
Using comment templates during approval:
If you wish to restrict the approver's free input, you can choose not to check the "Free Input" option to require the approver to select comments only from the preset templates. If you want to maintain the flexibility of approval, you can enable this option to allow the approver to freely input any comments.

Signature
Approvers can use their previous signature, which can be viewed in the workflow details and can also be printed out.
1.9 No need to fill out form fields when reject/return
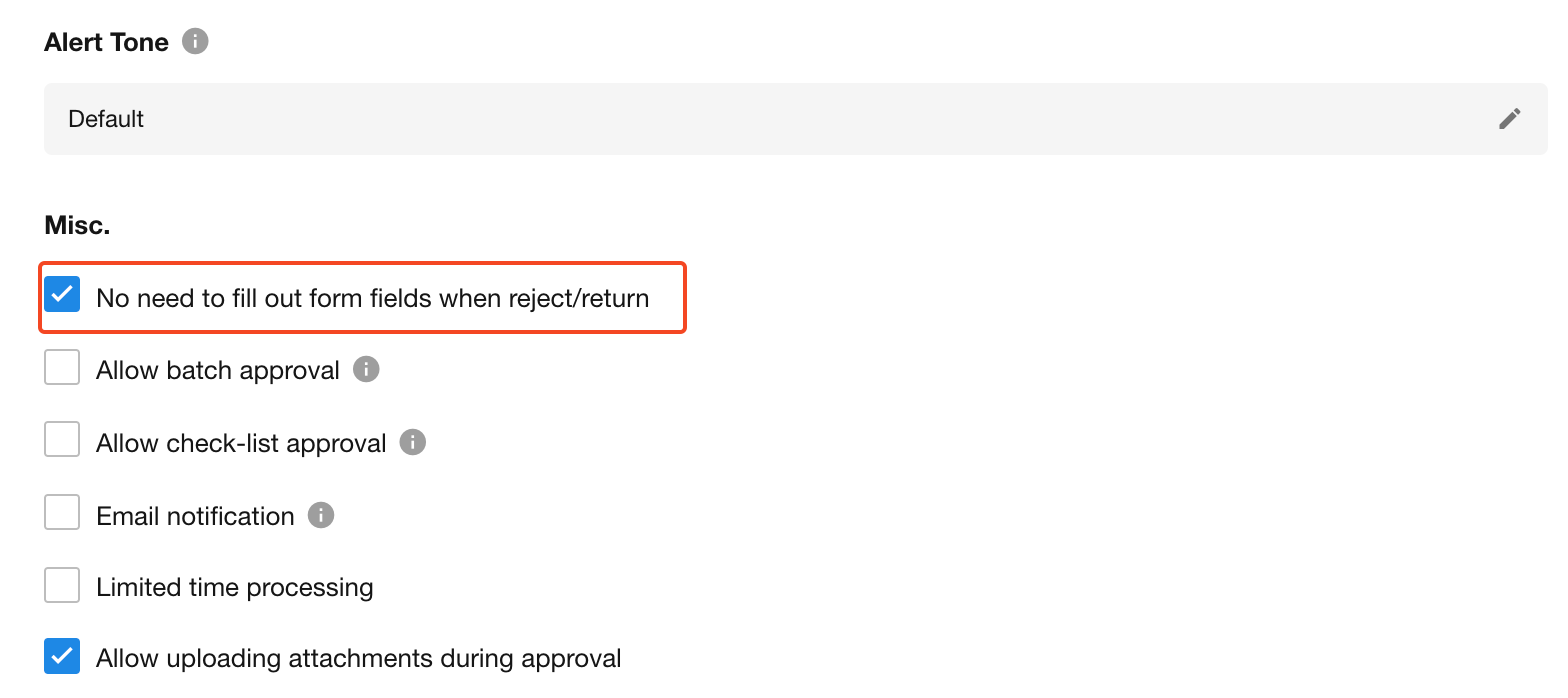
In the approval process, the approver may edit or be required to fill out certain fields. However, when the option "No need to fill out form fields when reject or return" is checked, if the approver rejects or returns it, the system will not prompt them to fill out any required fields, and the content filled in the fields will not be saved.
Please note that if it is approved and there are required fields, these fields must be filled out and cannot be left empty, otherwise the approval result cannot be submitted.
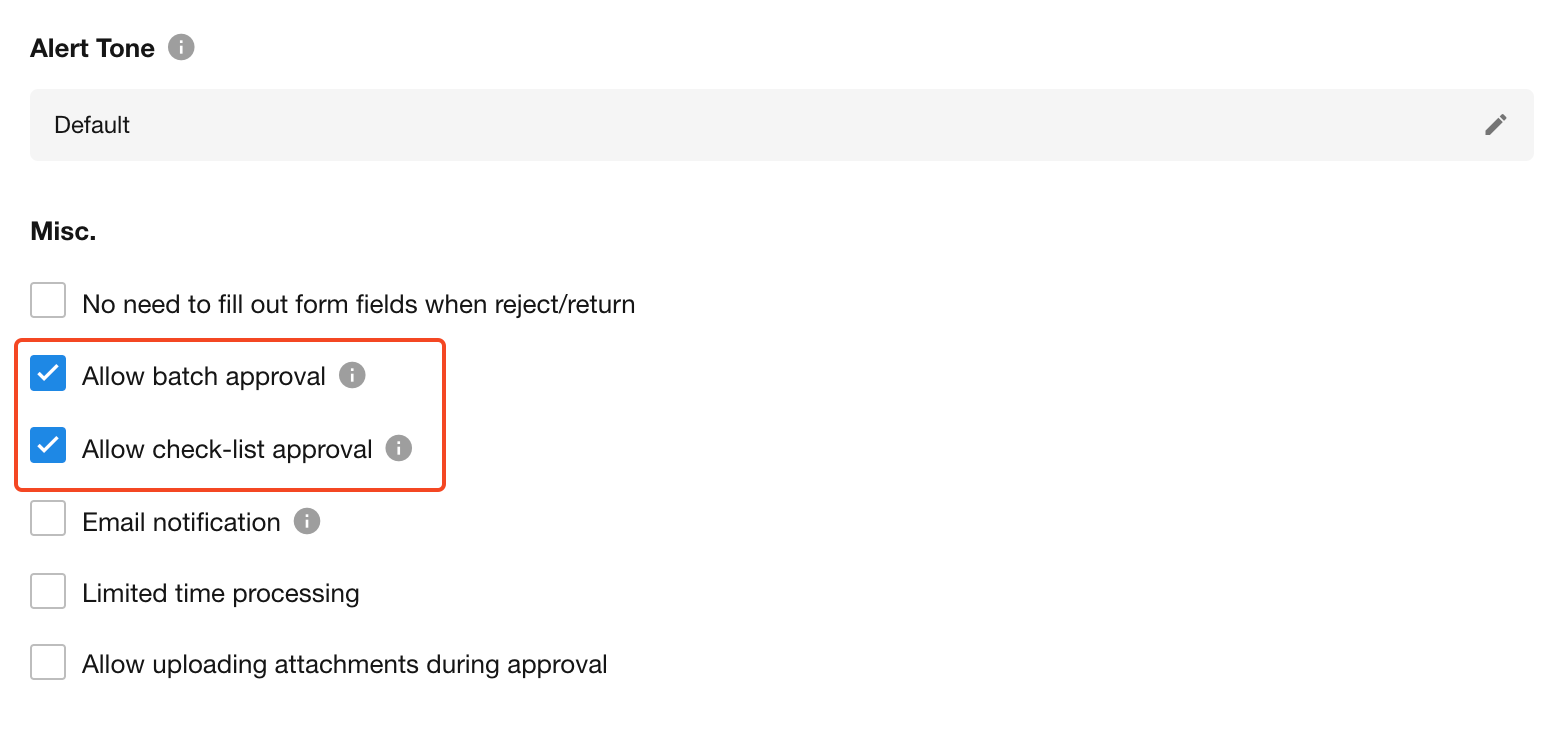
1.10 Batch approval/Check-list approval
-
Allow batch approval
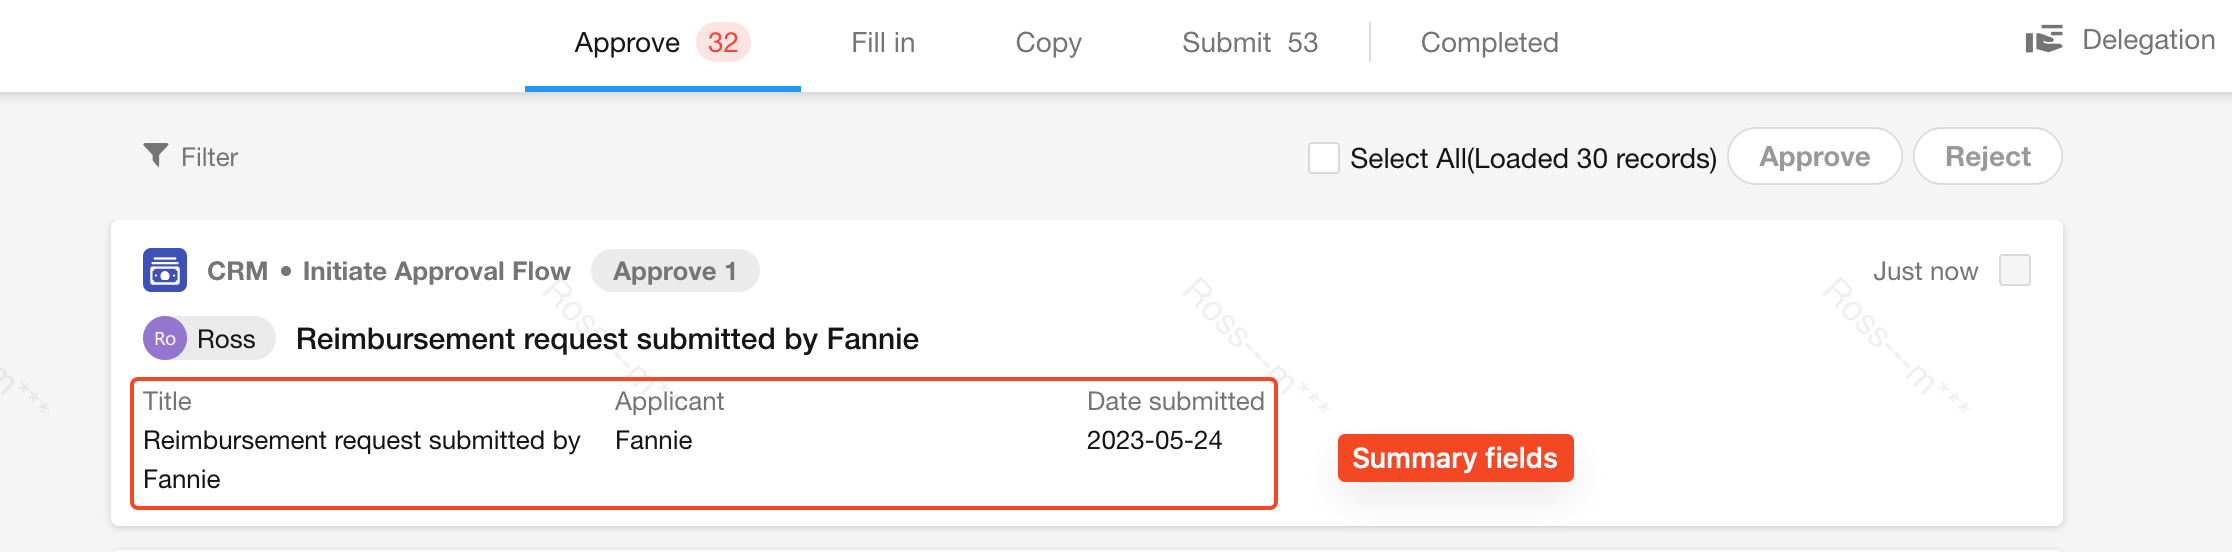
When "Allow batch approval" is checked, the approver will be able to approve or reject multiple requests at once. If required fields are set in the approval node or if approval comments are required, these requirements will be automatically ignored during batch approval. In other words, the approver does not need to fill out required fields or approval comments and can directly approve or reject it in bulk.
After checking this option, the approver can go to [To-do] > [Approve] to perform batch approval, as shown below:

-
Allow check-list approval
After checking "Allow check-list approval", the approver will see the approve and reject buttons in the details page of the record, email notifications, and Feishu. Additionally, when performing check-list approval, the required fields in the form will also be ignored.
1.11 Enable email notification
By enabling email notifications, the system not only sends reminder messages to approvers within the platform but also sends an email notification. In this email, the approver can directly click on buttons for approval or rejection to quickly take action, or click on links to navigate to the HAP platform for further processing. Additionally, email supports attachments. The sender's name in the email can be customized by the user to help approvers easily identify the source of the email. If the user has not set a sender's name, the system will default to displaying the sender's name as the platform name.
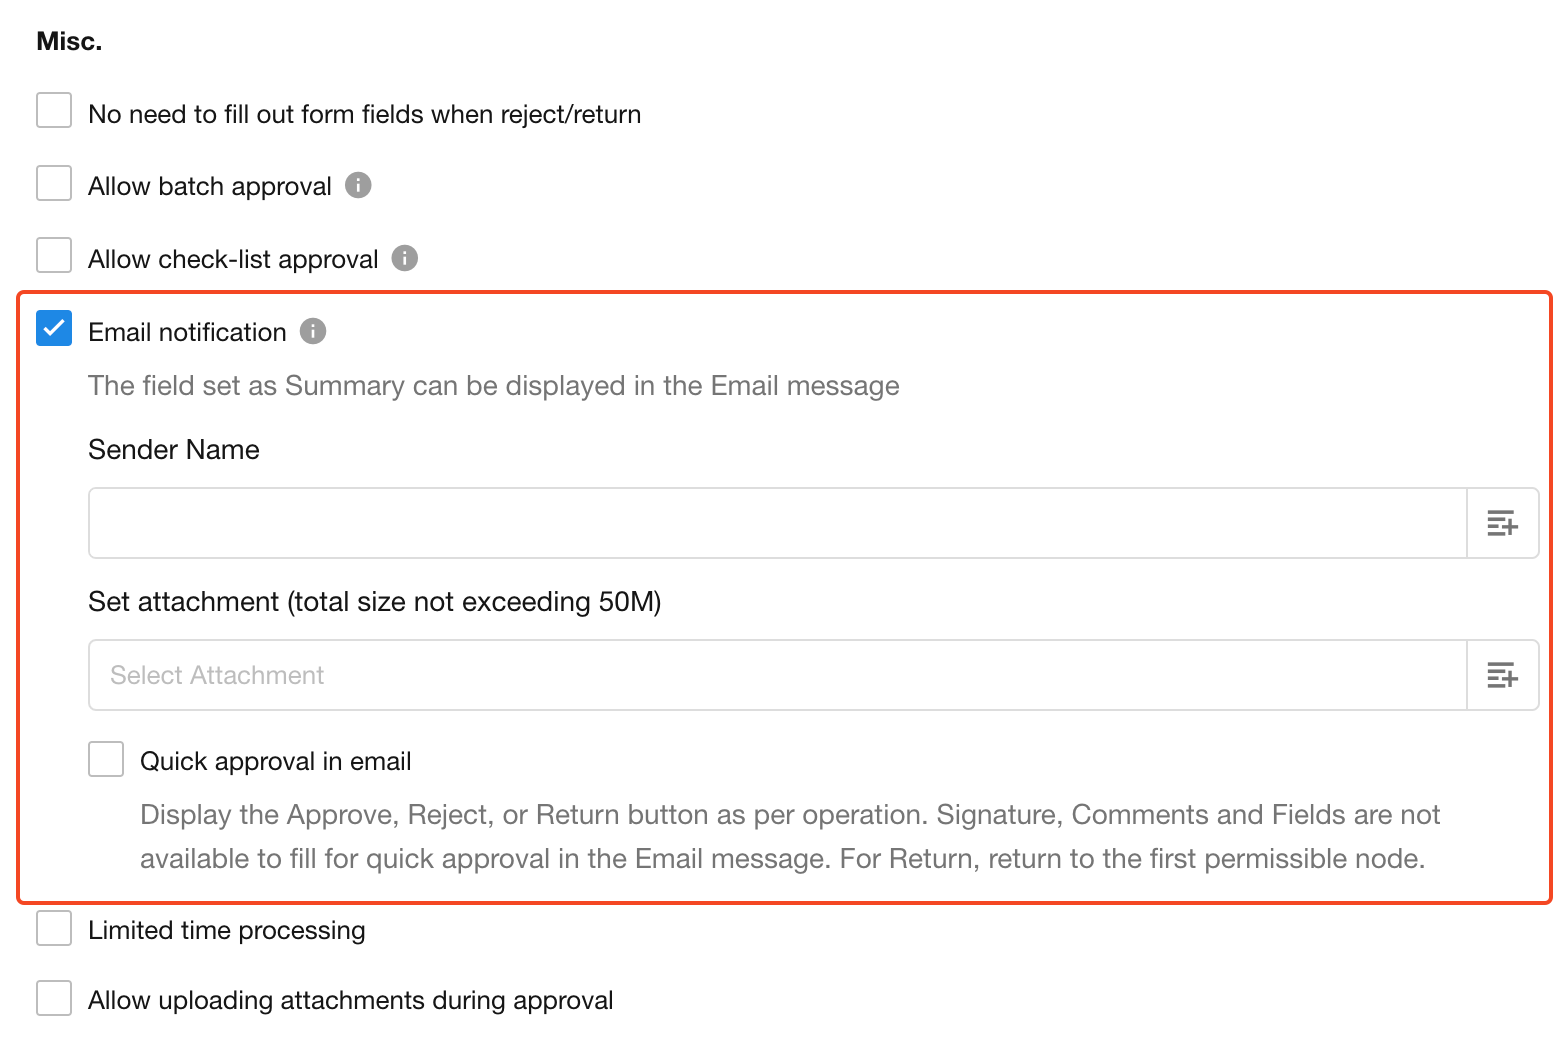
If the "Quick approval in email" option is checked, in the email, it will directly display buttons for approve, reject, and return. Approvers can simply click on these buttons to complete the approval while reading the email.
When approvers perform approval actions in the email, any fields, signatures, or comments, that may have been required in the platform for approval will be ignored.
Users can also configure summary fields in the node settings. By setting summary fields, the approval email can display more information, helping approvers to have a more comprehensive and intuitive understanding of the specific details of the pending approval.
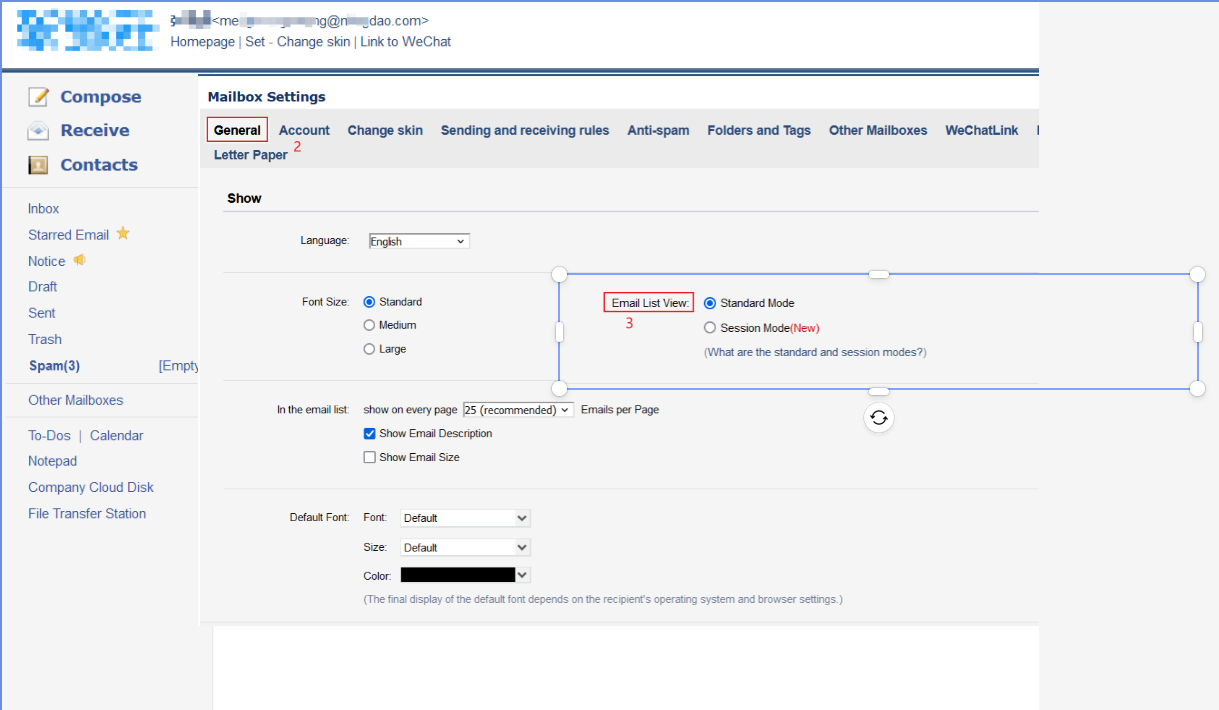
Email style
When sending multiple emails to the same mailbox, the email style changes in session mode. You can switch to the standard mode.
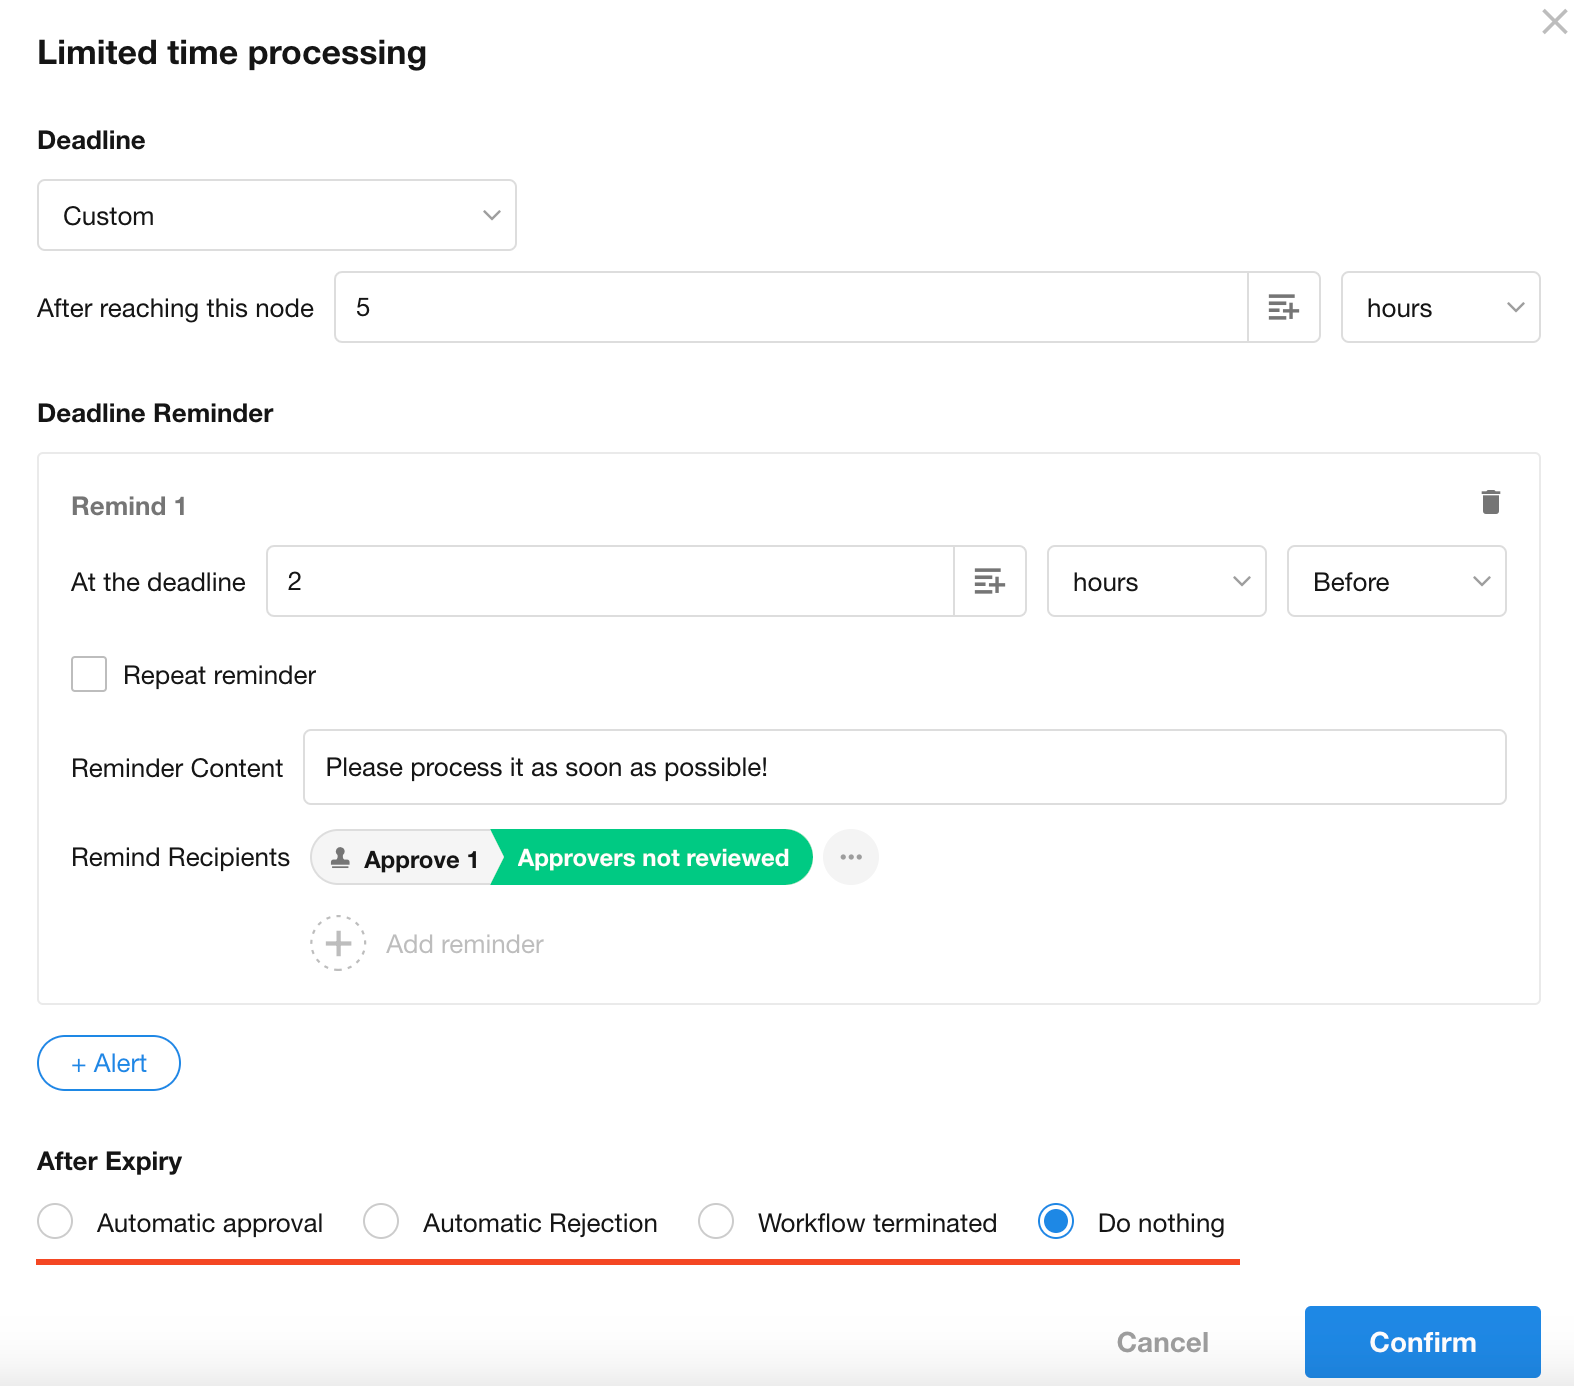
1.12 Time-limited processing
Set a processing time limit for the approver in the current approval node. Approvals completed within this time limit are regarded as normal approvals, and once the time limit is exceeded, it is regarded as timeout. The system supports sending one or more reminders to the approver before the deadline, and allows setting up automatic approval after a period of timeout.

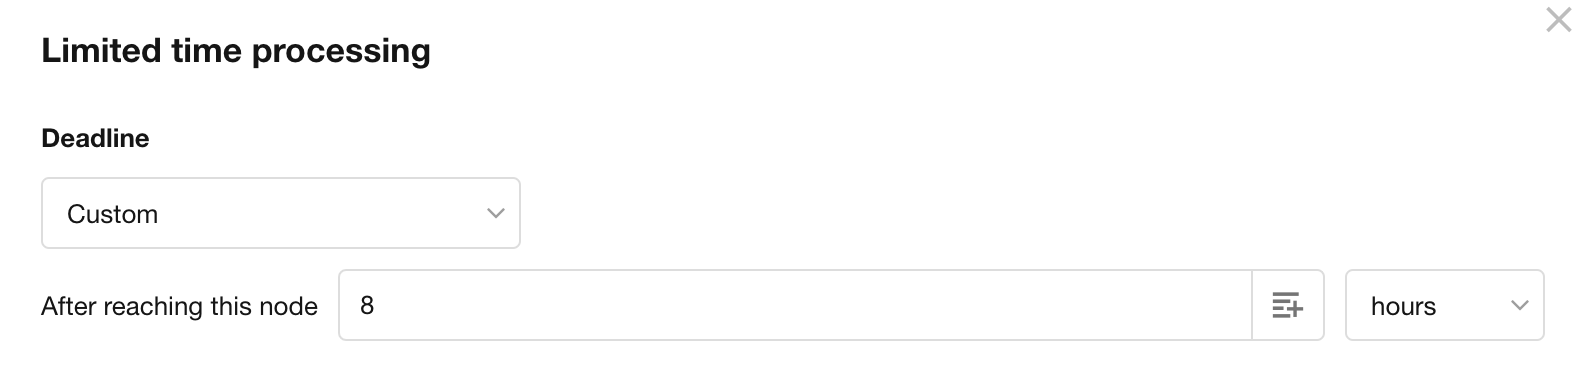
1) Set the deadline for approval
If the approval is not completed by the set deadline, the system will mark it as overdue. There are two ways to set the deadline:
-
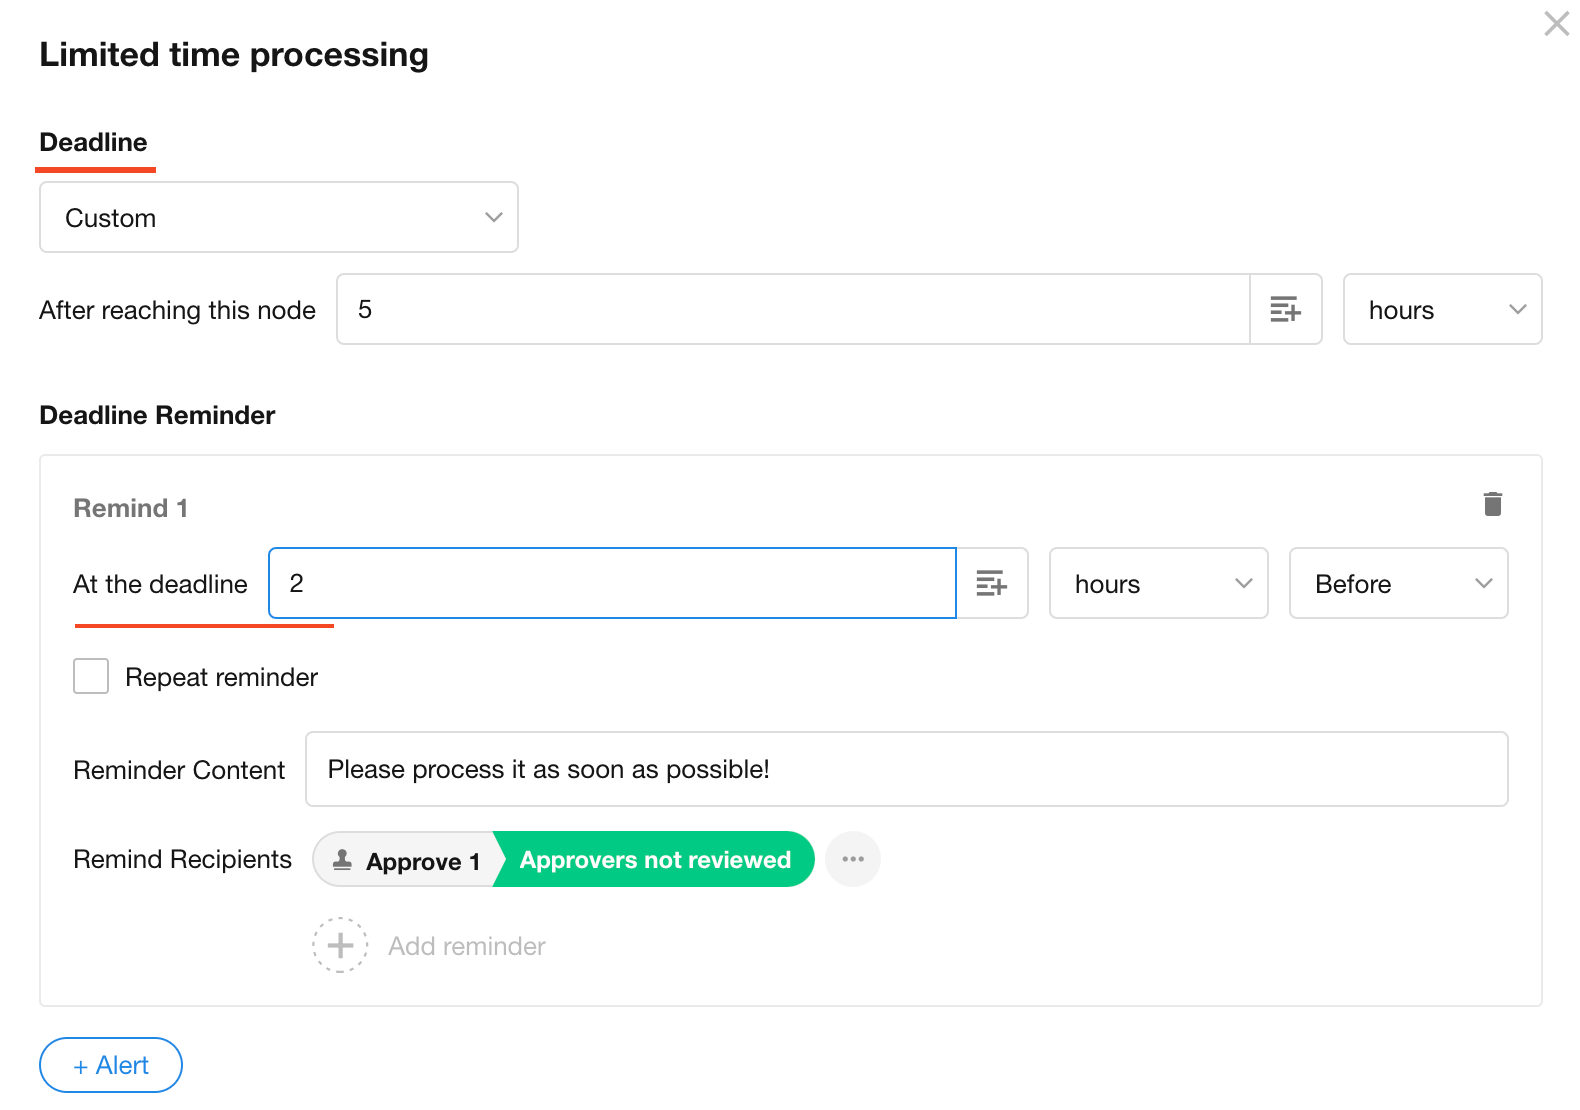
Custom
Starting from the point the approval process reaches the node, if it remains unprocessed after the set X days (hours/minutes), it will be considered timeout. For example, setting it to be considered timeout if not processed after 8 hours.
-
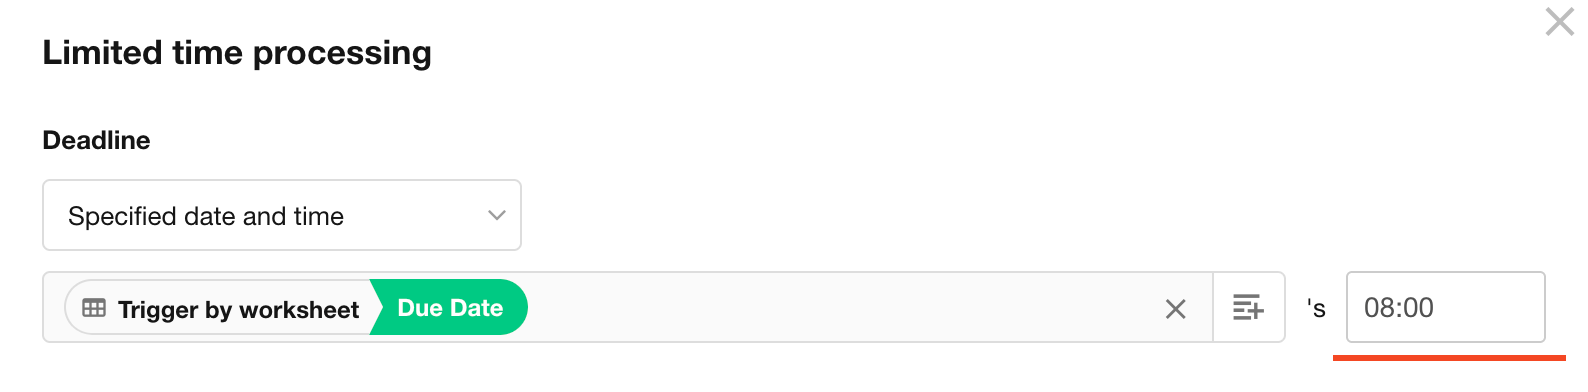
Specify a date field
You can select a date field as the deadline while also supporting setting a fixed time.
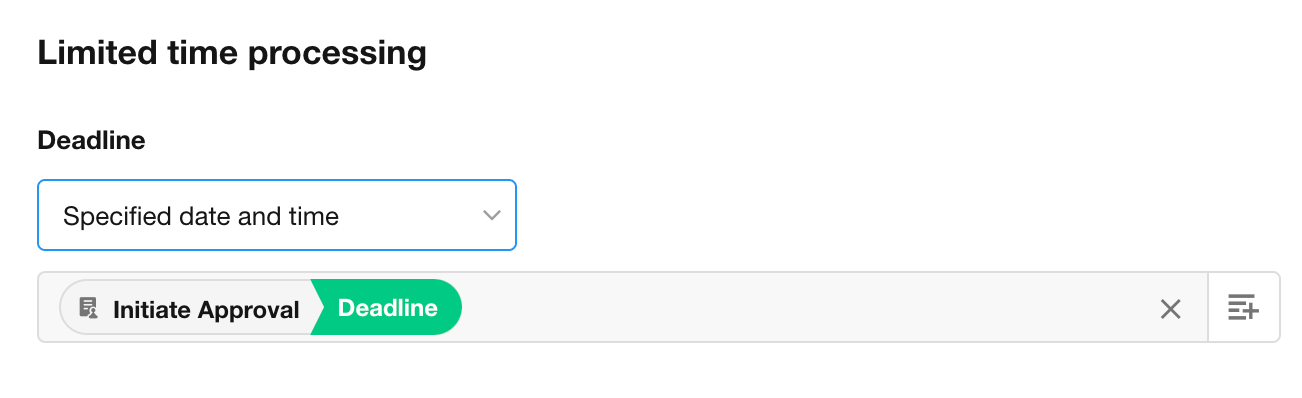
If the chosen date field does not include a time part, the time needs to be manually set.
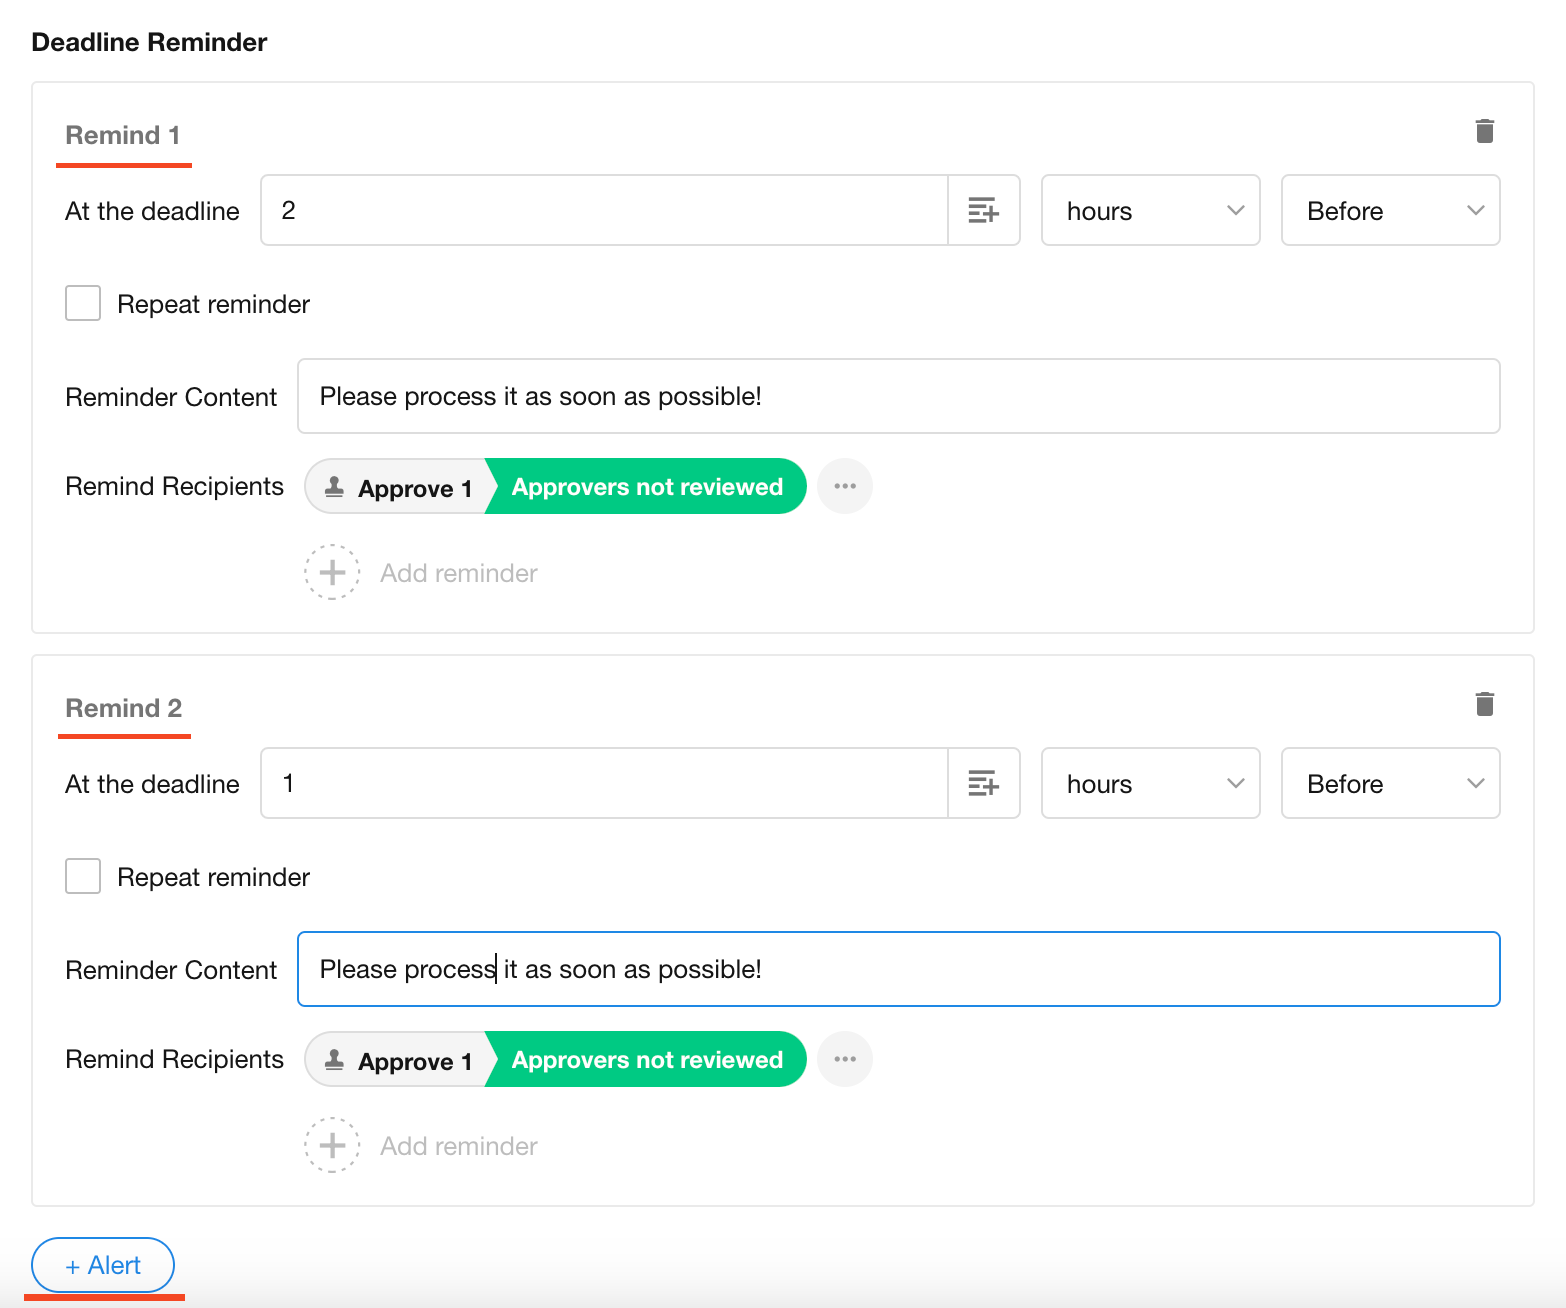
2) Reminder method and content
Around the deadline, if the approval remains incomplete, the system can automatically send reminders to the approvers nudging them to complete it promptly. In addition to the approvers, other personnel (such as the approver's supervisor) can also be added as recipients of the reminders.
Example: Send a reminder to the approvers 2 hours before the deadline.
After checking "Repeat reminder", the system will send reminders at intervals after the first reminder (even after the deadline has passed, reminders will continue, up to a maximum of 10 times).
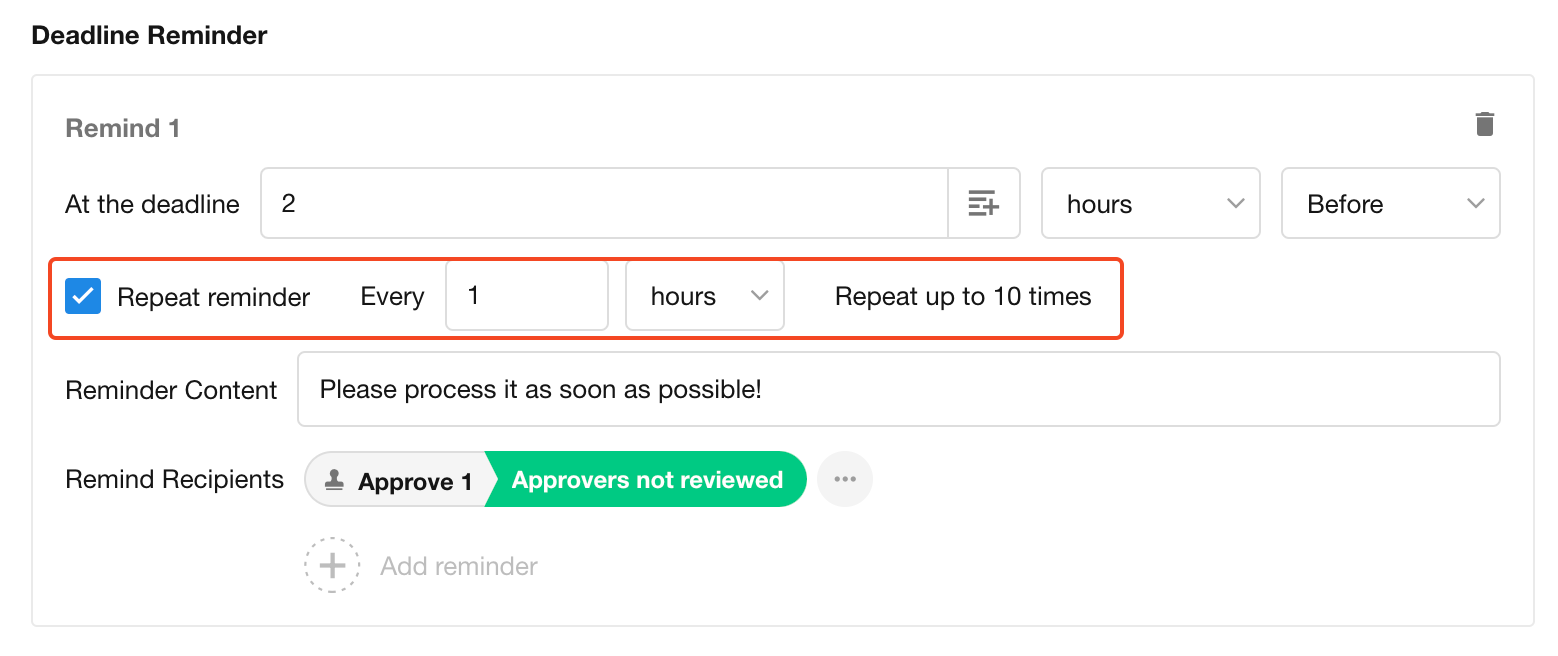
You can set up multiple sets of reminders if you want to remind the approver after a timeout as well, or set up to remind the approver at intervals.
3) What to do after timeout
If the approval has not been processed after the timeout, the following actions can be set:
- Automatic approval
- Automatic rejection
- Workflow terminated
- Do nothing
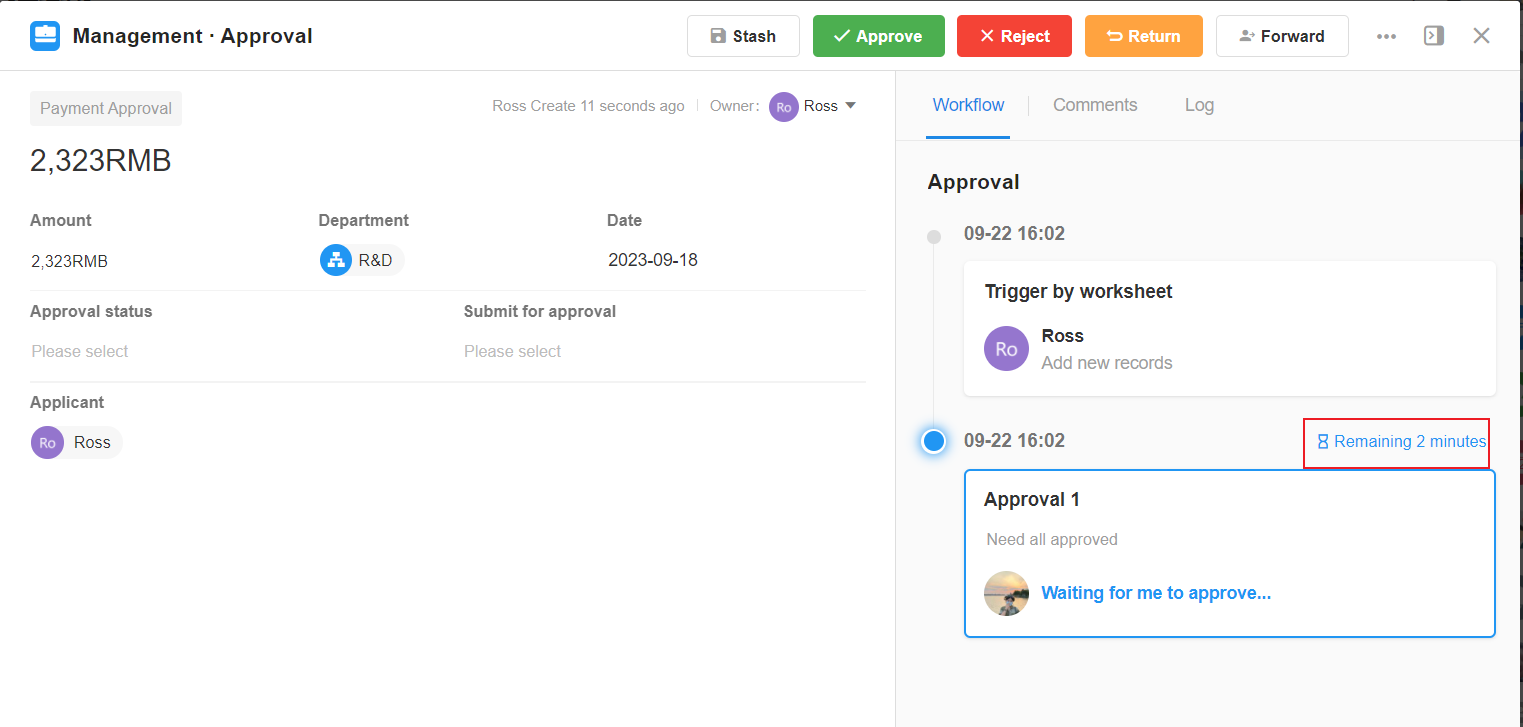
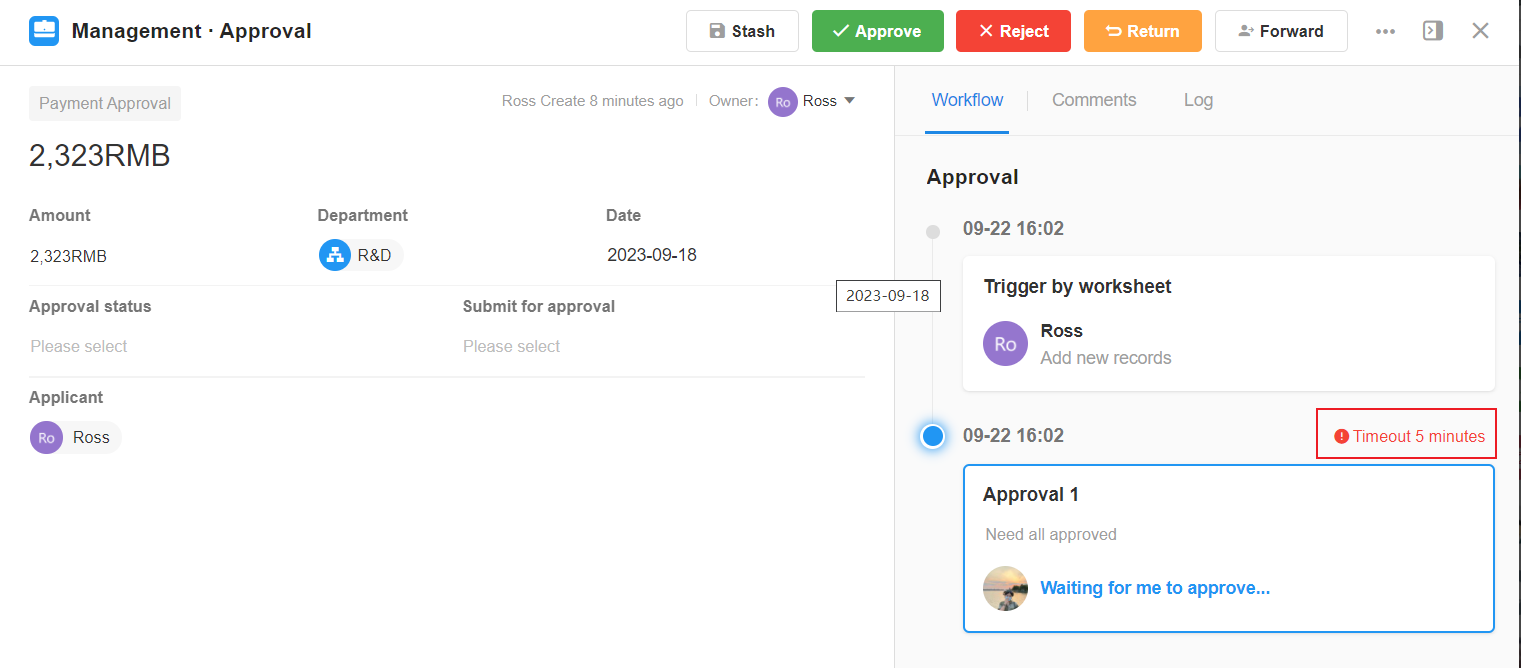
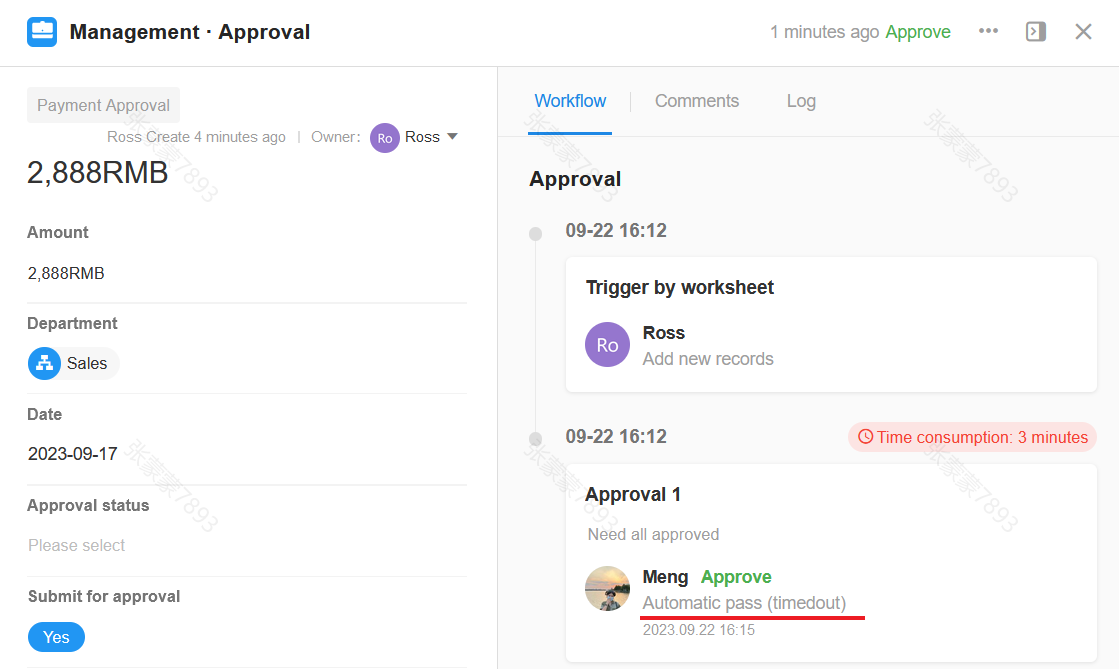
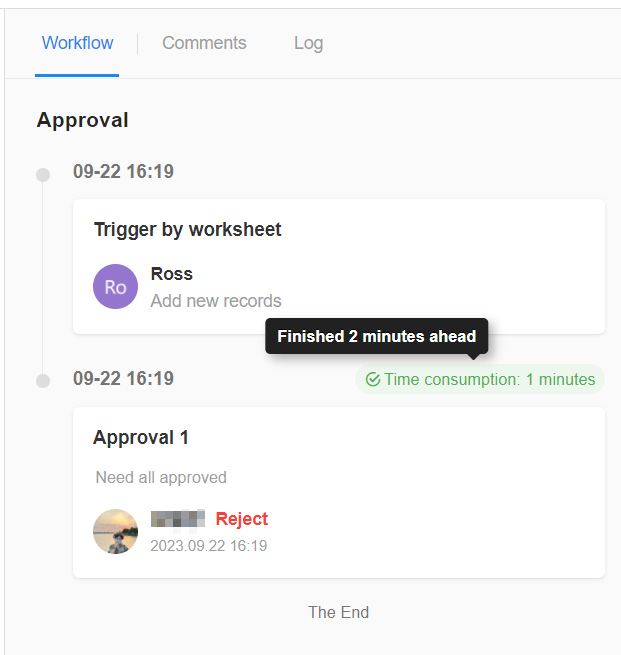
4) Effect
If a time limit is set for processing, the approver can view the remaining hours and the time passed.
-
Remaining time (before the deadline reminder)
-
Remaining time (after the deadline reminder and before deadline)

-
Timeout duration
-
Automatic approval after timeout
-
Processed before the deadline
-
Timeout reminder
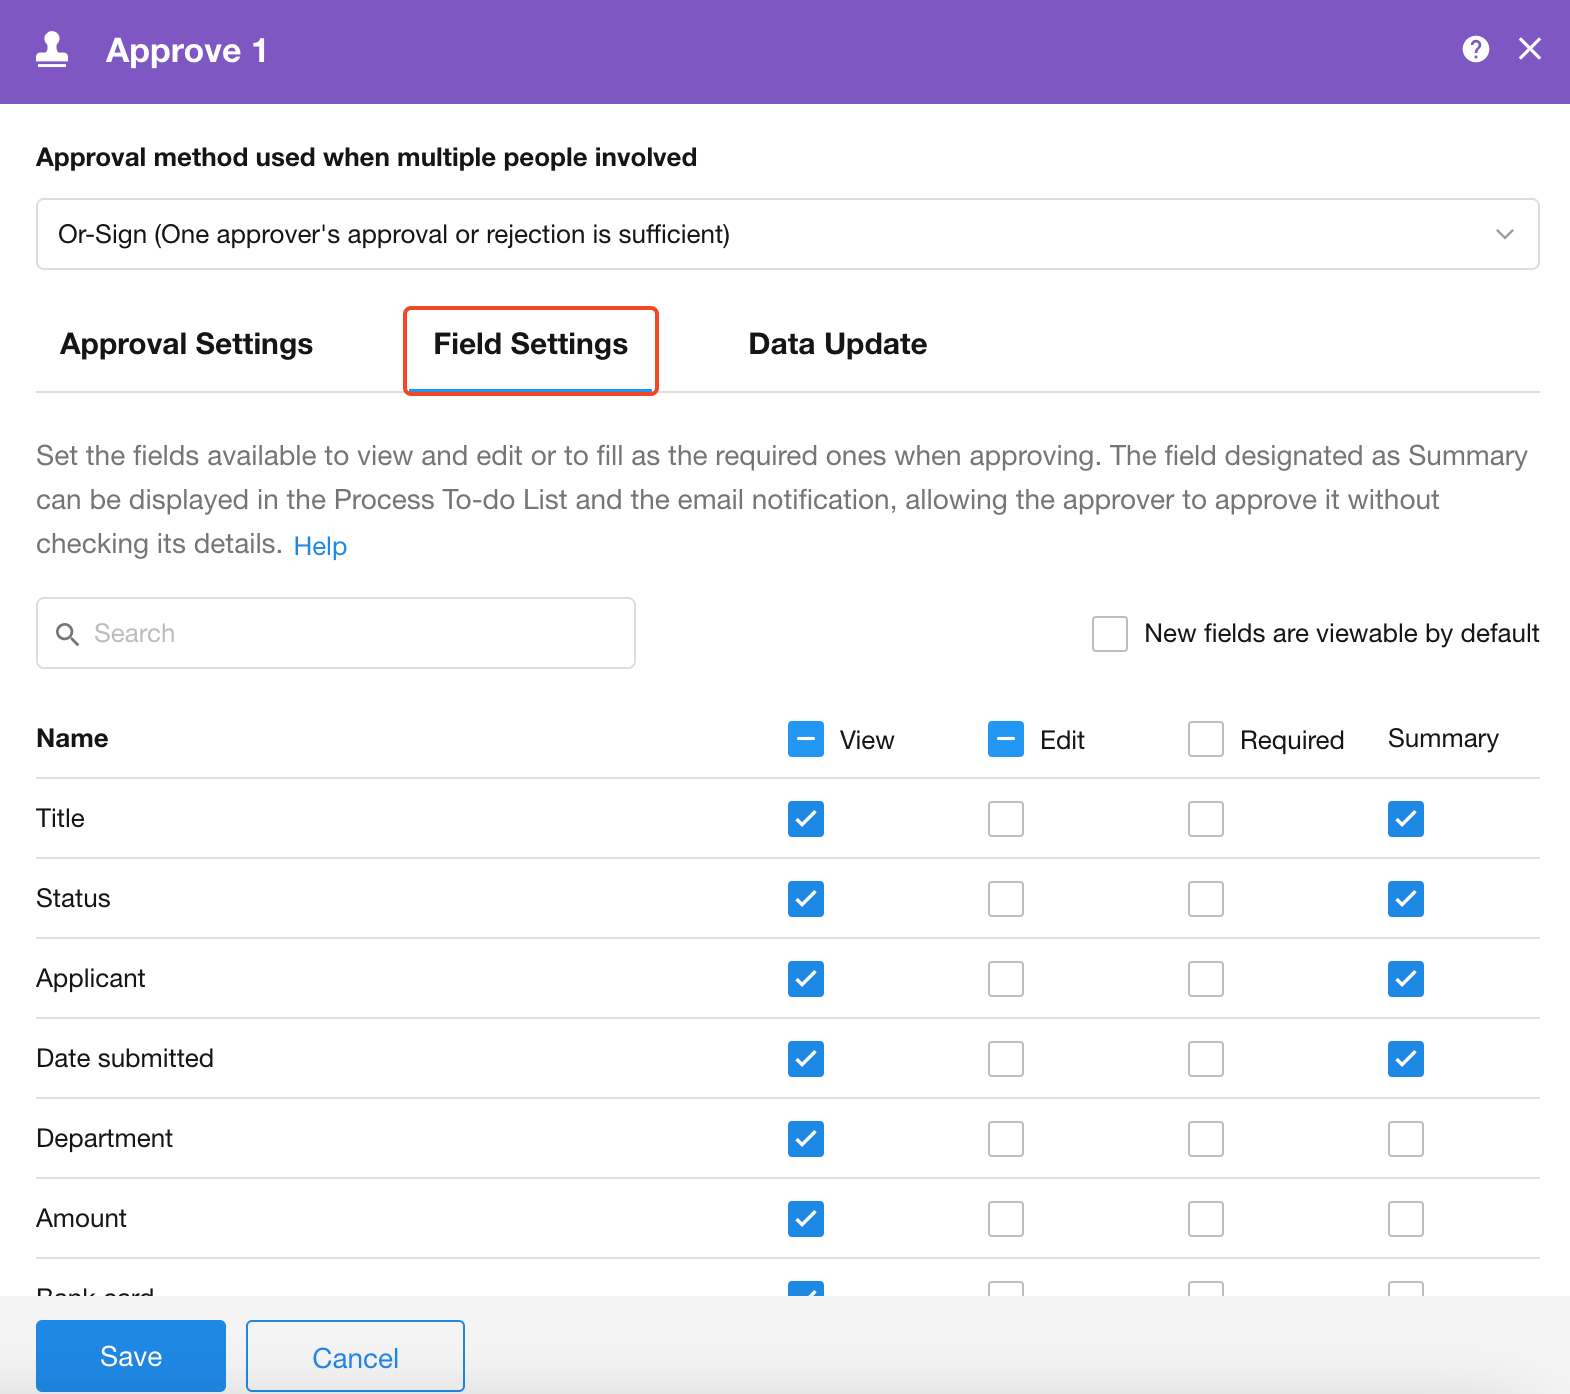
1.13 Field settings
-
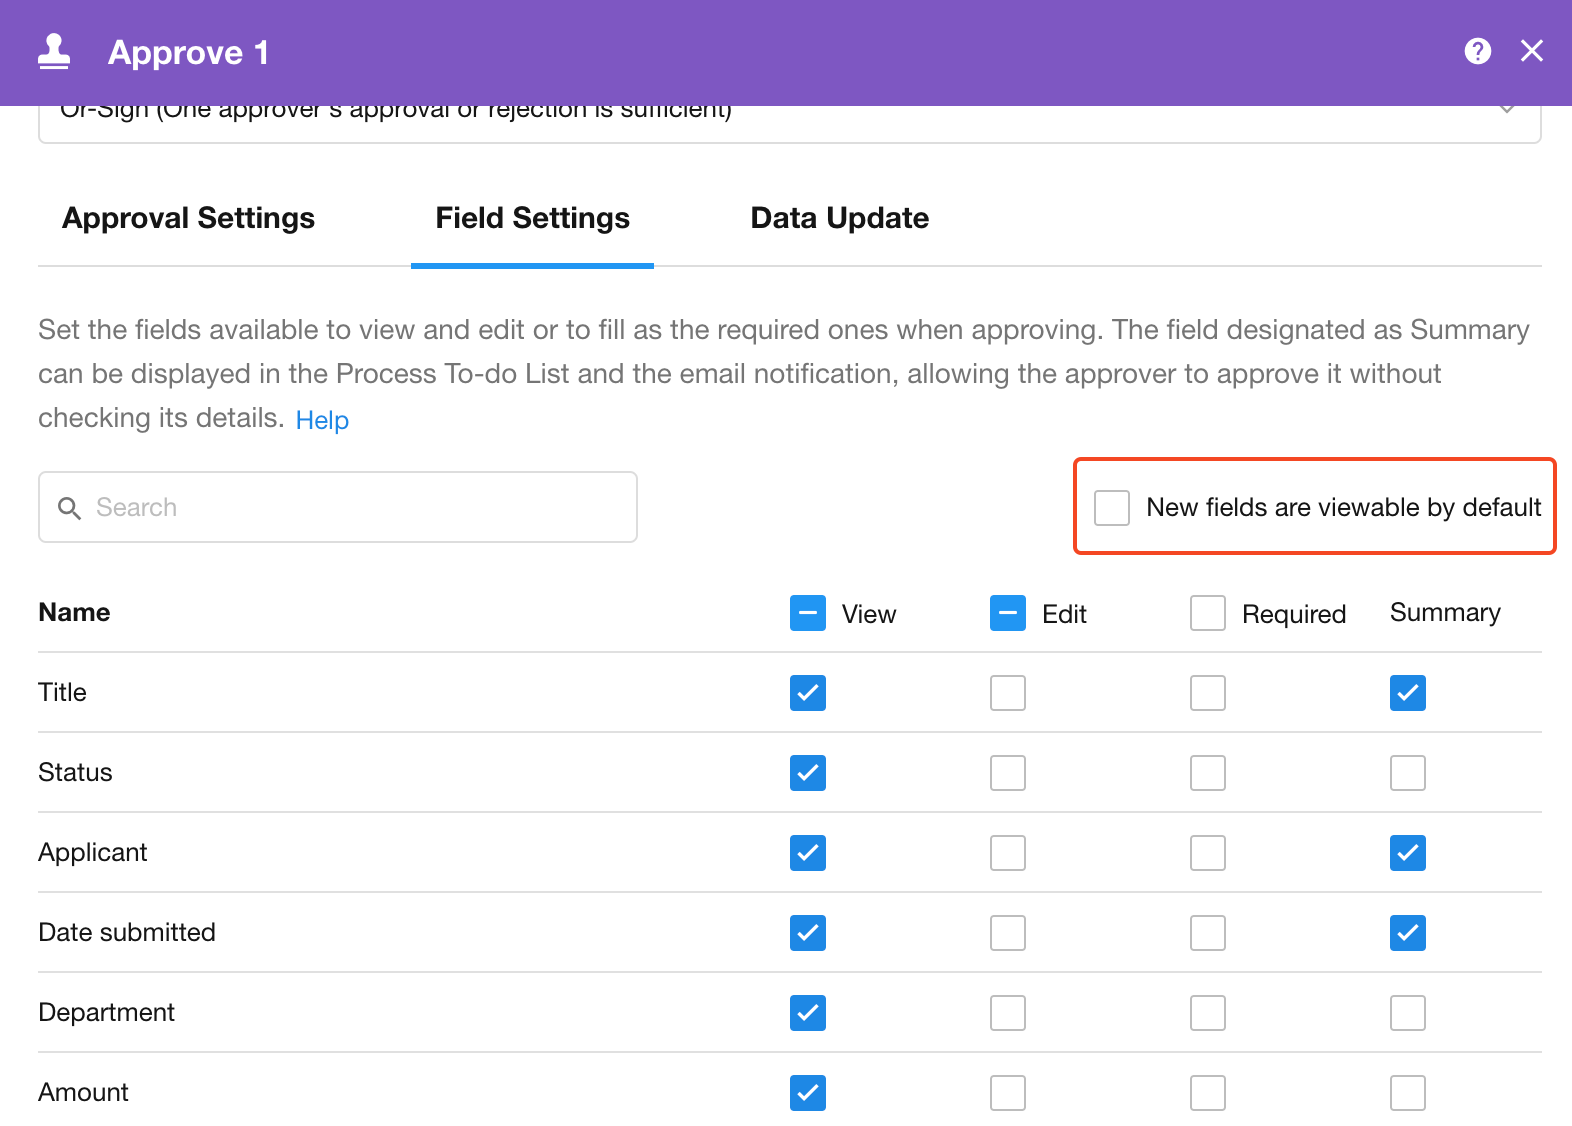
When setting the approval node, you can configure the approver's permissions for the record, which fields are not visible to the approver, which fields are required, and so on. If the approver modifies the record, it will also be recorded in the log.
-
You can also set the summary fields to be displayed in the to-do list for quick preview by the approver.
-
New fields are viewable by default
If this option is checked, newly added fields in the worksheet will automatically have the "View" option checked.
If unchecked, newly added fields in the worksheet will not be visible to the approvers by default. If there is a need to view the newly added fields, the visibility settings for approvers need to be adjusted accordingly.
The approver's permissions to operate on the record configured in the approval node are not restricted by the approver's role and permissions in the application. With the role assigned in the application, the approver may not has permissions to access the worksheet to view this approved record, but the approver can be given access to this record in the node configuration.
1.14 Data update
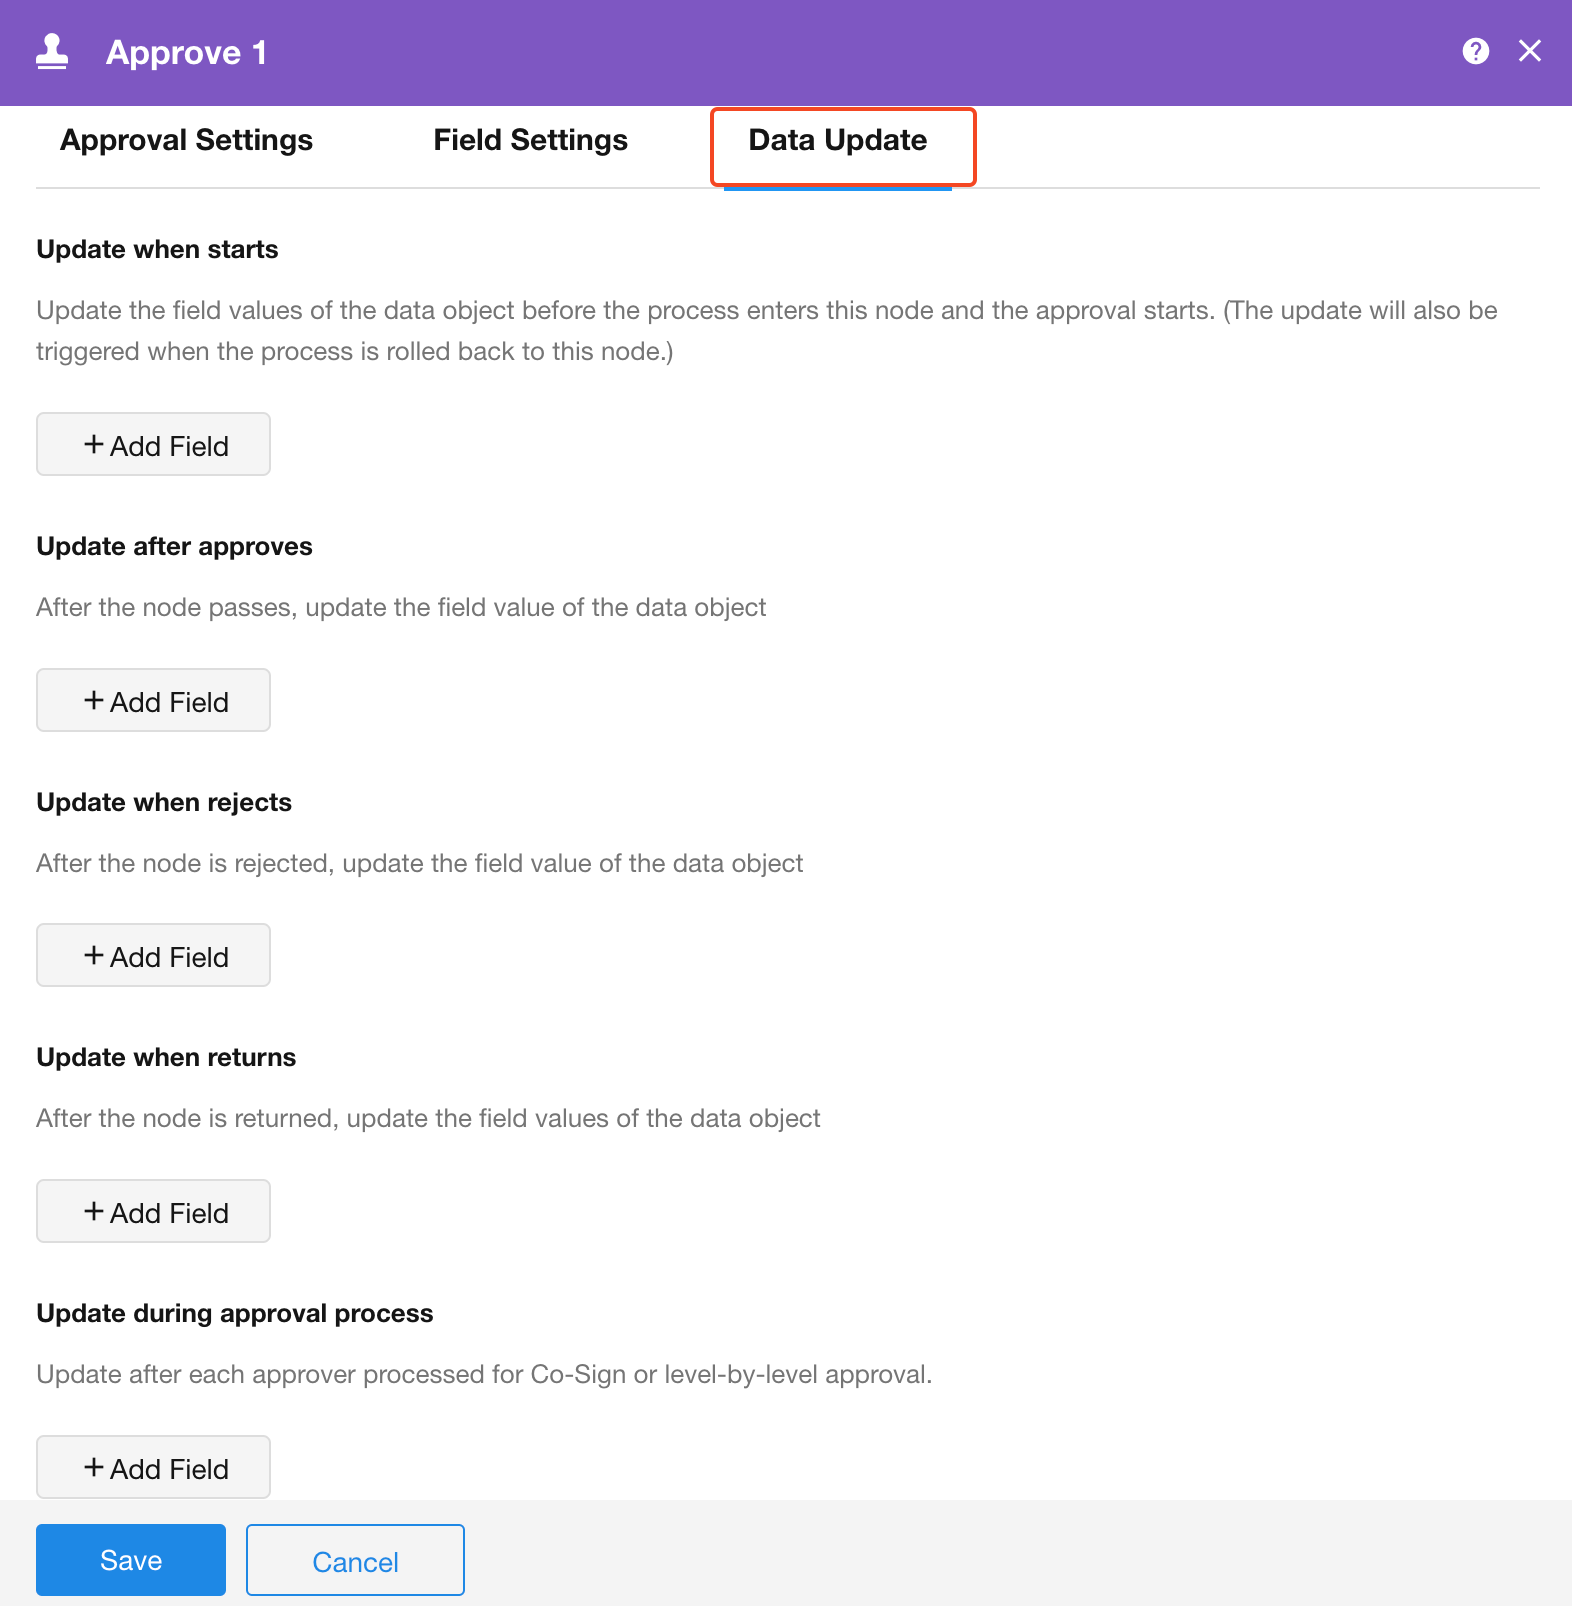
Approval nodes can update data in the approved records. The system supports data update settings at different stages of the approval process, including updates at the start of approval, after approval, after rejection, after return, and during the approval process.
-
Update when approval starts
When the workflow reaches this approval node, the system will automatically update the record data. If the approval is later returned to this node by subsequent approvers, the data will also be updated according to preset rules.
-
Update after approval
Once it is approved, the system will automatically update the specified field in the record.
-
Update after rejection
If it is rejected, the system will also update the relevant field in the record based on preset rules.
-
Update after return
When the approver returns it to a certain node, the system will automatically update the field data in the record based on the settings.
-
Update during the approval process
For approvals involving multiple approvers' co-signing or level-by-level approval, the system supports updating partial field data after each approver completes their processing.
Only field data in the current worksheet can be updated. For subforms or related worksheets, field updates through approval nodes are currently not supported.
1.15 Approver in action
The approver in action refers to the approver who perform the approval operation (whether approving or rejecting) at a certain stage of the approval process. In an approval node, there may not be just one approver in action; there could be multiple.
-
First operator
Example: An approval node includes Approvers A, B, and C (co-sign). If Approver B is the first to complete the approval operation (whether approving or rejecting), then the approver in action is Approver B.
-
Forward
Example: If an approval node includes Approvers A and B (co-sign), and Approver A forwards the approval to Approver C, and Approver C completes the approval operation while the original Approver B does not, then the approver in action is Approver C.
-
Add an approver
Example: In an approval node with Approvers A, B, and C (co-sign), if Approver B adds Approver D before his own approval, and after Approver D approves and it moves to Approver B who then also approves, the approvers in action for this stage include the newly added Approver D and the original Approver B.
Example: In an approval node with Approvers A, B, and C (co-sign), if after his own approval, Approver B adds a new Approver D, and Approver D rejects, then the approver in action for this stage is the newly added Approver D.
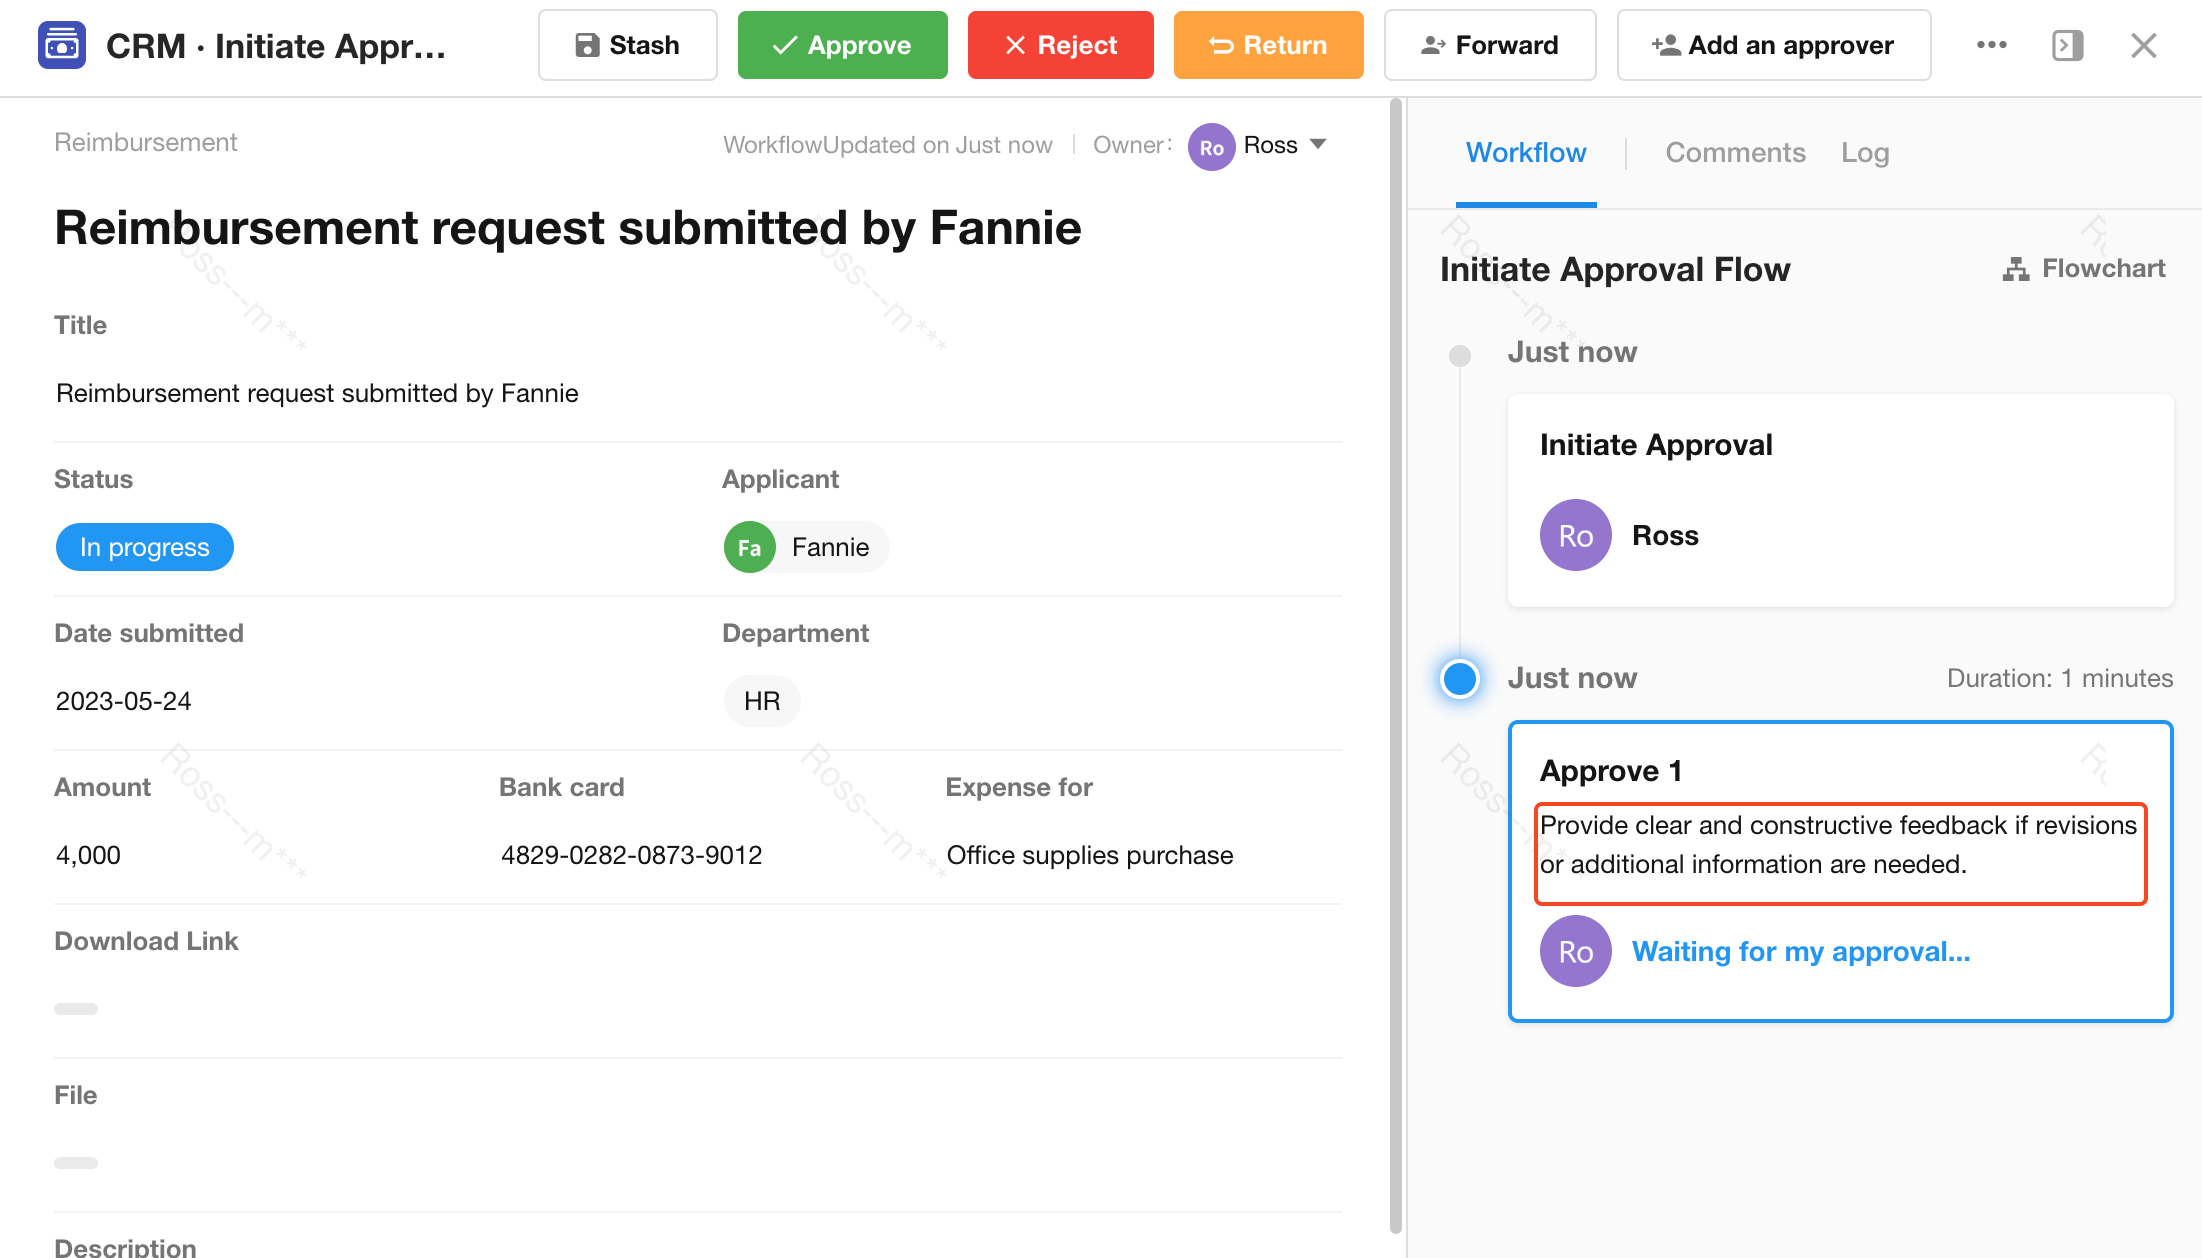
1.16 Approval instructions
Setting approval instructions in the approval node is intended to provide detailed notes or specific requirements for the approvers. This allows approvers to quickly refer to and focus on key information points at the current approval stage. Through the guidance of approval instructions, approvers can have a more comprehensive understanding of the approval background and requirements, enabling them to make more accurate, timely, and compliant decisions.

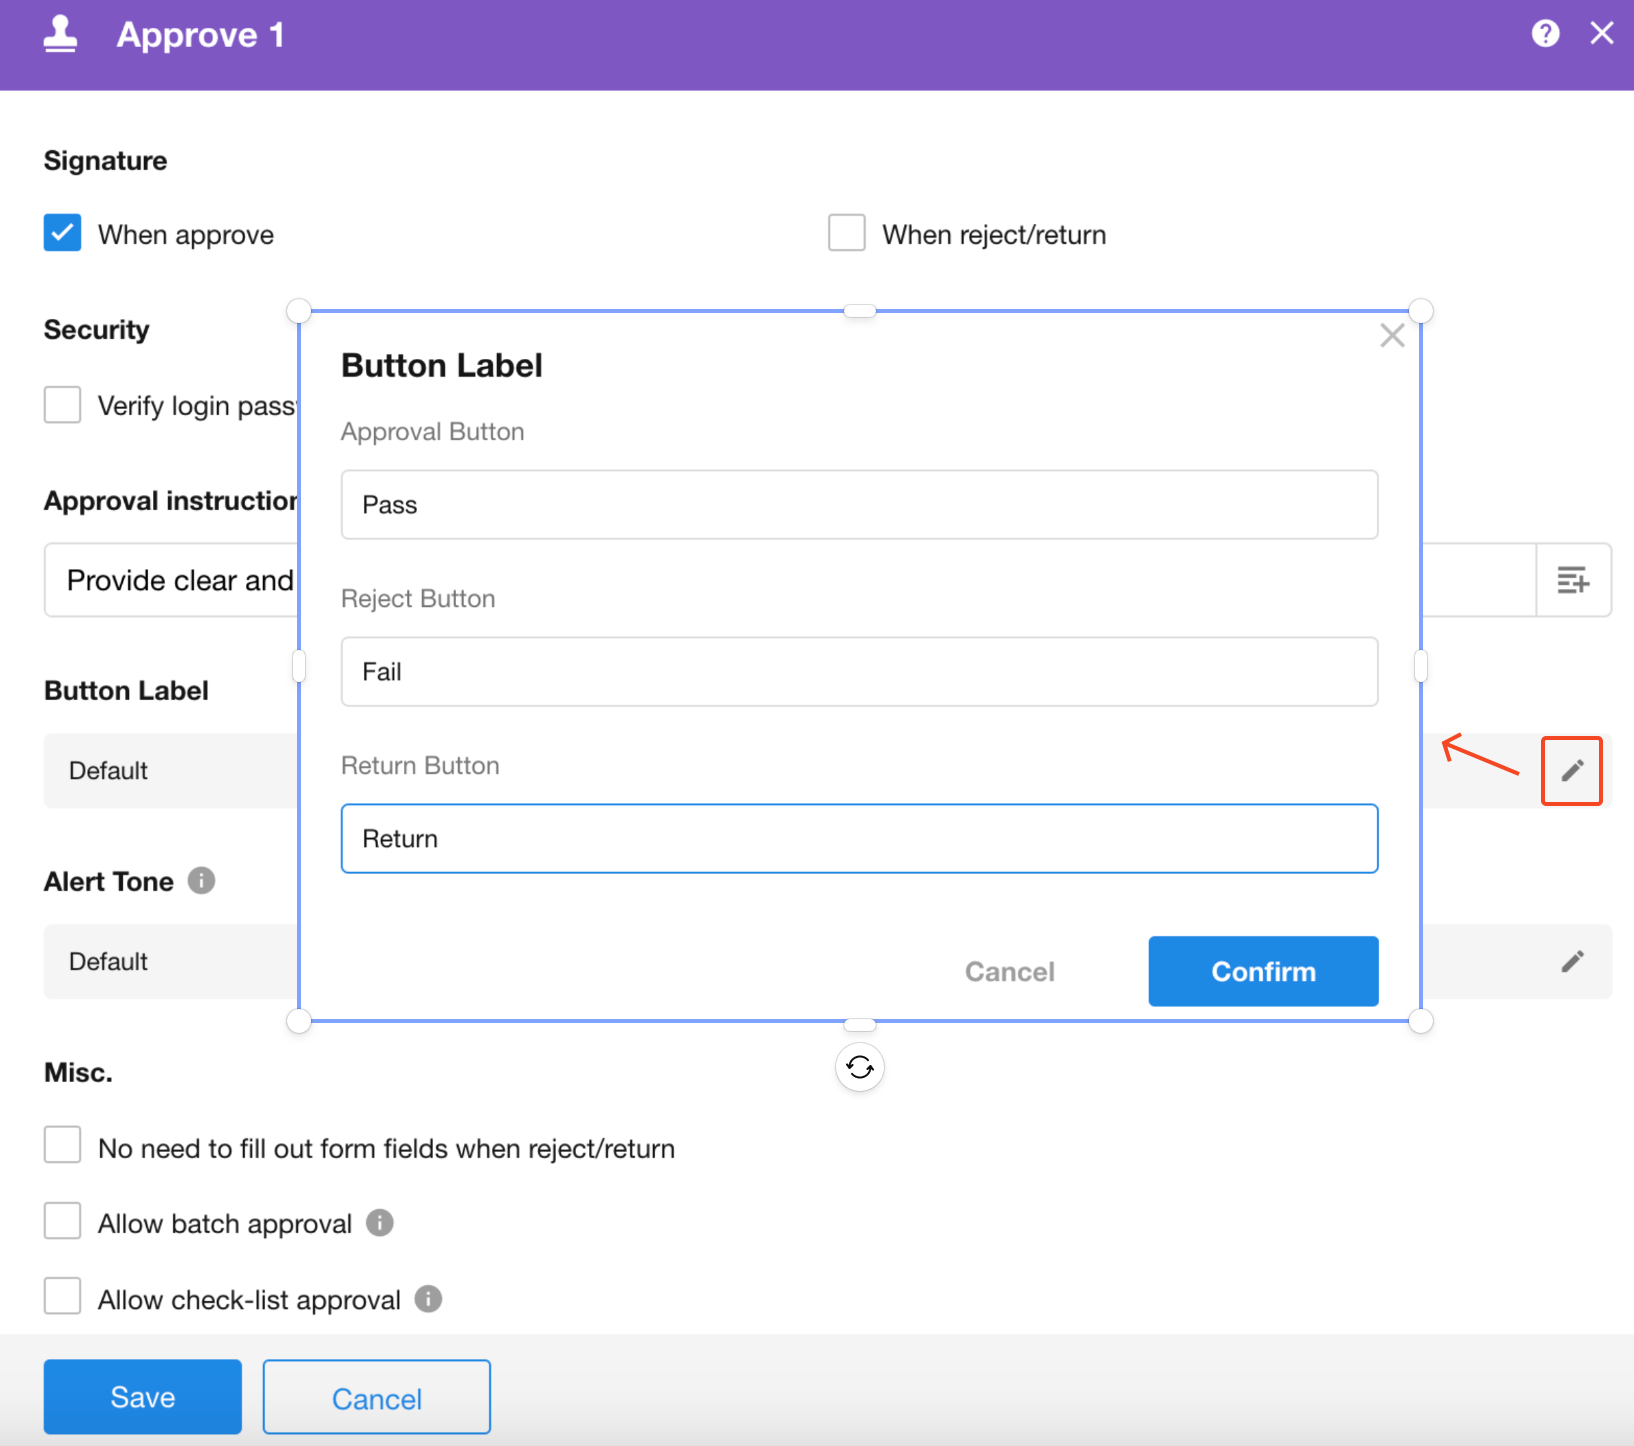
1.17 Customize Approve, Reject, and Return Button Labels
Approval action buttons support custom labels and descriptions to accommodate different approval processes and business requirements.
By default, the approval buttons are labeled Approve, Reject, and Return.
You can also configure descriptions for each button to provide guidance or reminders for approvers when entering approval comments.

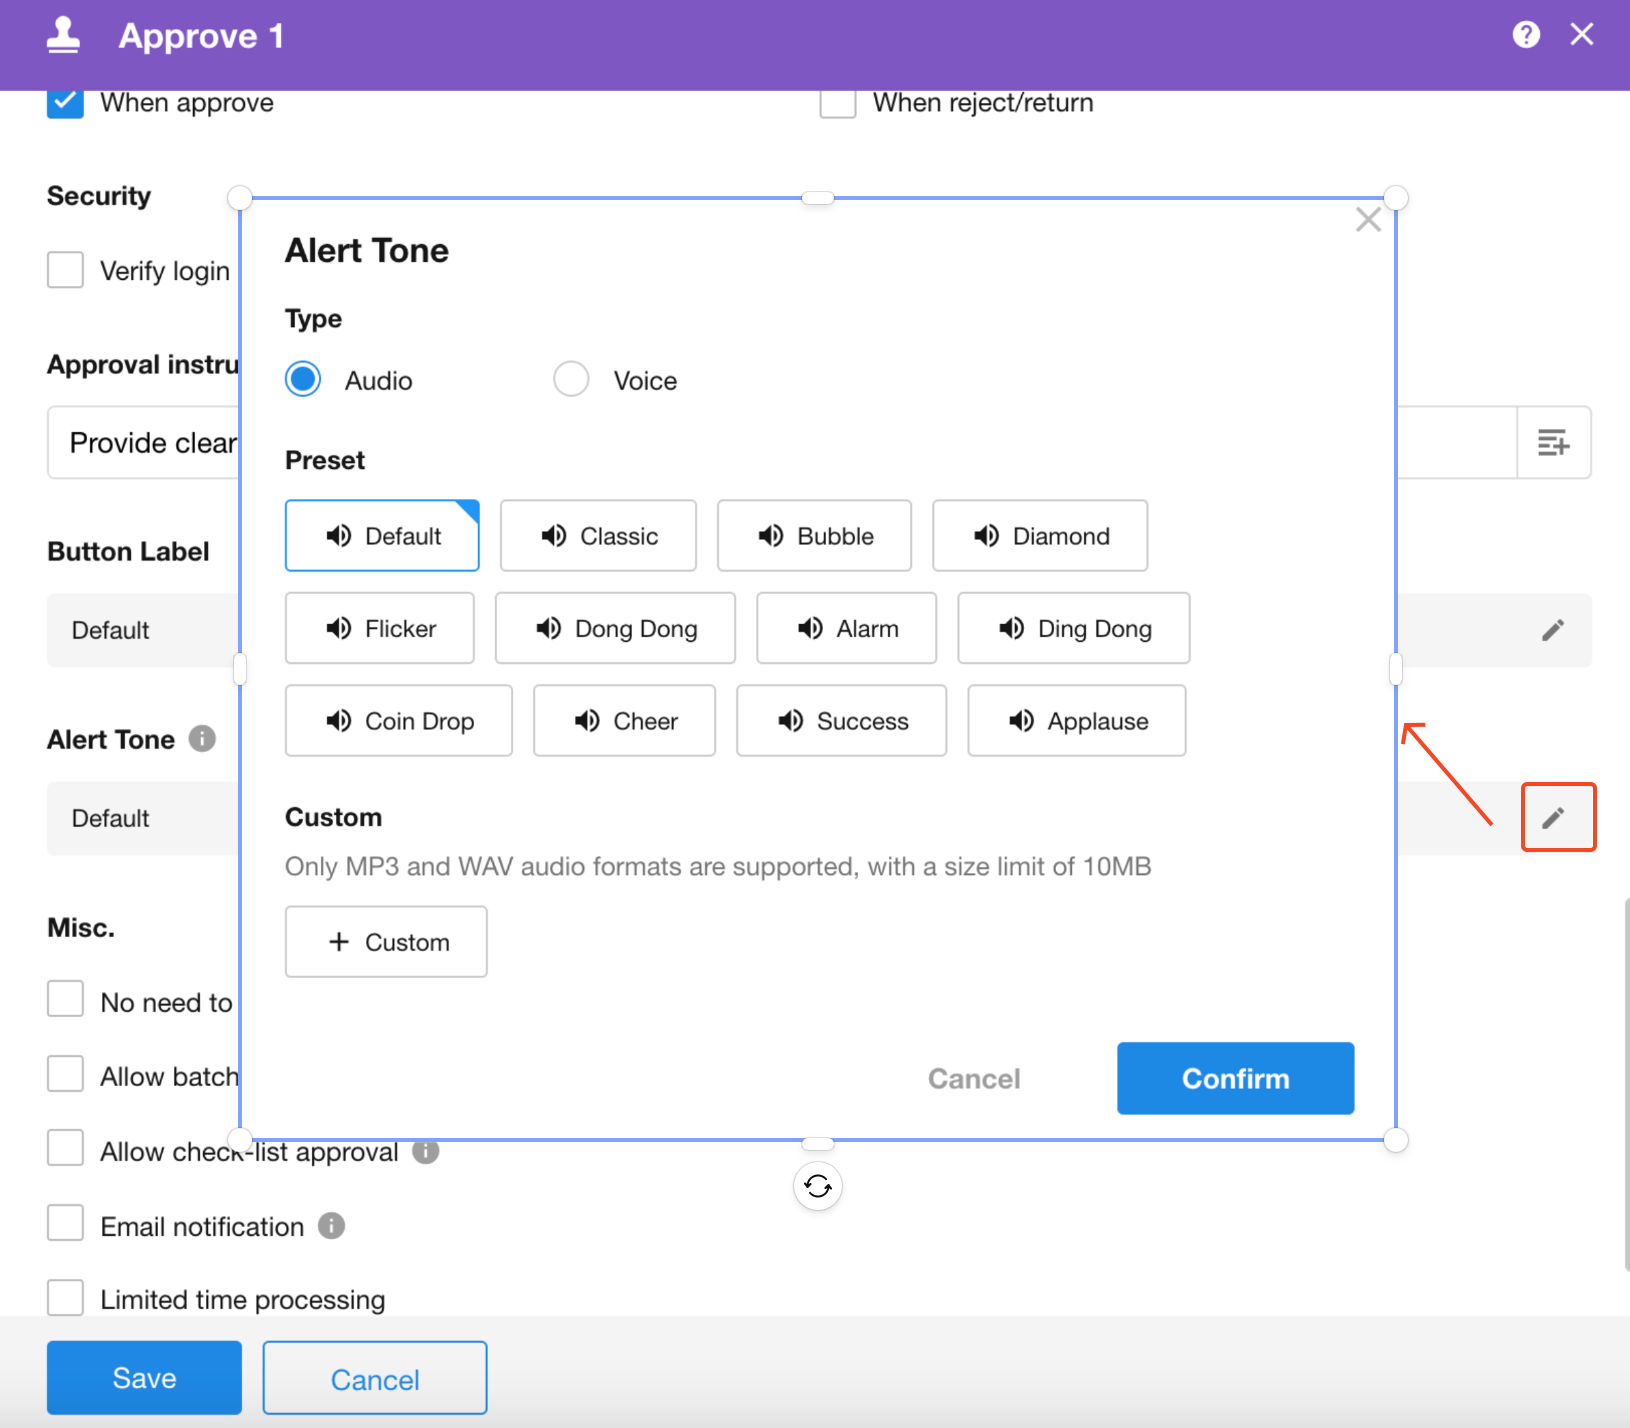
1.18 Alert tone
When the approver is logged in, the system will play a designated alert tone based on preset conditions to remind the approver to promptly process the approval items. The setting of the alert tone is flexible and diverse, it can be a fixed audio or a text converted to speech for playback.
Specifically, when the approver is simultaneously online on the PC and the mobile app, the system will only play the alert tone on the PC by default.
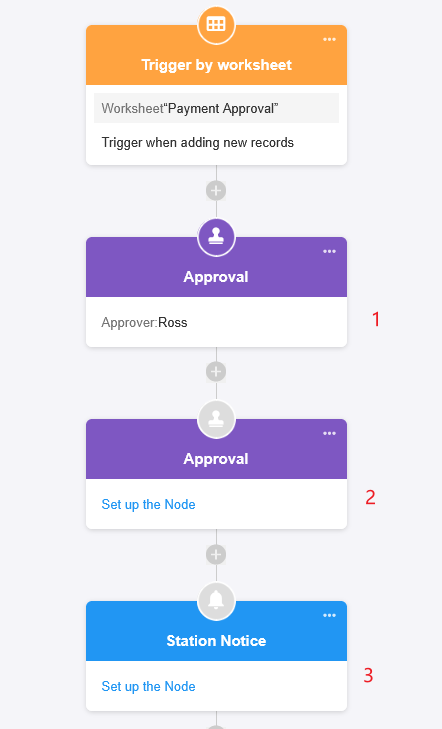
1.19 Add branches based on approval results
After the approval node, add a branch node according to the approval result, which is often used for multi-step approval.
Note:
As shown below, for such two approval nodes, if it is rejected in the first node, the subsequent nodes will not be executed. So, if it is a multi-step approval with multiple approvers, select to add a branch node.
1.20 Approval automatically passed
For example, when the approver and the trigger are the same person, it is automatically approved. View more details
Setting for "approval automatically passed" is the configuration of the entire workflow and works on all approval nodes in this workflow.
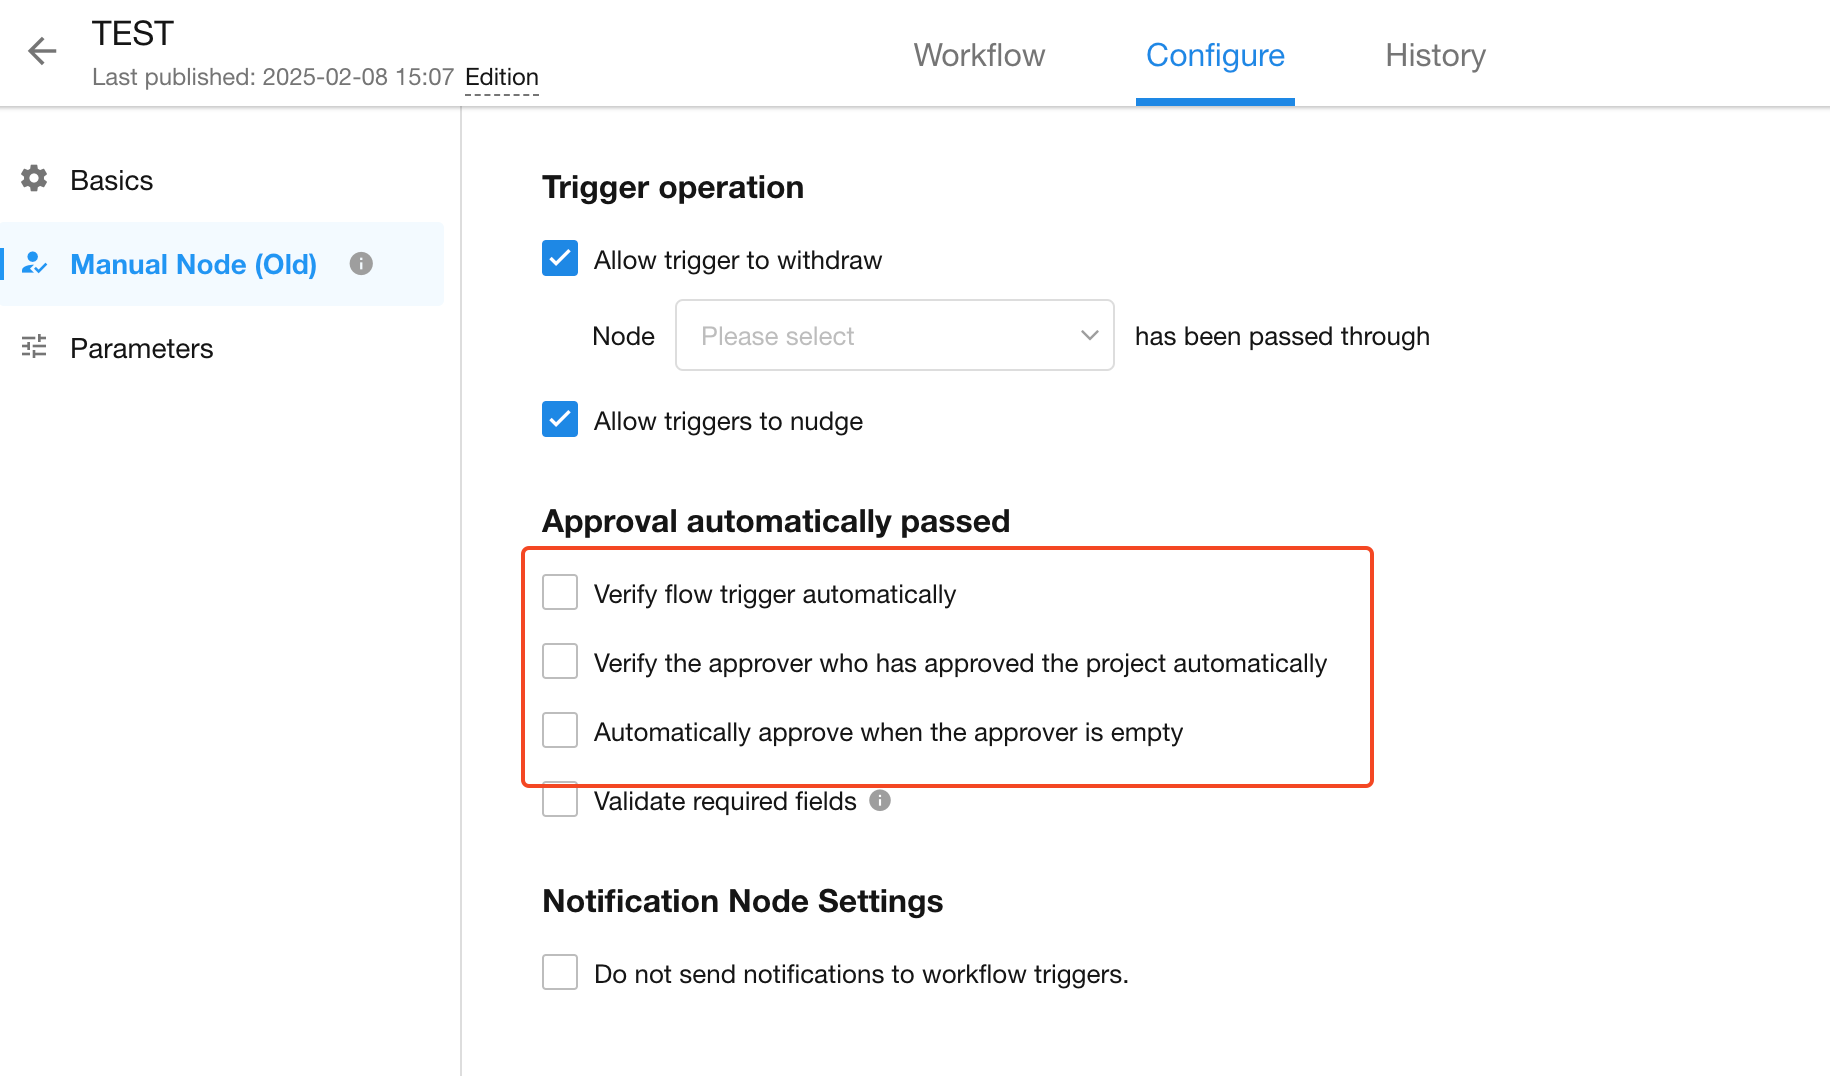
If the approval node is in the [Initiate Approval Flow] block, this configuration is invalid, and the configuration in the [Initiate Approval Flow] will prevail.

Was this document helpful?