Node - Send Email
Overview
The Send Email node allows you to send email notifications to specified recipients. It supports dynamic recipients, CC and BCC recipients, rich-text email content, and attachments.
Common use cases include:
- Sending completion notifications to customers after a support ticket is resolved
- Sending confirmation emails to requesters after an approval is completed
- Sending bulk emails to target customers during marketing campaigns
- Sending alert notifications to administrators when system exceptions occur
Configuration Example
When a customer's support ticket is marked as completed, automatically send a notification email to the customer.
1. Create a Workflow Triggered by a Worksheet Event
Configure the workflow to trigger when the Status field of a ticket record changes to Completed.
2. Add and Configure the Send Email Node
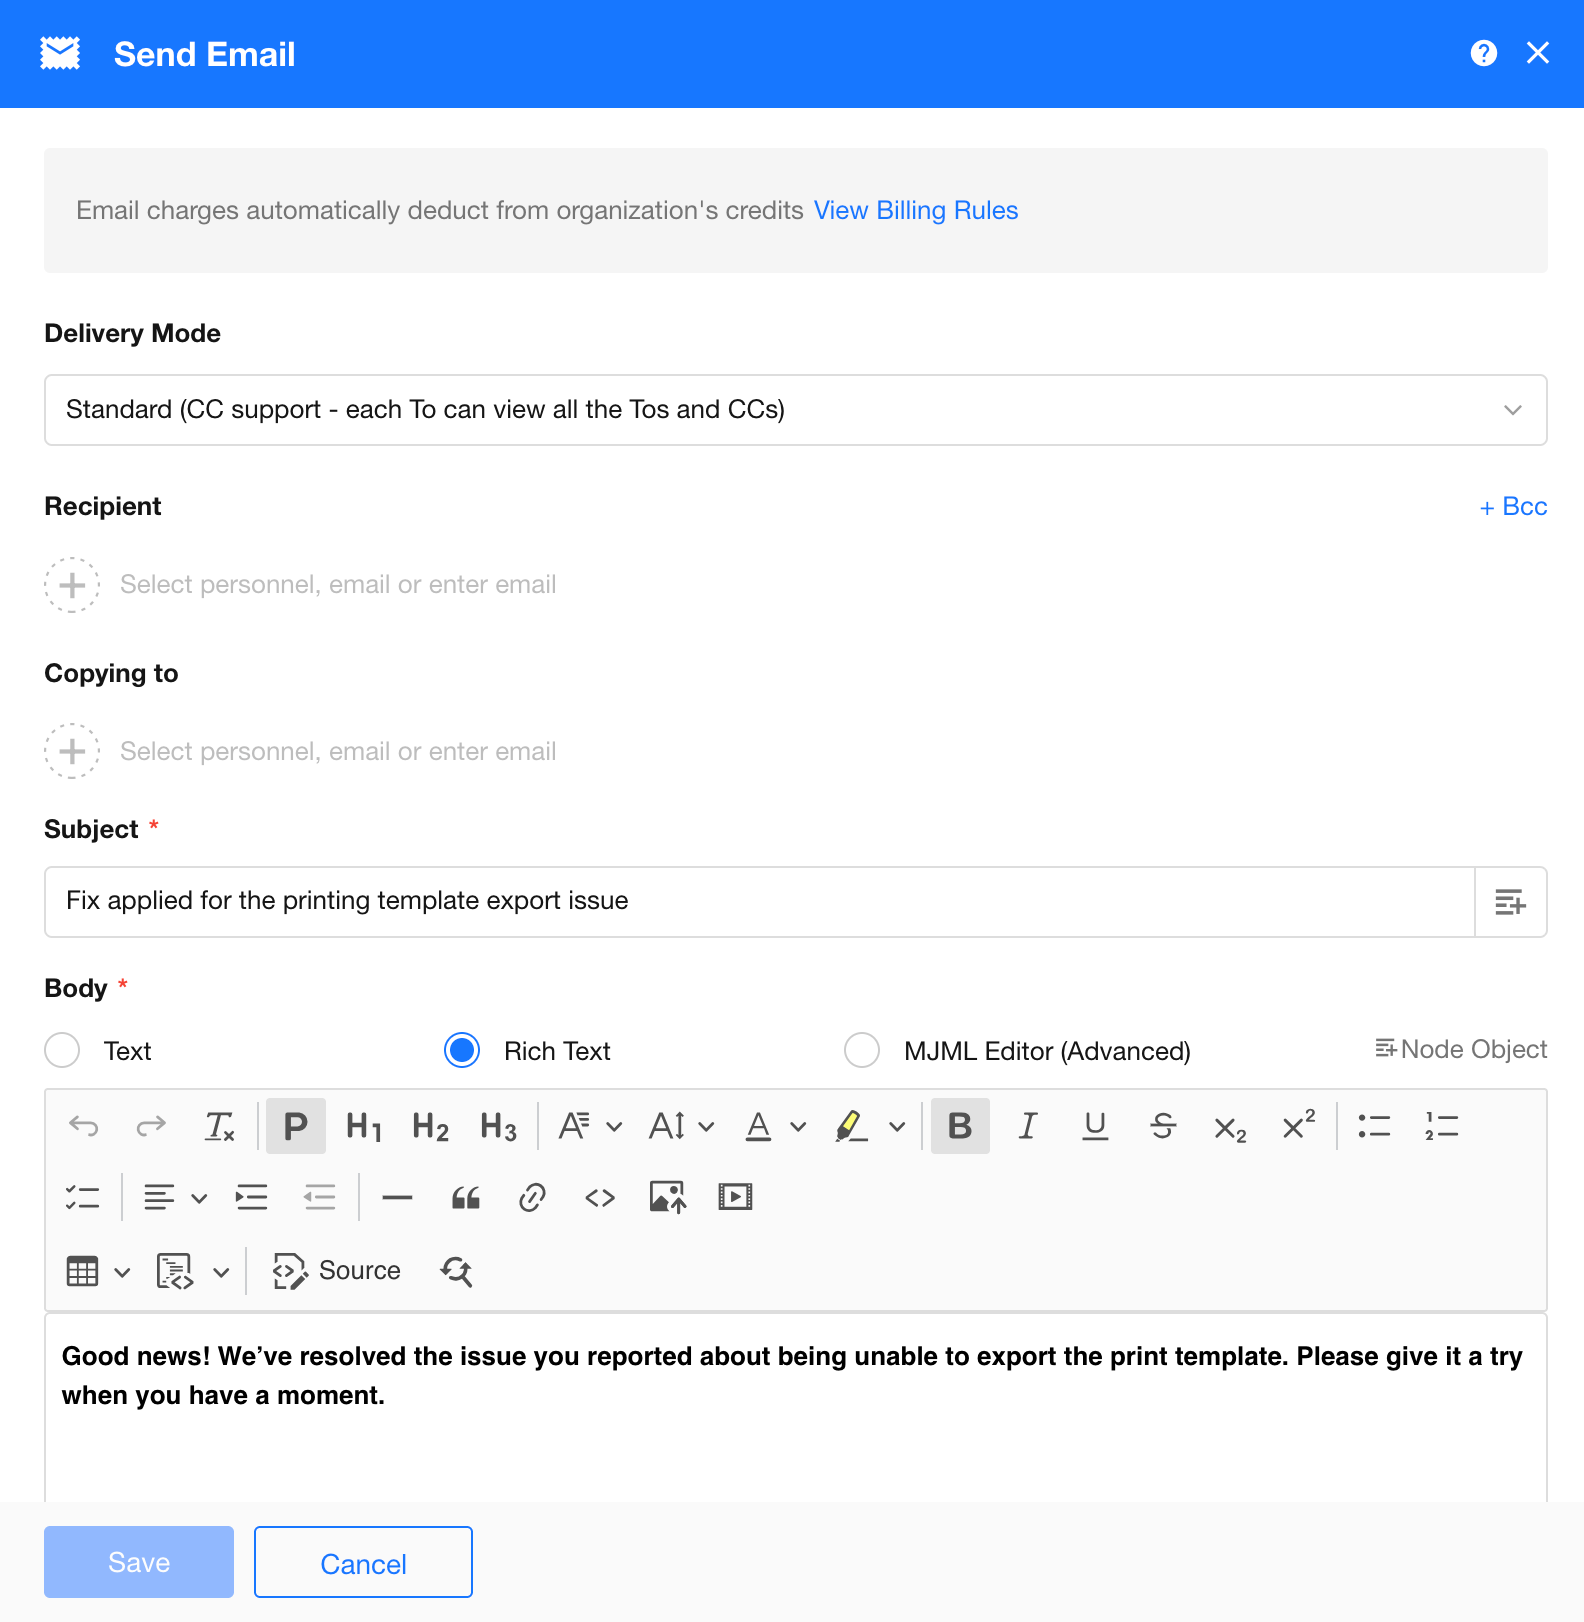
Configuration Details
Delivery Method
The following delivery methods are supported:
Standard Delivery
Supports configuring To, CC, and BCC recipients.
After the email is sent:
- Recipients can view all recipients and CC recipients.
- Recipients cannot view BCC recipients.
- CC recipients cannot view BCC recipients.
- BCC recipients cannot view each other's email addresses.
Individual Delivery (Bulk Send with Hidden Recipients)
CC and BCC are not supported.
The system sends a separate email to each recipient, and each recipient can only see their own email address.
Regardless of the delivery method, each recipient email address consumes email credits equivalent to one email delivery.
Recipients
Recipients can be selected from multiple sources and combined together.
Manually enter email addresses or select from Contacts:
- Fixed Email Address: Enter an email address directly.
- System User: Select a user from Contacts (the account must have an email address associated with it).
Dynamic Sources:
- Email Field: Select an email field from the current record.
- Workflow Participants: Such as the requester, approver, or other workflow-related users.
- Batch Data Nodes: Select an email field from records returned by a Get Multiple Data node.
Multiple recipient sources can be configured simultaneously. The system automatically merges all recipients.
Recipient and CC Ordering Rules
Email addresses added manually, selected users, and users from member fields are displayed in the order they were added or stored in the field.
Users retrieved through dynamic sources such as application roles, departments, positions, or organization roles retain the original order returned by the system.
When multiple sources are configured, recipients are merged according to the configuration order.
Duplicate recipients are automatically removed, while preserving the position of their first occurrence.
CC Recipients
Available only in Standard Delivery mode.
CC recipients can be selected using the same methods as recipients, including fixed email addresses, system users, email fields, and workflow participants.
BCC Recipients
Available only in Standard Delivery mode.
BCC recipients can be selected using the same methods as recipients, including fixed email addresses, system users, email fields, and workflow participants.
After the email is sent:
- Recipients cannot see BCC recipients.
- CC recipients cannot see BCC recipients.
- BCC recipients cannot see each other's email addresses.
BCC recipients receive a copy of the email but do not appear in the recipient list.
Subject and Email Content
The email subject and body support:
- Fixed text
- Referencing workflow field values
- Referencing node output parameters
- Dynamic content composition
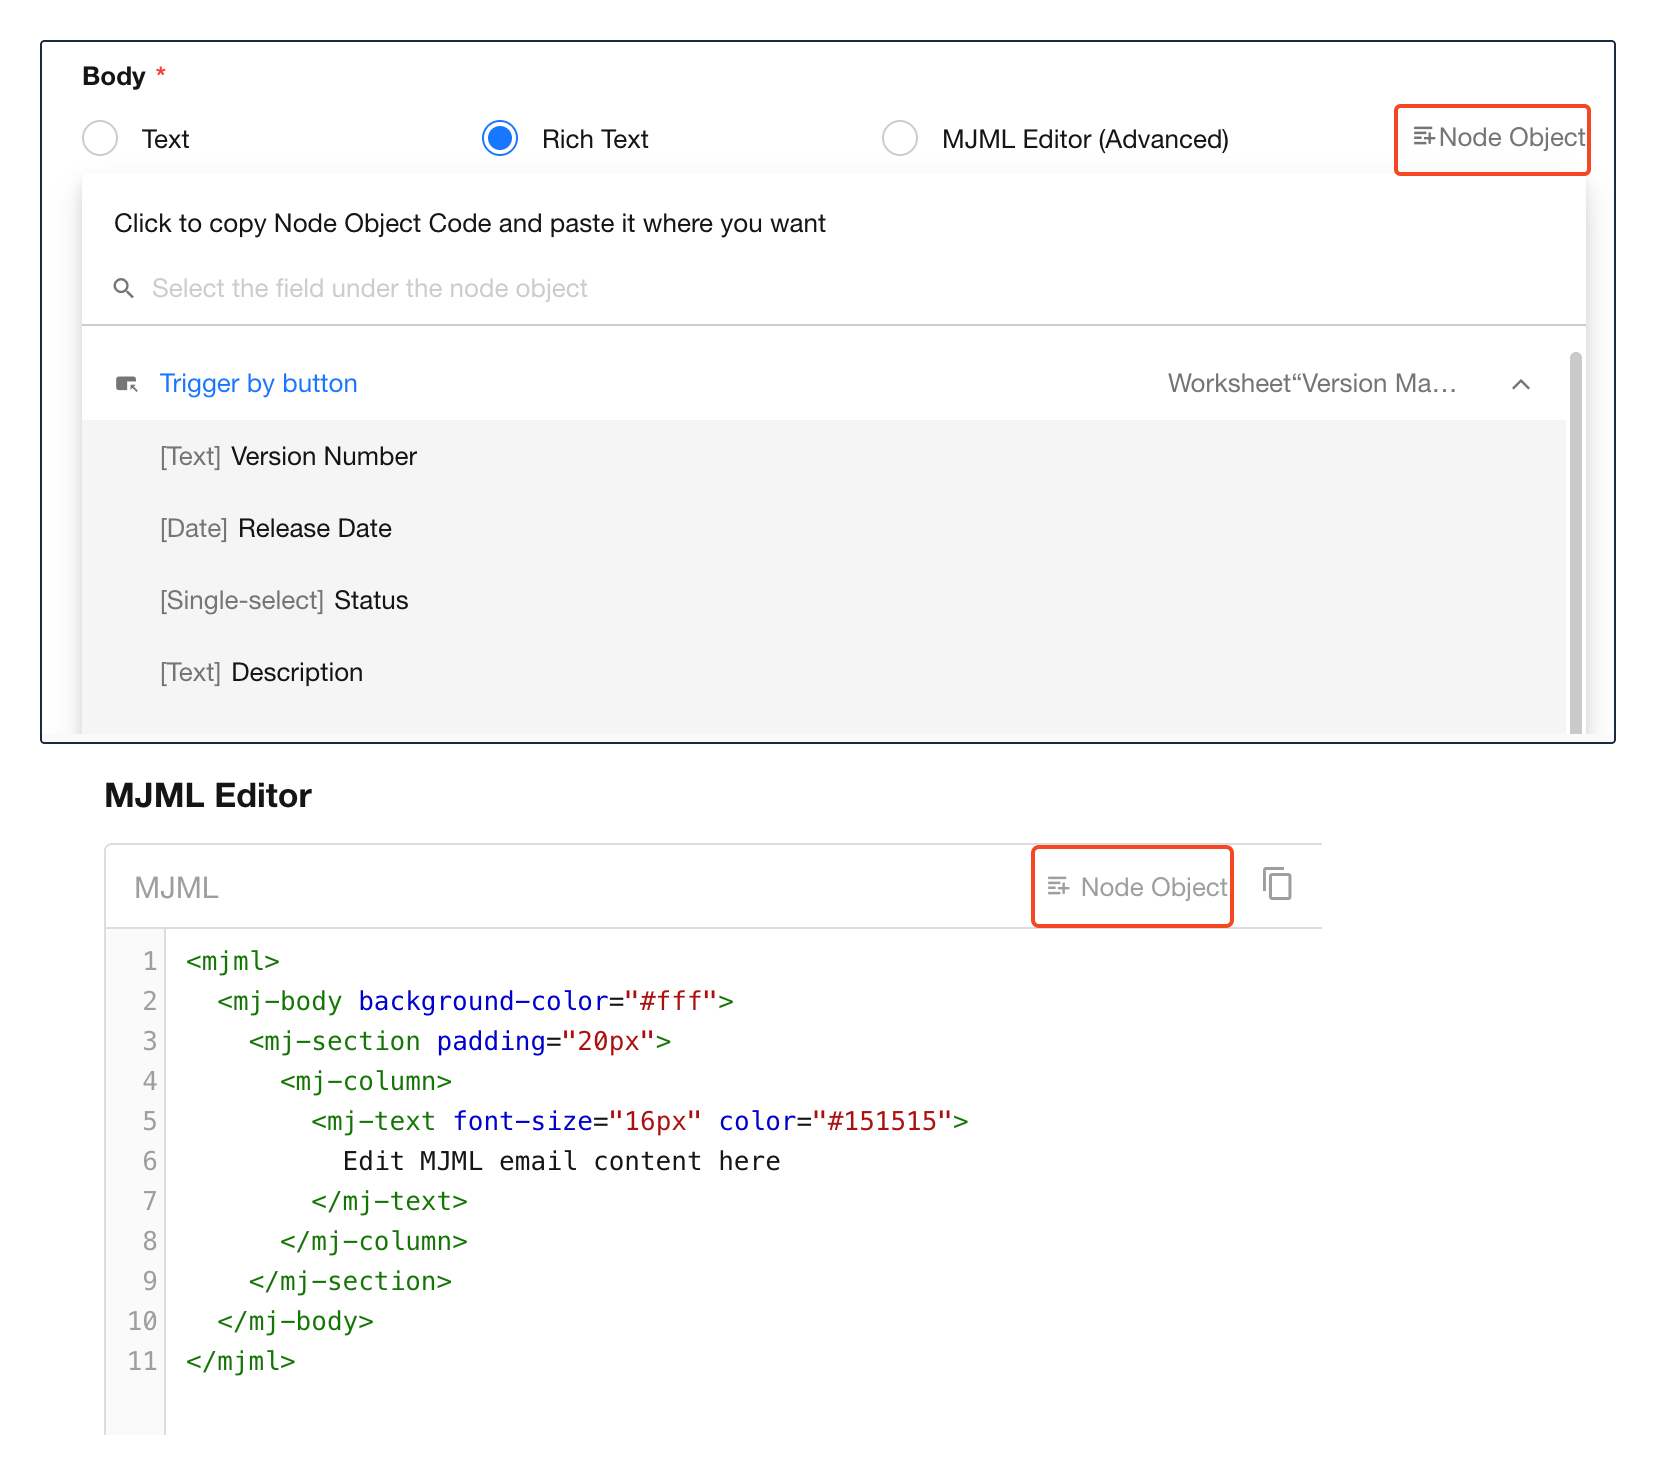
The email body supports the following editing modes:
-
Plain Text
Enter plain text content only.
Formatting such as images, hyperlinks, tables, or text styling is not supported.
This mode is suitable for simple notification emails.
-
Rich Text Editor
Use the visual editor to compose email content.
Supported formatting includes:
- Headings
- Bold
- Italic
- Underline
- Lists
- Hyperlinks
- Images
- Tables
After formatting the content, you can enable Automatically Convert to Email-Compatible Format. The system will optimize the content for better rendering across different email clients.
For users who require greater control over styling and layout, MJML Editor (Advanced) is also available.
-
MJML Editor (Advanced)
Use MJML code to build more sophisticated email layouts with improved compatibility across email clients.
MJML is a markup language specifically designed for responsive email templates. The system automatically converts MJML into email-compatible HTML.
This option is recommended for users who need fine-grained control over email design and are comfortable working with code.
Inserting Fields in Rich Text and MJML Modes
-
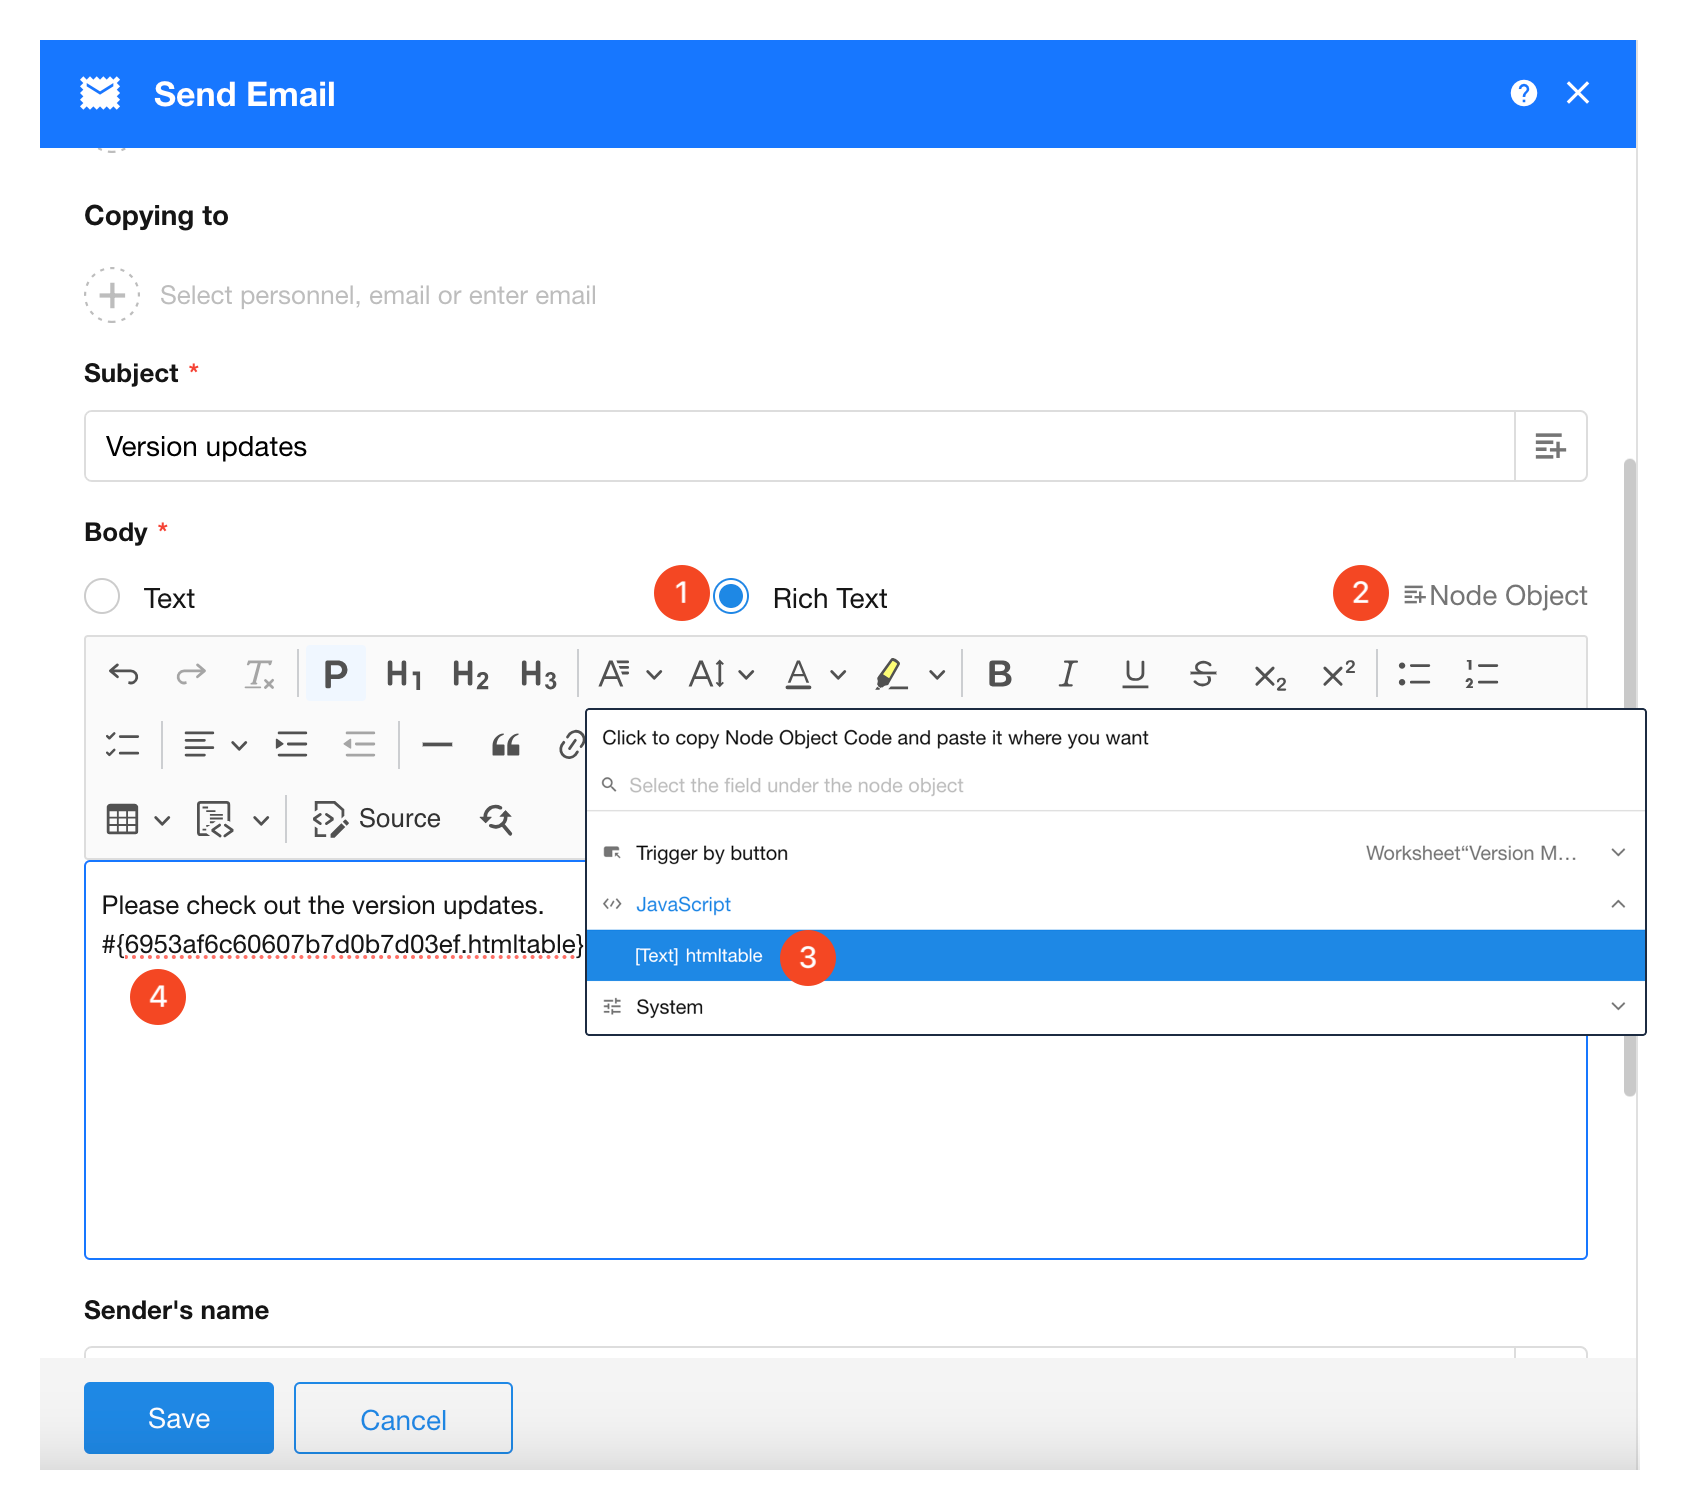
Rich Text Editor
Click Node Object, then insert the desired field into the target location.
-
MJML Editor (Advanced)
Place the cursor at the desired location in the code editor, then select a field from Node Object. The field placeholder will be inserted automatically.
Configure Node Aliases and Field Aliases
By default, inserted fields appear as:
{NodeID.FieldID}{NodeID-FieldID}
Because IDs can be difficult to identify and maintain, aliases can be configured for both workflow nodes and worksheet fields.
After aliases are configured, fields are displayed as:
{NodeAlias.FieldAlias}
This improves readability and makes email templates easier to maintain.
Sender Name
Specify the sender name displayed to recipients.
Sender Email Address
The sender email address is managed by the platform and cannot be customized.
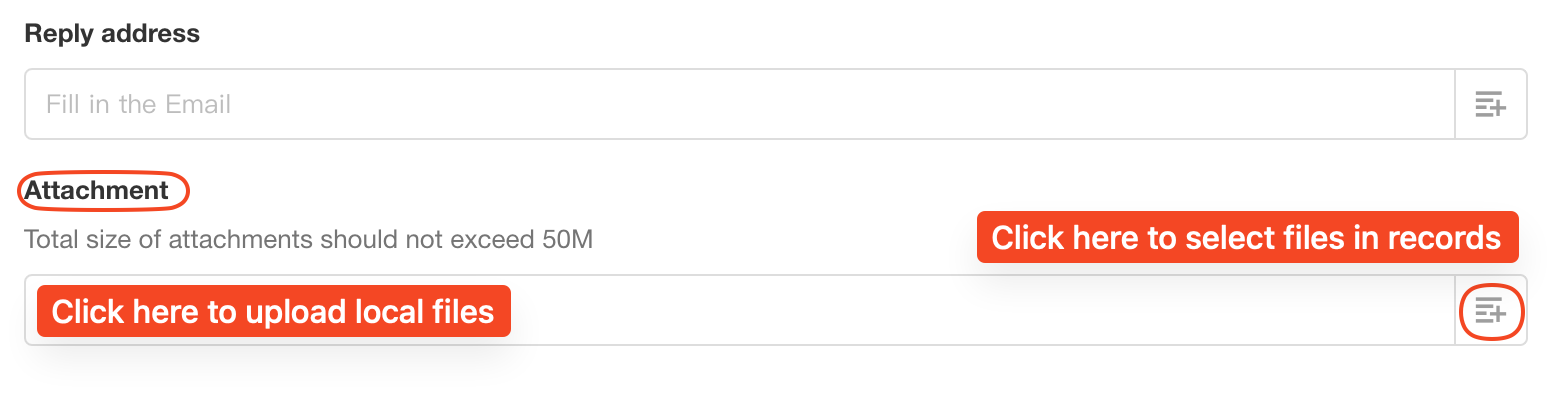
Reply-To Address
Specify the email address that should receive replies from recipients.
When a recipient clicks Reply, the response is sent to the configured address.
Attachments
Both fixed and dynamic attachments are supported.
- Upload multiple local files as attachments
- Use file fields from records as attachments
- Total attachment size cannot exceed 50 MB
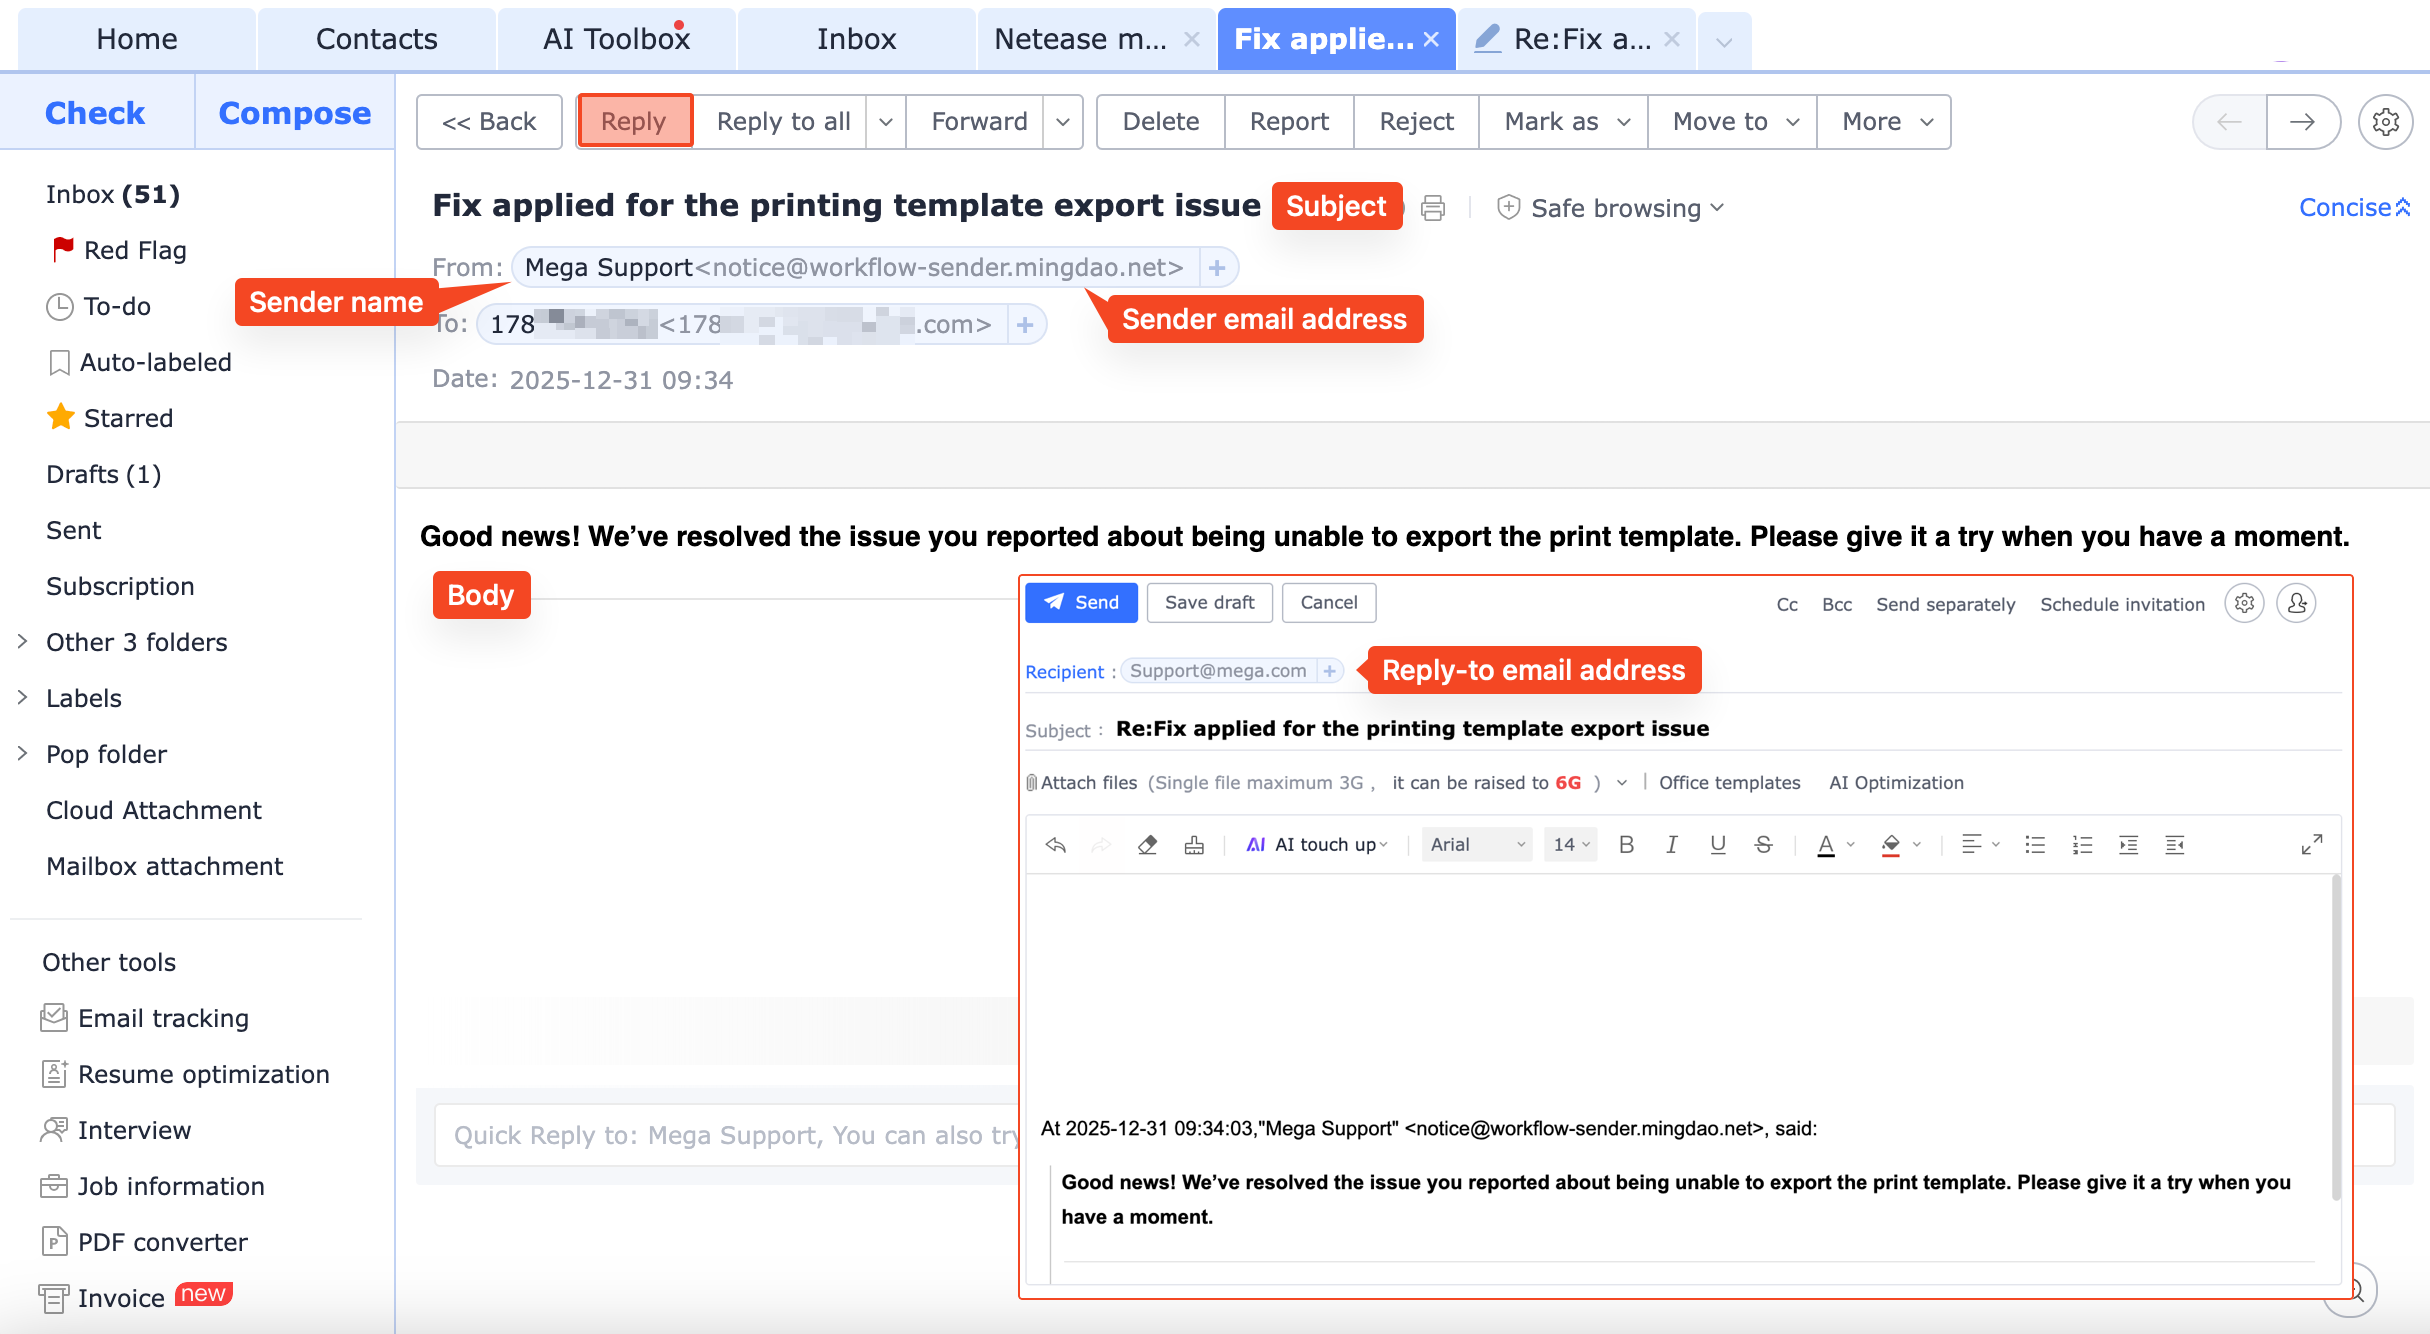
Example Result
The email appears as follows after delivery:
Email Sending Limits
For the same recipient (the same email address), a maximum of 10 emails per hour can be sent.
Any additional emails beyond this limit may be blocked by the email service provider.
This restriction helps prevent excessive or unintended email delivery caused by workflow misconfigurations. When designing workflows, avoid sending more than 10 emails per hour to the same address.
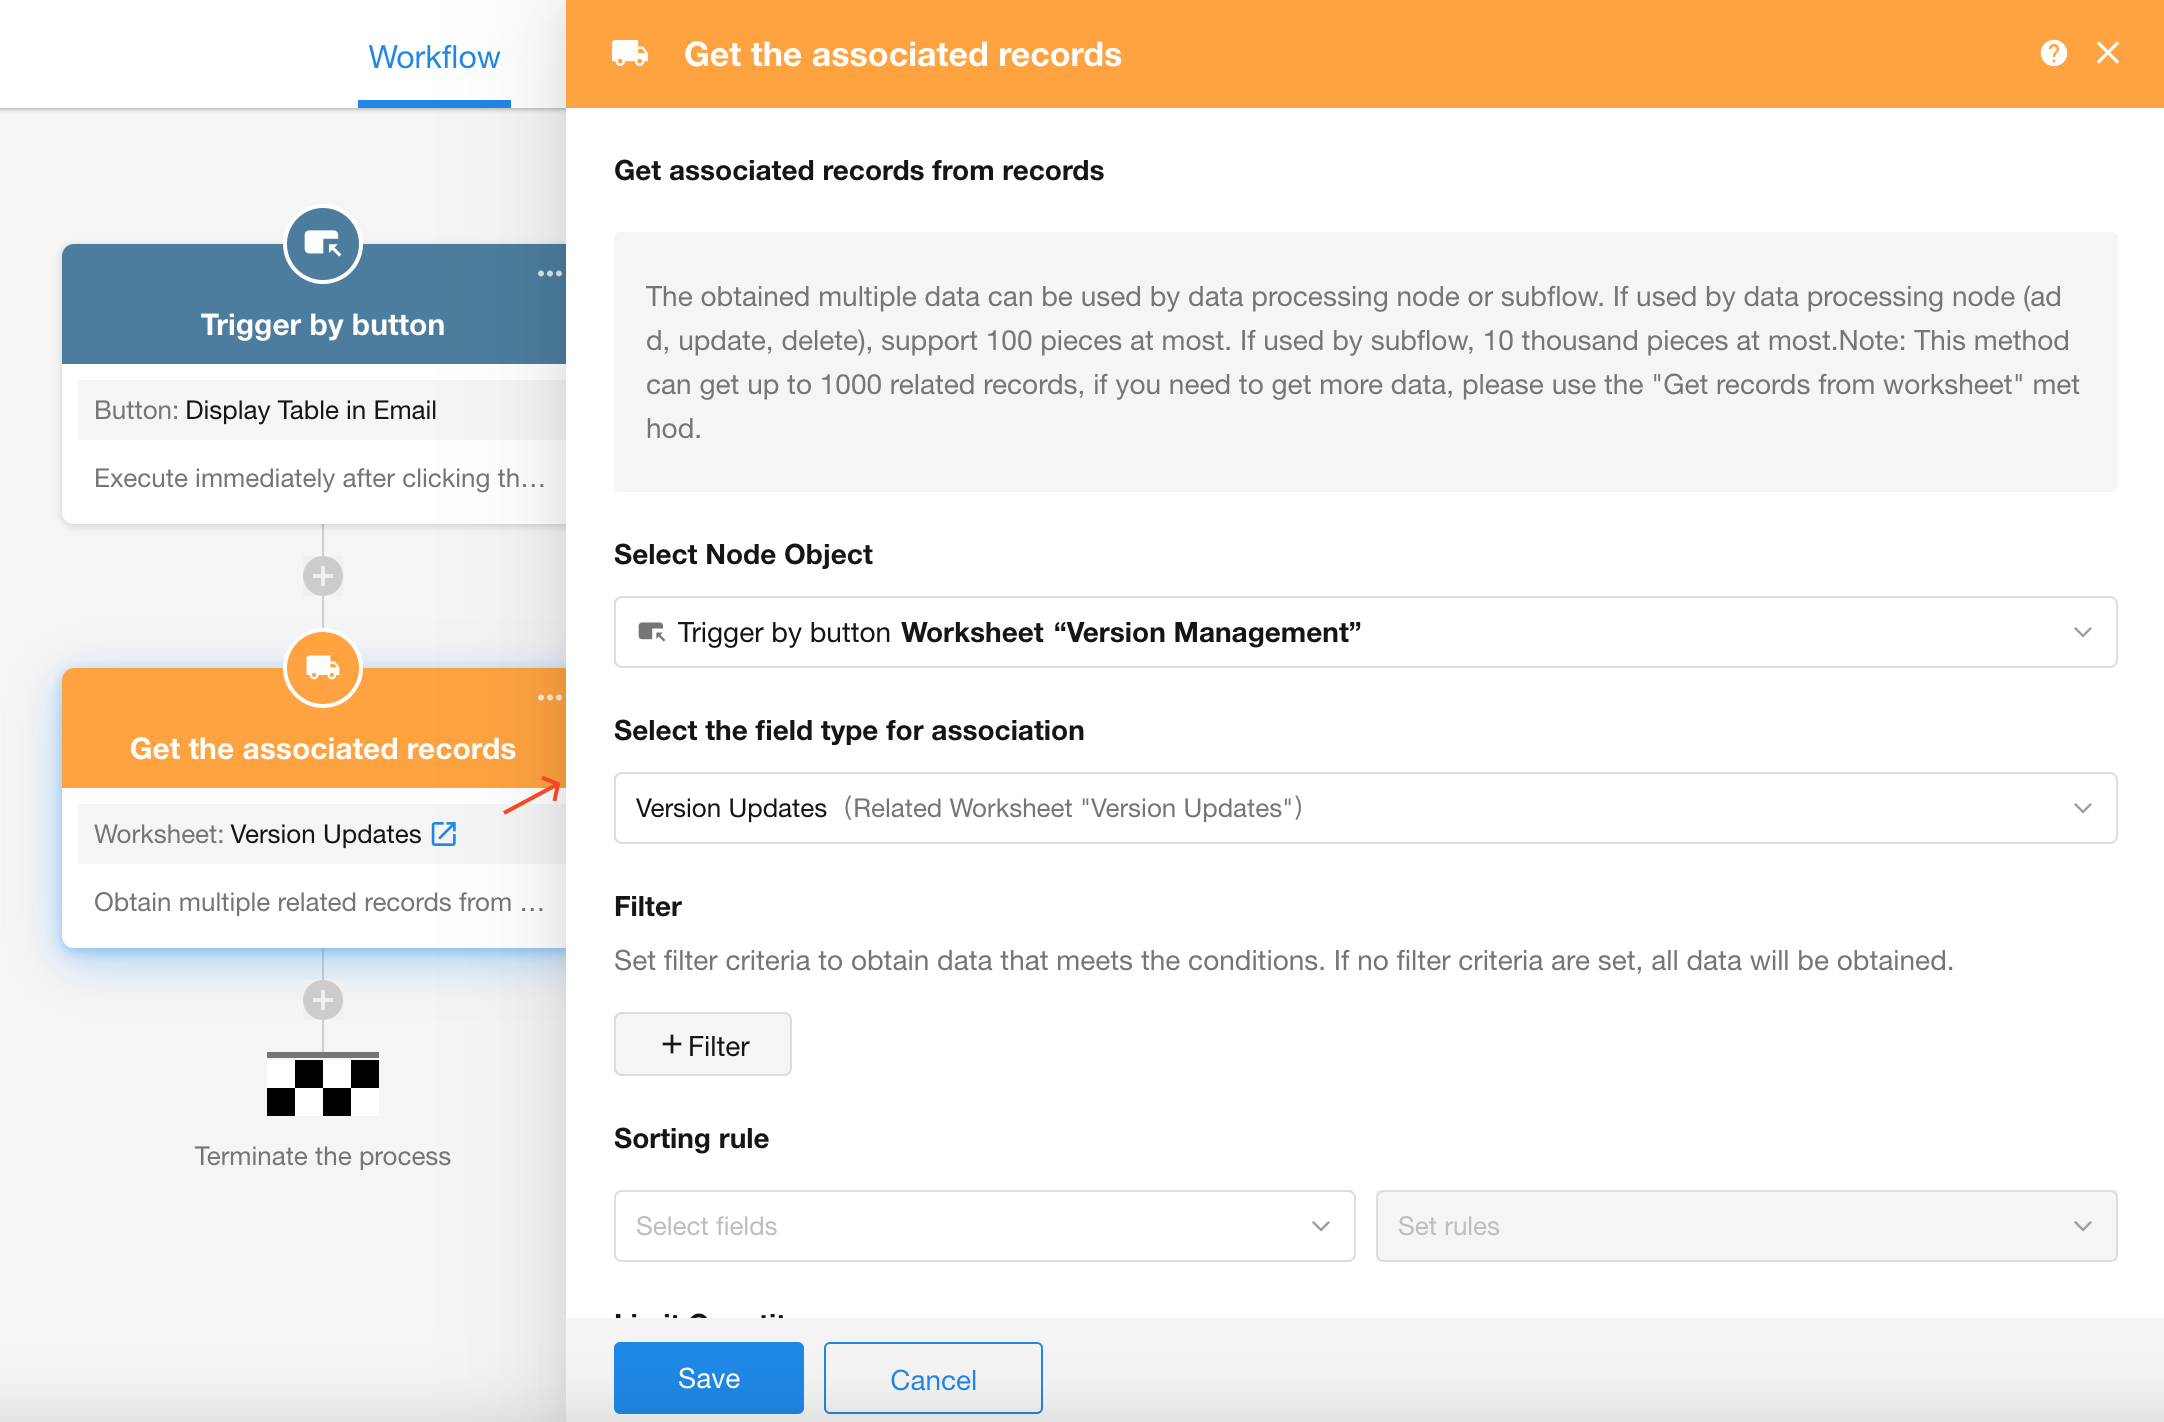
Scenario: Display Multiple Records as a Table in an Email
After retrieving multiple records, you may want to display them as a table in the email body so that recipients can review the data more easily.
Subform data in a record:

Implementation Steps
1. Retrieve Multiple Records in the Workflow
In this example, a button-triggered workflow retrieves data from a subform.
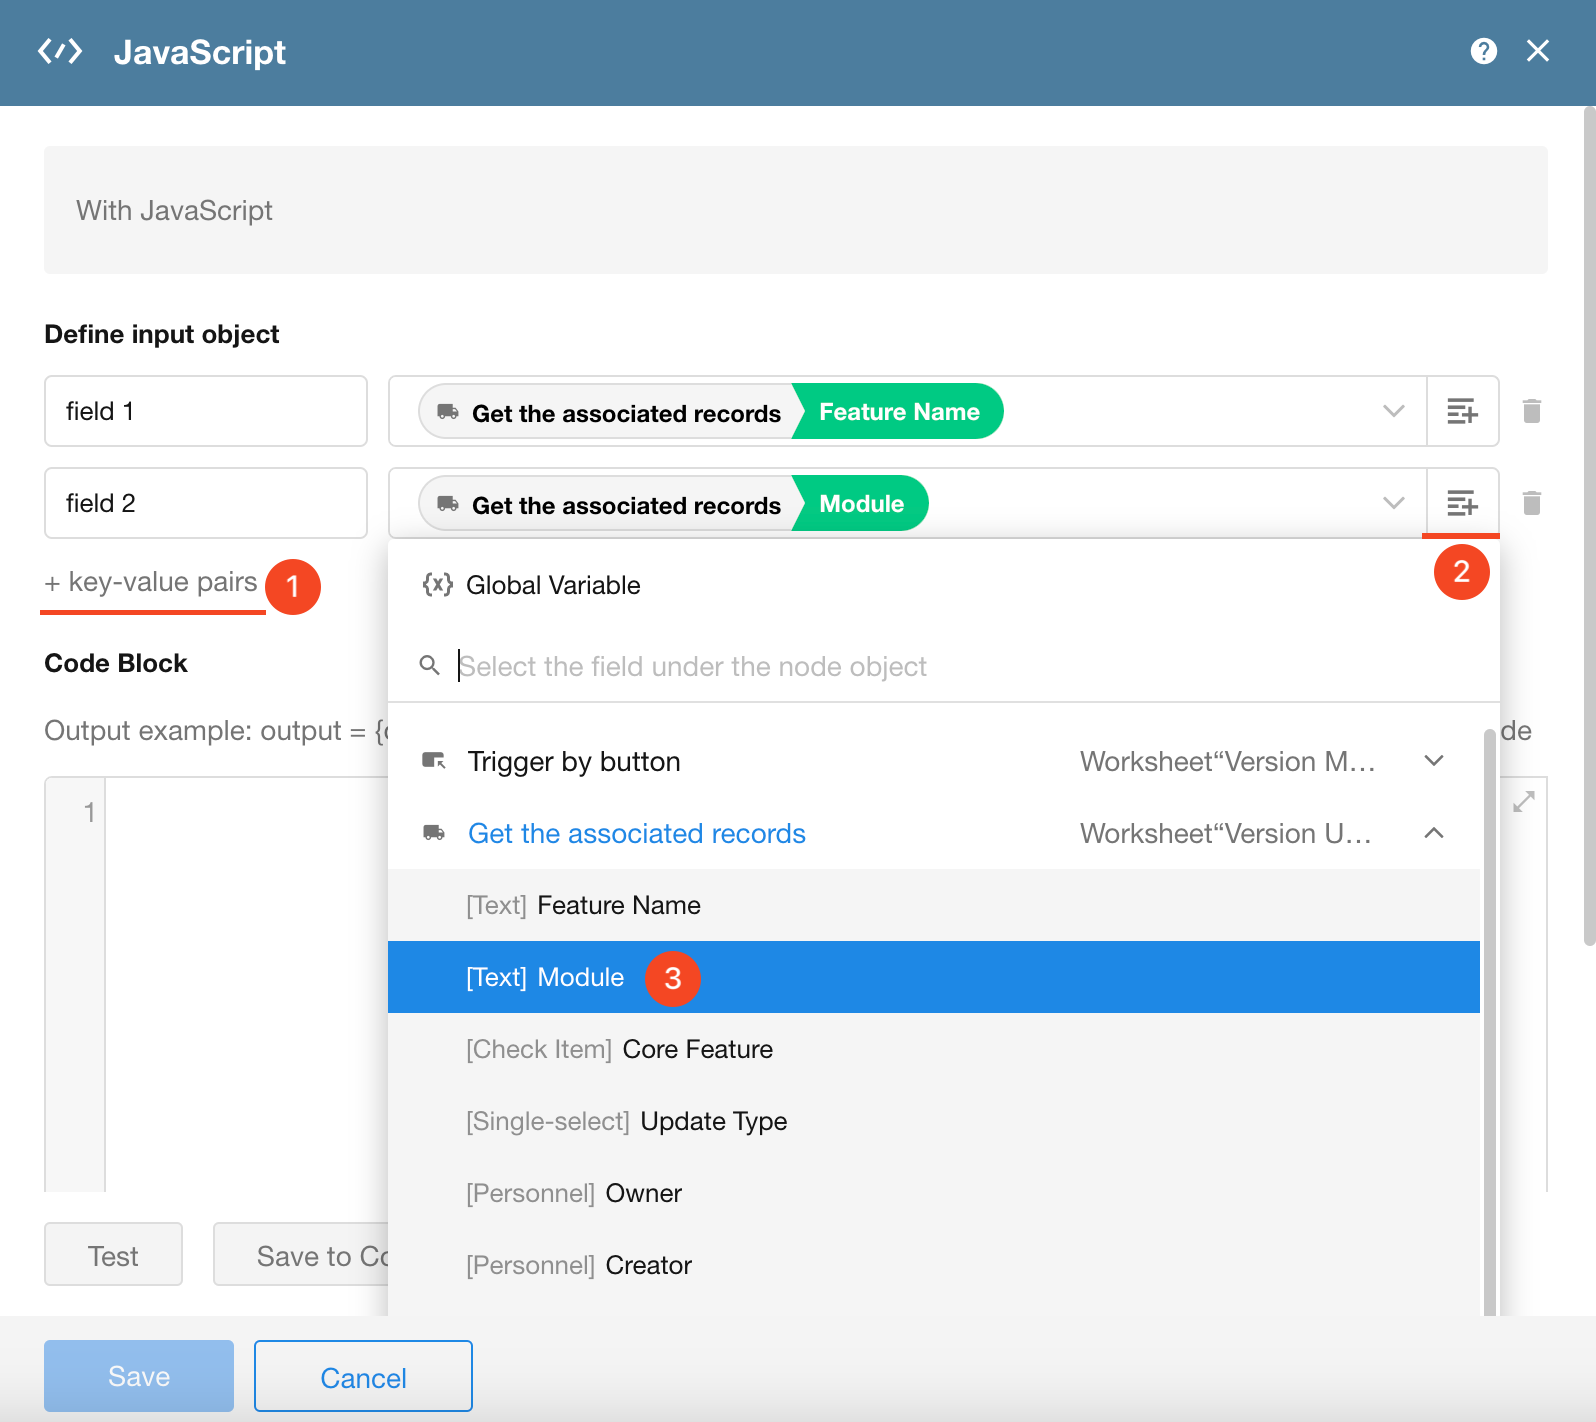
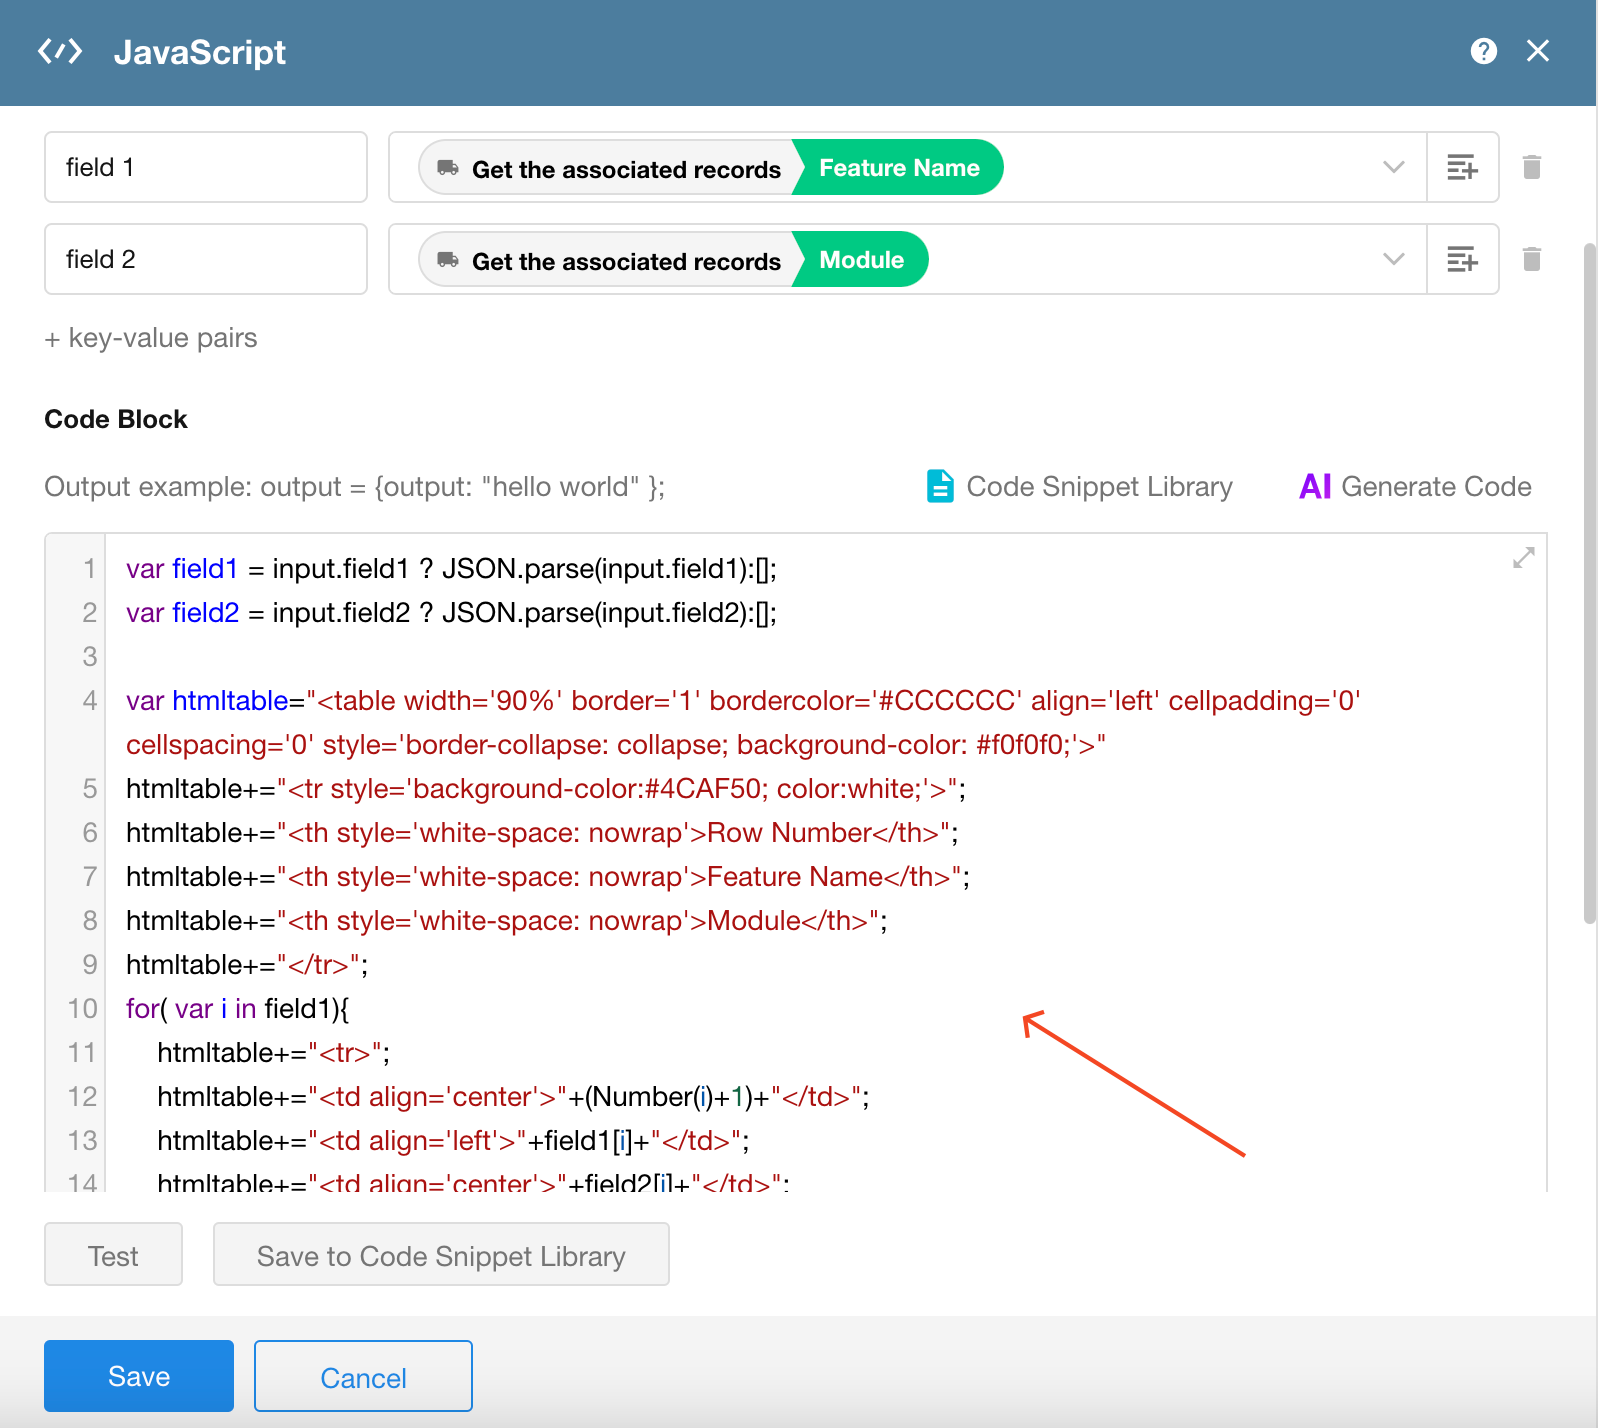
2. Format the Data Using a Code Block
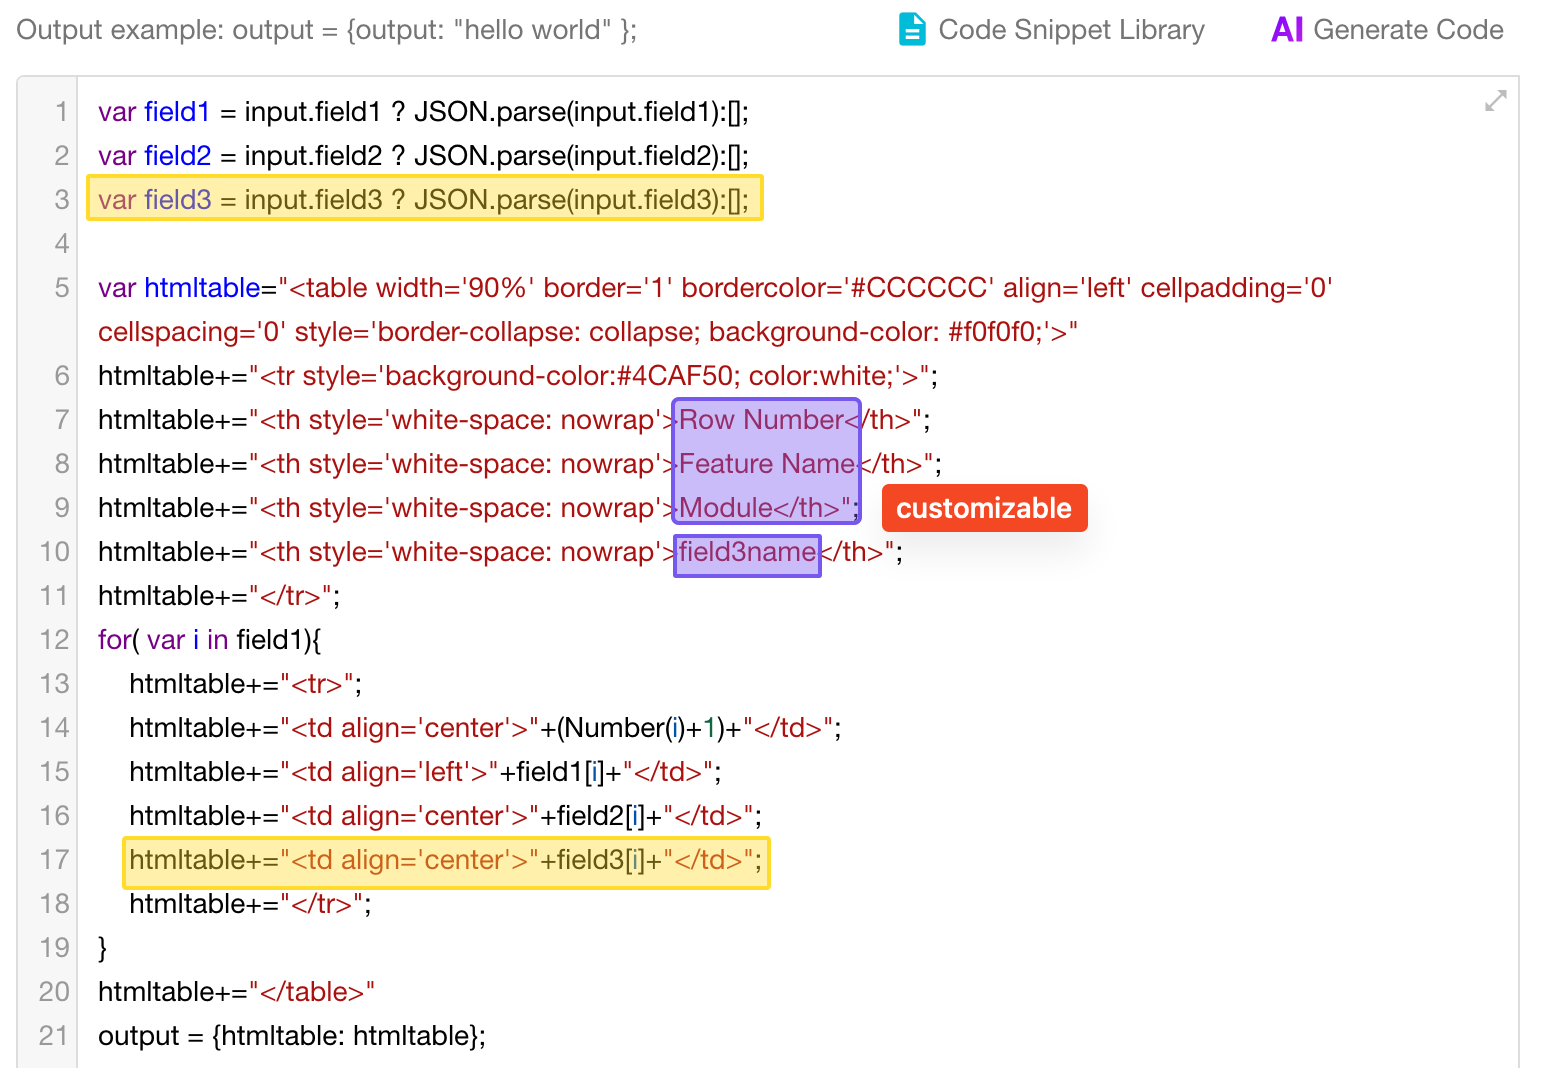
A code block can process up to 100 rows of data, allowing up to 100 records to be converted into an HTML table.
Images are not supported within the generated table.
Sample Code: Click the button in the upper-right corner of the code block to copy the complete code.
var field1 = input.field1 ? JSON.parse(input.field1):[];
var field2 = input.field2 ? JSON.parse(input.field2):[];

var htmltable="<table width='90%' border='1' bordercolor='#CCCCCC' align='left' cellpadding='0' cellspacing='0' style='border-collapse: collapse; background-color: #f0f0f0;'>"
htmltable+="<tr style='background-color:#4CAF50; color:white;'>";
htmltable+="<th style='white-space: nowrap'>No.</th>";
htmltable+="<th style='white-space: nowrap'>Name</th>";
htmltable+="<th style='white-space: nowrap'>Module</th>";
htmltable+="</tr>";
for( var i in field1){
    htmltable+="<tr>";
    htmltable+="<td align='center'>"+(Number(i)+1)+"</td>";
    htmltable+="<td align='left'>"+field1[i]+"</td>";
    htmltable+="<td align='center'>"+field2[i]+"</td>";
    htmltable+="</tr>";
}
htmltable+="</table>"
output = {htmltable: htmltable};
Code Block Configuration
-
Define Input Parameters
Add two parameters as shown below.
If you are unfamiliar with code blocks, keep the parameter names exactly as shown and simply select the corresponding fields.
-
Paste the Code into the Editor
Paste the complete code into the editor without making any modifications.
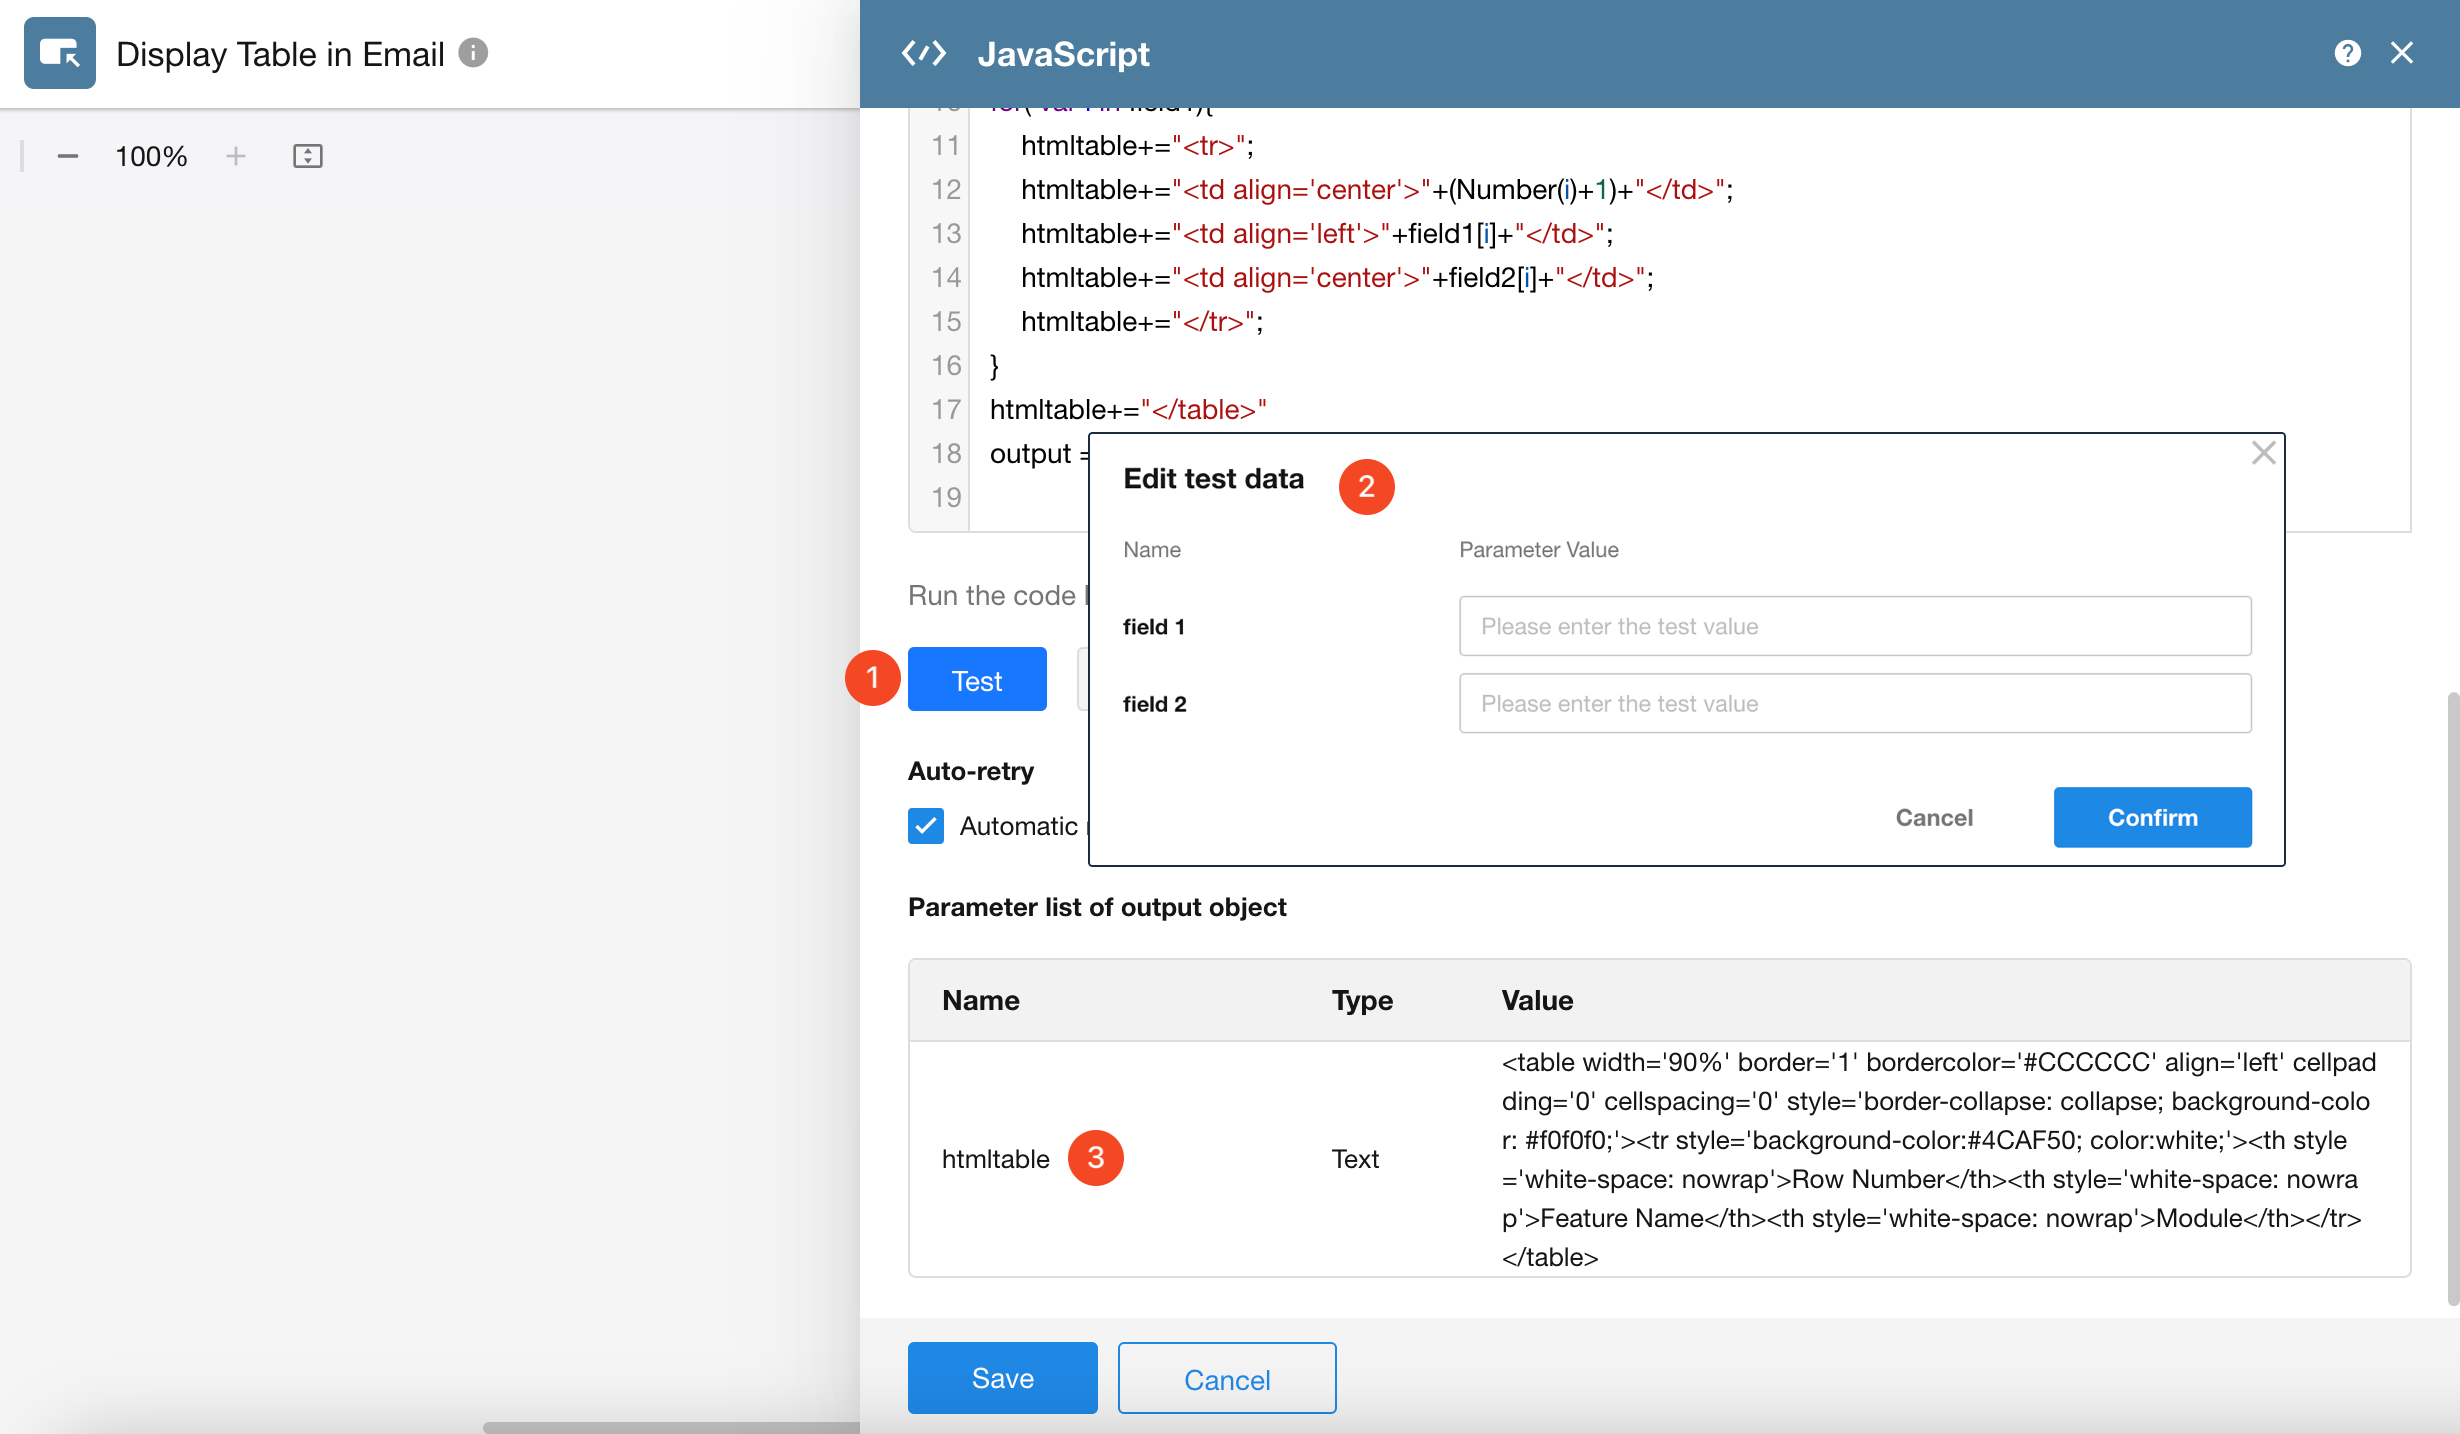
-
Test the Code
Click Test.
Leave all parameter values empty and click OK.
After successful execution, generated output parameters and content will appear in the output area.
3. Use the Generated Table in the Send Email Node
In the Send Email node, use Rich Text mode and insert the generated HTML table.
You can also write the code block output to a Rich Text field and display the table from that field.
4. Publish the Workflow and Test the Email
Customize Table Styles
Add More Columns
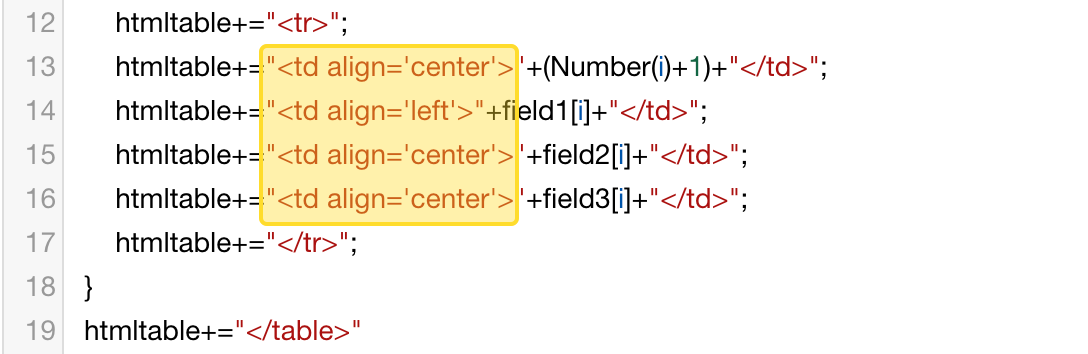
The sample template displays only a few columns. To display additional columns, add more input parameters and update the code accordingly.
-
Add New Input Parameters
Create additional parameters and map them to the corresponding fields.

-
Update the Code
Modify the code block in three places:
- Accept the new parameters
- Add additional table headers
- Add cells for the new columns
-
Repeat as Needed
Repeat the same steps for any additional columns.
-
Save and Republish the Workflow
Text Alignment
You can control text alignment within table cells.
Modify the highlighted section of the code using:
- Center:
'center' - Left:
'left' - Right:
'right'
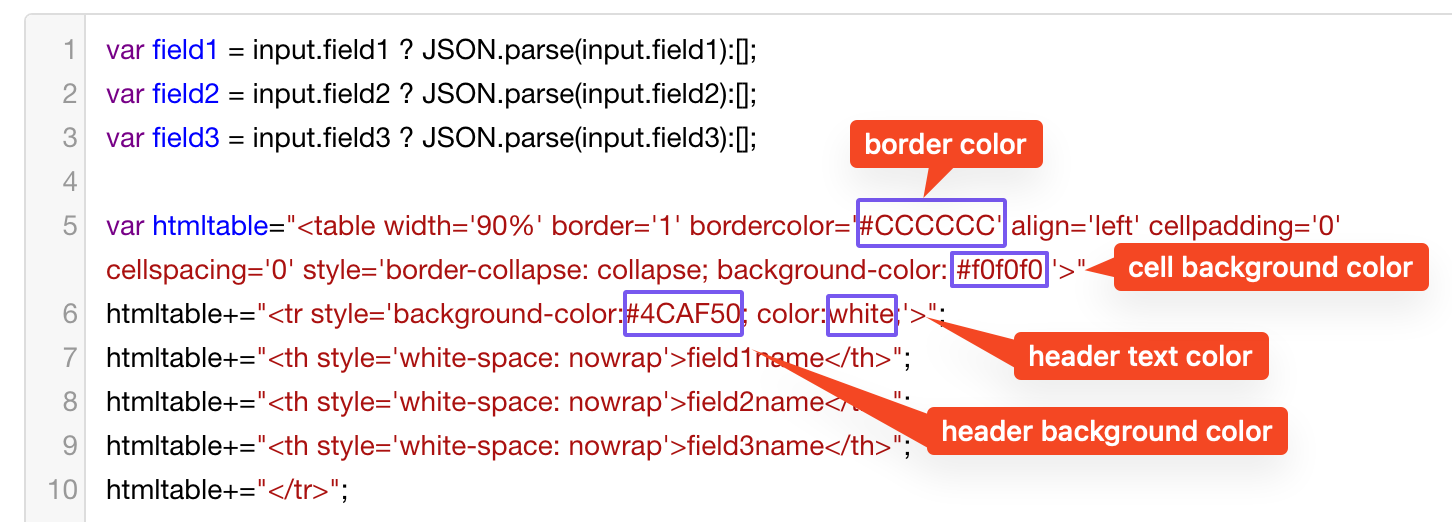
Background Colors
You can customize the following colors:
- Border color
- Header text color
- Header background color
- Data cell background color
After obtaining the desired color code, replace the corresponding value in the code.
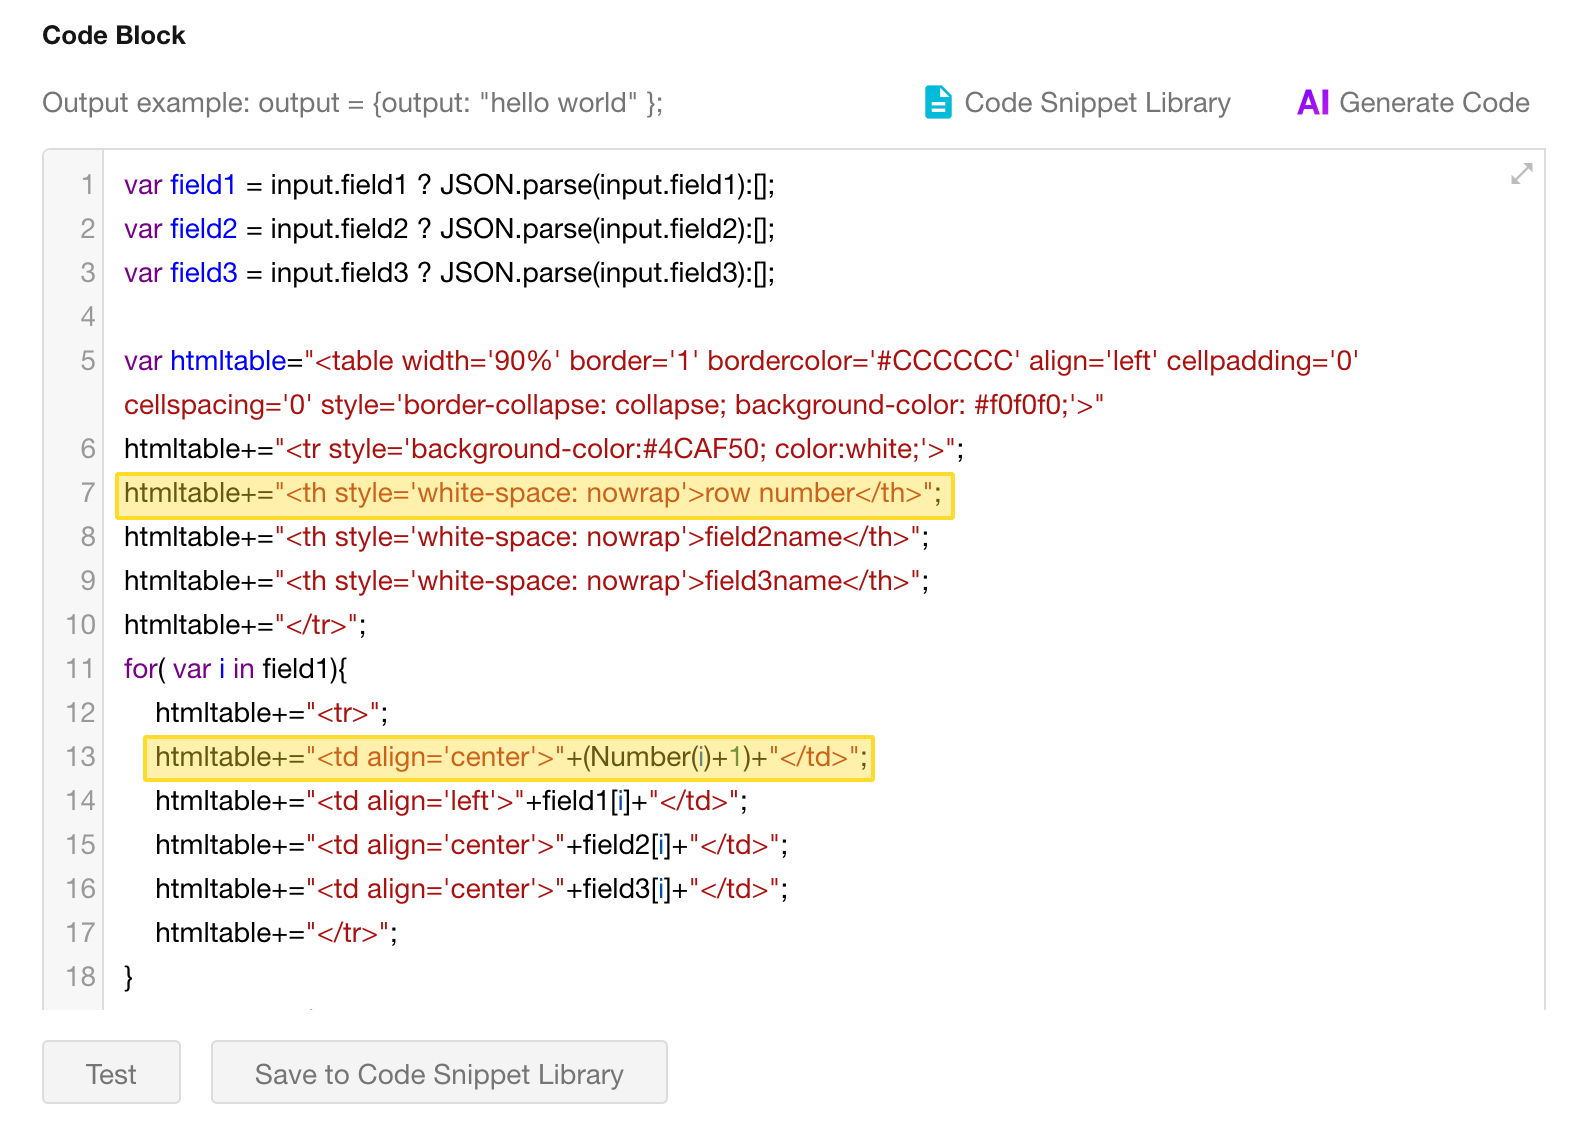
Remove Row Numbers
The first column automatically displays row numbers.
If row numbers are not needed, remove the two highlighted lines shown below.
Common Email Table Styling Issues
| Issue | Possible Cause | Solution |
|---|---|---|
| Styles not applied | Using <style> tags | Use inline styles instead, for example: <p style="color: grey;">Example: text color styling</p> |
| Background color missing | The email client does not support external CSS | Apply background-color directly to div or td elements |
| Incorrect text alignment | Using margin for spacing | Use padding instead |
| Images not displayed | Using relative paths or non-public URLs | Use publicly accessible absolute URLs or embed images using Base64 |
| Font rendering issues | Using unsupported fonts | Use common web-safe fonts such as Arial or Helvetica |
Was this document helpful?