Public Forms
Public Forms allow external users to submit data without logging in through a public link or QR code. When submitted through WeChat, the form can identify respondents based on their WeChat identity, enabling them to update previously submitted data when permitted.
Common Use Cases
- Collect registrations, survey responses, customer satisfaction feedback, and other information through public forms.
- Allow customers to submit support tickets through a public form.
Basic Configuration
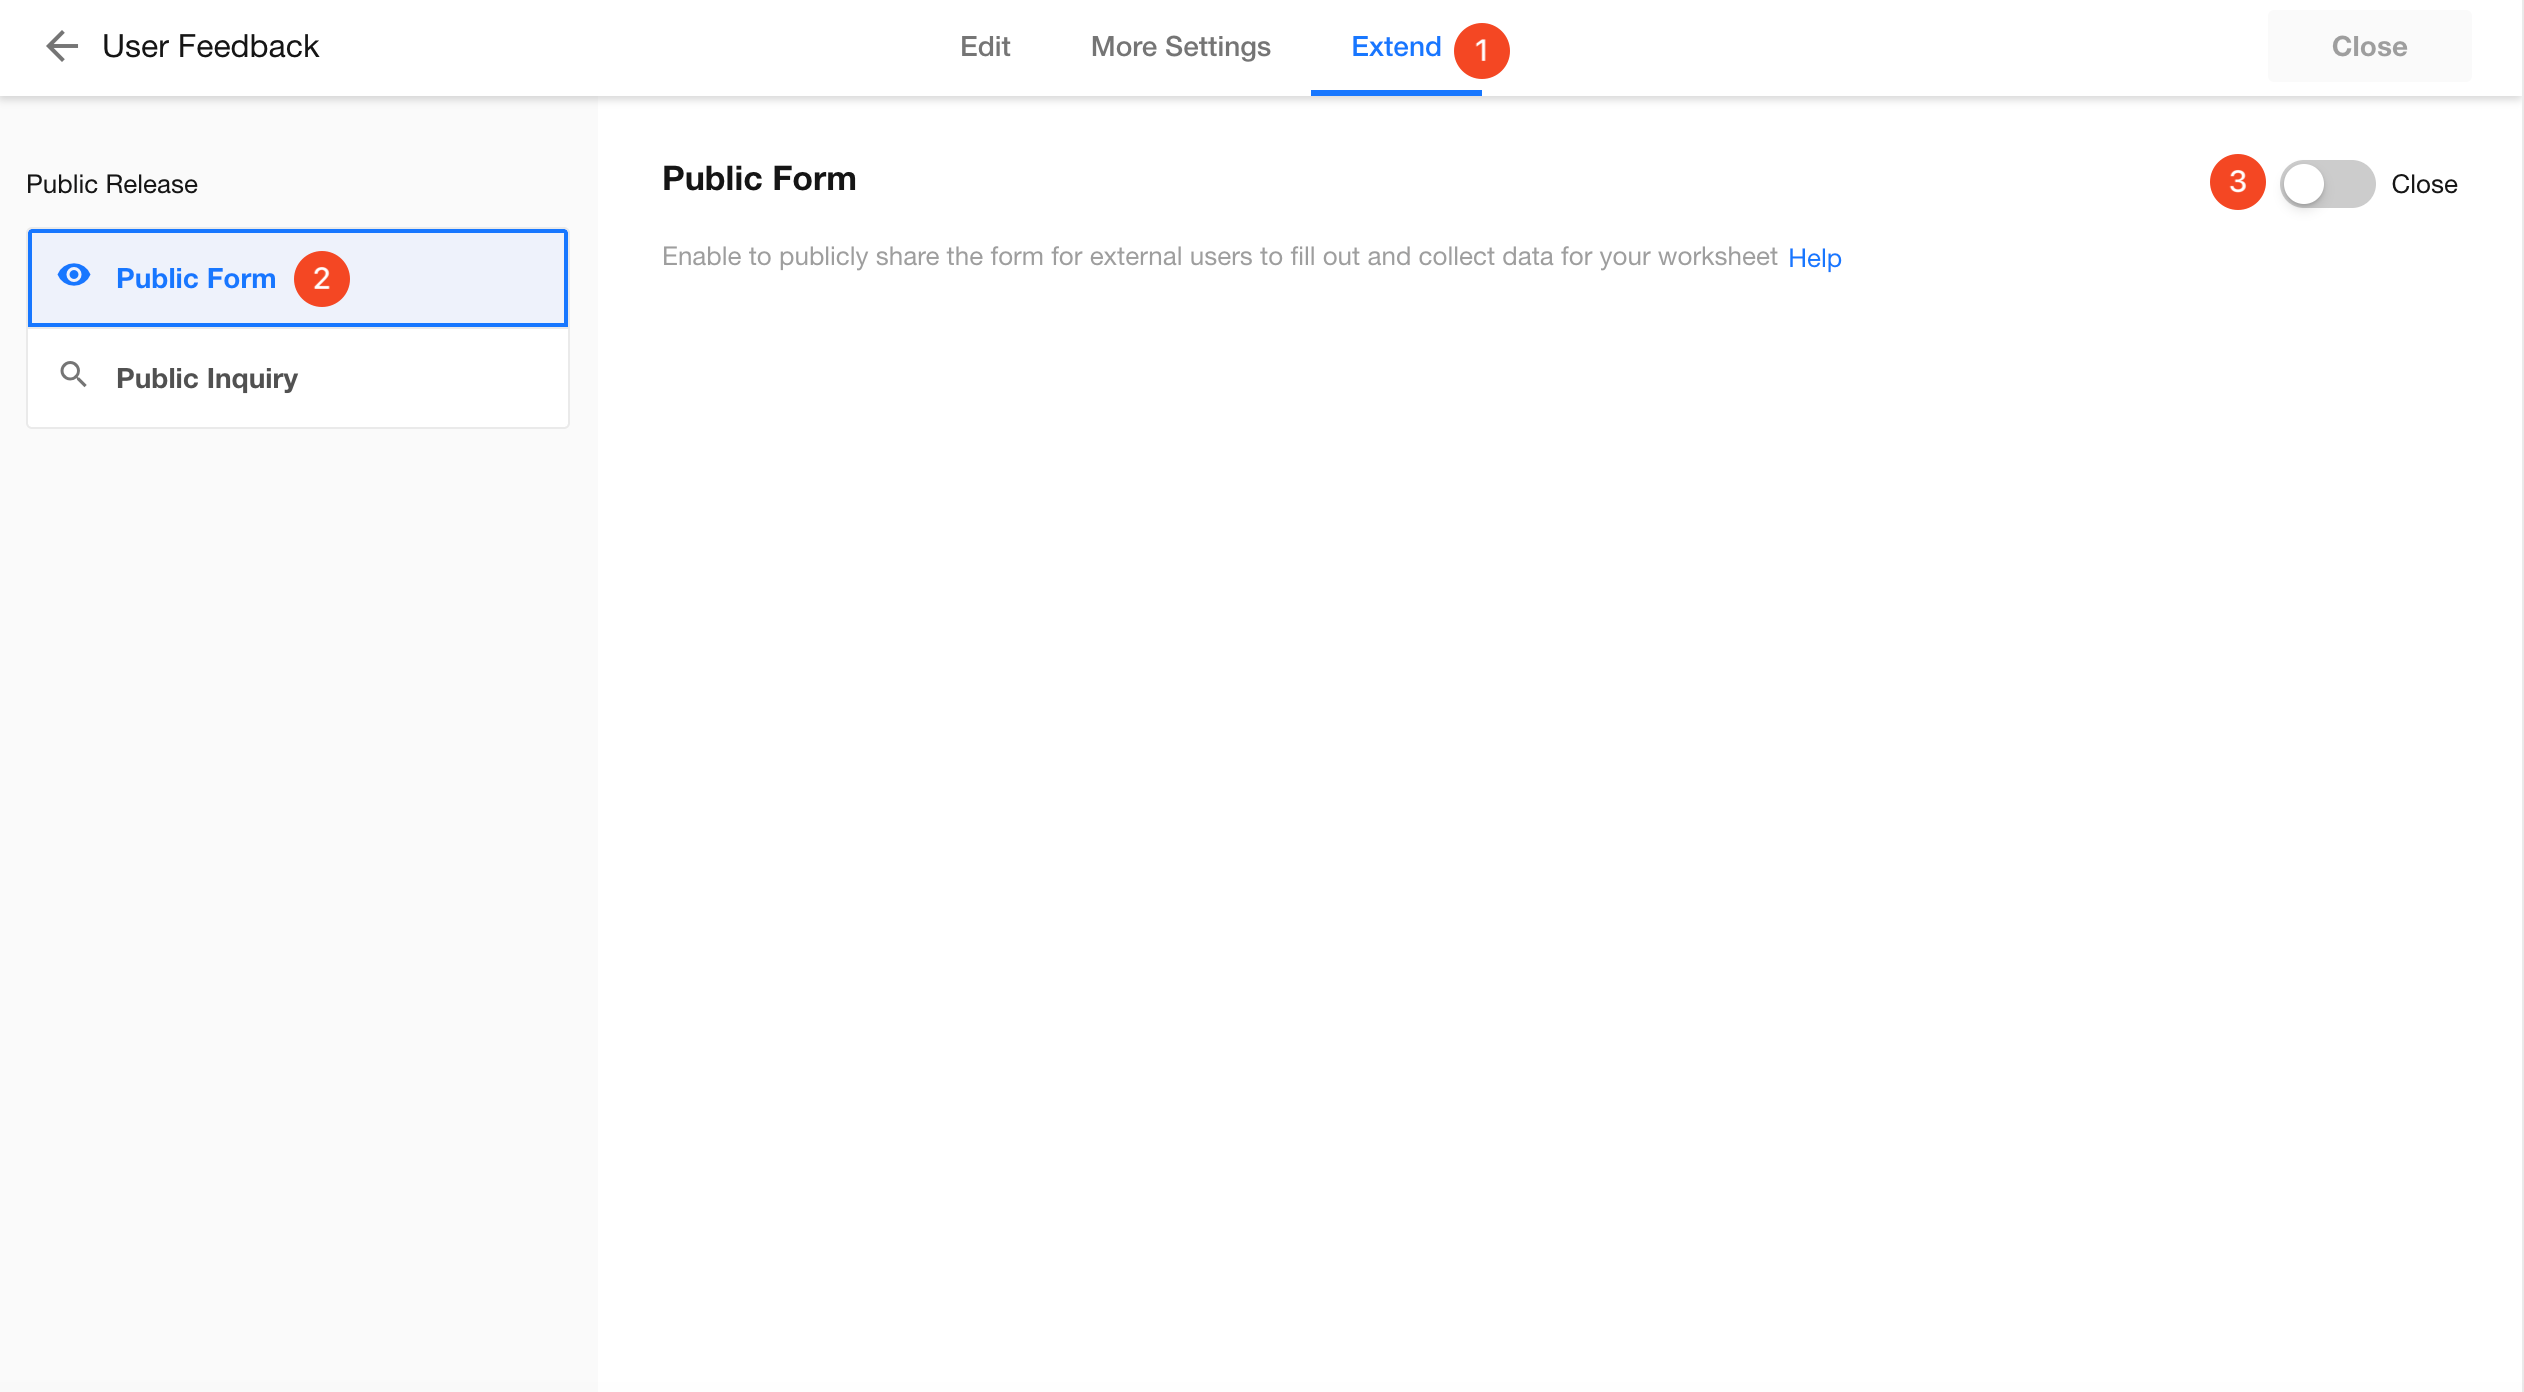
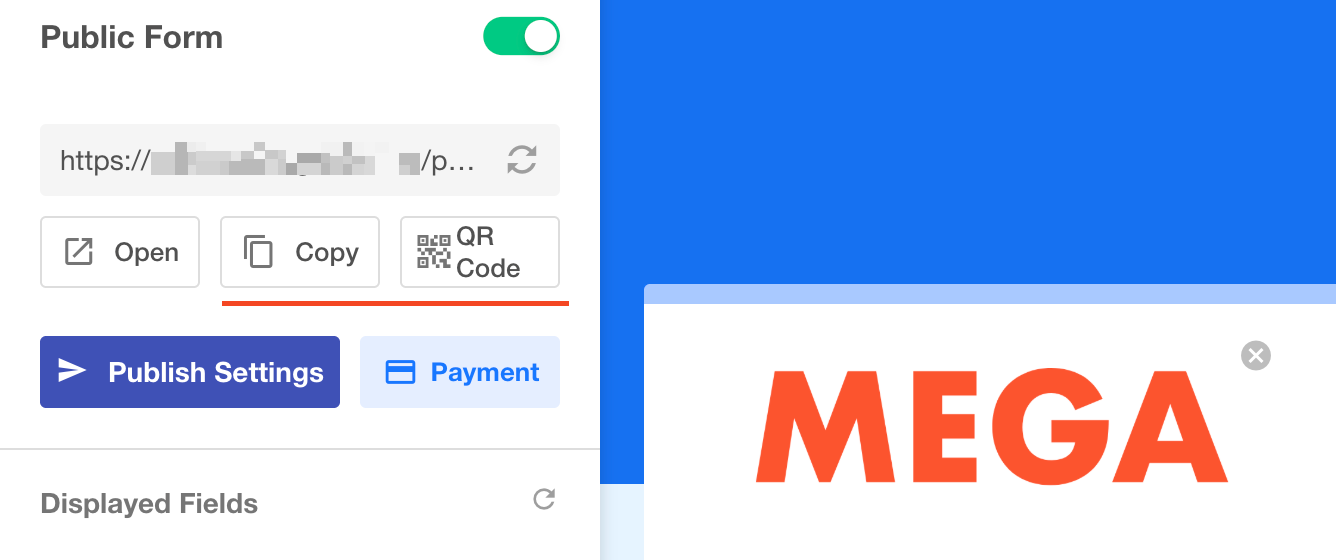
Enable a Public Form
After designing the worksheet, open the worksheet and go to Extend > Public Form to enable the public form.
Configure the Form Title and Description
Set the title and description displayed on the public form page.
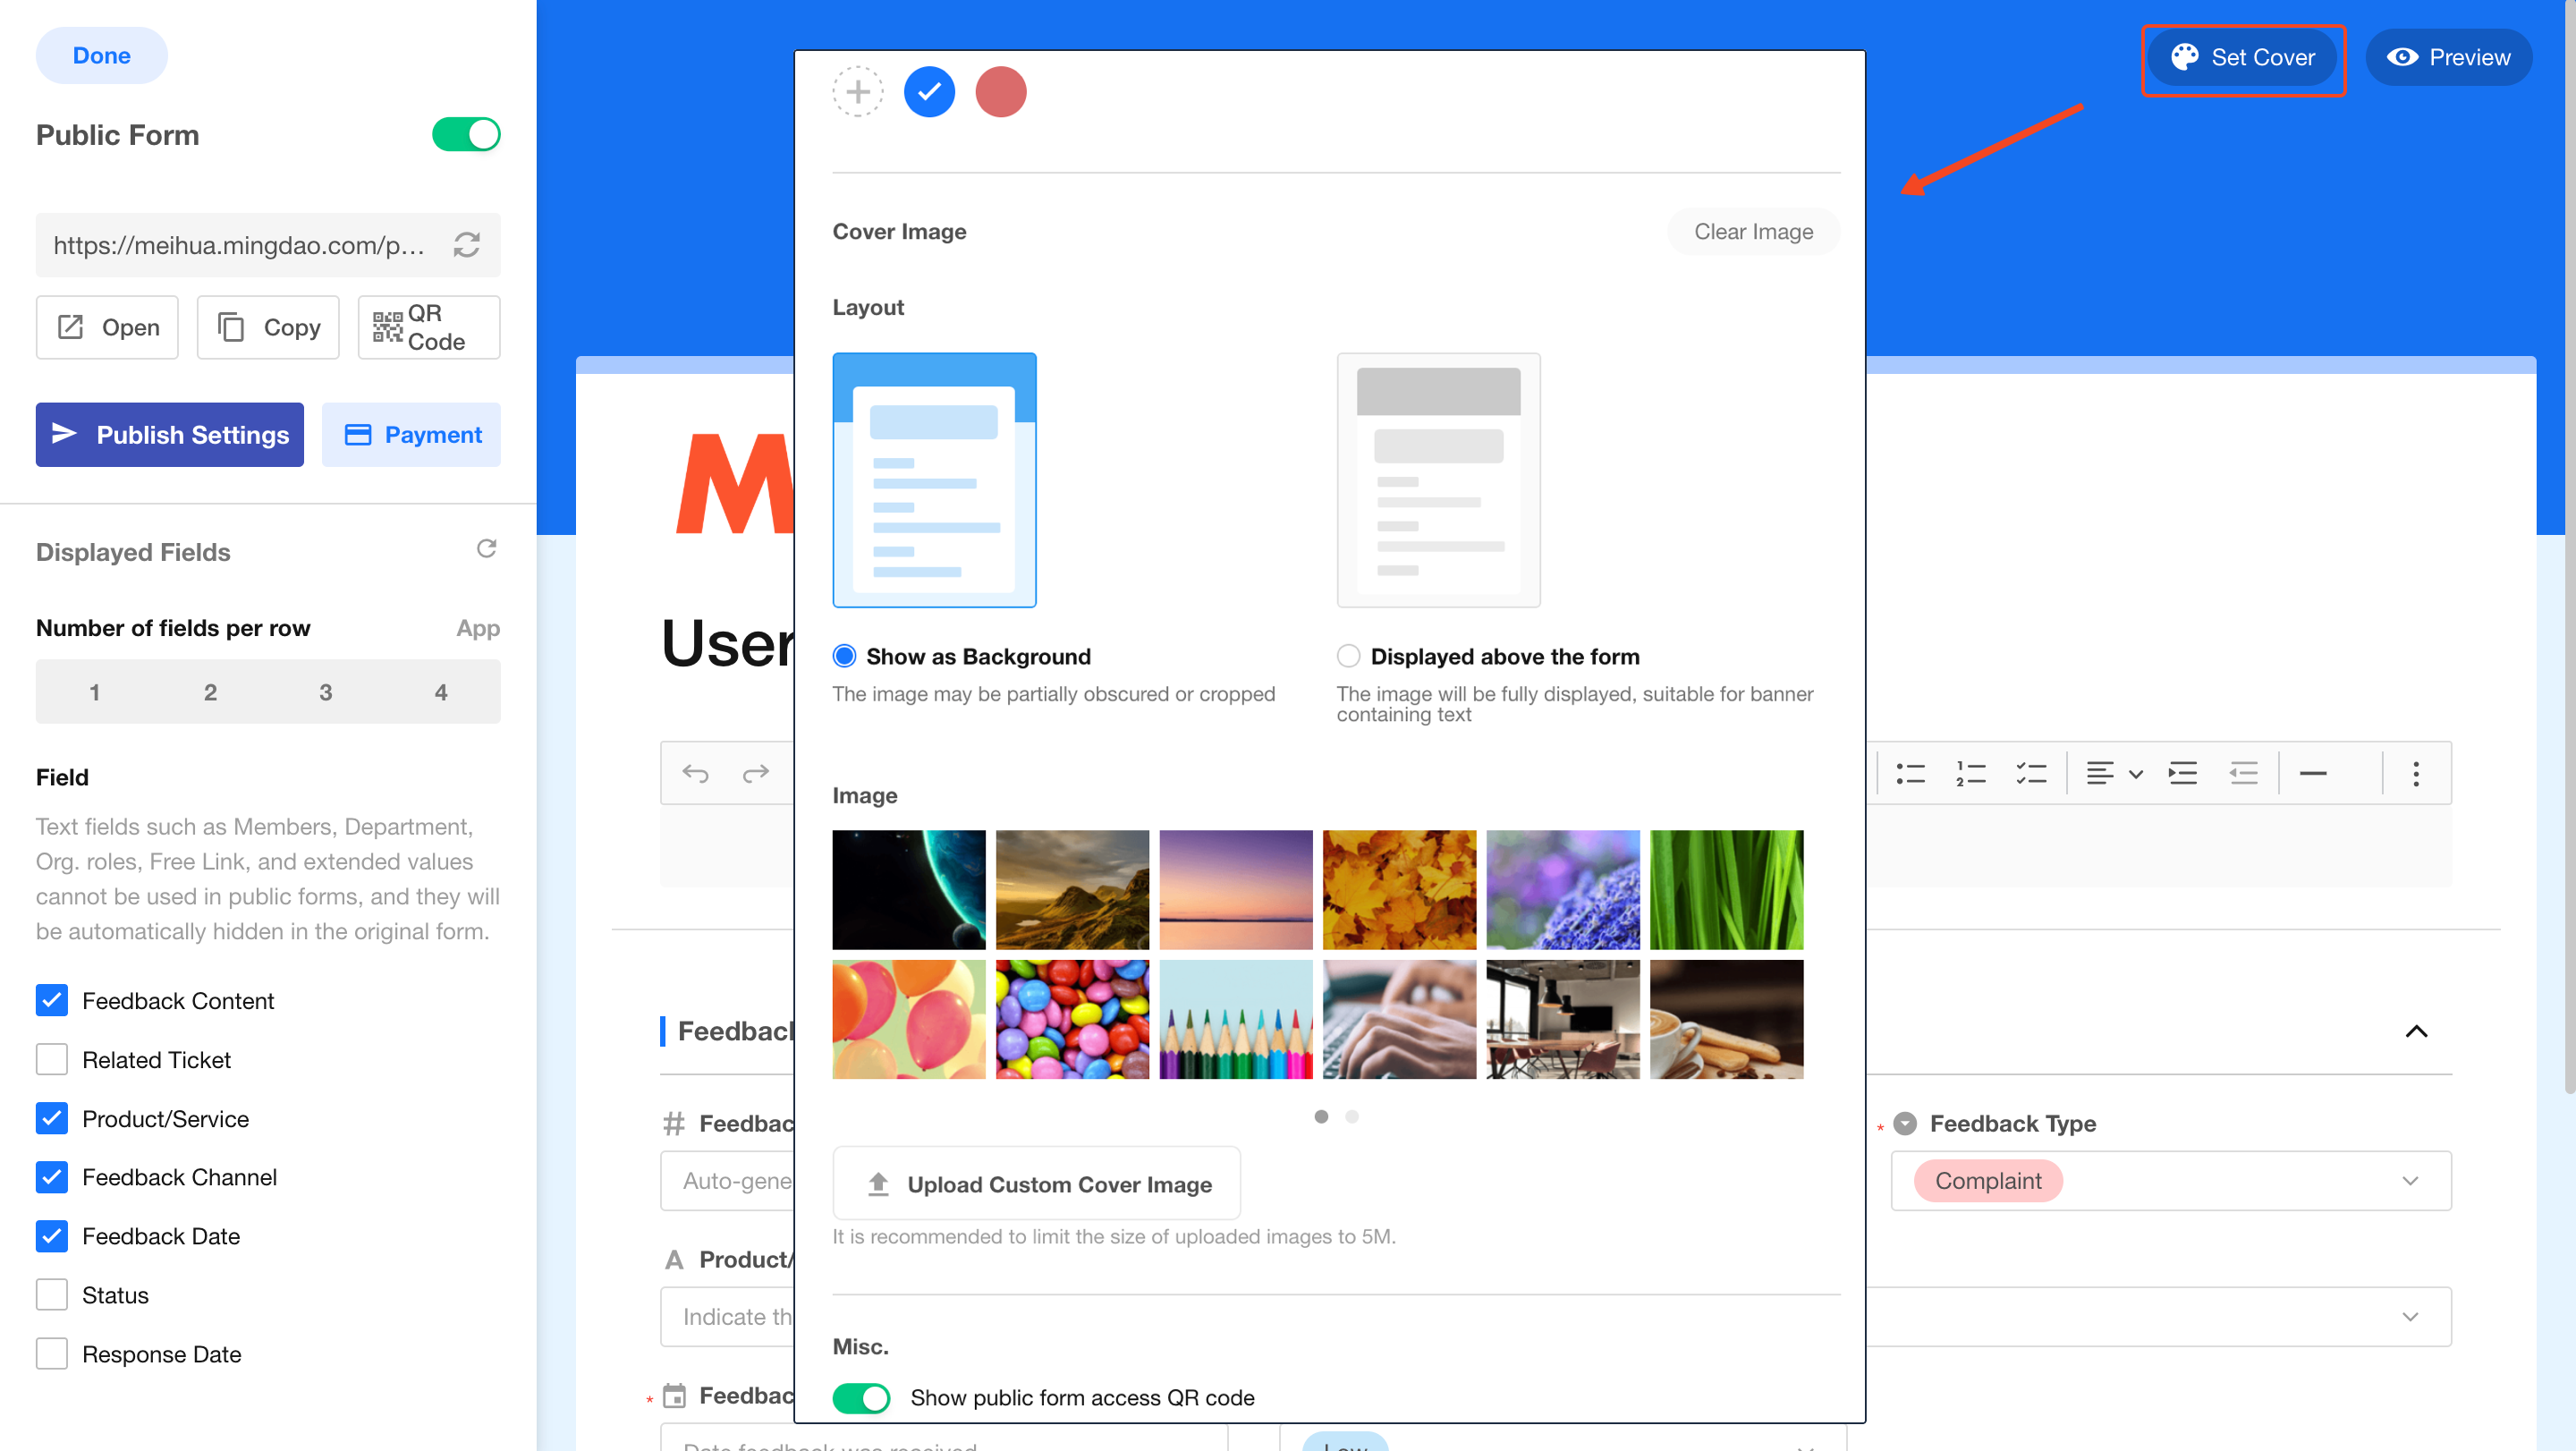
Configure the Form Cover
Customize the theme color and background image, and choose whether to display a QR code on the public form.
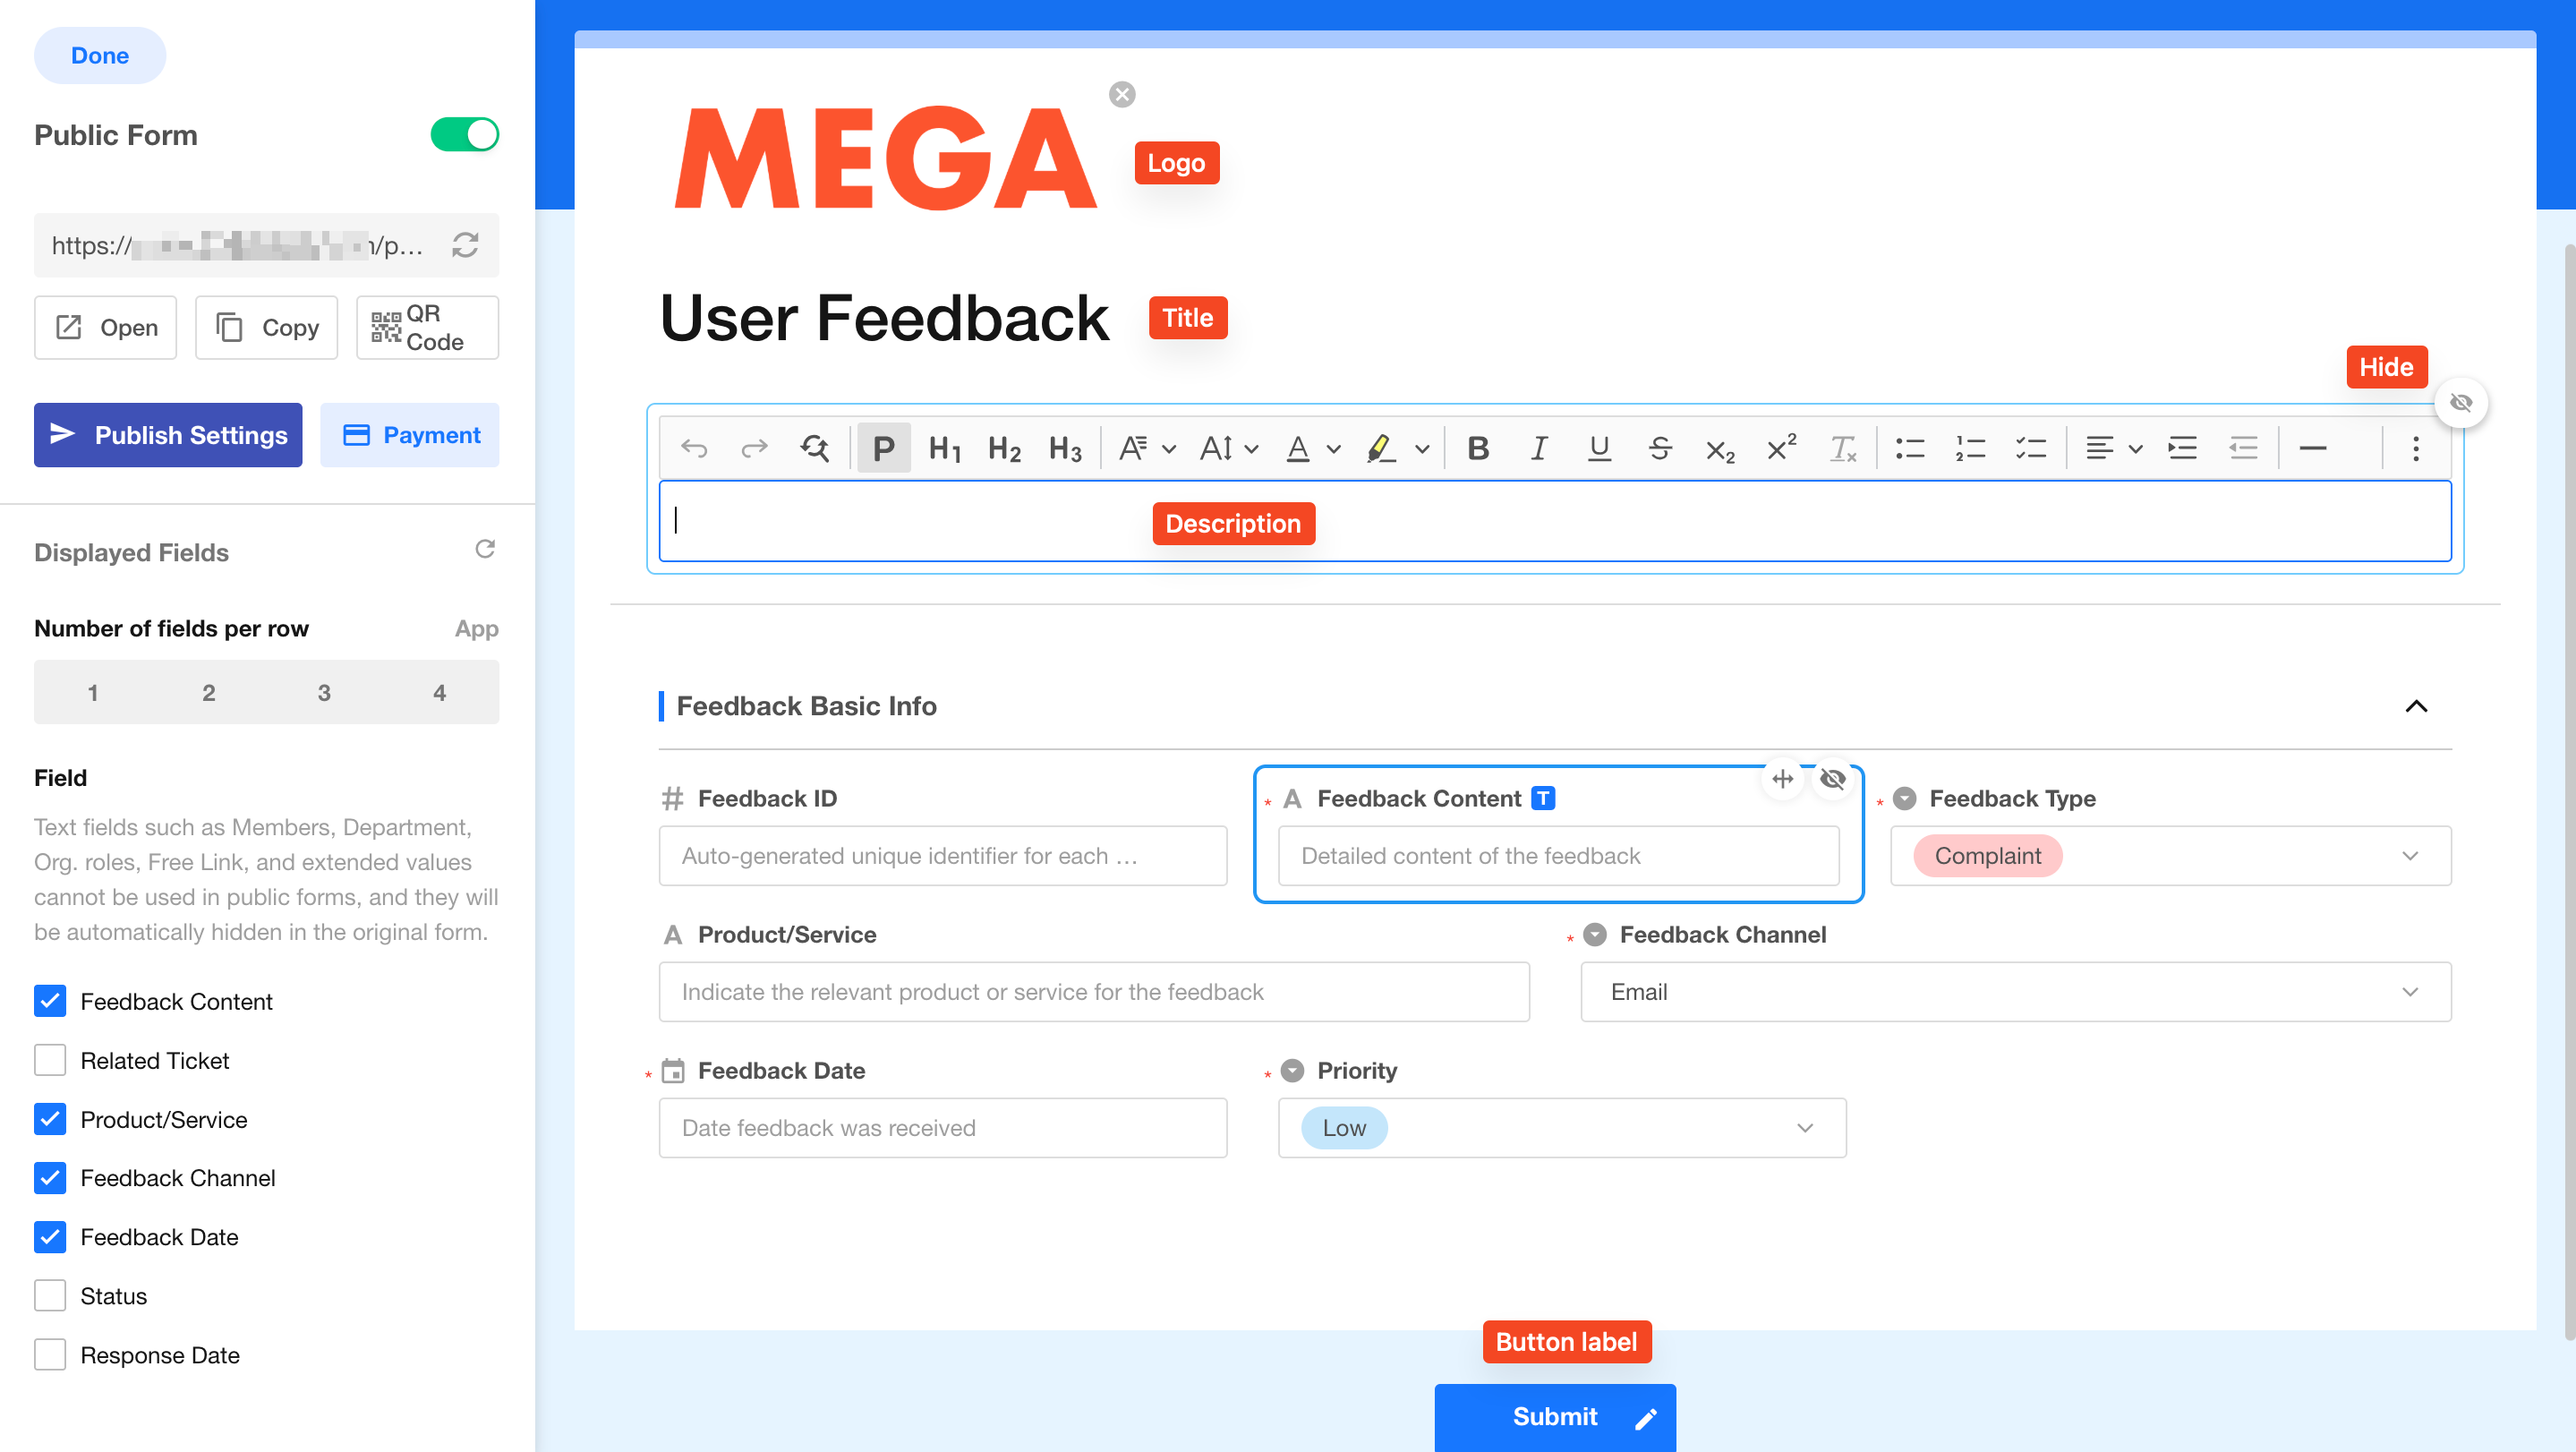
Select Fields to Collect
- Add the required worksheet fields to the public form.
- Drag and drop fields to adjust their layout. Field positions in the public form are independent of the worksheet form design.
- Quickly arrange the layout by configuring the number of fields per row.
- Configure field width ratios individually.
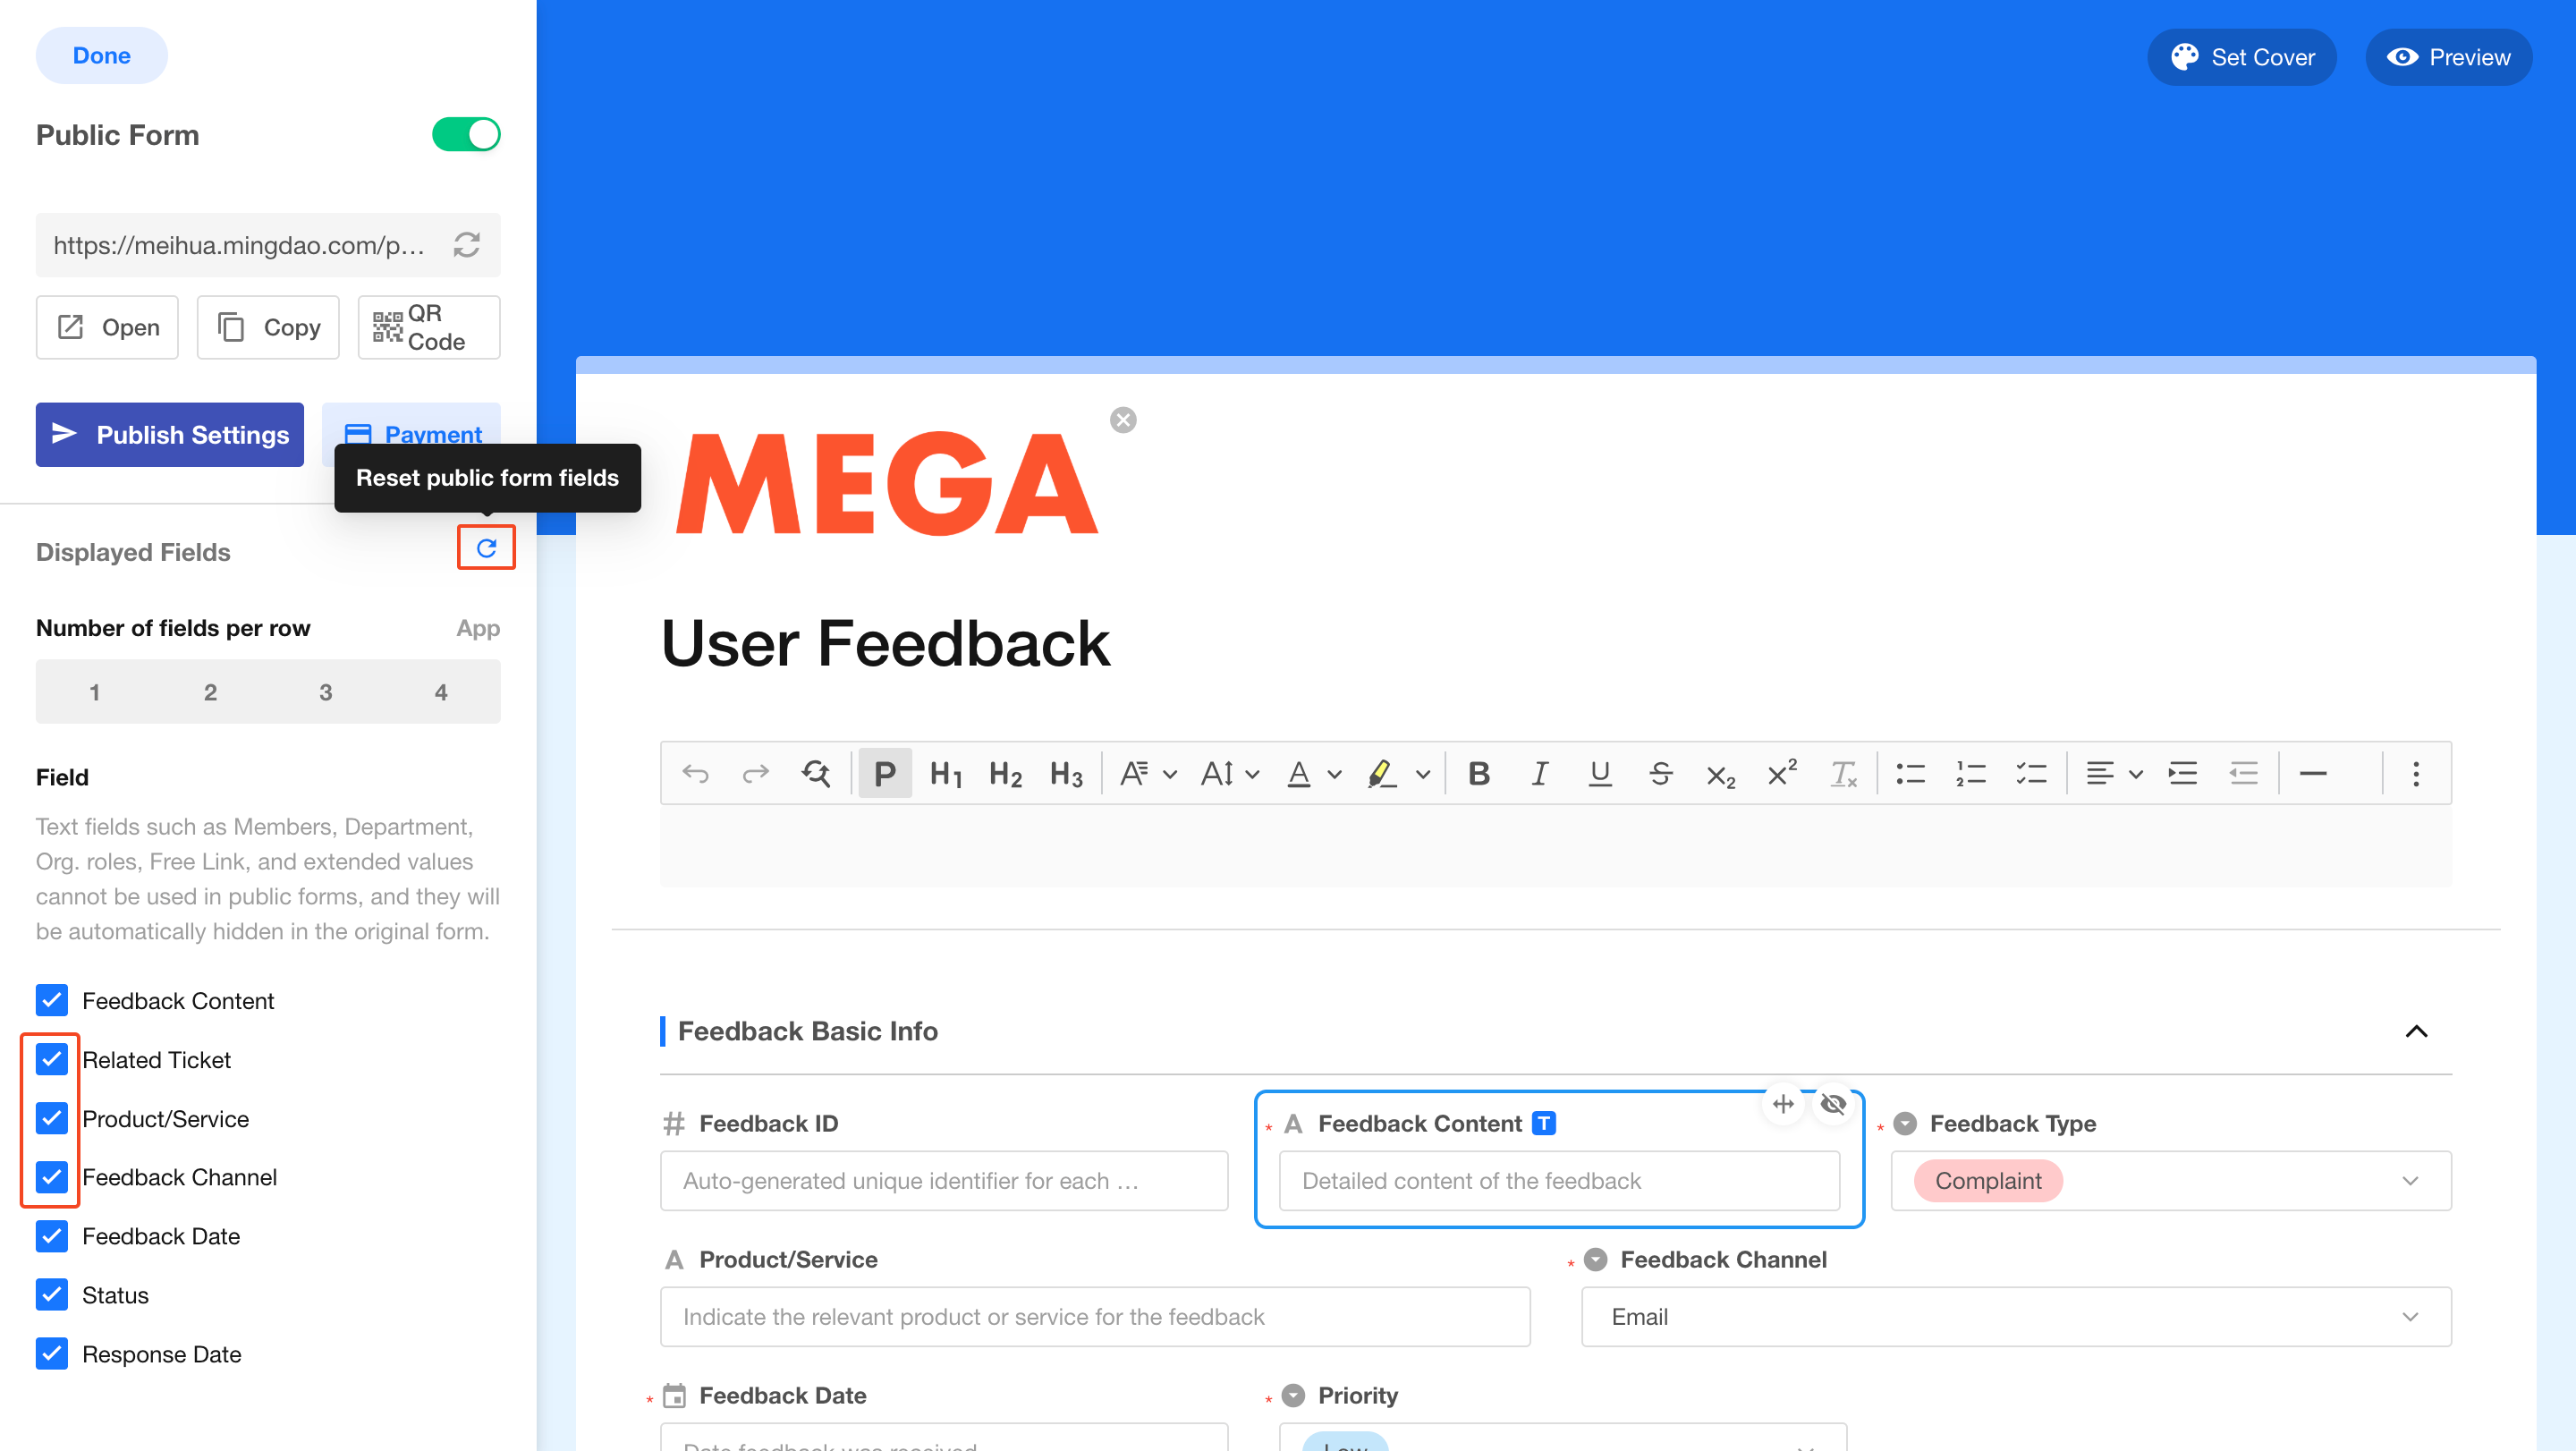
- Click Reset to restore the original layout. Any customized field visibility and sorting settings will be cleared.
- System fields cannot be exposed publicly: Member, Department, Organization Role, and similar system fields cannot be displayed in public forms.
- File upload limit: Each uploaded file can be up to 64 MB.
Get the Public Link and QR Code
After configuration is complete, copy the public link or download the QR code to share the form with respondents.
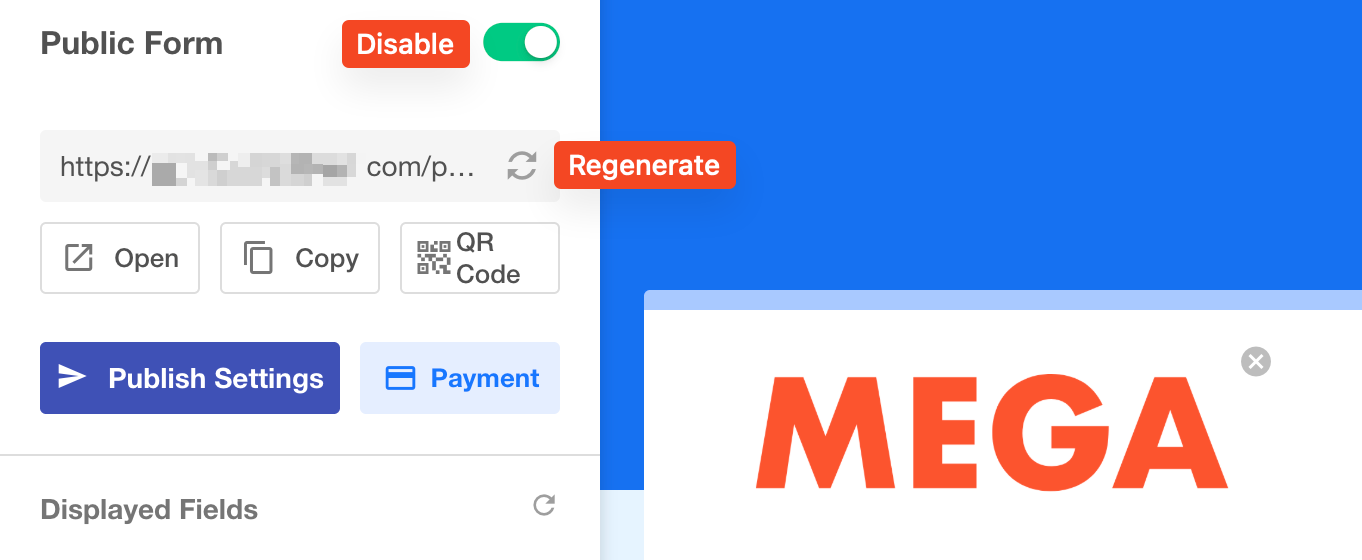
Disable or Regenerate the Link
- Disable Public Form: Data can no longer be submitted through the existing link or QR code.
- Regenerate Link: The previous link becomes invalid, while all collected data is retained.
Configure Data Collection Restrictions
Configure submission restrictions such as who can access the form, submission periods, collection limits, submission frequency limits, passwords, and verification methods.
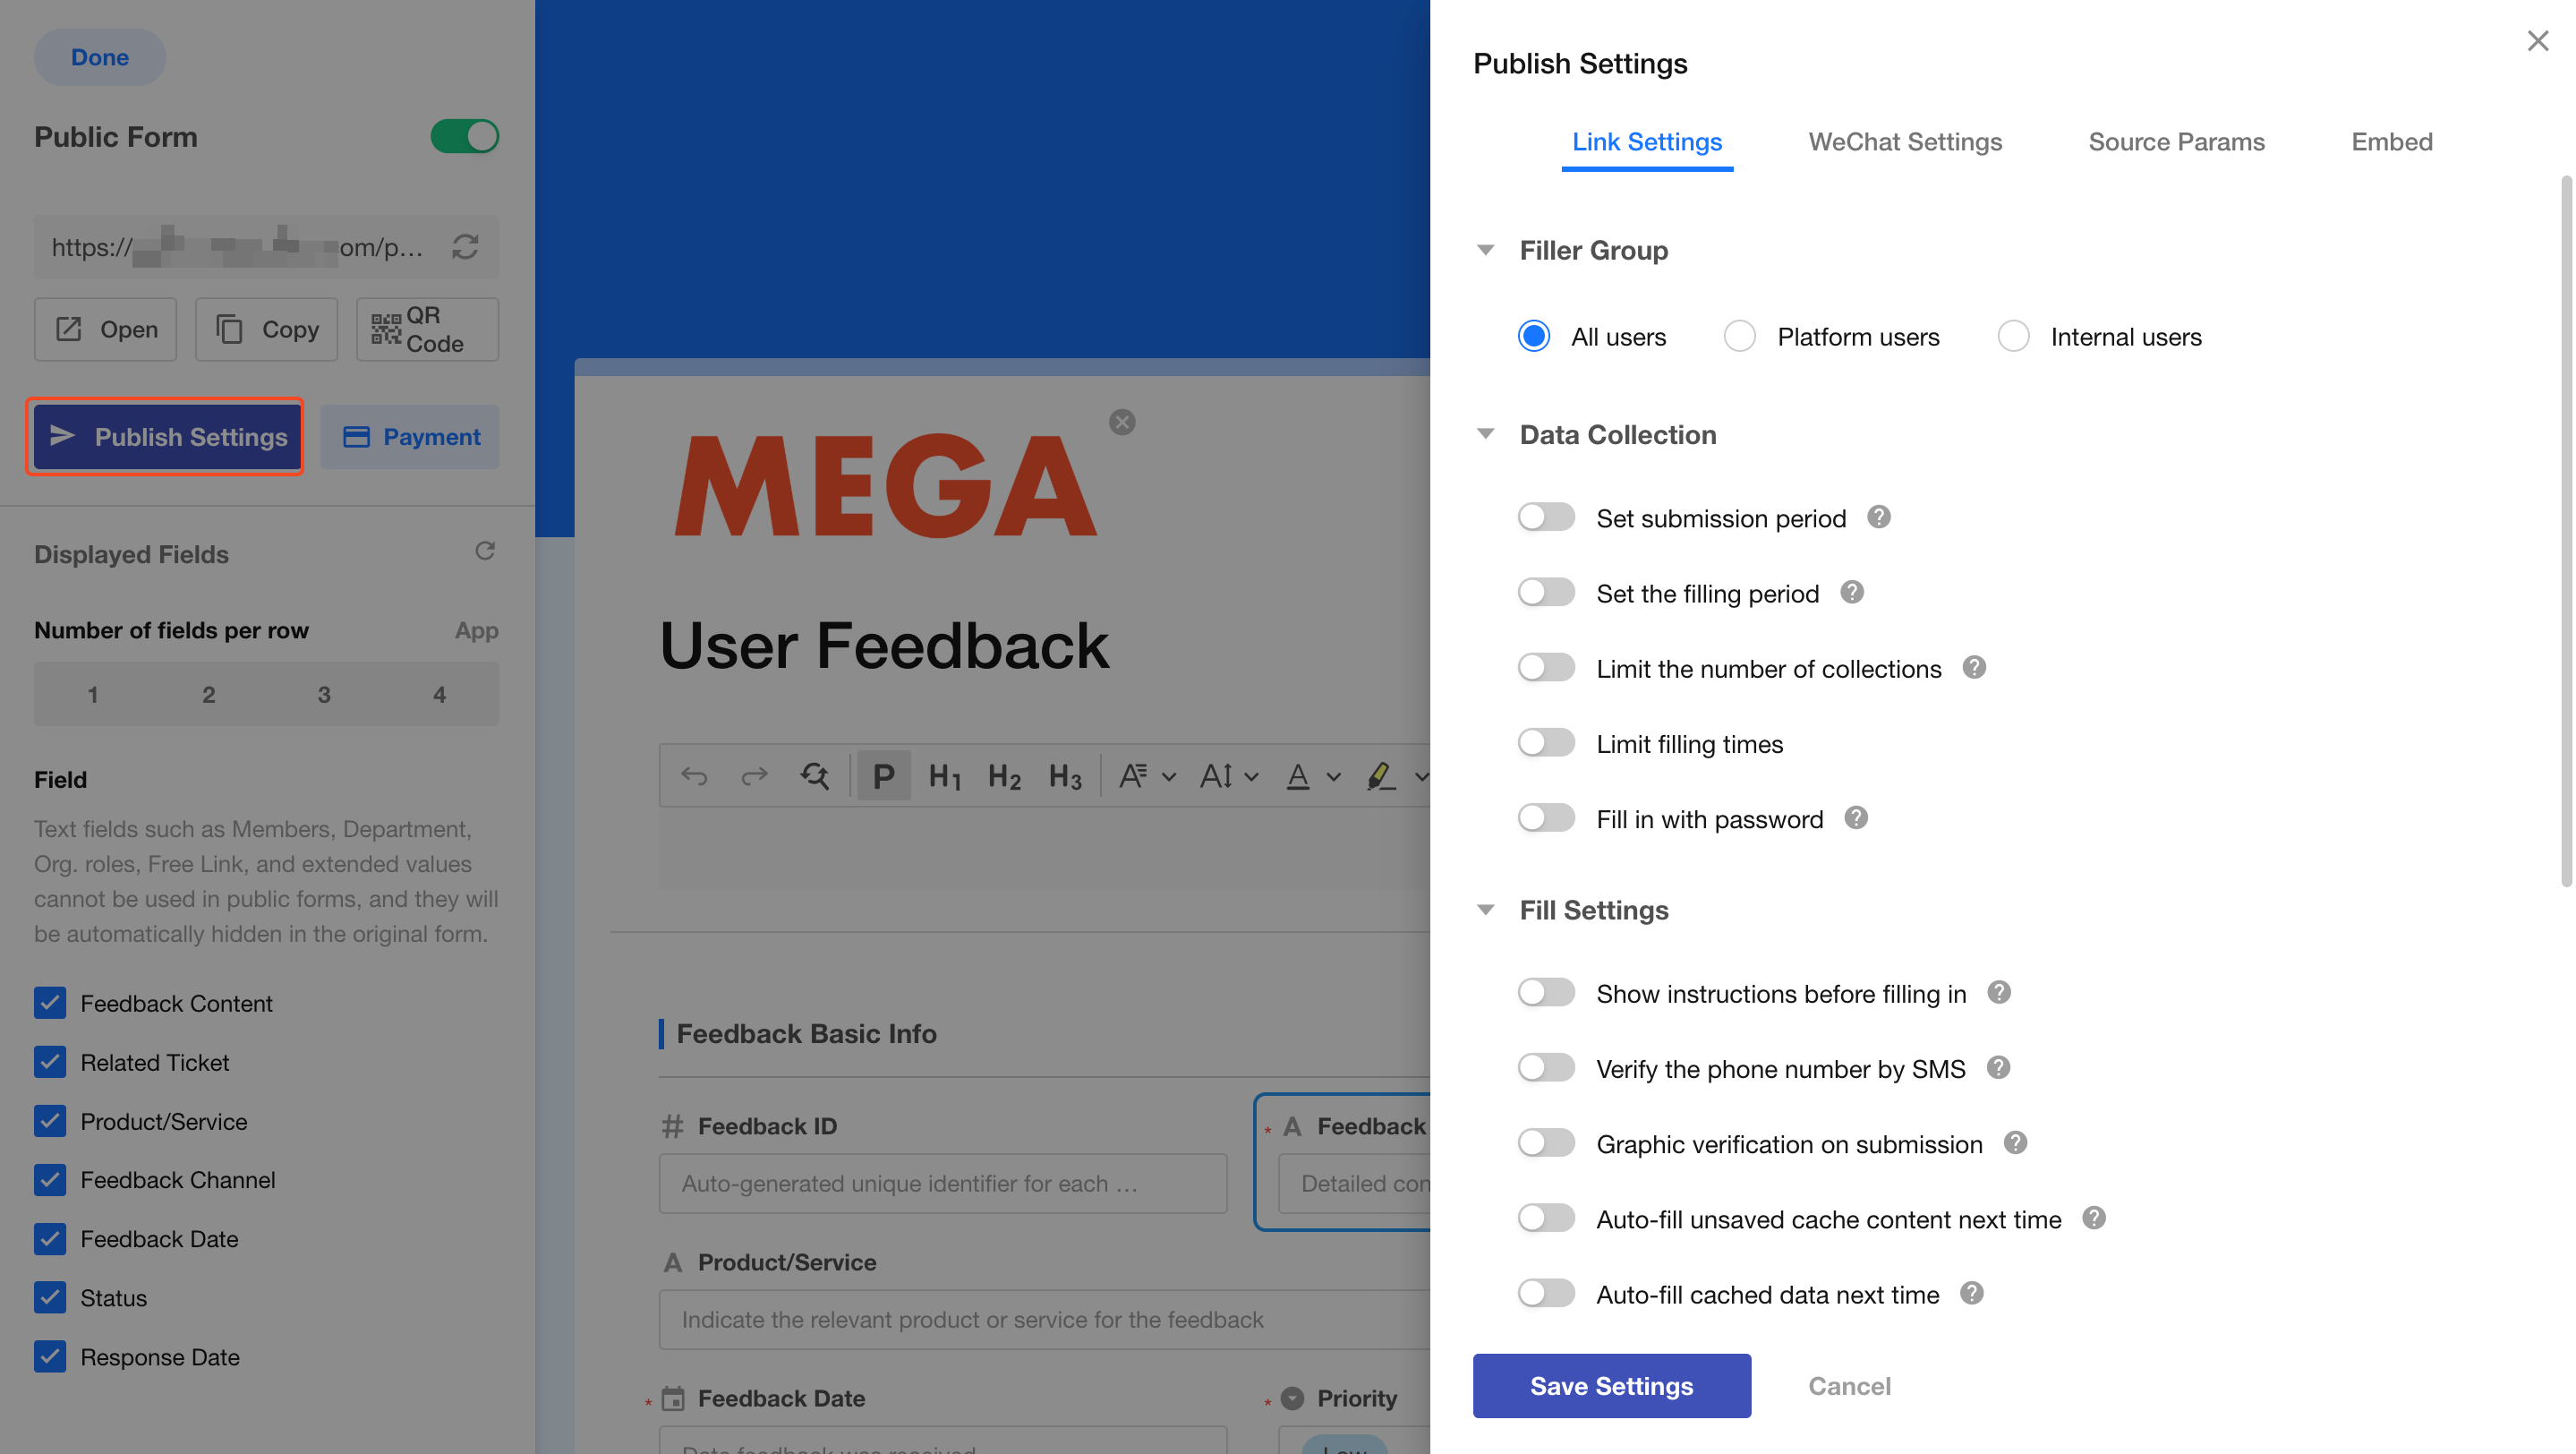
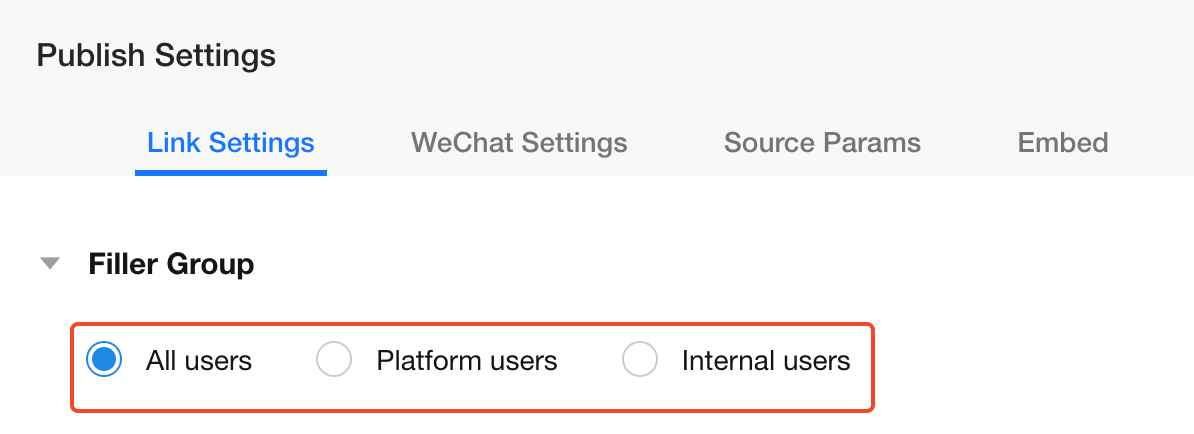
Restrict Who Can Submit the Form
- All users: Users can submit the form without logging in.
- Platform users: Only registered HAP users can submit the form (login required).
- Internal users: Only users who belong to the current organization can submit the form (login required).
Restrict When the Form Can Be Submitted
Submission Start and End Time
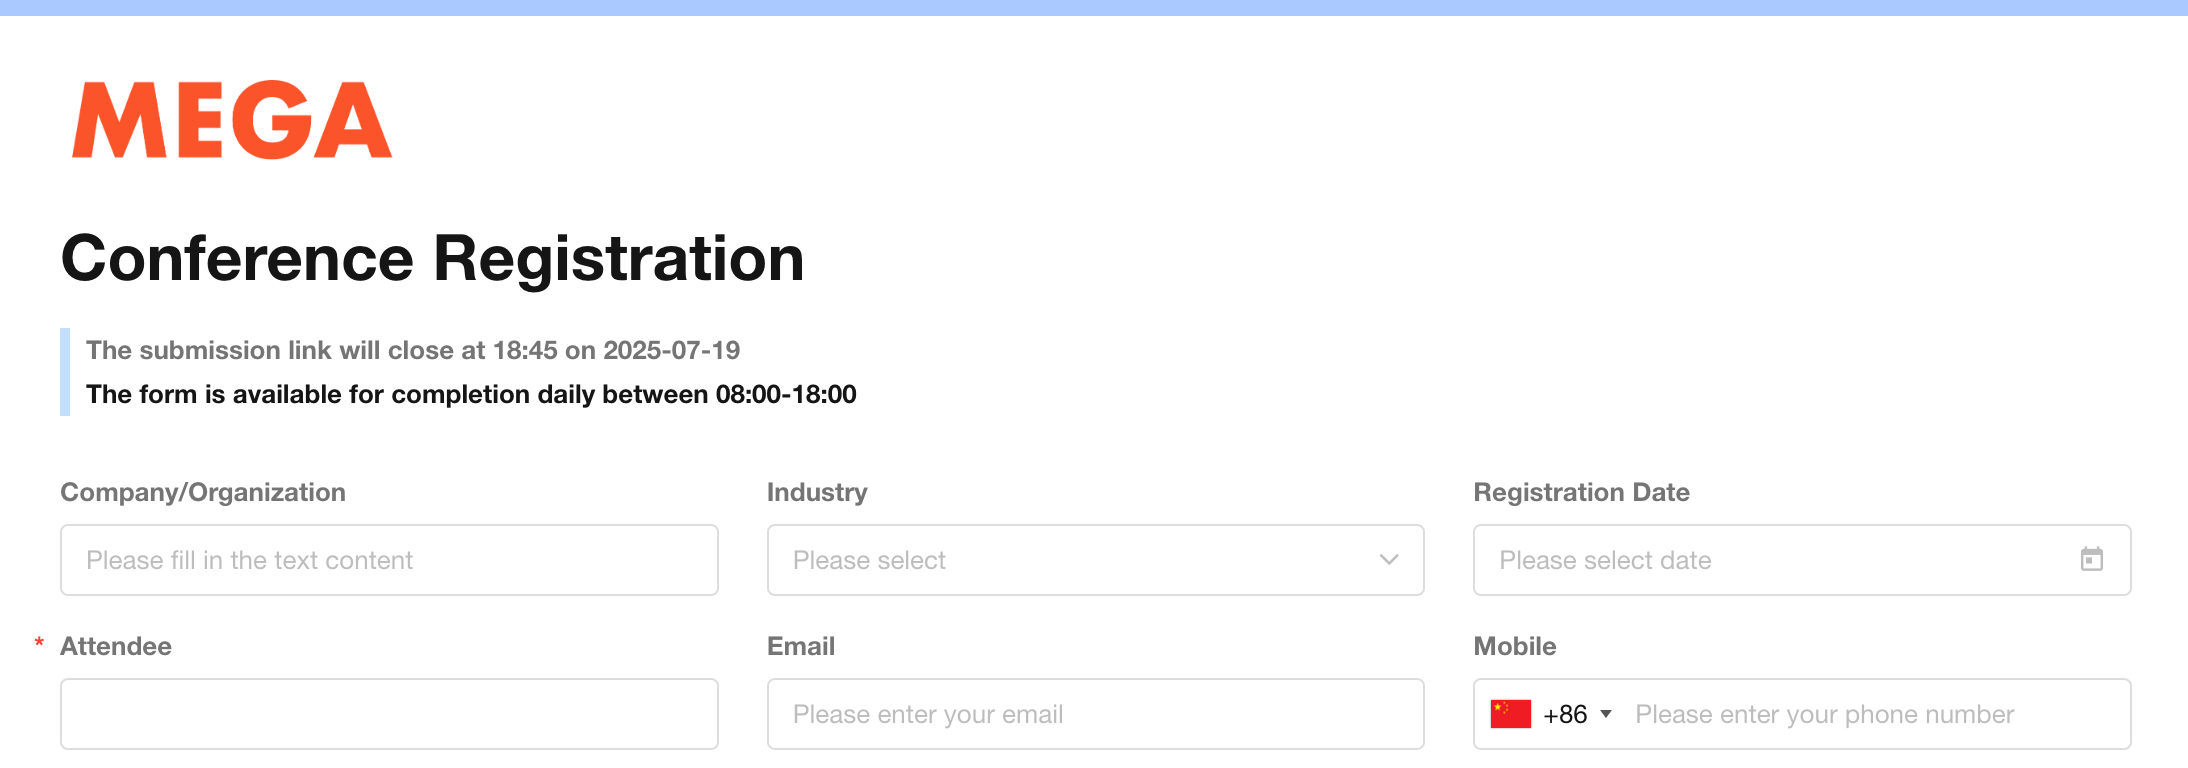
Specify a time range during which submissions are allowed. Outside this period, a notification message is displayed on the form page.
Countdown Display
When Show Countdown is enabled, the page displays a message such as:
Collection ends in 3 days, 2 hours, and 17 seconds
When disabled, the page displays a specific deadline, such as:
Collection closes on 2023-08-10 20:00
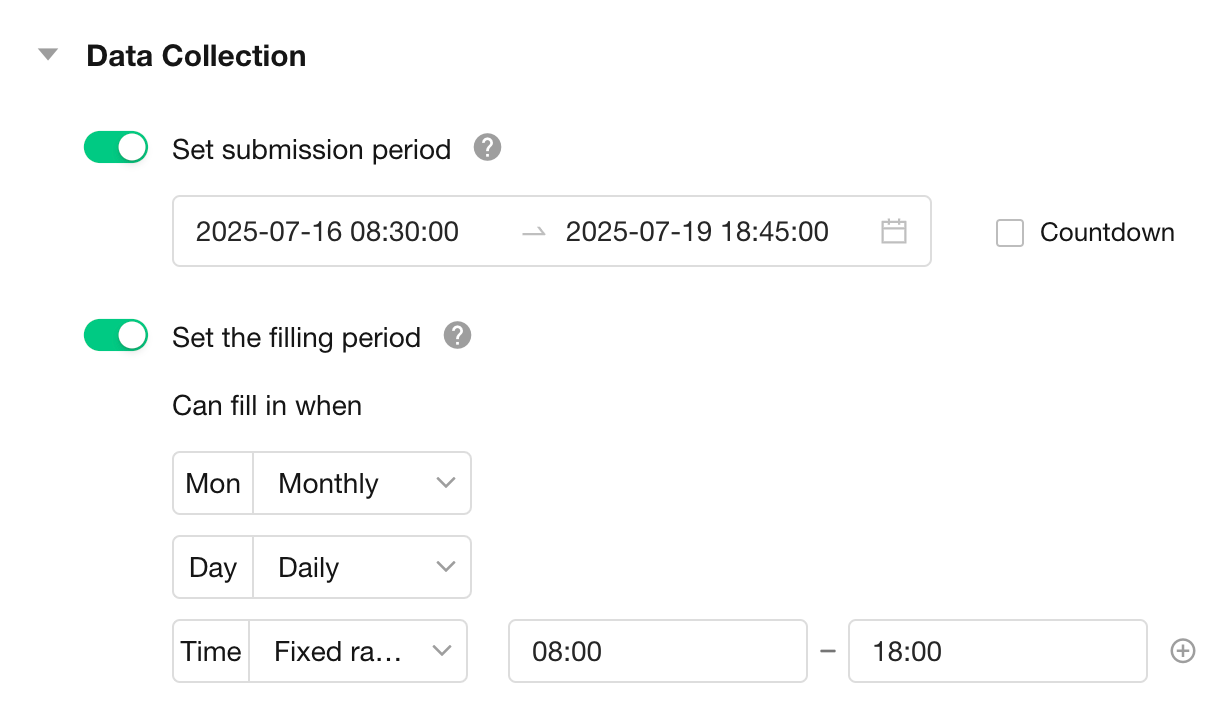
Restrict by Schedule
Define submission windows based on months, dates, weekdays, or specific time ranges.
These two restriction methods can be used together.
Example message displayed on the form page:
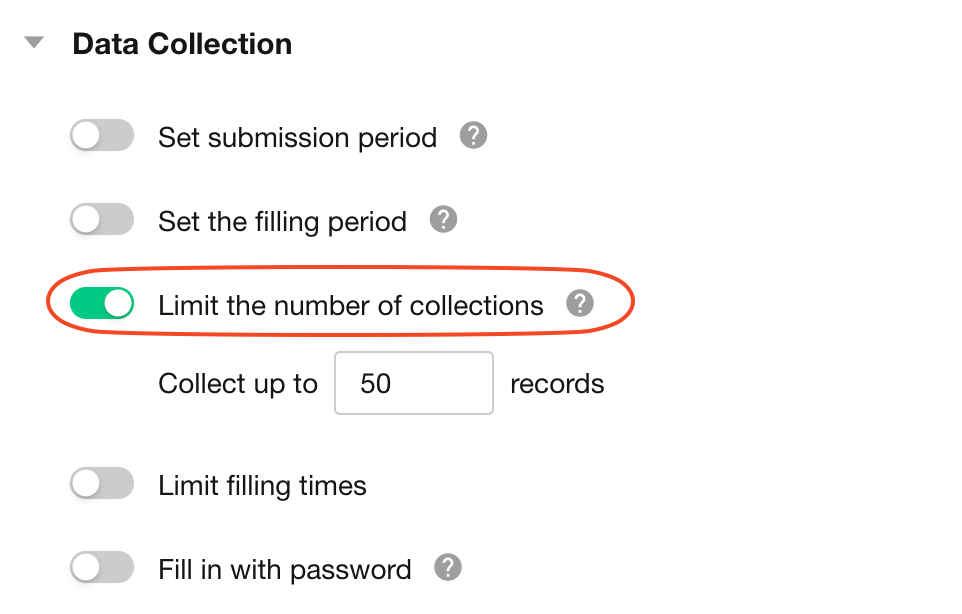
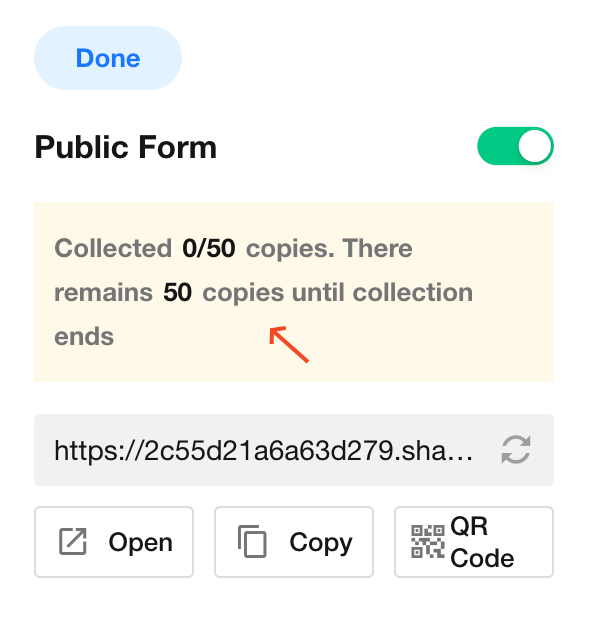
Limit the Number of Responses Collected
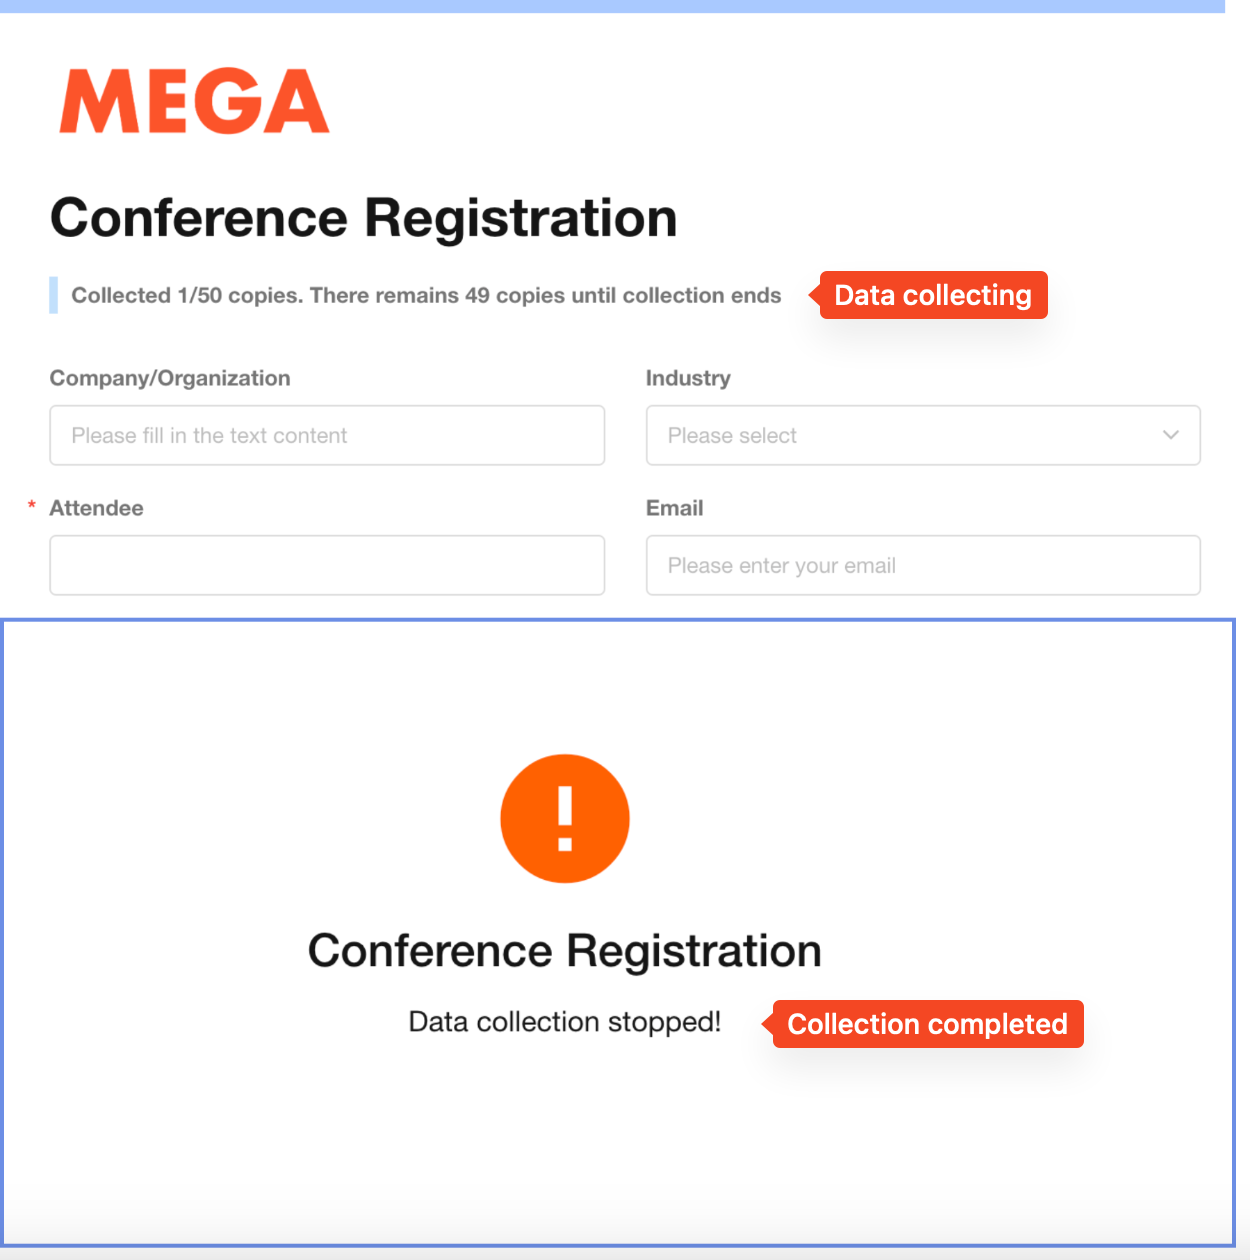
Set a maximum number of responses. Once the limit is reached, the form will stop accepting submissions.
Only responses collected through the public form are counted. Records created directly within the application are not included.
Message displayed when the limit is reached:
Application administrators can view collection progress on the configuration page:
Limit the Number of Submissions per User
You can limit how many times each respondent may submit the form per day, week, month, or year. By default, there is no limit.
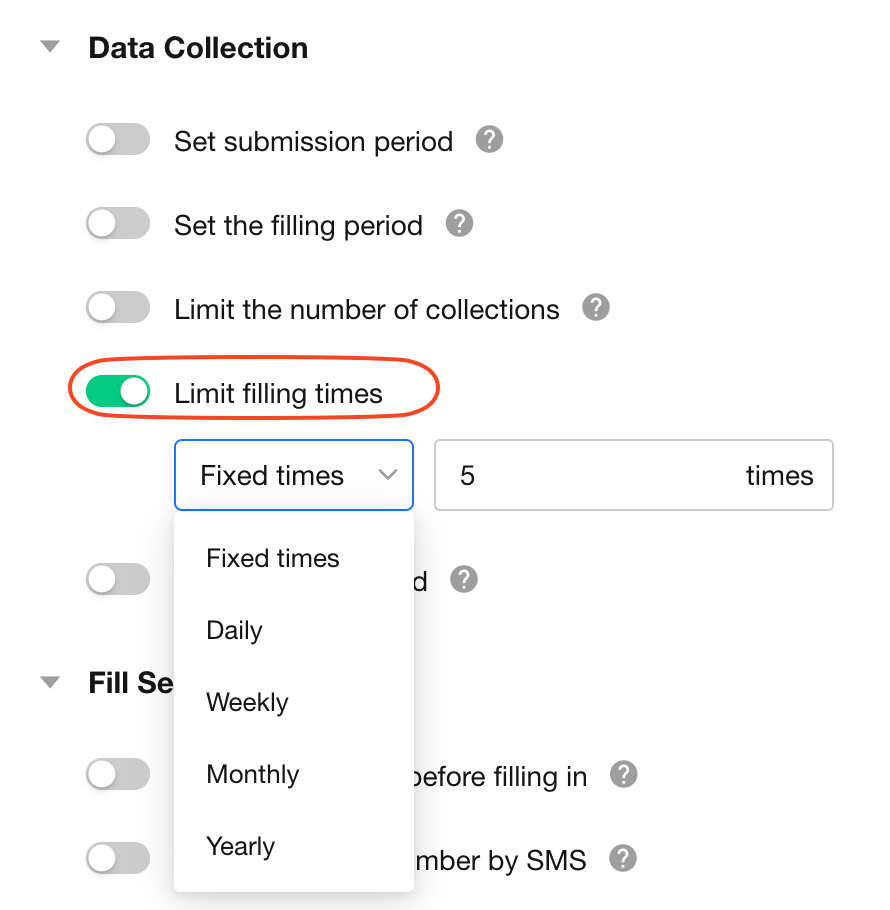
For public forms that are available to all users and do not collect WeChat identity information, submission limits are enforced based on device cache. For logged-in platform users or forms that collect WeChat identity information, limits are enforced based on user identity.
Set a Password
A random four-digit password is generated by default and can be customized. Respondents must enter the password before they can access the form.
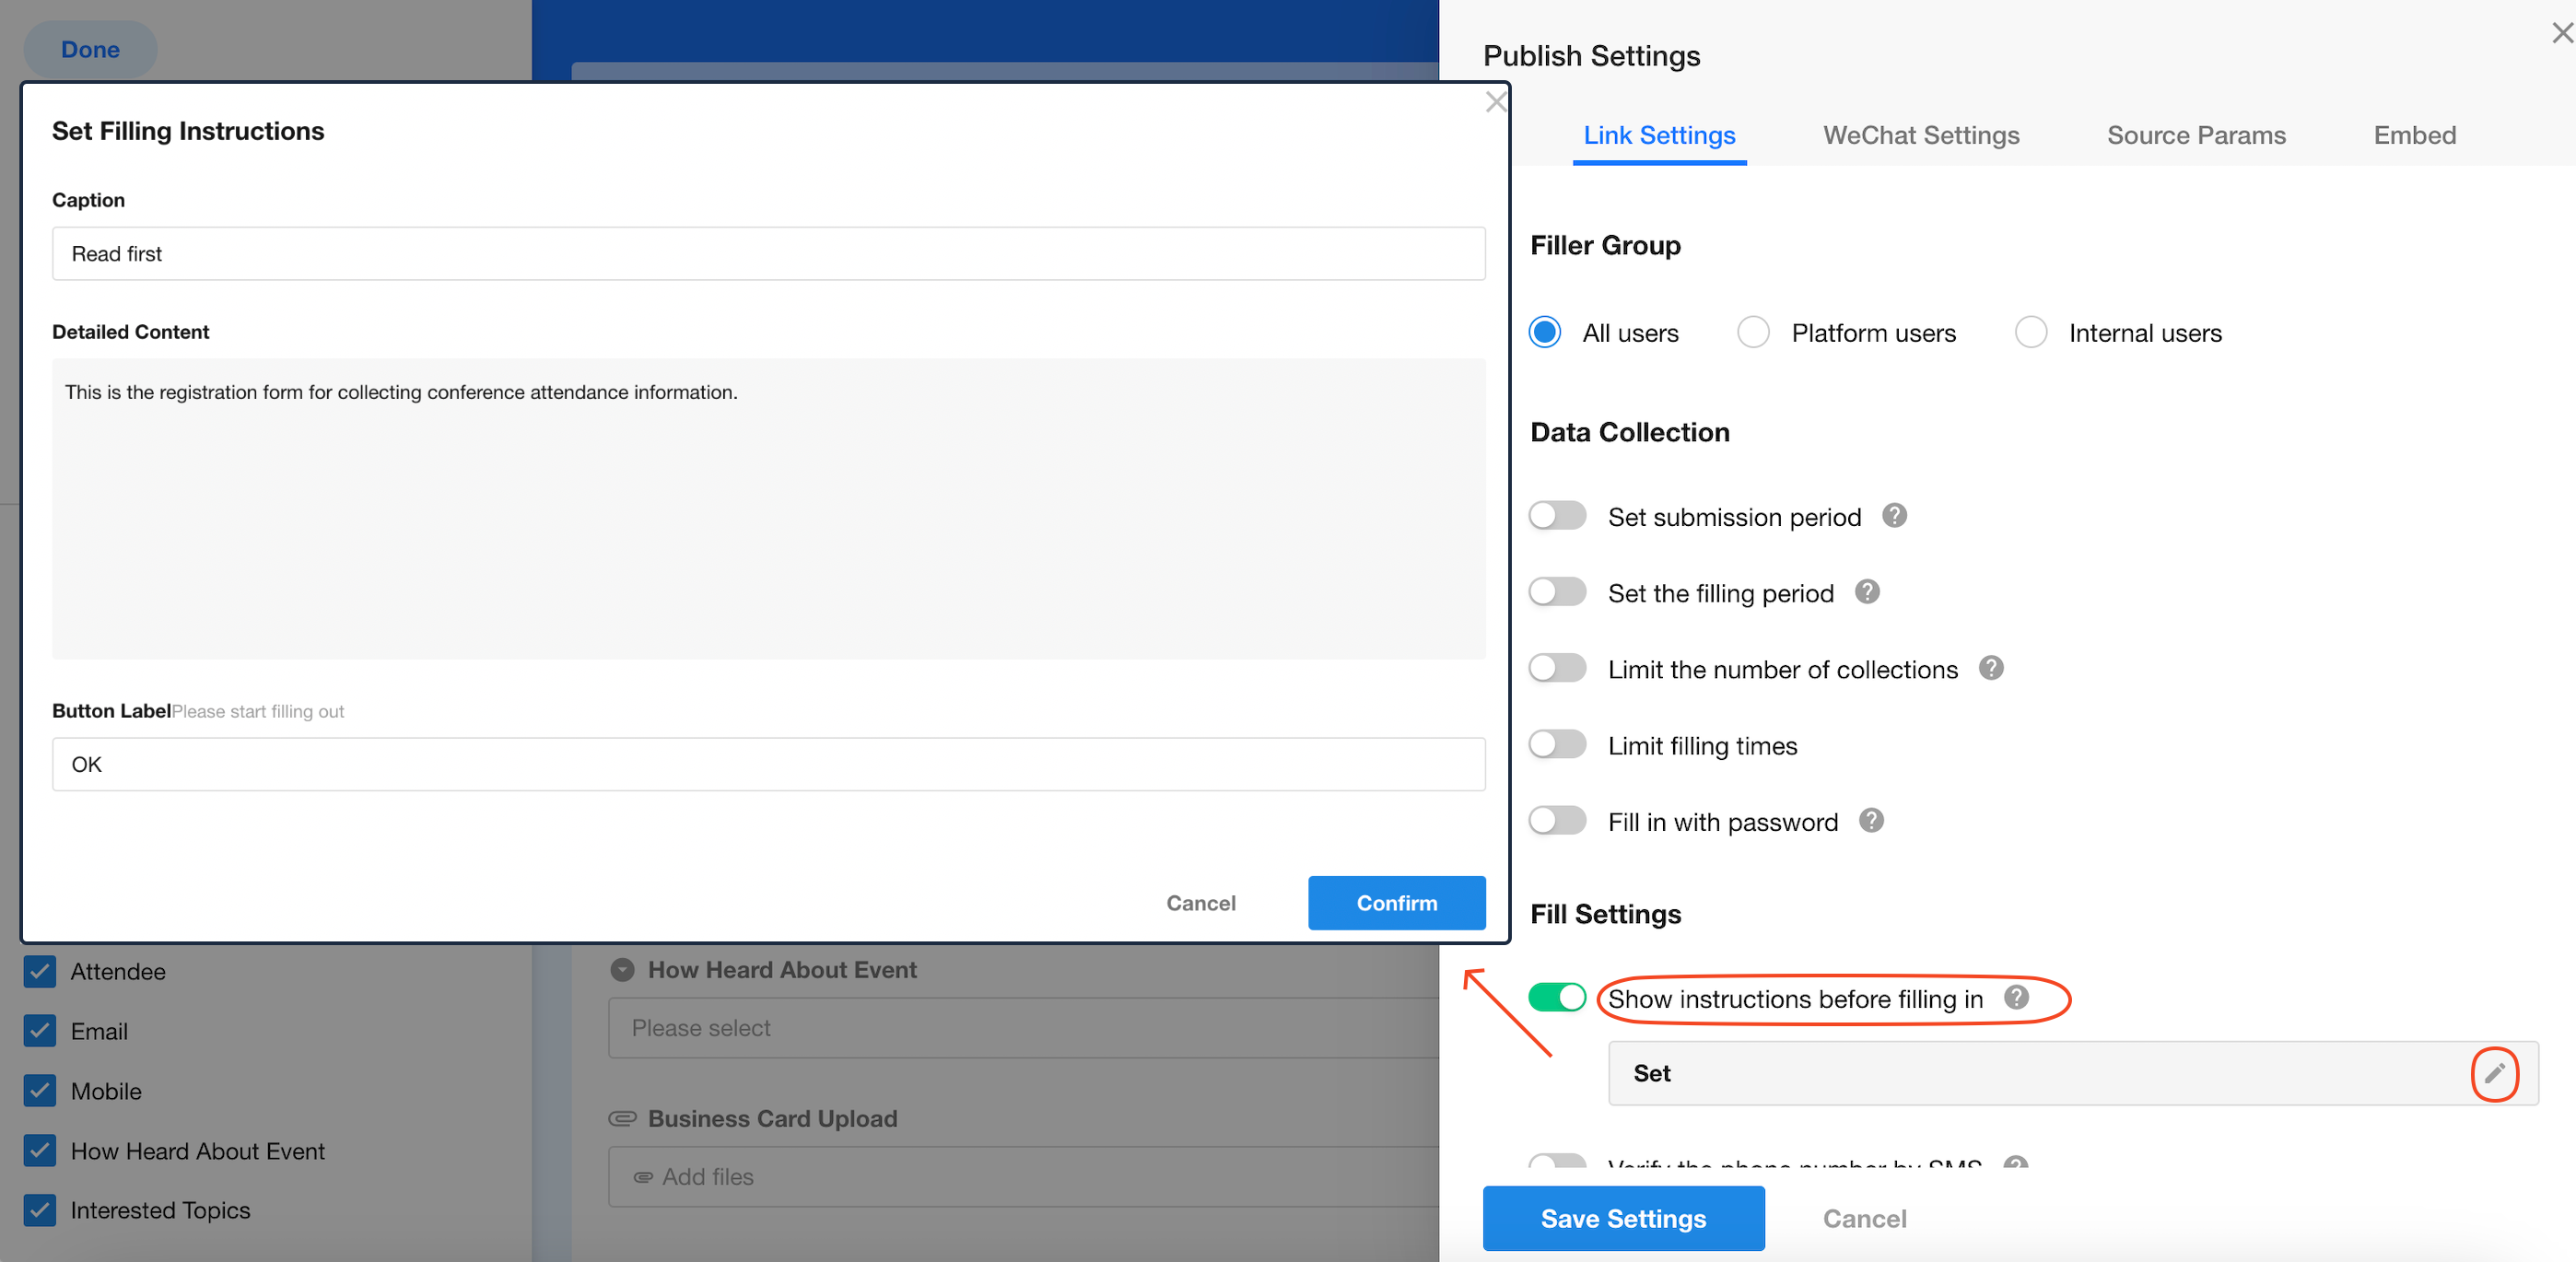
Display a Description Before Form Submission
Configure instructions or information to display before users start filling out the form.
What respondents see:

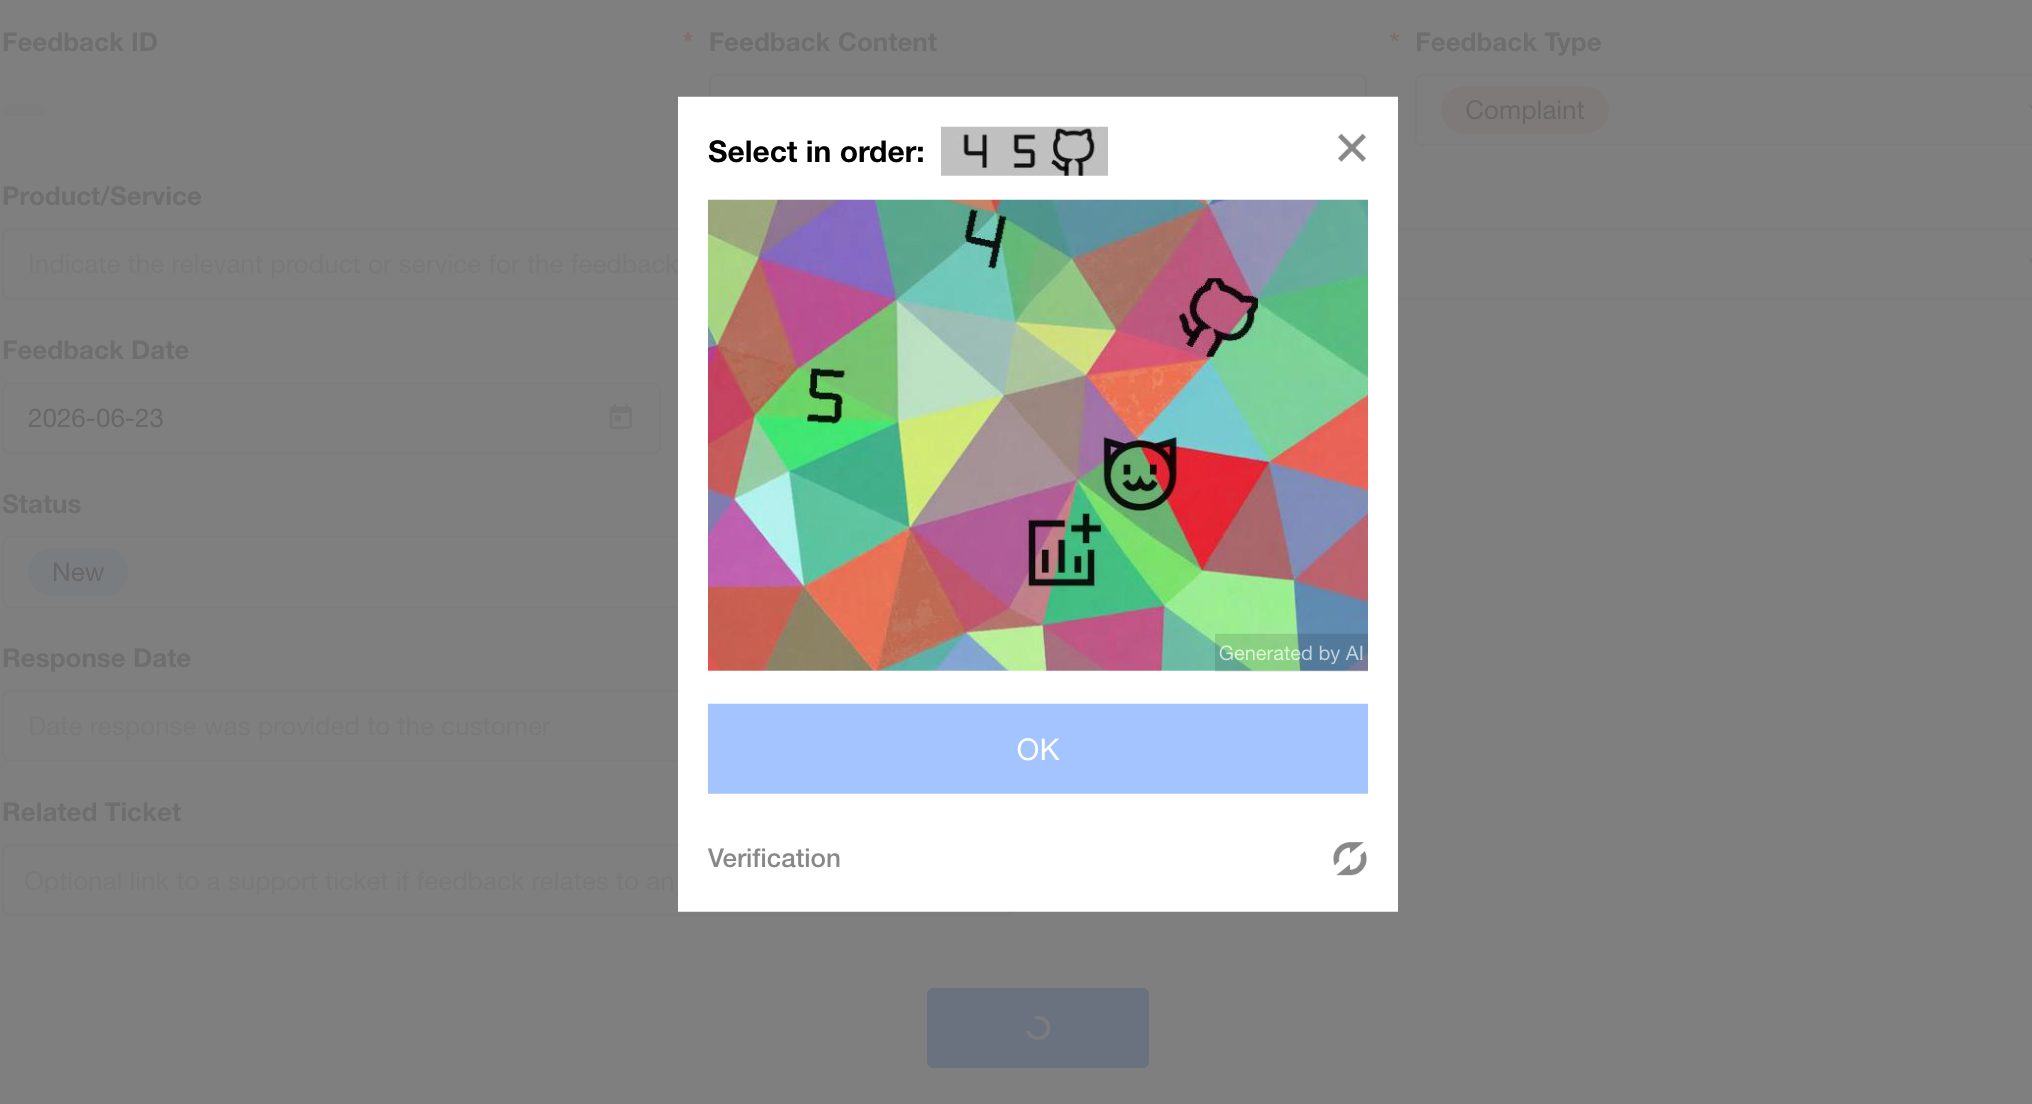
SMS Verification and CAPTCHA Verification
To prevent spam and malicious submissions, two verification methods are available:
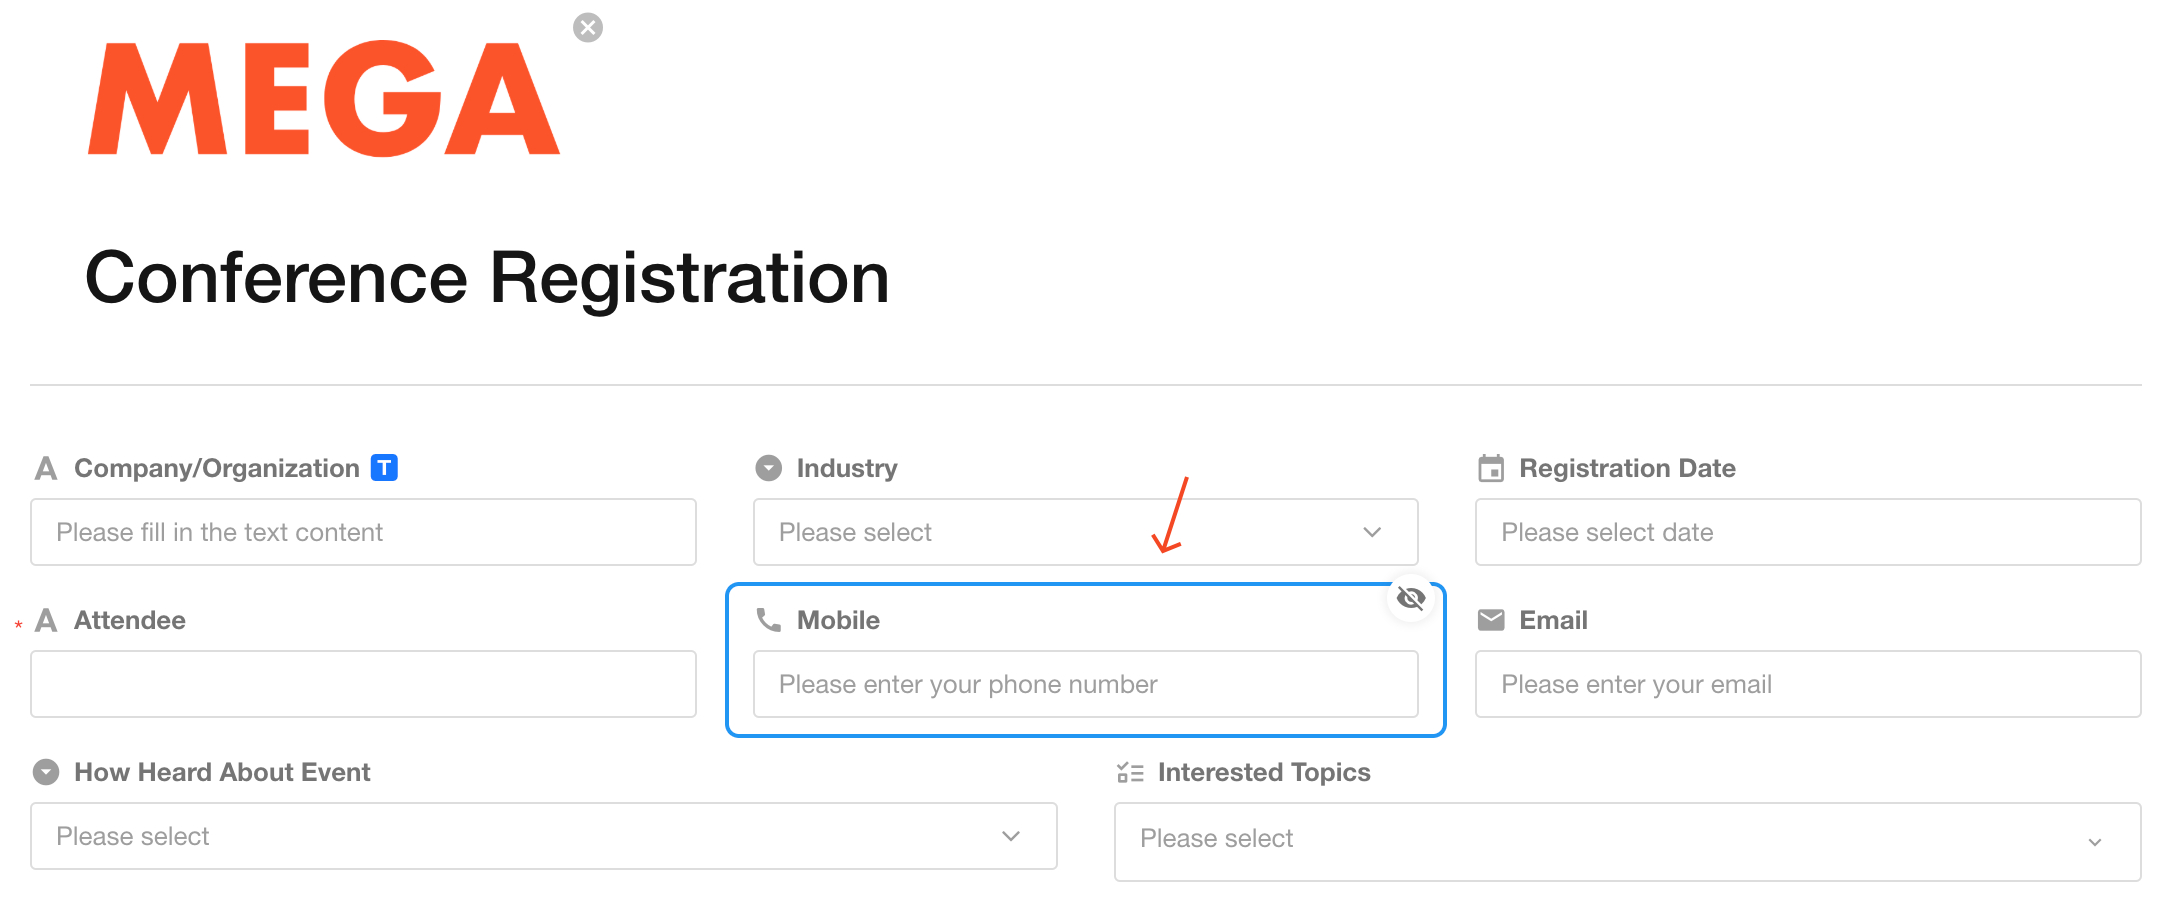
SMS Verification
Once enabled, if the form contains a mobile number field, respondents must enter a verification code and verify their phone number before submitting the form. The signature can be customized.
CAPTCHA Verification
Once enabled, respondents must complete a puzzle CAPTCHA before the form is submitted.
When both verification methods are enabled:
SMS verification is performed first, followed by CAPTCHA verification. If SMS verification is enabled but the form does not contain a mobile number field, SMS verification is skipped automatically.

Cached Data
You can cache both unsubmitted form data and previously submitted data. This feature relies on browser storage. Clearing the browser cache will remove all cached data.

- Cache Unsubmitted Data: If a user leaves the form before submitting it, previously entered values are automatically restored when the form is reopened.
- Cache Submitted Data: Useful for forms that require repeated submissions with similar information. Previously submitted values are automatically populated each time the form is opened, allowing users to modify only the necessary fields before submitting. You can also choose to cache only specific field values.
If a field has a default value configured, cached data takes precedence over the default value.
Filling Out Forms in WeChat
When a form is opened in WeChat, the system can retrieve the respondent's OpenID, WeChat nickname, and profile picture. You can also customize the appearance of the share card displayed in WeChat.
Collect WeChat User Information
Collection Methods
User information must be obtained through a WeChat Service Account. You can use either the official HAP Service Account or your own connected Service Account.
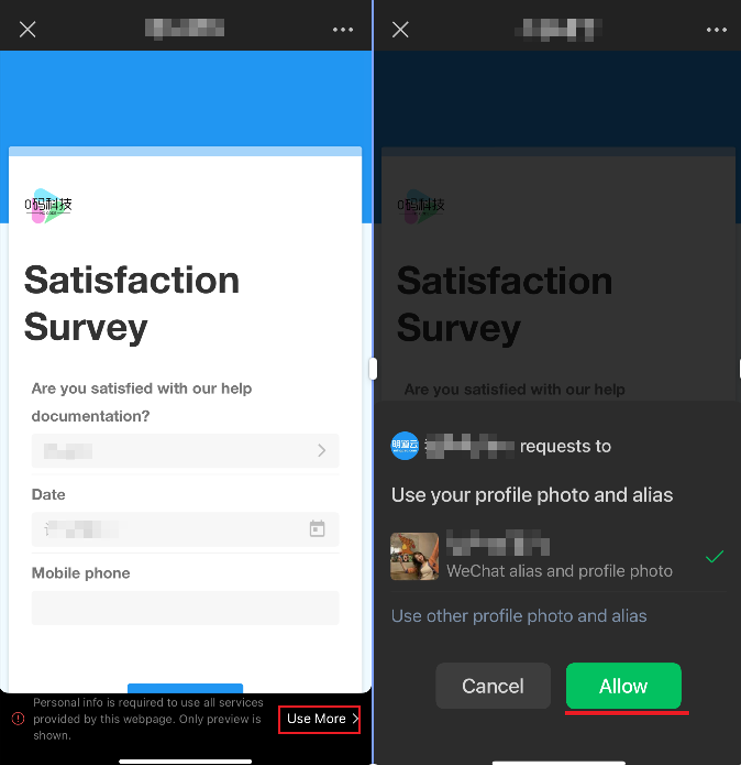
- Silent Authorization (no user interaction required): Retrieves only the OpenID.
- Authorized Access (user authorization required): Retrieves the OpenID, nickname, and profile picture.
- Fields selected to store WeChat information are hidden from the form page.
If you use your own connected WeChat Service Account, only silent OpenID collection is supported.
Authorization example:
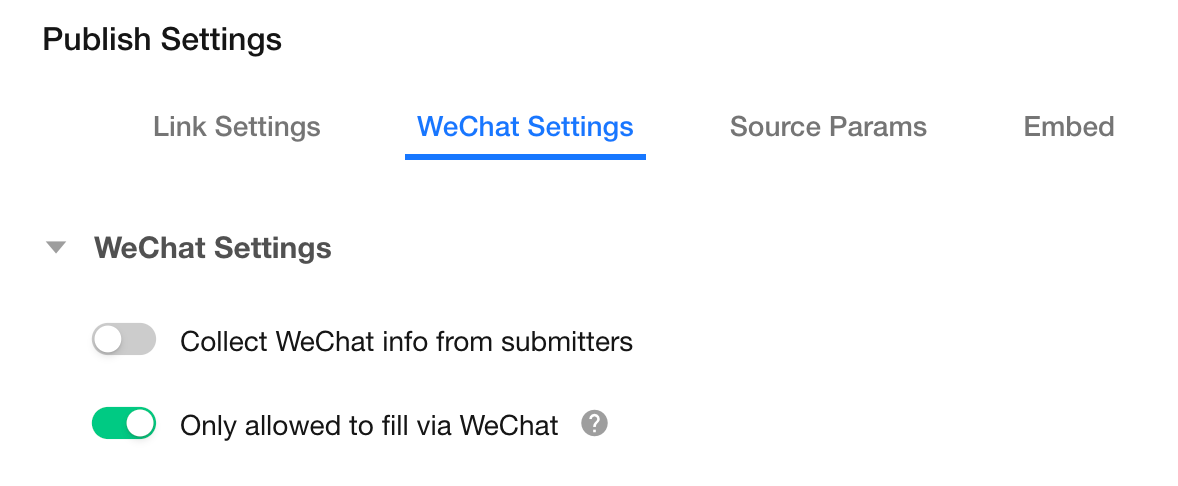
Allow Form Submission Only in WeChat
When enabled, the form link can only be opened in WeChat. Users opening the link from other apps will see a notification and will not be able to submit the form.

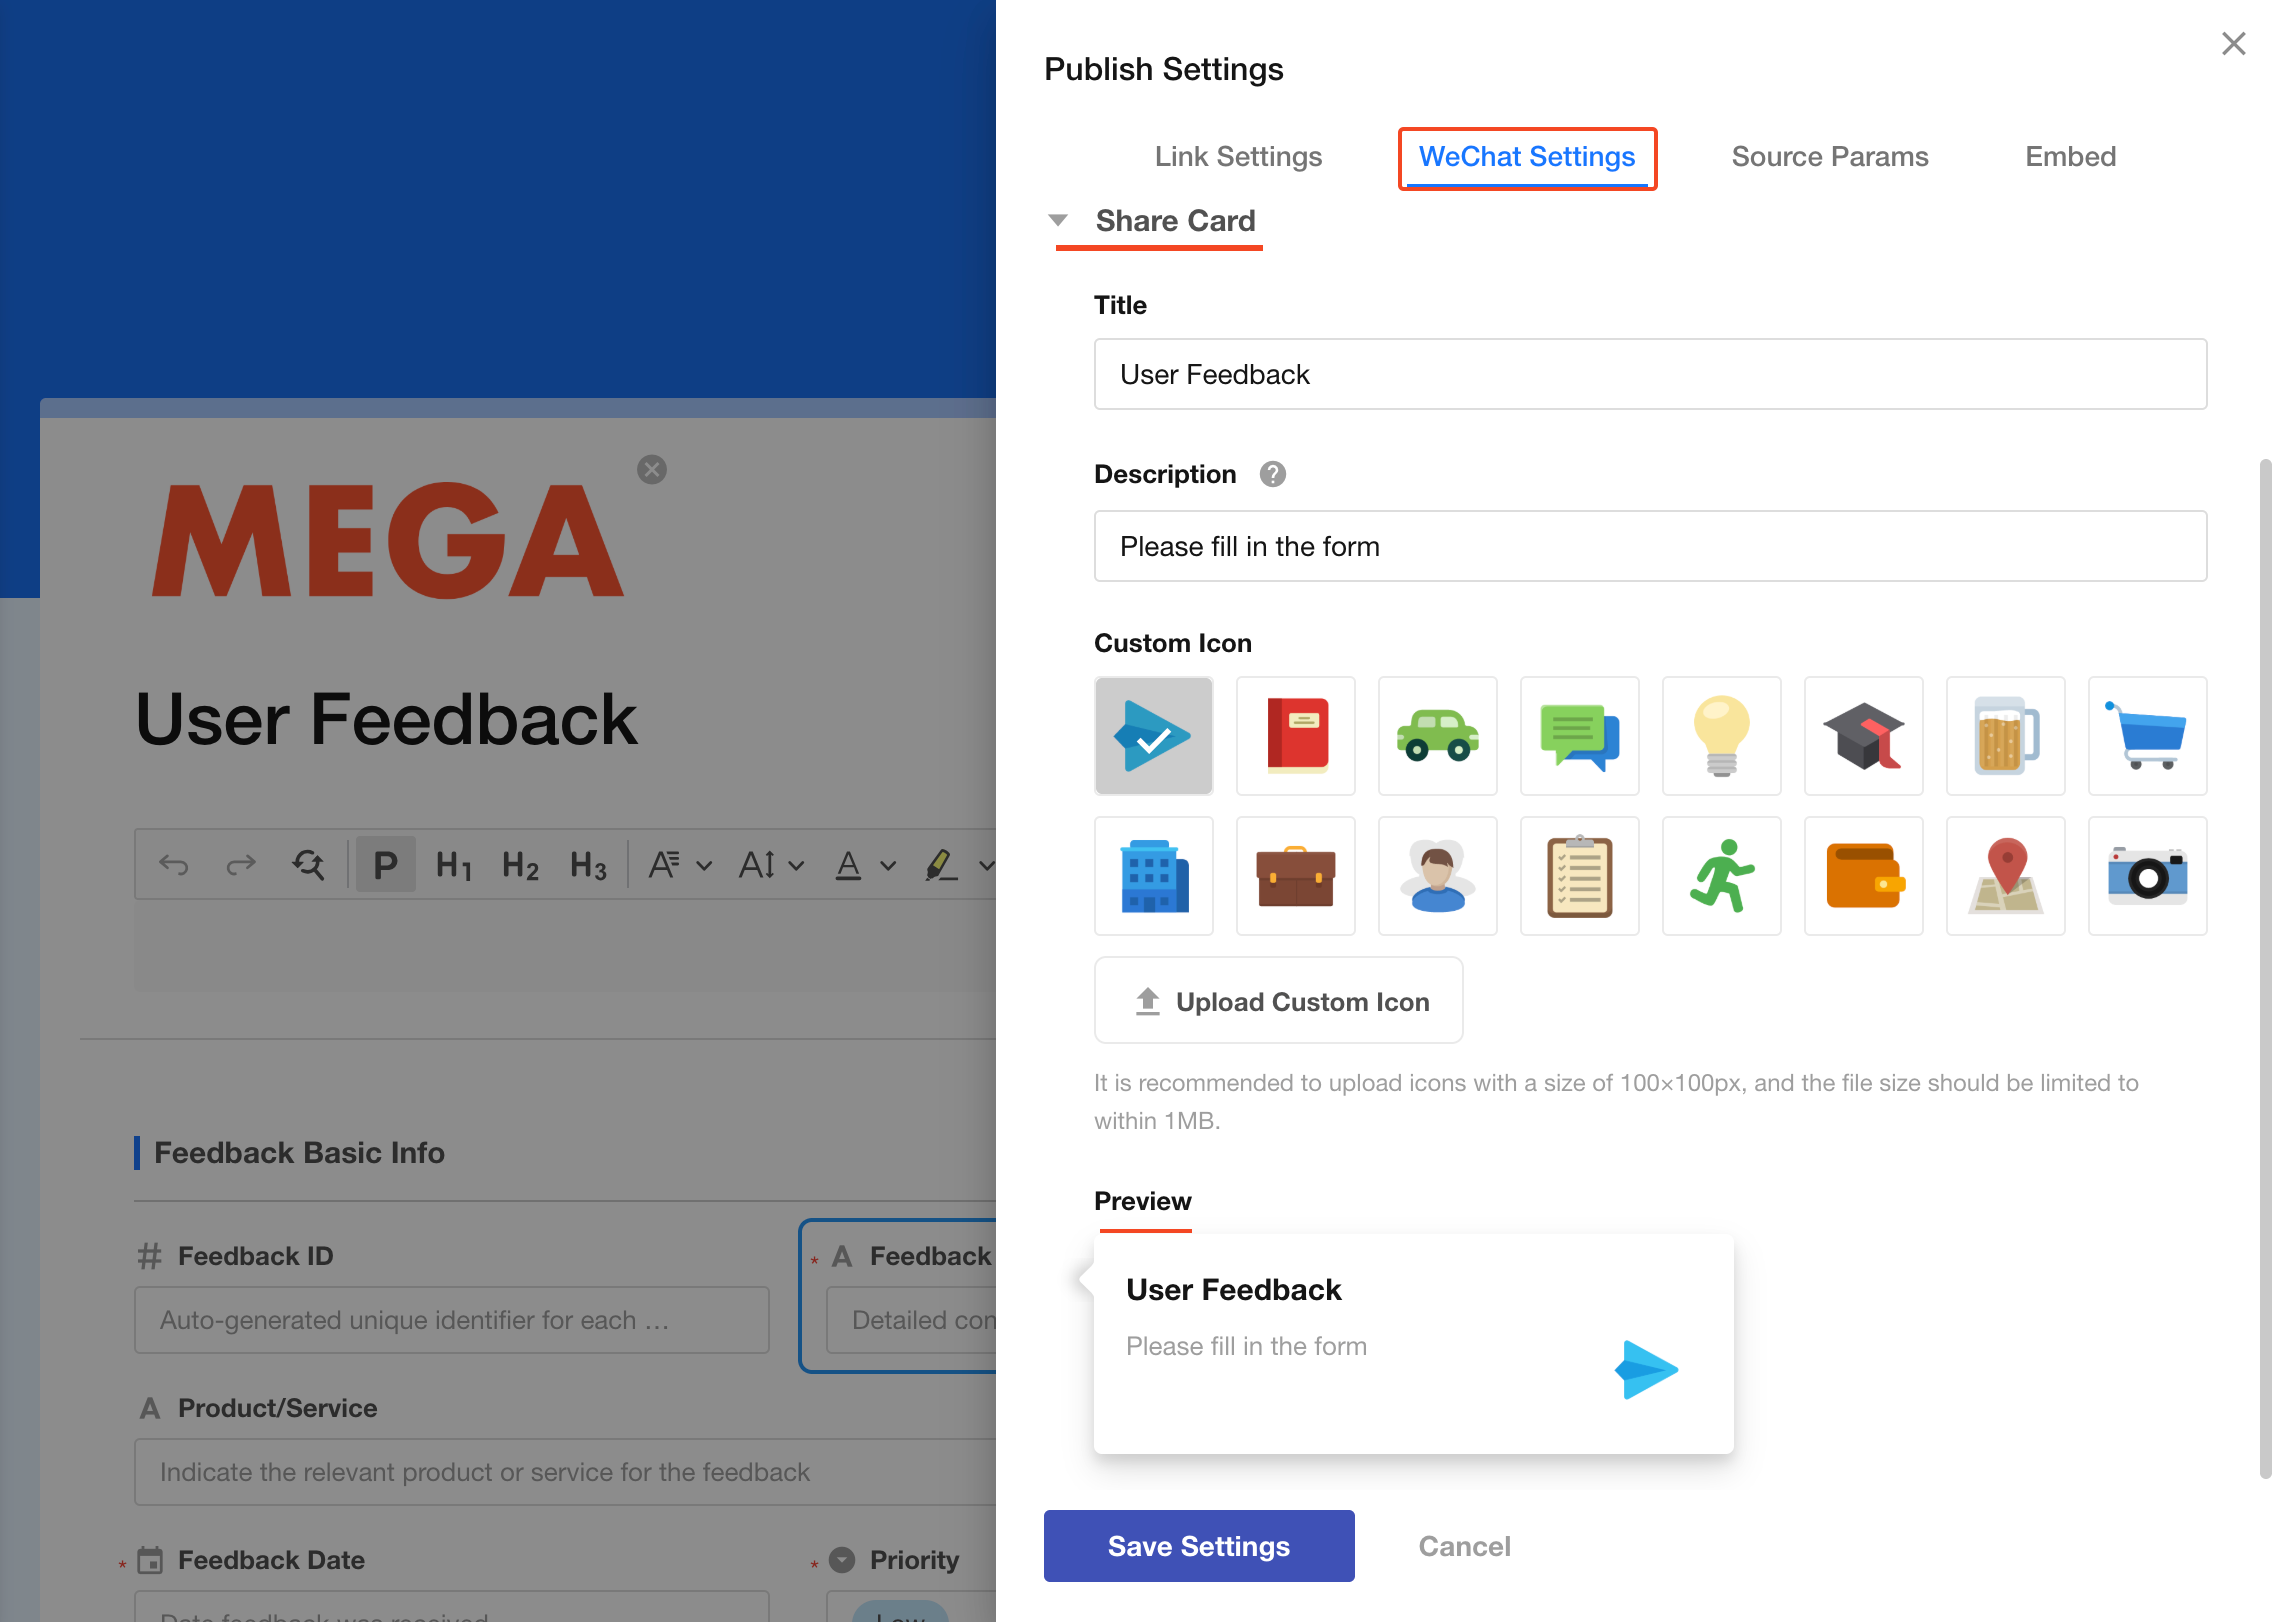
Customize WeChat Share Cards
When a form is shared in WeChat, you can customize the title, description, and icon displayed on the share card.
For the share cards in WeChat Moments, only the title and icon are displayed.
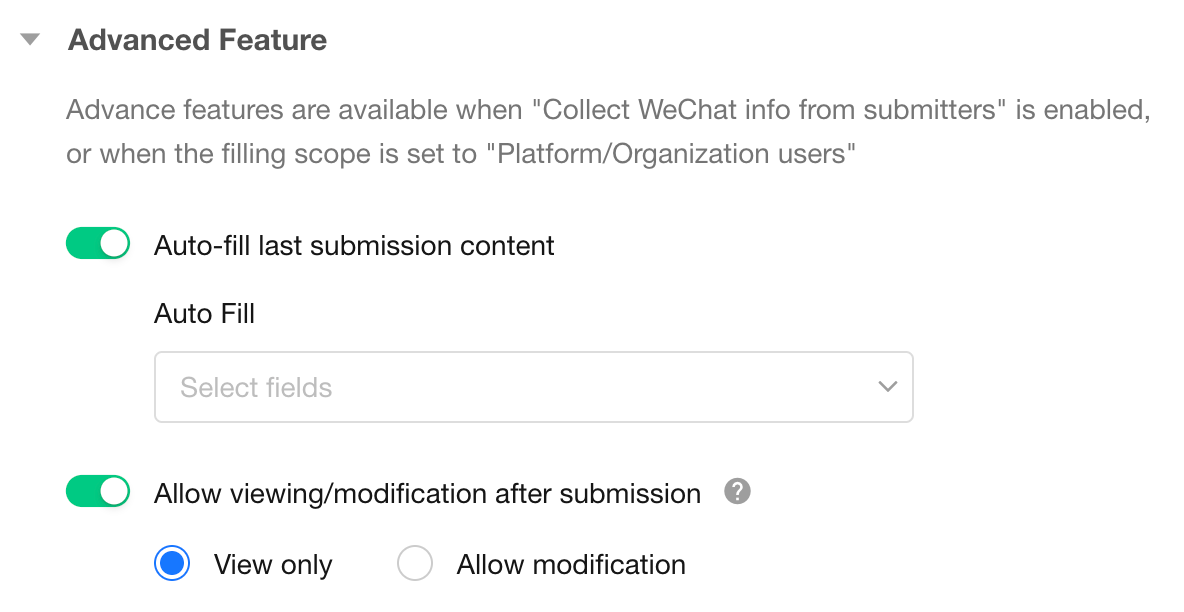
Identify Respondents
When Collect WeChat Information is enabled, or when form access is restricted to Platform Users or Internal Users, the system can identify respondents and retrieve their previous submissions.
This allows the form to automatically populate previous values or enable respondents to view and update previously submitted data.
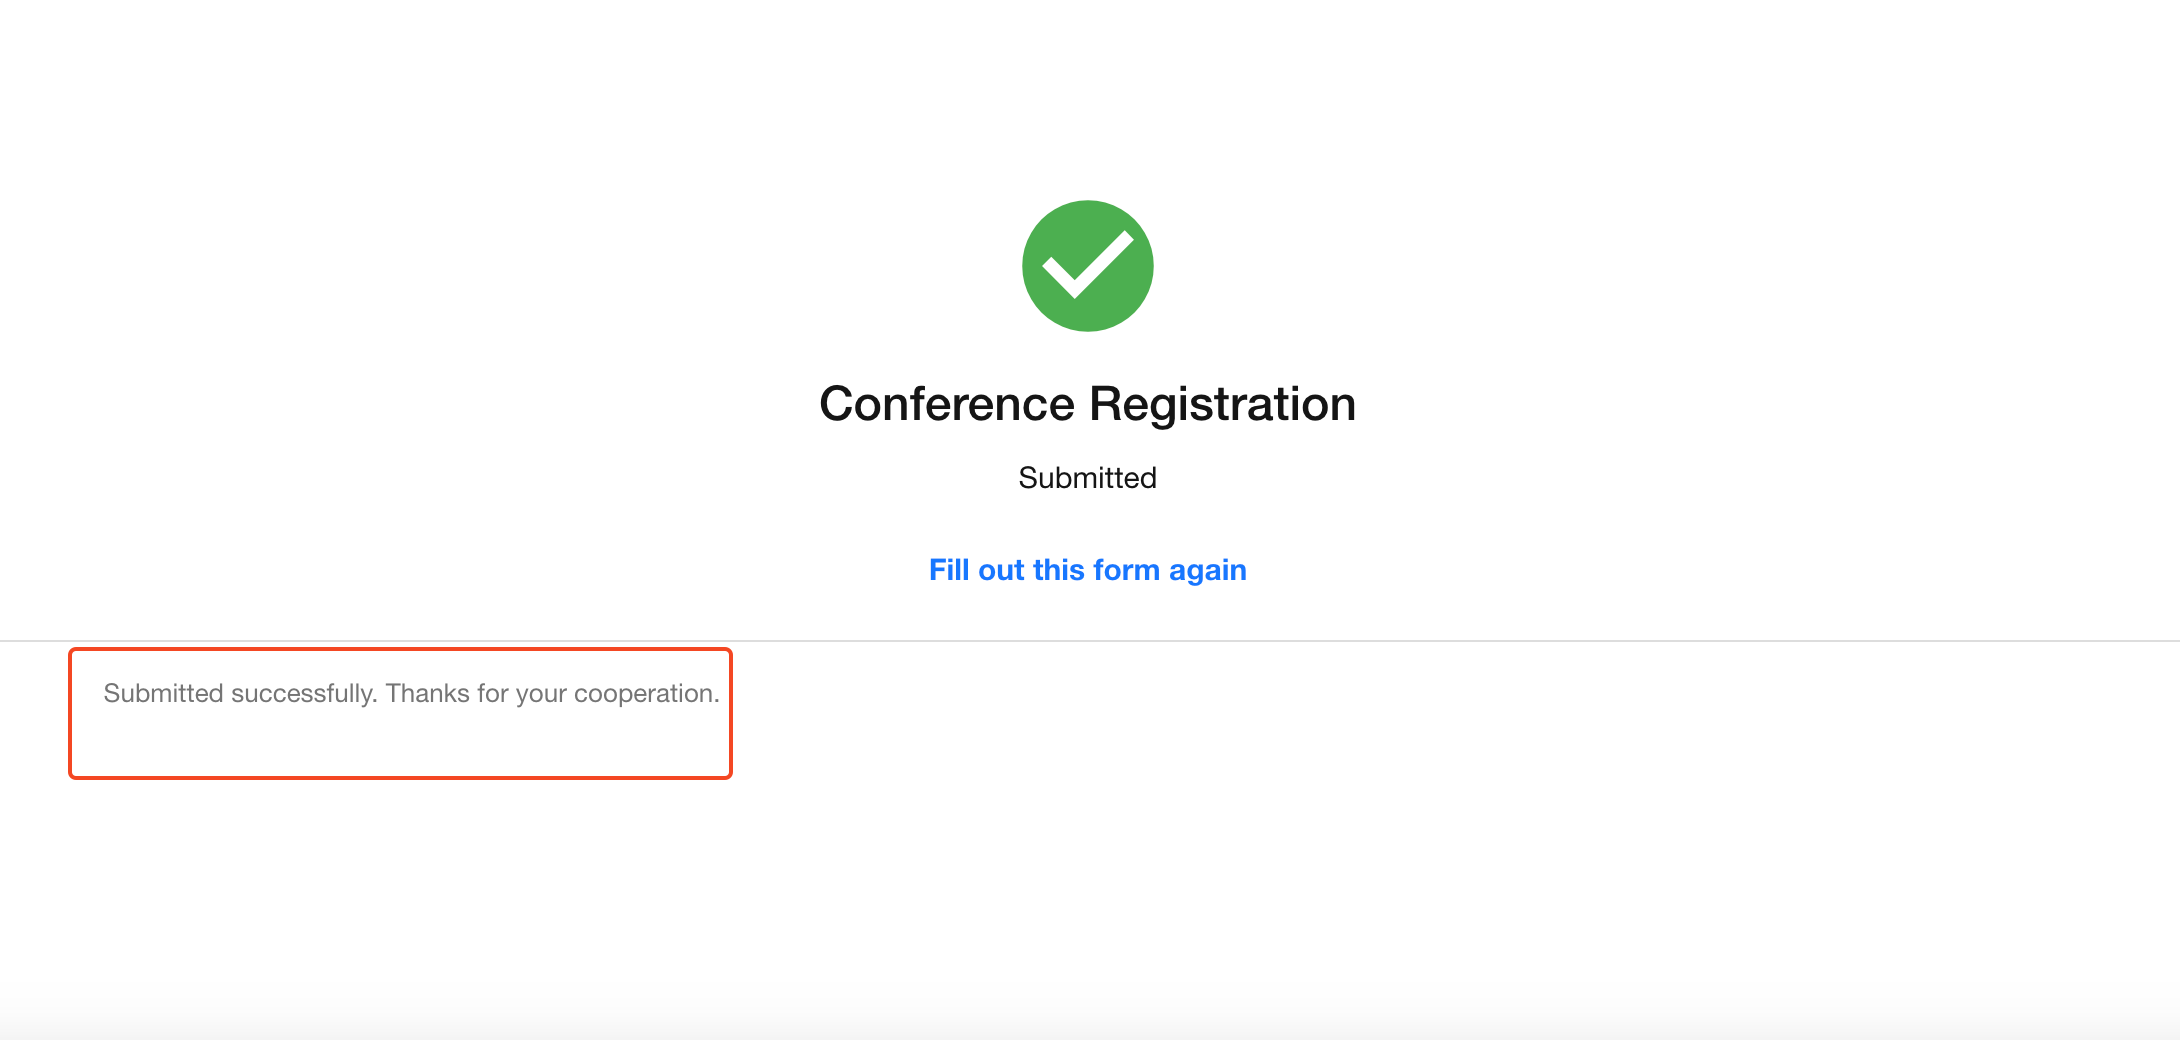
Submission Receipt
Configure the content displayed after a successful submission, such as confirmation messages, follow-up instructions, or redirect links.
Dynamic field values can be used to generate personalized receipt content based on the submitted data.
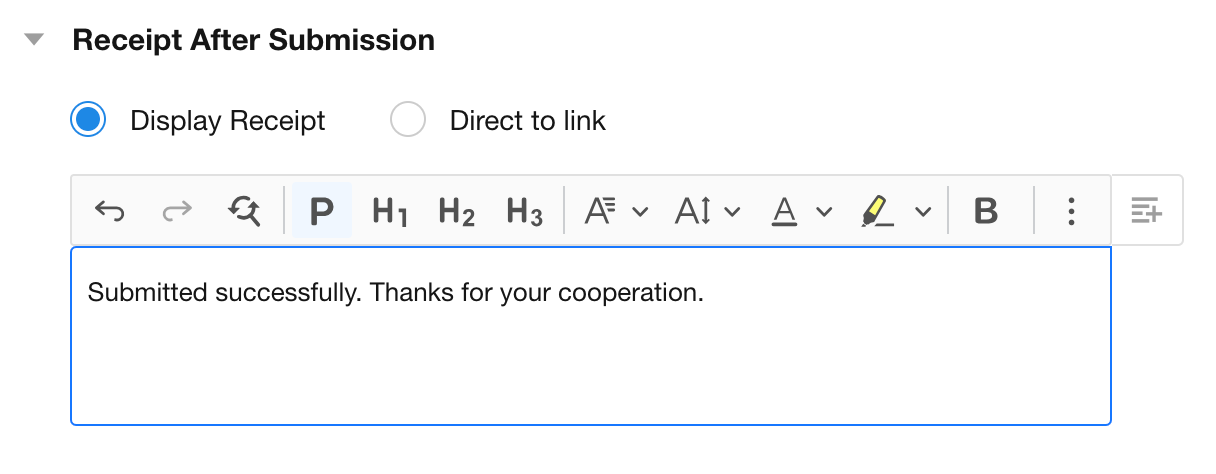
Example:
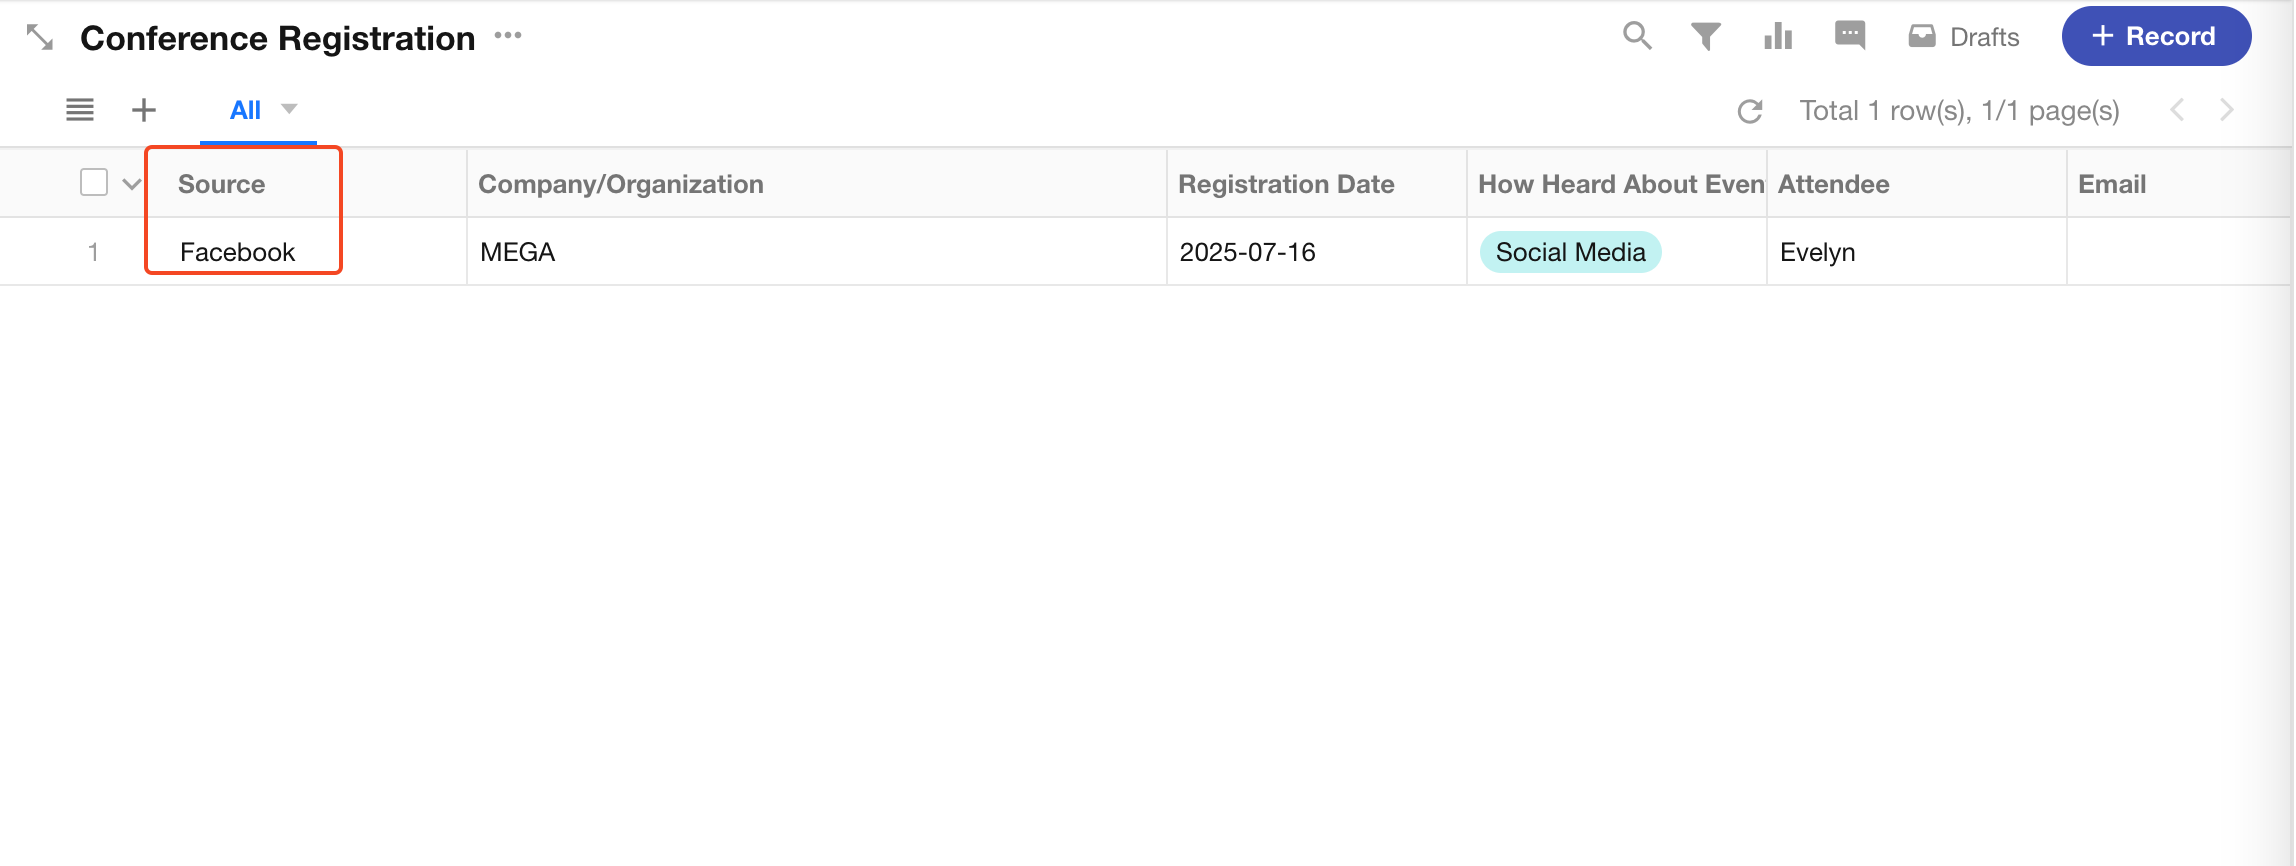
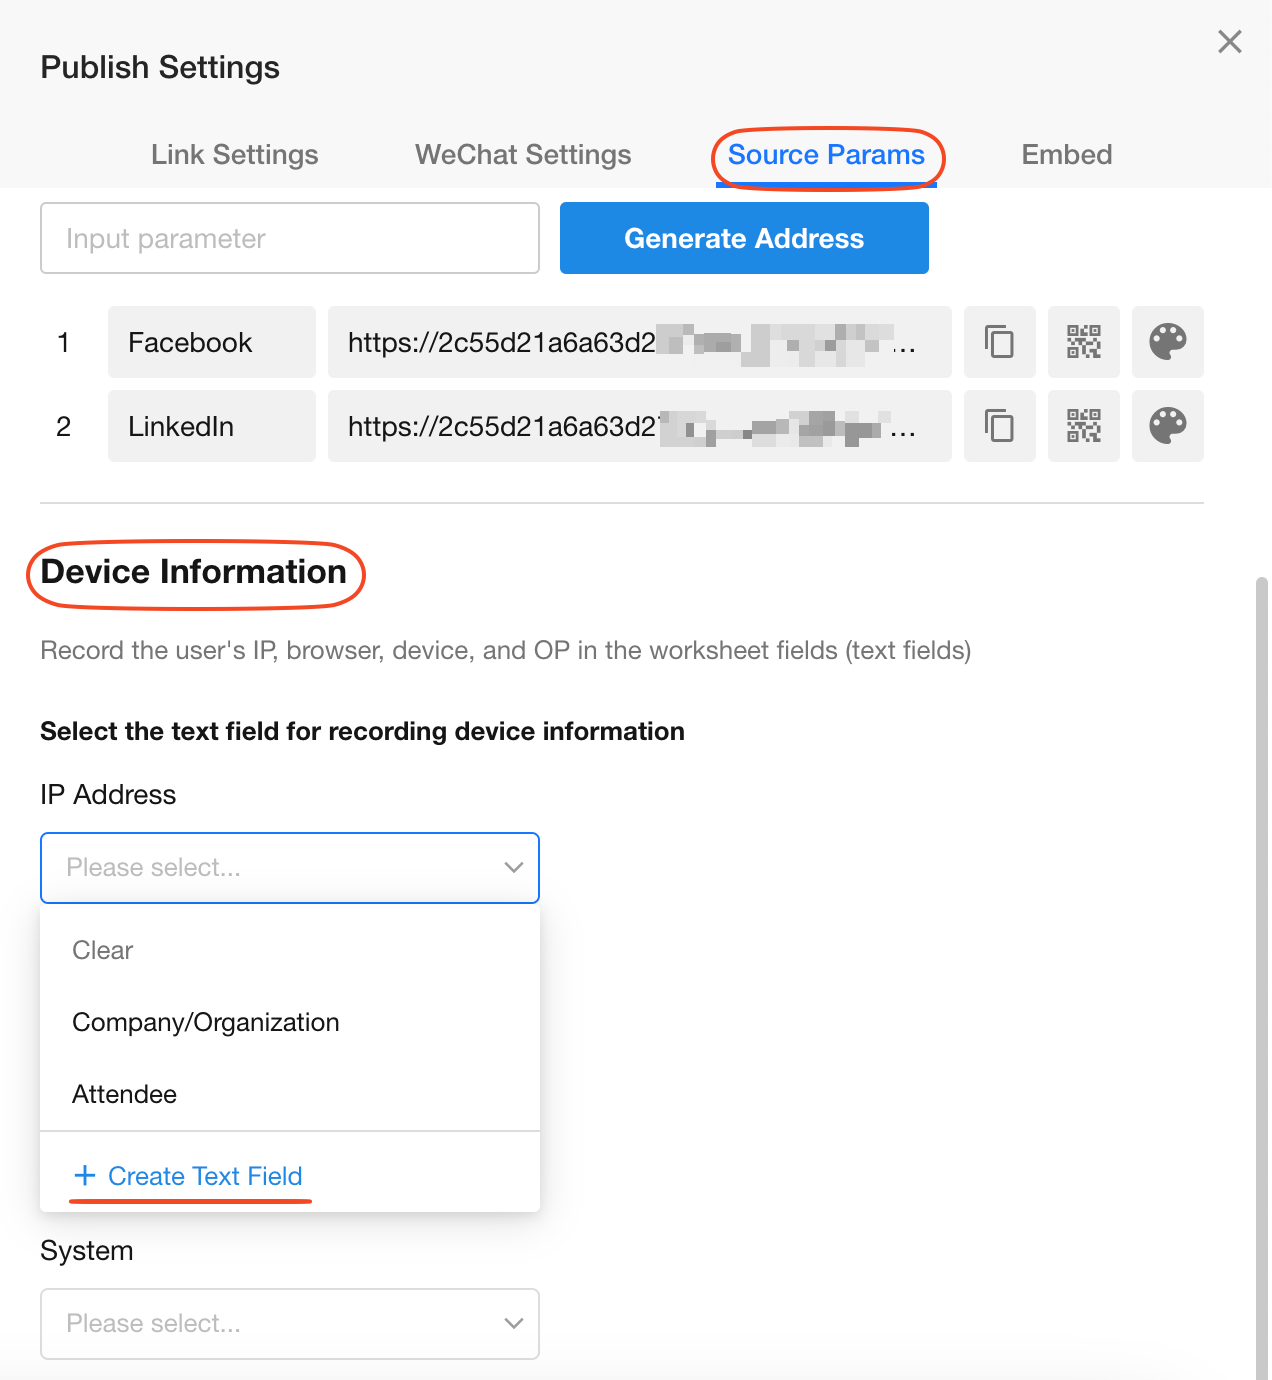
Submission Source Tracking
Track Sources with URL Parameters
Add URL parameters to form links and automatically store source information in a designated field.
For example, if a form is promoted through LinkedIn, X (Twitter), and Facebook, you can generate a dedicated link for each channel and use a Source field to track where submissions originate.
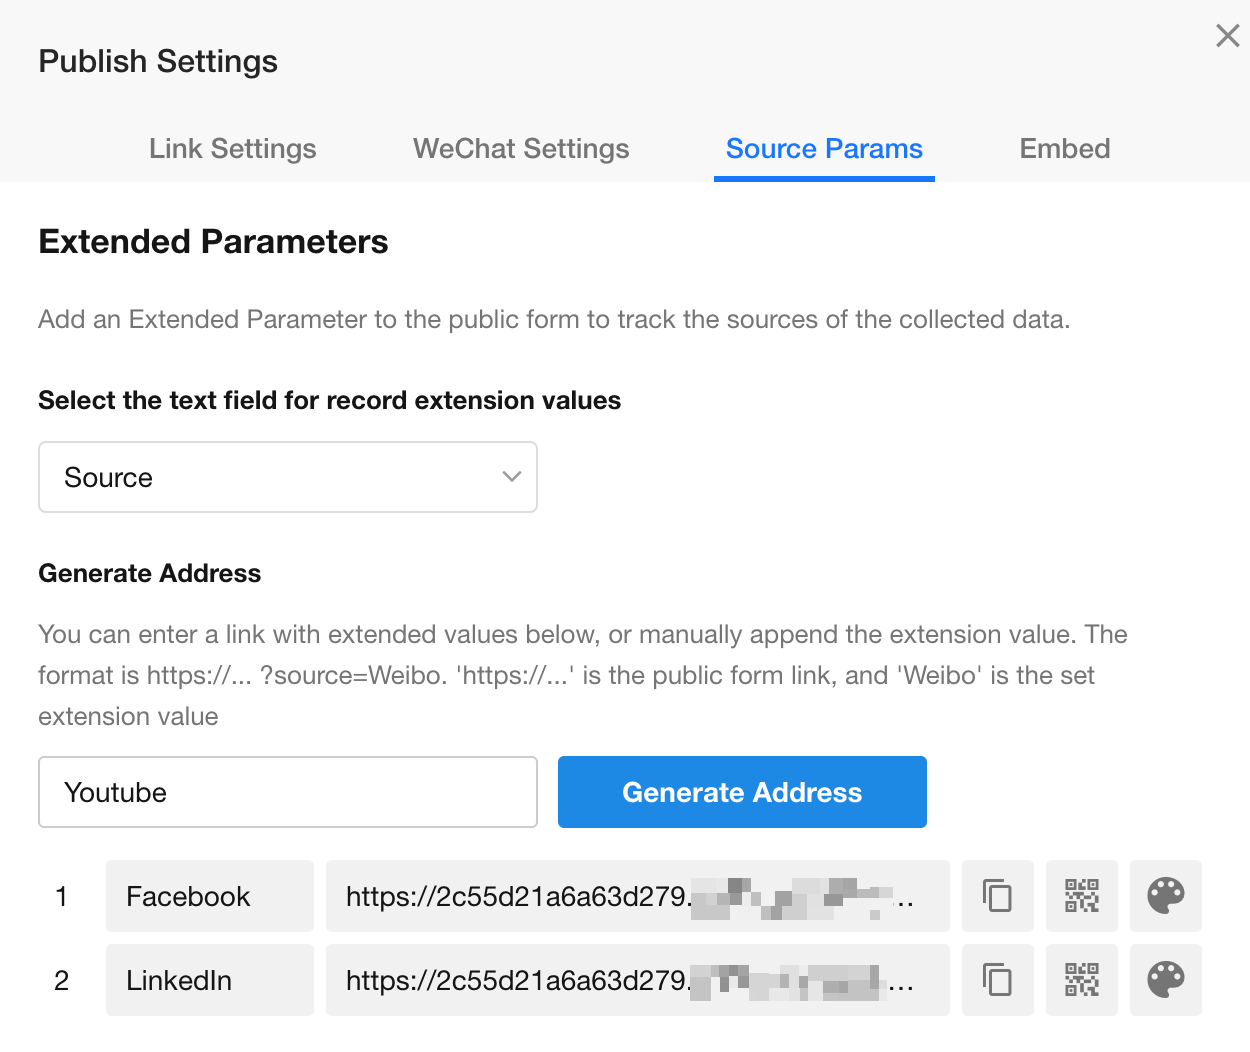
Enter a channel name and click Generate Link to create a dedicated URL and QR code for that channel.
Fields used to store URL parameter values are hidden from the form page.
Manually Append URL Parameters
Source parameters can be added manually or automatically. Links do not need to be generated through Generate Link in order to capture parameter values.
Example URLs:
https://www.xxx.com/form/66cxxxxxxxxxxxx846c?source=linkedinhttps://www.xxx.com/form/66cxxxxxxxxxxxx846c?source=twitterhttps://www.xxx.com/form/66cxxxxxxxxxxxx846c?source=facebook
You can also modify the value after source= directly:
https://www.xxx.com/form/66cxxxxxxxxxxxx846c?source=email
Workflow automation can also be used to append parameters dynamically. By using field values such as Record ID or Mobile Number as parameter values, you can generate traceable public links.
Retrieve URL Parameters
Before a record is submitted, other fields can retrieve URL parameter values using custom functions. Learn more
Record Device Information
Automatically store the respondent's IP address, browser, device type, and operating system in designated Text fields.
If no suitable field exists, click + New Text Field to create one directly.
Fields used to store device information are hidden from the form page.
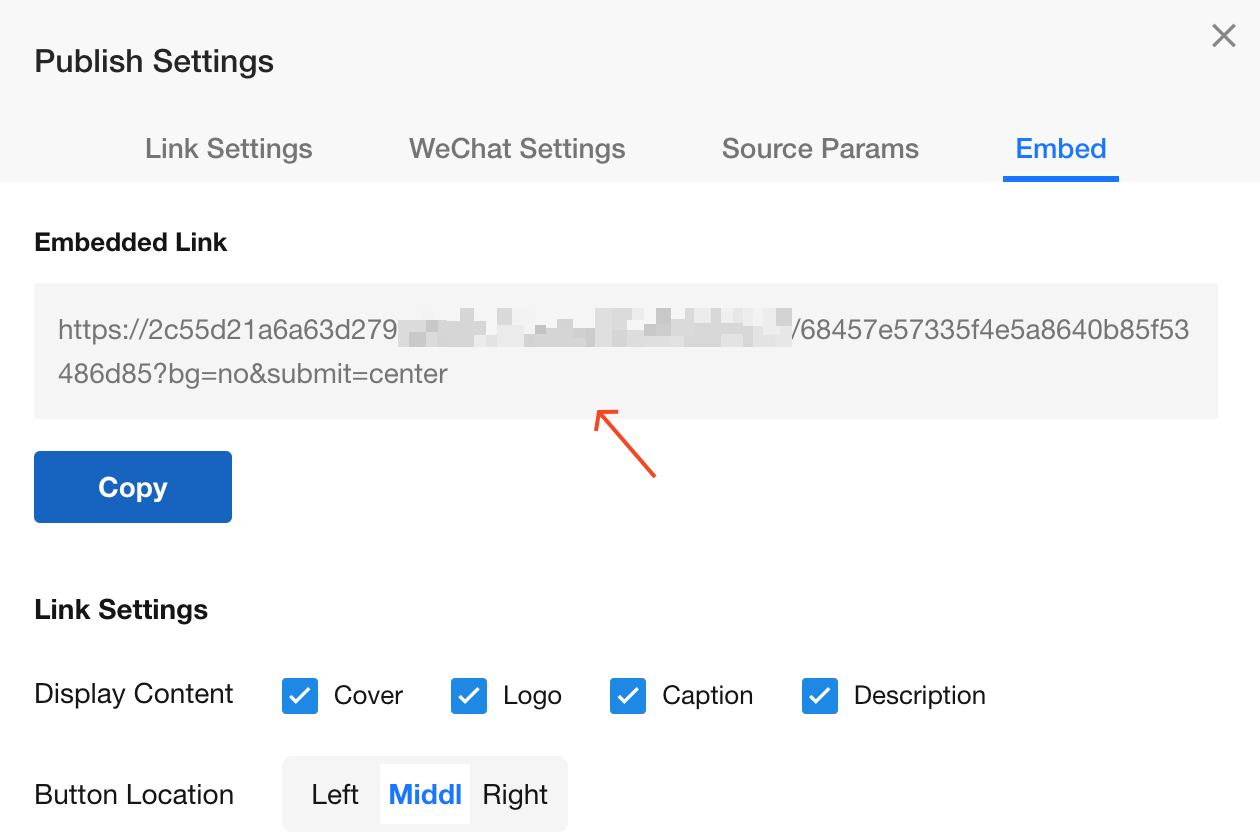
Embed Forms into Other Systems
Use the generated HTML embed code to seamlessly integrate a public form into another system.
Path to obtain the embed code:
Extend > Public Form > Form Settings > Publishing Settings > Embed
Before generating the embed code, you can configure the following options to keep the embedded page clean and consistent:
- Hide unnecessary elements (title, logo, form border, and description)
- Configure the alignment of the Submit button (left, center, or right)
After configuration, the selected options are automatically included in the embed code. Copy the generated code and paste it into your target system.
Was this document helpful?