Custom Action
Overview
Unlike system buttons such as Share, Delete, or Print, application administrators can create custom actions. When users click these buttons, they can either:
-
Open a pop-up window for operators to fill in specified fields
-
Execute a workflow
The effect of clicking a custom action varies depending on the data source:
-
Single Record Data Source:
When clicking a custom action on a single record:
-
A pop-up window appears for operators to fill in designated fields
-
Or directly executes the corresponding workflow
-
-
Multiple Records Data Source:
When multiple records are selected in the table view and a custom action is clicked, the system retrieves all selected data and executes the workflow once for the batch.
Entry Points for Adding Custom Actions
Custom actions can be added in both worksheets and views.
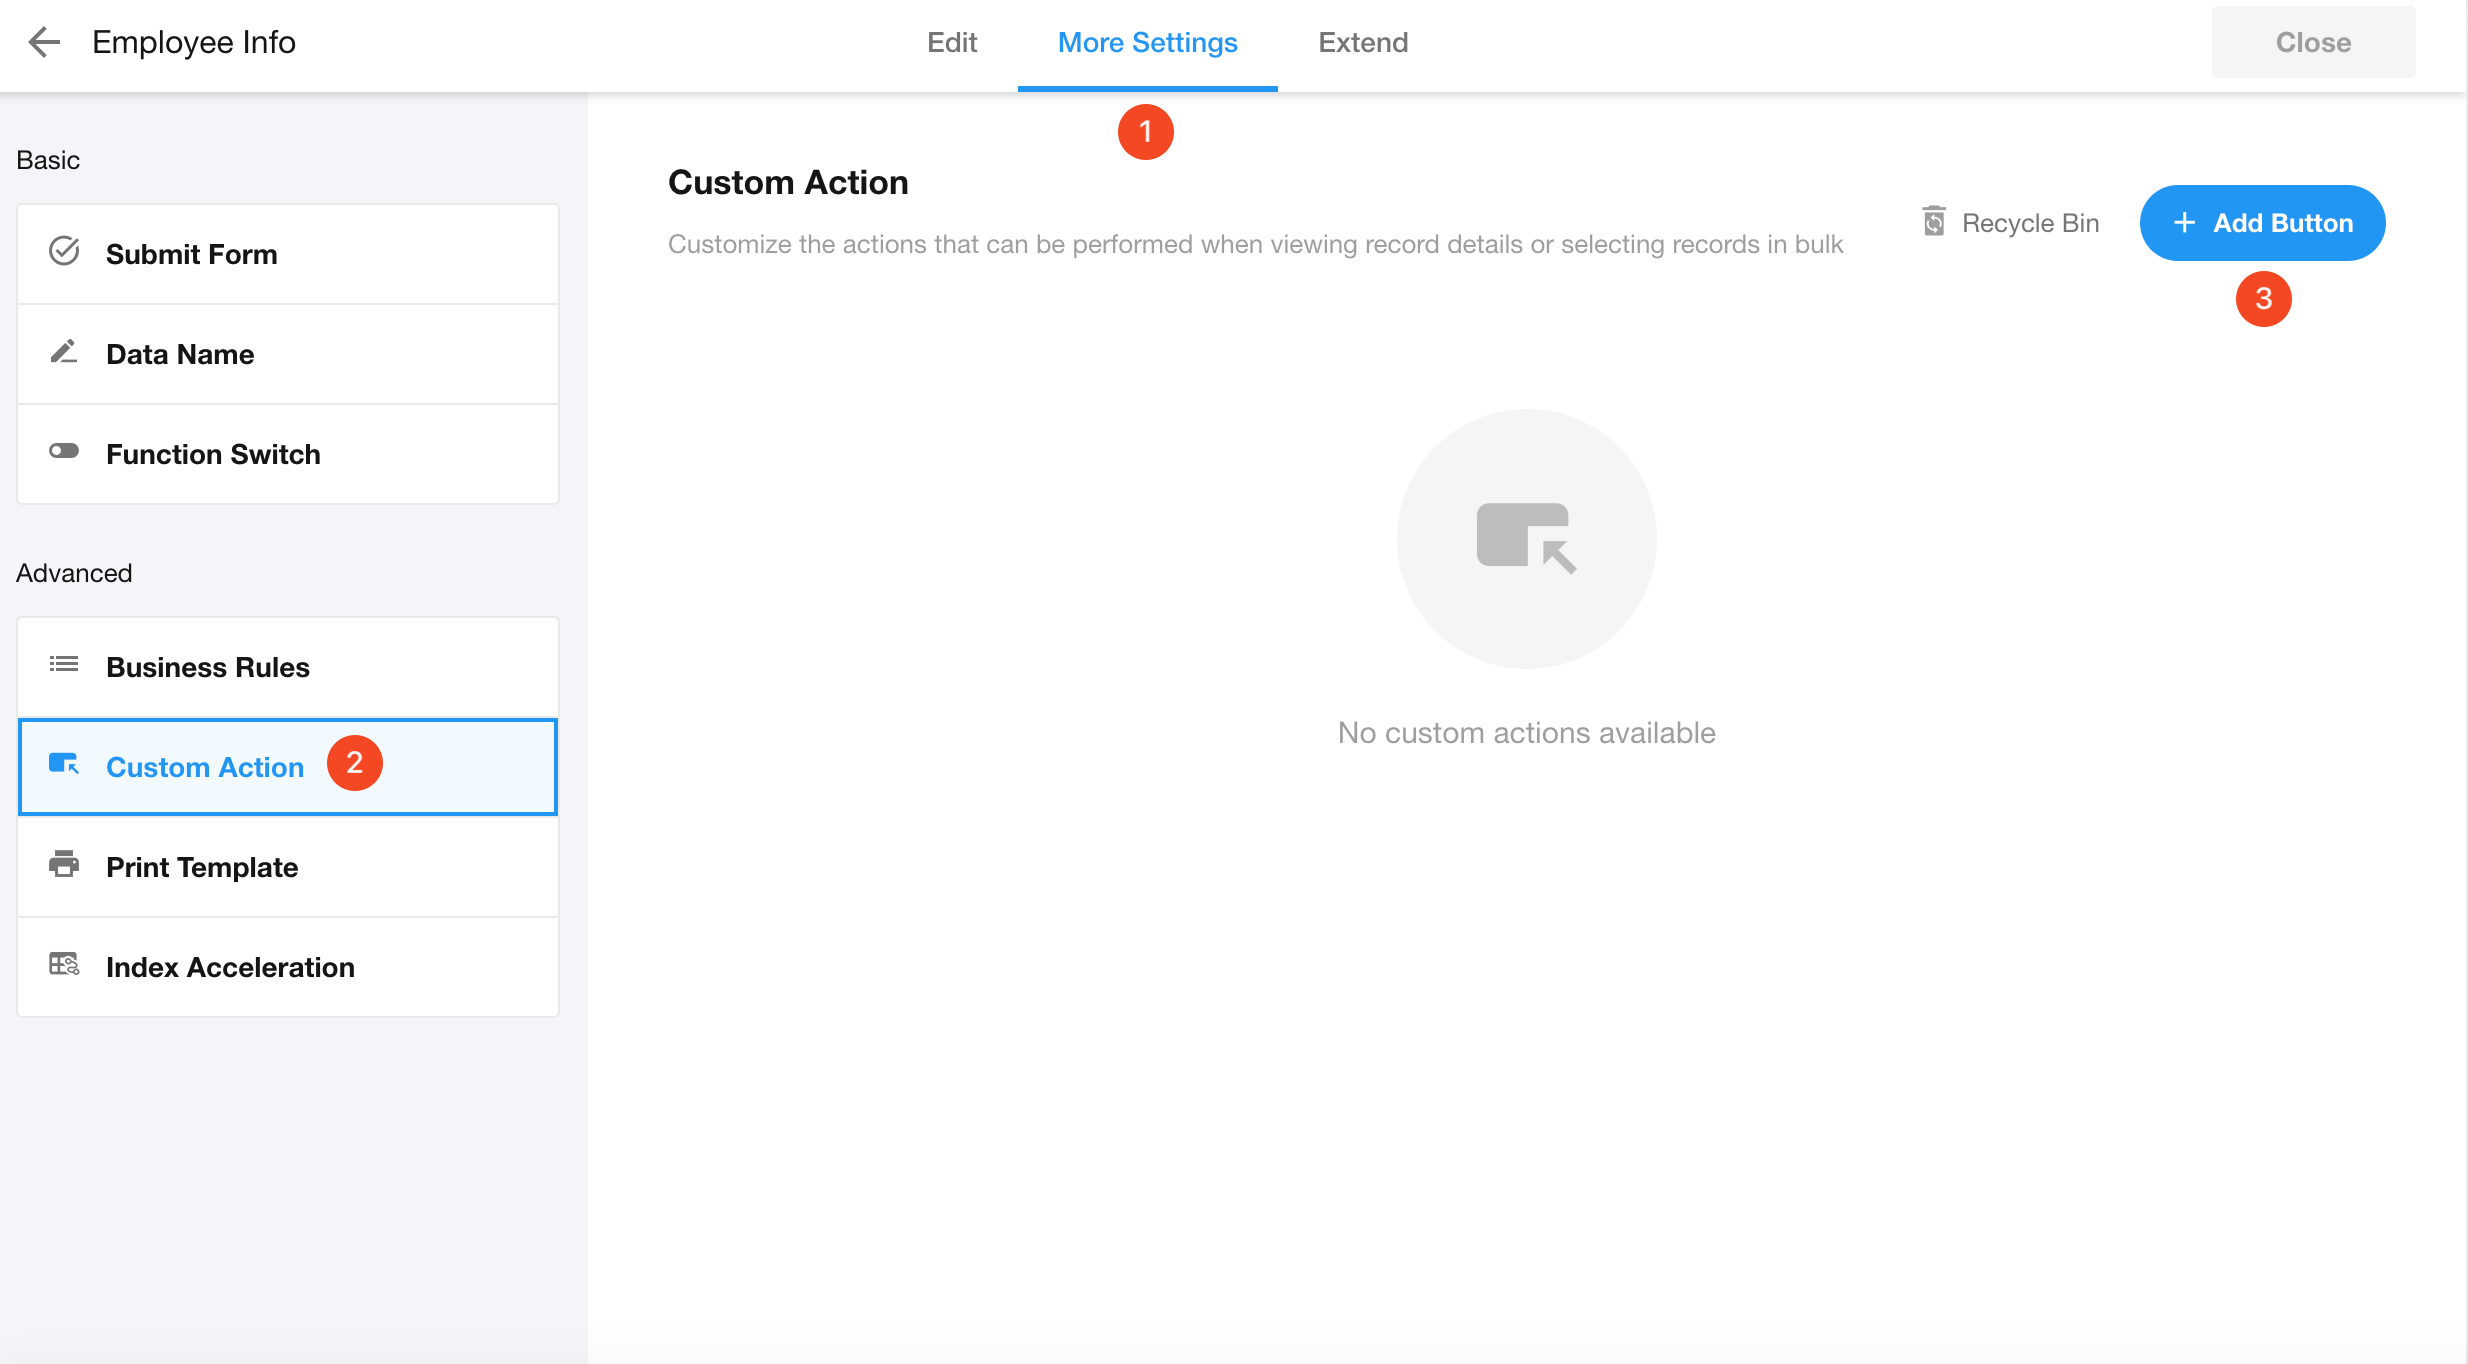
Adding Custom Actions in Worksheets
Path: [More Settings] > [Custom Action] > [Add Button]
Adding Custom Actions in Views
Path: [Configure View] > [Data Operation] > [+ Action]
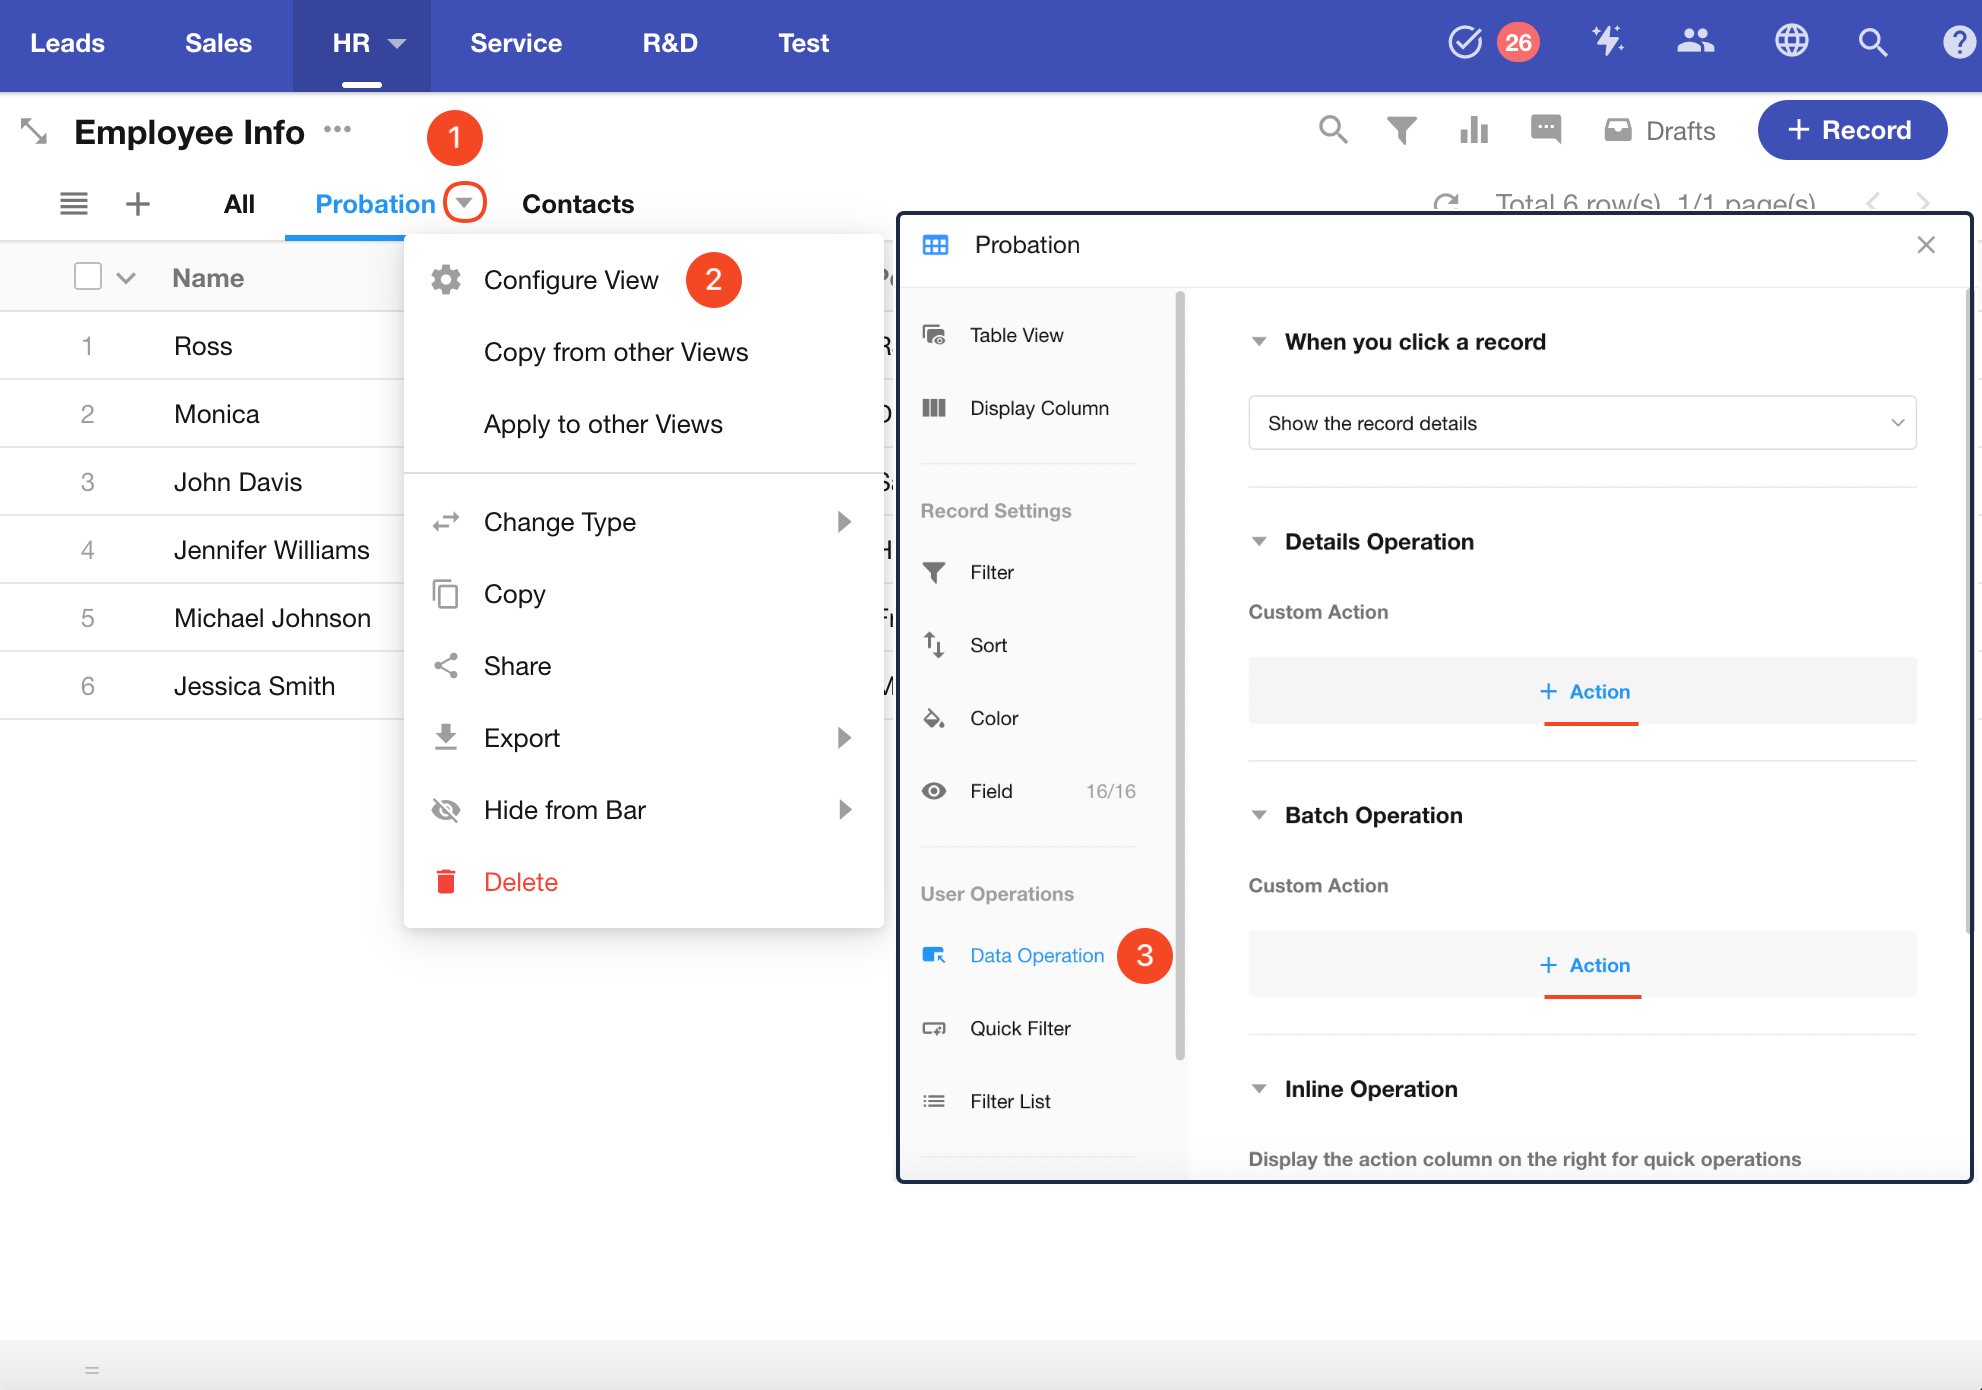
Custom actions created in views are automatically synchronized to worksheets. In the worksheet's custom action management page, you can configure which views the action should be available in.
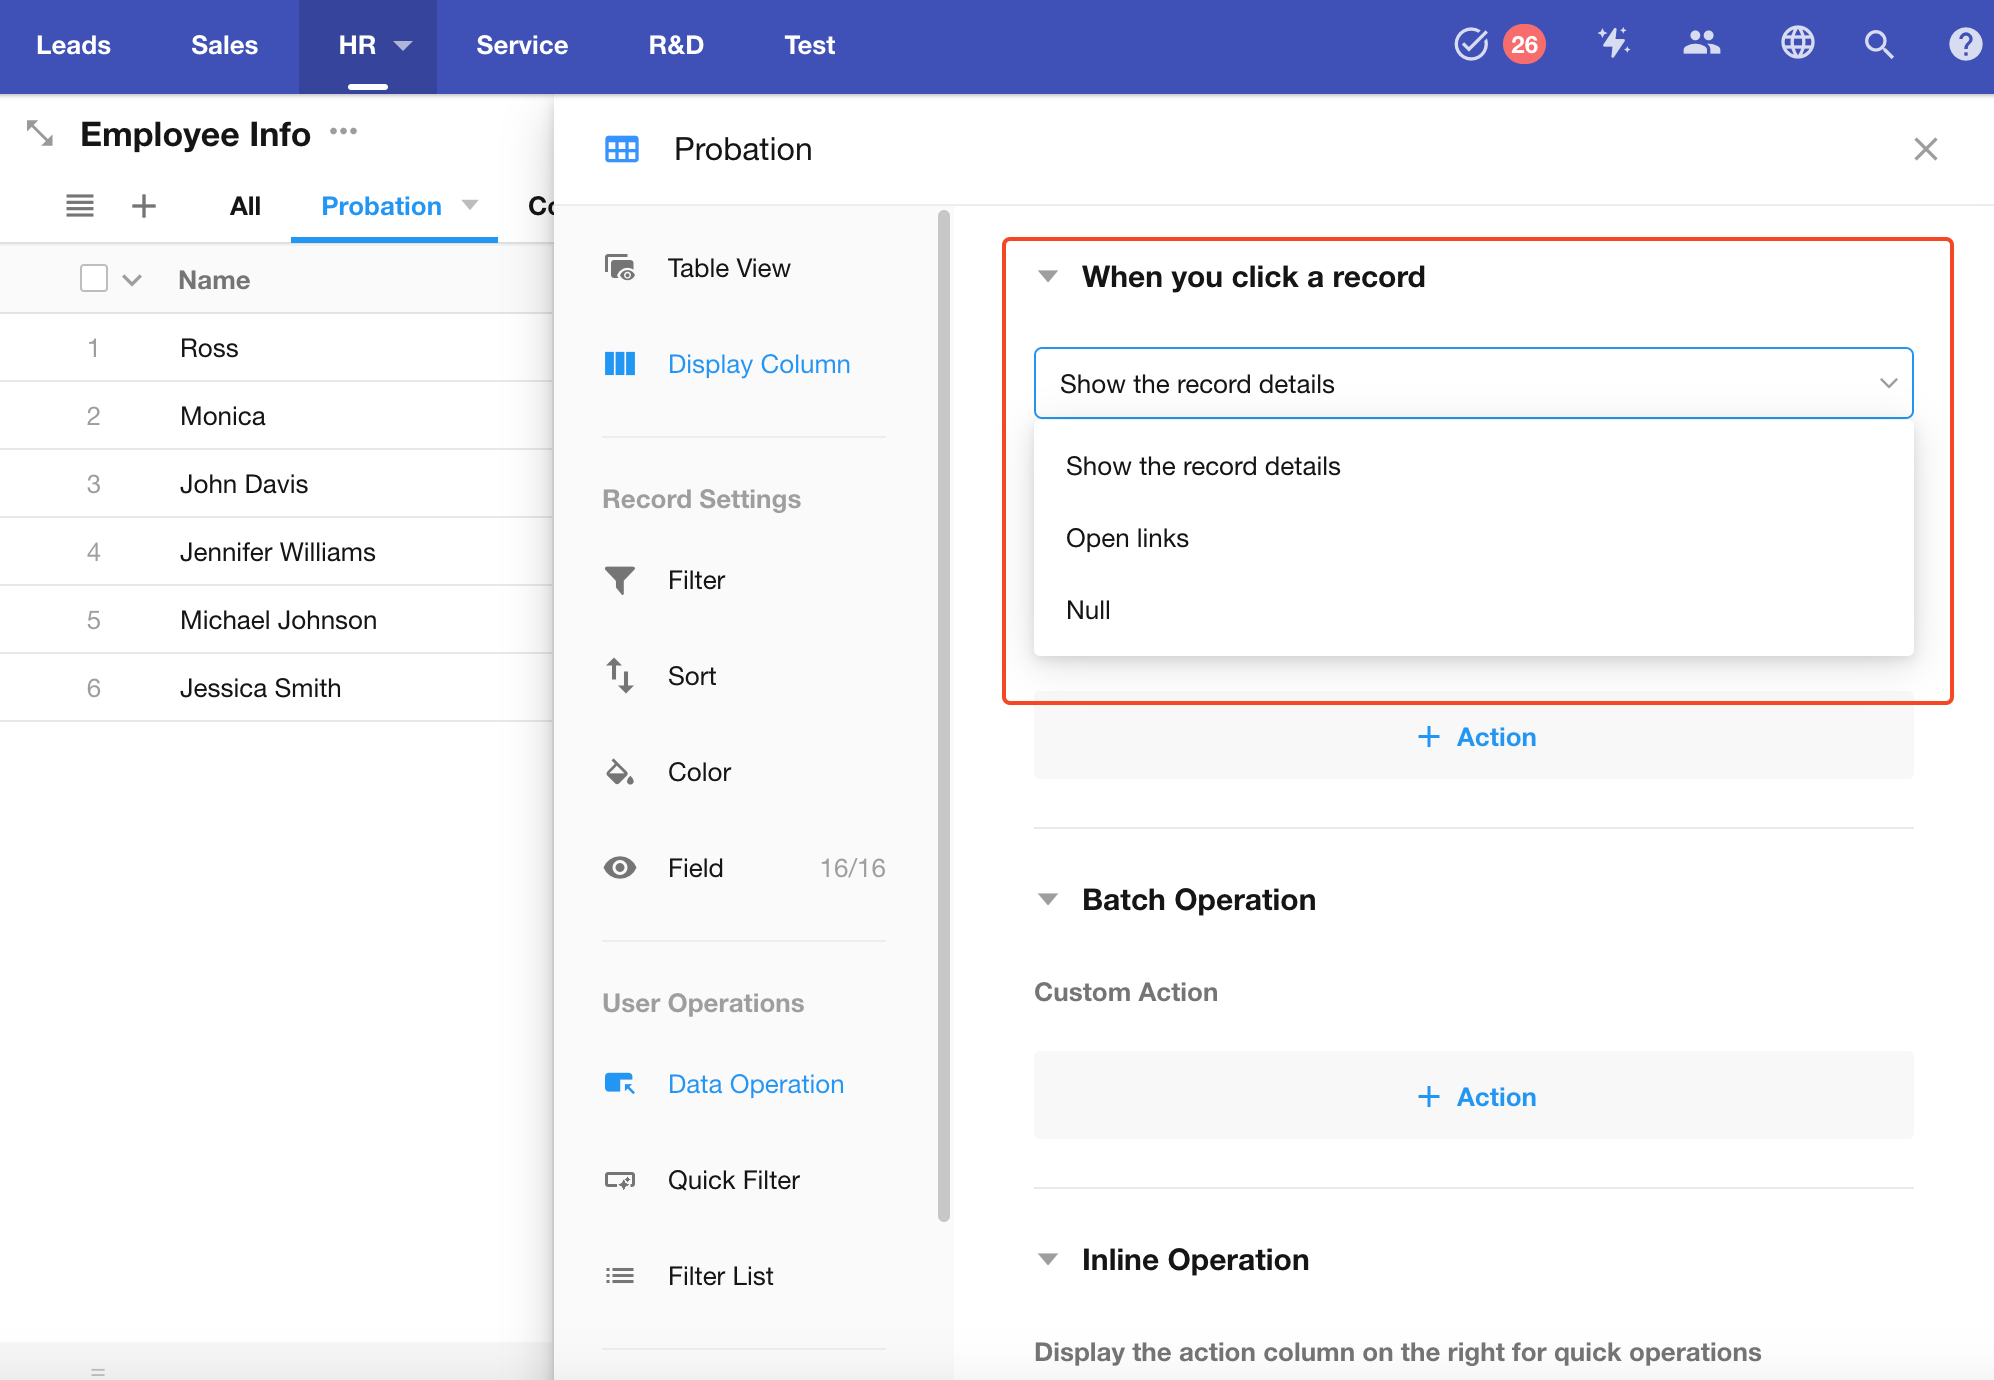
When clicking a record
Actions available when clicking a record (record card) in a view:
-
Directly open the record details page
-
Open a link (if a text field contains a URL, clicking the record will directly open the link)
-
No action (clicking the record triggers no operation)
Examples
Example 1: Filling Specified Fields After Clicking a Custom Action
In the "Probation" view, add a "Pass Probation" action. When clicked, this action prompts the operator to fill in the "Date" and "Status" fields.
Configuring the Action
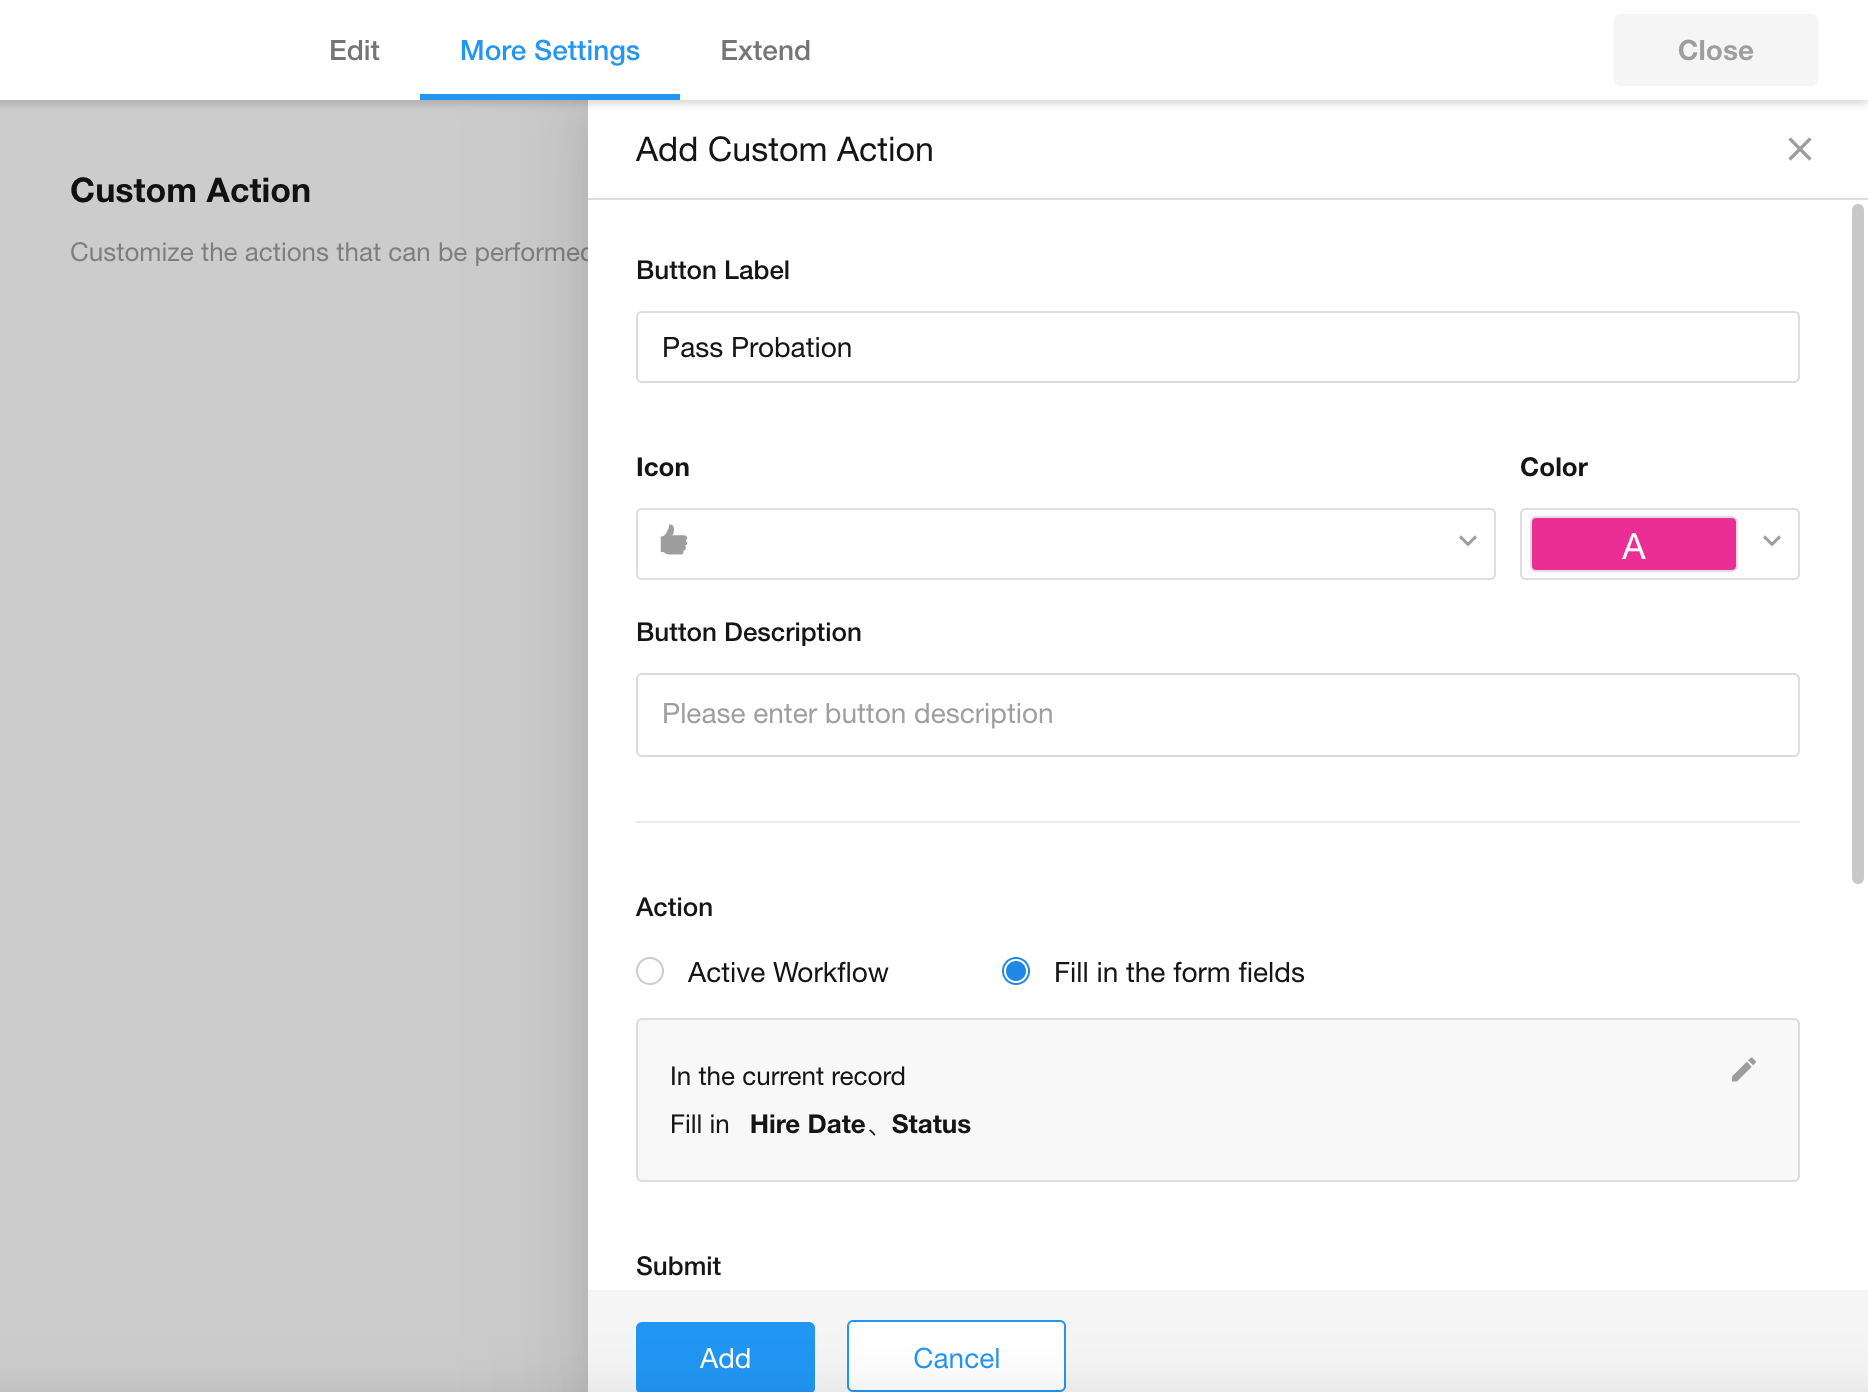
1. Name/Icon/Description
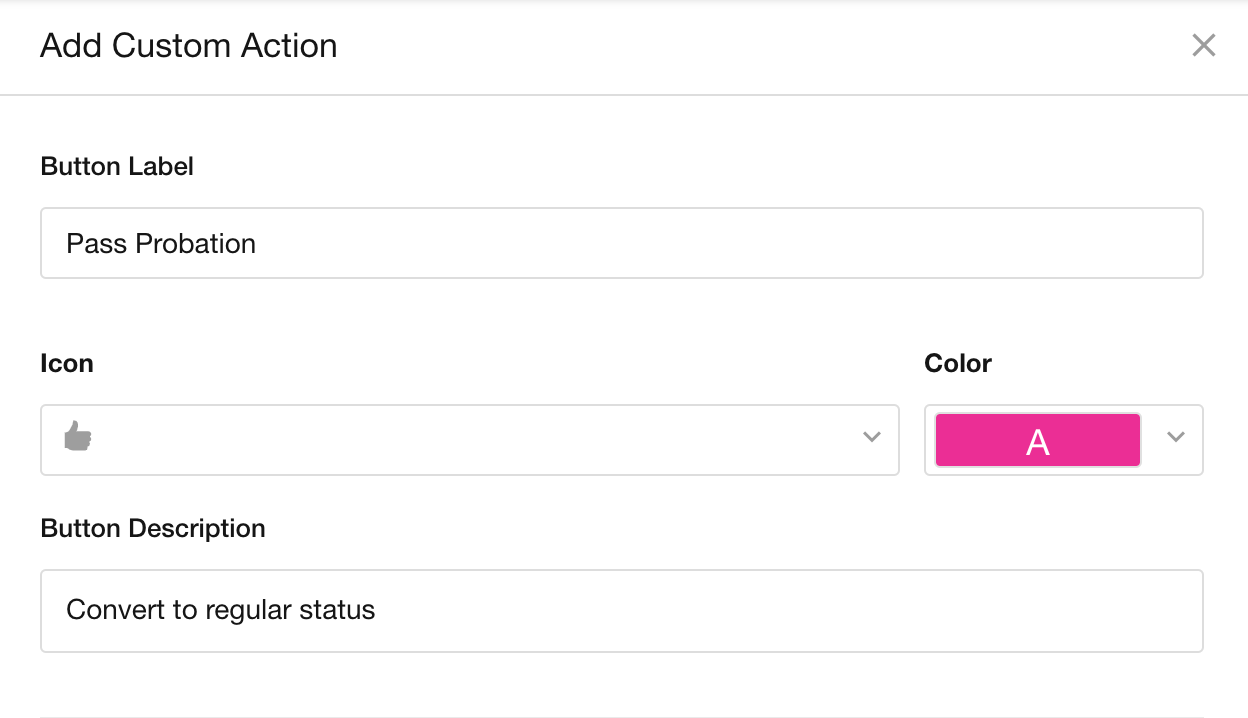
Name: No character limit
Icon and color: Customizable
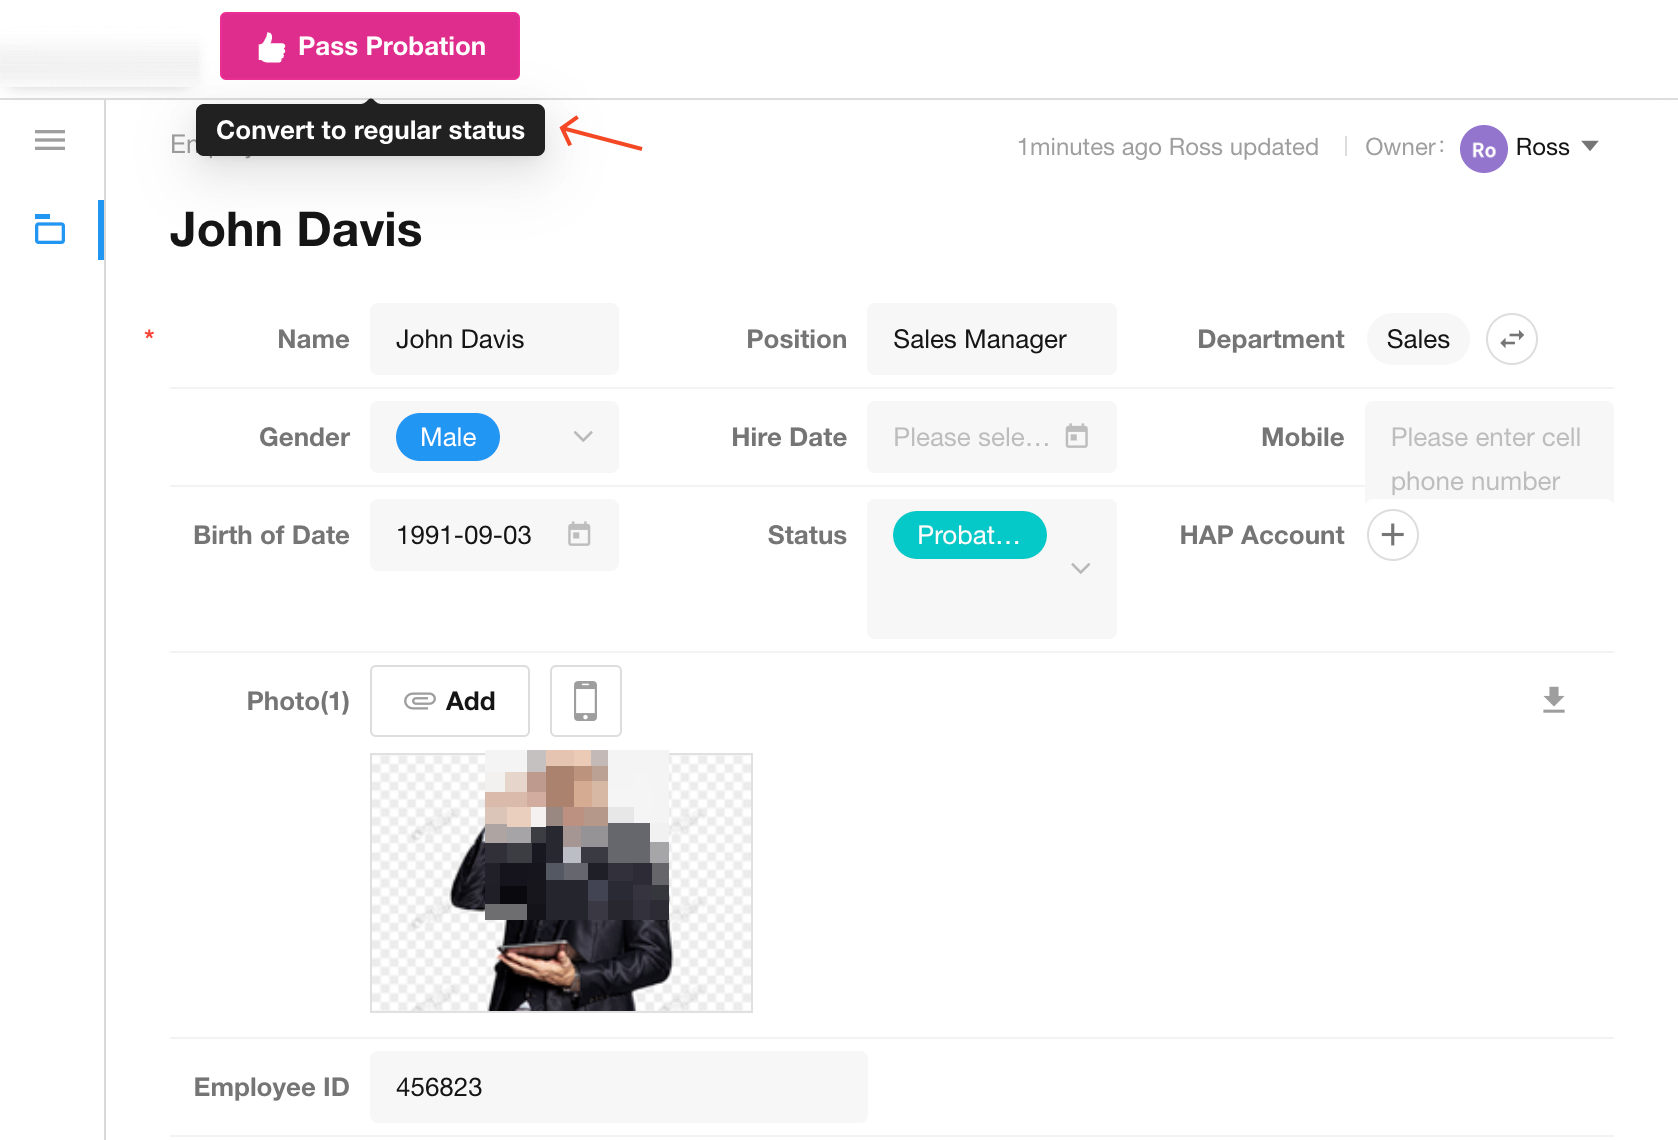
Description: Displayed when the operator hovers over the action.
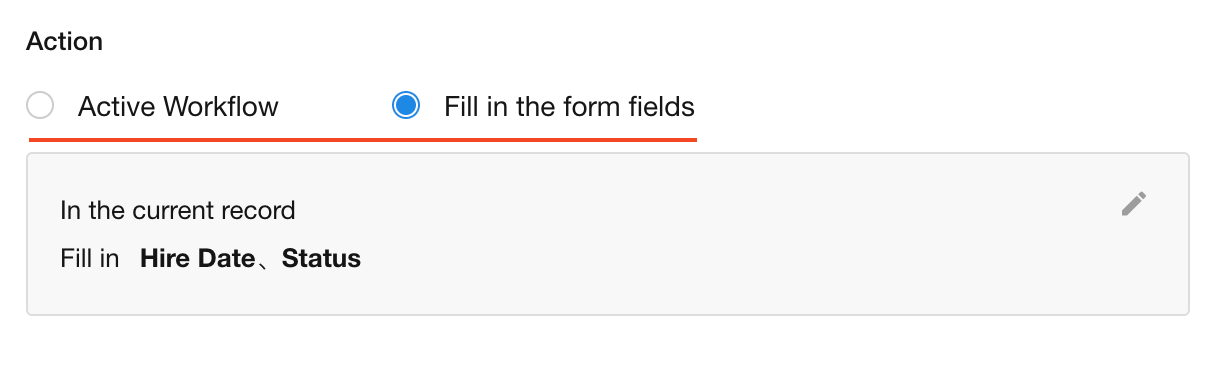
2. Action
After clicking the action:
-
Directly execute the corresponding workflow, or
-
Pop up a window to fill in specified fields.
Actually, after filling in the specified fields, it can continue to execute the workflow.
Here, the action is configured to prompt for the "Date" and "Status" fields upon clicking.
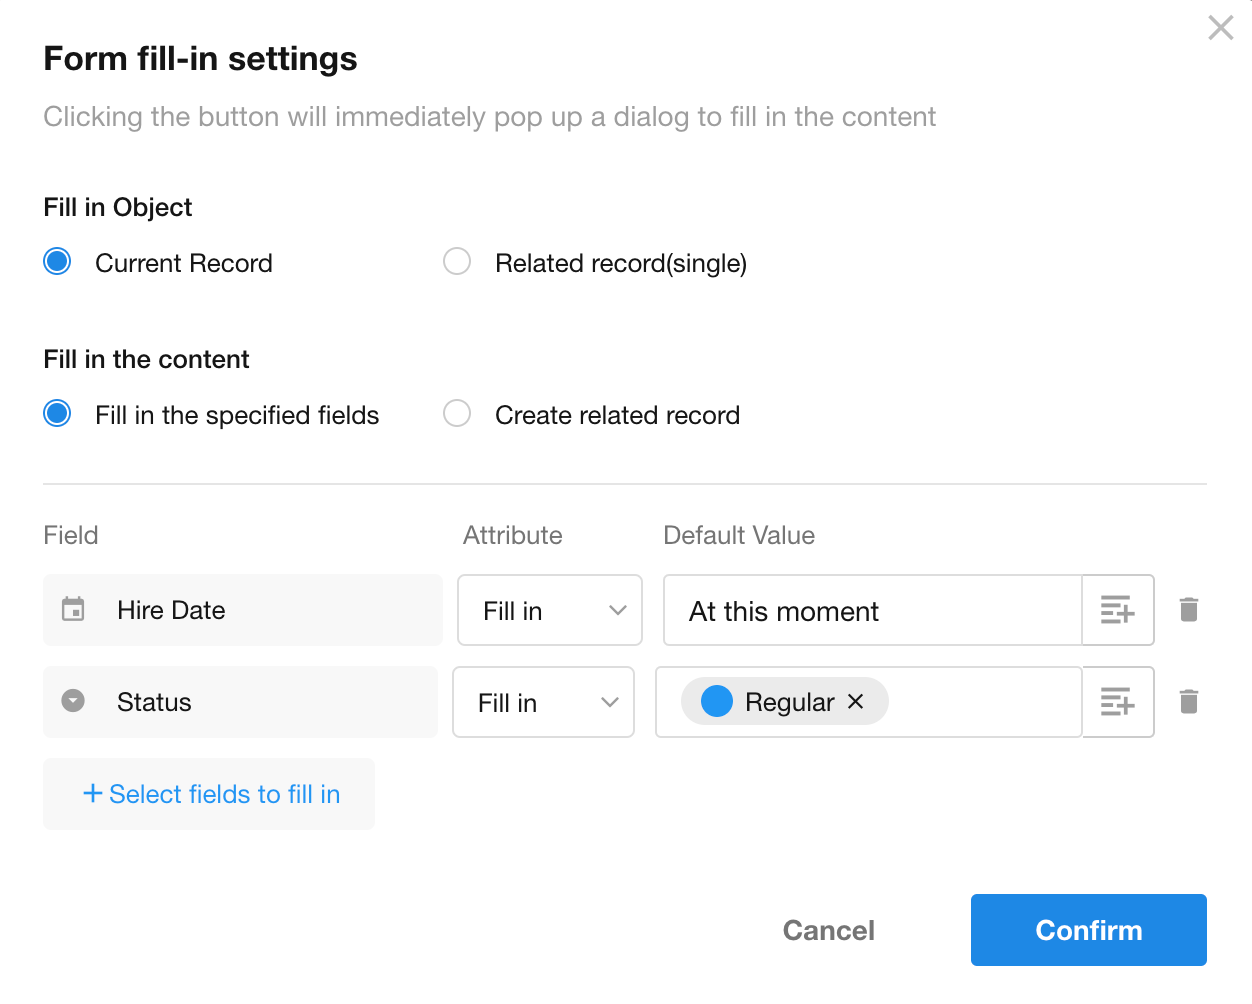
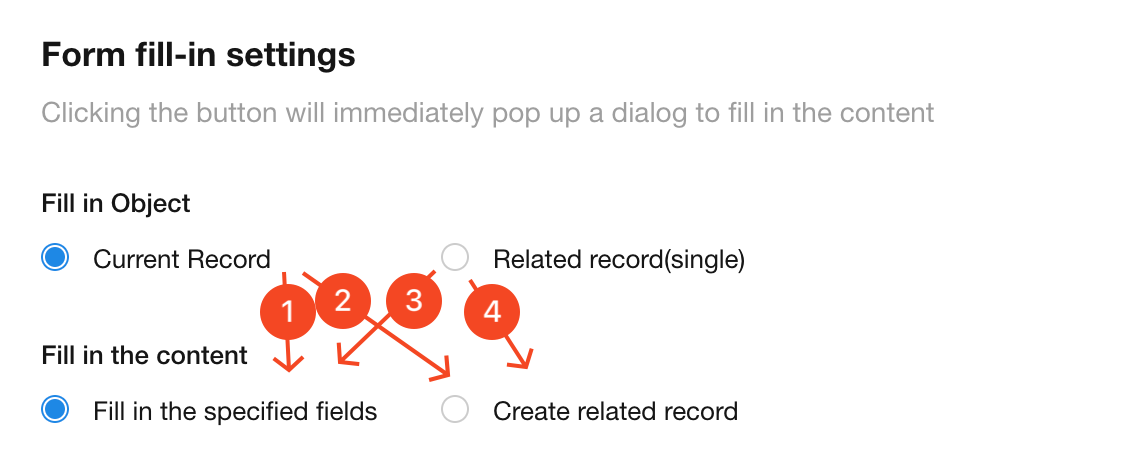
3. Field filling-in settings
-
Object: Fields in the current record or fields in related records (single-row relationship)
-
Content: Fill in specified fields or create a new related record
-
Fill in specified fields in the current record
Supports setting default values for fields
For Members and Date fields, dynamic default values can be set
-
Create a record related with the current record
After clicking the custom action, a pop-up window displays the page for creating the related record
-
Fill in fields of the record related with the current record
After clicking the custom action, a pop-up window displays the fields of the related record
Example: A contact record is related with a company record. When clicking the custom action in the contact record, a window opens directly to edit the fields in the company record
-
Add a new related record for the record related with the current record
Settings for fields to be filled
For fields displayed in the pop-up window, you can configure them as read-only, editable, required, etc.
Default values can be configured for fields in the following ways:
-
Fixed default value
-
Dynamic default value
-
Empty (clears field value if no input is provided)
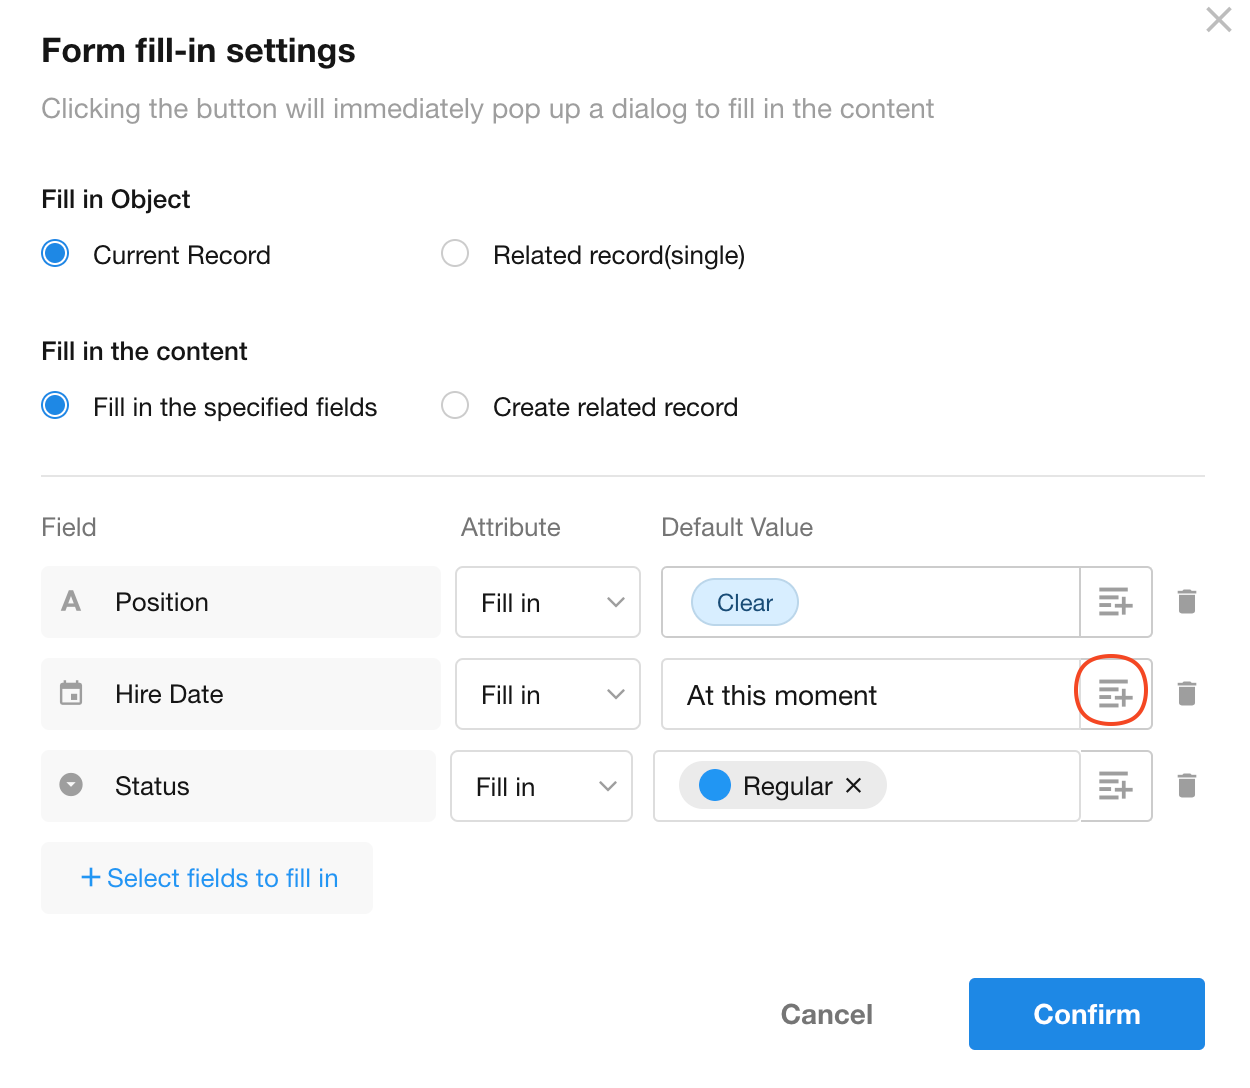
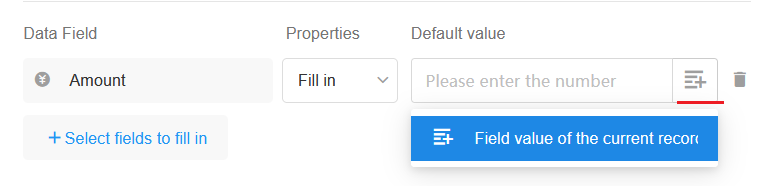
For fields in related records, when setting default values, you may select field values from the current record as the default.
5. Double check and comments
If enabled, clicking a custom action will:
-
Prompt the operator about subsequent steps
-
Require confirmation to proceed
-
Support adding comments
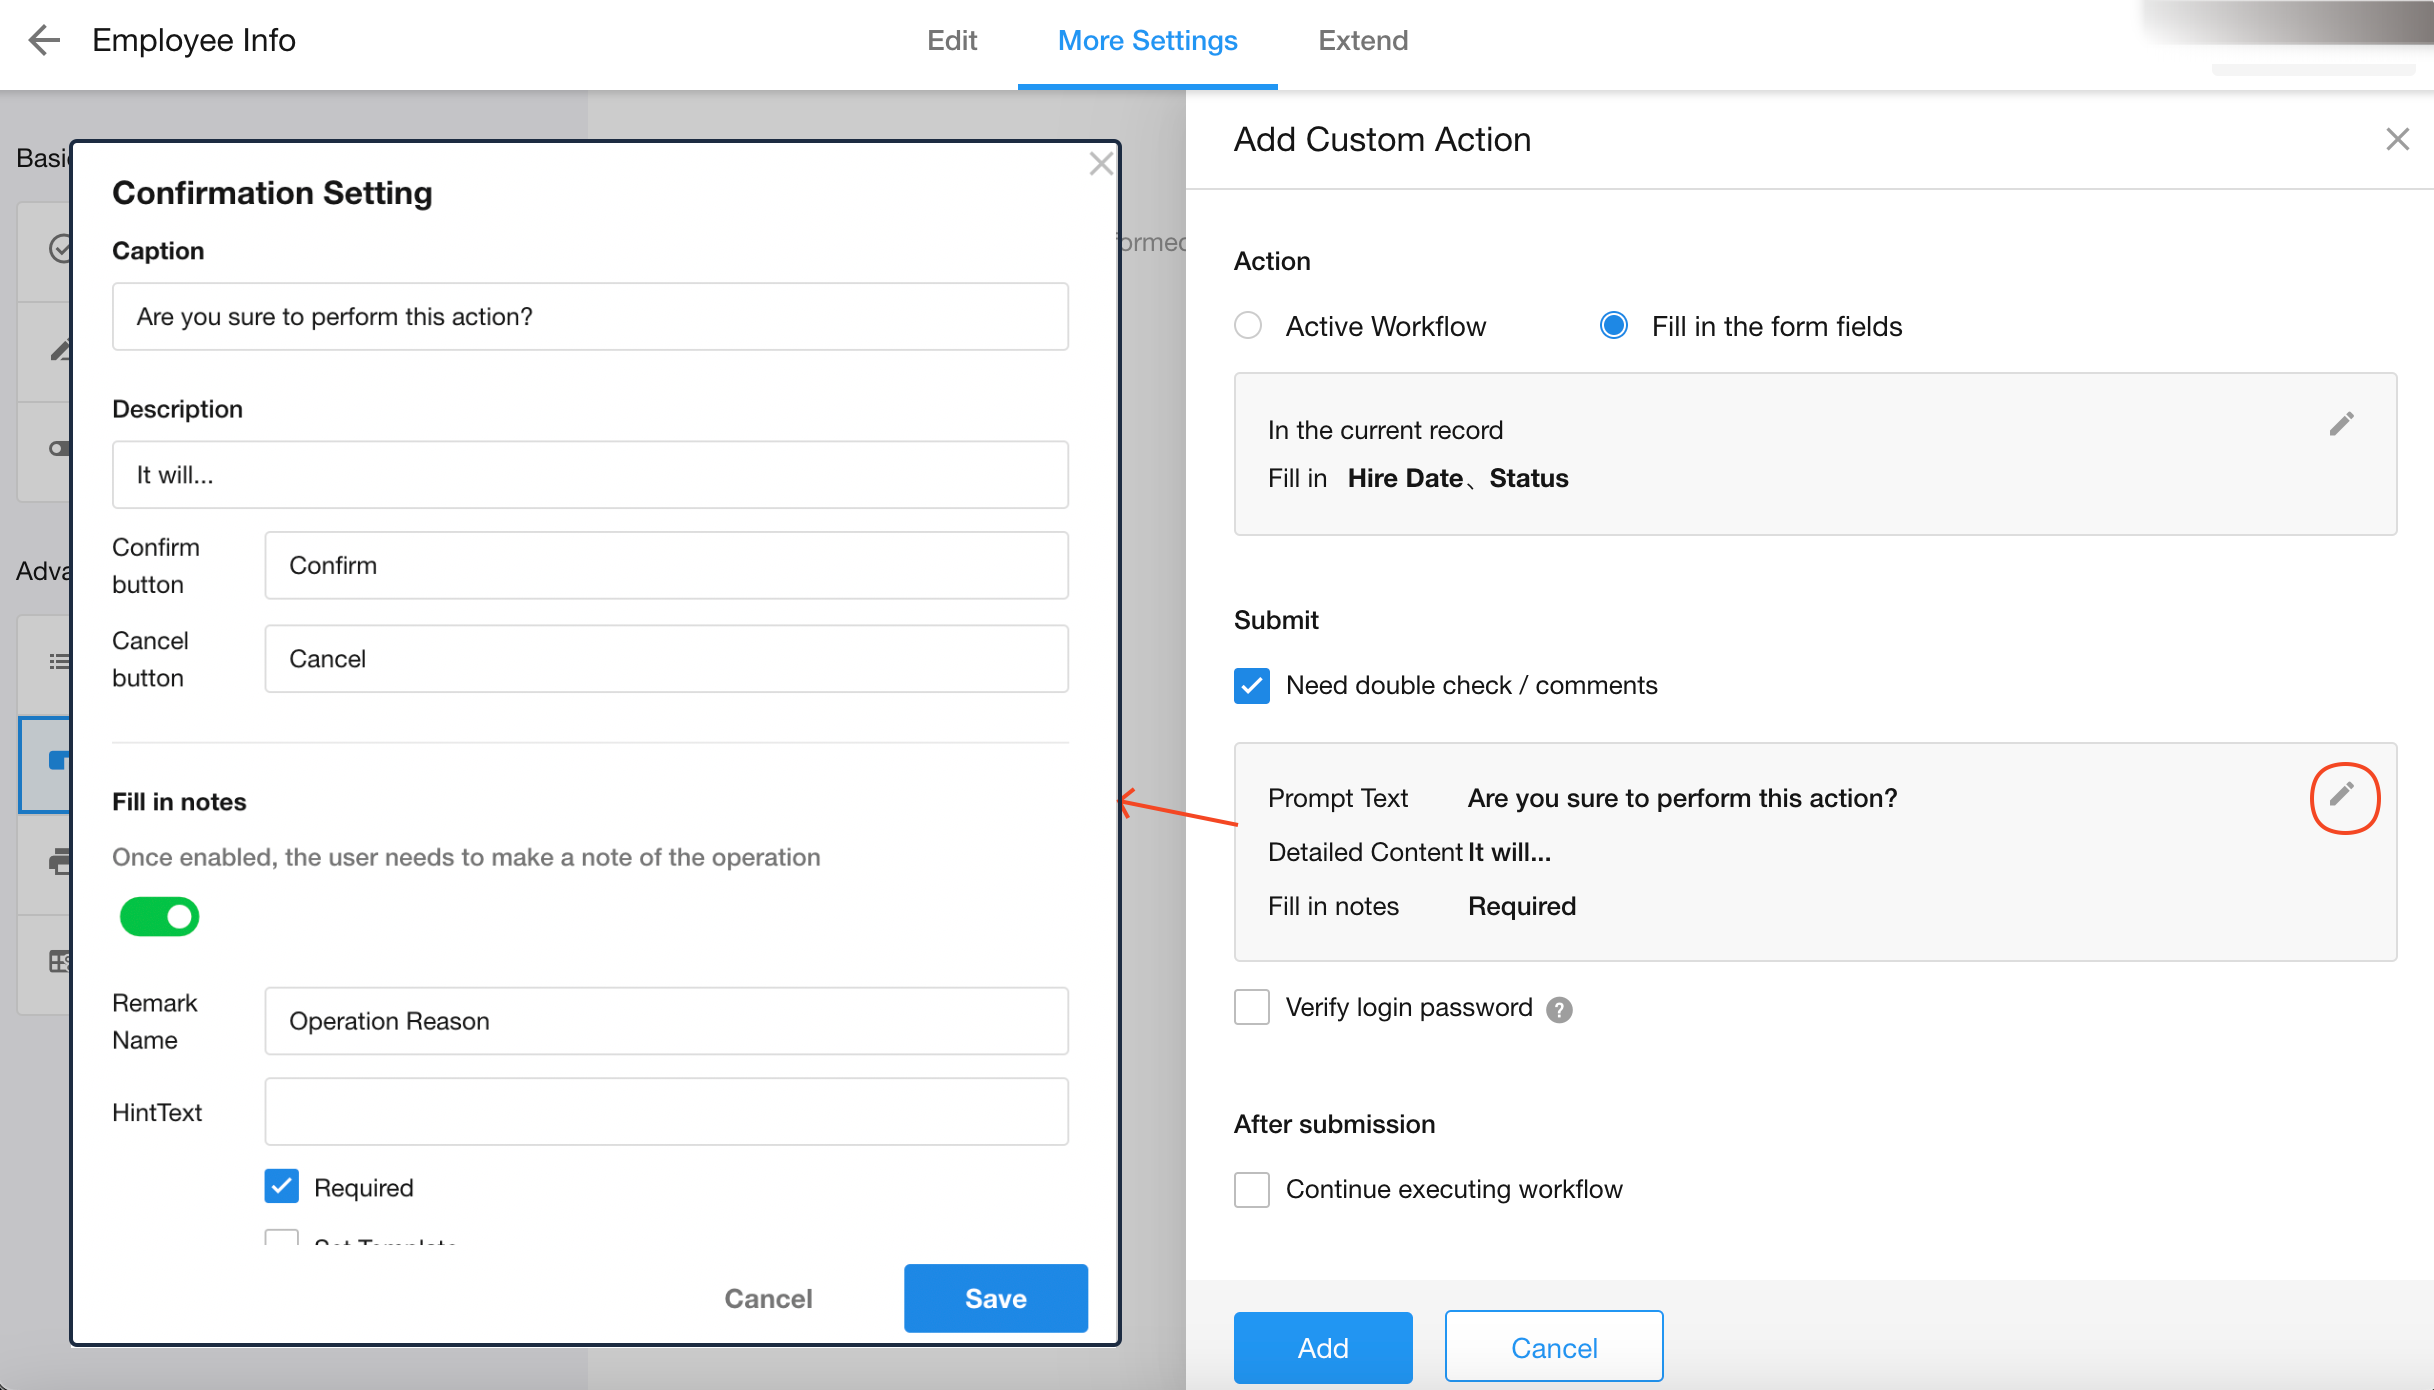
As shown below, a secondary confirmation appears after clicking the action. Field editing is only permitted after clicking "Confirm".

Comment Templates
When setting remarks, template support is available - commonly used comments can be predefined as templates. If unchecked, free-text input is allowed for users.

The remarks can be retrieved in the workflow as shown below.

6. Login password verification
If enabled, users must enter their login password to proceed with the action.

- When password verification is enabled, super admins can activate "1-Hour Password-Free Verification". If enabled, approvers may choose whether to skip password verification for 1 hour. View more setting details
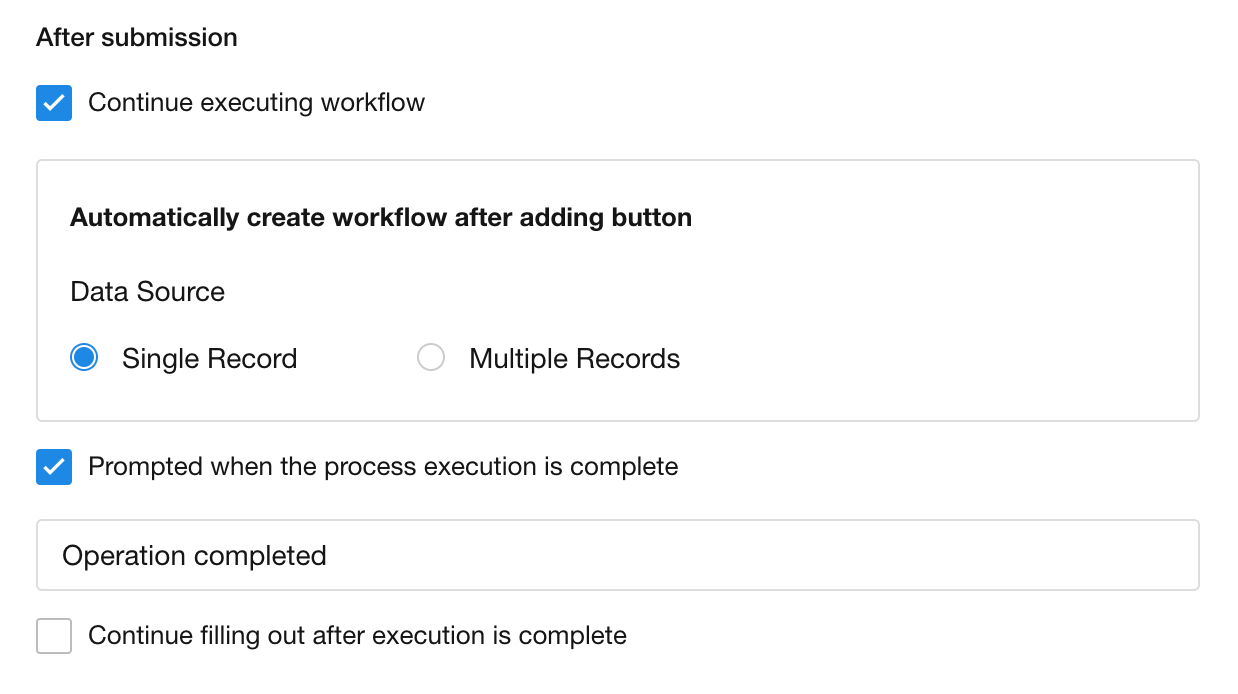
7. Continue workflow execution
-
After completing and submitting the fields, the corresponding workflow will automatically execute (see Example 2 for details).
-
Configure whether to notify the operator of the workflow execution result (see Example 2 for details).
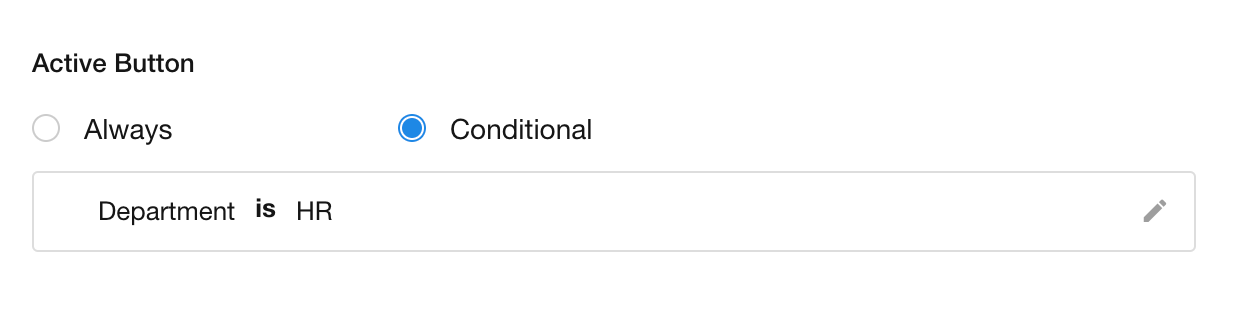
8. Enable custom actions
[Always]: The custom action can always be clicked.
[Conditional]: Set one or more field filters. The custom action can only be clicked if the current record meets the specified conditions. Otherwise, the action appears grayed out and is unclickable.
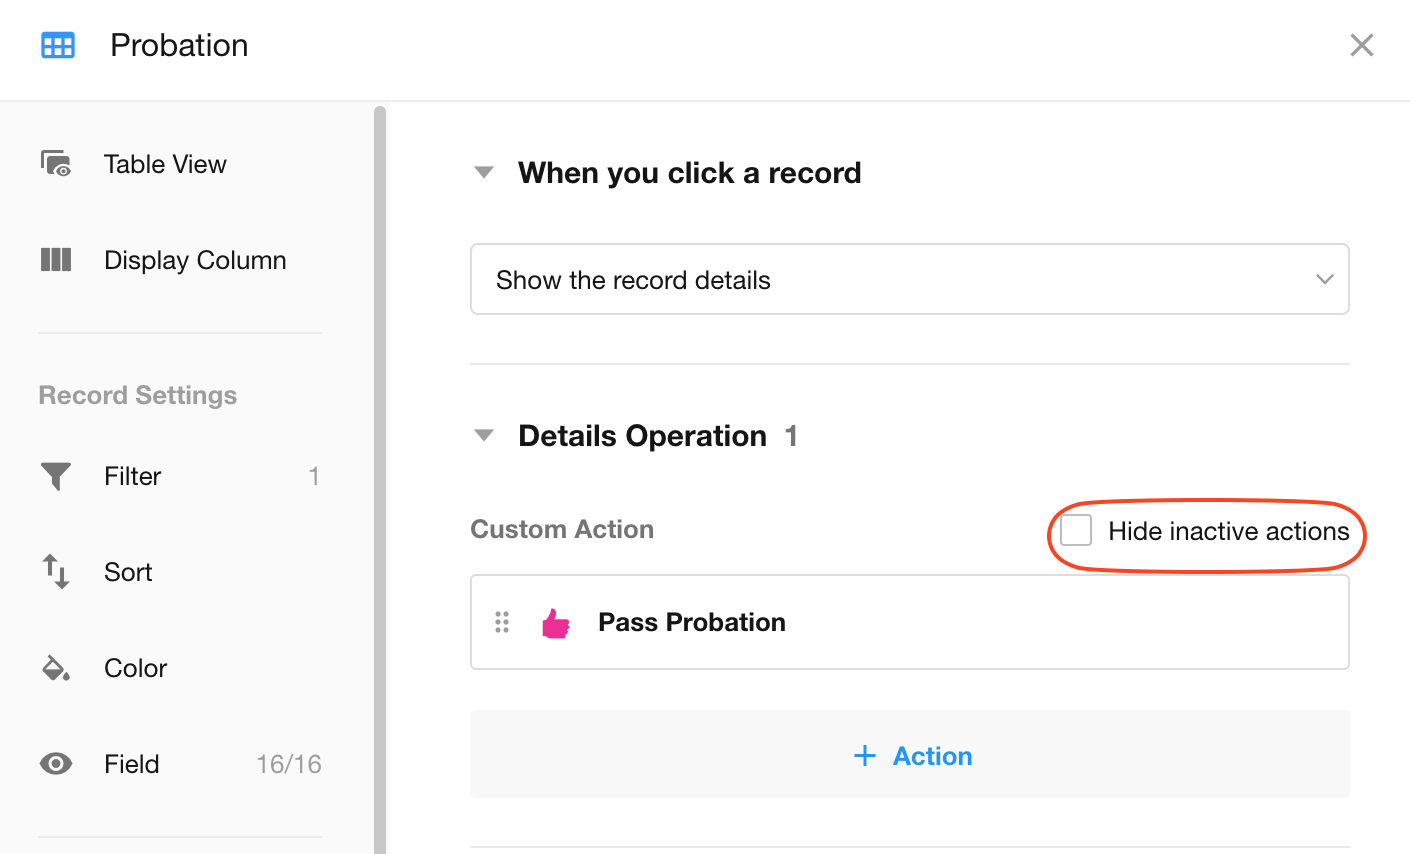
8. Hide custom actions
When conditions are not met:
-
By default, the button is disabled (grayed out)
-
For a cleaner interface, you can choose to hide unavailable actions
-
In the view where the custom action is located, check "Hide unavailable buttons" to enable this option.
9. Effect
Example 2: Execute a Workflow After Clicking a Custom Action
In the "Internship" view, add a "Convert to Full-time" custom action. When clicked, it triggers a workflow to automatically:
-
Update the "Status" field to "Full-time"
-
Set the "Date" field to the current date
1. Custom action name/description
To distinguish it from the action in Example 1, we name this custom action "Convert to Full-time 2".

2. Set action to "Execute Workflow"
When executing the workflow:
-
Specify whether the data source is a single record or multiple records
-
In this example, clicking "Convert to Full-time" applies to an individual employee, so it is single record.

Prompted when the process execution is complete
If "Prompted when the process execution is complete" is checked, the operator receives a customizable prompt upon finishing the workflow.
3. Other settings
Refer to Example 1 for configurations like:
-
Double check/comments
-
Login password verification
-
Enabling custom actions
-
Action icons and colors
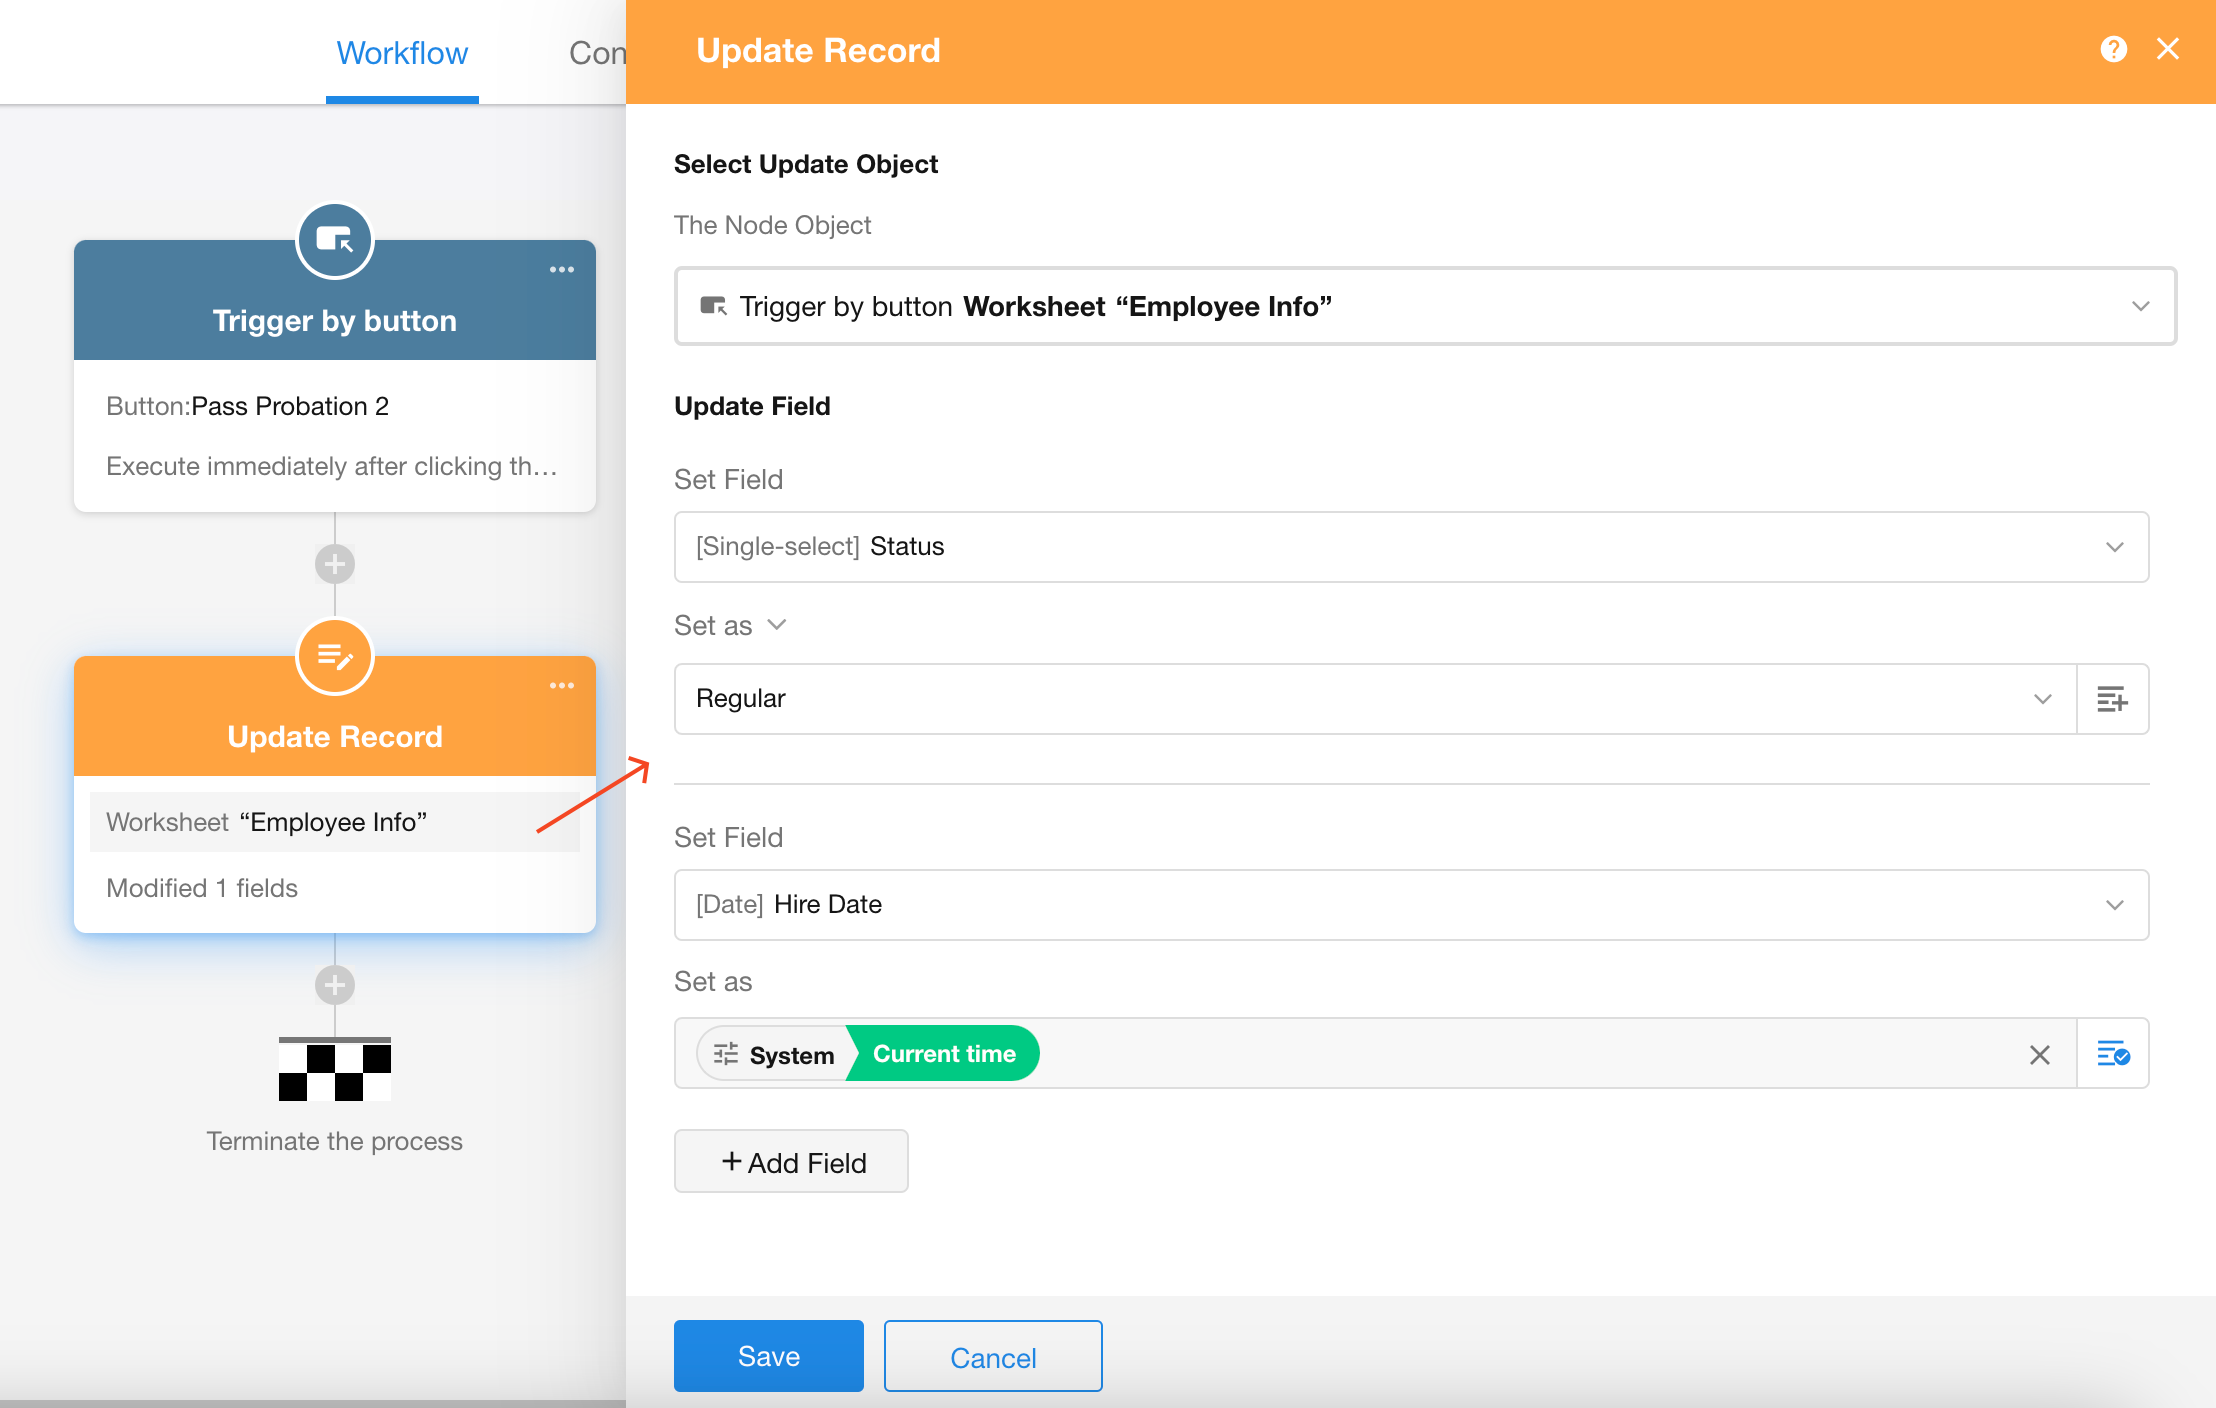
4. Configure the workflow
After adding the custom action, the workflow configuration page opens automatically. Add an "Update Record" node to modify the "Status" field, and "Date" field.
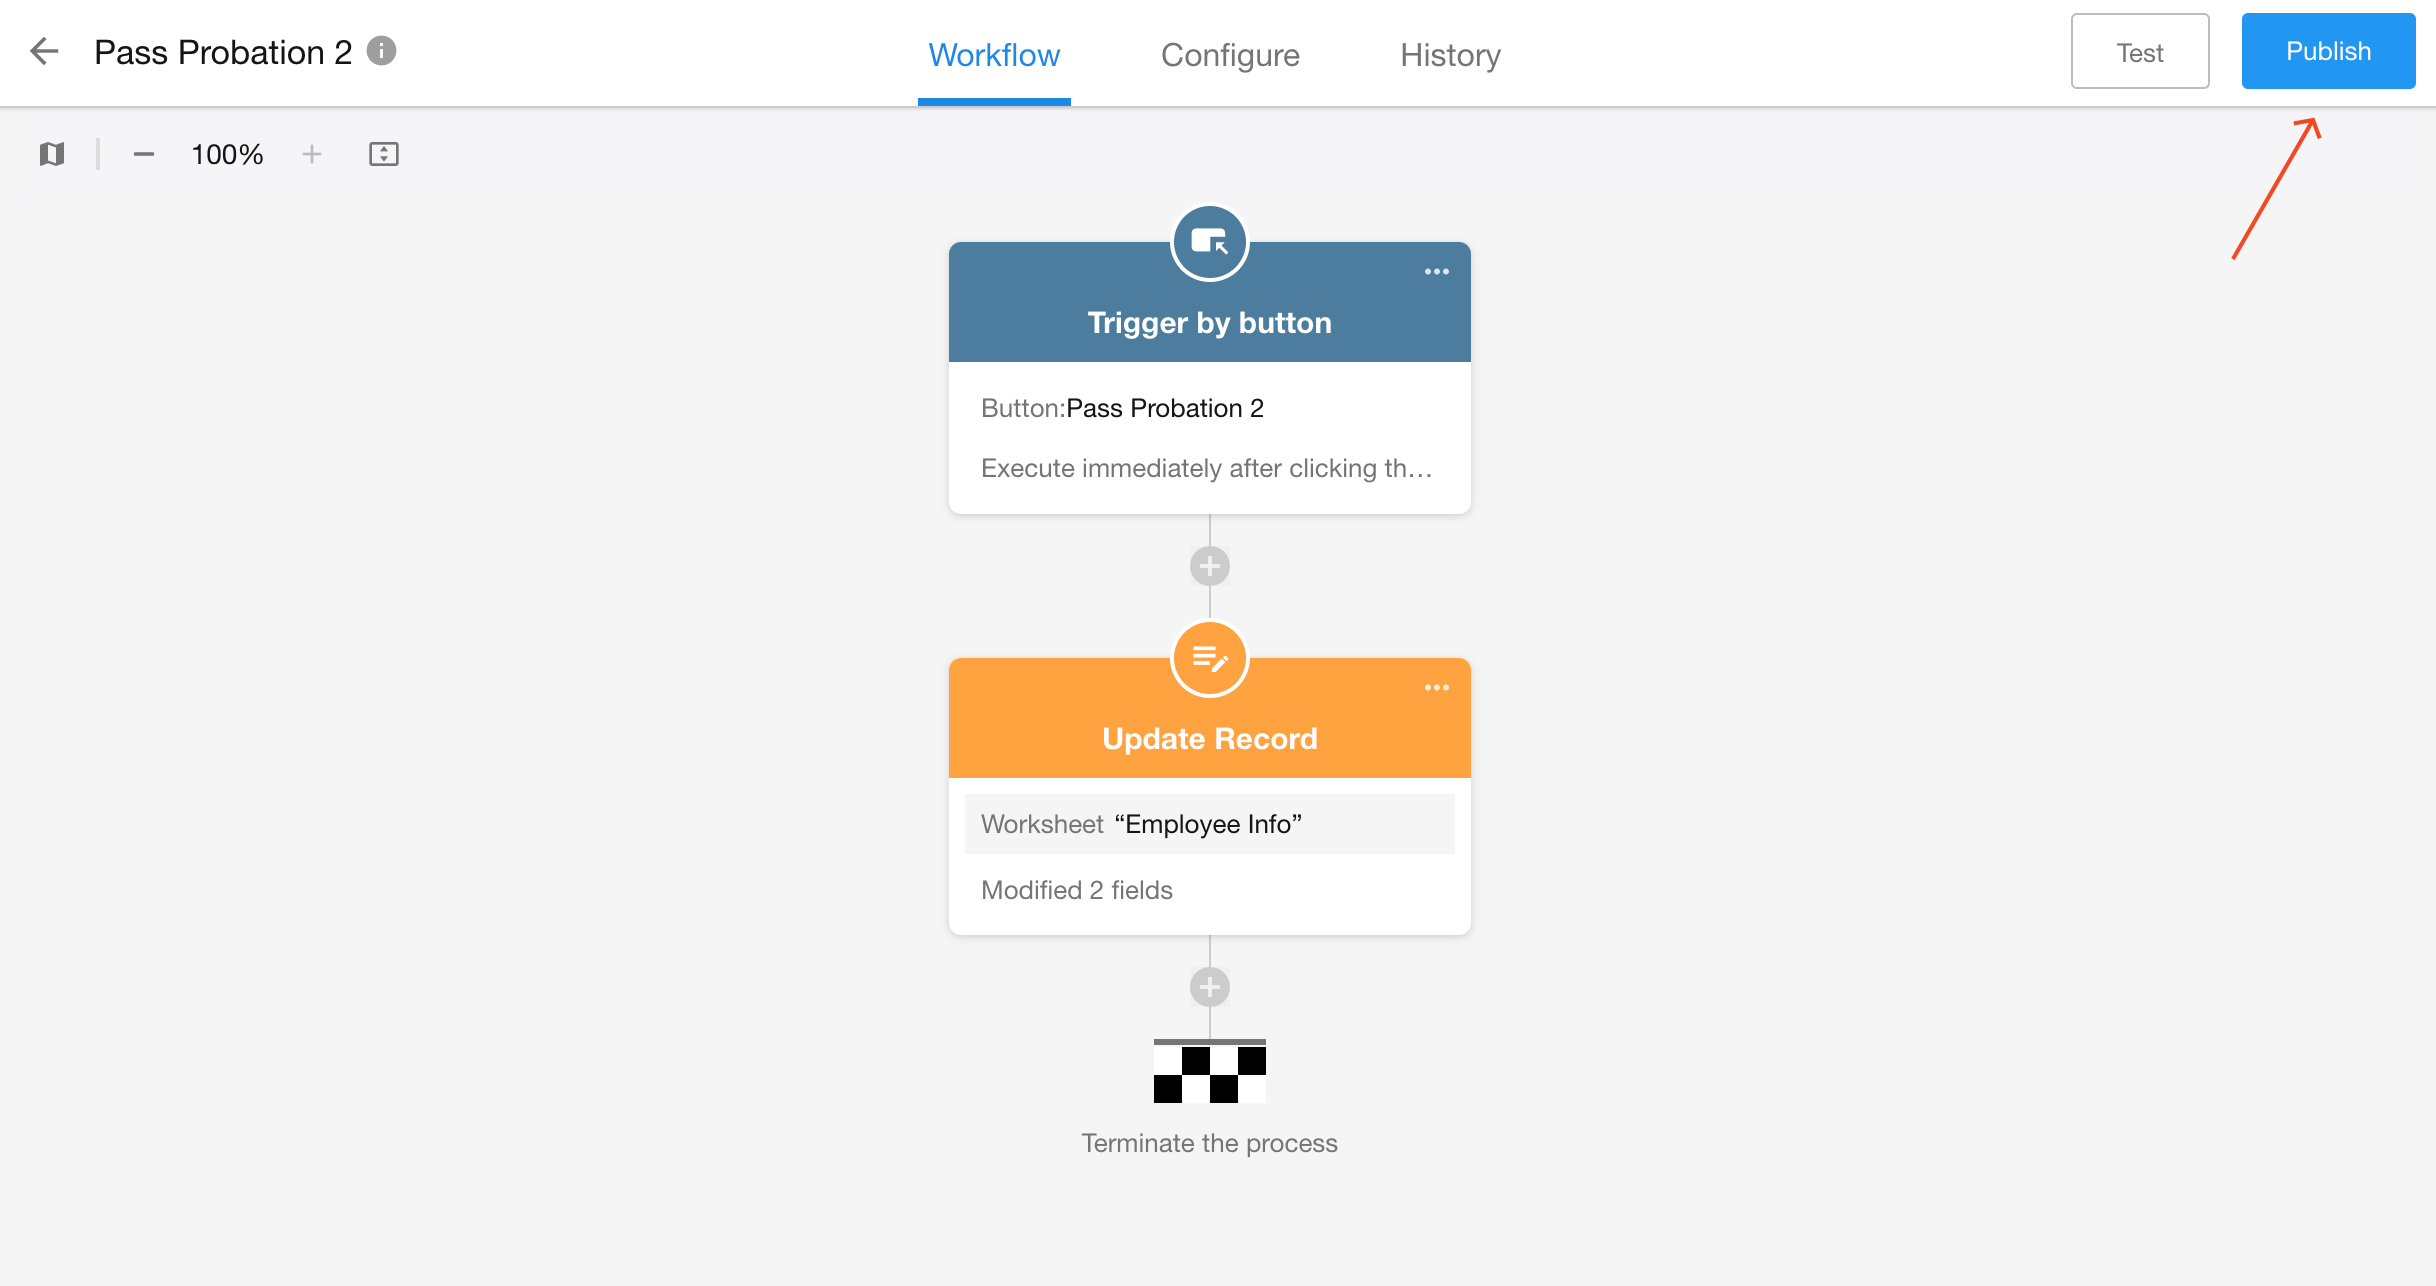
5. Publish the workflow
6. Test
Open an employee record with "Internship" status. After clicking the "Convert to Full-time" action, the workflow automatically updates the field values.
Example 3: Select Multiple Records and Execute a Workflow Once
Example: For employees' business trip expenses, select multiple expense detail records to automatically generate a reimbursement request.
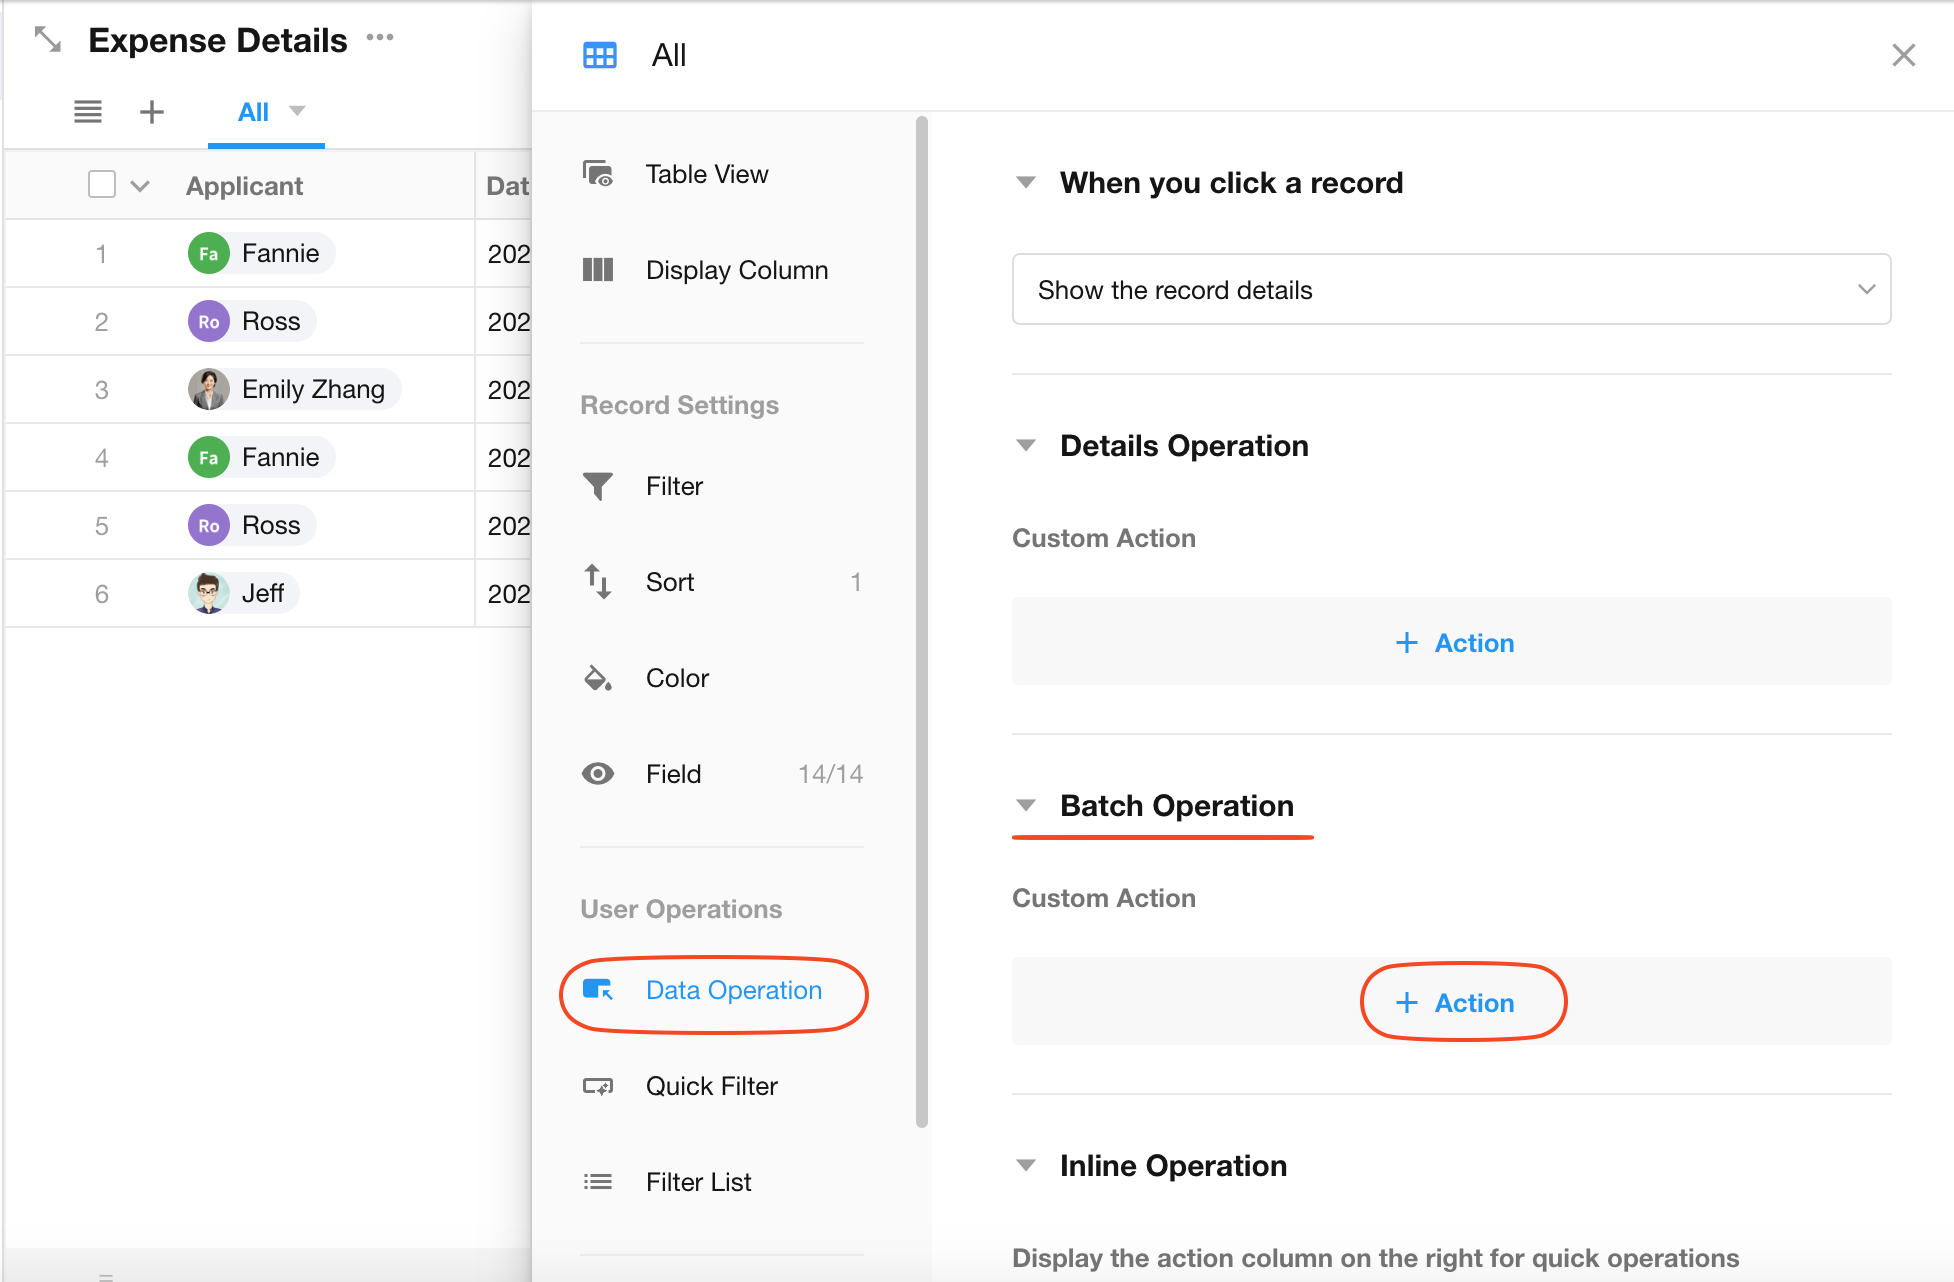
1. Create a Custom Action for Batch Operations
Add a custom action in the expense details worksheet.
2. Use Multiple Records as Data Source
Select multiple records, and trigger the workflow once after clicking the custom action.

3. Configure the workflow
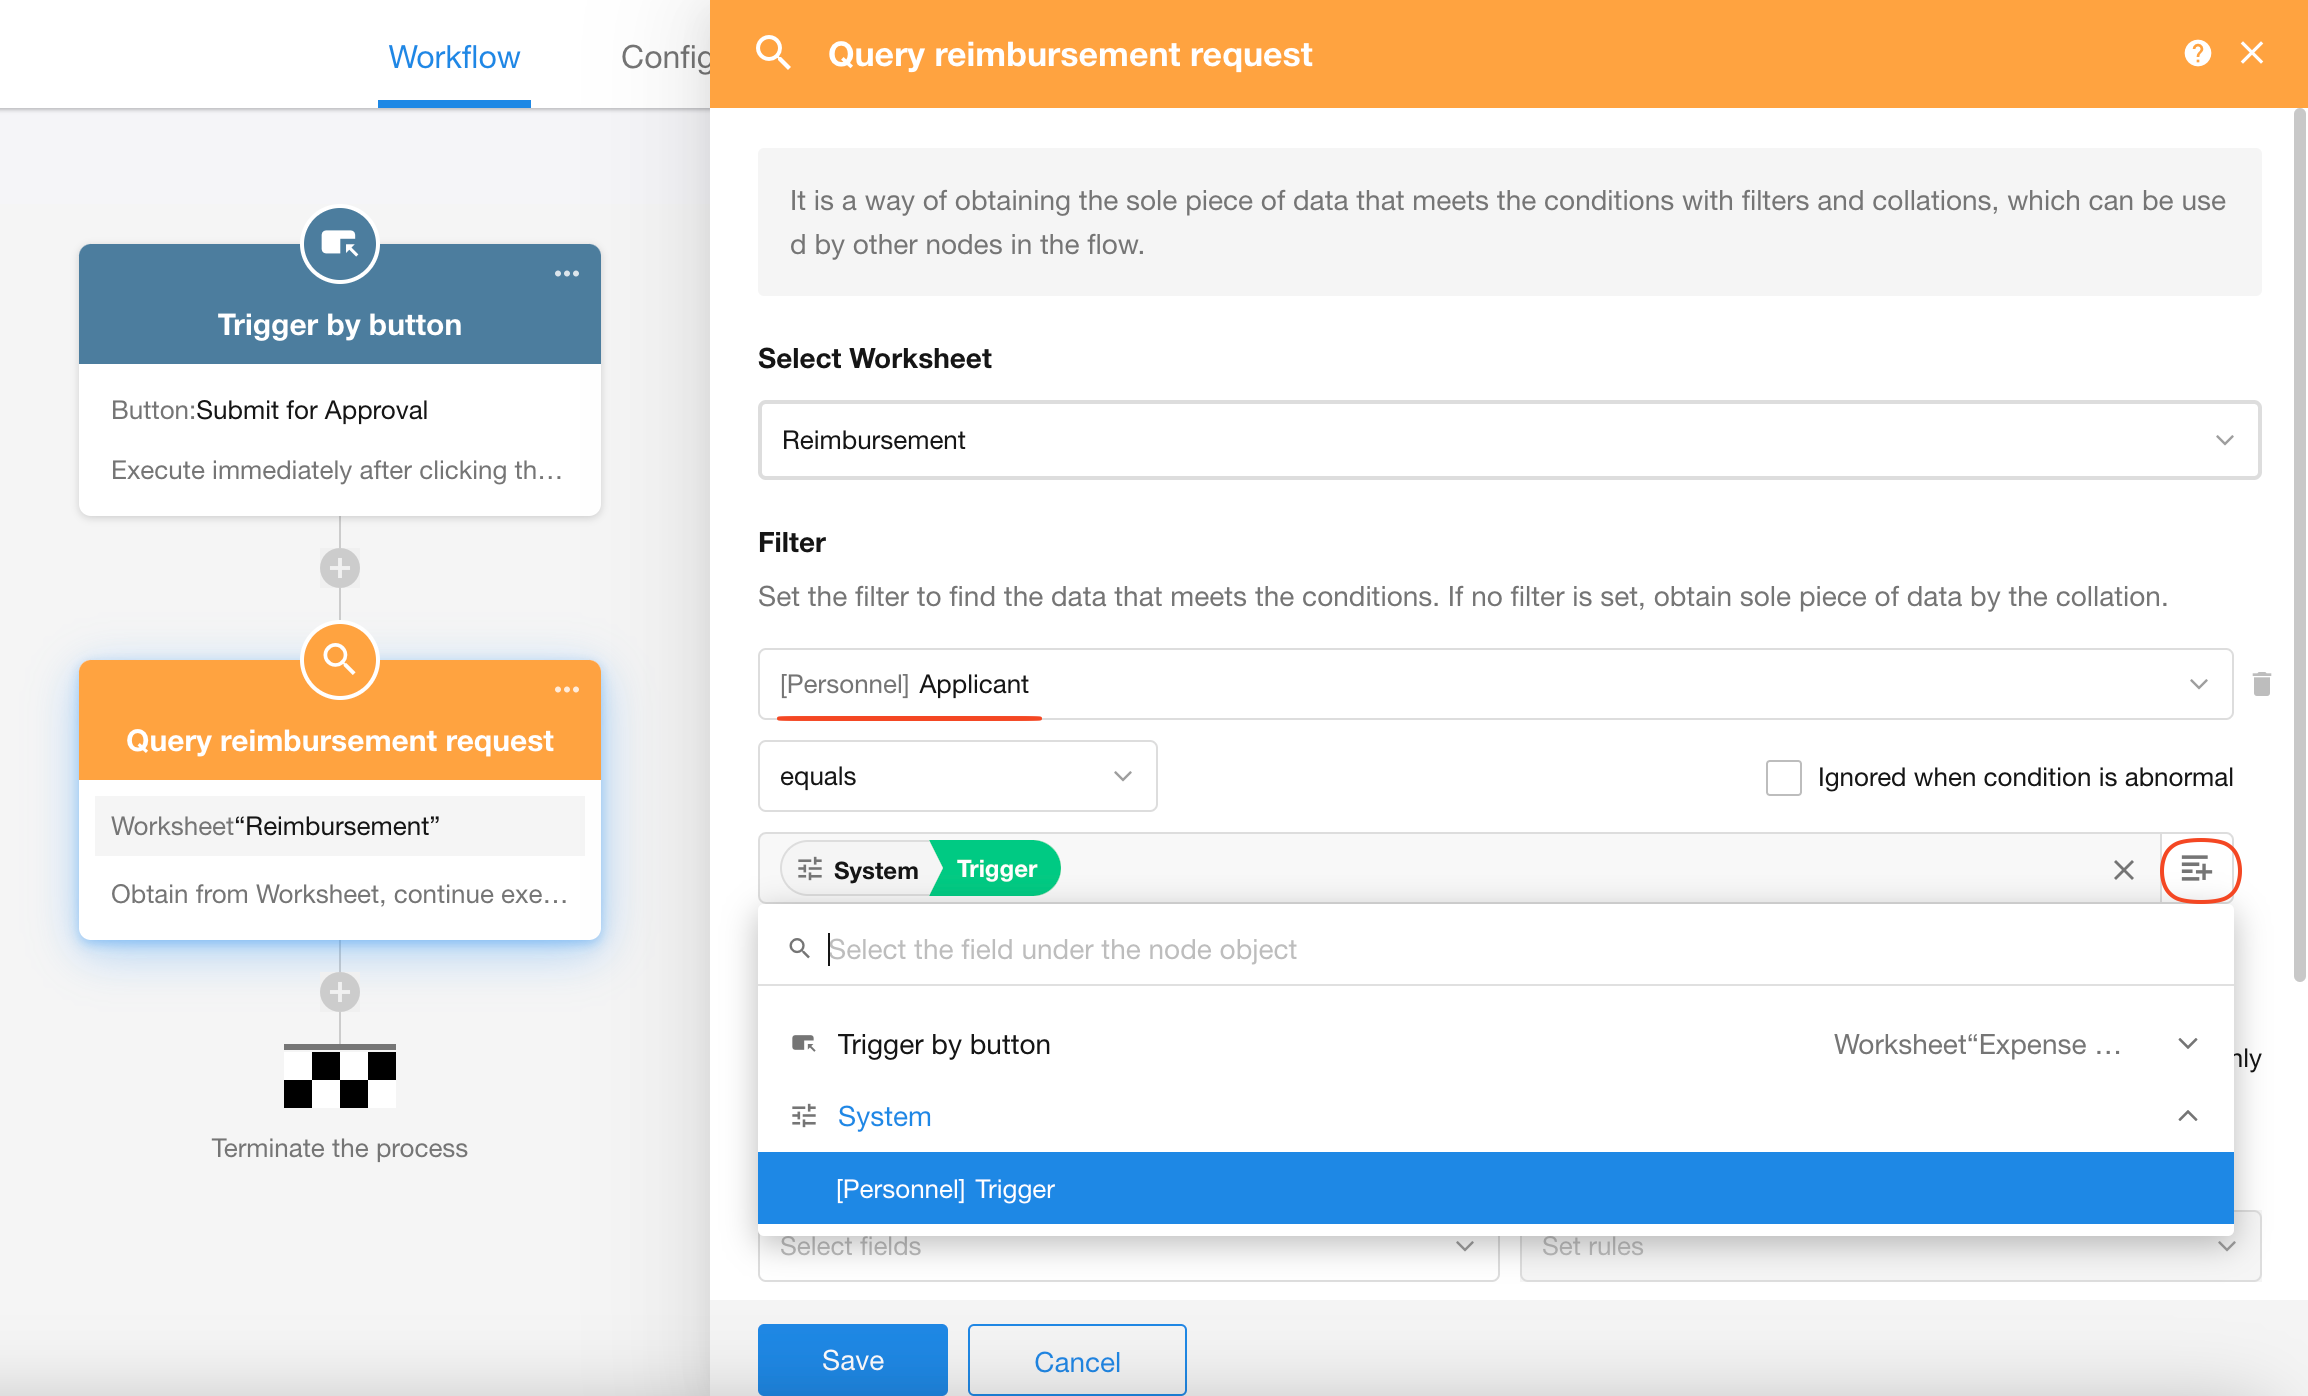
-
1)Retrieve the last submitted reimbursement request
Obtain information (e.g., bank account, department) from the most recently submitted reimbursement record.
-
2)Fetch any one of the selected expense detail records
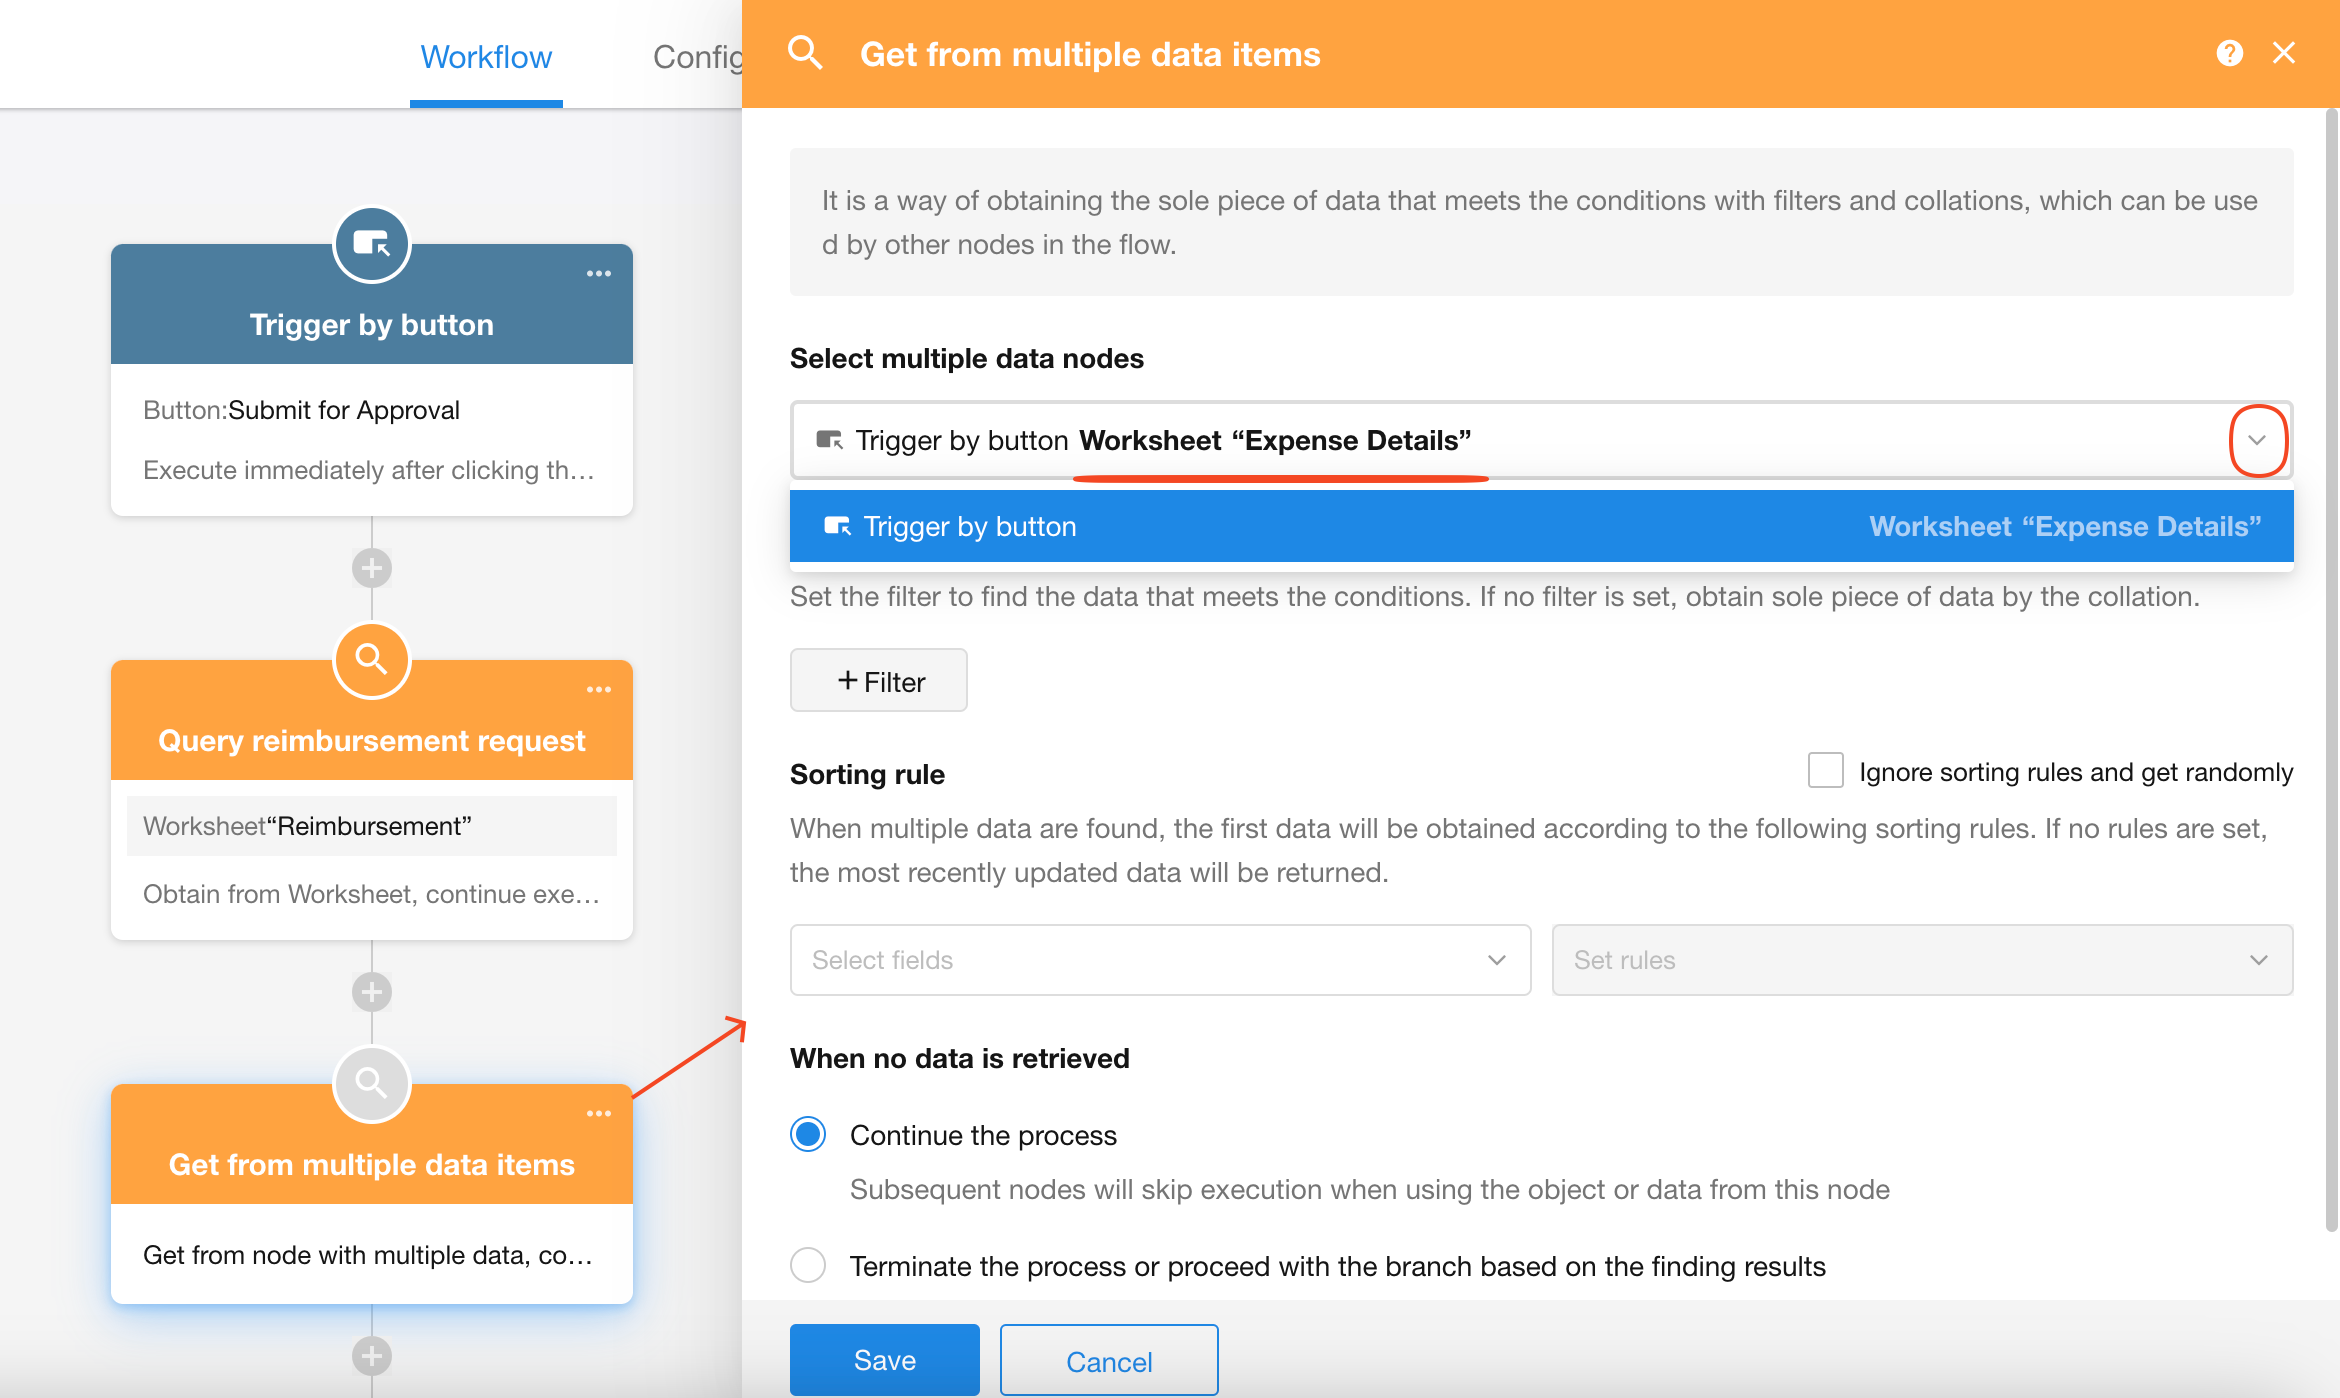
-
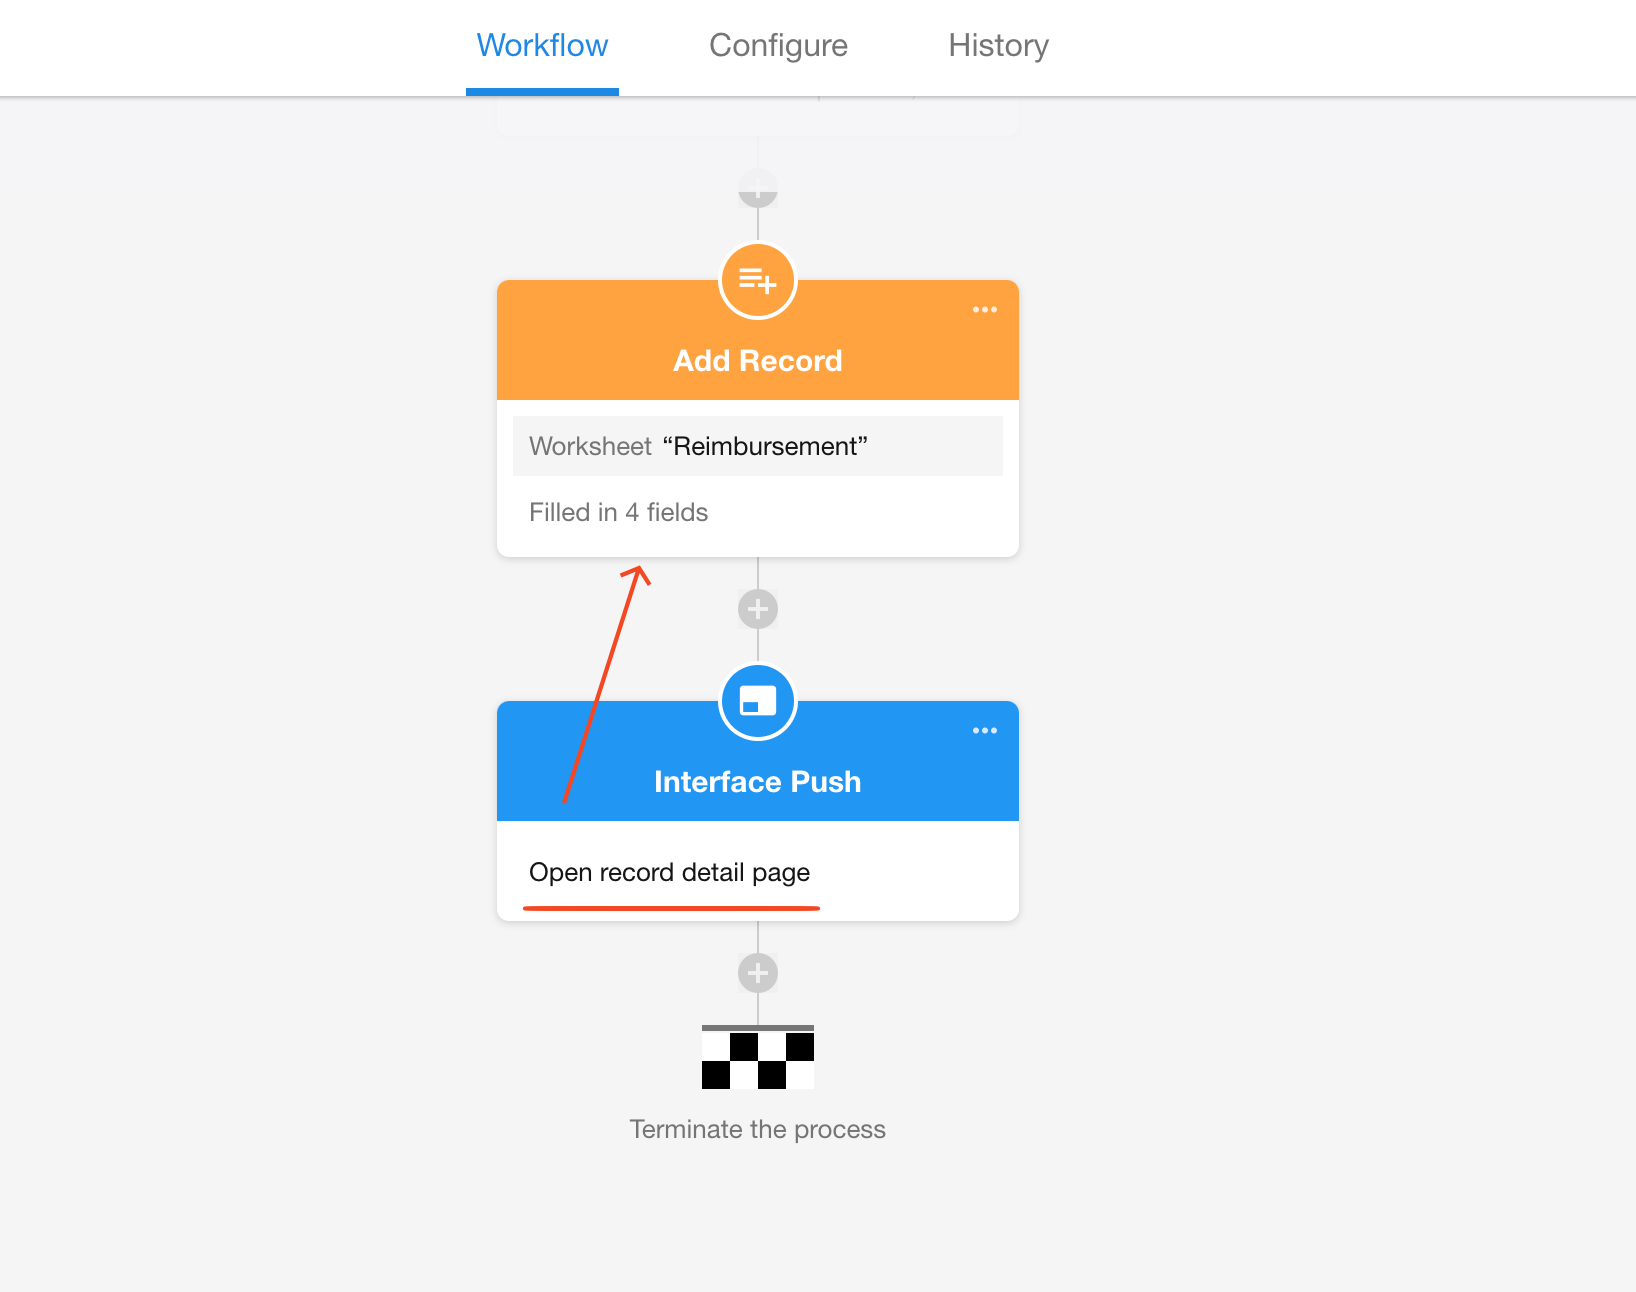
3)Create a new reimbursement request record

-
4)Display the new record in a pop-up window
If additional fields in the new record need completion, add an "Interface Push" node to automatically open the newly created reimbursement request record.
Effect:
Triggerring person of a workflow activated by a custom action
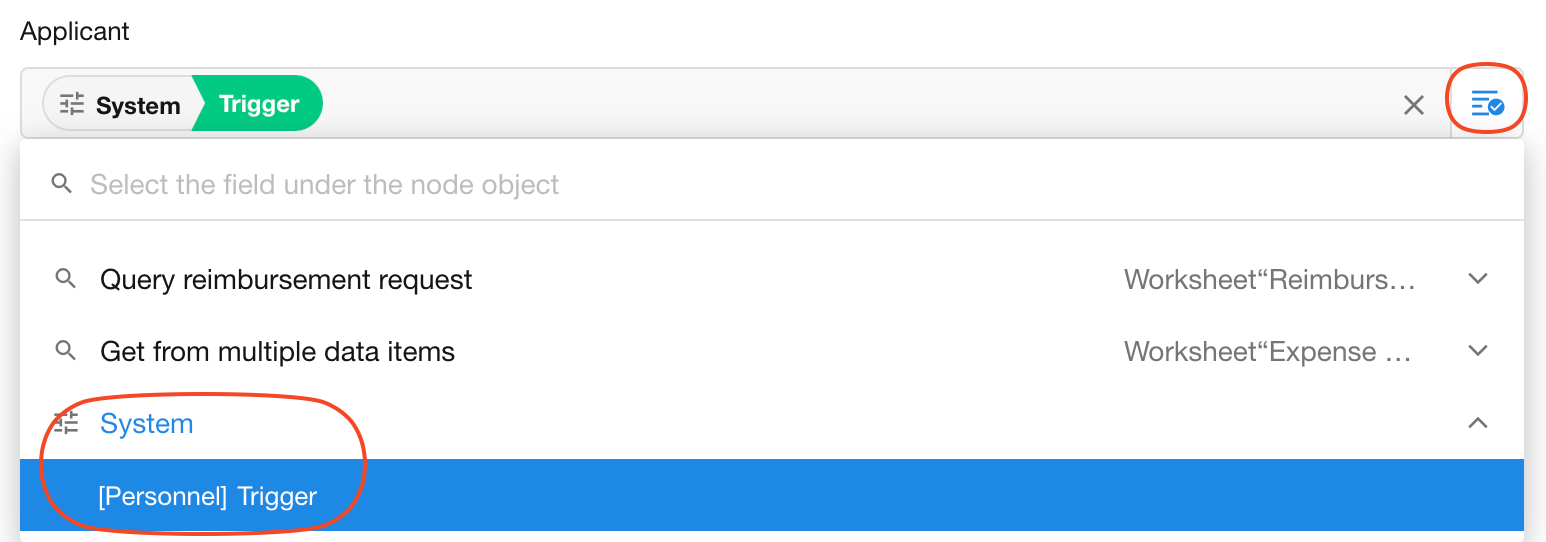
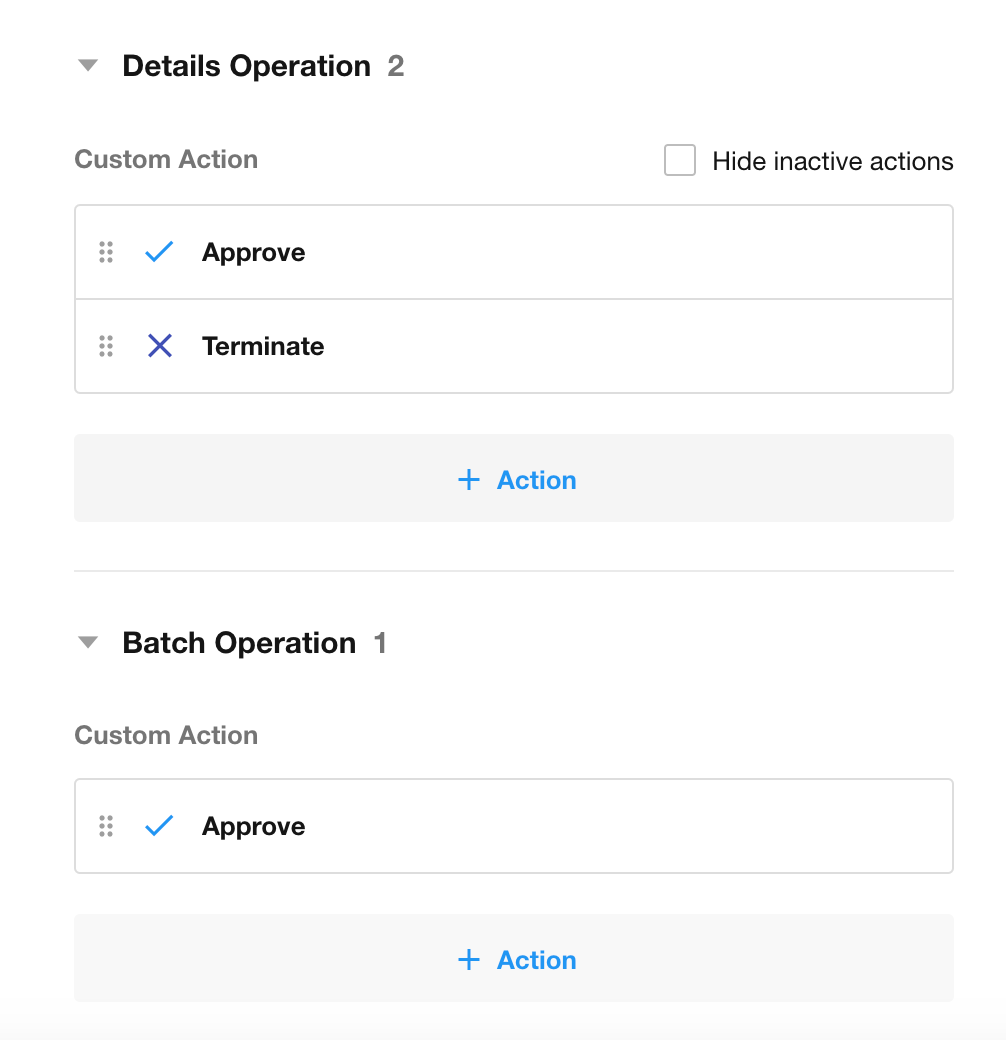
Custom Actions in Record Detail Page/Batch Operation
Custom actions can be configured separately for availability in:
-
Record details page
Available when:
-
Clicking to open a record's detail page
-
Selecting a single record in the worksheet
-
-
Batch operation
Available when:
- Selecting multiple records in table view
As shown in the settings below:
-
The "Approve" button is available in BOTH record details and batch operations
-
The "Terminate" button is ONLY available in record details
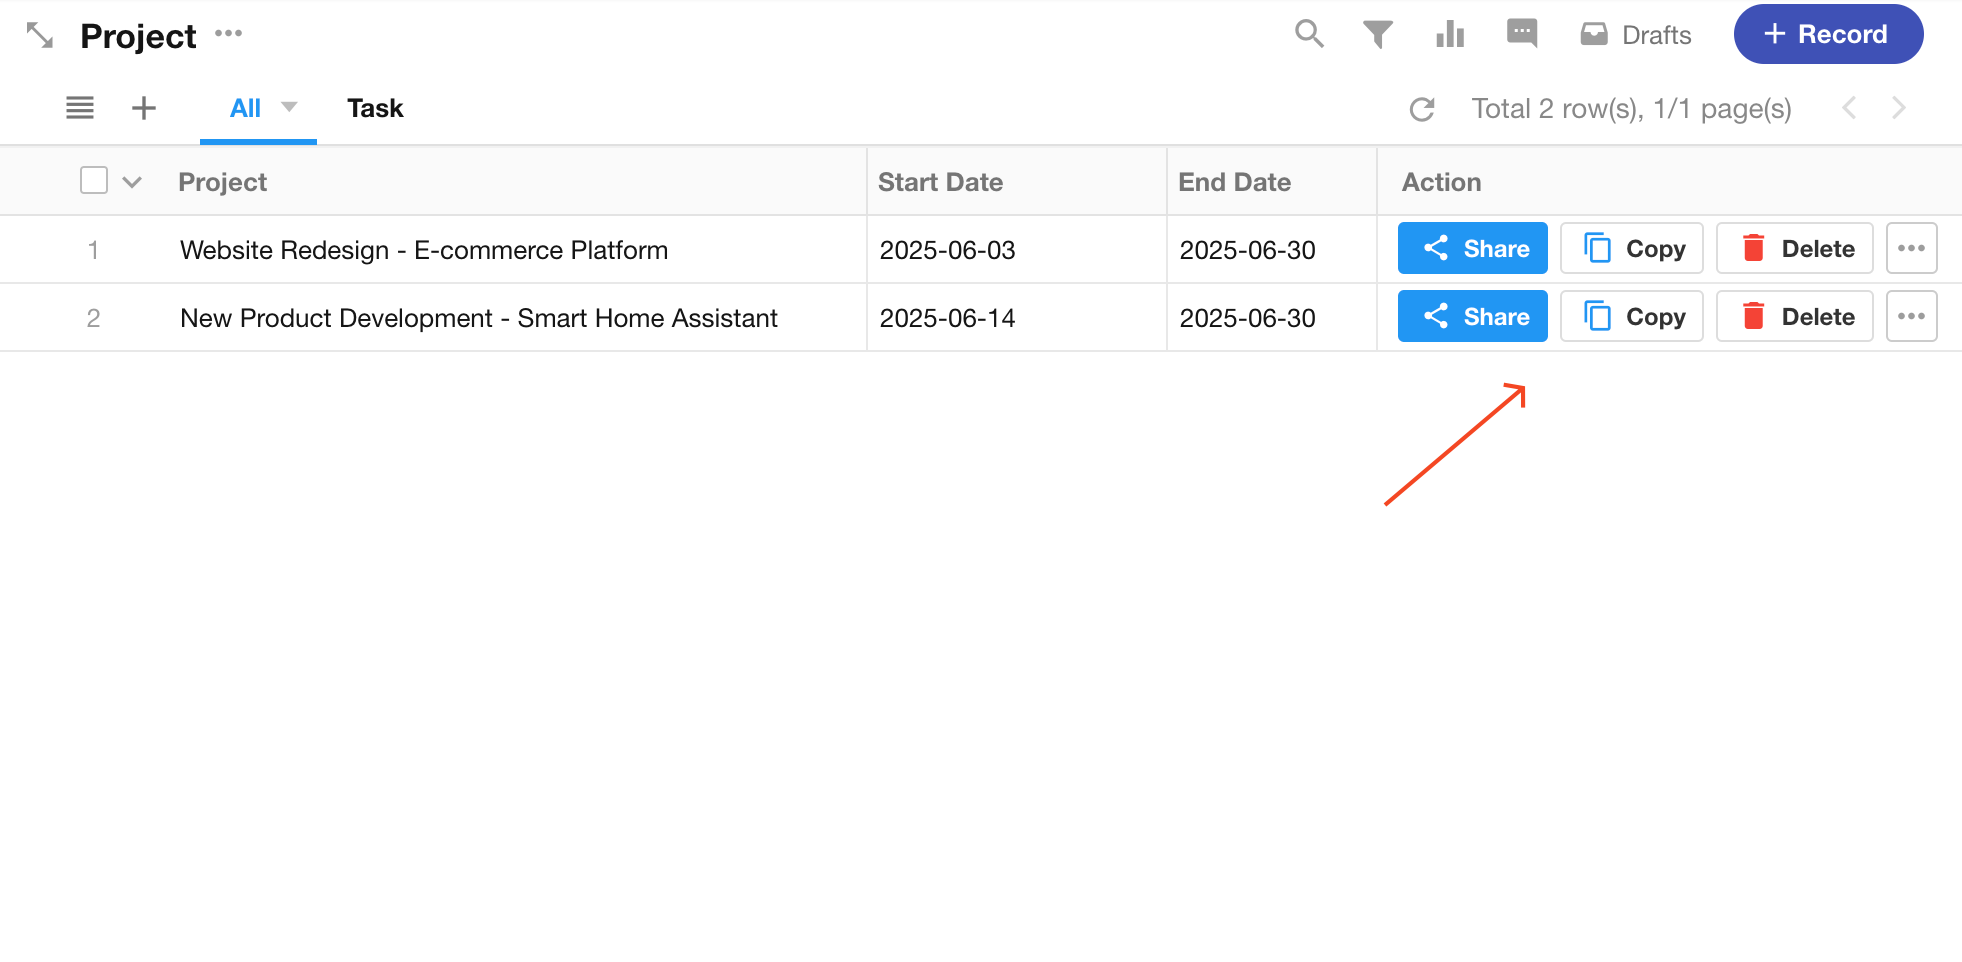
Quick Actions - Display Buttons in Cell and Card
Users can add and display custom actions in the worksheet's operation column for quick record operations.
Supported Actions: Custom actions, system buttons, and configured print templates
Supported Views: Table, Kanban, Gallery, Org View
If an action is unavailable in the current view, it will be hidden in the operation column; if record data doesn't meet the custom action's conditions, the button appears grayed out and unclickable.
In Table Cell:
In Card:
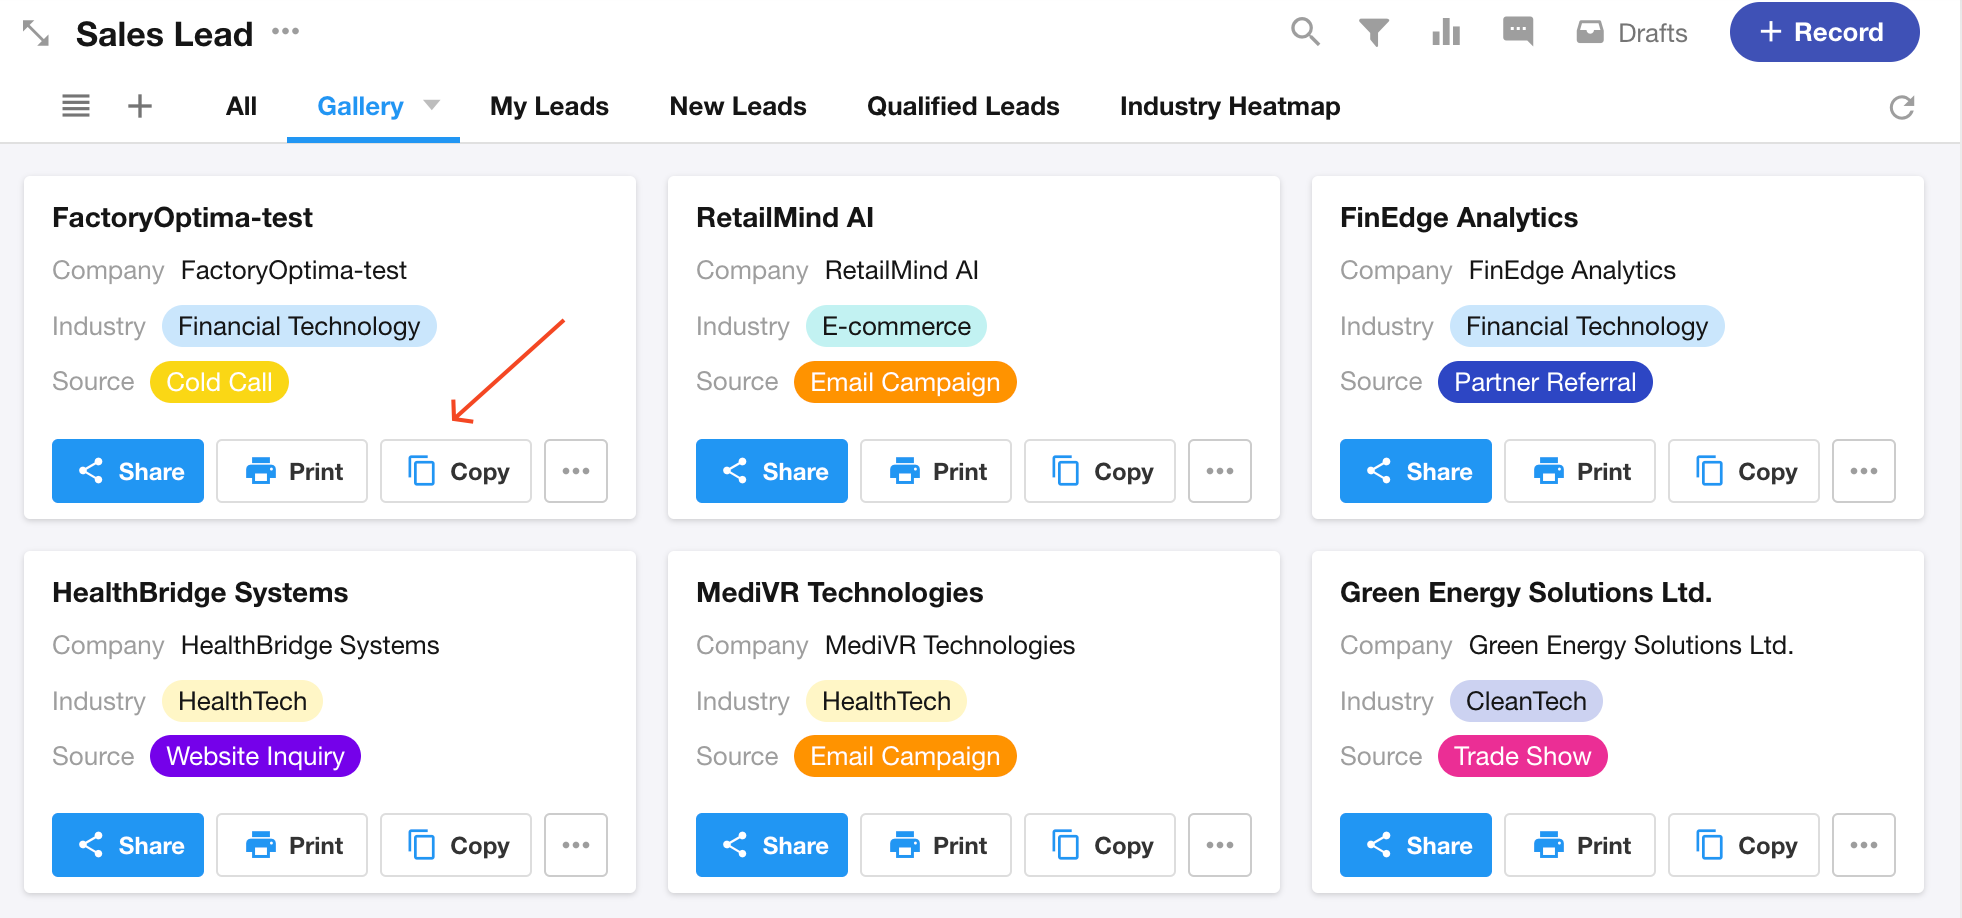
Adding Custom Actions:
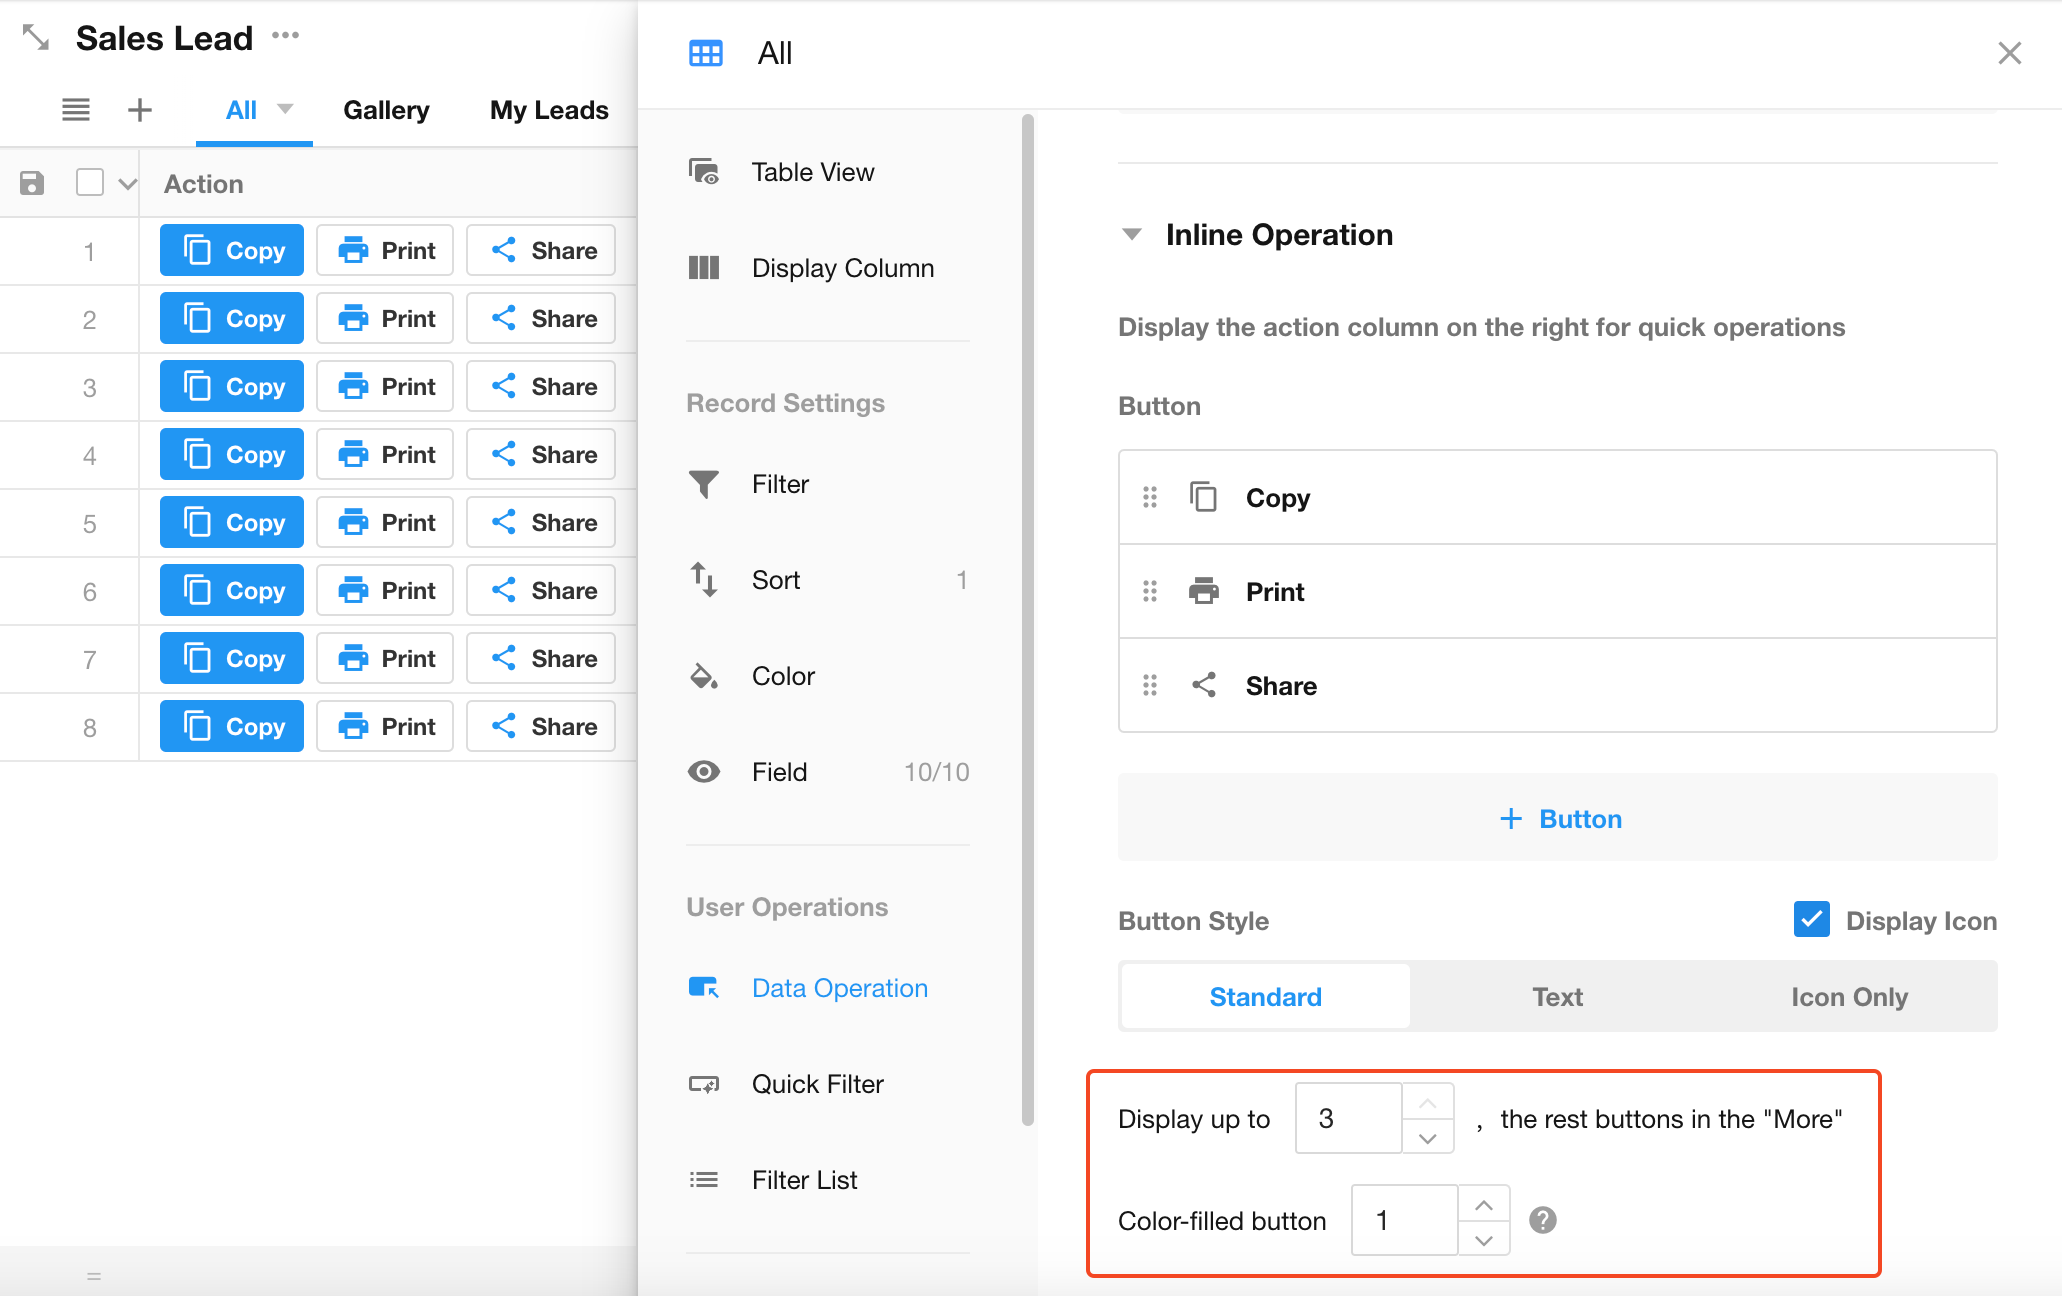
Go to [Configure View] > [Data Operation] > [Inline Operation], add the required action buttons.

Button Style
Three display formats available in table operation columns:
-
Standard: Shows name, icon, and color; icon display can be disabled.
-
Text: Shows text and icon; no color display; icon display can be disabled
-
Icon Only: Only shows icon; no name or color display
Number of displayed buttons
-
Set the maximum number of buttons shown in the operation column (up to 3).
-
Additional buttons are accessible via a "More" dropdown.
Primary buttons
-
Primary buttons display as color-filled buttons
-
Other buttons show as outlined buttons
-
Maximum of 3 primary buttons supported