Import and Upgrade Applications
Overview
The application import and upgrade feature allows configuration changes from a source application to be synchronized to a target application through an import operation, enabling rapid application updates.
Common Use Cases
-
Rapid Validation and Deployment — After validating application changes in a testing environment, synchronize the updates to the production environment through an import operation.
-
Multi-Environment Synchronization — Synchronize verified configurations from development or testing environments (such as workflow designs, worksheet structures, and permission settings) directly to the production environment, ensuring consistency across environments.
Upgrade an Application
Export the Source Application
After the source application (or development application) has been updated and fully tested, export the application and then import it into the target application to perform an upgrade.
What Are Source-Related Applications?
Suppose you create an application A, then export and import it to create A1, or duplicate it to create A2. In this case, A, A1, and A2 are considered source-related applications.
Each application has an internal source ID that is not visible to users. Source-related applications share the same source ID. Changes made to any of these applications can be imported into the others for upgrades.
Upgrade a Single Application
Access the Upgrade Page
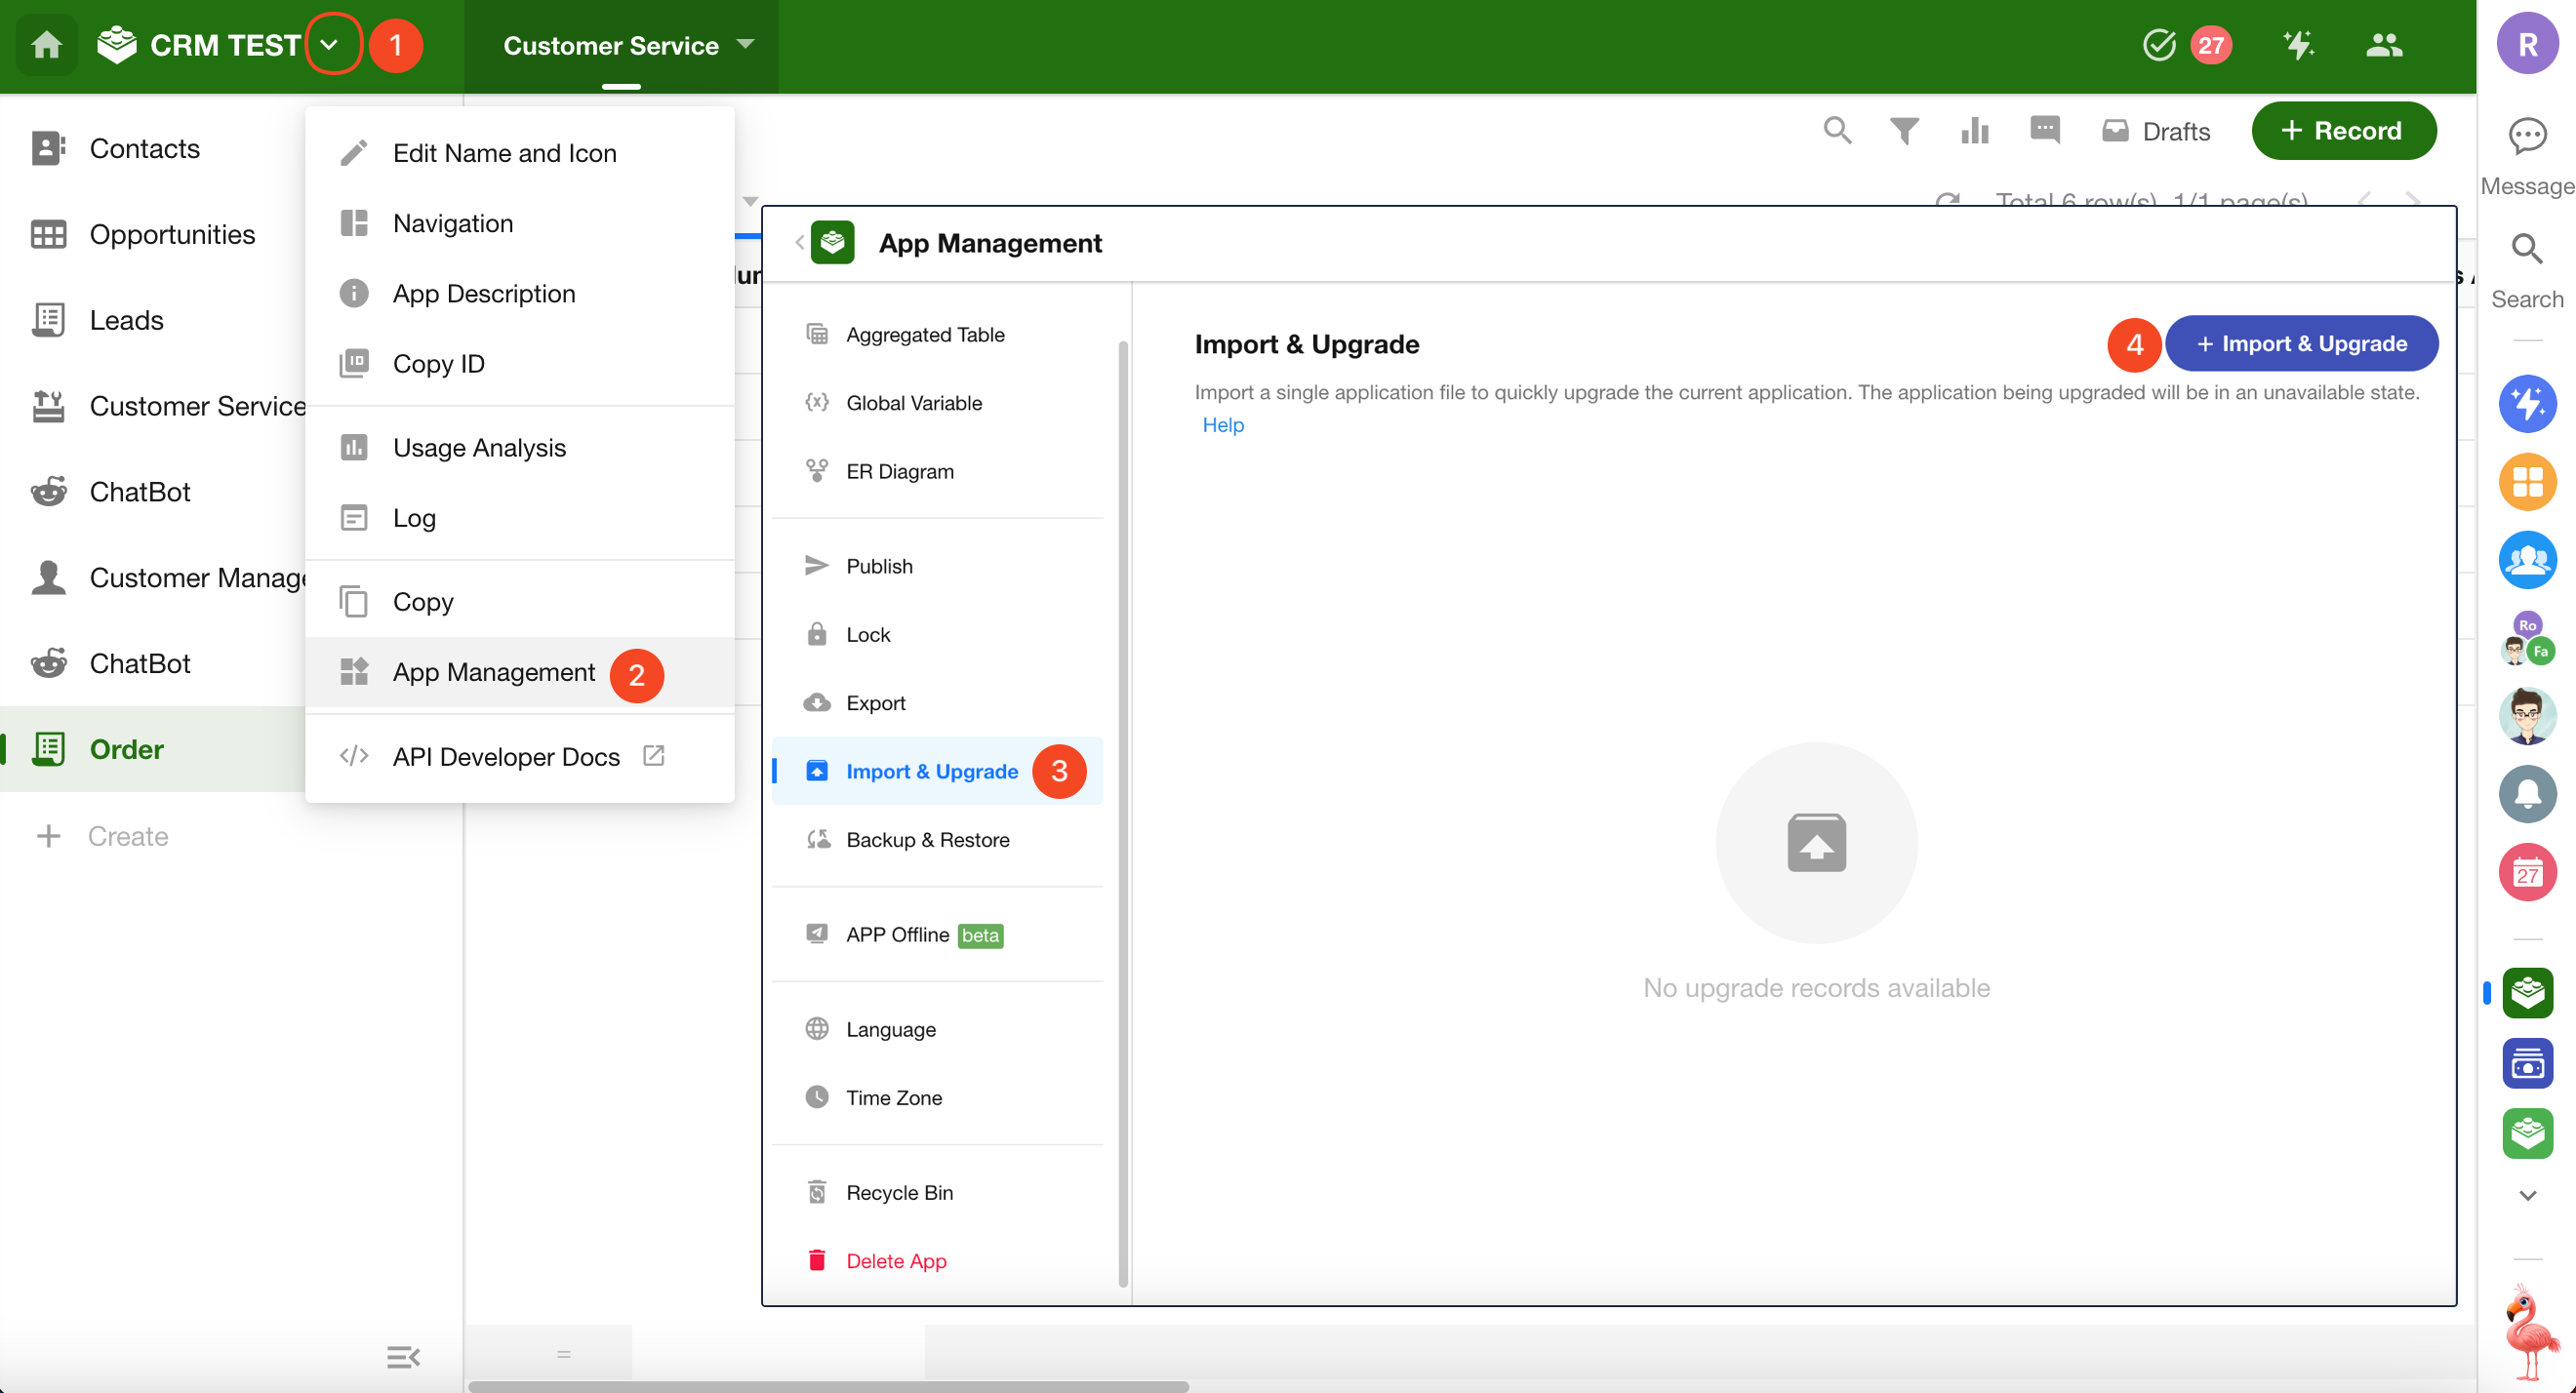
Application administrators can go to App Management and select Import & Upgrade from the left navigation menu.
Upload the Upgrade File
Select and upload the exported .mdy file.
During upload, the system validates the password and file format. If the uploaded file is not from a related application, the following message is displayed:
The imported file is not eligible for upgrade.

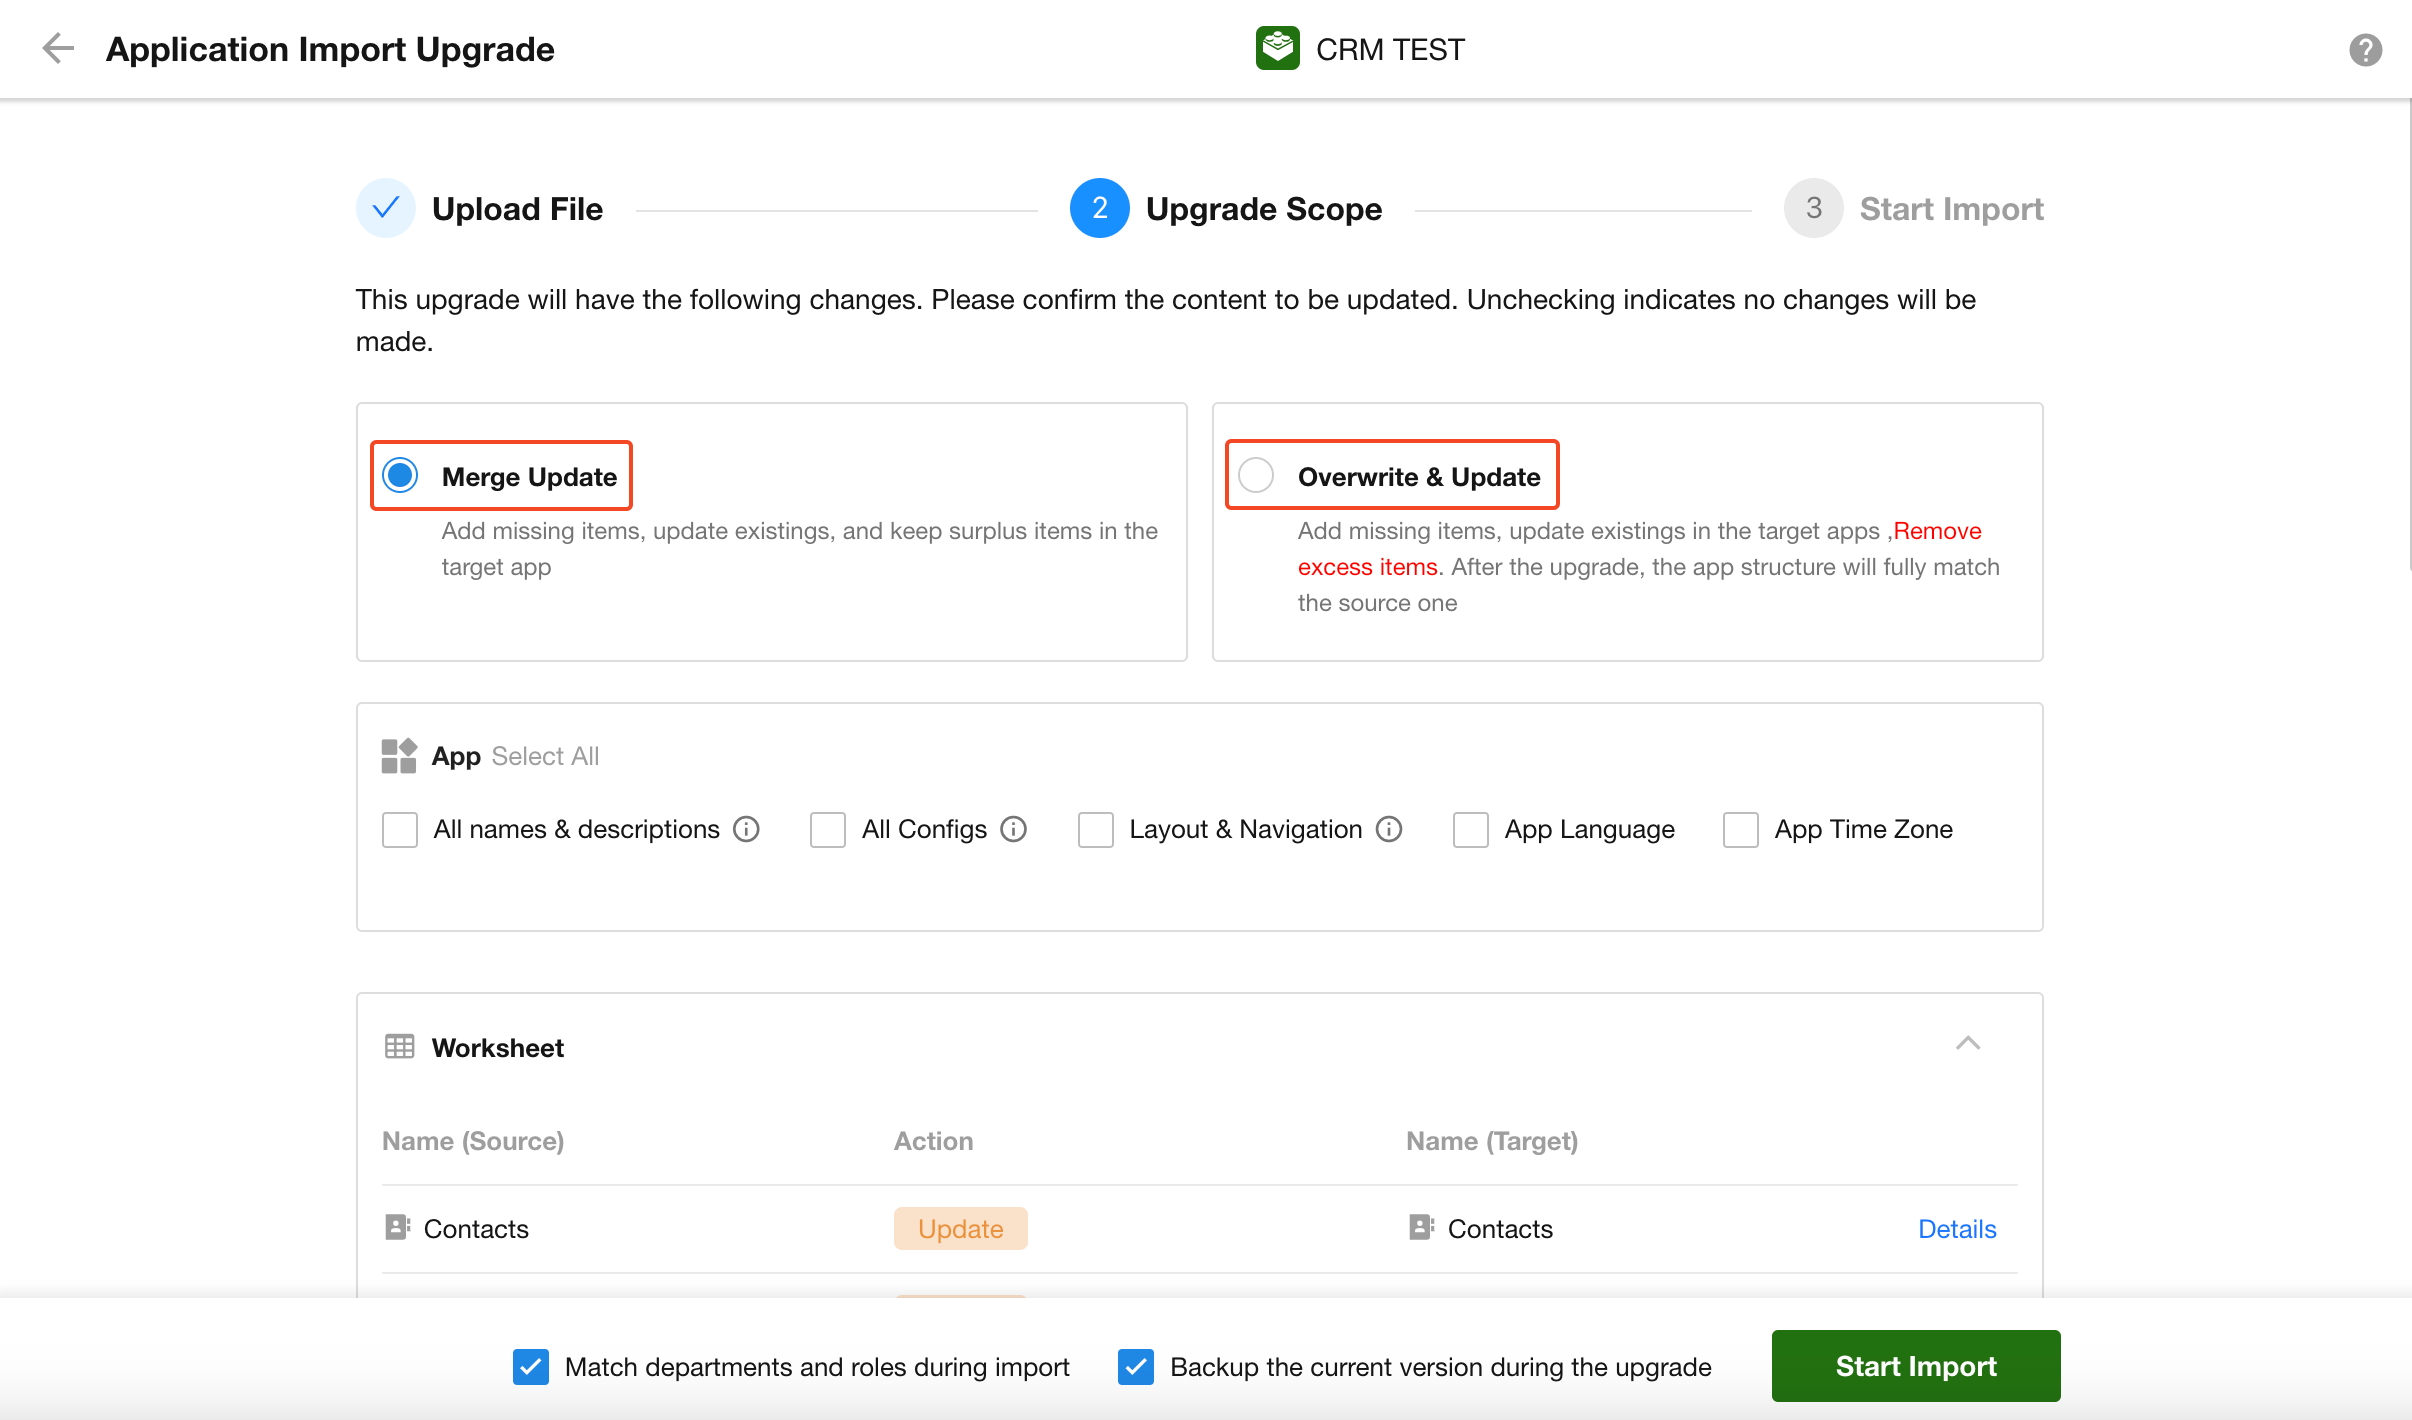
Choose an Upgrade Mode
Two upgrade modes are available:
-
Merge and Update — Adds missing items, updates existing items, and retains additional content. No content is removed from the target application.
Example
Both the source and target applications contain Worksheet A and Worksheet B.
In the source application:
- Worksheet A is modified
- Worksheet B is deleted
- Worksheet C is added
After upgrading using Merge and Update, the target application contains:
- Worksheet A (updated)
- Worksheet B (retained)
- Worksheet C (added)
-
Overwrite and Update — Adds missing items, updates existing items, and removes redundant content. After the upgrade, the target application's structure matches the source application completely. Deleted items are moved to the Recycle Bin.
Example
Using the same scenario above, after upgrading with Overwrite and Update, the target application contains:
- Worksheet A (updated)
- Worksheet B (deleted)
- Worksheet C (added)
Review Upgrade Details
After the file is uploaded, the system displays a summary of the upgrade changes.
Click Details next to an item to view the specific changes. Selective upgrades are not supported.
The following items can be upgraded:
- Worksheets
- Views
- Custom view plugins
- Fields
- Workflows
- Workflow plugins
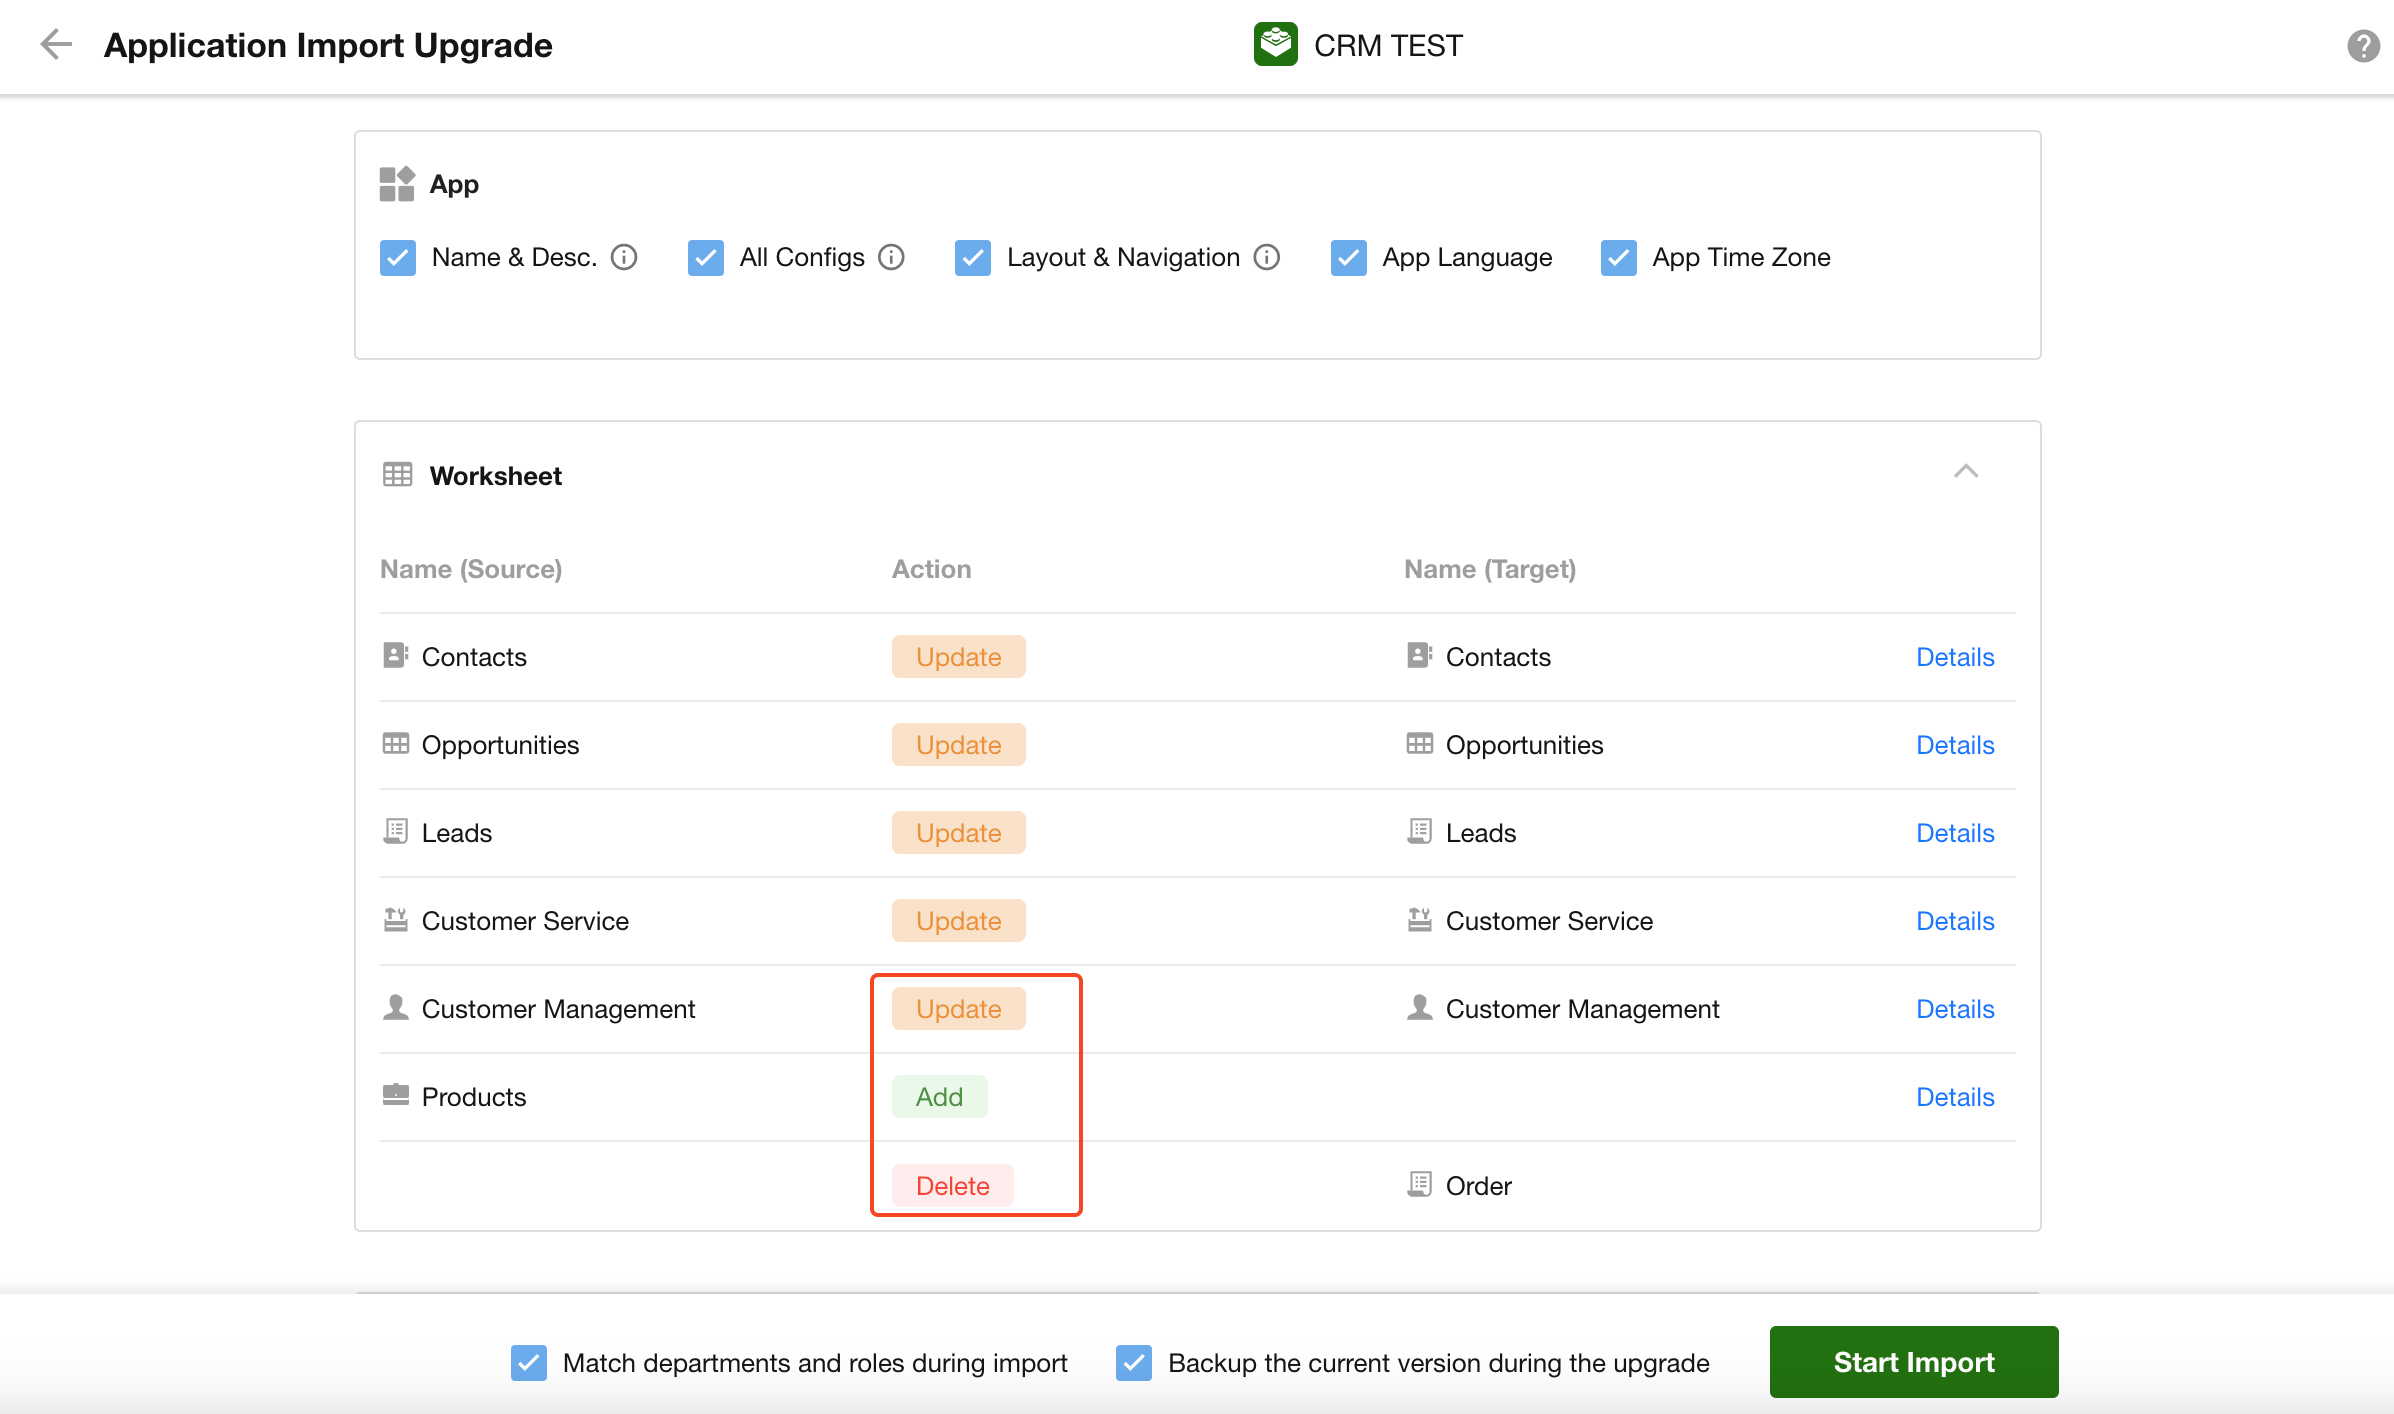
For each item, the upgrade result may be:
- Add — Exists in the source application but not in the target application.
- Update — Exists in both the source and target applications. (This does not necessarily mean the item has changed.)
- Delete — Removed from the source application but still exists in the target application.
Confirm Settings and Start the Upgrade
Merge and Update
You can choose which configuration settings should not be updated before starting the import.
Overwrite and Update
All supported settings are updated automatically and cannot be excluded.

Available configuration options:
-
All Names and Descriptions
Updates the names and descriptions of application items, views, workflows, and roles.
-
All Visibility Settings
Updates the visibility settings of application items, views, and roles.
-
Appearance and Navigation
Updates theme colors, navigation colors, navigation settings, and application item order.
-
Application Language and Time Zone
Updates language and time zone settings.
-
Match Users, Departments, and Positions During Import
-
Enabled
- If an item exists in the source application but not in the target application, it is created in the target application.
- If an item exists only in the target application, it is retained.
- If an item exists in both applications, permission settings are updated.
-
Disabled
- If an item exists in the source application but not in the target application, the corresponding configuration is cleared.
- If an item exists only in the target application, it is retained.
- If an item exists in both applications, member-related settings are not updated.
For details about the matching logic, see Matching Rules for Users and Departments During App Import.
-
-
Back Up the Current Version Before Upgrading
Creates a backup file of the target application's current configuration before the upgrade begins.
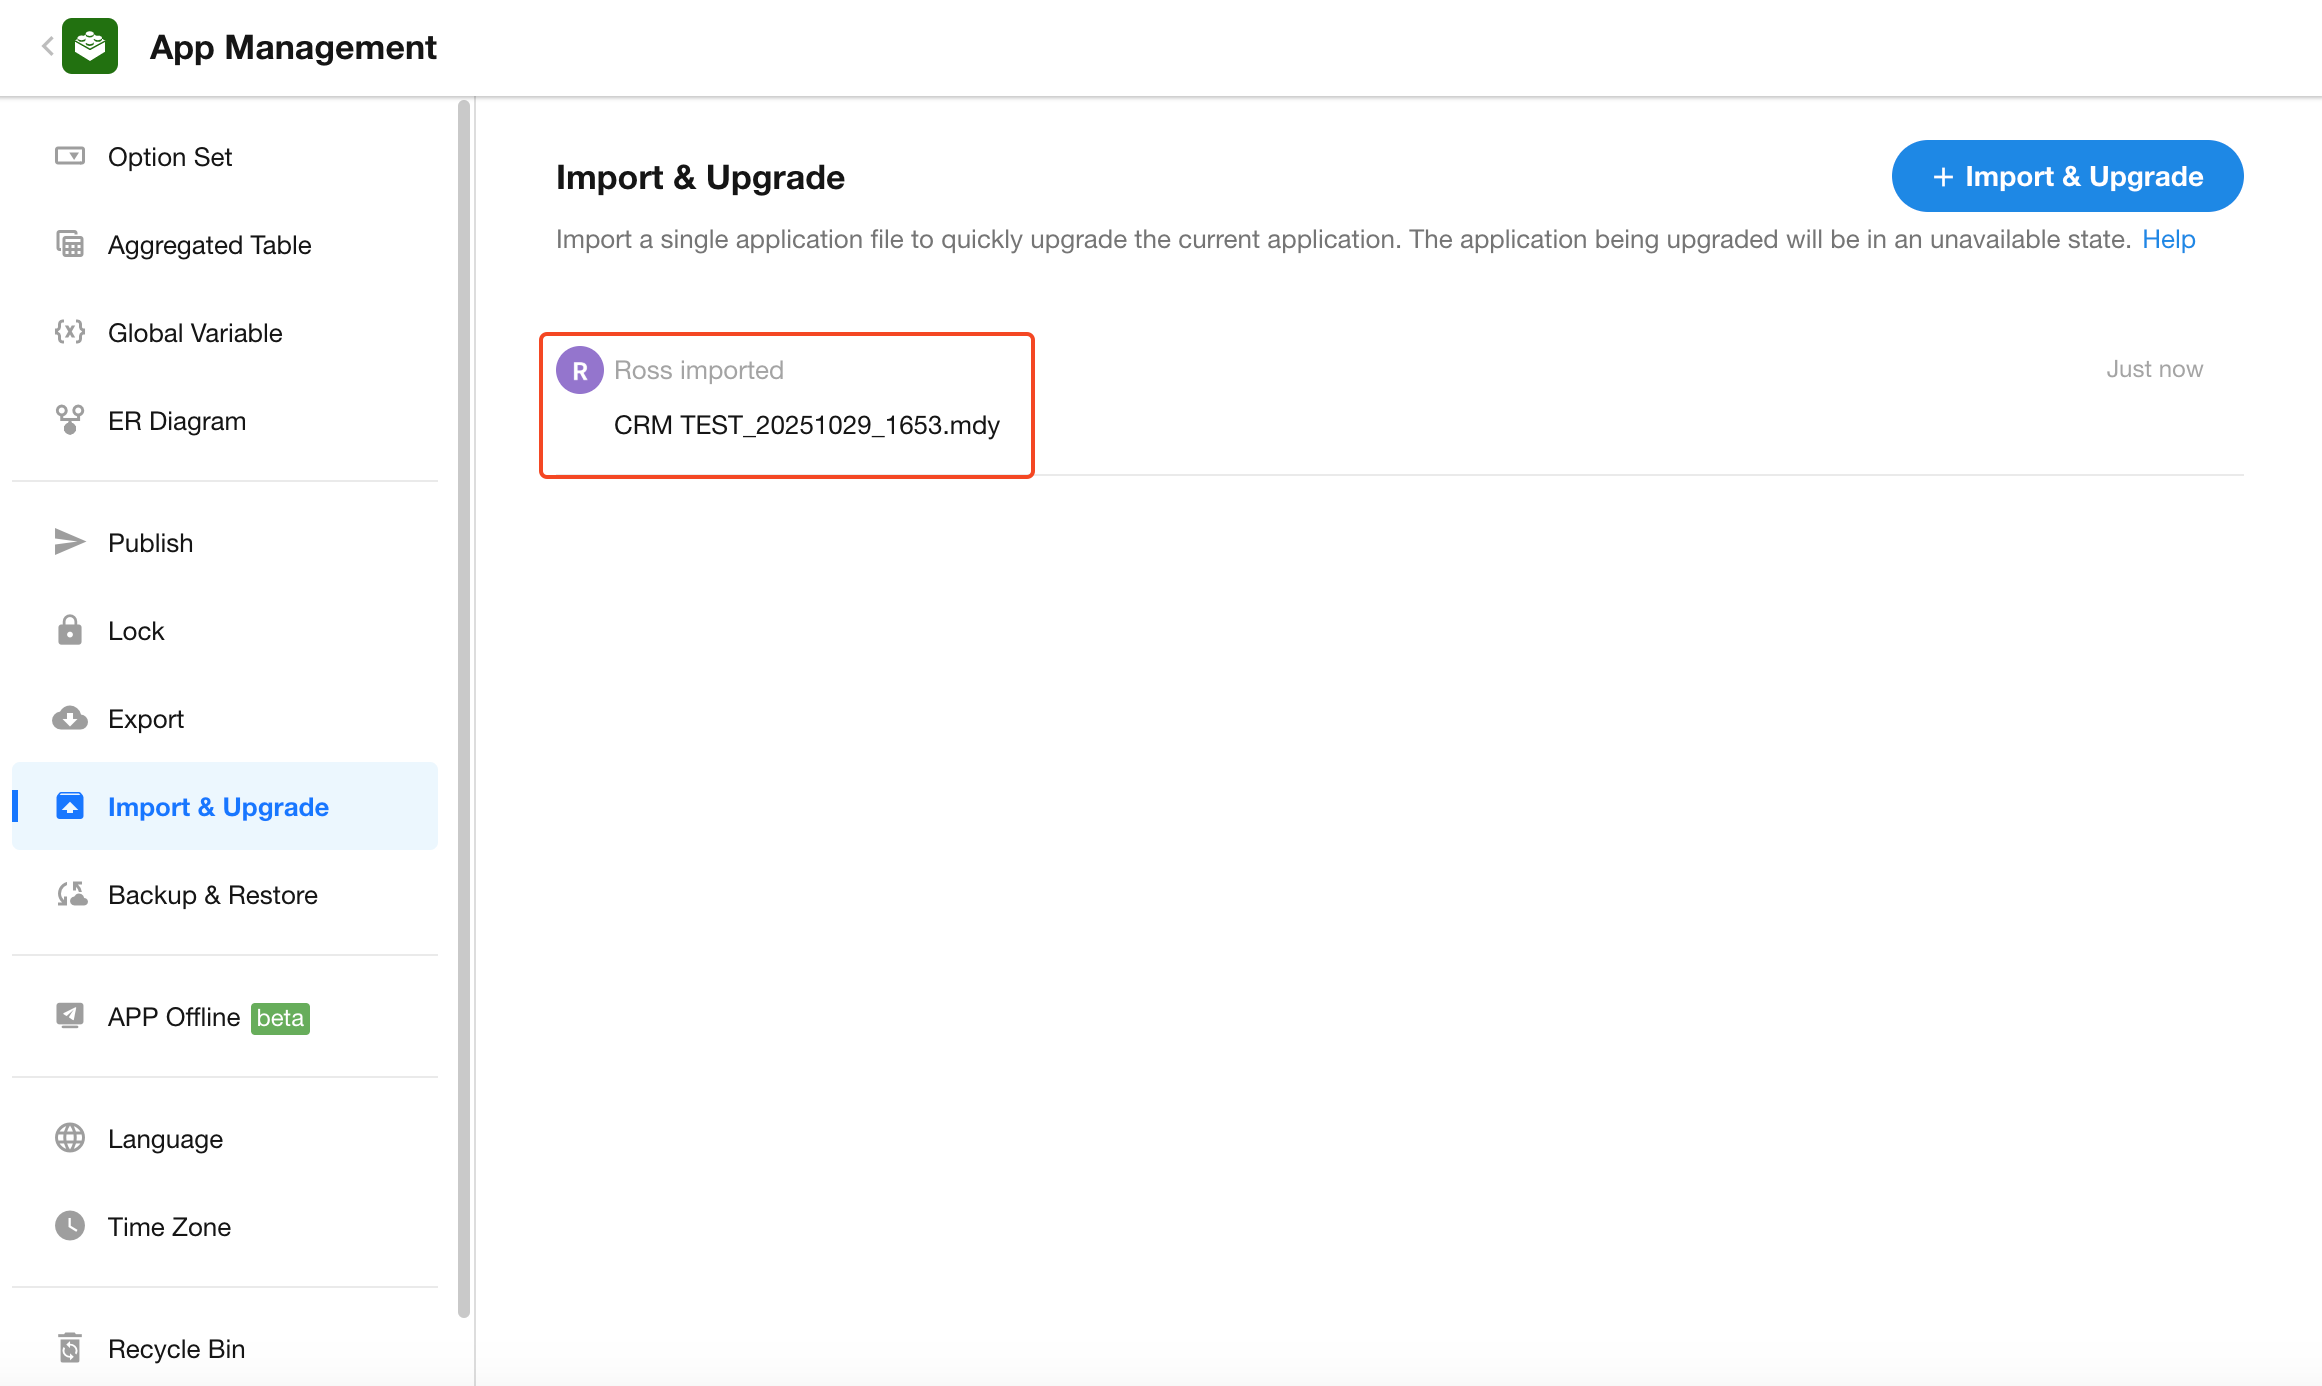
After the upgrade is completed, all upgrade records are displayed on the management page.
Upgrade Multiple Applications
Organization administrators can upgrade multiple applications in bulk from the organization management console.
Access the Bulk Upgrade Page
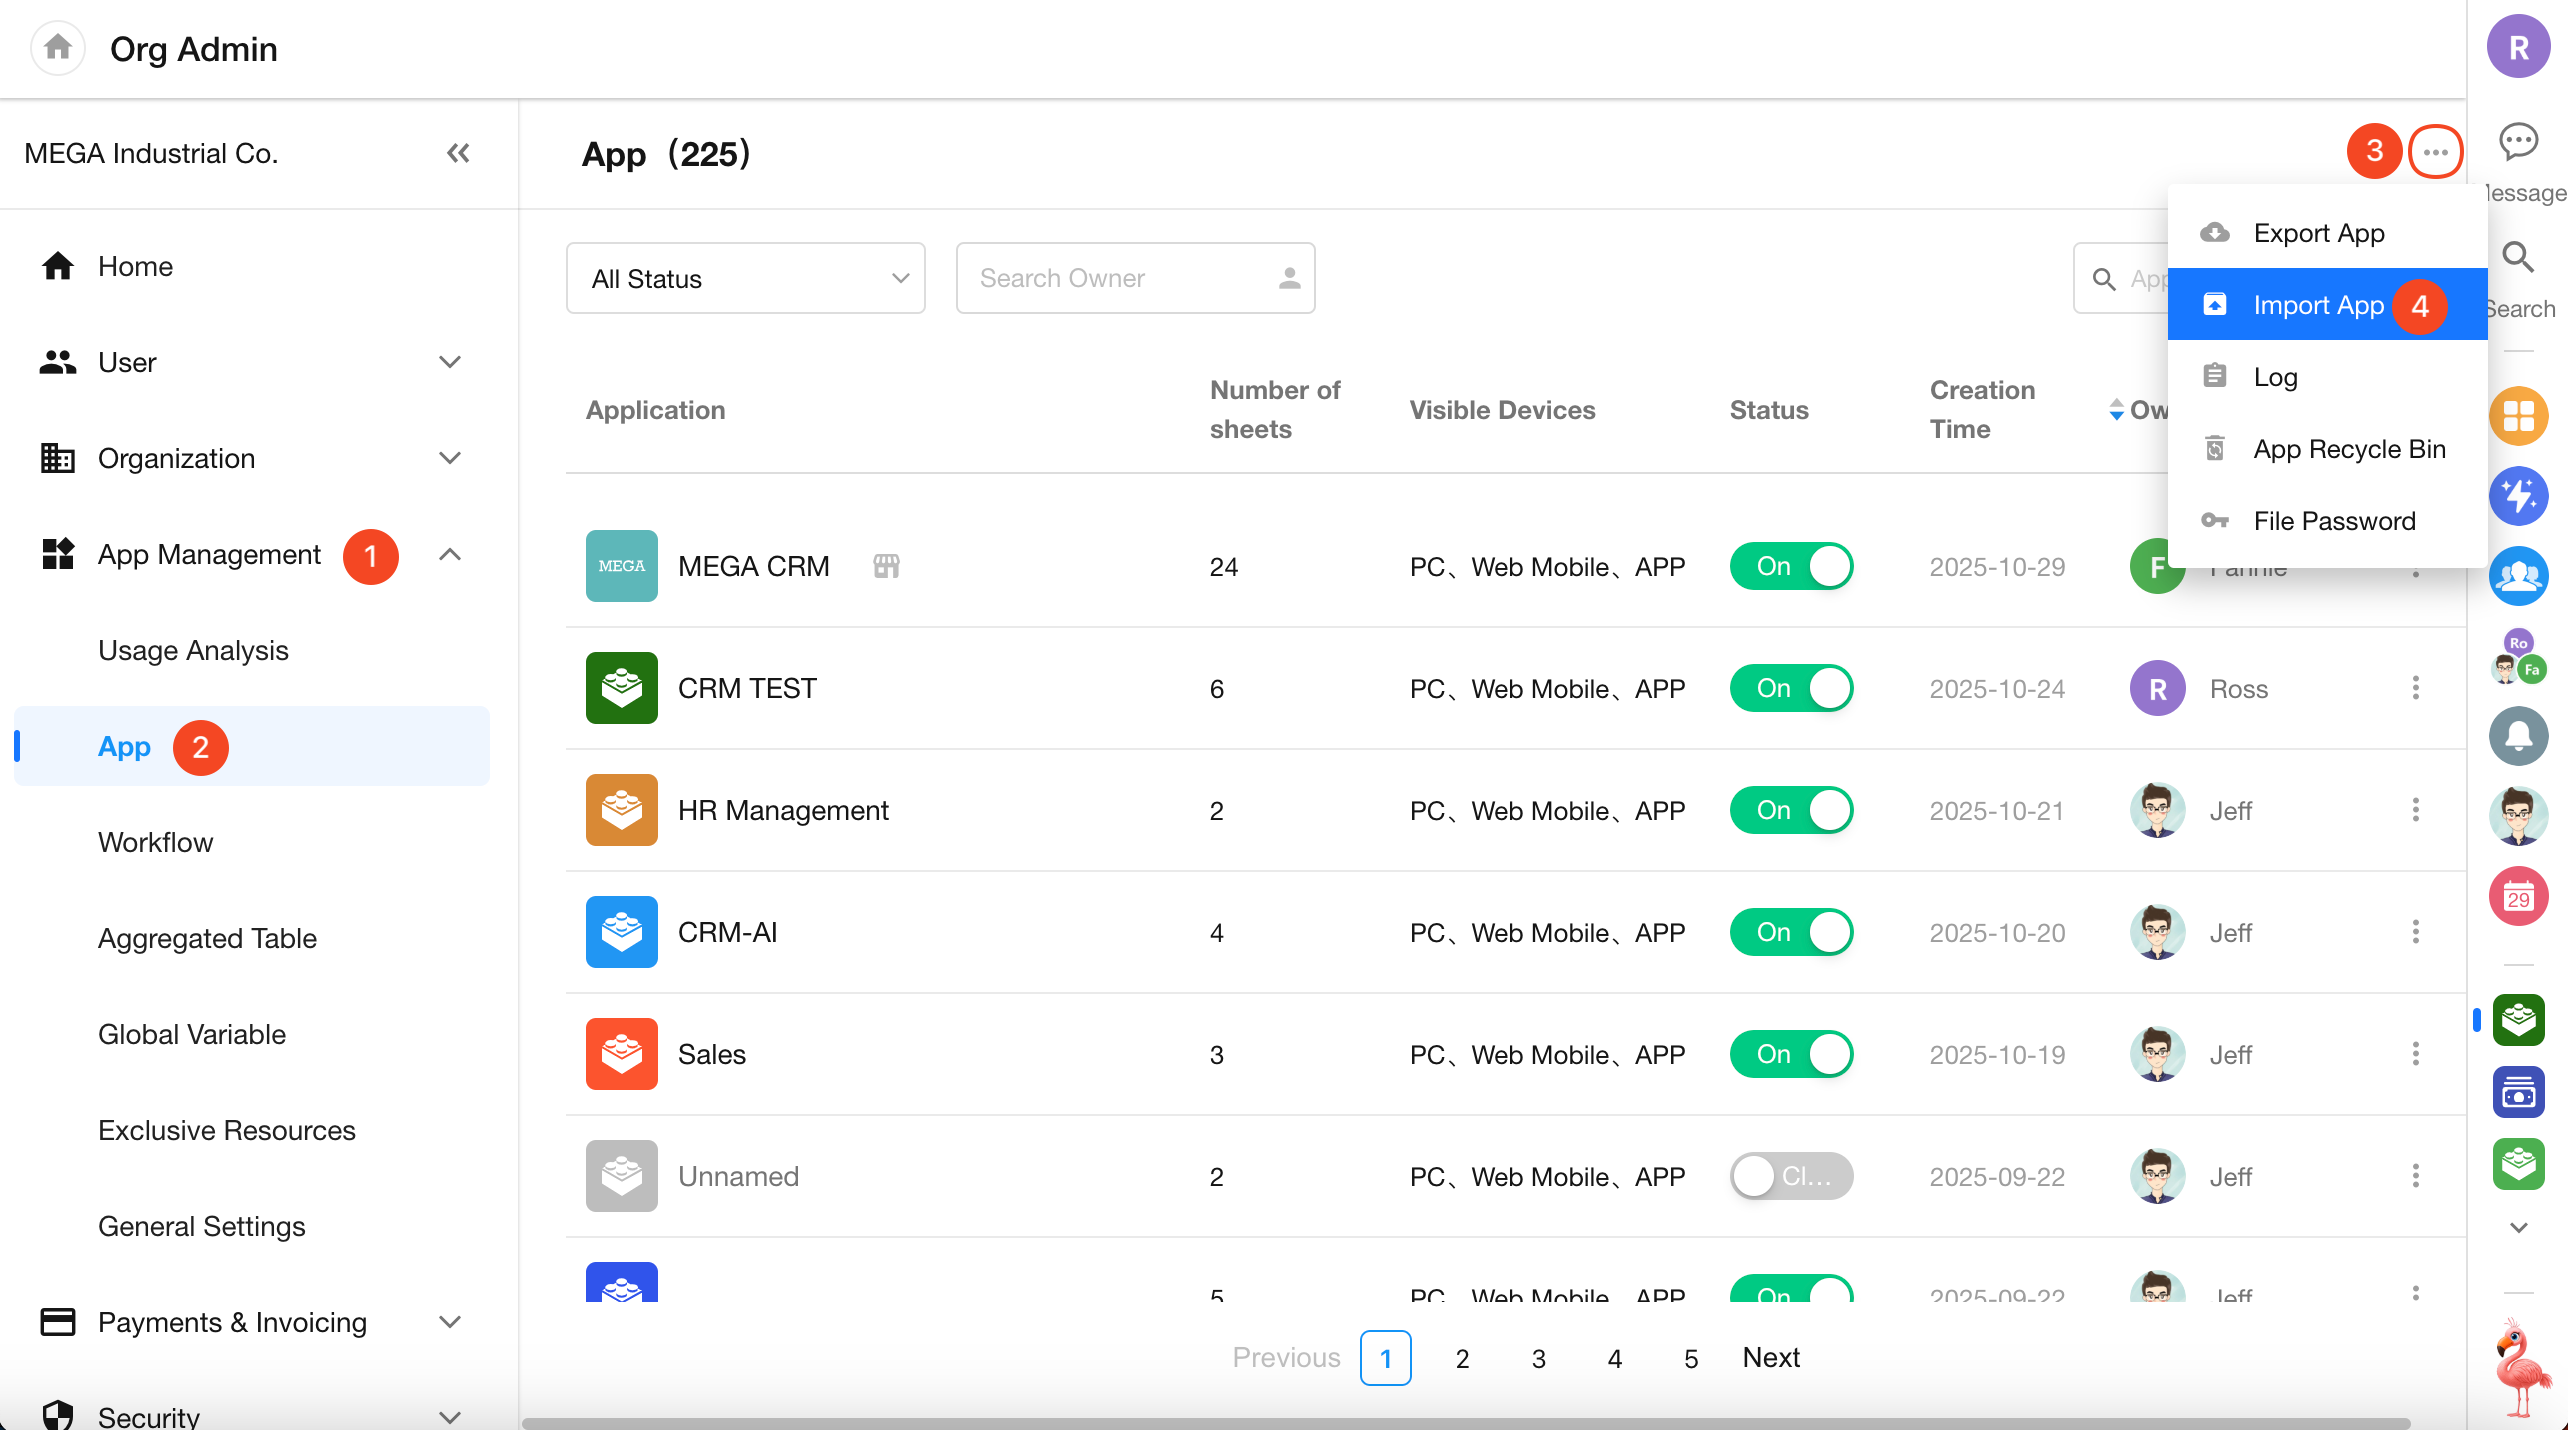
Go to Org Admin > App Management > Apps, click More in the upper-right corner, and select Import App.
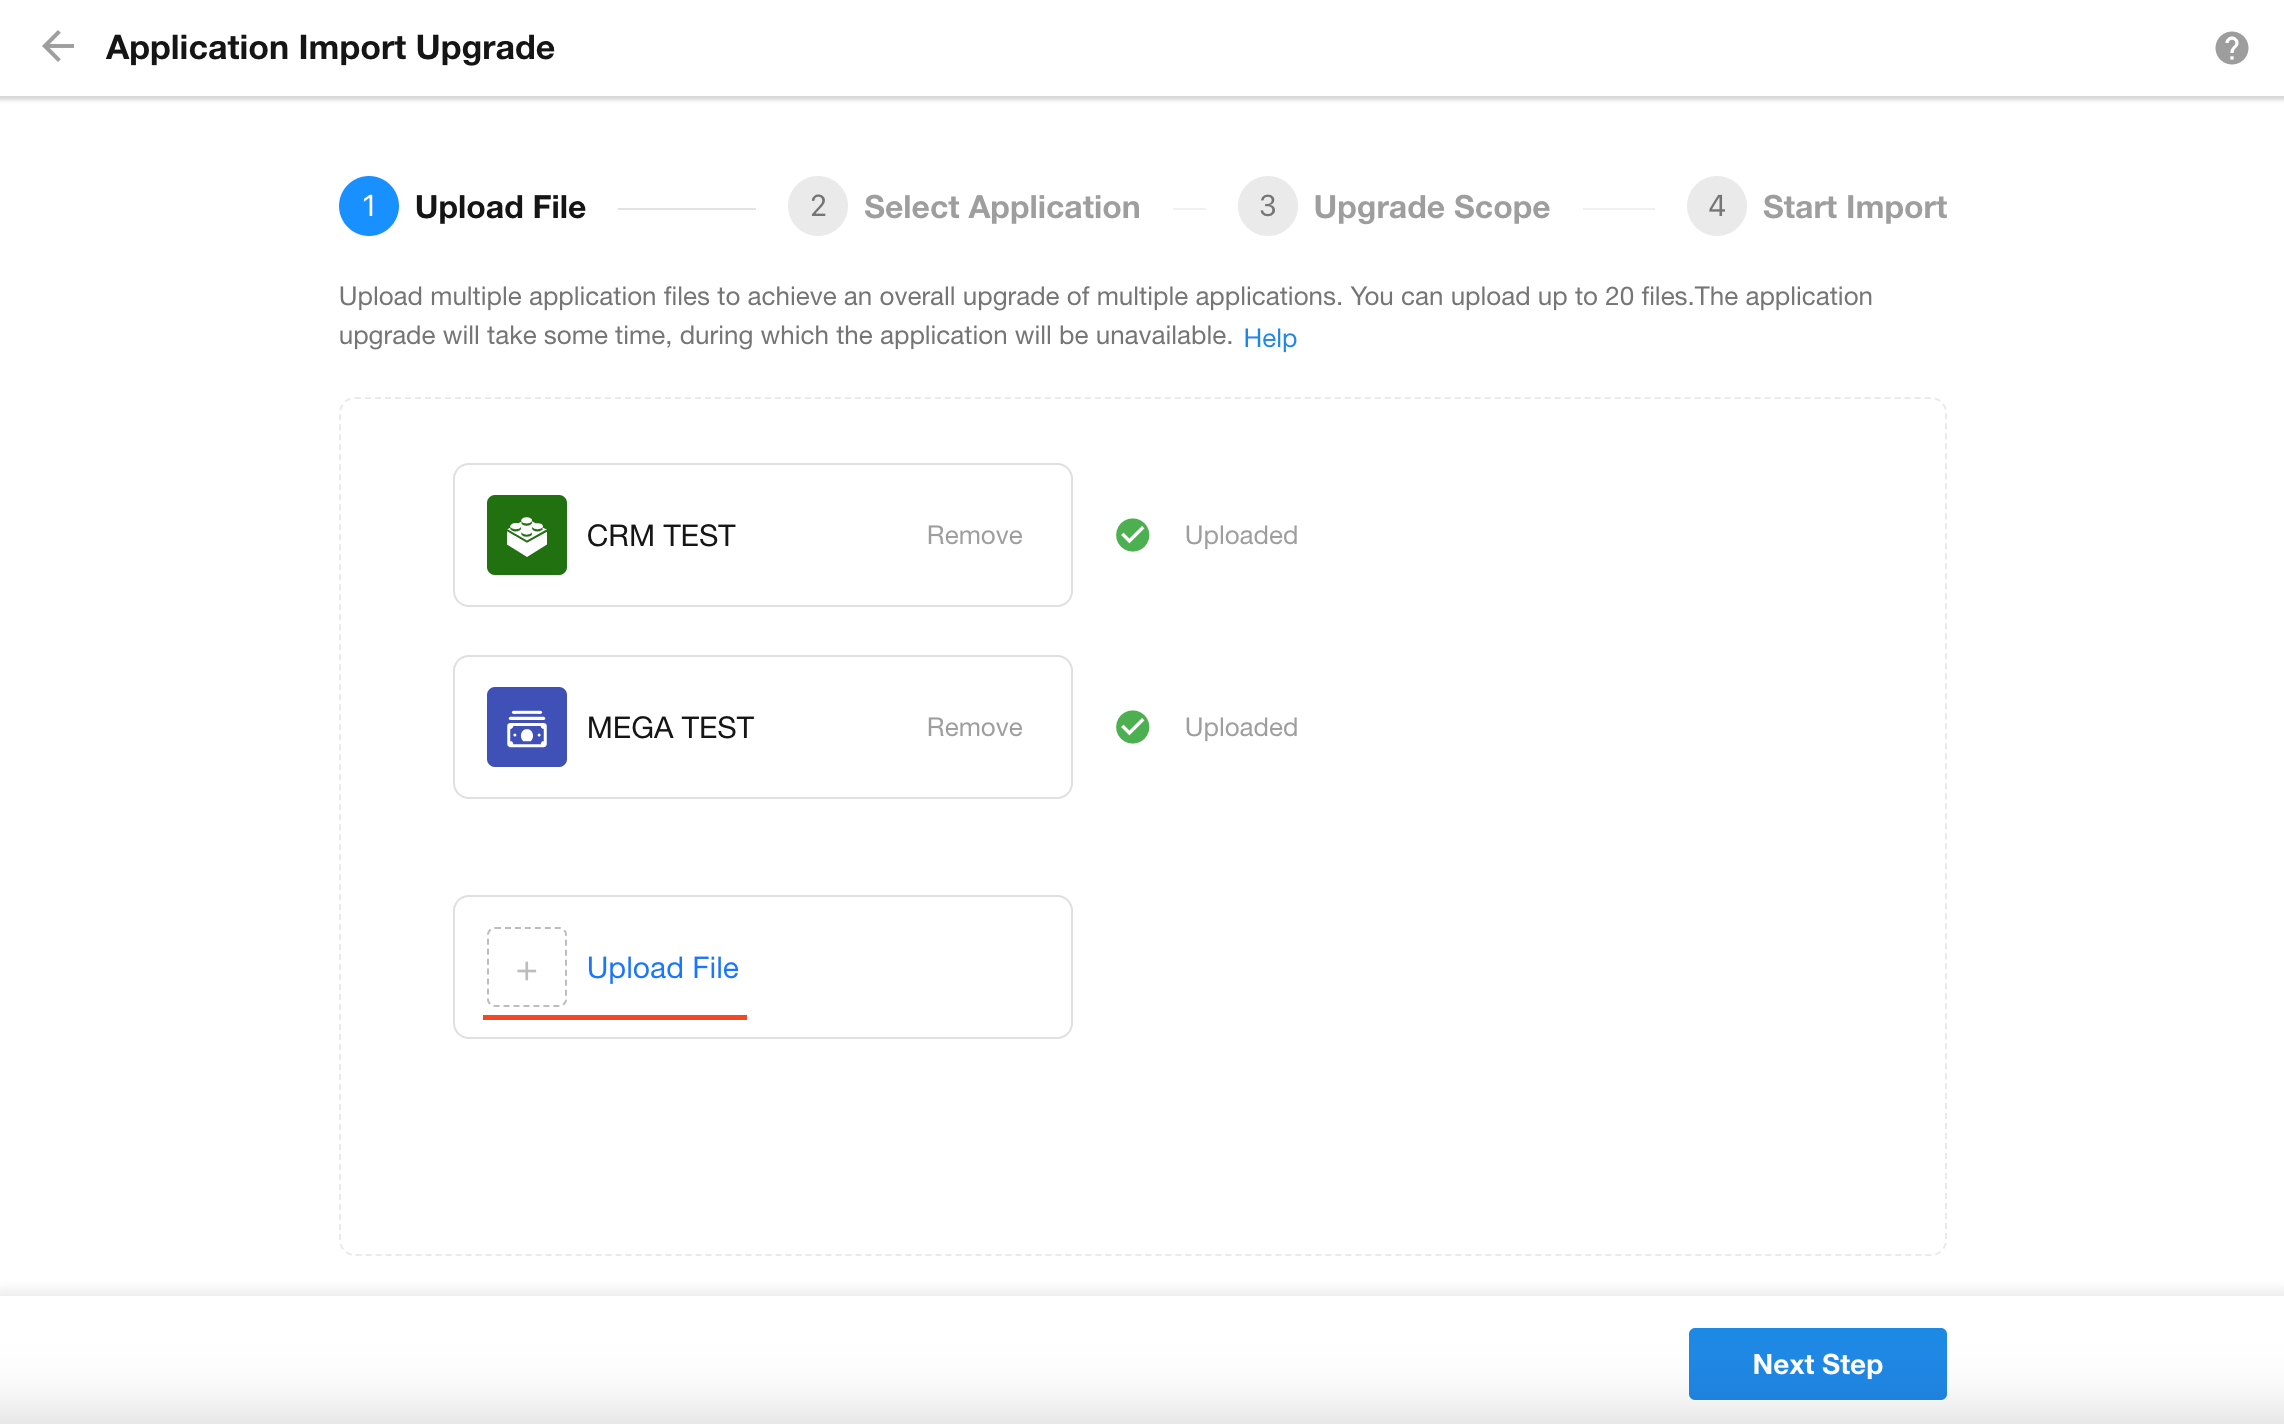
Upload the Upgrade File
Select and upload the exported .mdy file.
If the file was exported as a batch package, extract it before importing.
The system validates the password and file format during upload.
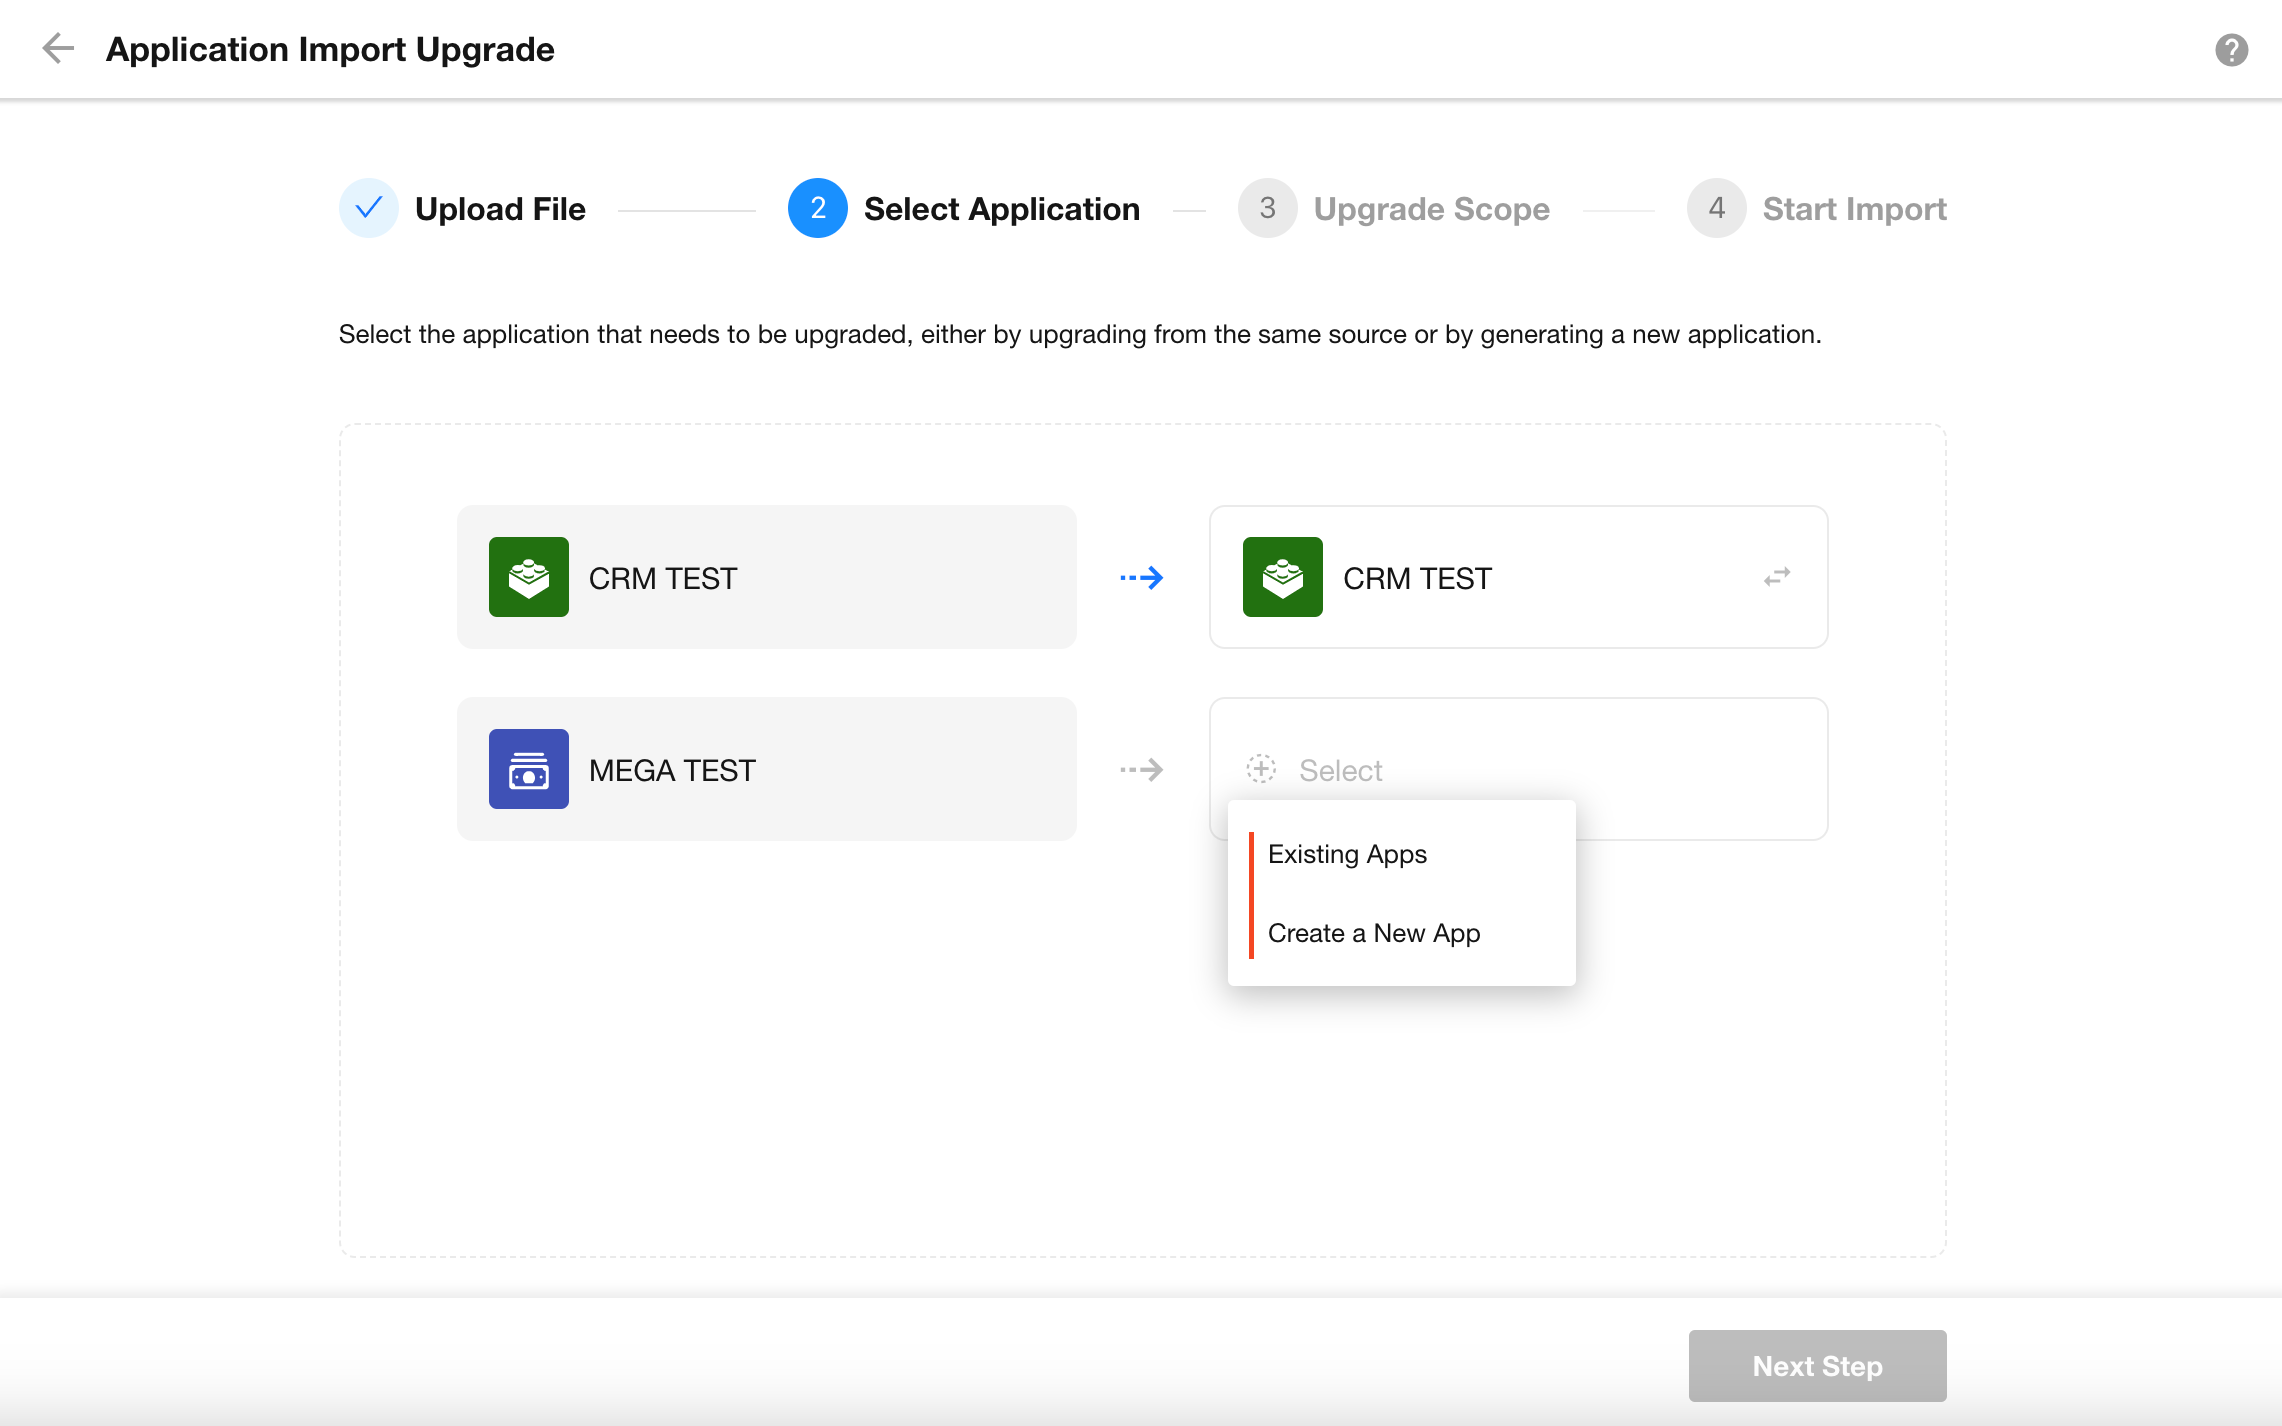
Select Upgrade Targets
-
Select Existing Applications
Upgrade the selected applications.
-
Create New Applications
Import the file as a new application.
Review Changes and Confirm Import
The bulk import and upgrade process follows the same process as upgrading a single application.
For details, refer to Confirm Settings and Start the Upgrade.
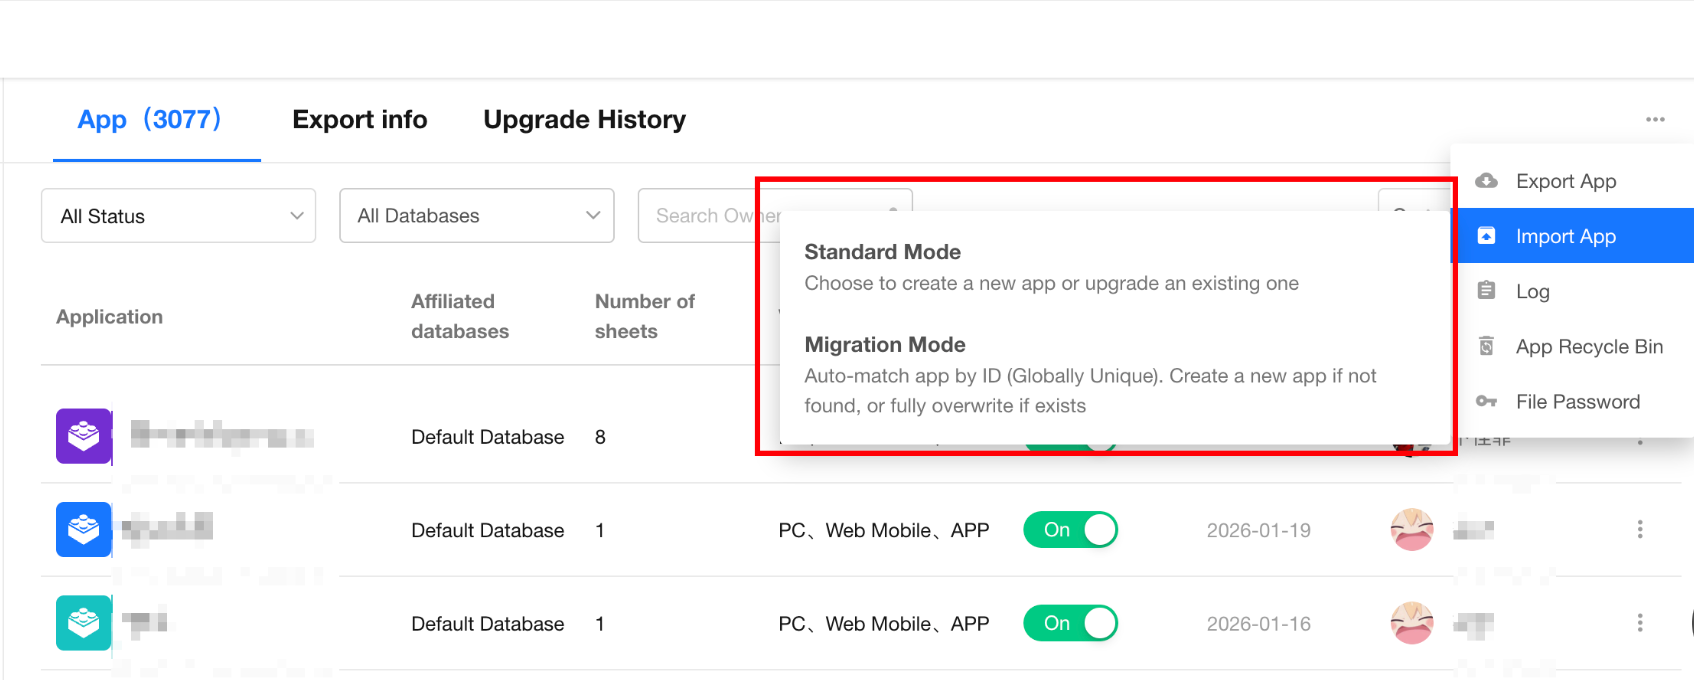
Upgrade Applications in Migration Mode
HAP Server supports application upgrades through Migration Mode, a more reliable import method. Applications imported in Migration Mode retain their original application IDs, which must be unique across the platform. Subsequent upgrades are applied to the existing application based on the same application ID.
Note: If a migrated application has been deleted, attempting to upgrade it again in Migration Mode will display the following message:
Import failed. The application is either in the Recycle Bin or has been permanently deleted.
Upgrade Rules
Update Scope
- Add — Exists in the source application but not in the target application.
- Update — Exists in both the source and target applications.
- Unchanged (Merge and Update) — Exists only in the target application.
- Delete (Overwrite and Update) — Exists only in the target application and is moved to the Recycle Bin through logical deletion.
Special Cases
-
If an item to be updated is currently in a logically deleted state in the target application (for example, a workflow in the Recycle Bin), the item is restored and then updated.
-
If an item to be updated has been moved to another application, a new item is created instead of updating the original one.
Was this document helpful?