Advanced Design Guidelines for Word/Excel Print Templates
1. Print Unselected Options in Single/Multi-Select Fields
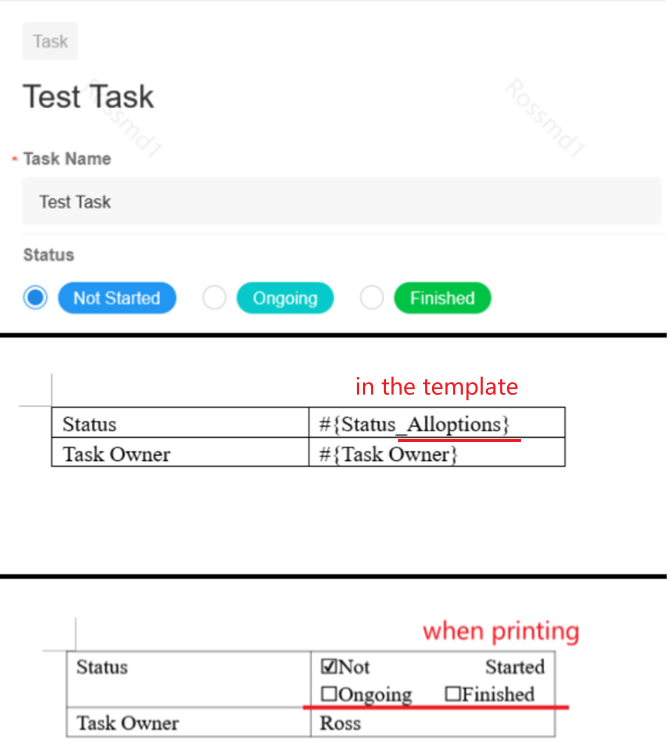
To print the unselected options of single-select or multi-celect fields in a tiled layout, append _Alloptions to the field code. For example: #{SingleChoice_Alloptions}. By default, options are printed horizontally. To print vertically, append [V] at the end: #{SingleChoice_Alloptions[V]}.
For instance, for a "Status" field with the options “Not Started”, “Ongoing”, and “Finished”, and the selected option is “Not Started”, to print the other two options, use #{Status_Alloptions}. To print them vertically, use #{Status_Alloptions[V]}.
2. Image Printing Rules
2.1 Setting Image Width and Height
Images in records can be printed with specified width and height. For example, in the “File” field code #{File$[90*auto]$}, [90*auto] represents [width * height].
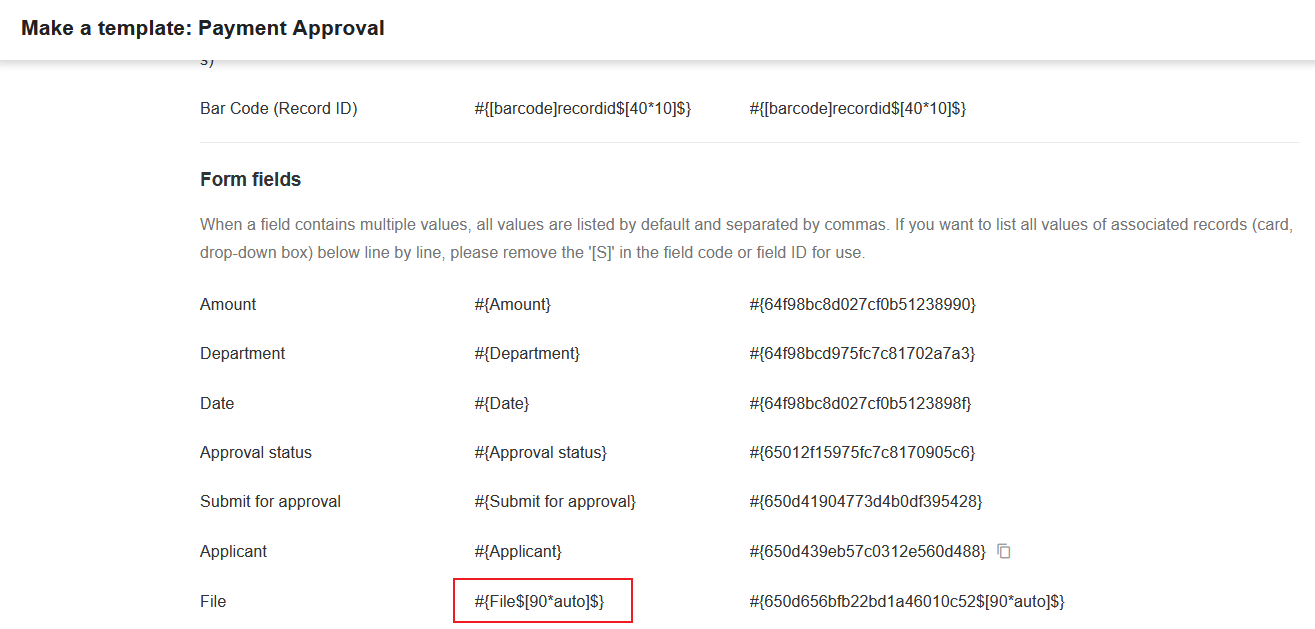
There are four ways to configure image dimensions:
-
Fixed width, auto height:
#{File$[90*auto]$}
Width is fixed at 90, height adjusts automatically. The number can be customized. -
Auto width, fixed height:
#{File$[auto*80]$}
Width adjusts automatically, height is fixed at 80. The number can be customized. -
Fixed width and height:
#{File$[70*90]$}
Width is 70 and height is 90. Both can be customized. -
Auto-fit within a fixed range:
#{File$[45*90_auto]$}
Image auto-fits within a 45×90 area. The number can be customized.
Full auto-fit for both height and width is not supported. For example,
#{File$[auto*auto]$}is invalid.
2.2 Image Quality Settings
To meet various clarity requirements, images can be printed in low, medium, or high quality:
- Low (L) – Resolution: 75 dpi, size multiplier: X3. Fast generation, suitable for general use.
- Medium (M) – Resolution: 150 dpi, size multiplier: X6. Balanced clarity and speed.
- High (H) – Resolution: 300 dpi, size multiplier: X12. Slower generation, ideal for high-quality color prints.
Field code examples:
#{File$[auto*90_M]$}, #{File$[auto*90_H]$}, #{File$[45*90_auto_H]$}
Notes:
-
If no quality tag is added, low quality is used by default.
-
To avoid the processed image being larger than the original, the system compares both and uses the original if it's smaller.
2.3 Printing Image Filename
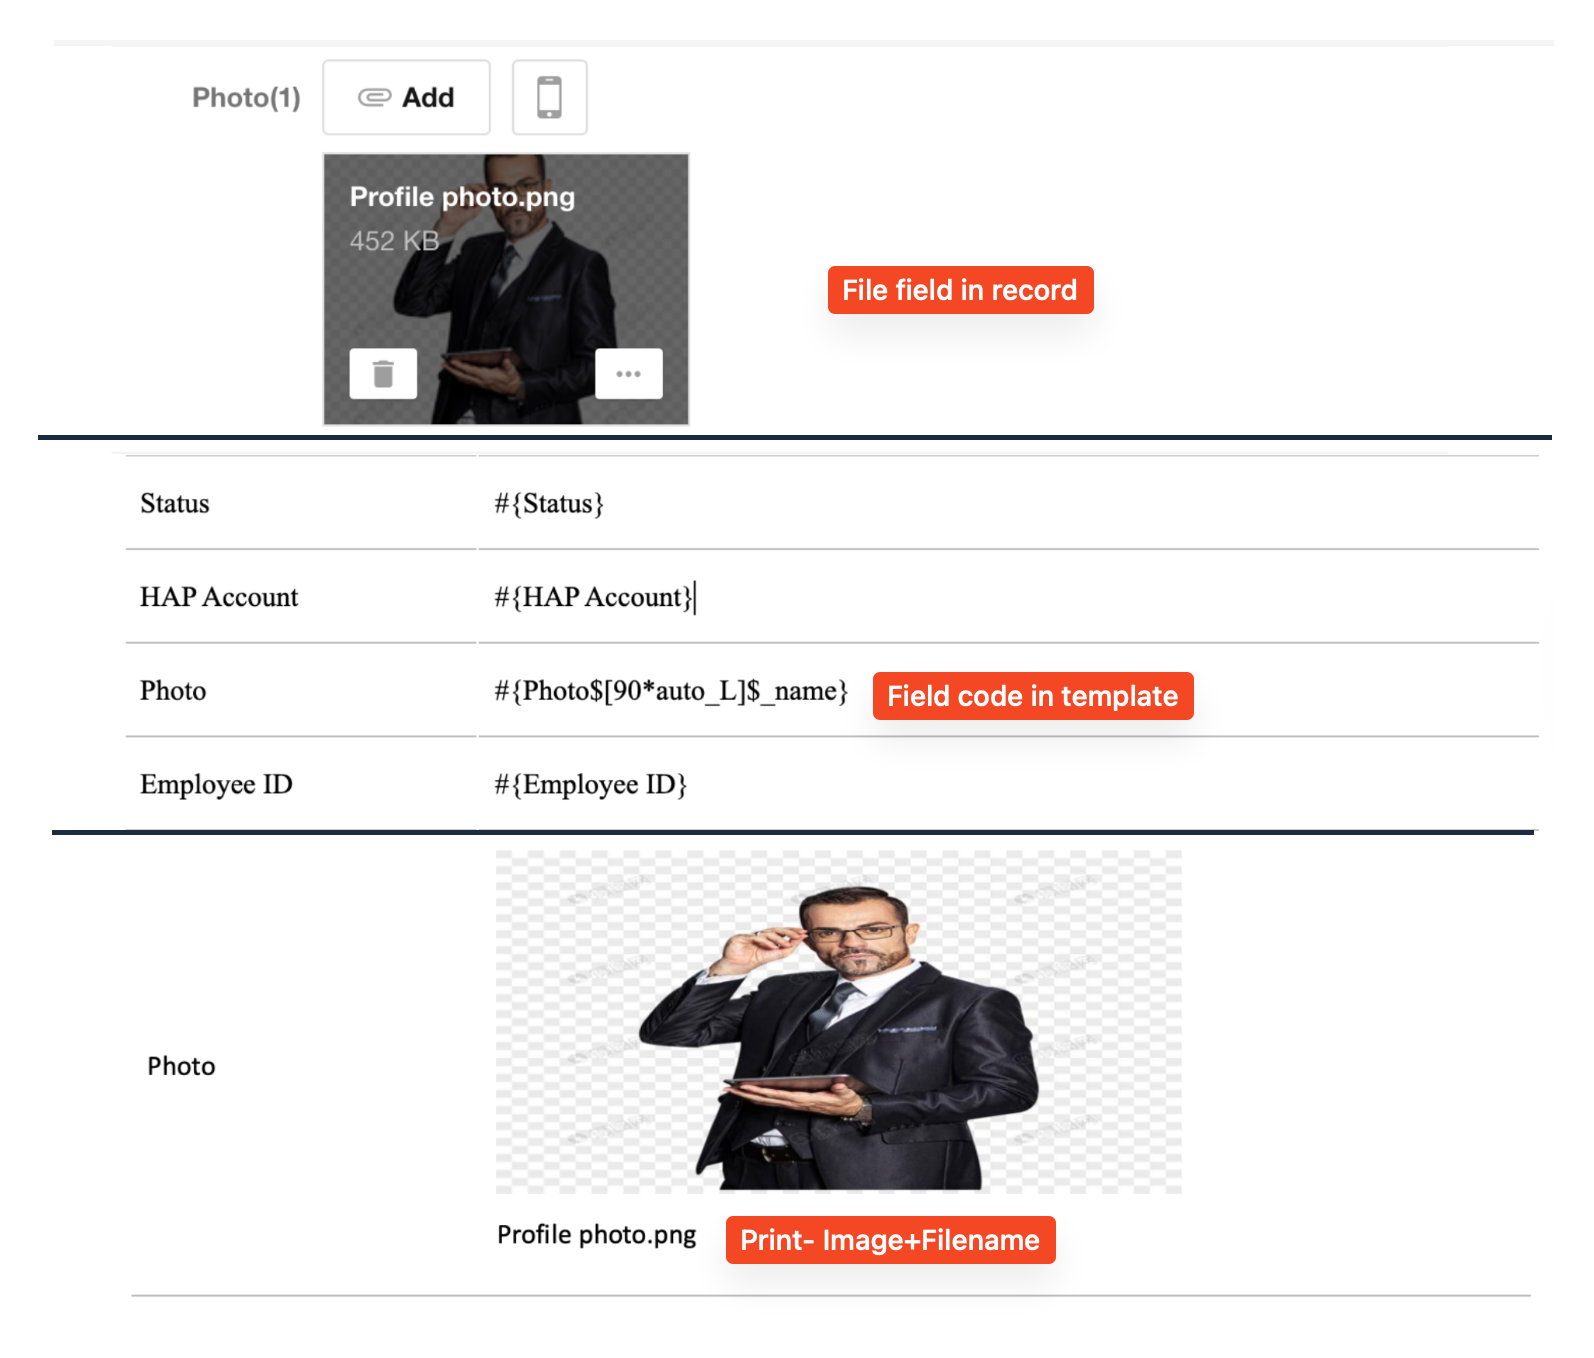
To print the image name, append _name to the field code. You can choose to print only the name or both image and name.
-
Print both image thumbnail and name:
Example:
#{FileFieldCode$[90*auto_L]$_name} -
Print only the name:
Example:
#{FileFieldCode_name}
-
Excel templates do not support displaying image and filename simultaneously.
-
Document-type attachments can only print the file name, not the content.
3. Print QR Codes/Barcodes for Fields
You can generate QR codes or barcodes for specific fields using the following codes:
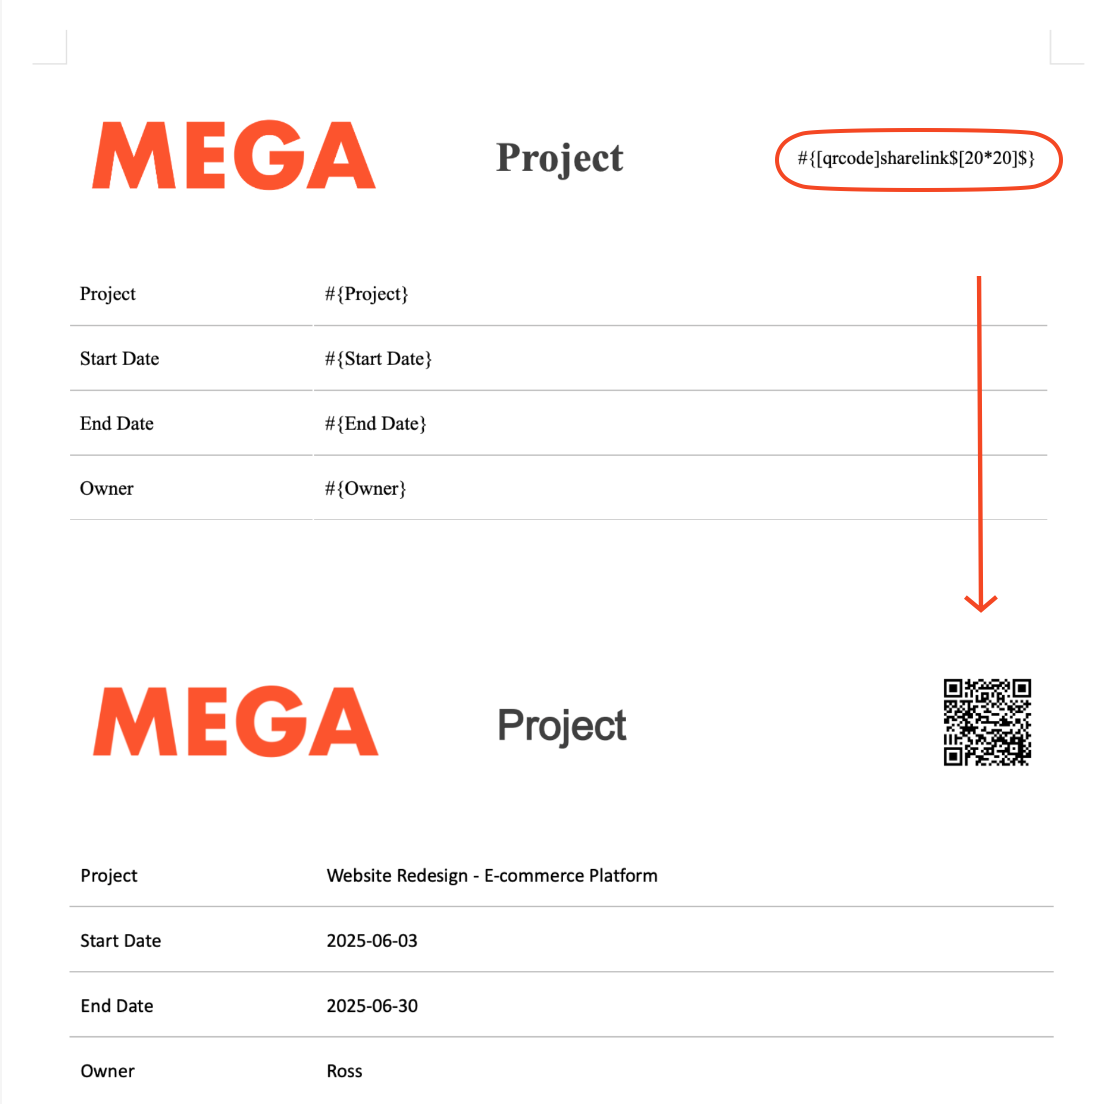
- QR code:
#{[qrcode]FieldName$[20*20]$} - Barcode:
#{[barcode]FieldName$[40*10]$}
“FieldName” can also be the field ID. You may customize the dimensions, but do not modify other parts of the code.
QR codes use the QR-Code format, supporting up to 150 characters (including Chinese).
Barcodes use Code128 format, supporting up to 30 characters (letters, numbers, symbols only).
Example:
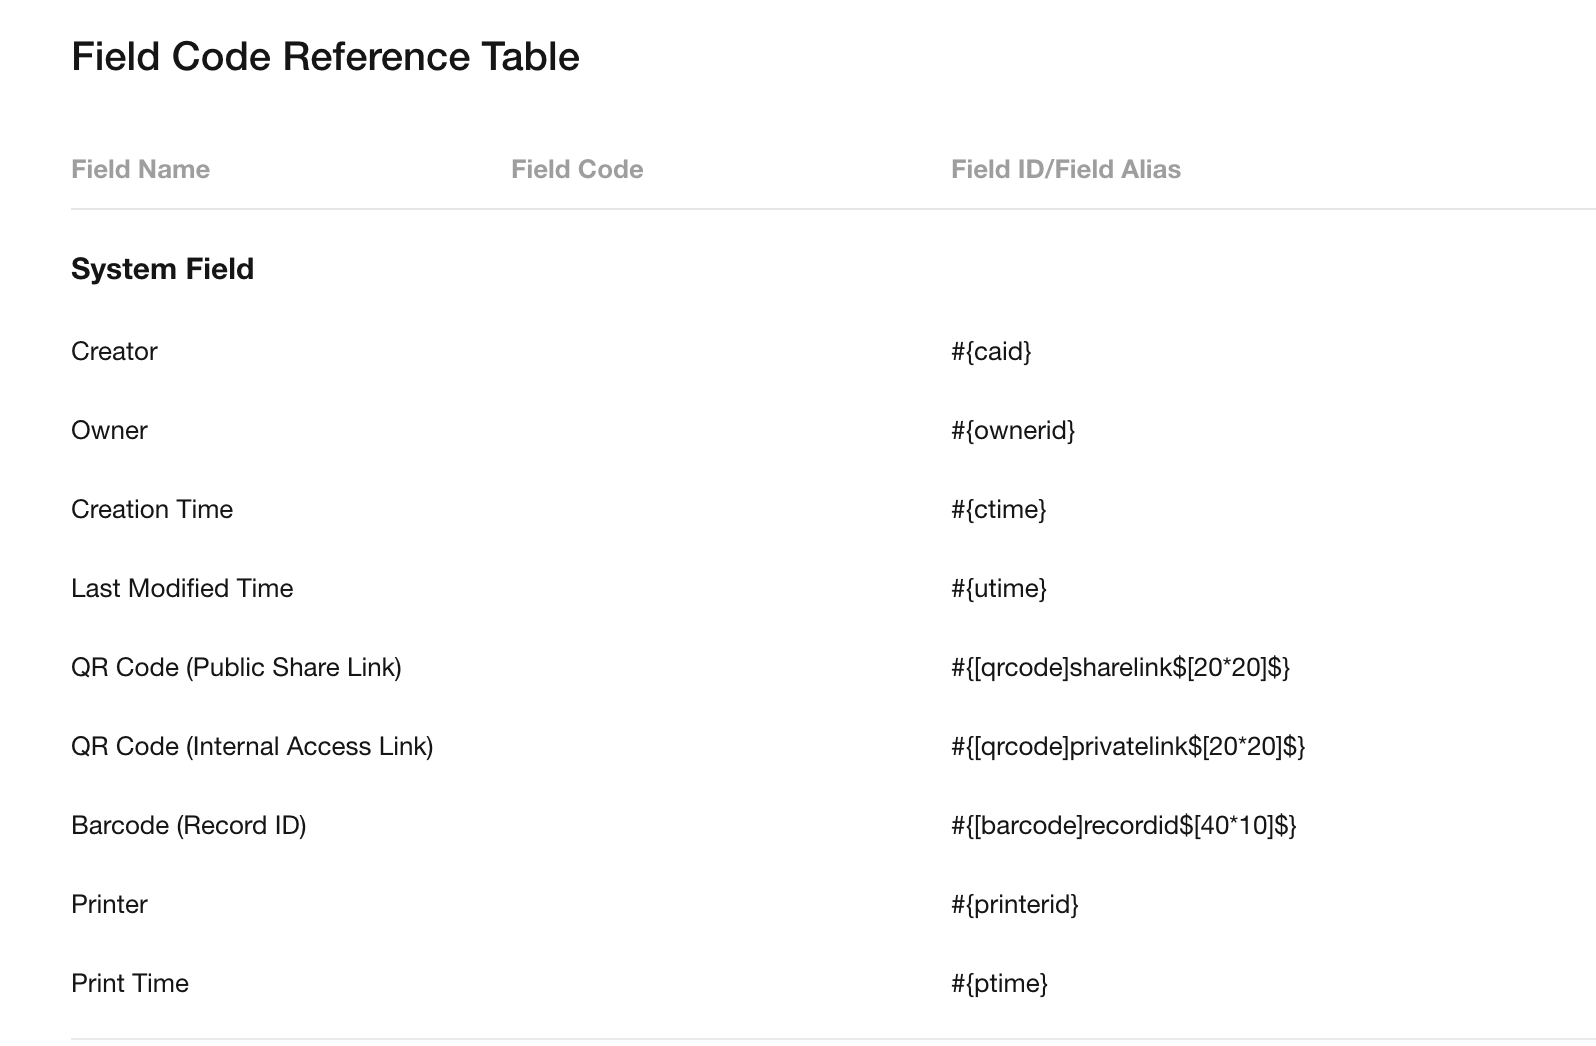
Field IDs for common system fields:
- Public Share Link:
sharelink - Internal Access Link:
privatelink - Record ID:
recordid
4. Print Subforms and Related Worksheets (Multiple Records)
Method 1: Display as a Table
Row Numbers in Related Worksheets
If you need to display row numbers when printing related worksheets or subforms, you can use the special code sequencenumber.
Format: #{DetailWorksheetName.sequencenumber} or #{DetailWorksheetID.sequencenumber}
Template Design:
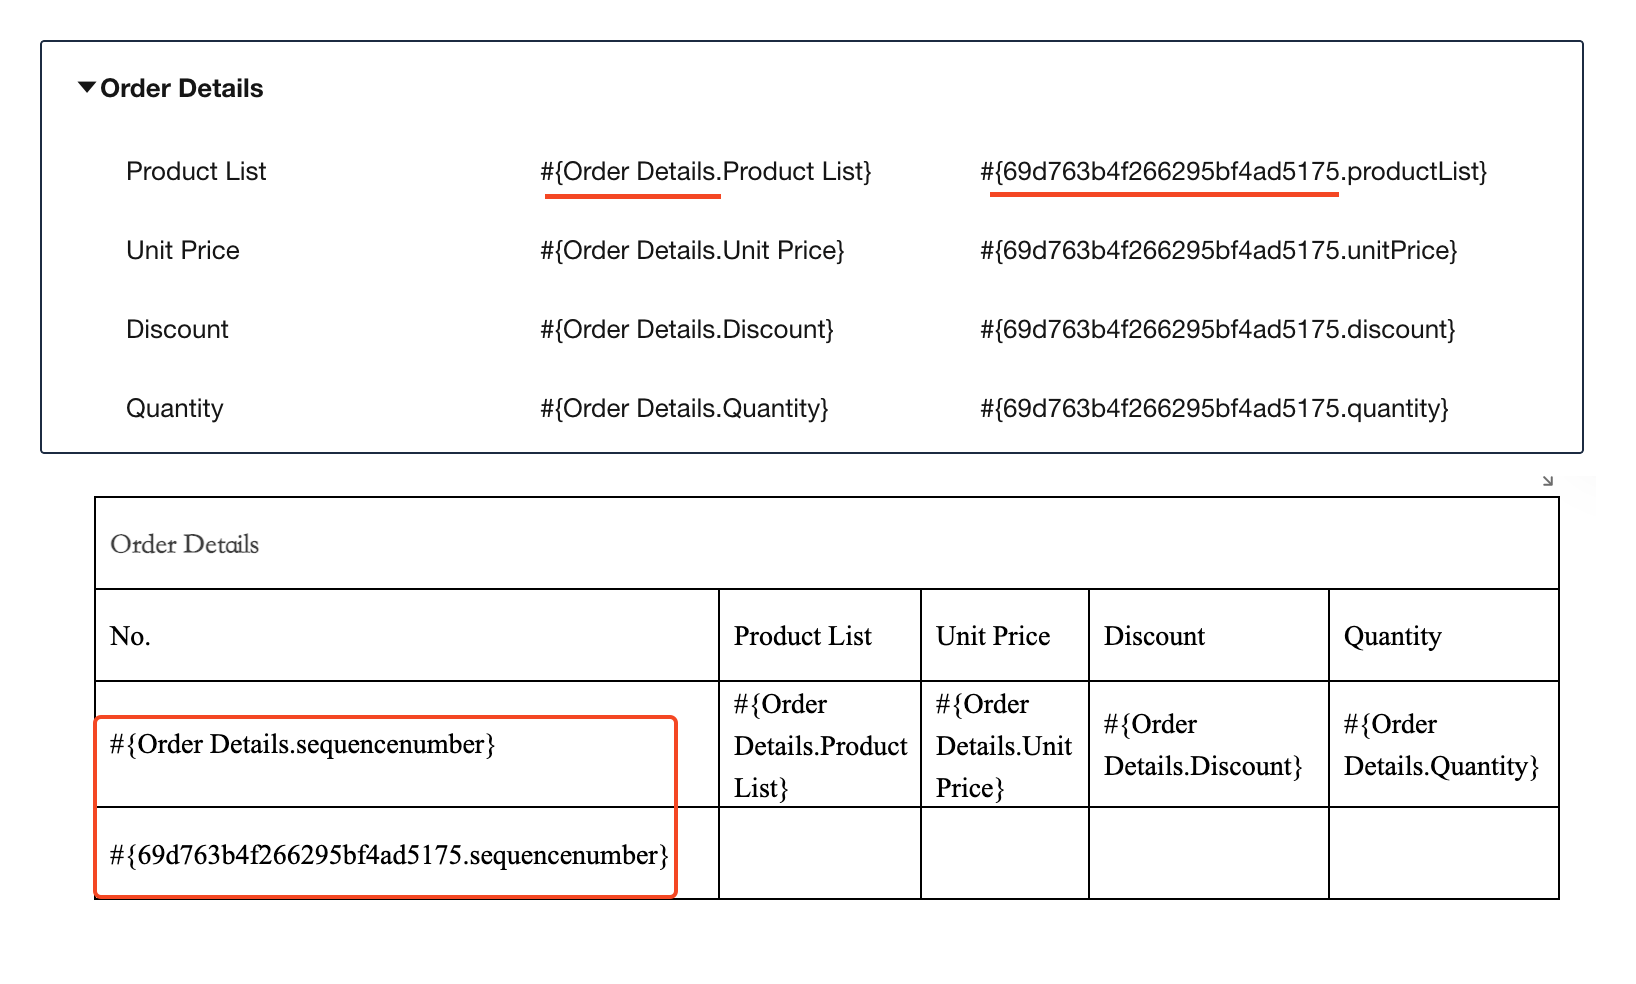
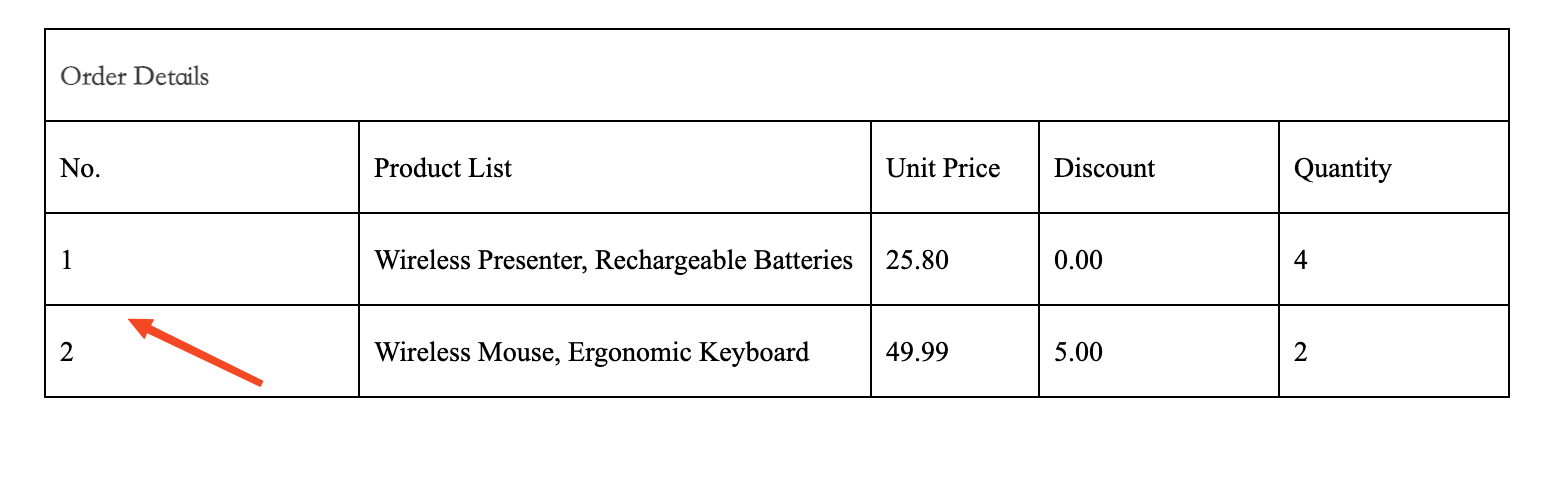
Print Output:
Merge Cells
When cells in the same column have identical values across rows, they can be merged.
Field code for merging vertical cells:
#{SubformName.FieldName[M]}
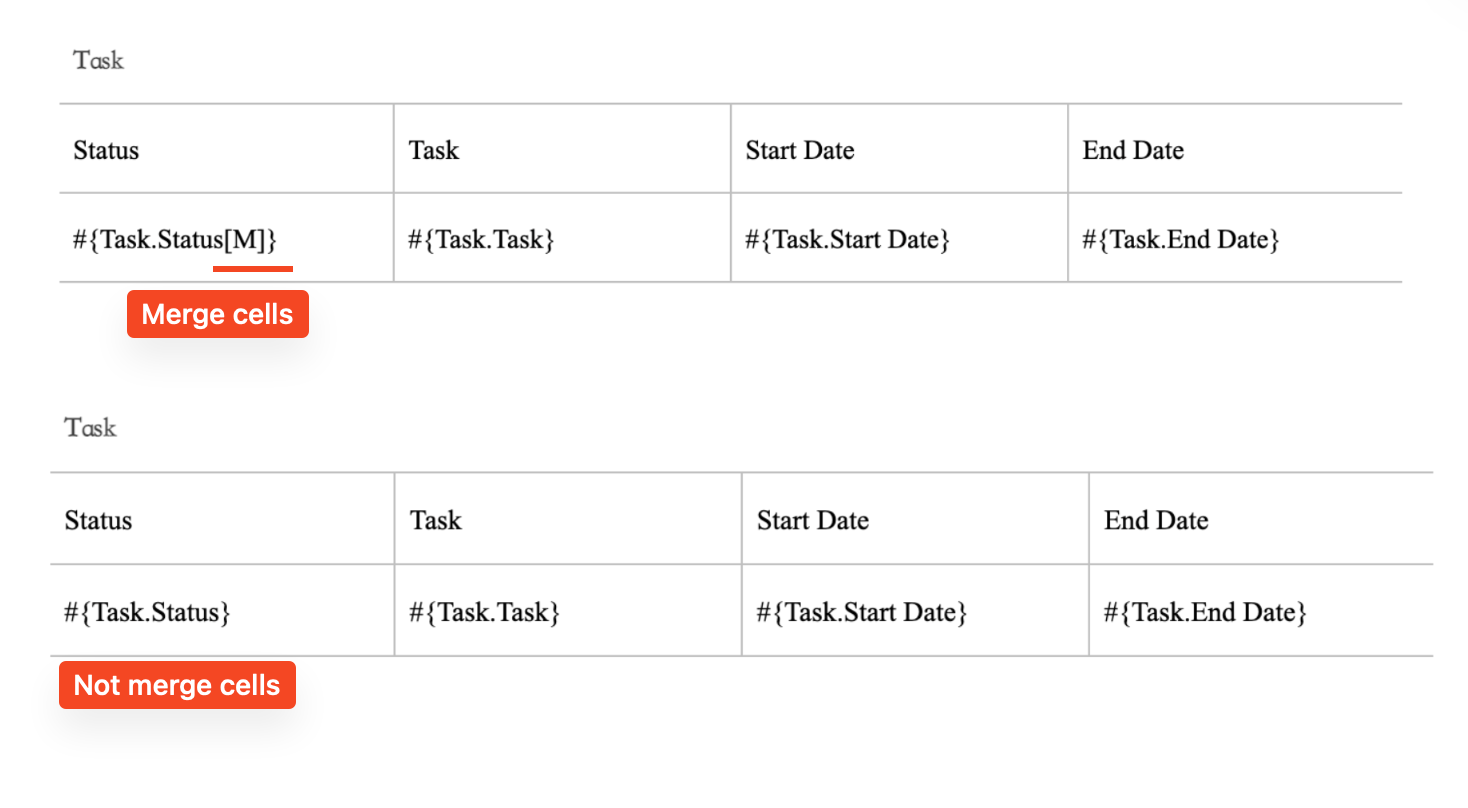
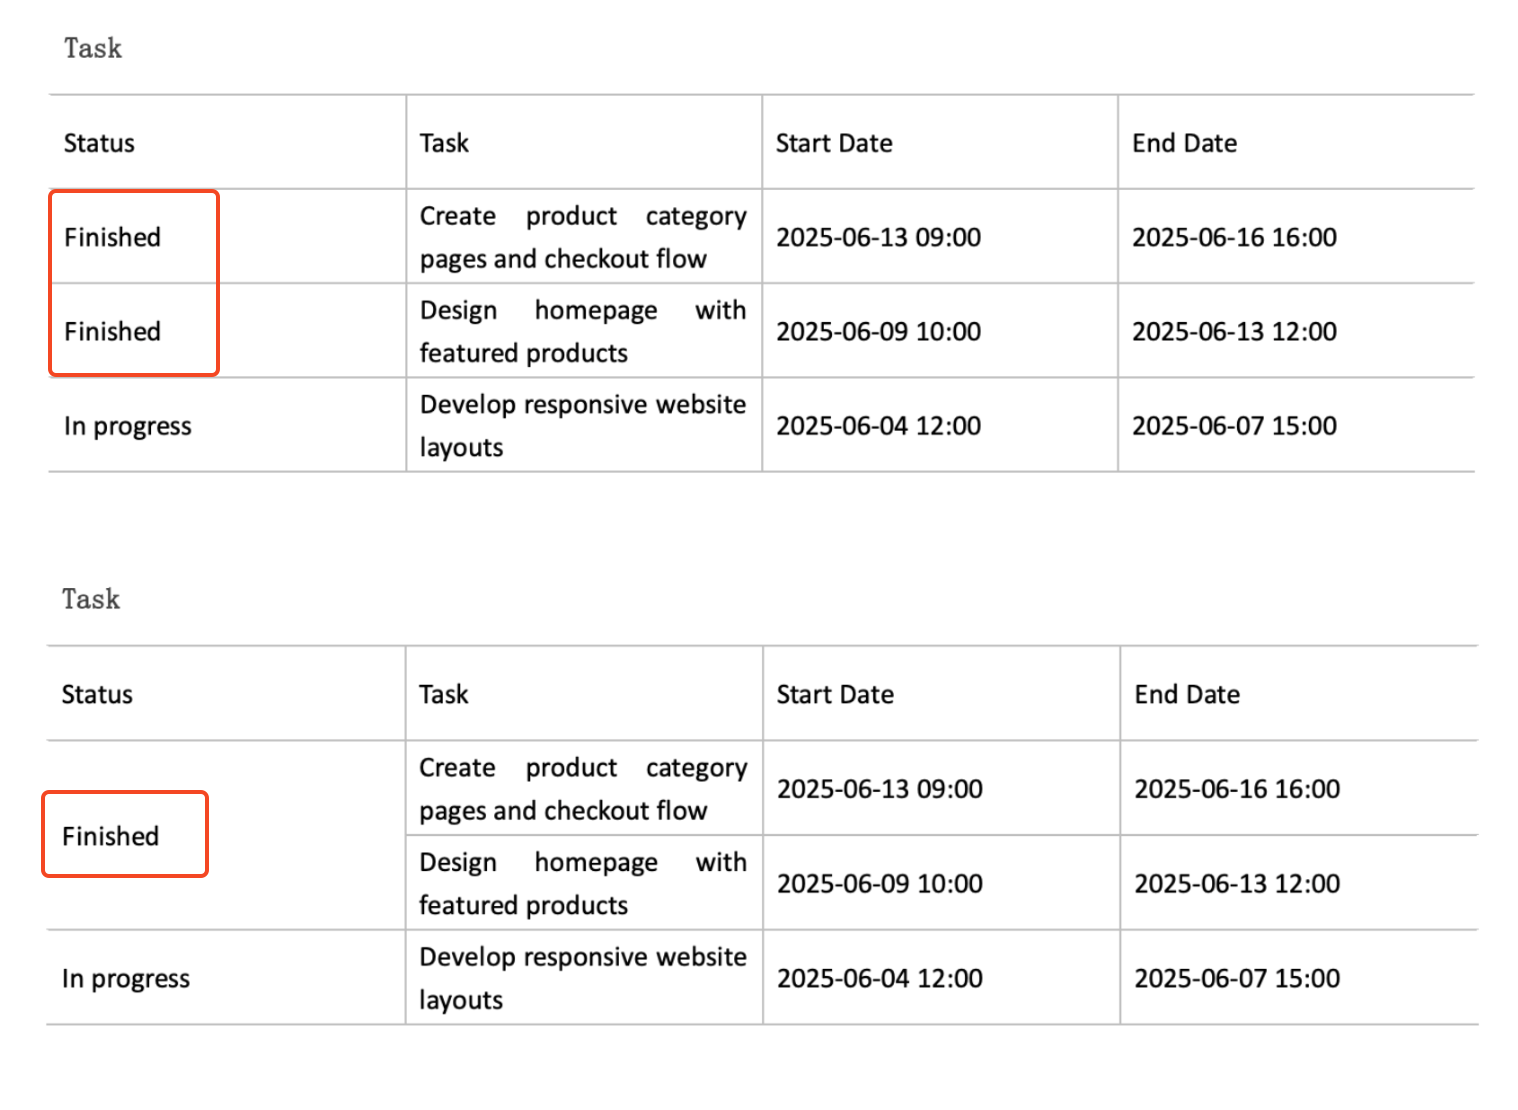
Print Output:
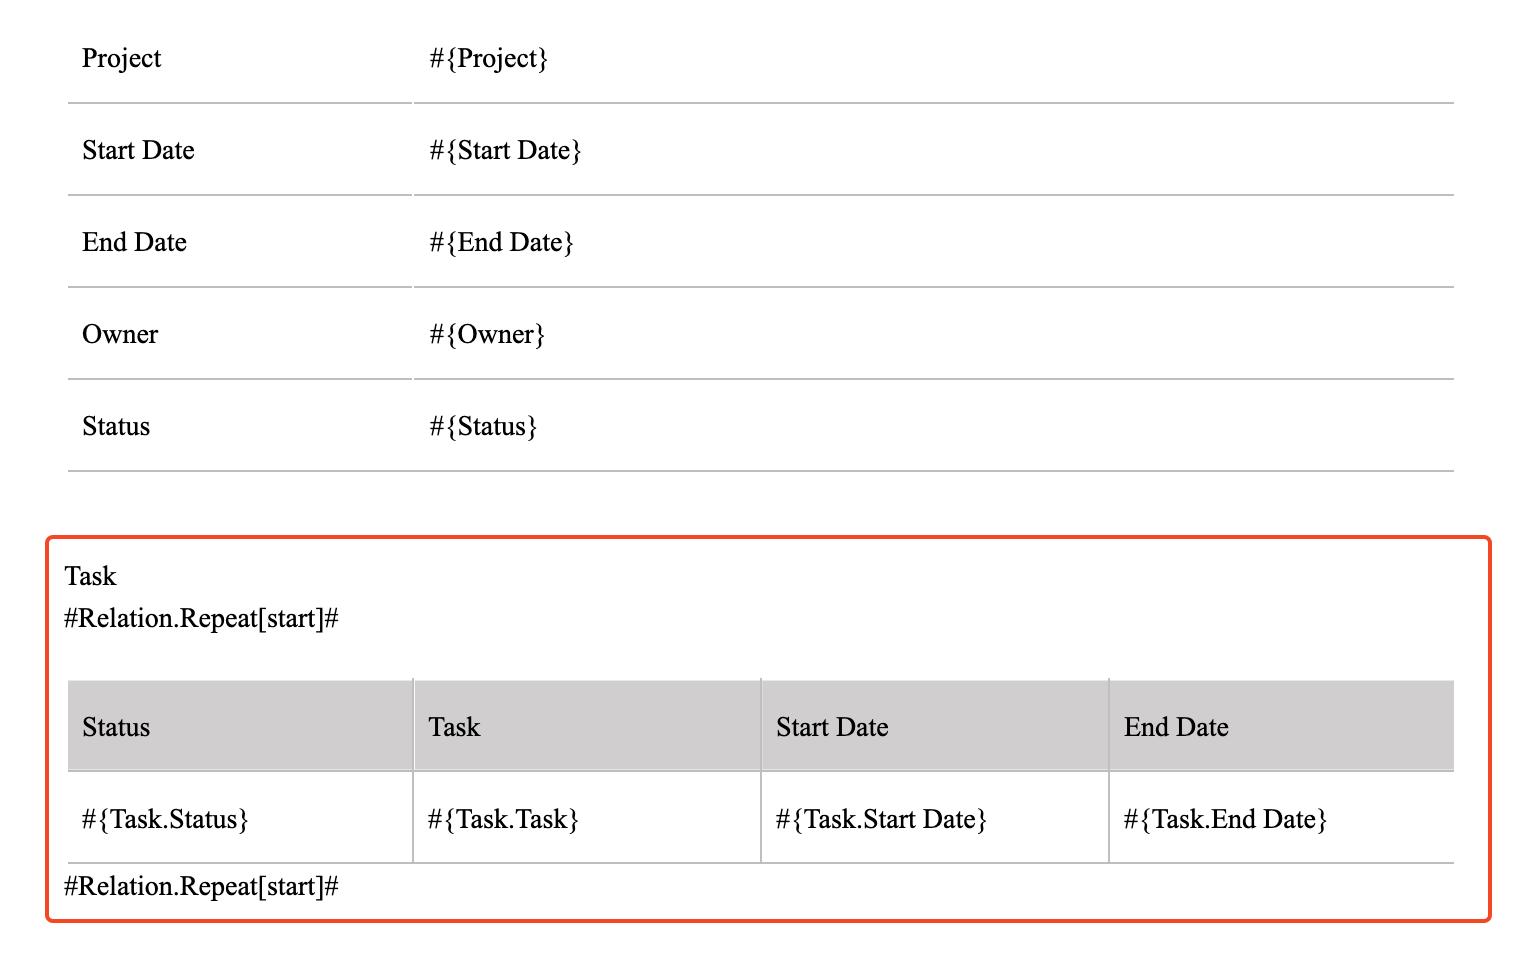
Method 2: Print Each Record Individually
If you want to print each related record or subform entry separately (with headers repeated), insert the following tags:
#Relation.Repeat[start]#

#Relation.Repeat[end]#
These tags must be placed in their own rows, not within the same cell as other content.
For example: printing each order item record individually.
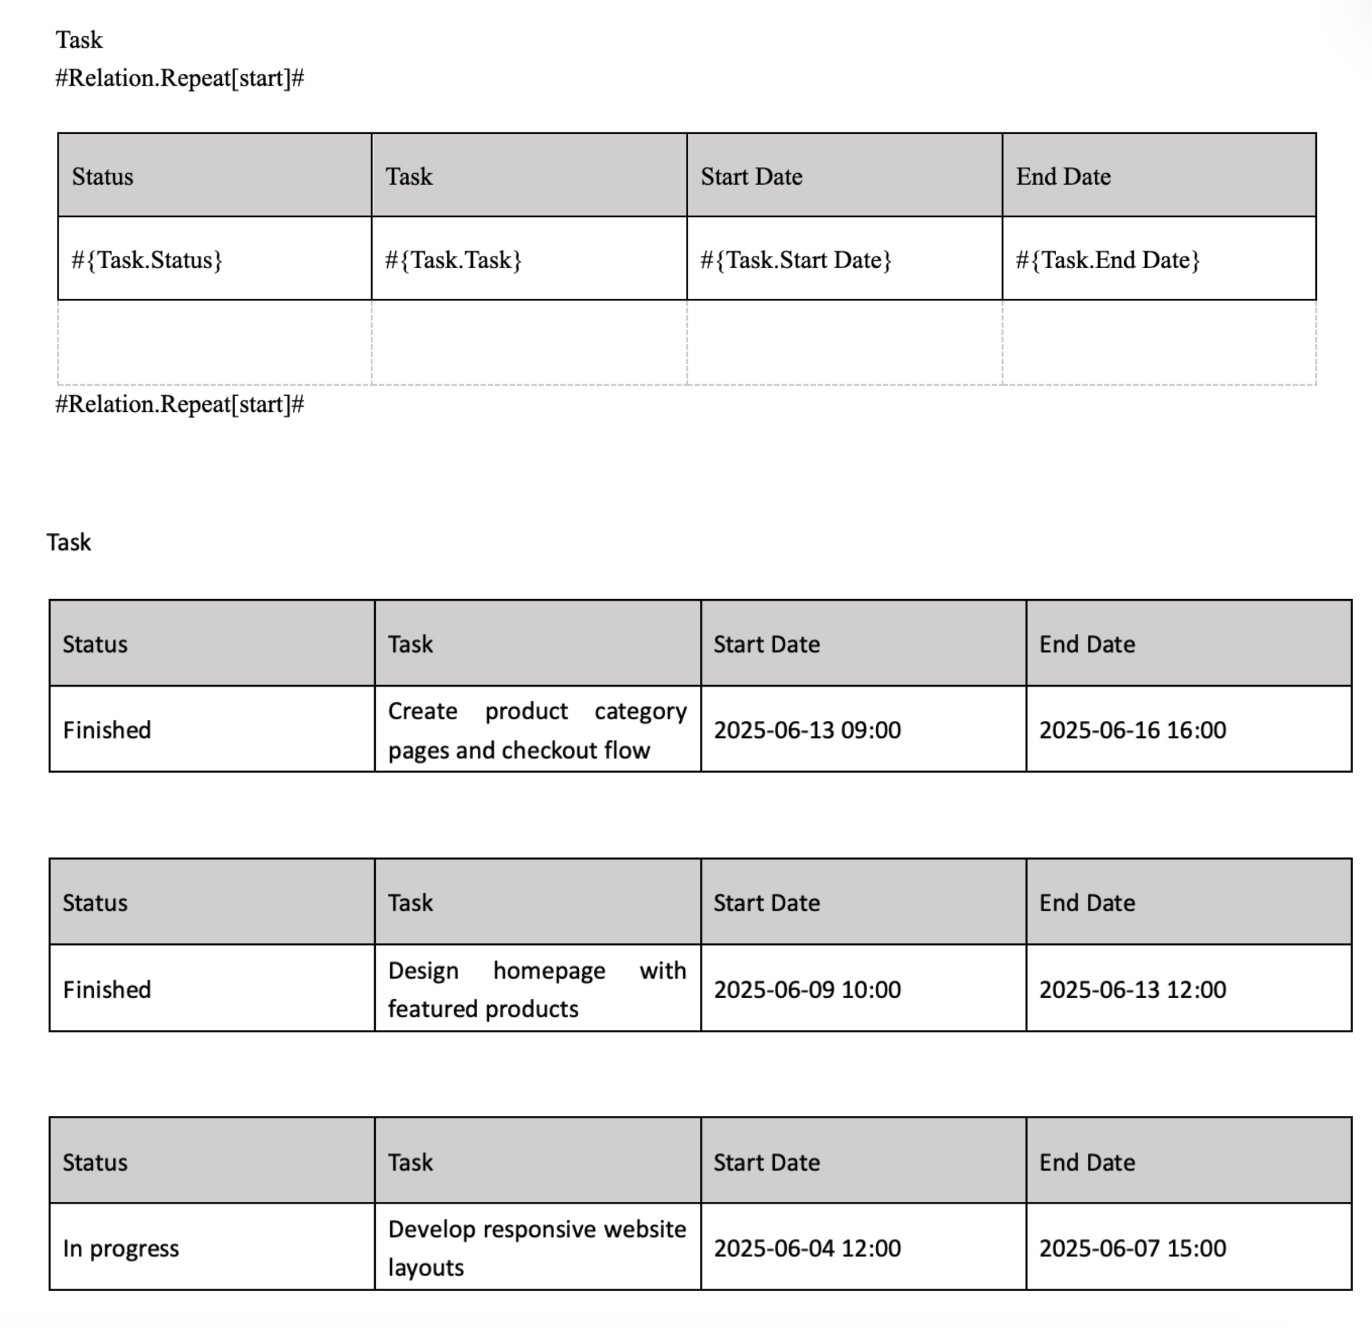
Template Design:
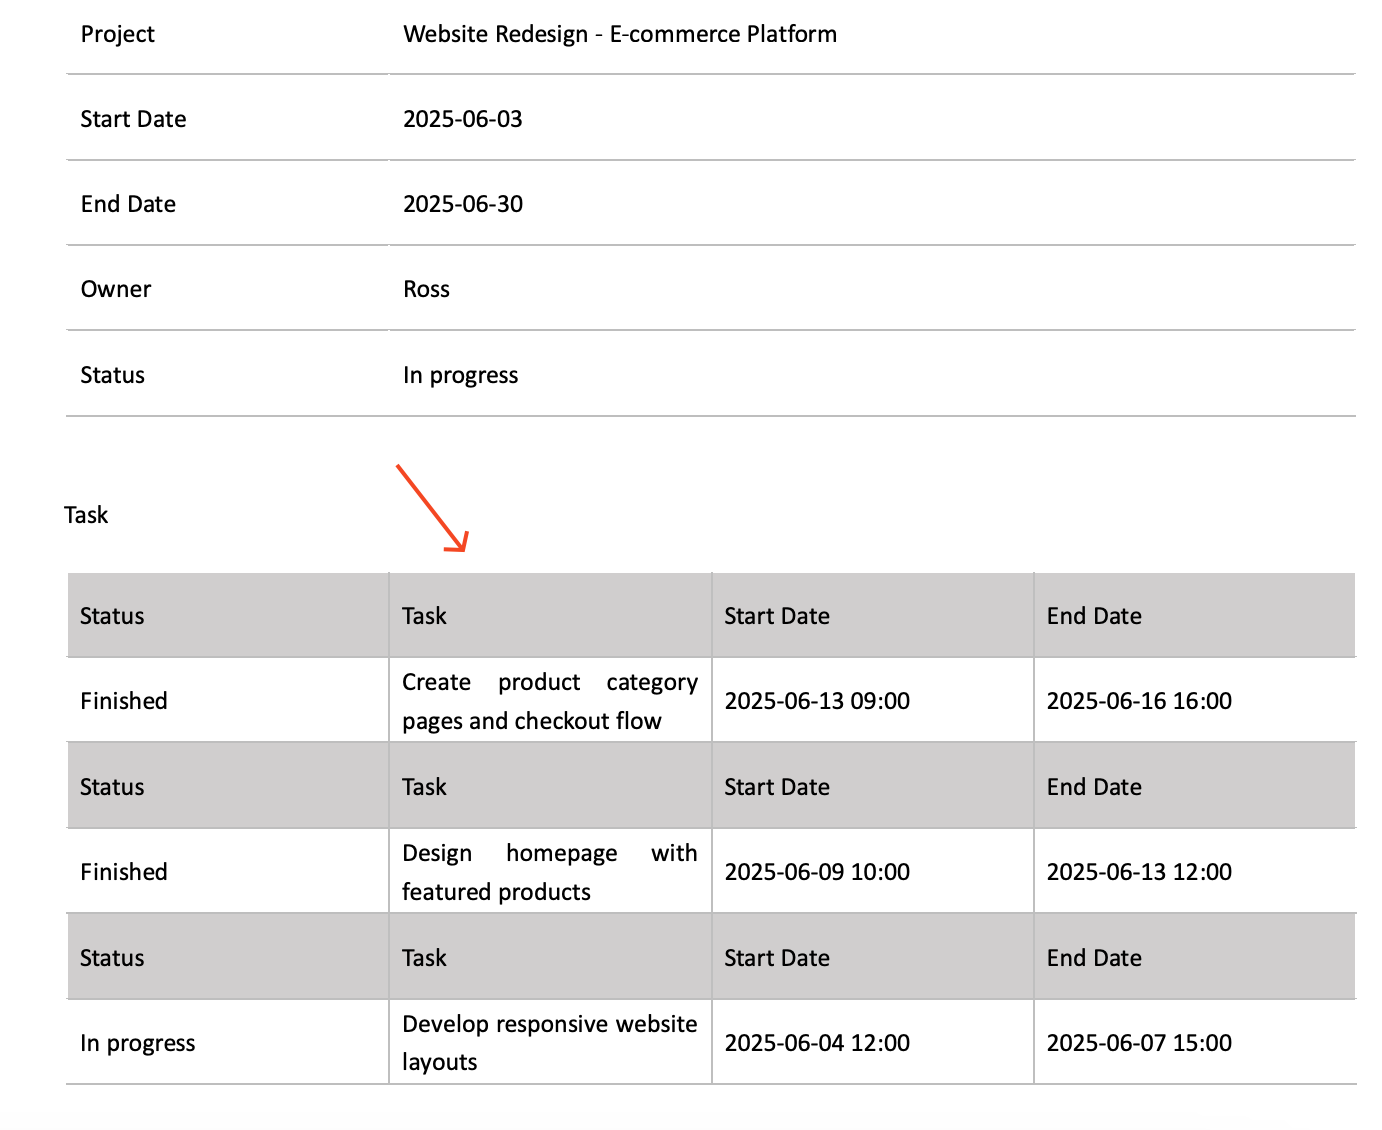
Print Output:
Tips:
If you want a blank row between records, insert one manually in the template and set its border to "none".
Method 3: Concatenate Values of a Field Across Records
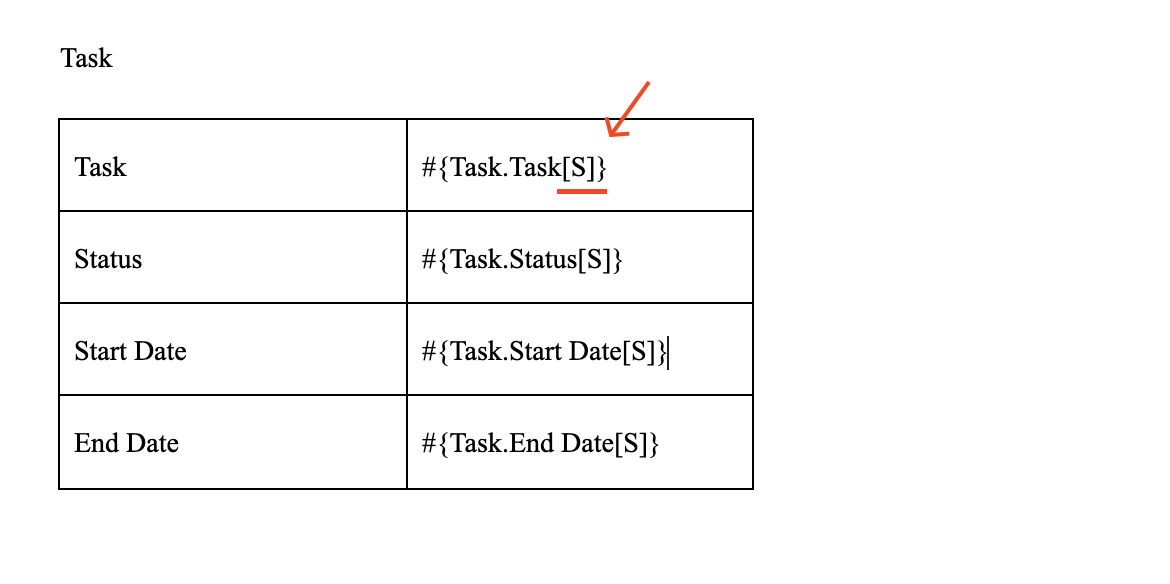
This method concatenates values of the same field across multiple records using commas. Just add [S] to the end of the field code.
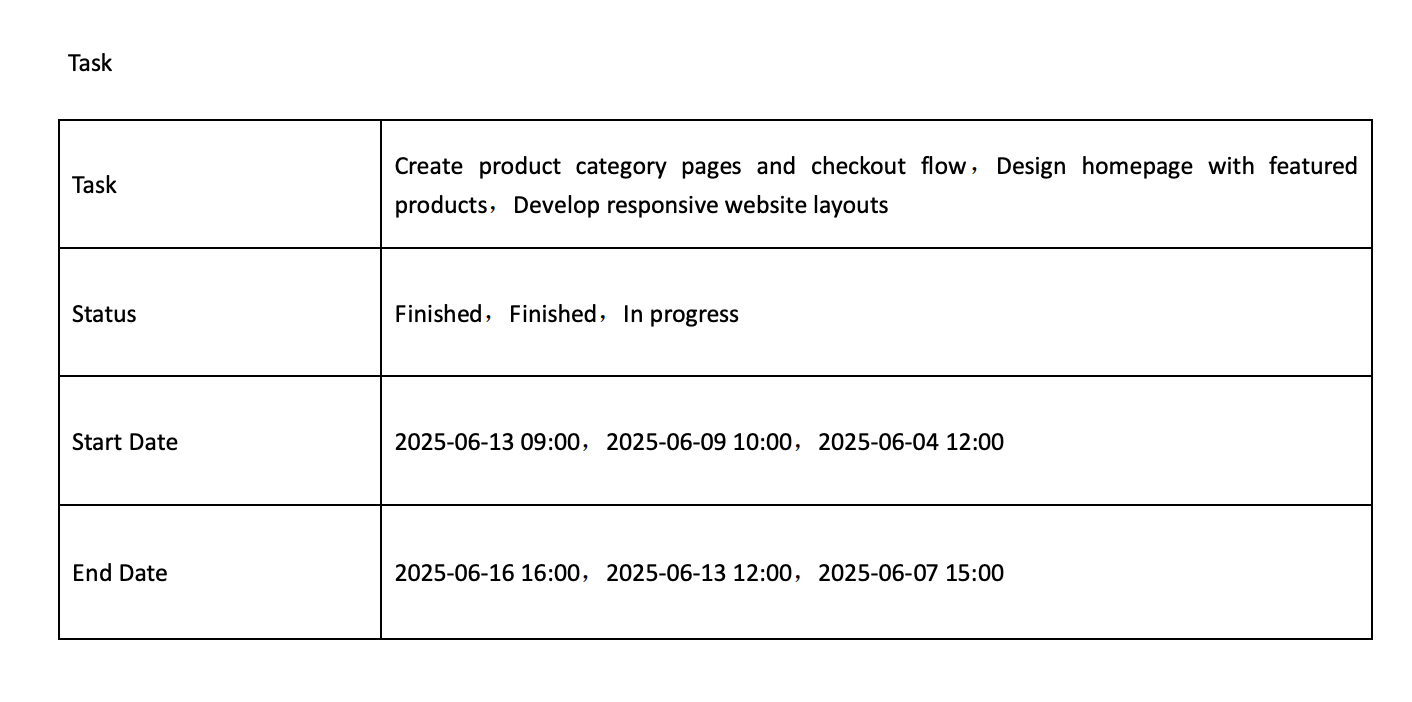
Template Design:
Method 4: Print Specified Records
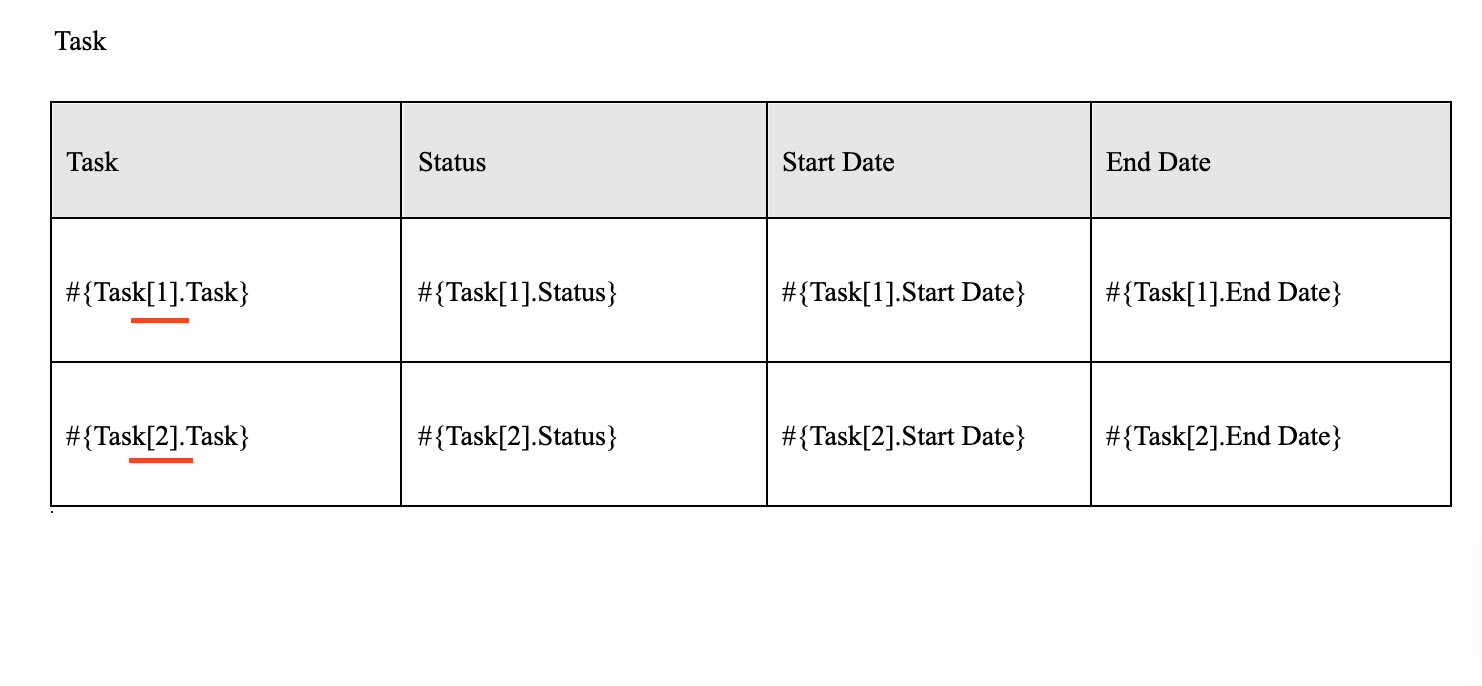
If the subform has 10 records but you only want to print the first few rows, you can append an index to the subform name.
Example below prints only the first two records:
Template Design:
Print Output:

Do Not Print If Subform or Related Worksheet Is Empty
To avoid printing sections with no data, insert the tag: #NoDataNotPrint[start]# and #NoDataNotPrint[end]#. Records between these tags will not be printed if no data exists.
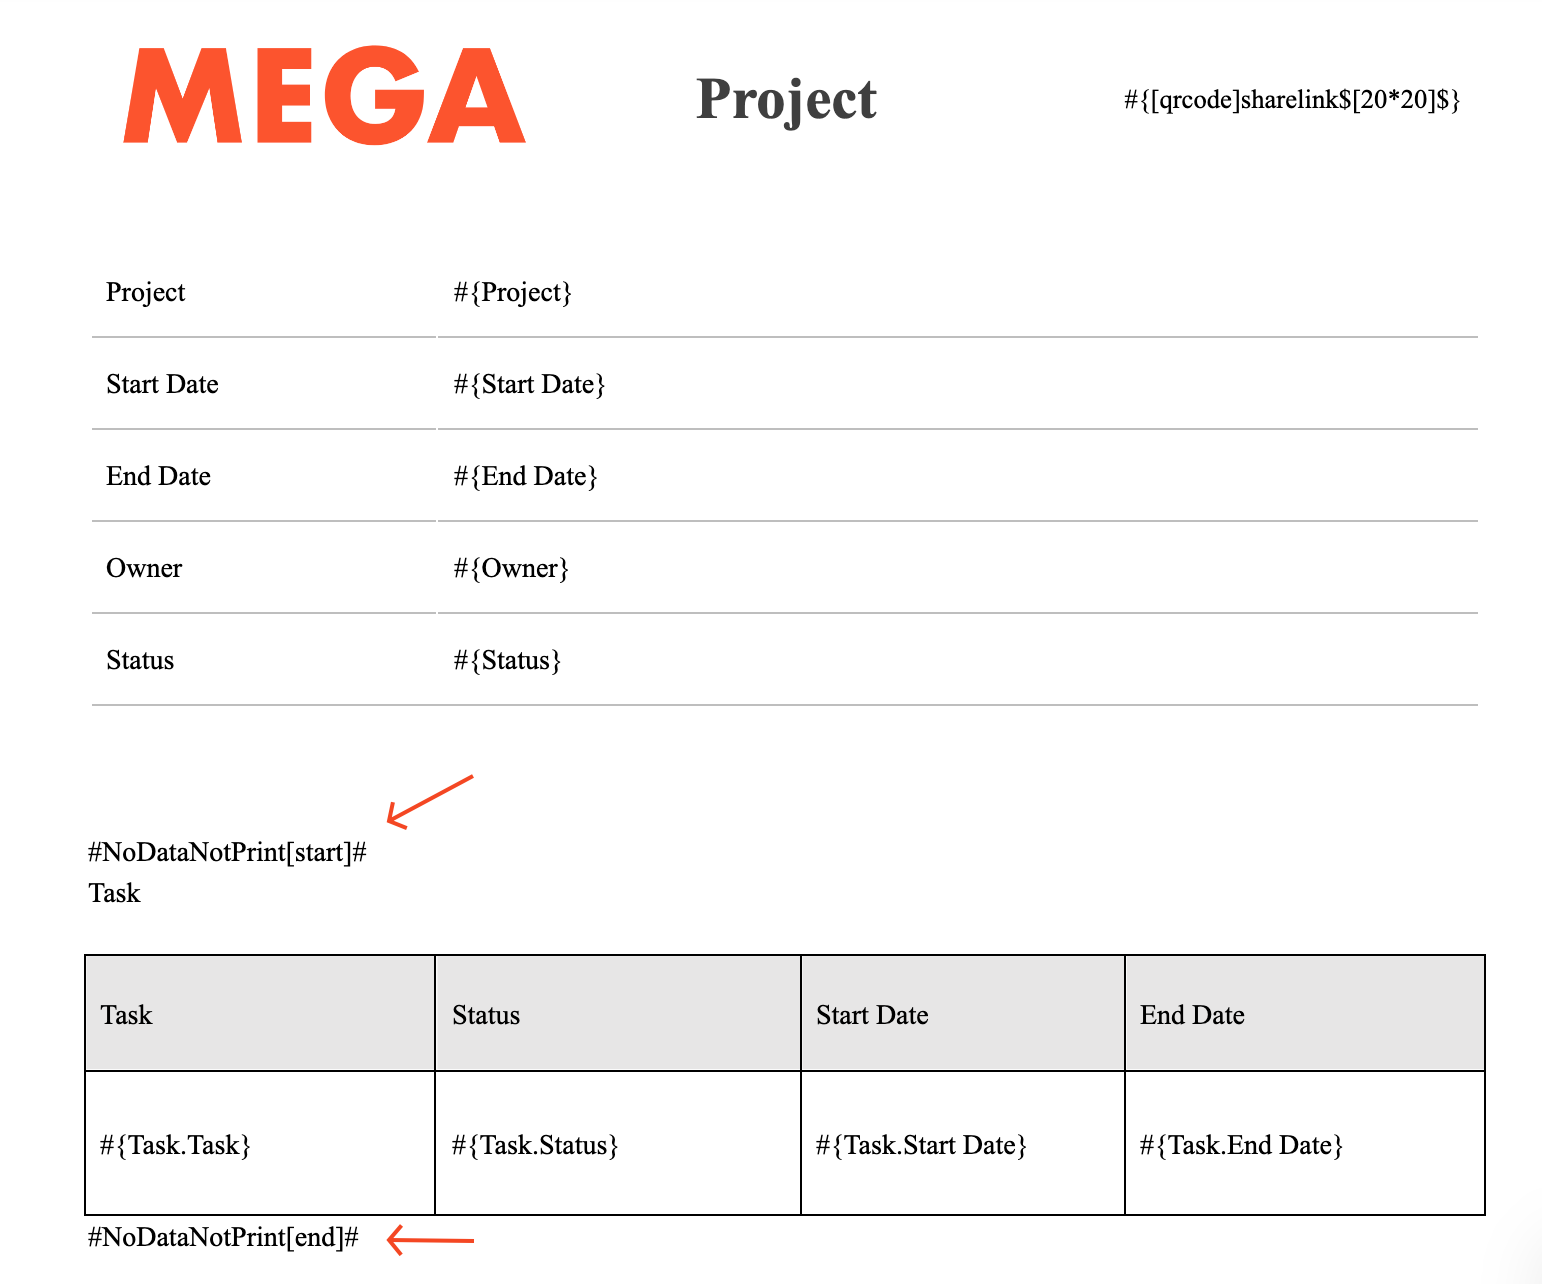
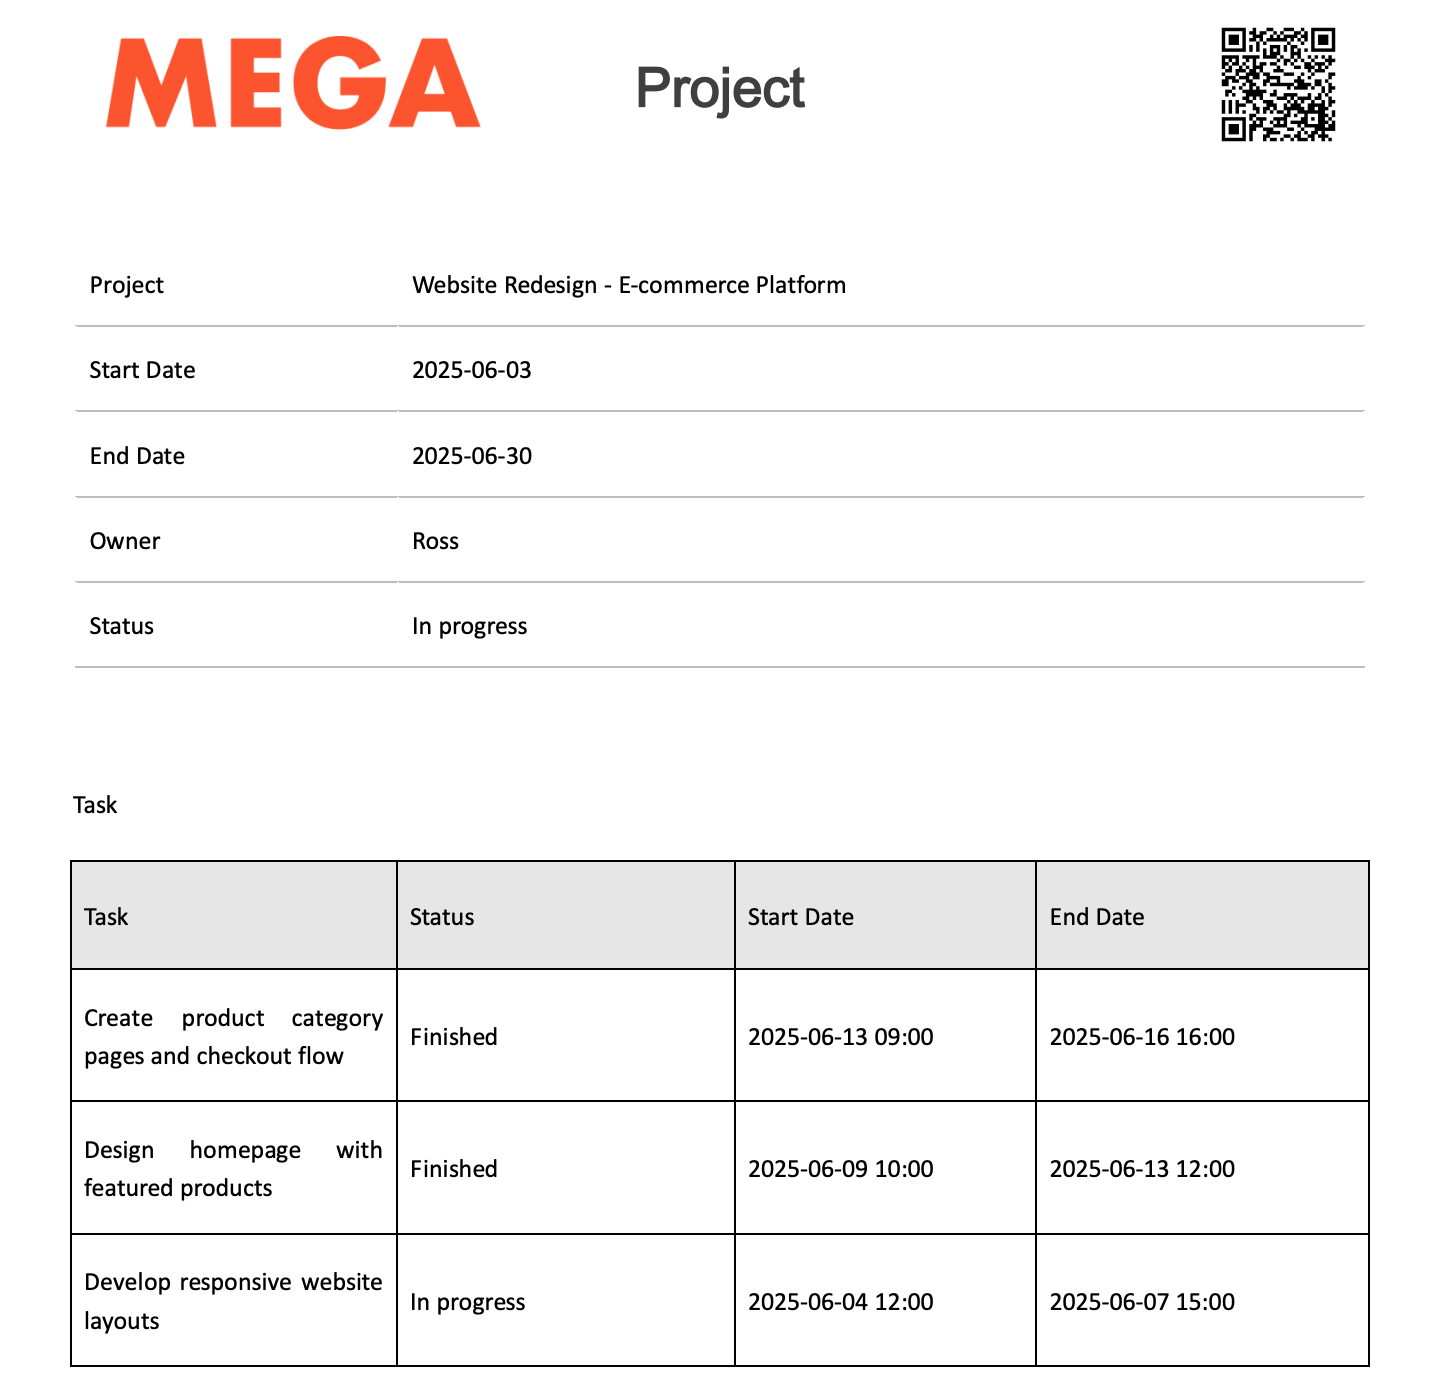
When Related Worksheet Has Data:
When Related Worksheet Has No Data:
If multiple subforms or related worksheets are wrapped in the same NoDataNotPrint tag, and even one of them has data, all sections will be printed. It is recommended to wrap each subform/related worksheet in a separate NoDataNotPrint block. Also, do not place multiple subforms within the same table structure—each should have its own.
5. Print Phone/Email for Members Fields
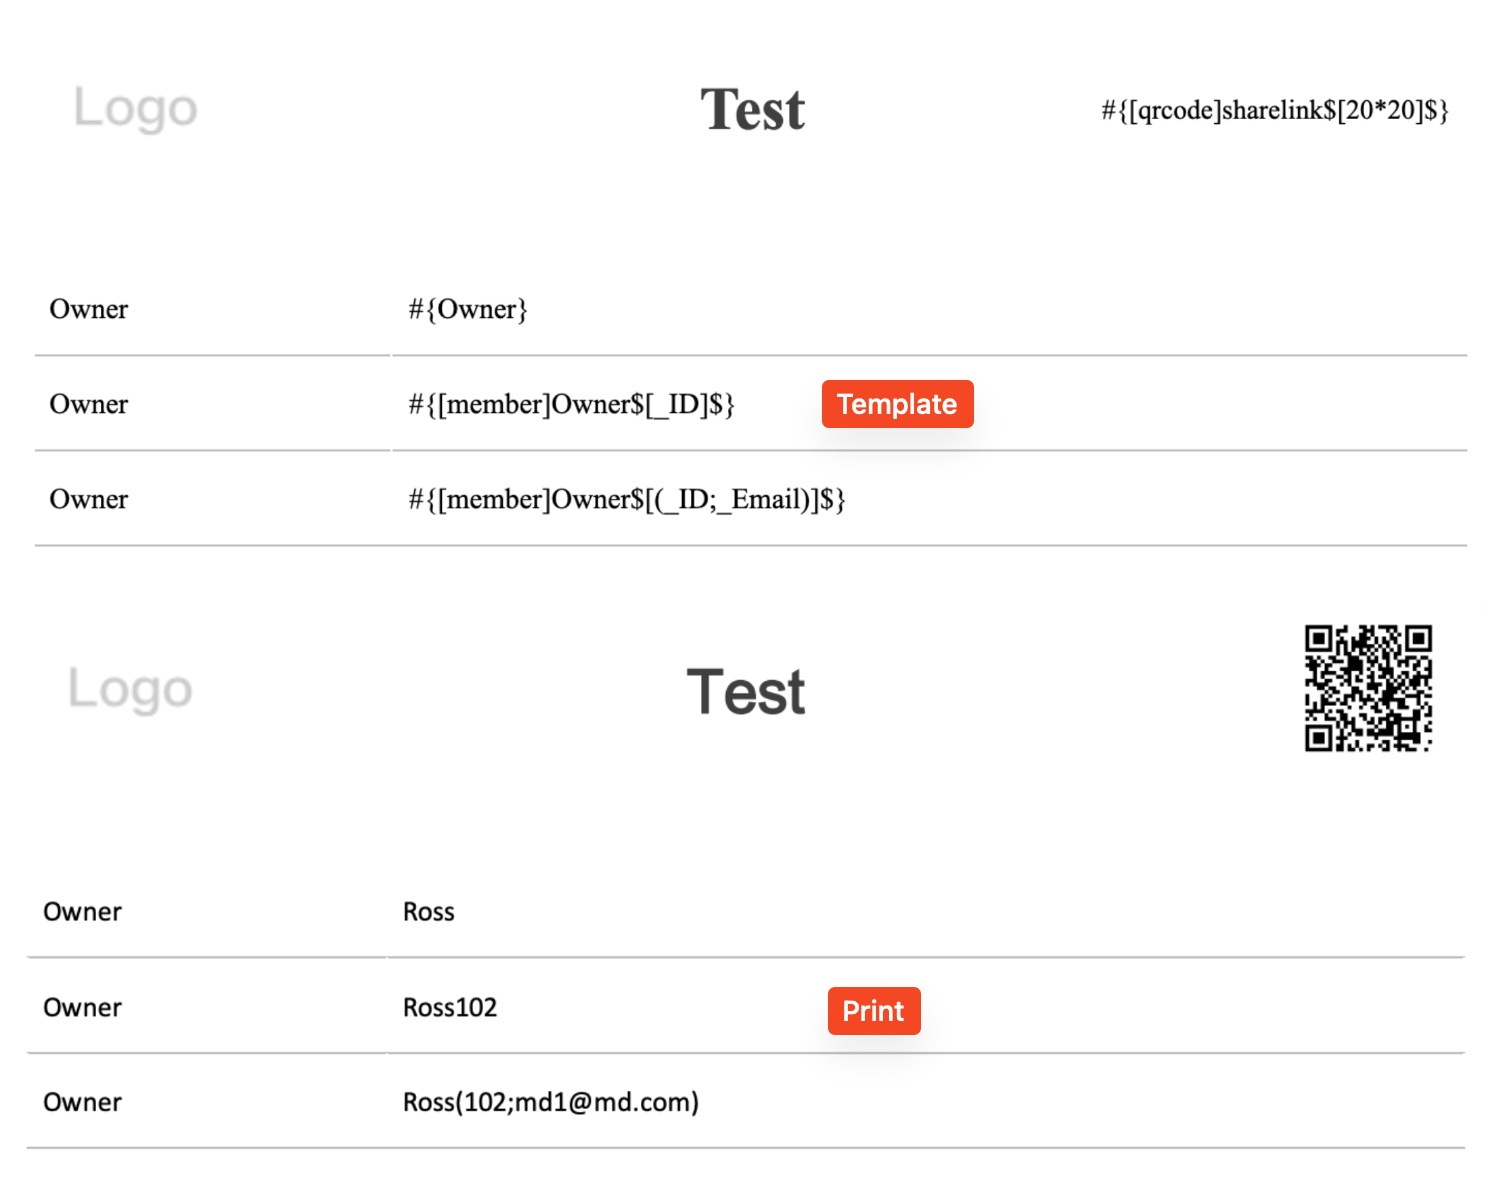
When printing members fields, you can include not only names but also Employee ID (_ID), Email (_Email), and Phone Number (_Phone). These can be inserted into the field code using a special format.
Format: #{[member]MemberFieldID$[AccountInfoCode]$}
Example: A members field "Owner" has the value Ross, with ID 102 and Email md1@md.com.
-
Print only name:
#{Owner}→ Output: Ross -
Name + ID:
#{[member]Owner$[_ID]$}→ Output: Ross102 -
Name + ID + Email:
#{[member]Owner$[(_ID;_Email)]$}→ Output: Ross (102;md1@md.com)
Use () to wrap the extra info and ; to separate items.
6. Custom Date/Time Format
By default, date/time fields print in the format yyyy-MM-dd HH:mm:ss (e.g. 2025-01-01 12:00:00). You can customize this by appending a format string to the field code.
Format: #{DateTimeFieldID$[CustomFormat]$}
Examples:
#{ctime}→ 2025-01-01 12:00:00#{ctime$[yyyy/M/d]$}→ 2025/1/1#{ctime$[yyyy/M/d HH:mm]$}→ 2025/1/1 12:00
Learn more about custom date formatting
7. Print Time/Printed By
In addition to field data, you can also print metadata such as:
- Print time
- Printed by
- QR codes
- Barcodes
- Creation time
- Last modified time
Just insert the corresponding field codes or aliases into the template.
8. Bulk Printing
Was this document helpful?