Data Integration
The core capability of Data Integration in HAP’s Integration Center is to solve the issue of fragmented data across different business systems. By connecting directly to databases, it supports both real-time and scheduled synchronization. With simple field mapping, users can sync data between databases and worksheets, or even between different databases.
This helps address the following scenarios:
- Migrate legacy system data into HAP in bulk
- Sync data from other systems into HAP in real time
- Sync data from HAP to other databases in real time
- Bridge different databases to enable data flow between them
Supported Database Types
| Database | As Source | As Destination | Supported Versions |
|---|---|---|---|
| Worksheet | ✅ | ✅ | – |
| MySQL | ✅ | ✅ | 5.6, 5.7, 8.0.x Supports Alibaba Cloud & Tencent Cloud |
| SAP HANA | ✅ | ❌ | Supports only scheduled sync (no other source supports scheduled sync) |
| SQL Server | ✅ | ✅ | 2012, 2014, 2016, 2017, 2019 Supports Alibaba Cloud & Tencent Cloud |
| Oracle | ✅ | ❌ | 9i, 10g, 11g, 12c+ |
| PostgreSQL | ✅ | ✅ | 9.6, 10, 11, 12+ |
| MongoDB | ✅ | ✅ | ≥ 3.6 Supports Alibaba Cloud & Tencent Cloud |
| MariaDB | ✅ | ✅ | ≥ 10.3 Supports Alibaba Cloud & Tencent Cloud |
| IBM DB2 | ✅ | ❌ | 11.5x |
| Kafka | ✅ | ❌ | 2.3.x |
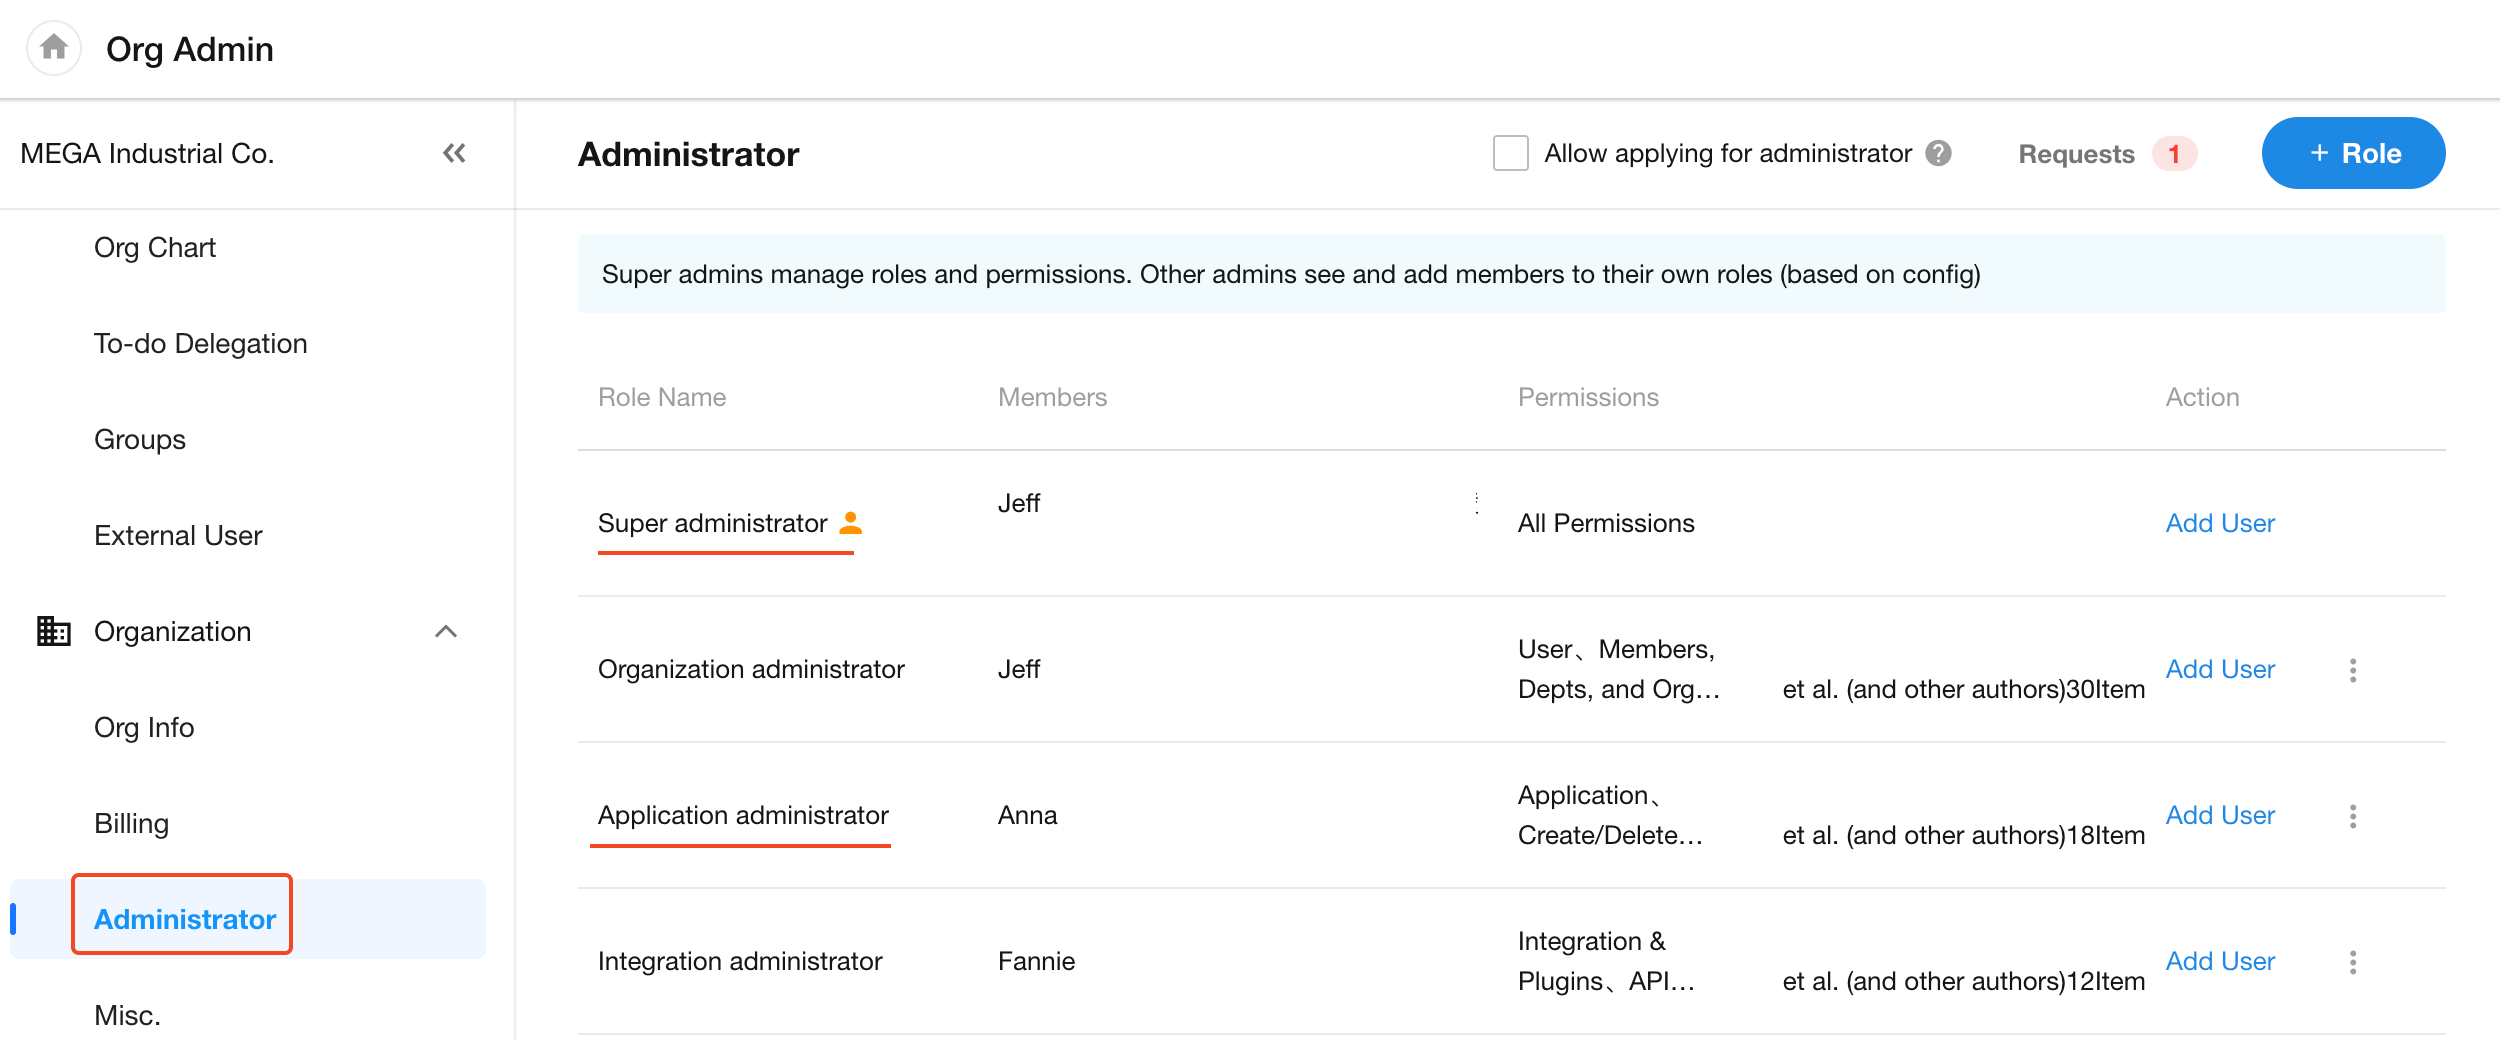
Accessing Data Integration
Navigate to [Integrate] in the left-hand menu from the home page to enter the Data Integration module.
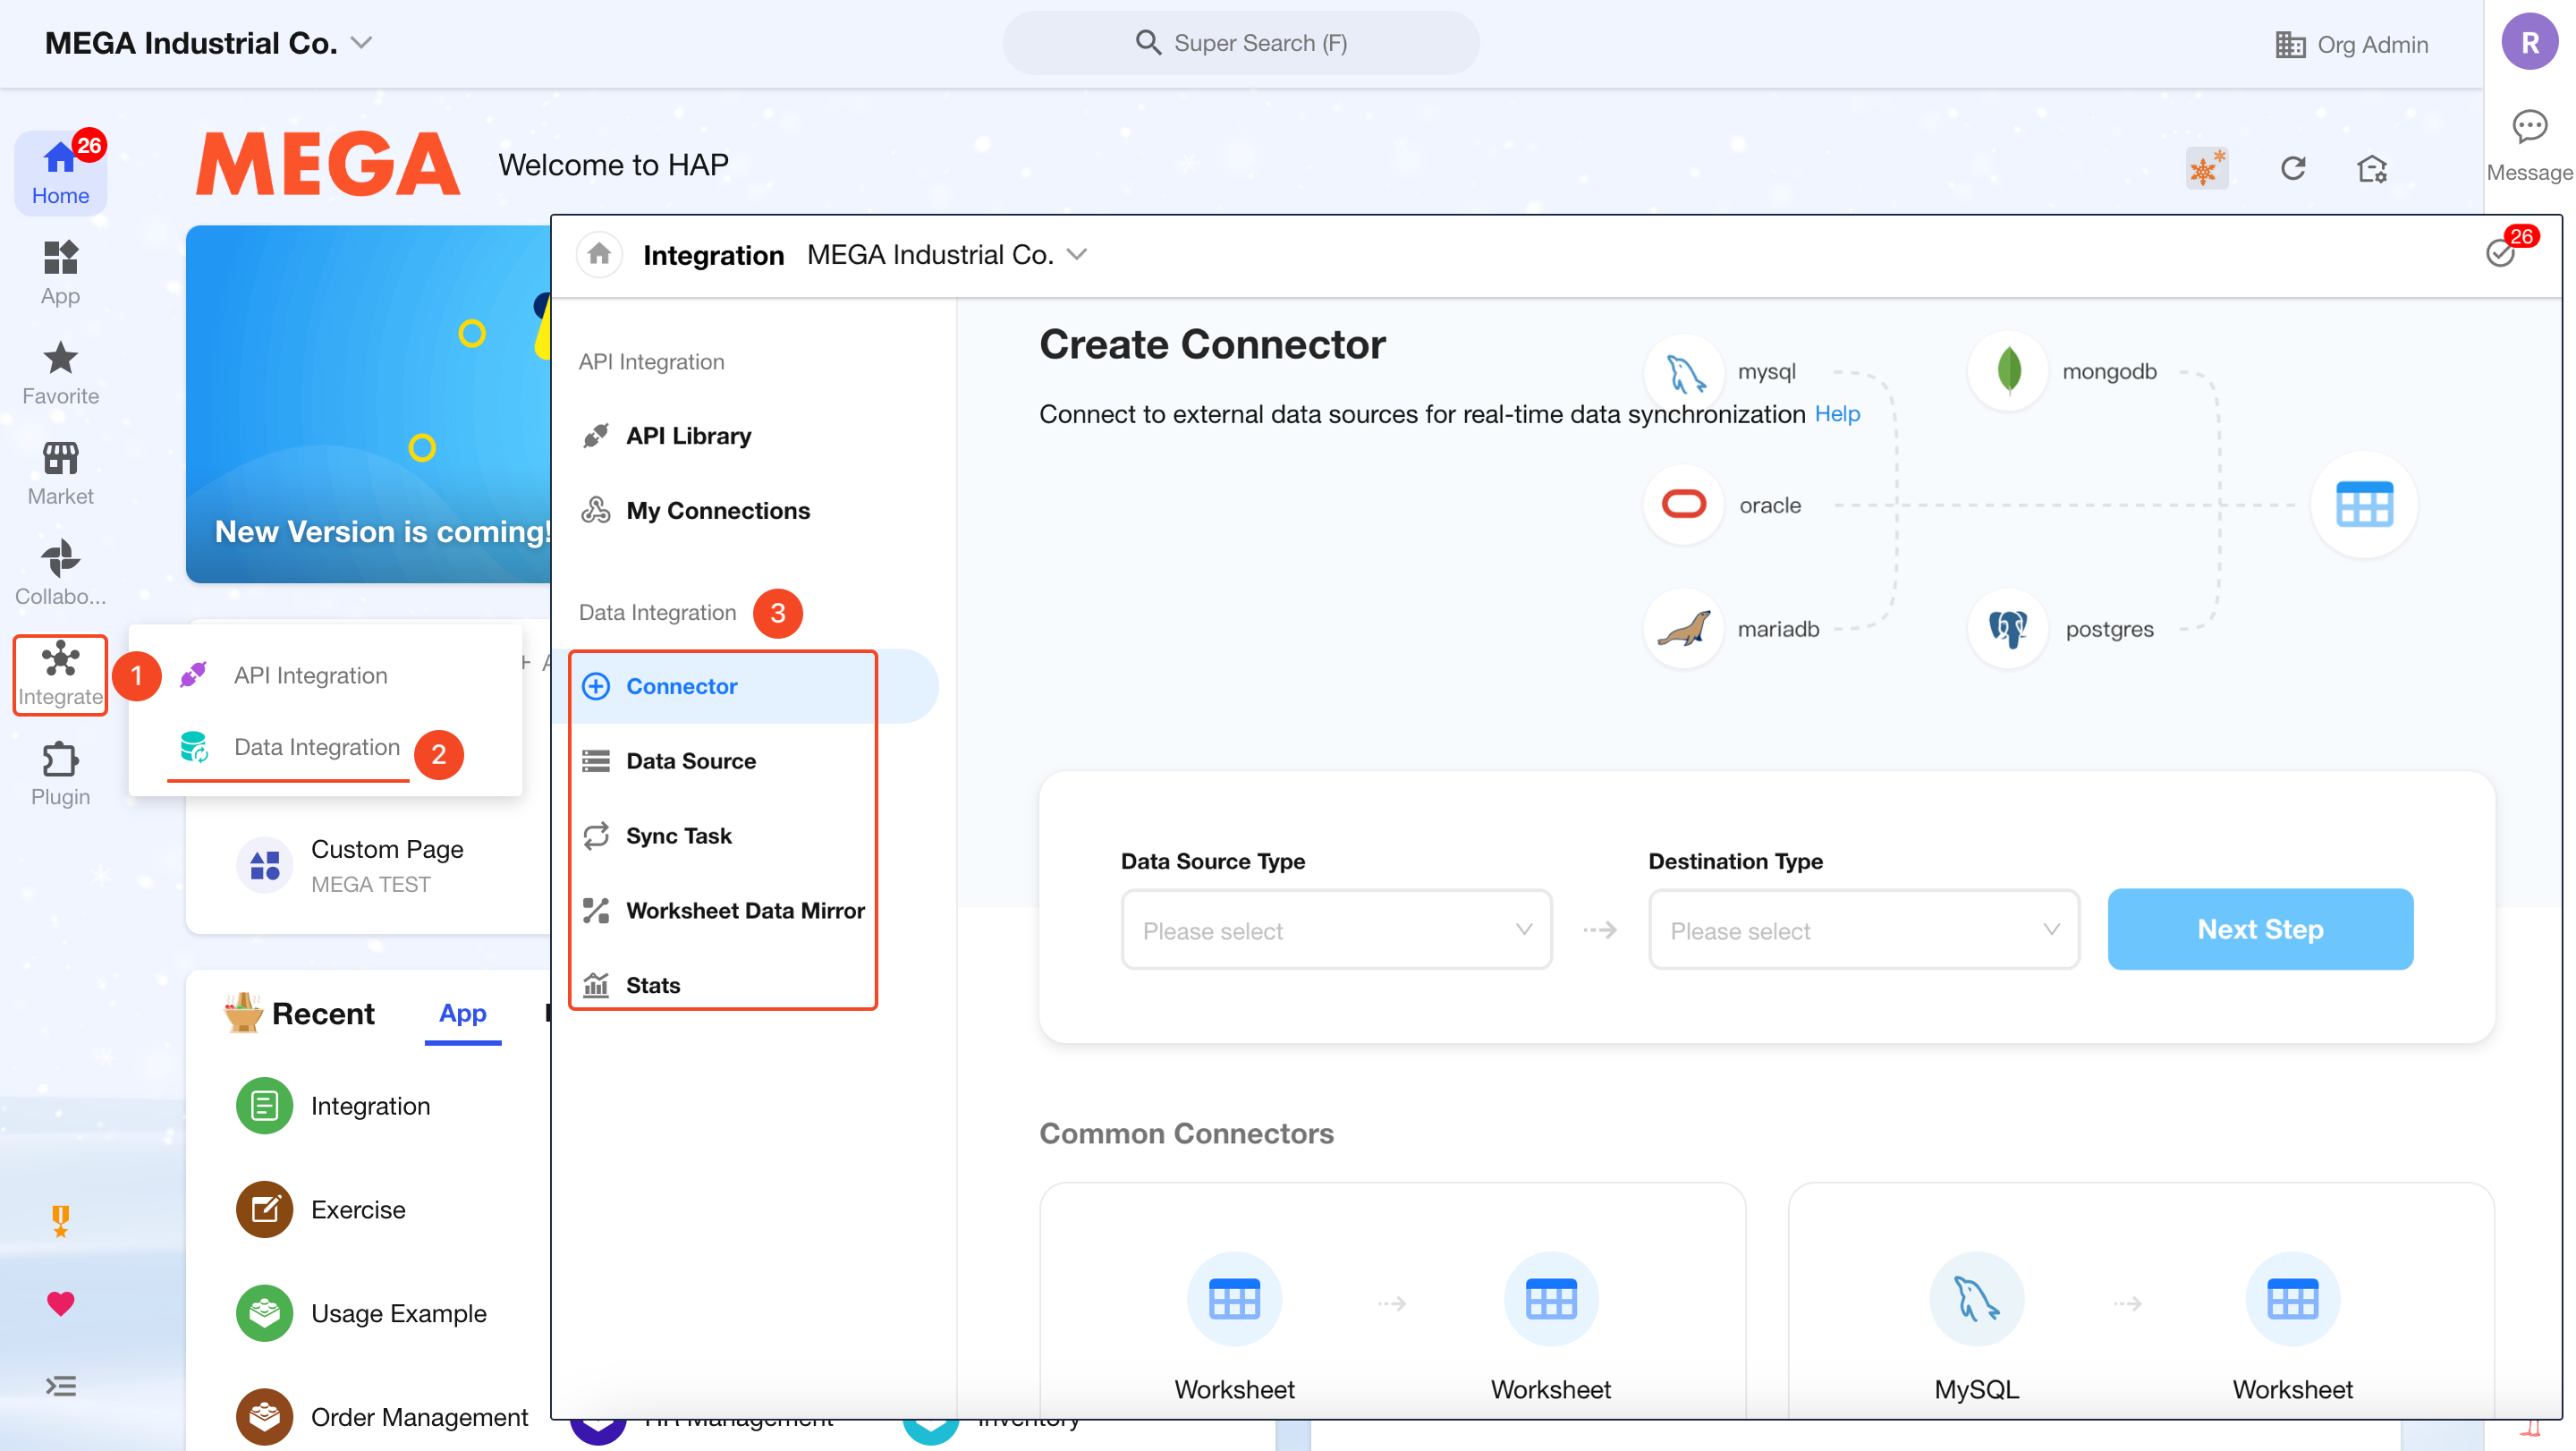
This feature is only visible to Org Super Admins and App Admins.
Three Steps to Set Up Data Integration
Step 1: Create a Connector
A connector establishes the connection between source and destination databases and defines the field mapping. During this step, you can create multiple sync tasks from multiple tables within the same data source.
1. Select Source and Destination Types
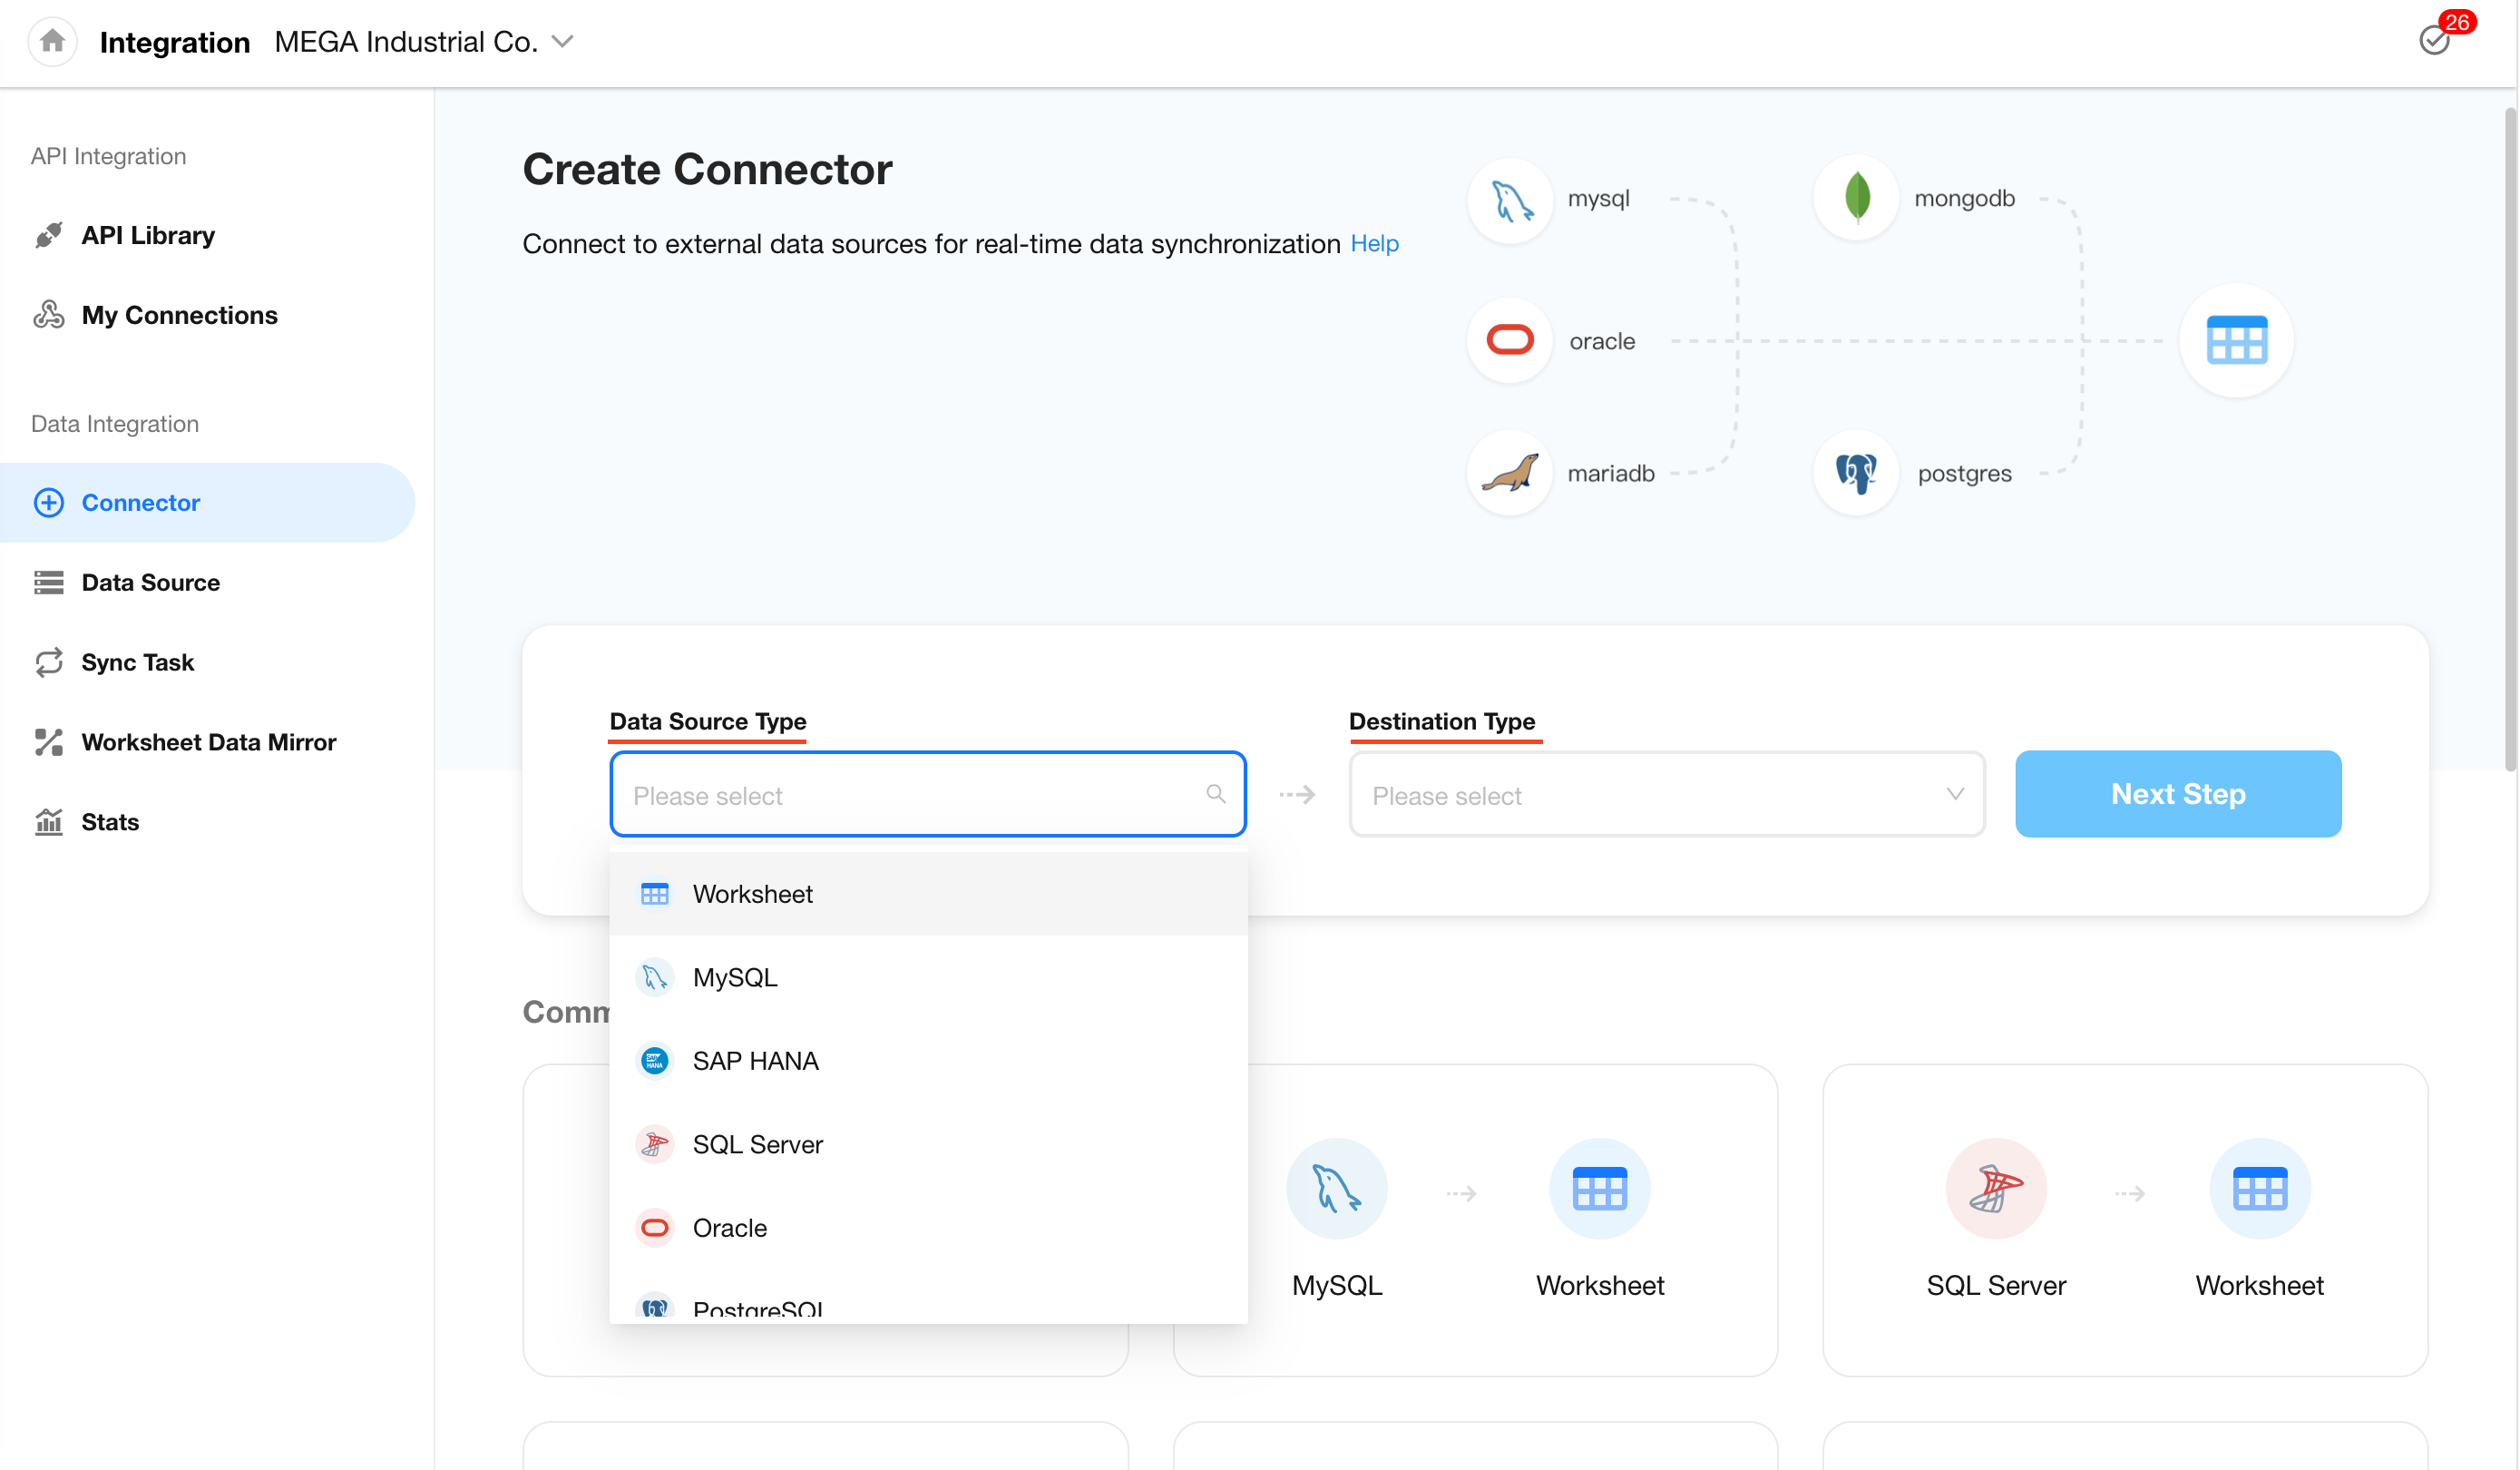
If both source and destination support MySQL, the following types of sync are supported:
- Sync worksheet → worksheet
- Sync MySQL database → worksheet
- Sync worksheet → MySQL database
- Sync MySQL database → MySQL database
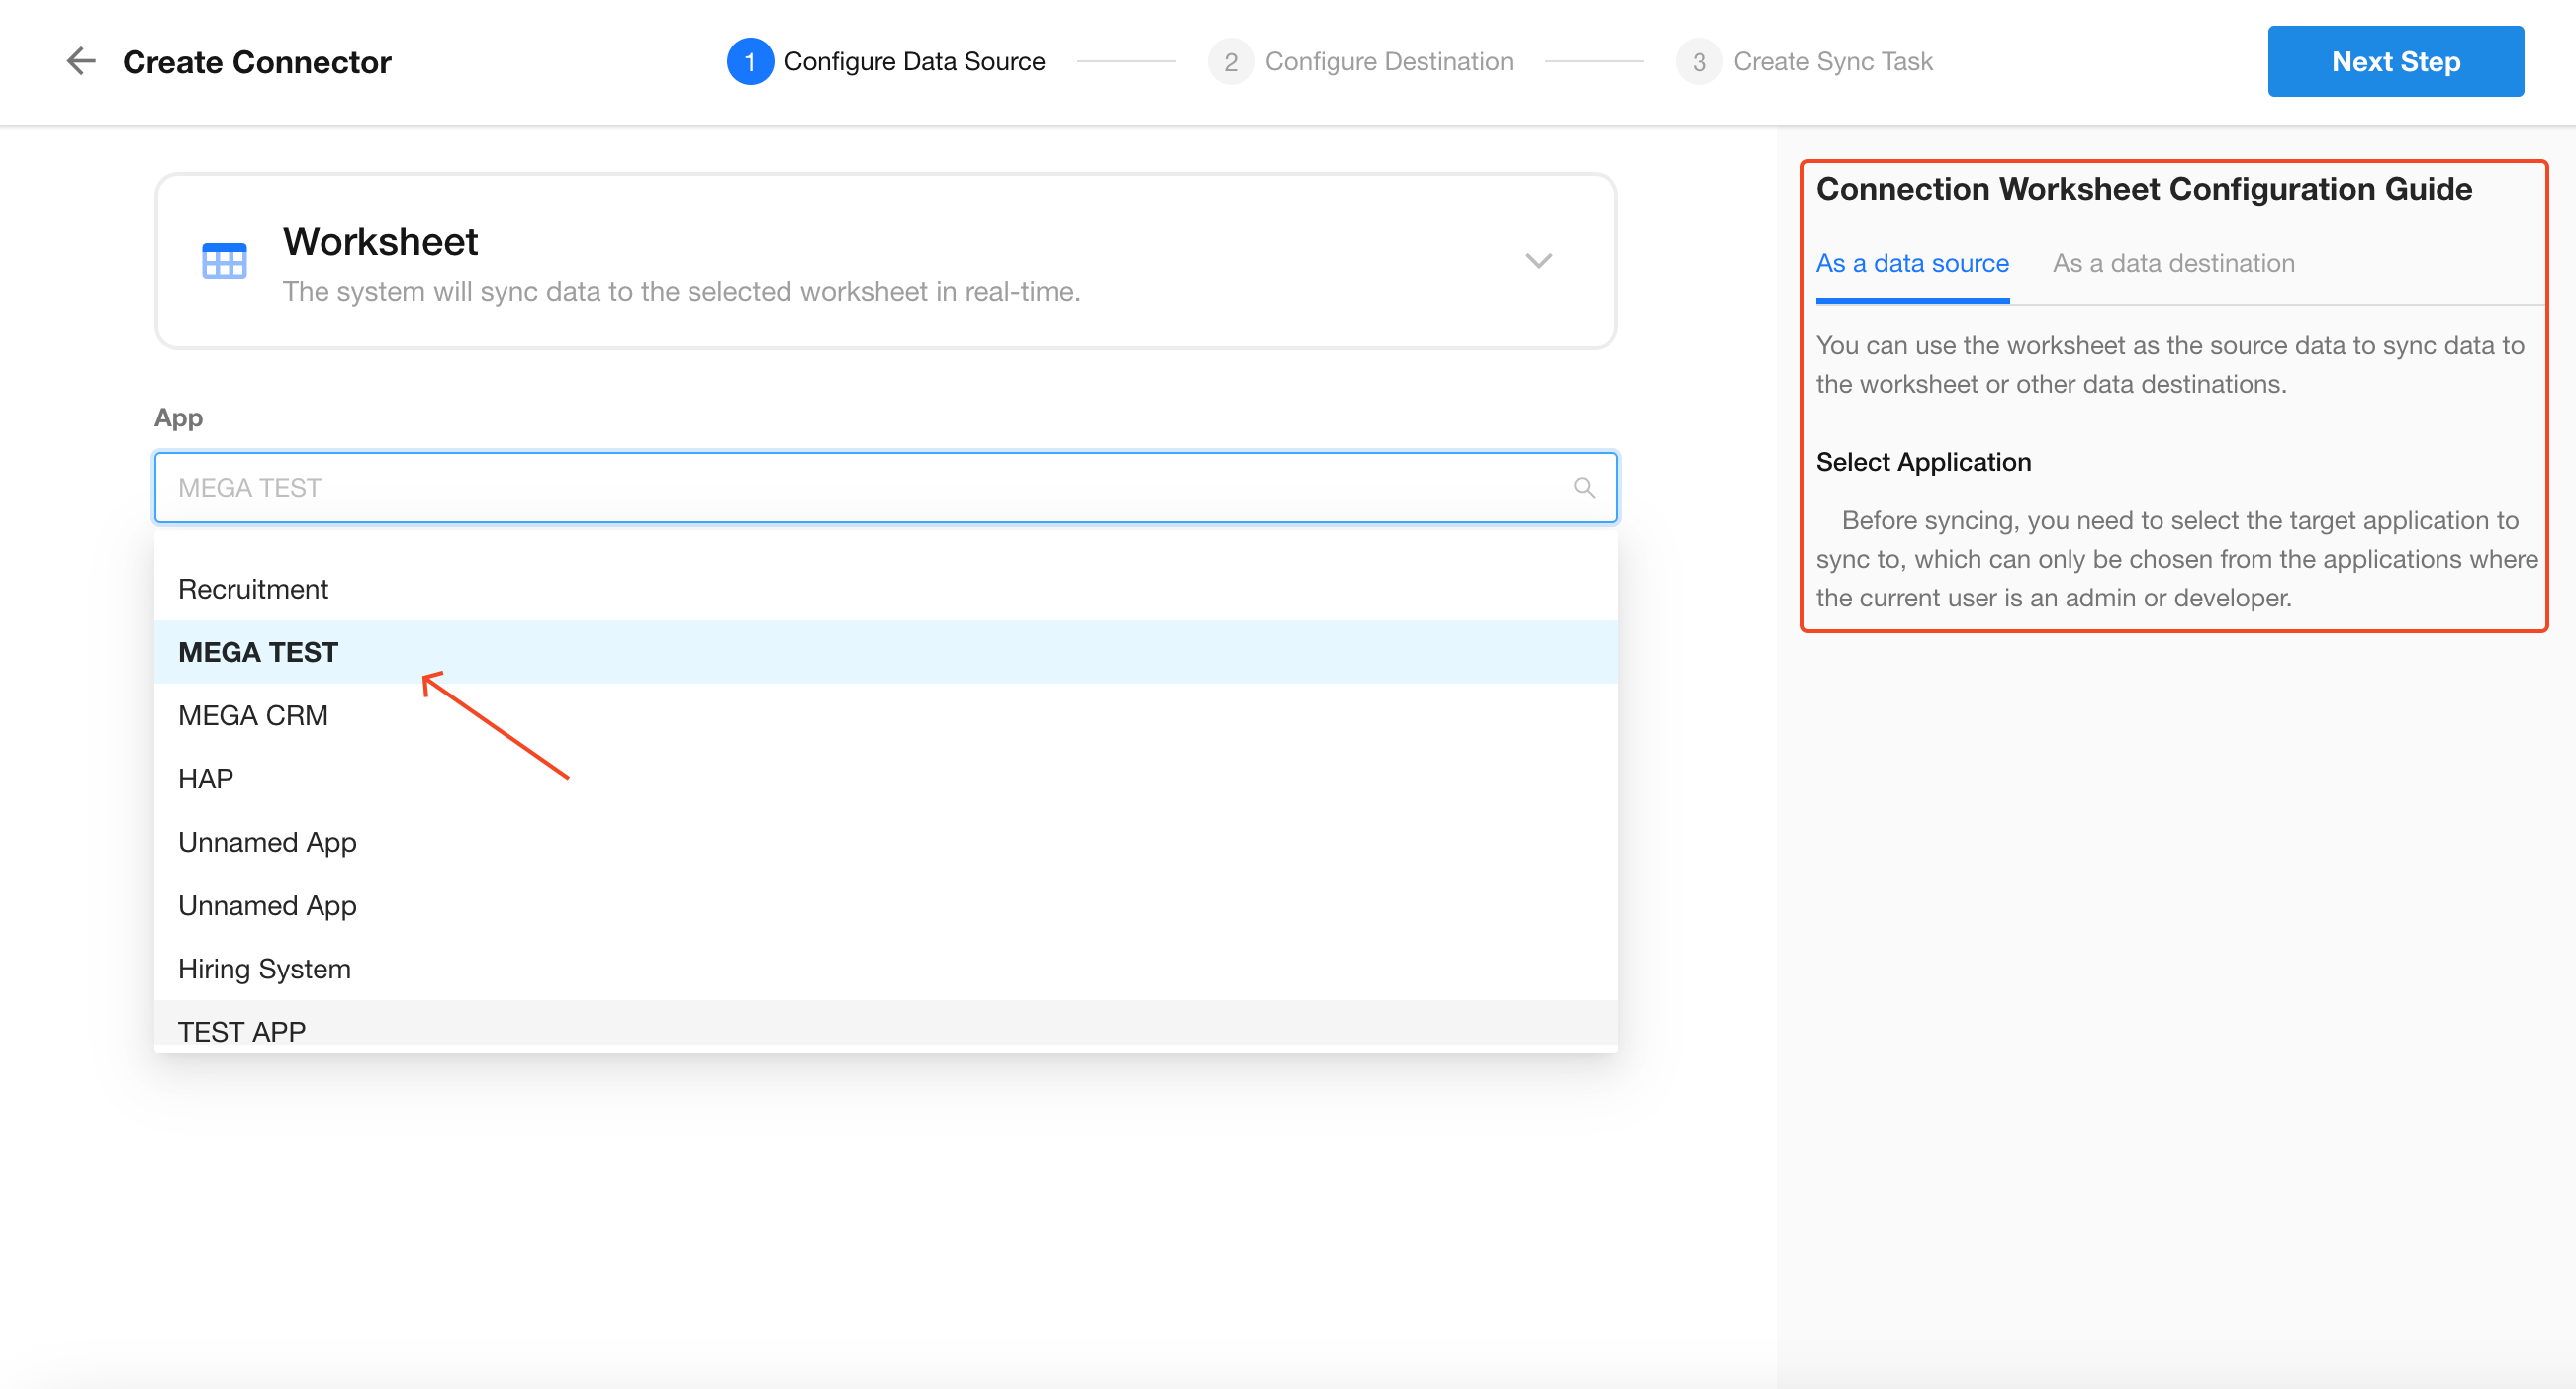
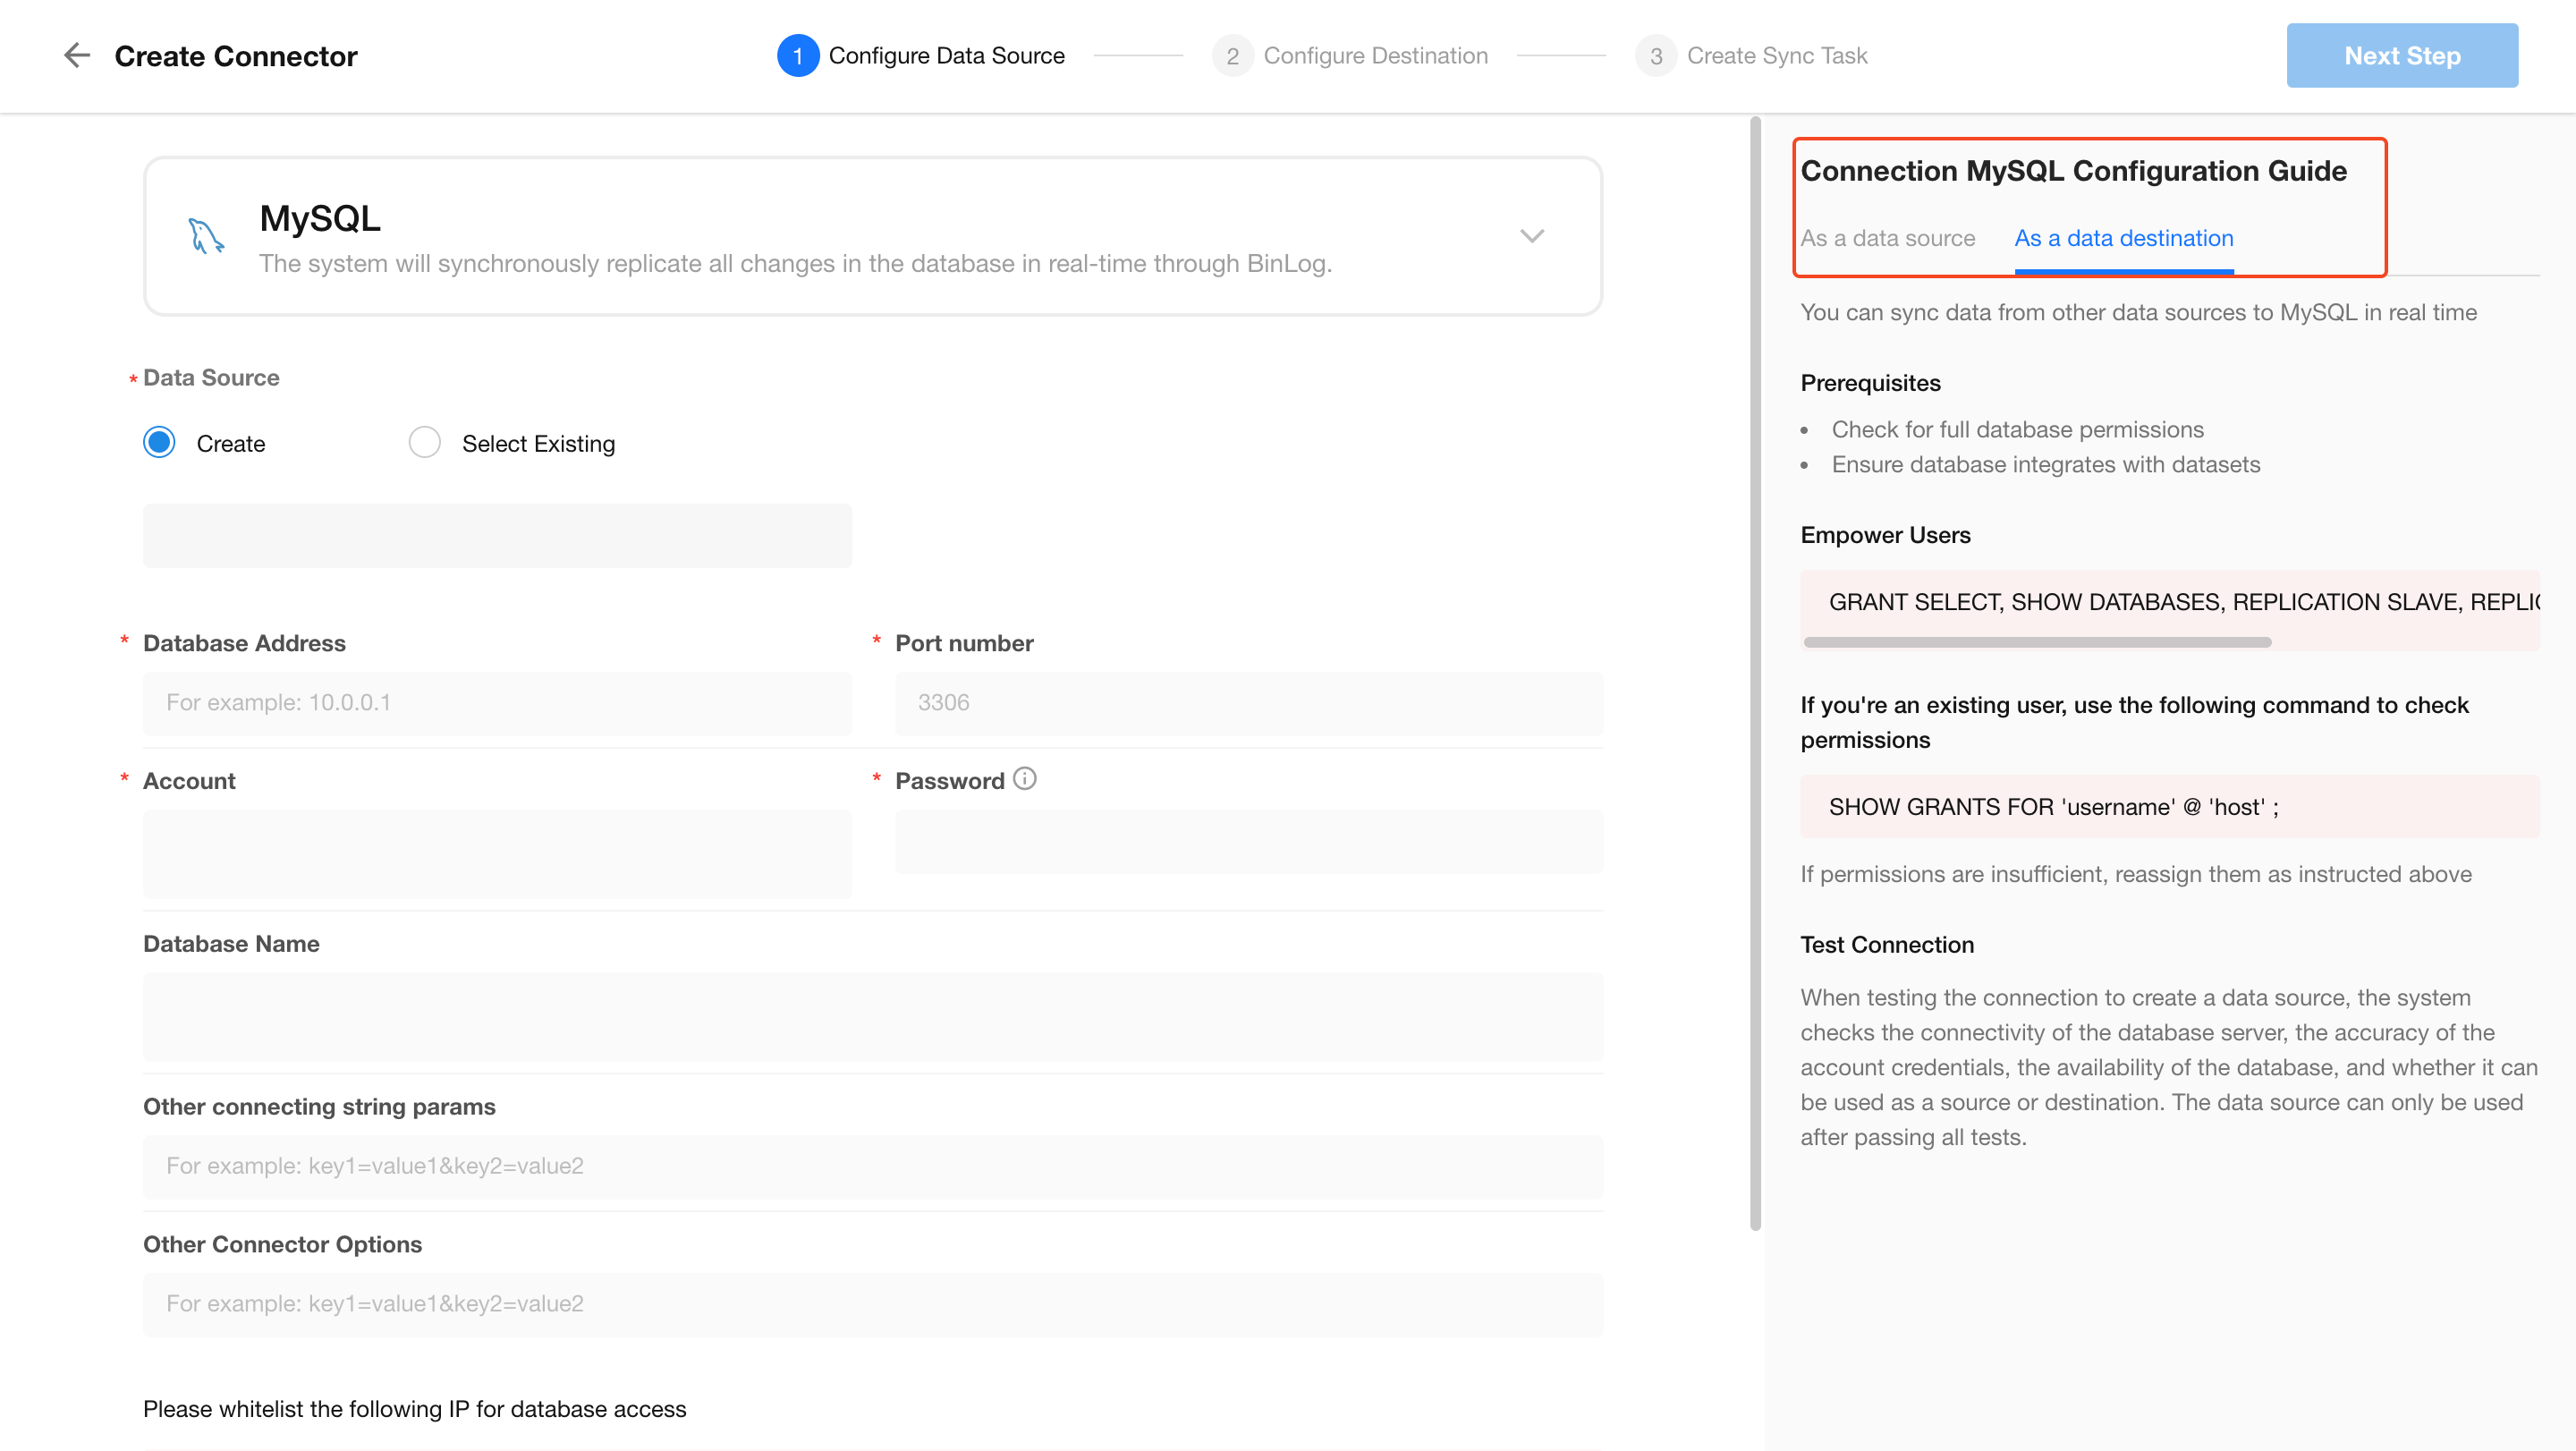
2. Configure Source and Destination
-
For Worksheets: Simply select the app and worksheet
-
For External Databases: Enter the database connection details
A checklist and setup guide is provided on the right-hand side.
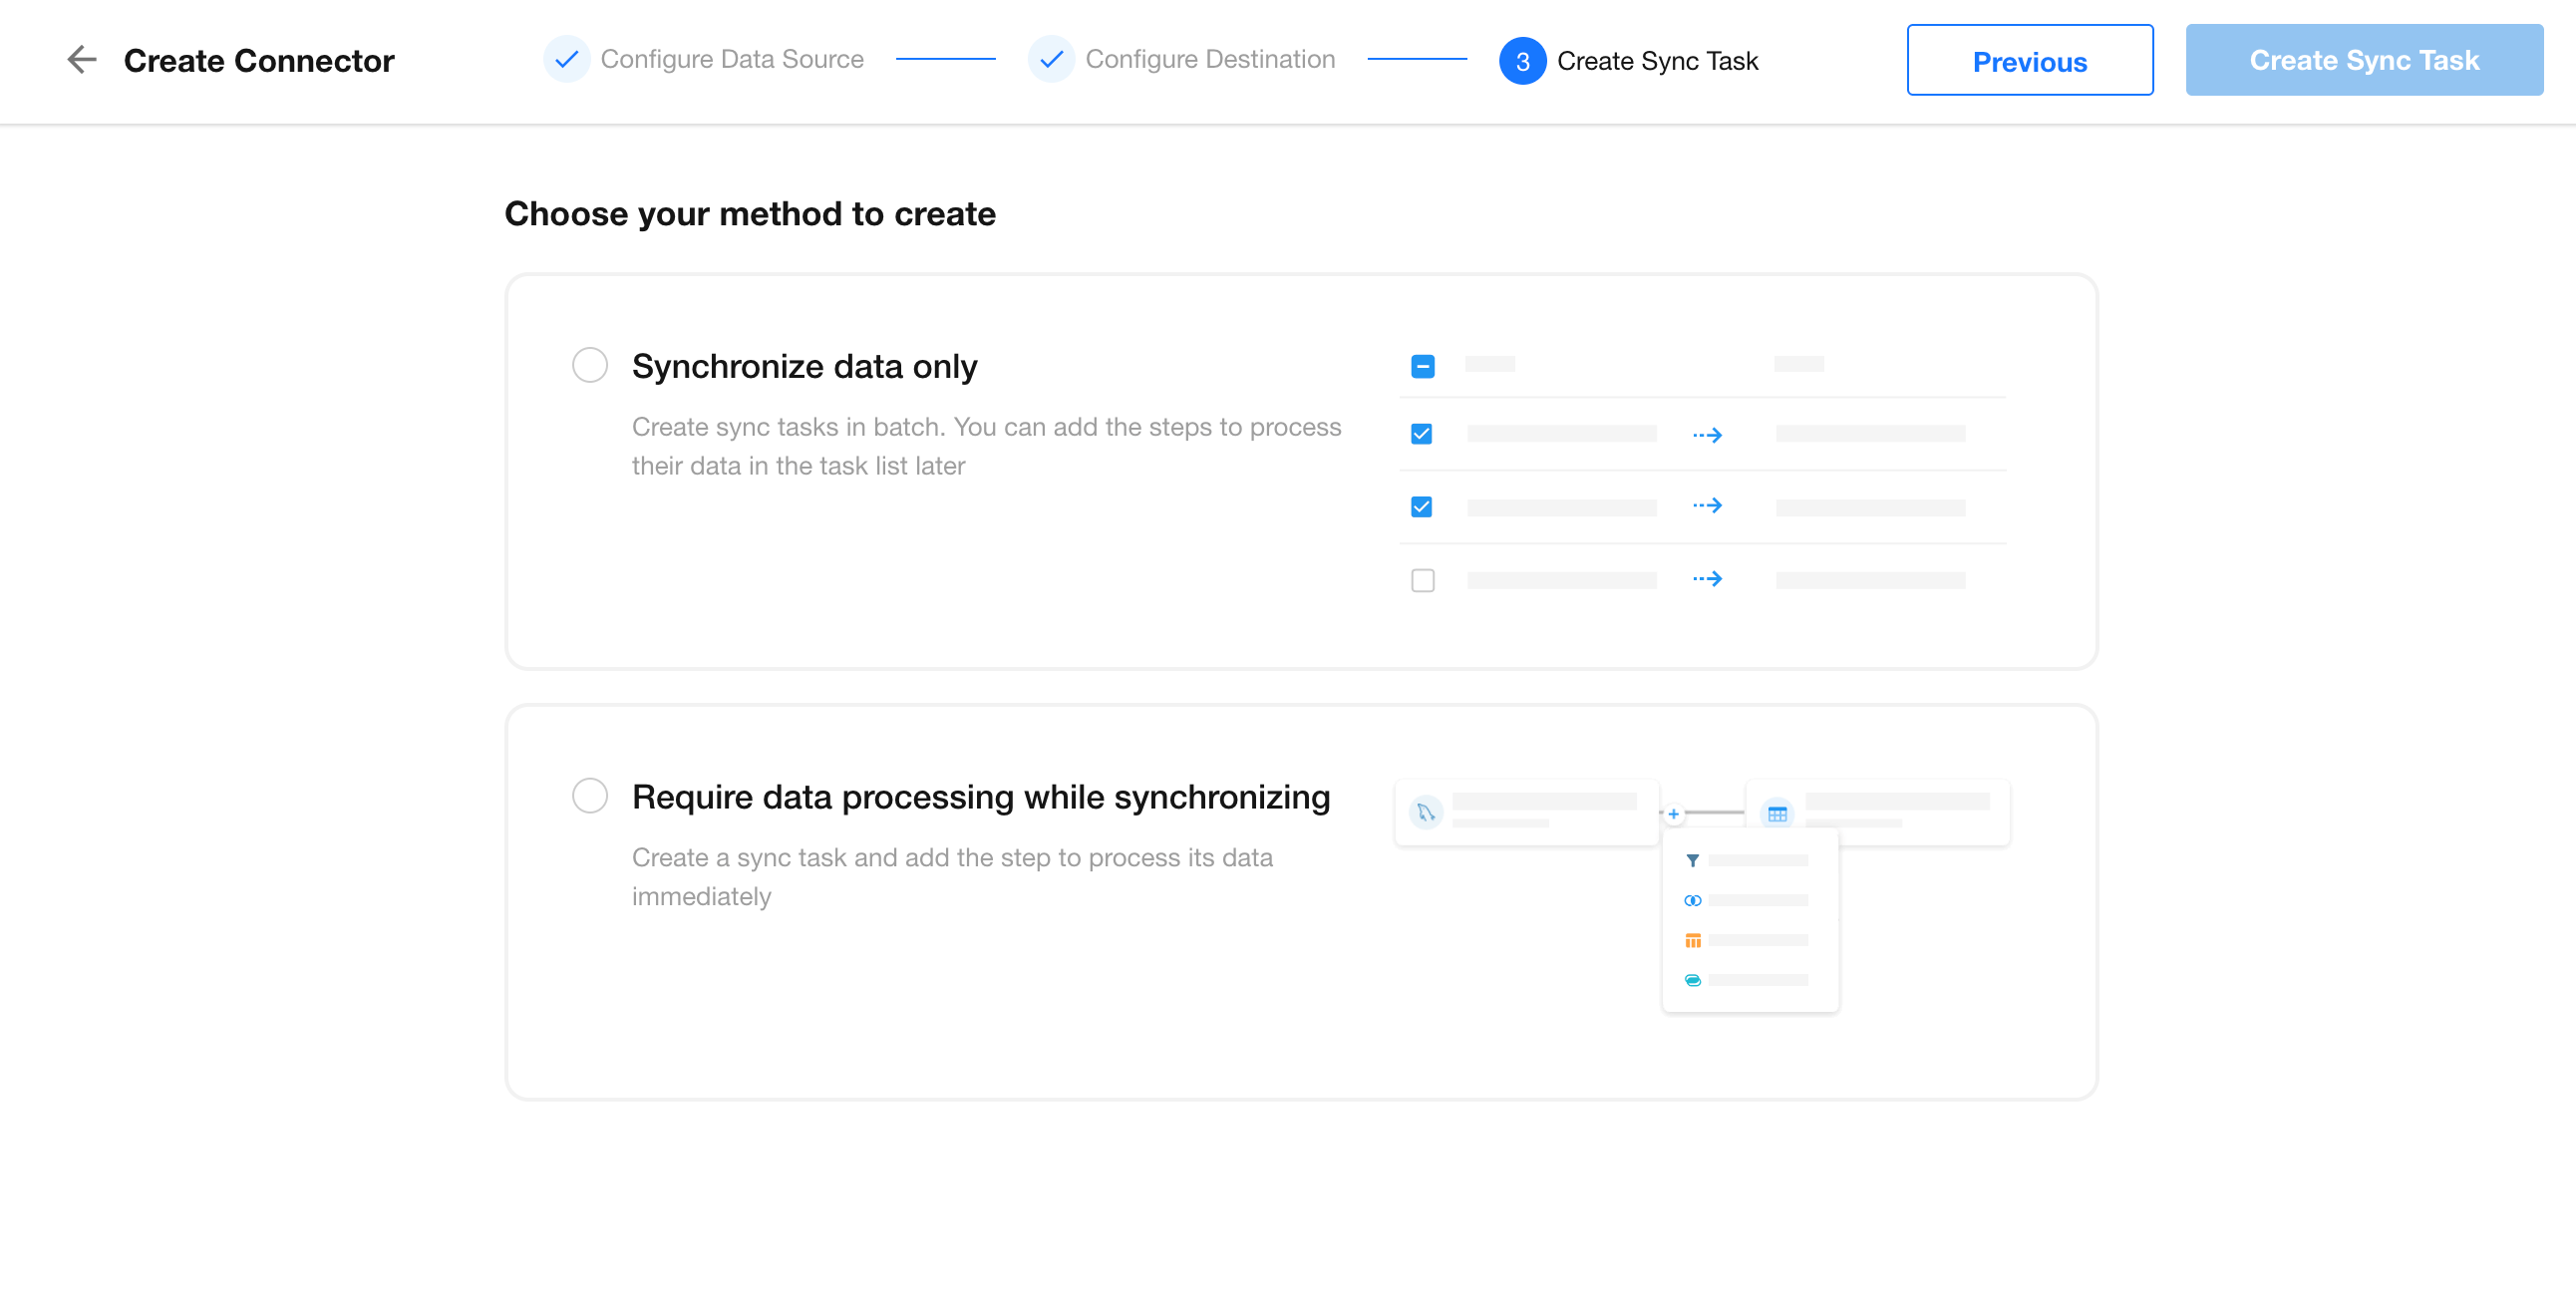
3. Create Sync Tasks
After configuring the connection, define the sync method:
- Sync data only
- Require data processing while syncing
The default mode is real-time sync. Only SAP HANA supports Scheduled Sync.
Next, define the field mapping between source and destination, then click “Create X Sync Tasks.”
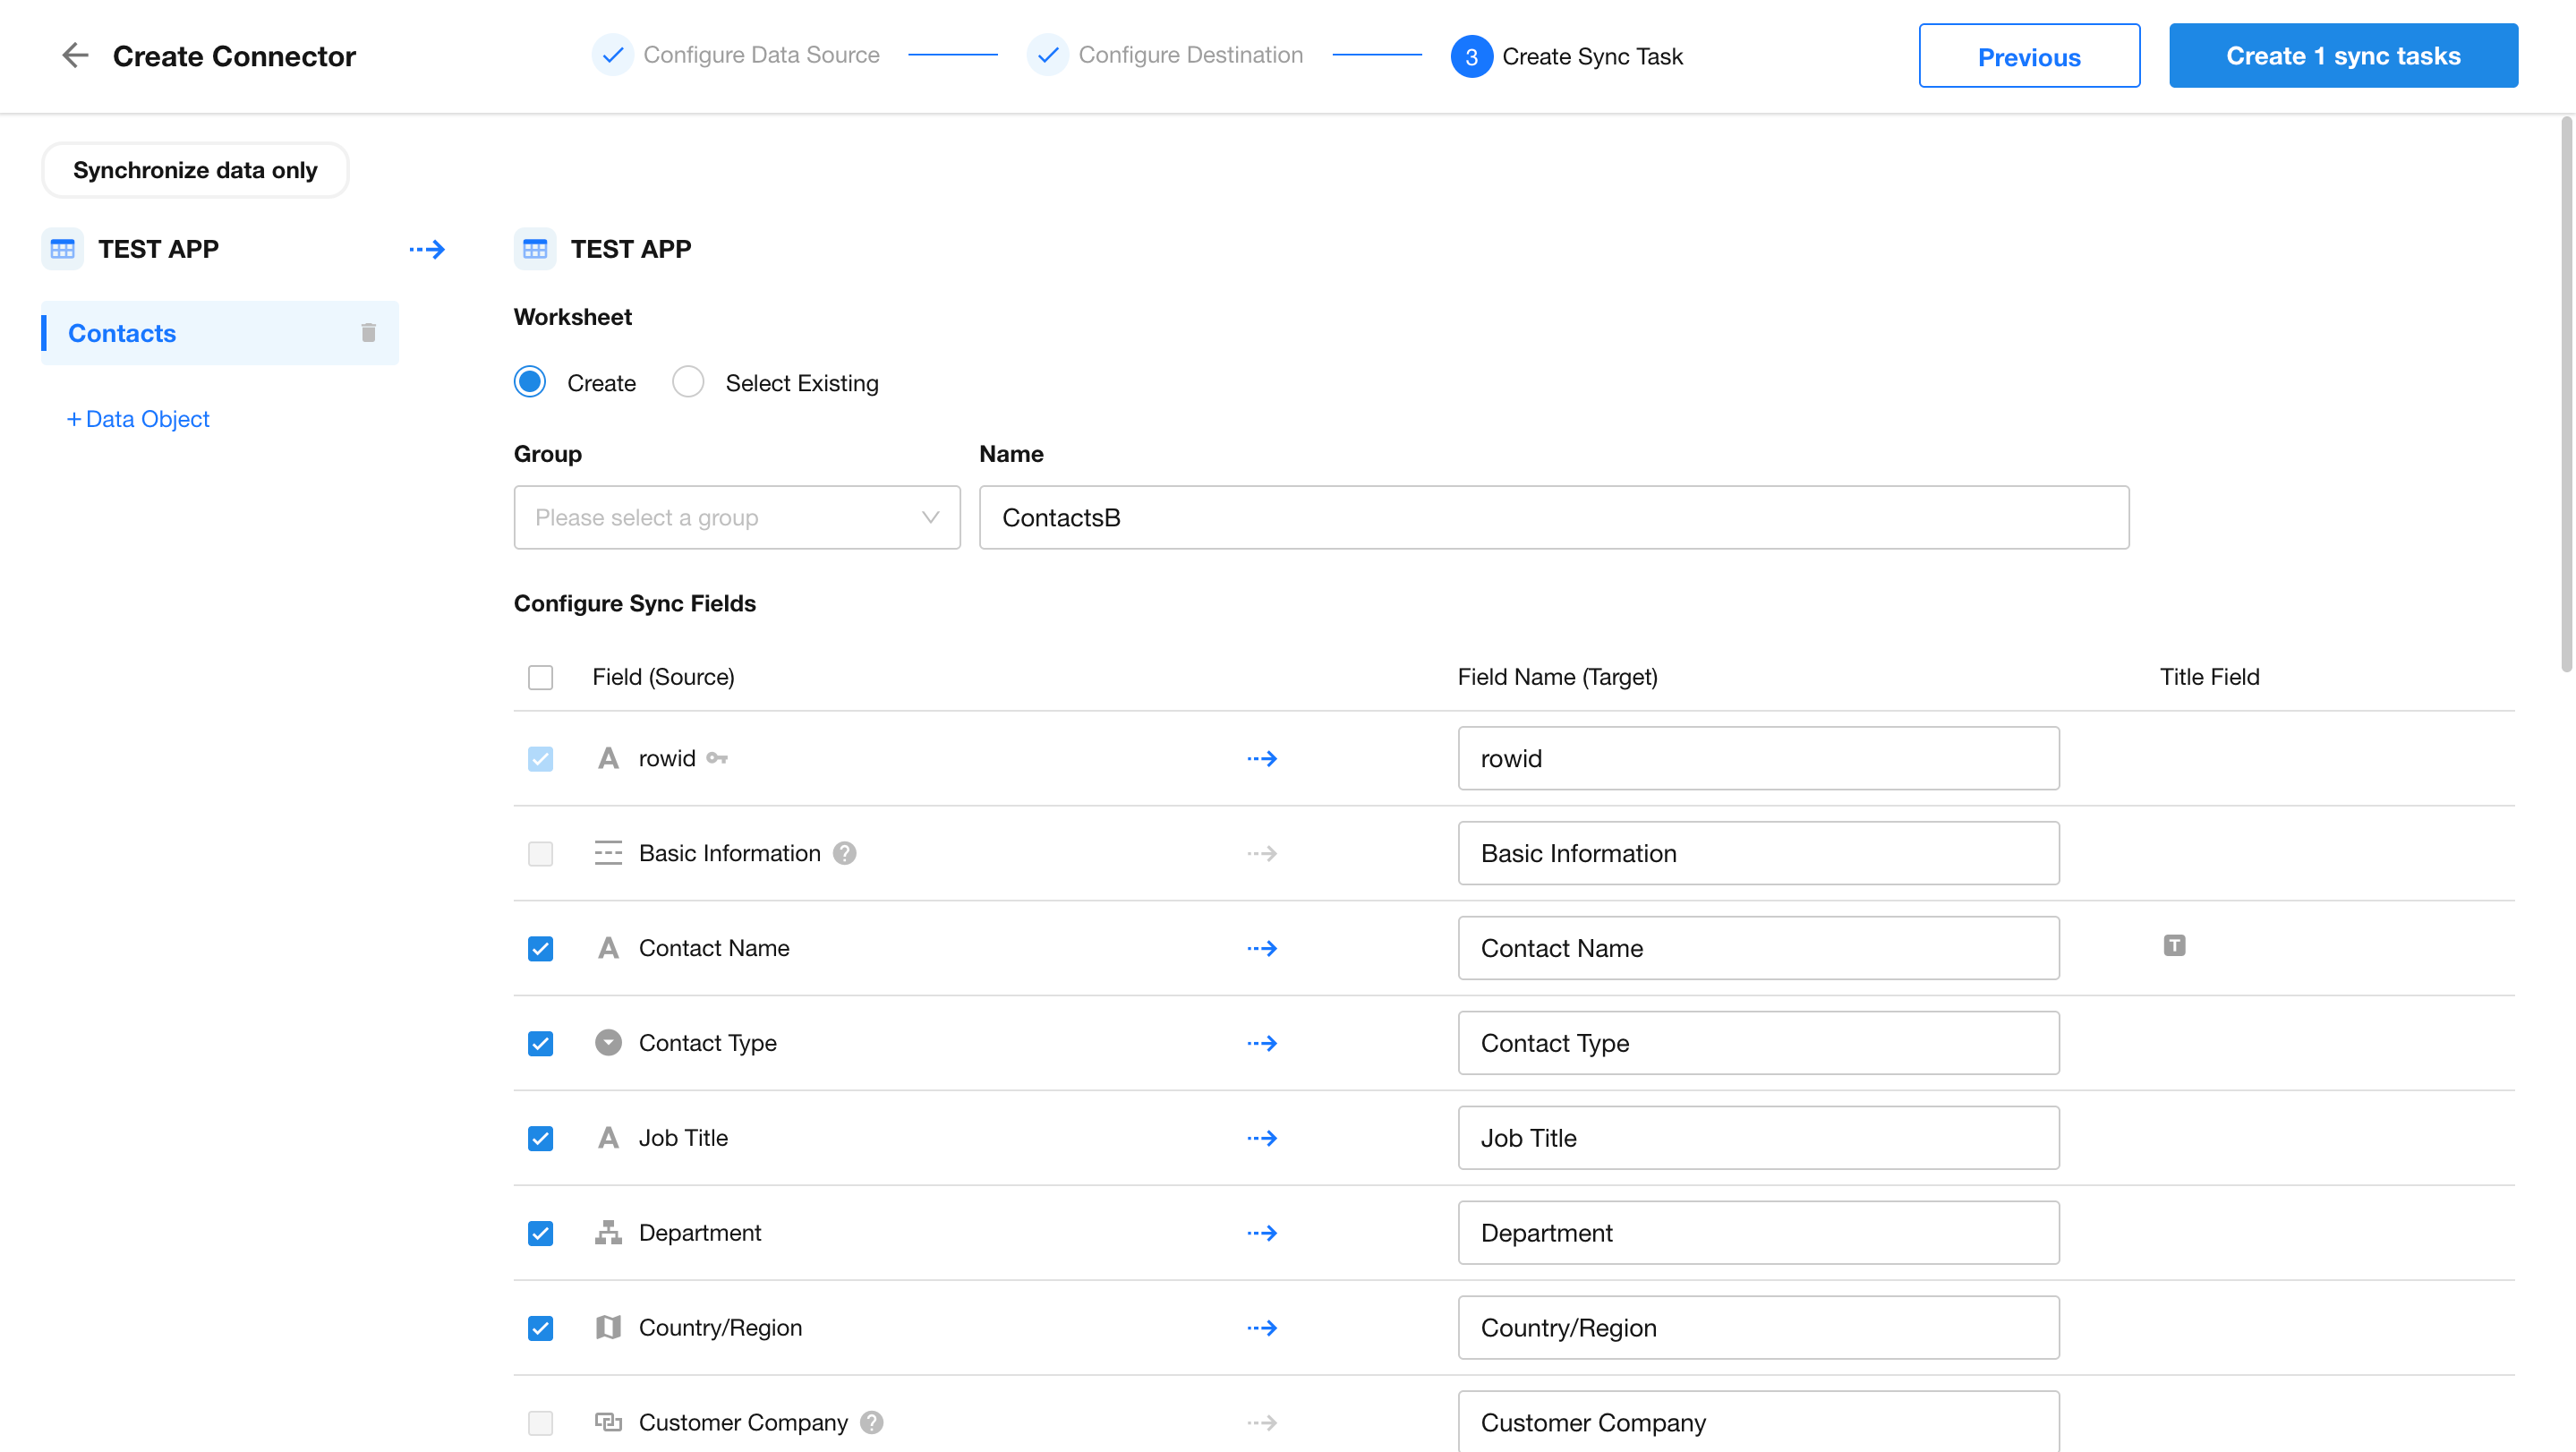
- Each table requires an individual configuration.
- Each table will generate a separate sync task.
4. Validate the Sync Results
To confirm sync is working correctly:
-
Check if all worksheet data has been synced
-
Update records in the source table and verify they are reflected in the destination
-
Add new records to confirm they are synchronized
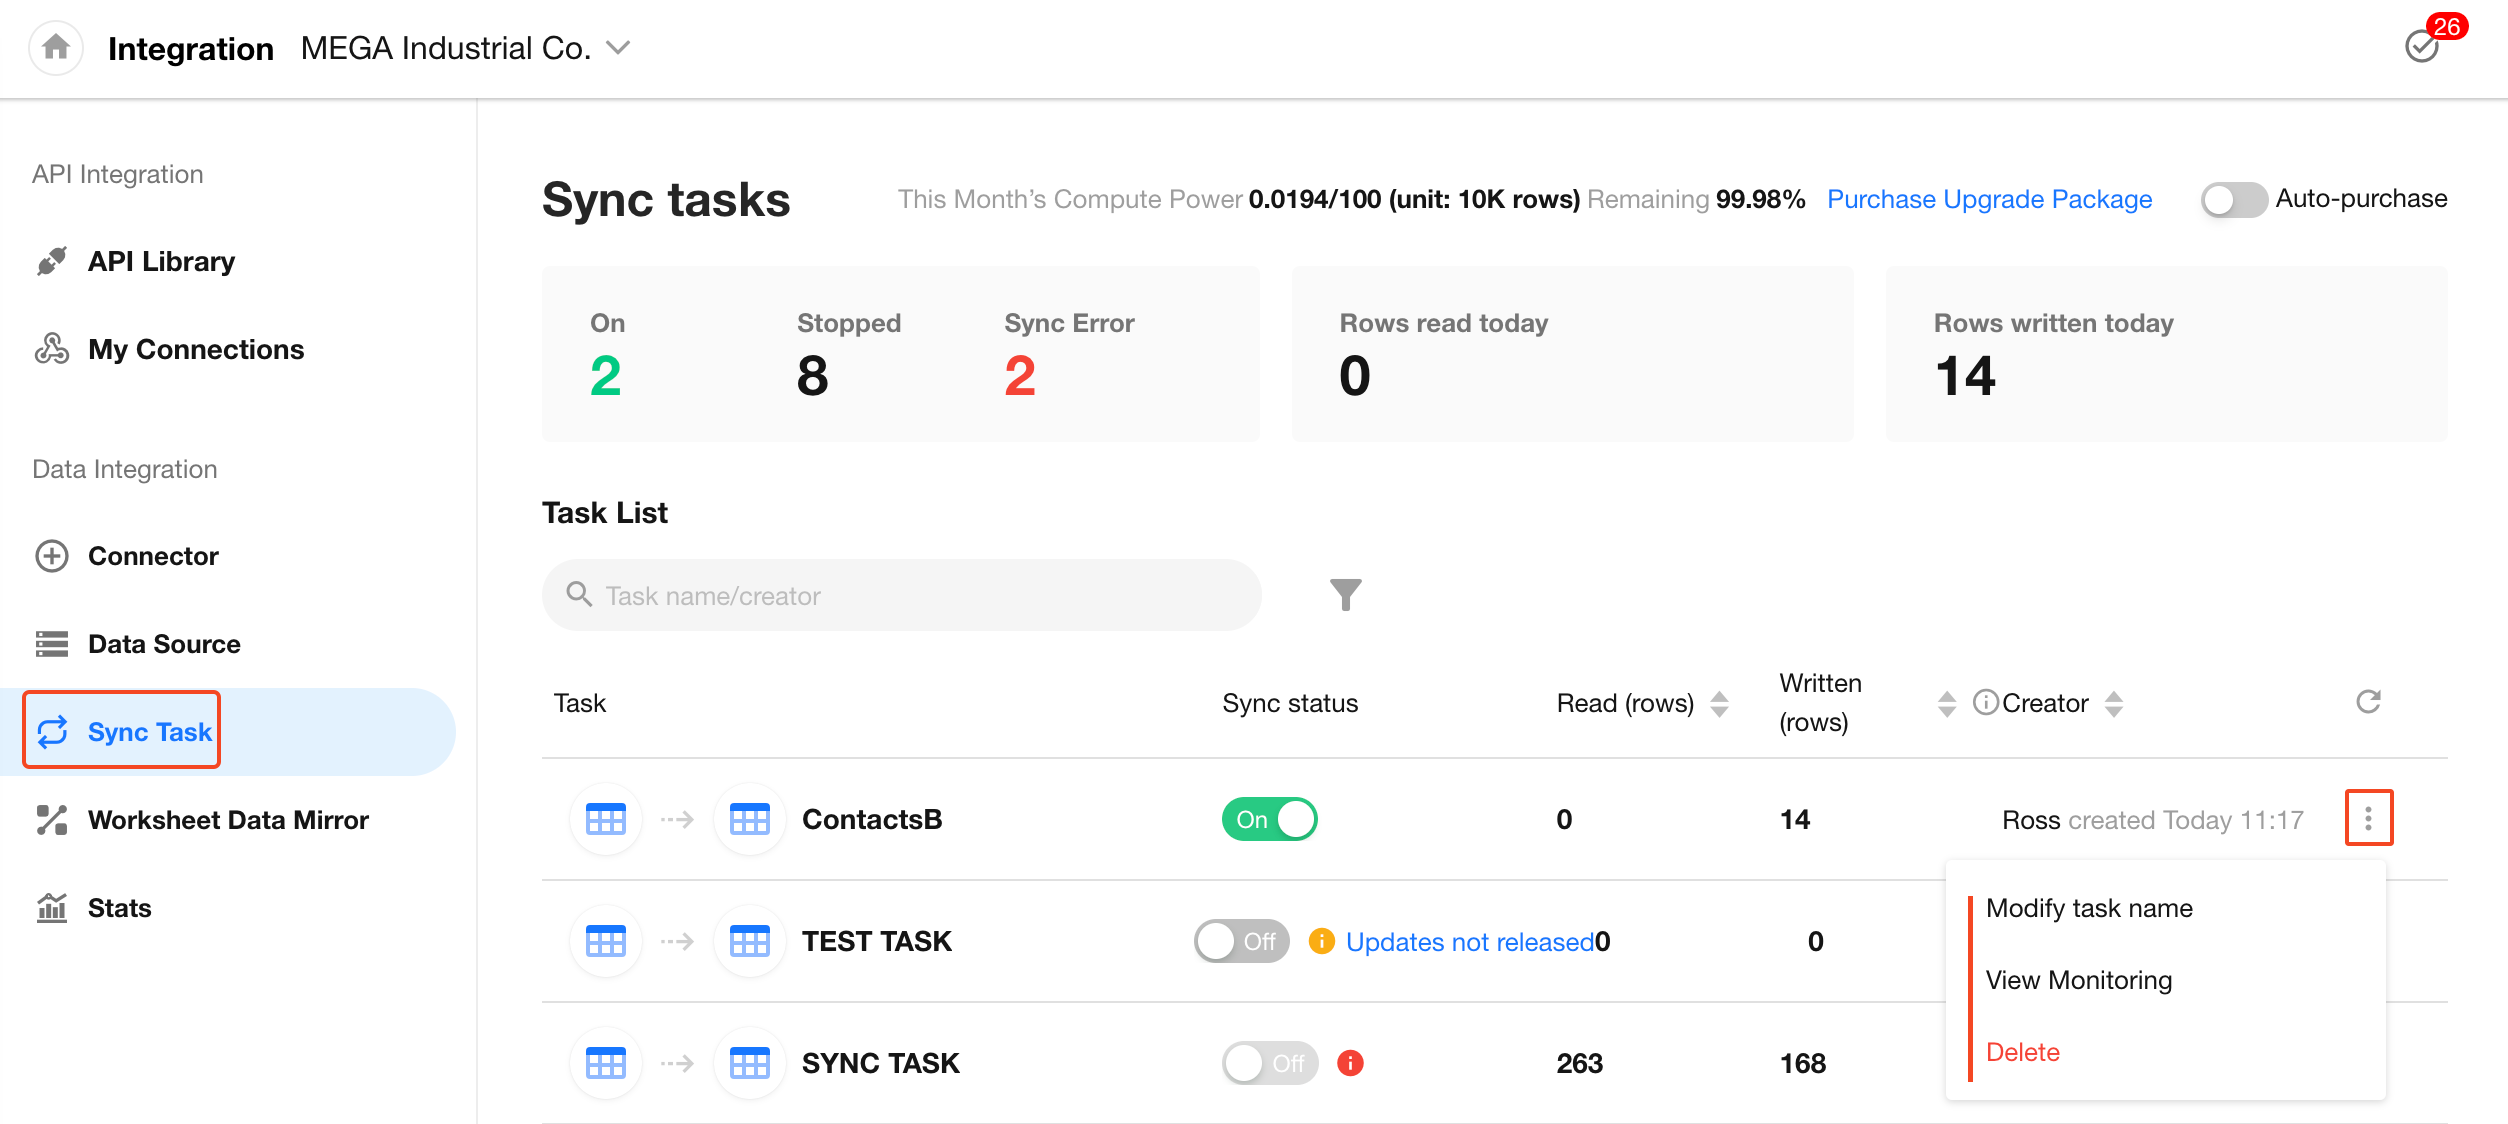
Managing Sync Tasks
Once a sync task is created, you can modify its settings, monitor its status, and track the volume of synchronized data. The monitoring dashboard provides insights such as cumulative run time, total records read and written, and recent data activity through trend charts.
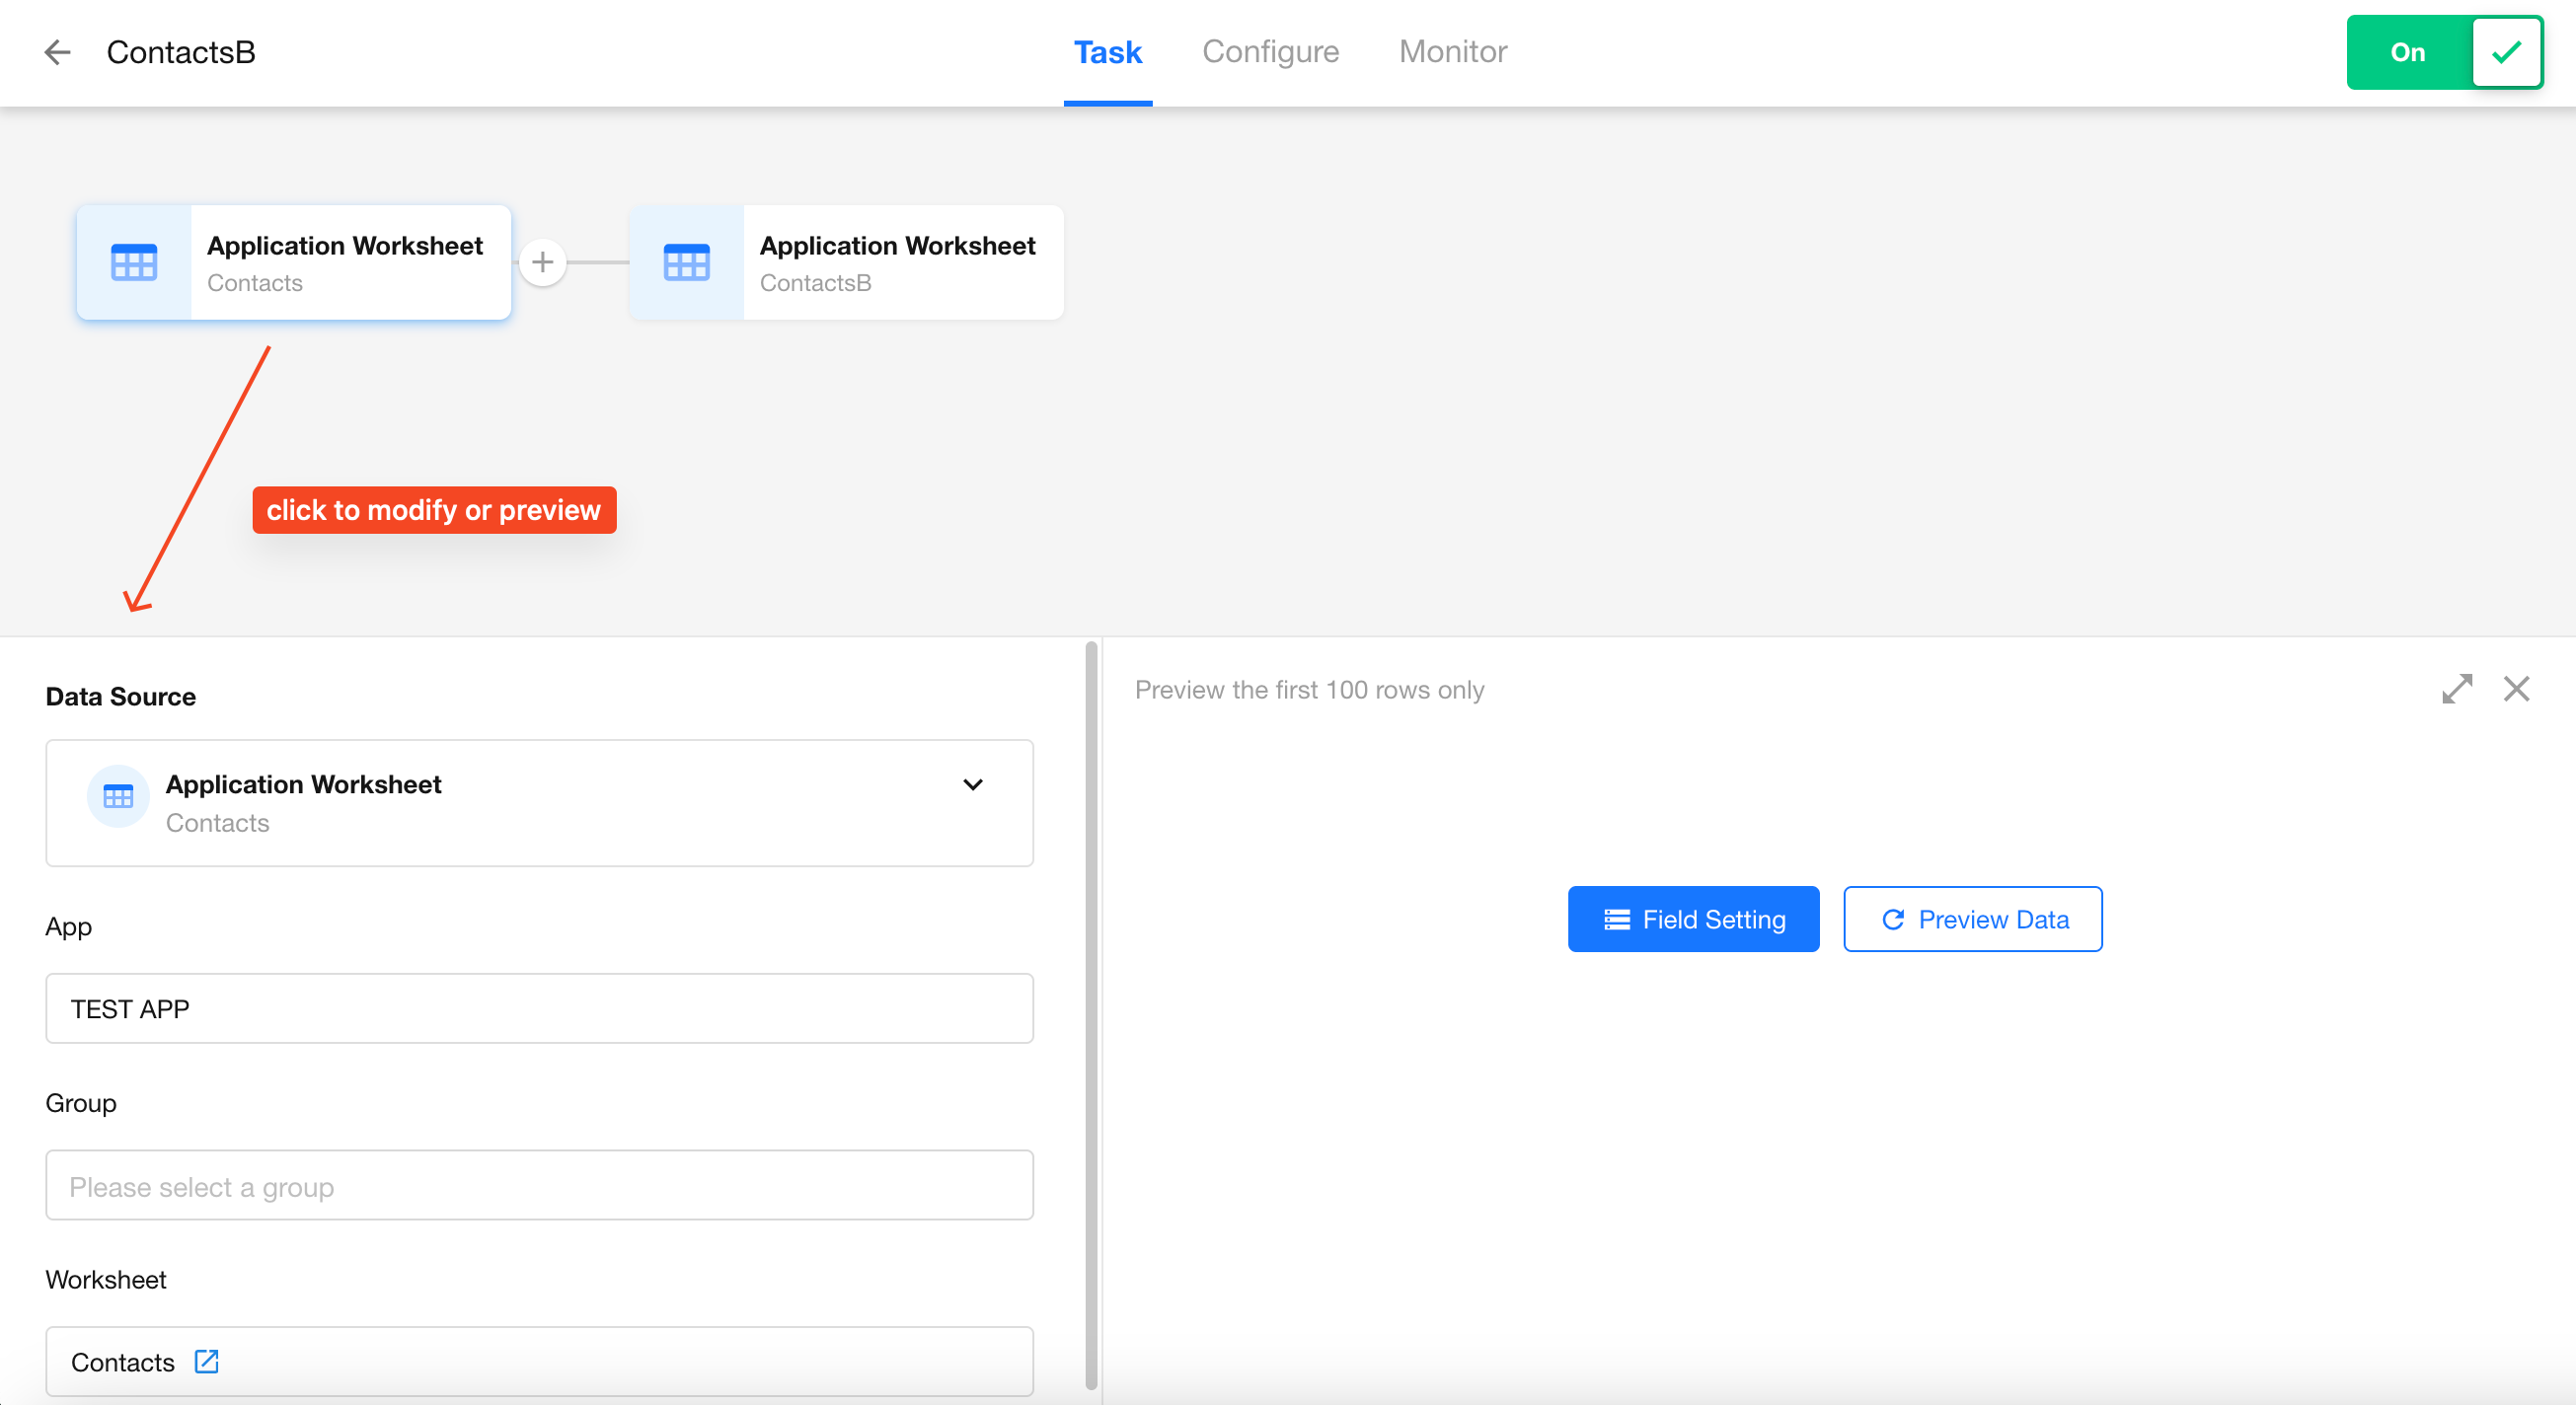
Edit Task Settings
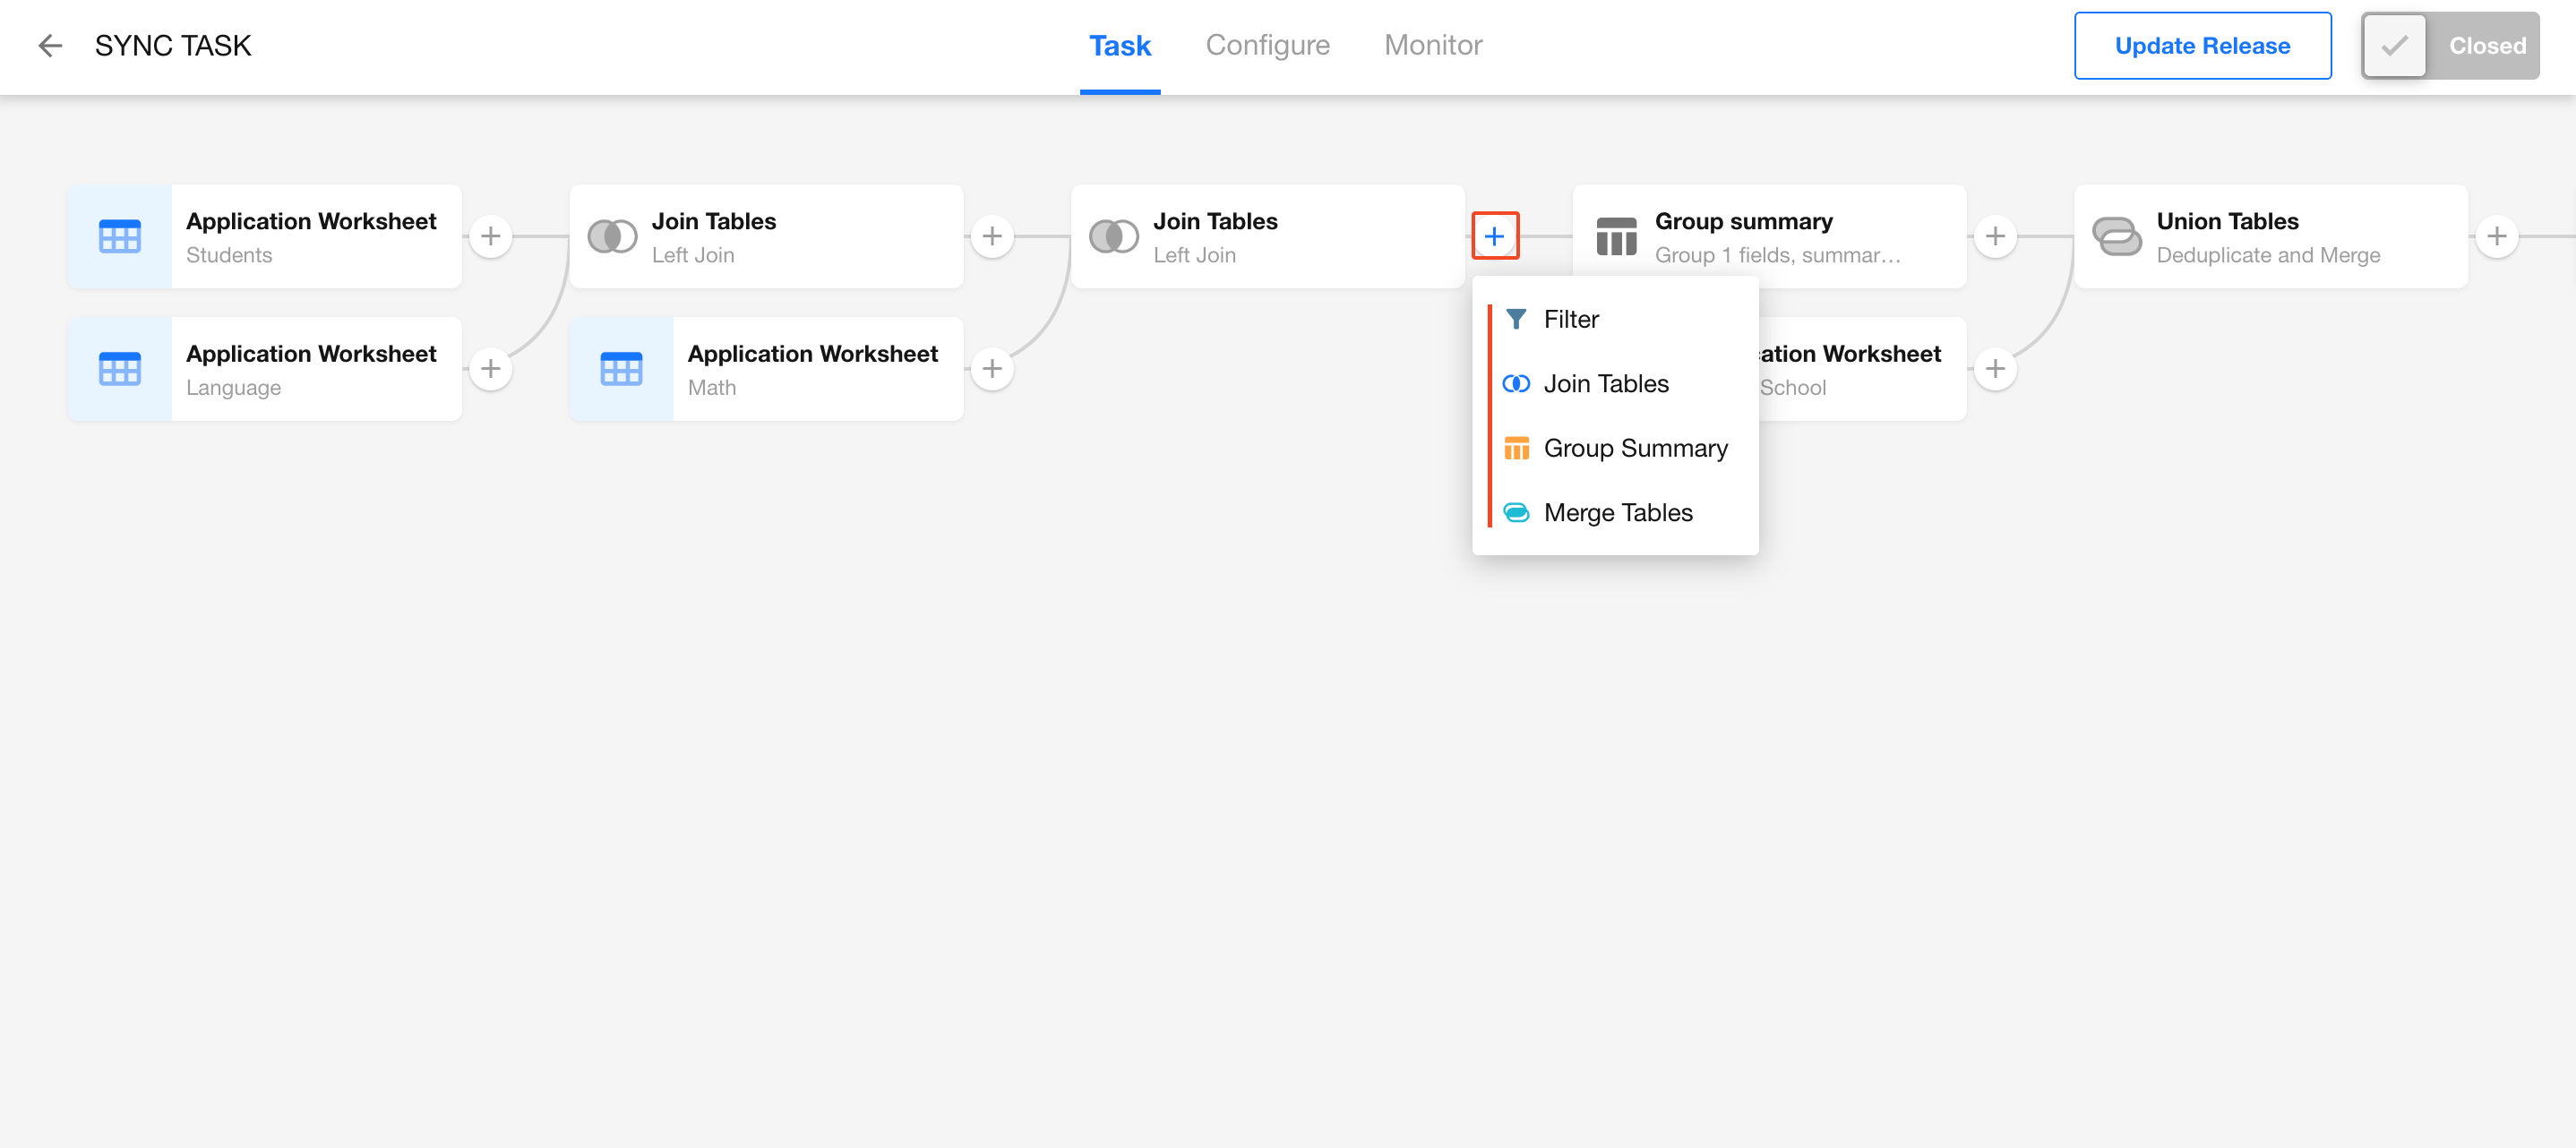
ETL Data Processing Capabilities
ETL (Extract, Transform, Load) is an enhanced feature of data integration. It refers to the end-to-end process of extracting data from a source, applying transformations, and loading it into a destination.
In HAP’s Data Integration module, the following ETL operations are supported before writing data to the destination:
- Sync after filtered
- Sync after multi-table join
- Sync after grouped summary
- Sync after table merge
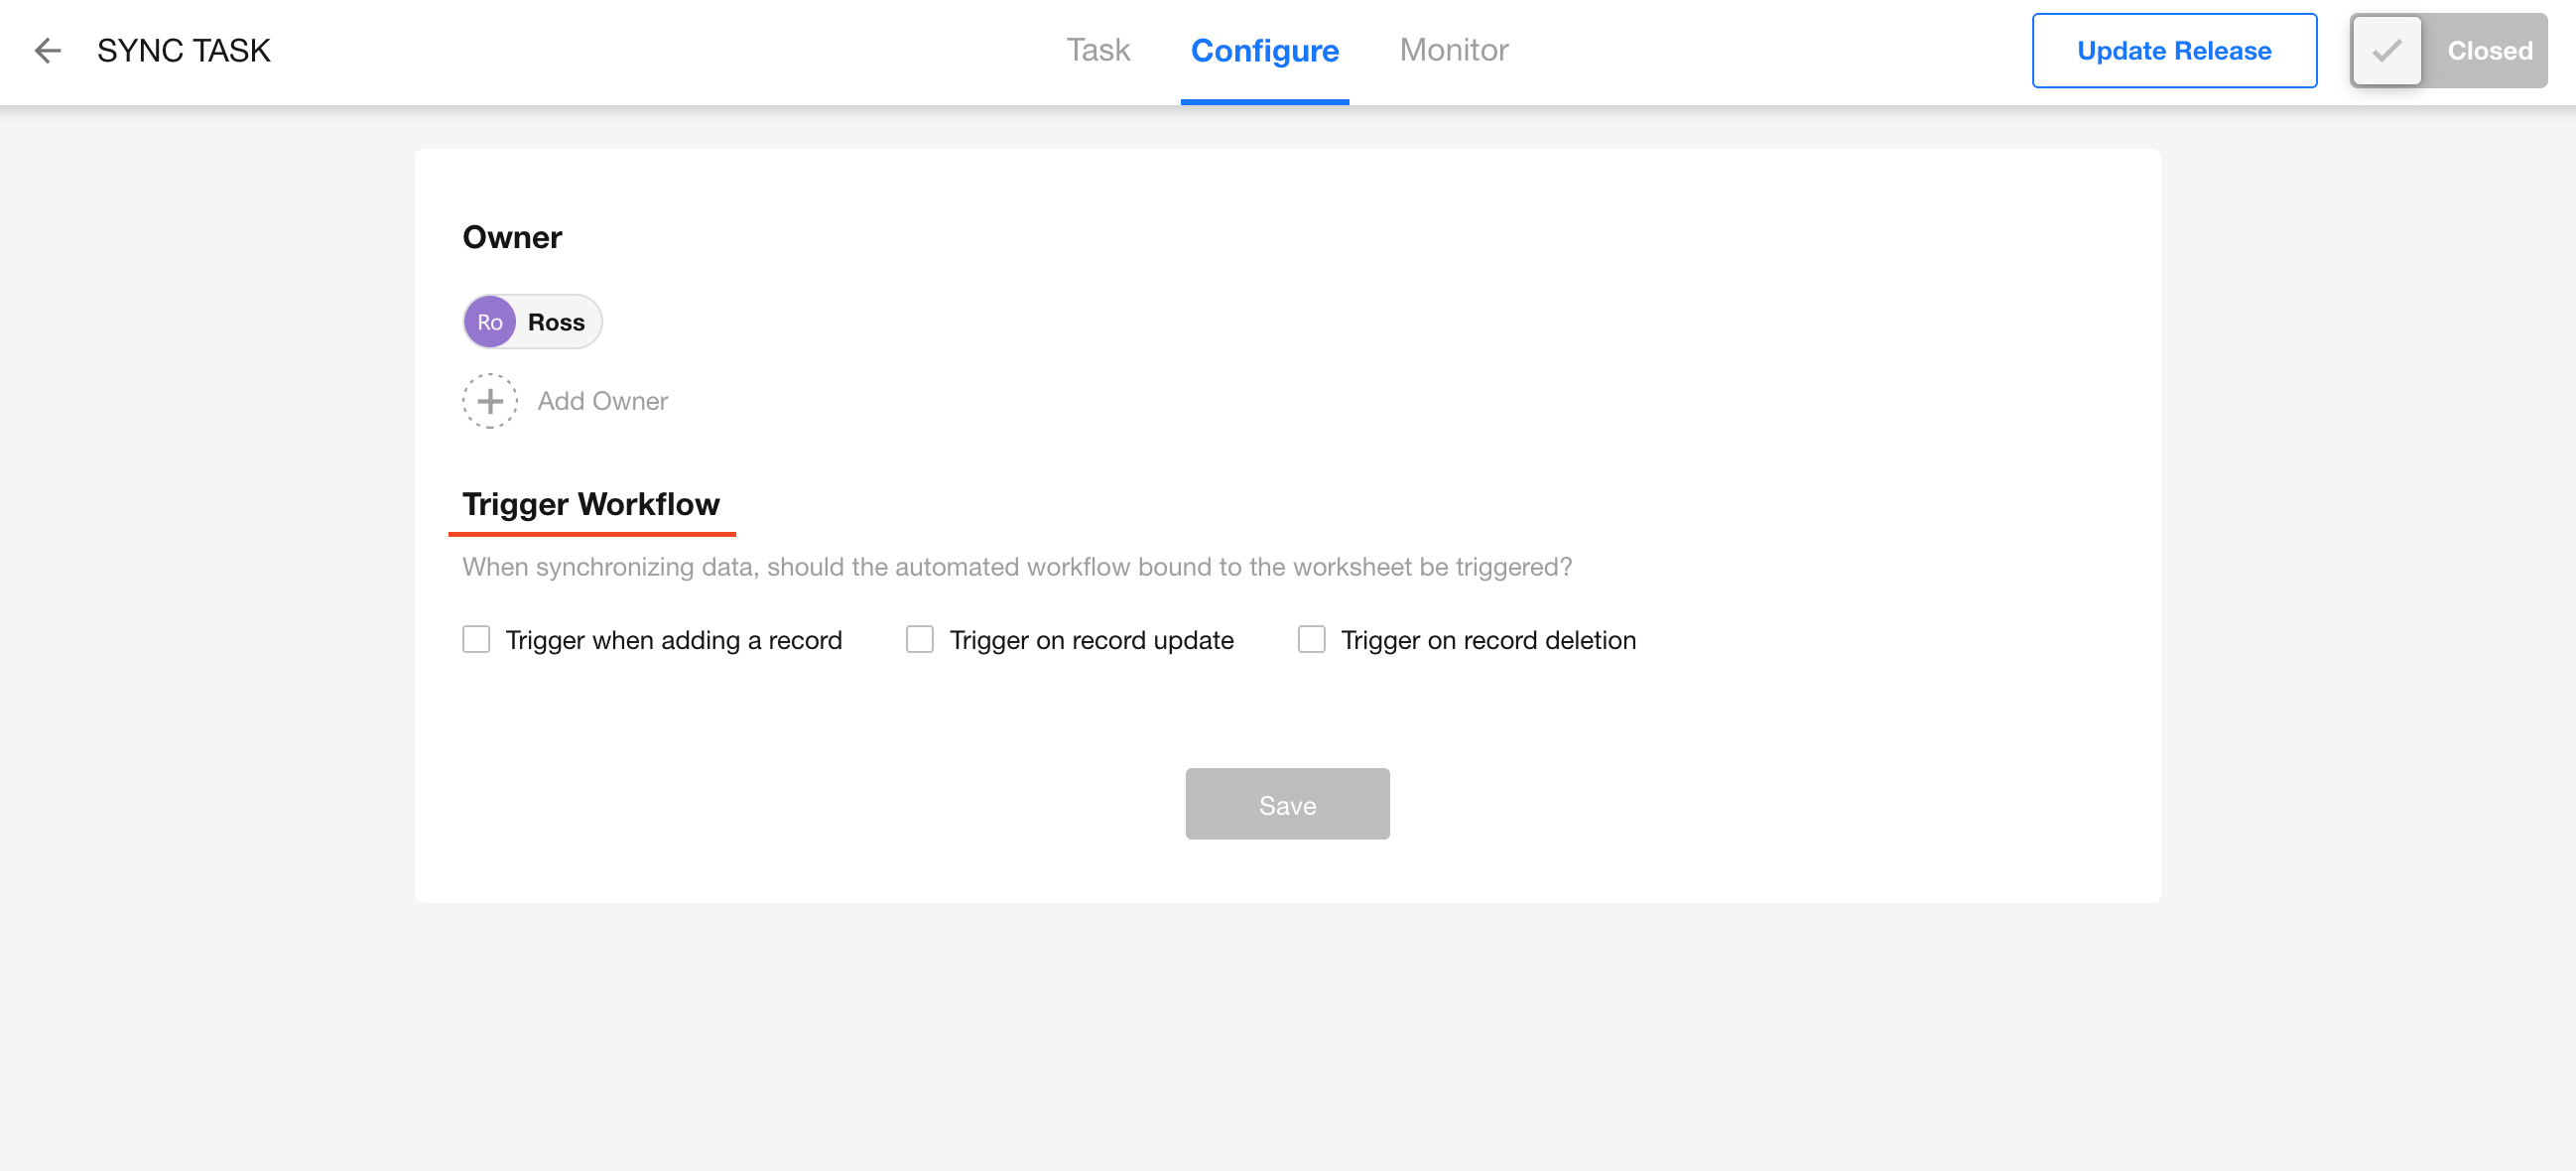
Triggering Workflows
Click the task name to configure whether the synchronized data should trigger associated workflows.
Will Records Be Synced After Deletion from the Destination?
-
When syncing data from a source worksheet to a destination worksheet A, if some records in A are soft-deleted (i.e., moved to the recycle bin but not permanently deleted), updates made to those records in the source will not restore or re-sync them. Only after restoring the deleted records from the recycle bin will subsequent updates be synced again.
-
If records are permanently deleted, they will not be synchronized again.
-
To re-sync permanently deleted records, create a new sync task.
"Permanently deleted" means records were either emptied from the recycle bin or deleted again from within the recycle bin.
Managing Data Sources
The Data Sources page stores all source and destination connection configurations created during connector setup. When creating a new sync task, you can reuse any previously configured data sources.
Rest assured, any passwords entered in connection settings are encrypted and securely stored. HAP implements robust safeguards to ensure this information is inaccessible to developers or any unauthorized party.
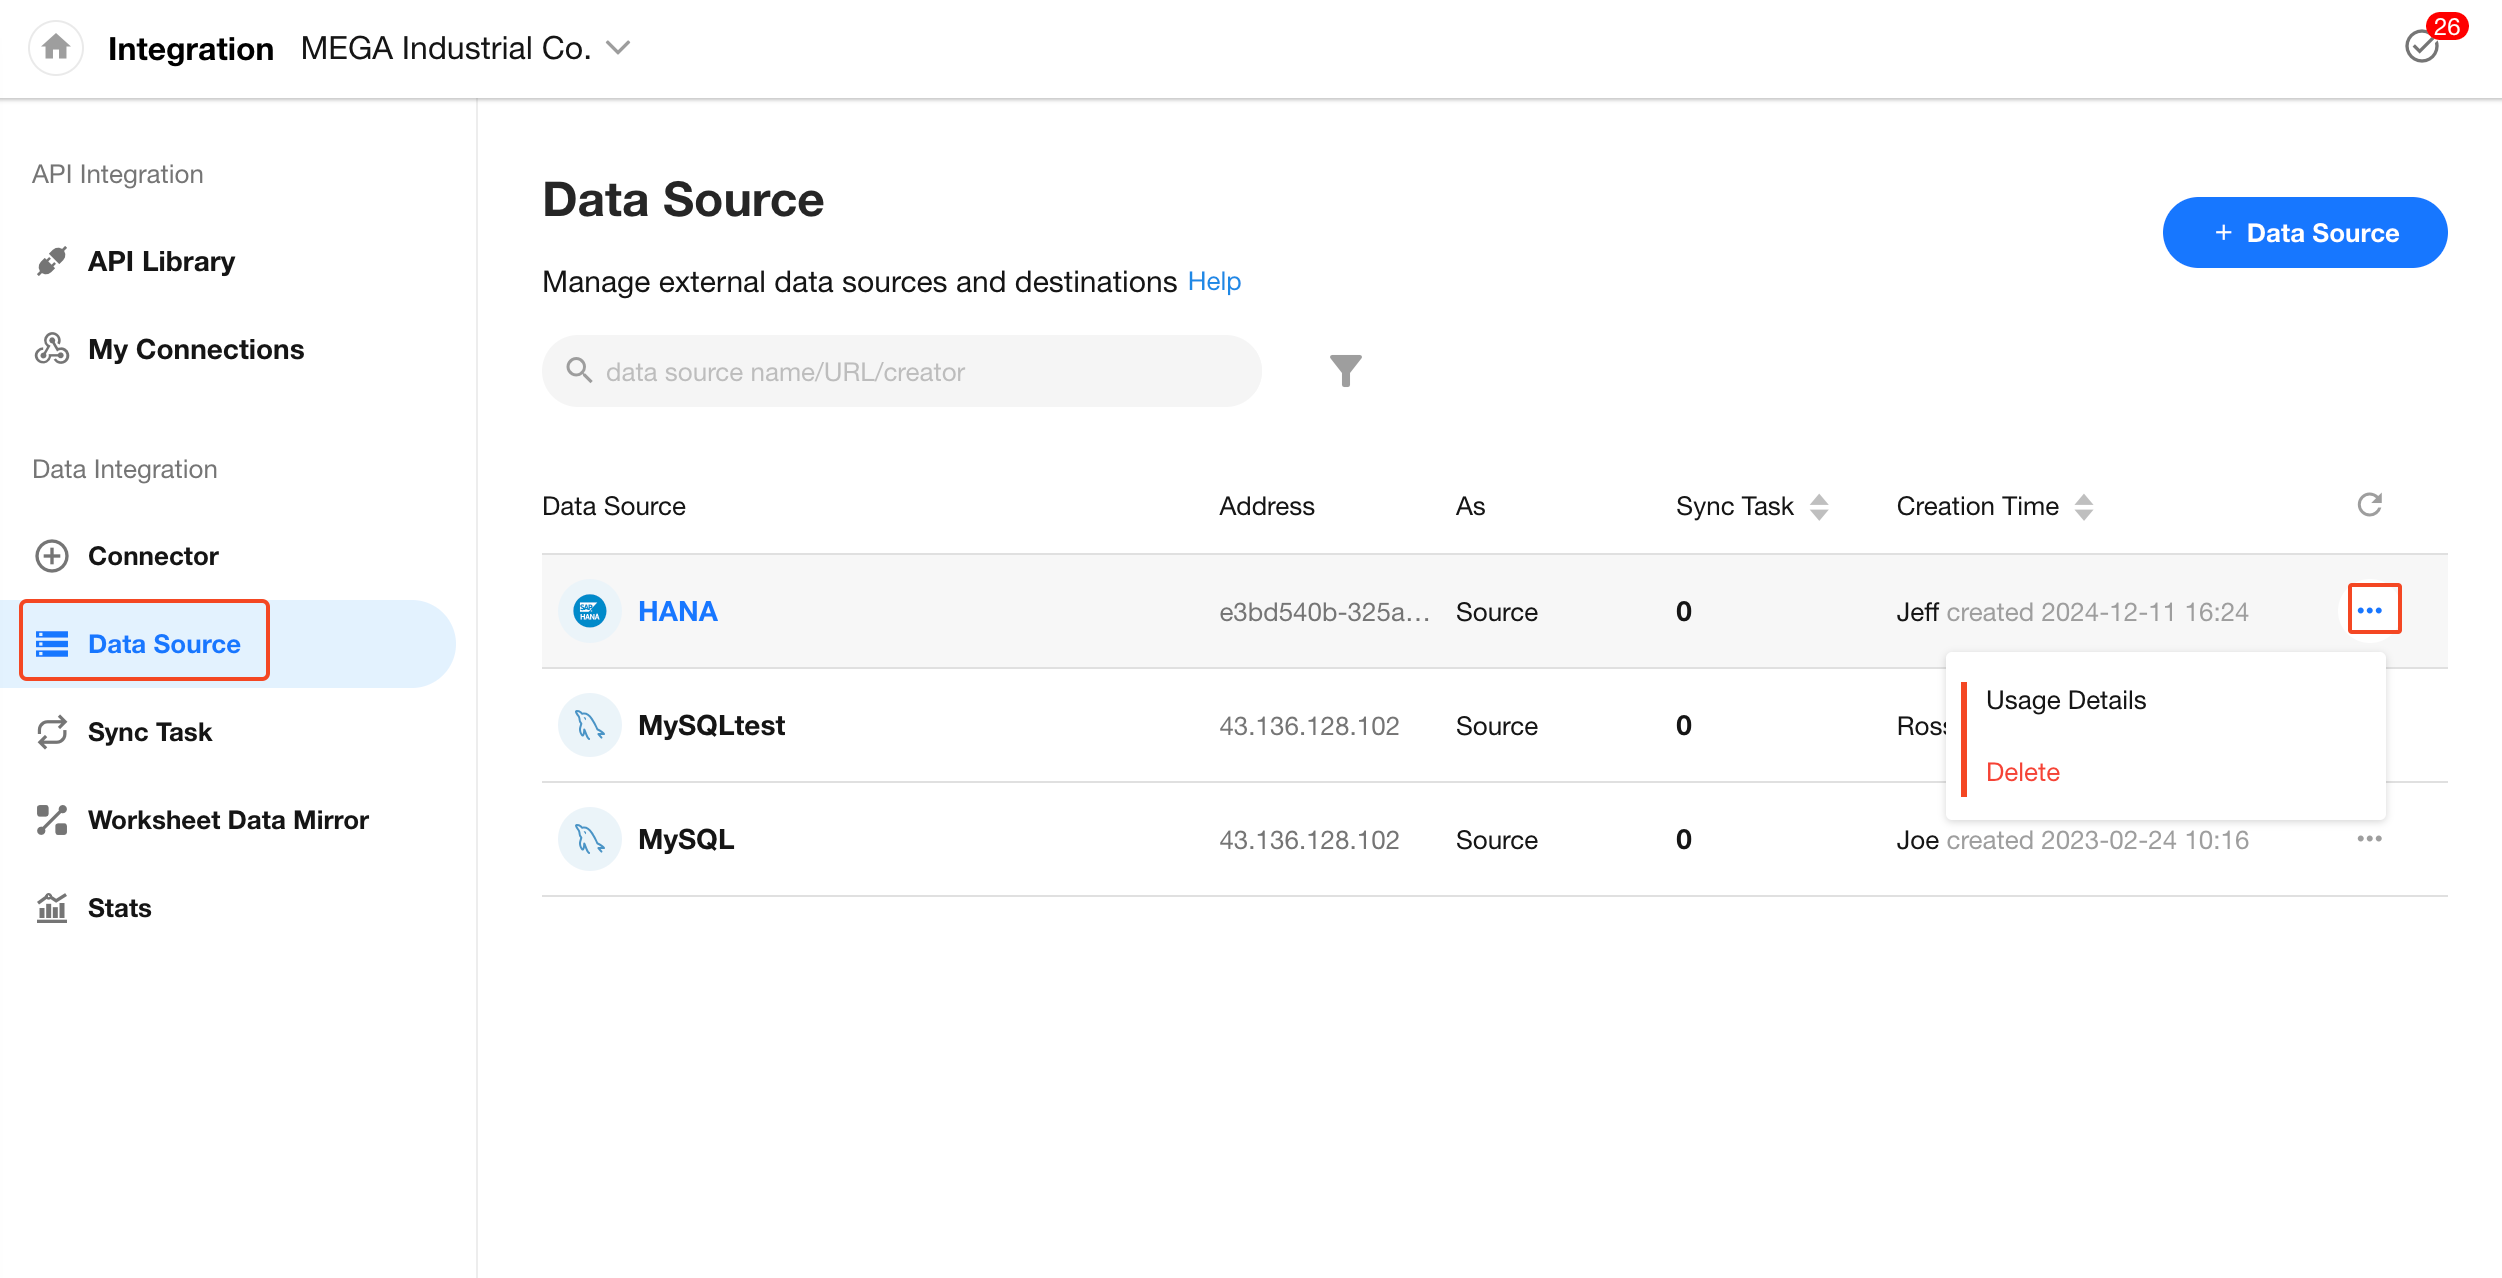
When setting up a new connector, you can select an existing data source.

Field Sync Rules
Unsupported Fields
The following field types are not supported for synchronization:
| No. | Control Name | Control Type Code | Notes |
|---|---|---|---|
| 1 | Uppercase | 25 | |
| 2 | Remarks | 10010 | |
| 3 | Free Link | 21 | |
| 4 | Embed | 45 | |
| 5 | Section | 22 | |
| 6 | Tab | 52 | |
| 7 | Relationship | 29 | Multiple rows |
| 8 | Foreign Field | 30 | Sync only |
| 9 | Signature | 42 | |
| 10 | Barcode | 47 | |
| 11 | API Query | 49 | Query button |
| 12 | OCR | 43 | |
| 13 | Query Records | 51 |
Field Sync Exampl
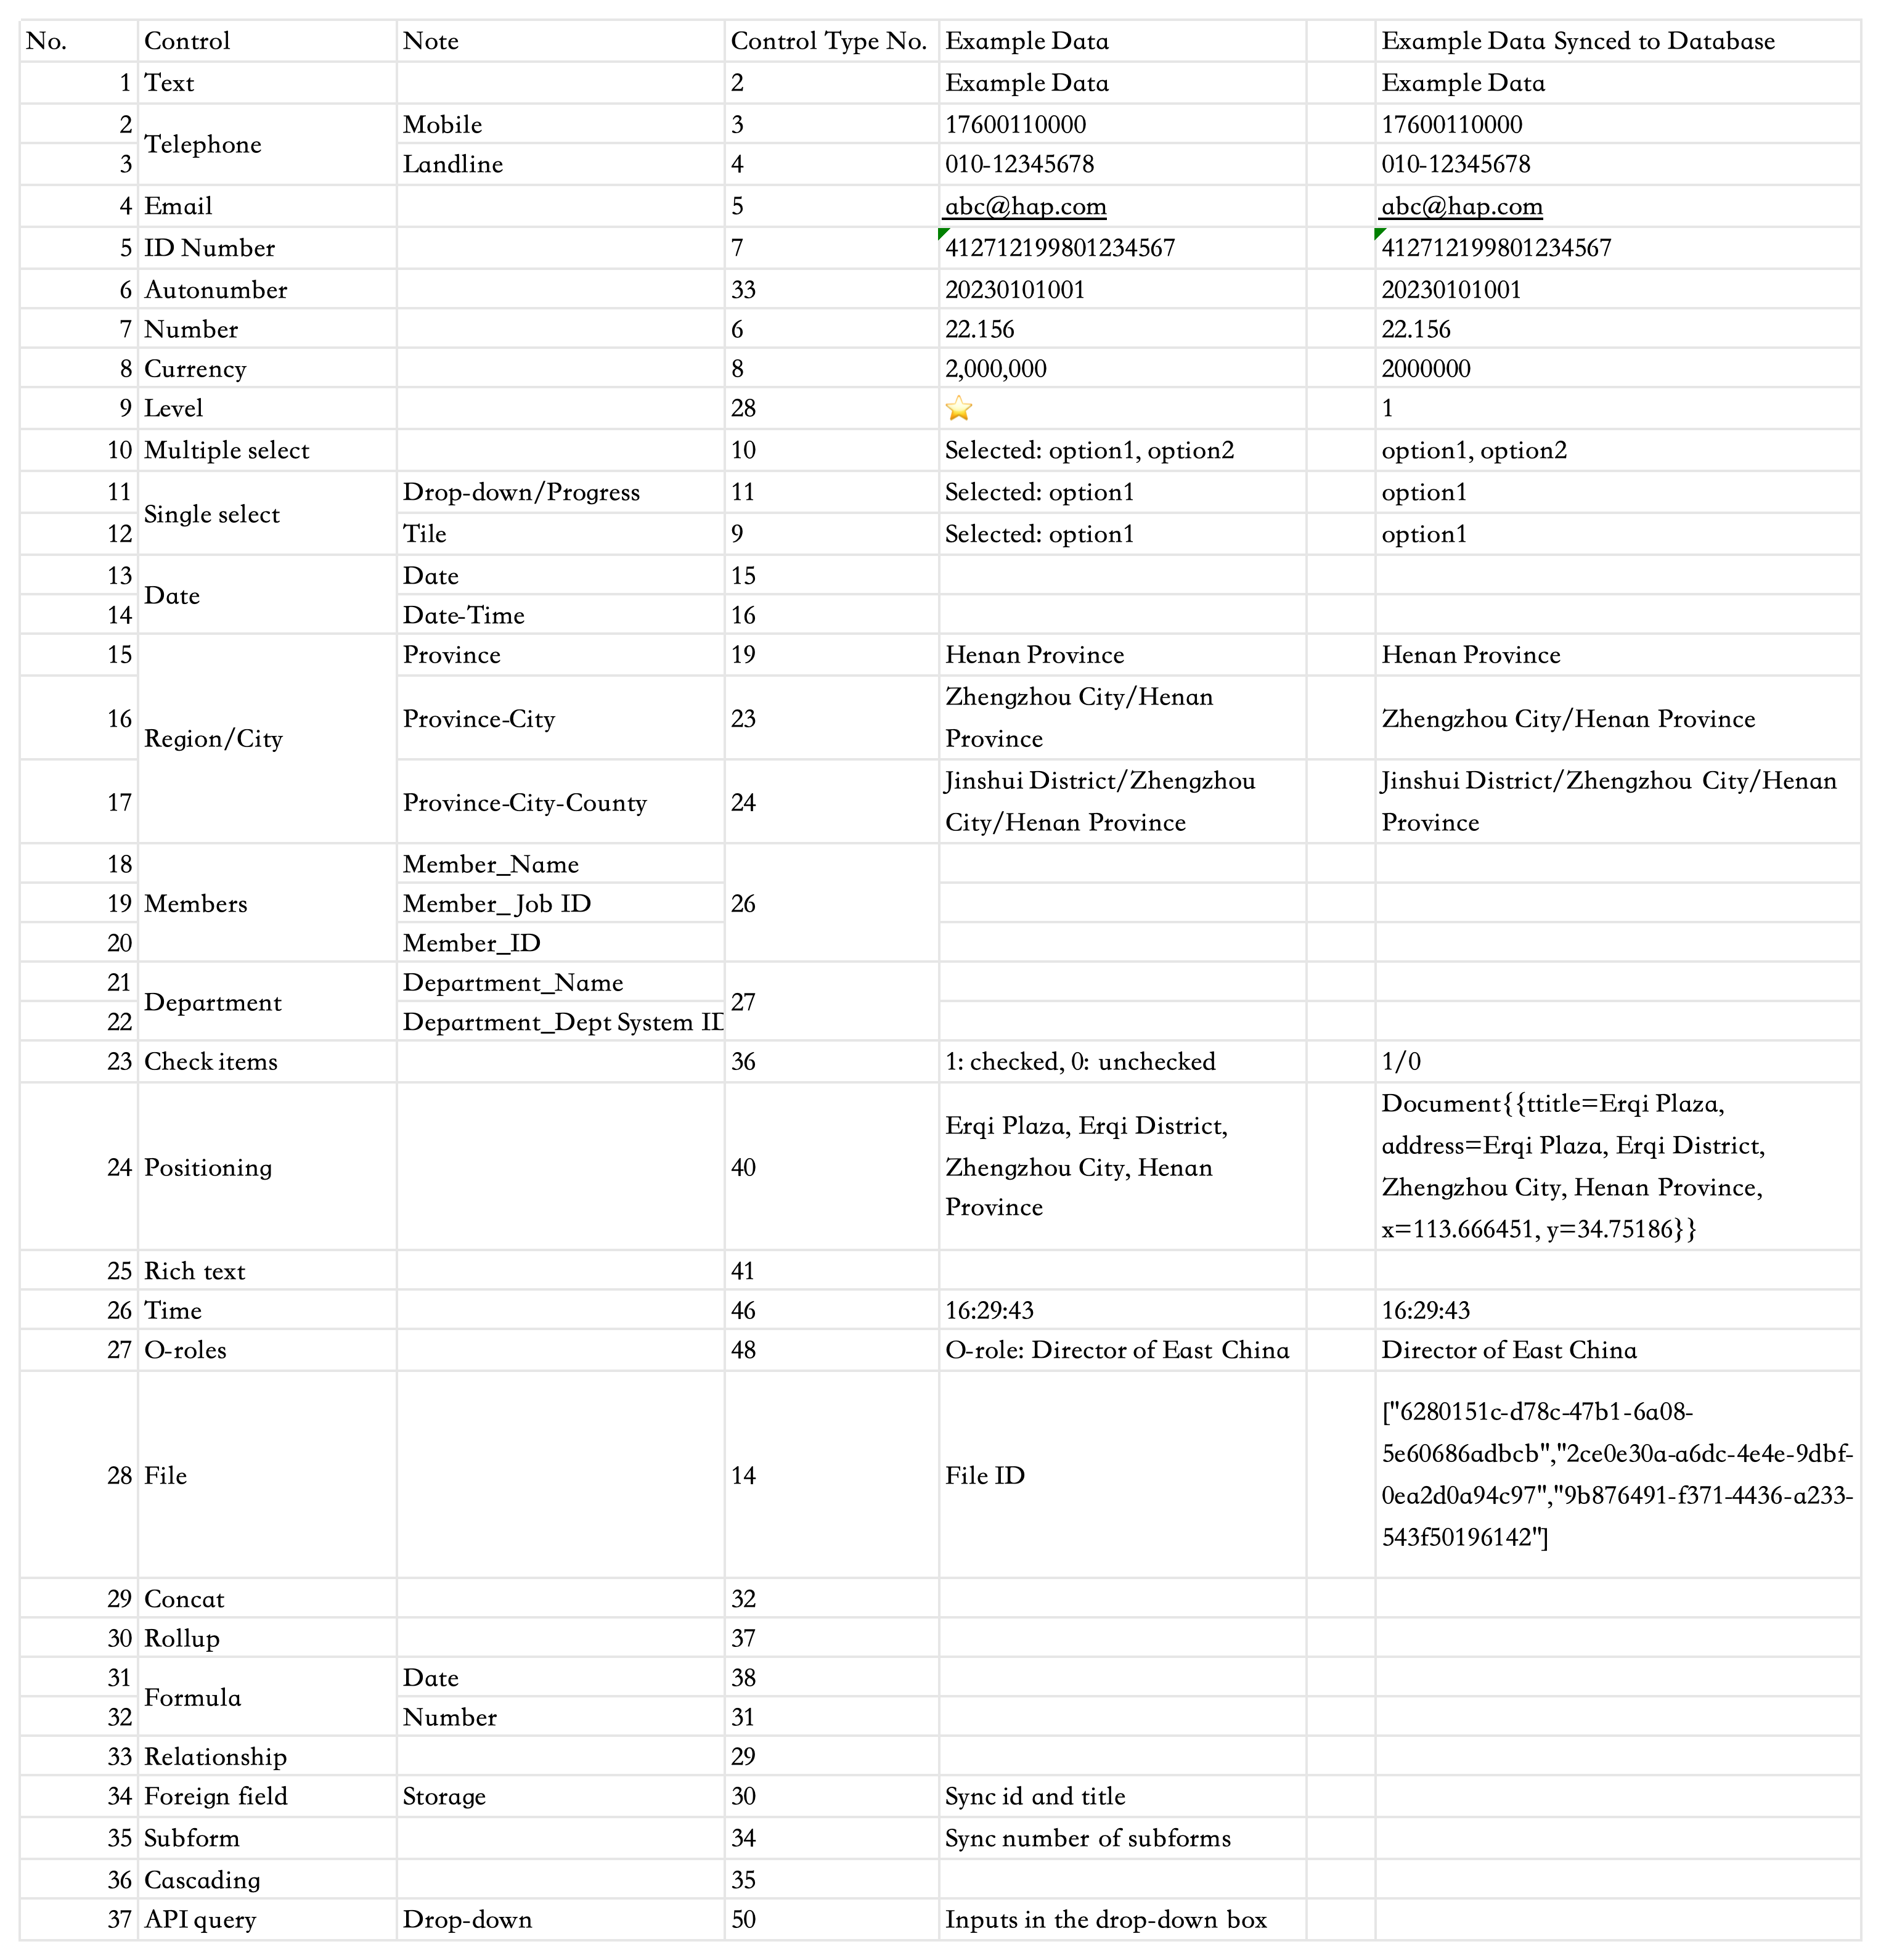
Supported System Fields
When syncing to a database, system fields from the worksheet can also be included in the sync.
| No. | Control Type | Field Name | Control Type Code | Field ID (Fixed for system fields) |
|---|---|---|---|---|
| 1 | Text | Record ID | 2 | rowid |
| 2 | Members | Owner | 26 | ownerid |
| 3 | Members | Creator | 26 | caid |
| 4 | Date & Time | Created At | 16 | ctime |
| 5 | Date & Time | Last Modified At | 16 | utime |
| 6 | Members | Last Modified By | 26 | uaid |
| 7 | Text | Workflow Name | 2 | wfname |
| 8 | Members | Node Owner | 26 | wfcuaids |
| 9 | Members | Workflow Initiator | 26 | wfcaid |
| 10 | Date & Time | Workflow Initiation Time | 16 | wfctime |
| 11 | Date & Time | Node Start Time | 16 | wfrtime |
| 12 | Formula (Date) | Time Remaining | 38 | wfftime |
| 13 | Single-select | Workflow Status | 11 | wfstatus |
Data Integration Examples
- Scenario 1: Sync data from one worksheet to another
- Scenario 2: Sync data from a local MySQL database to a worksheet
Scenario 1: Sync Data from One Worksheet to Another
Within the same organization, data from a worksheet can be synced to another worksheet in the same or a different app. This is often used for shared foundational data that is maintained in a single place but consumed across multiple applications.
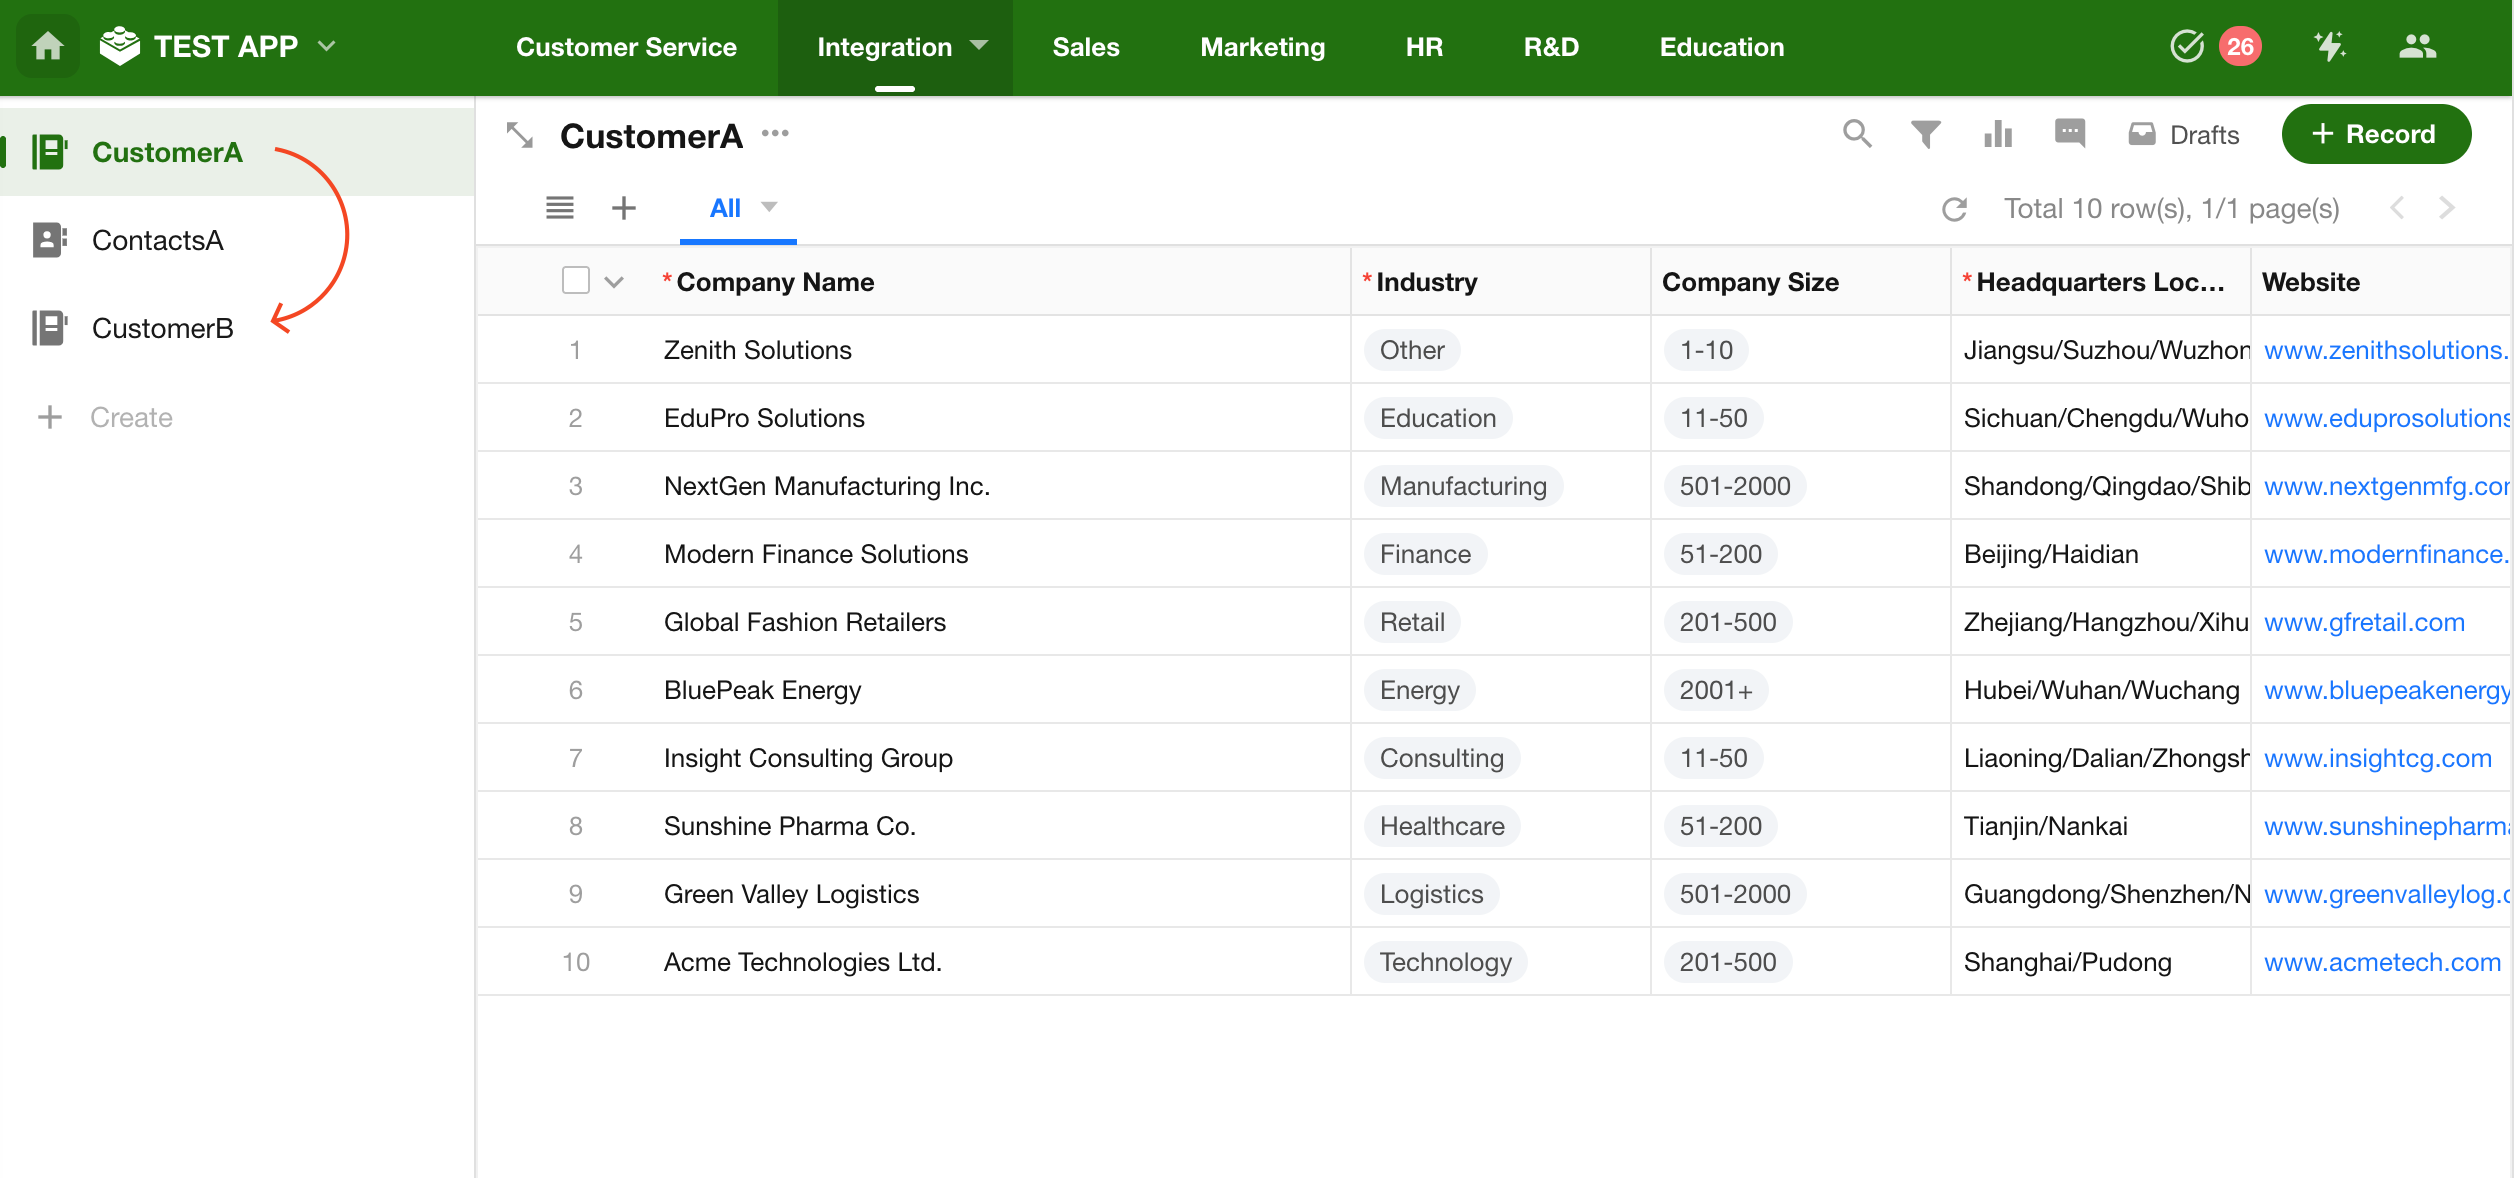
Example: Sync data from Customer Worksheet A to Customer Worksheet B.
Step 1: Create a Connector
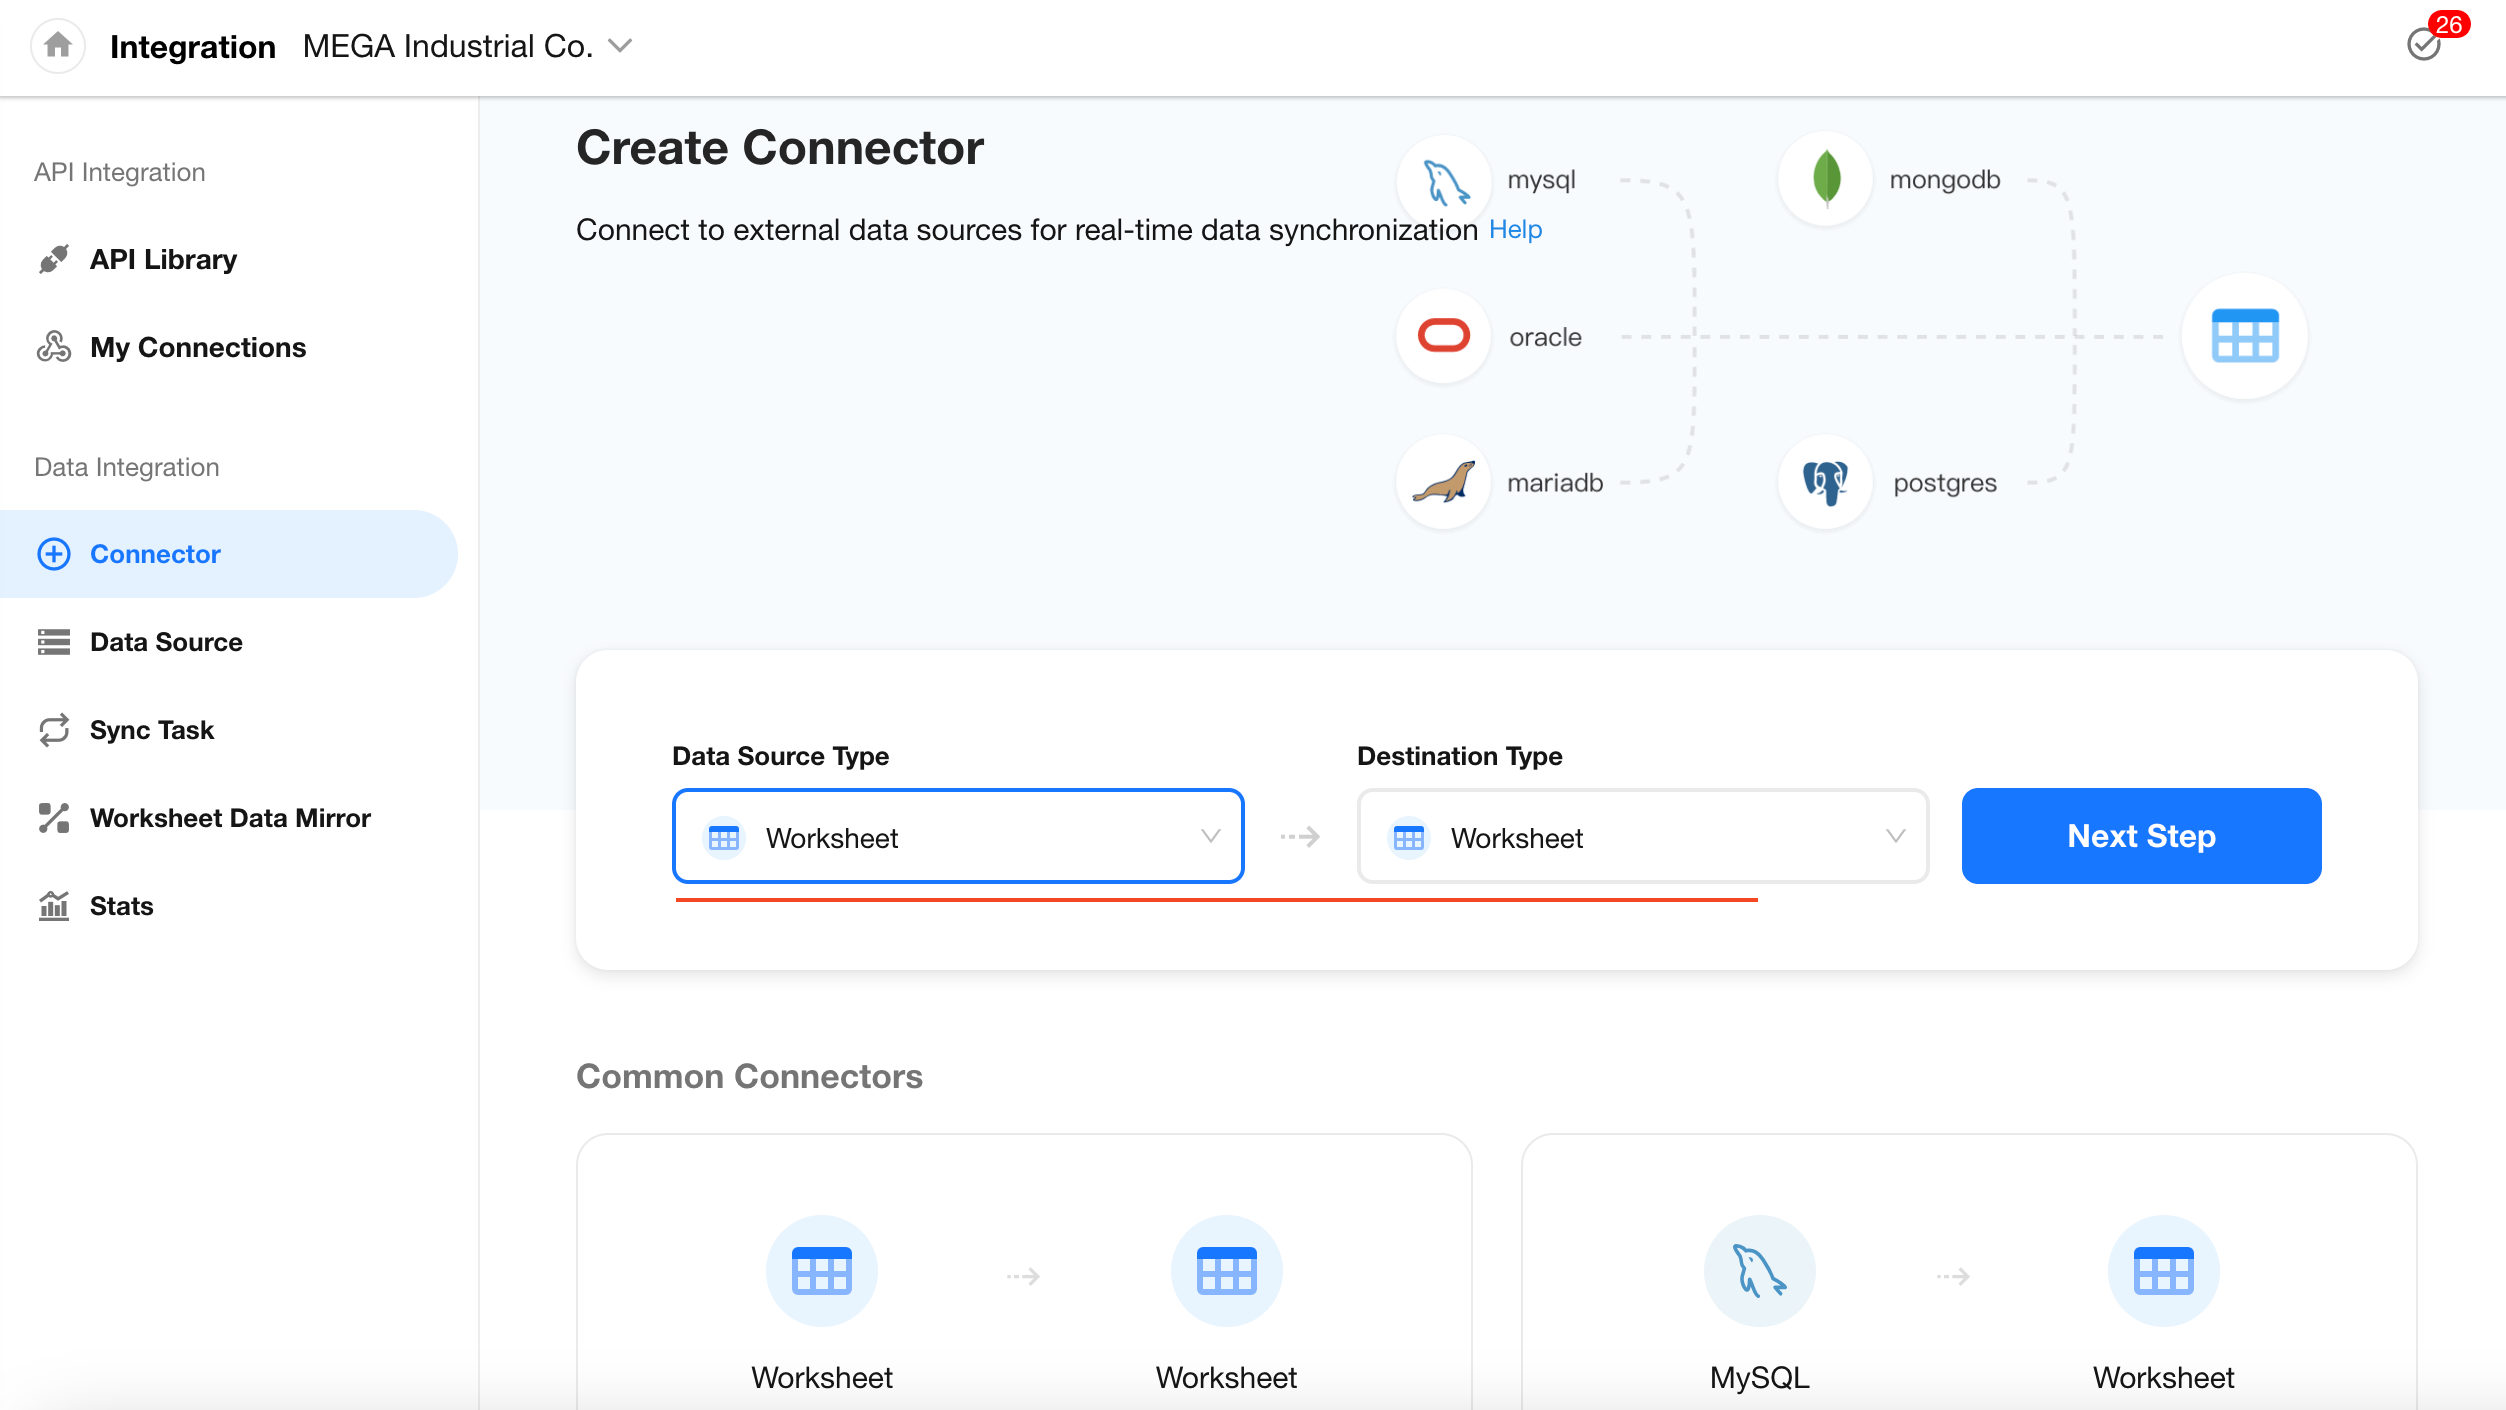
1. Select Database Type
Set both the source and destination types to Worksheet, then click Next.
2. Configure the Source
Choose the app where Customer Worksheet A is located, then click Next.
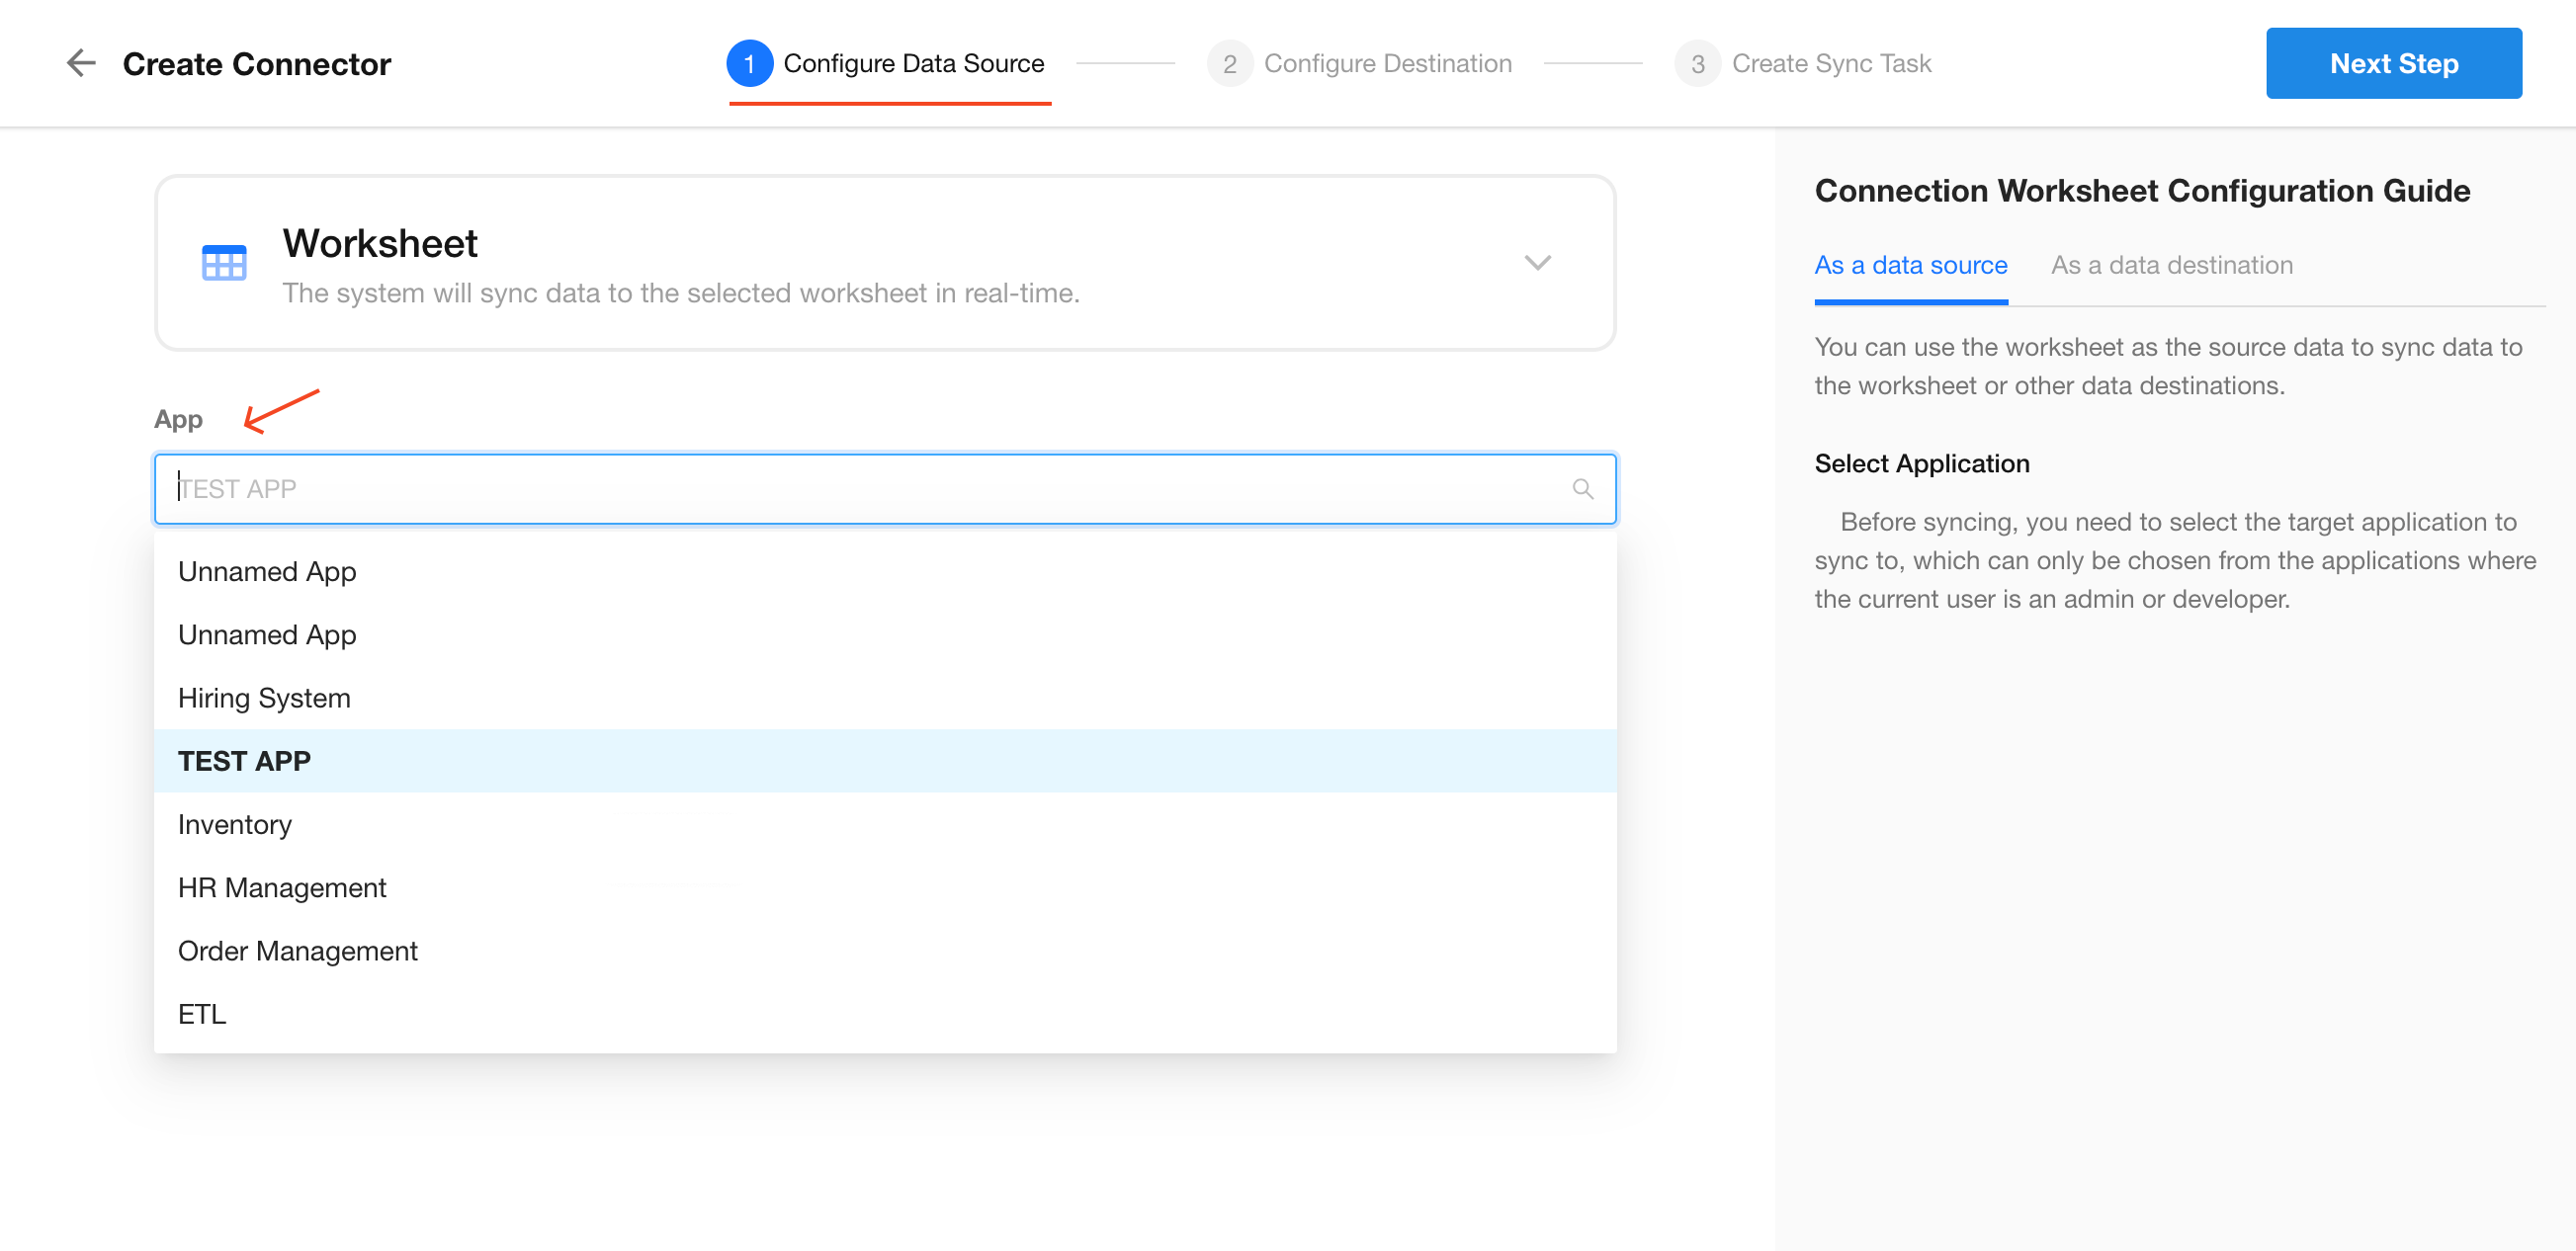
Only apps where you are listed as an app admin will be shown here.
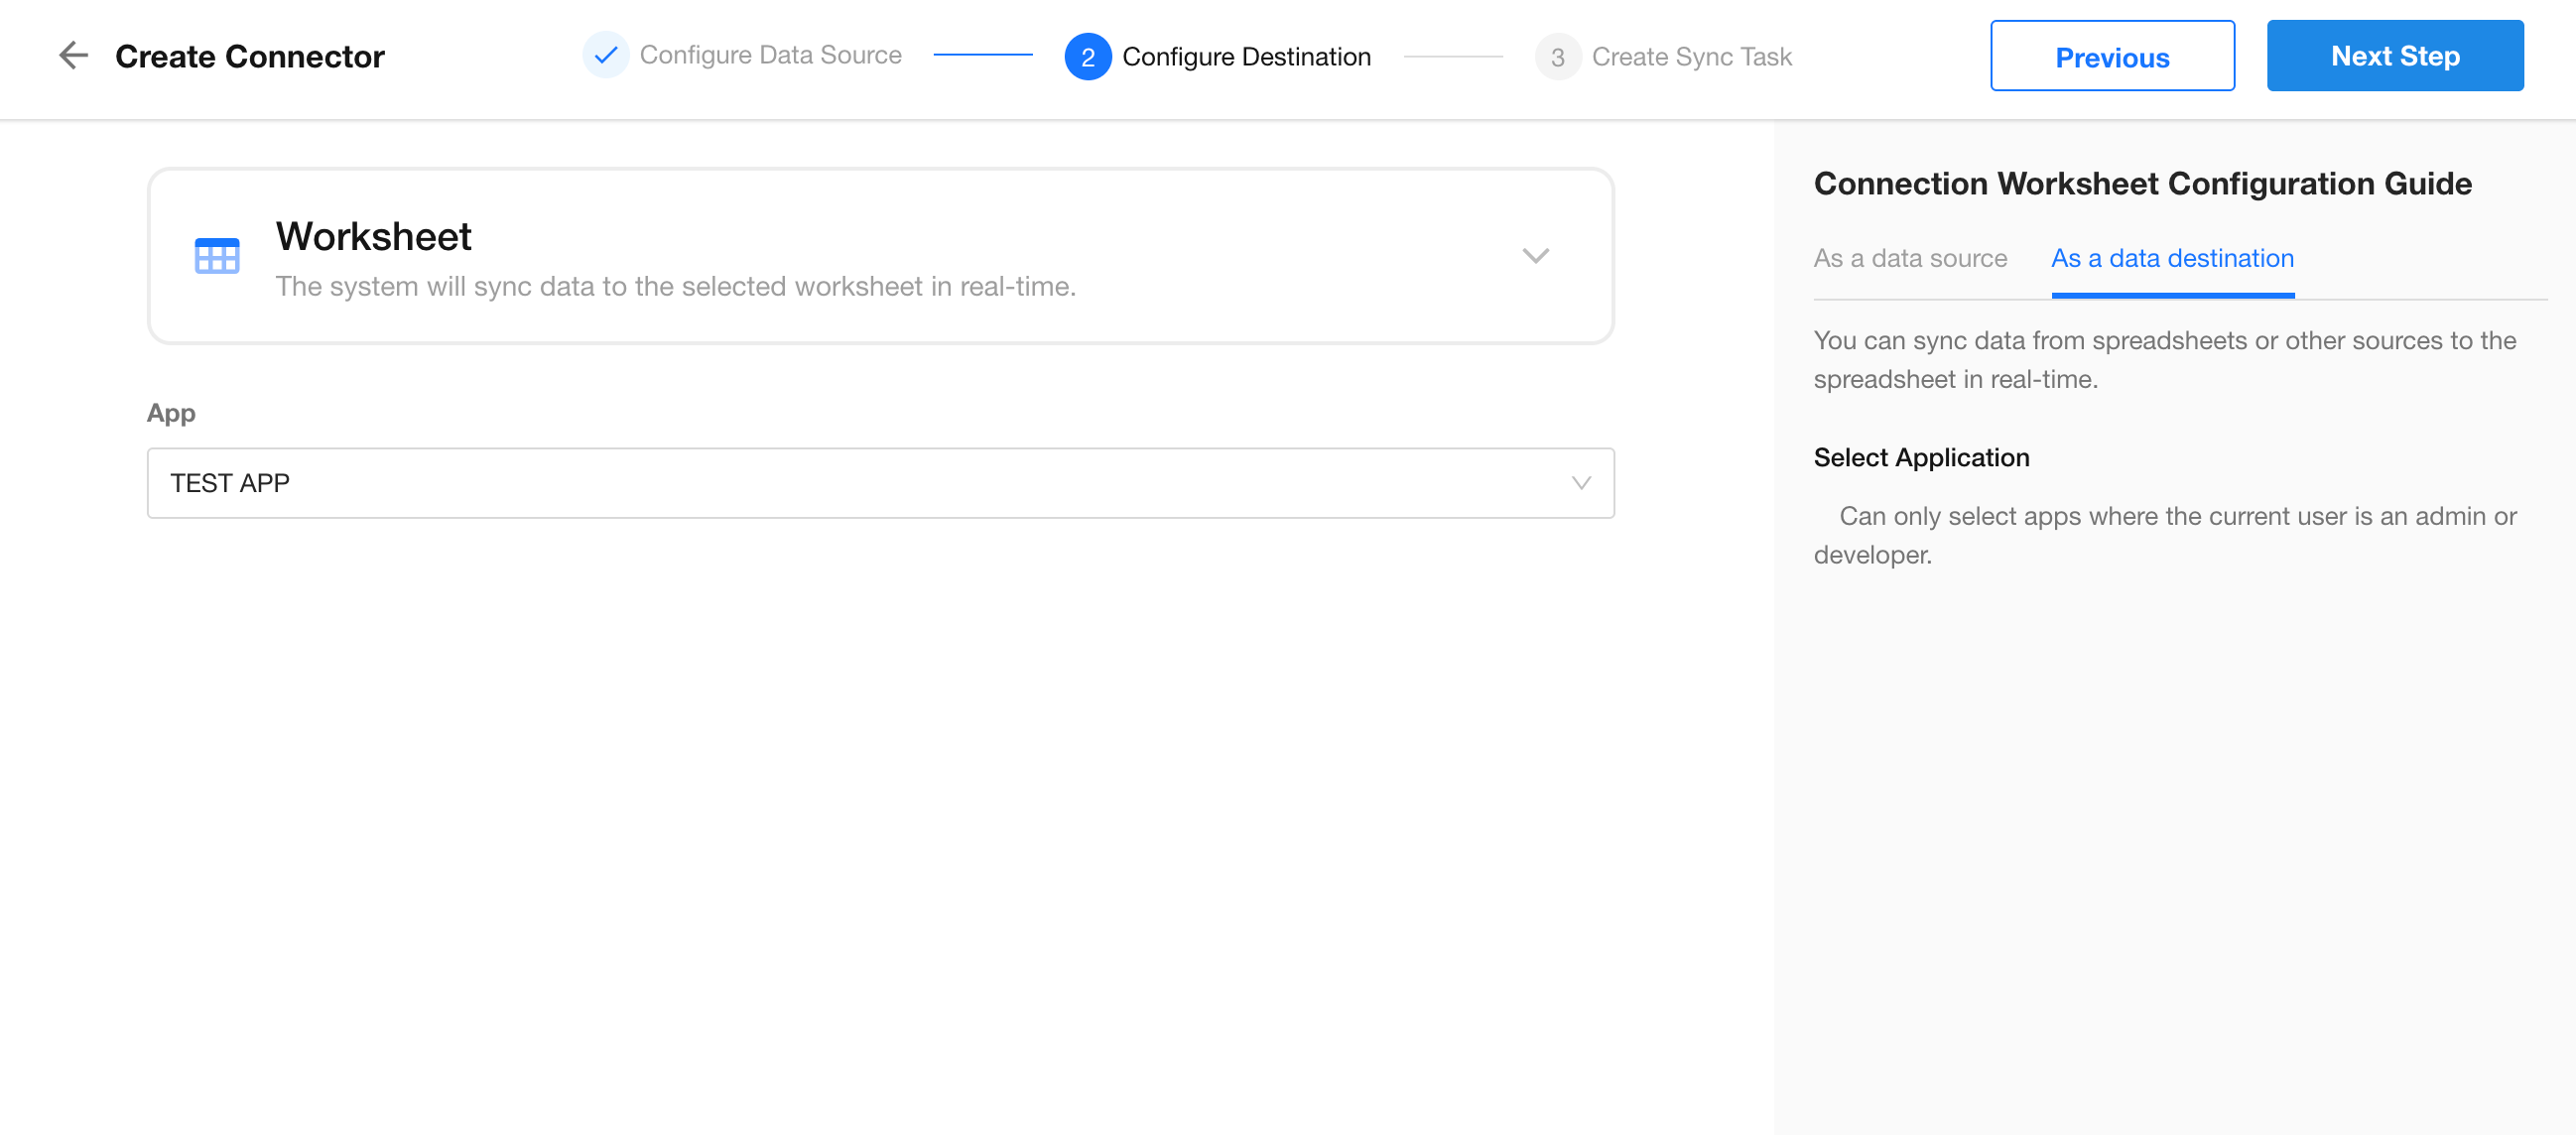
3. Configure the Destination
Choose the app where Customer Worksheet B is located. In this example, both worksheets are in the same app for demonstration purposes. Click Next to proceed with task creation.
Step 2: Create Sync Tasks
1. Choose Sync Mode
Select Sync data only.
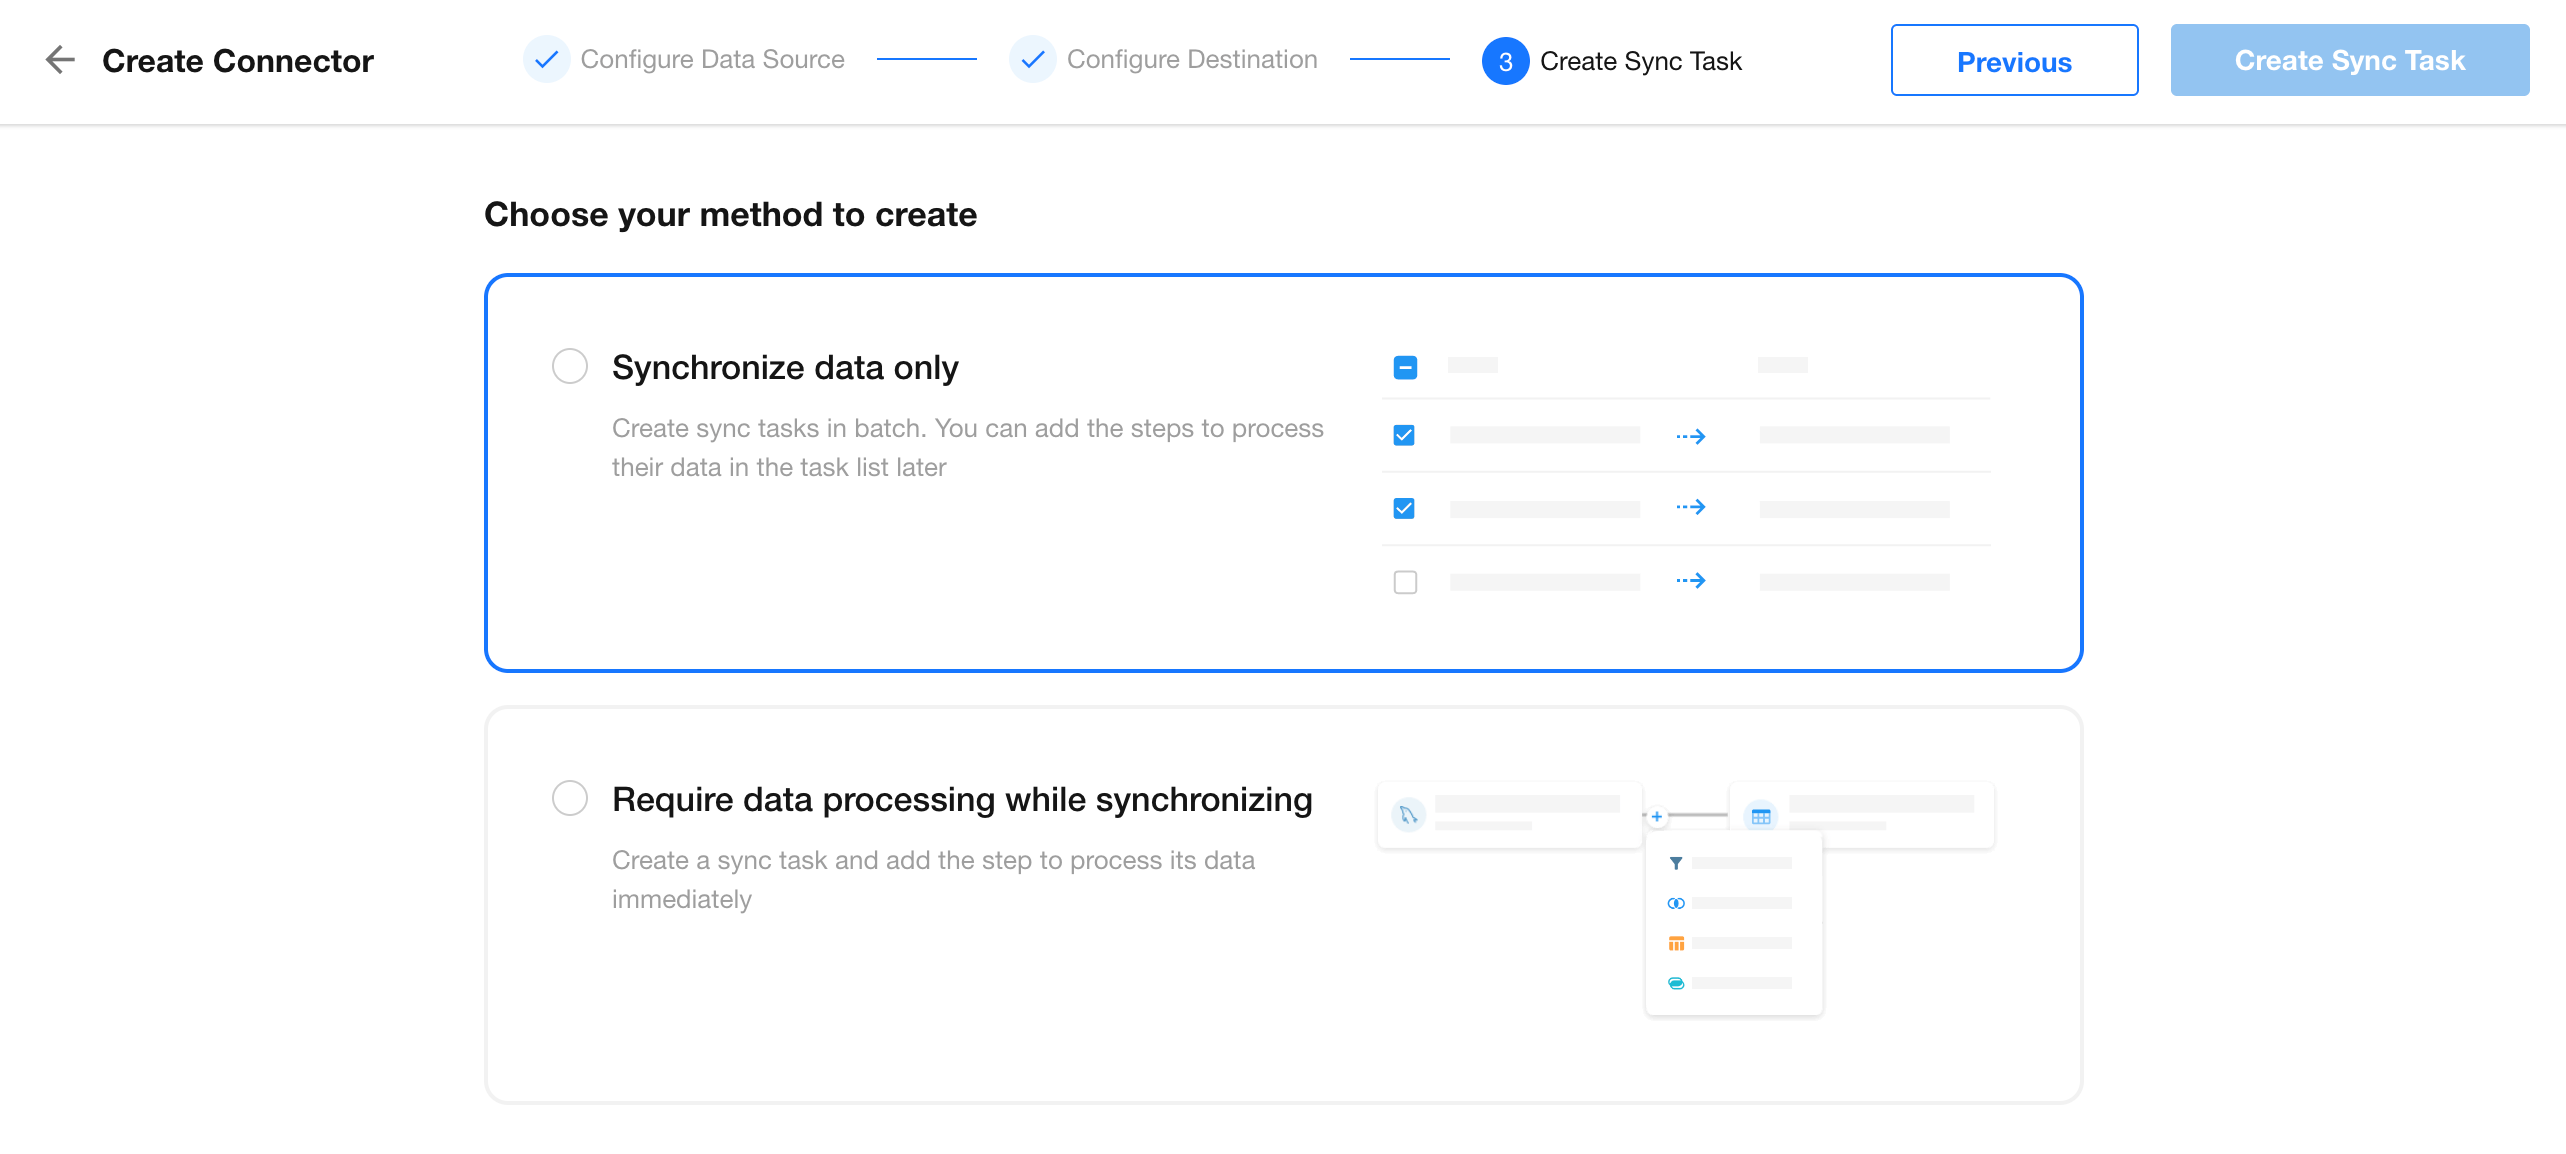
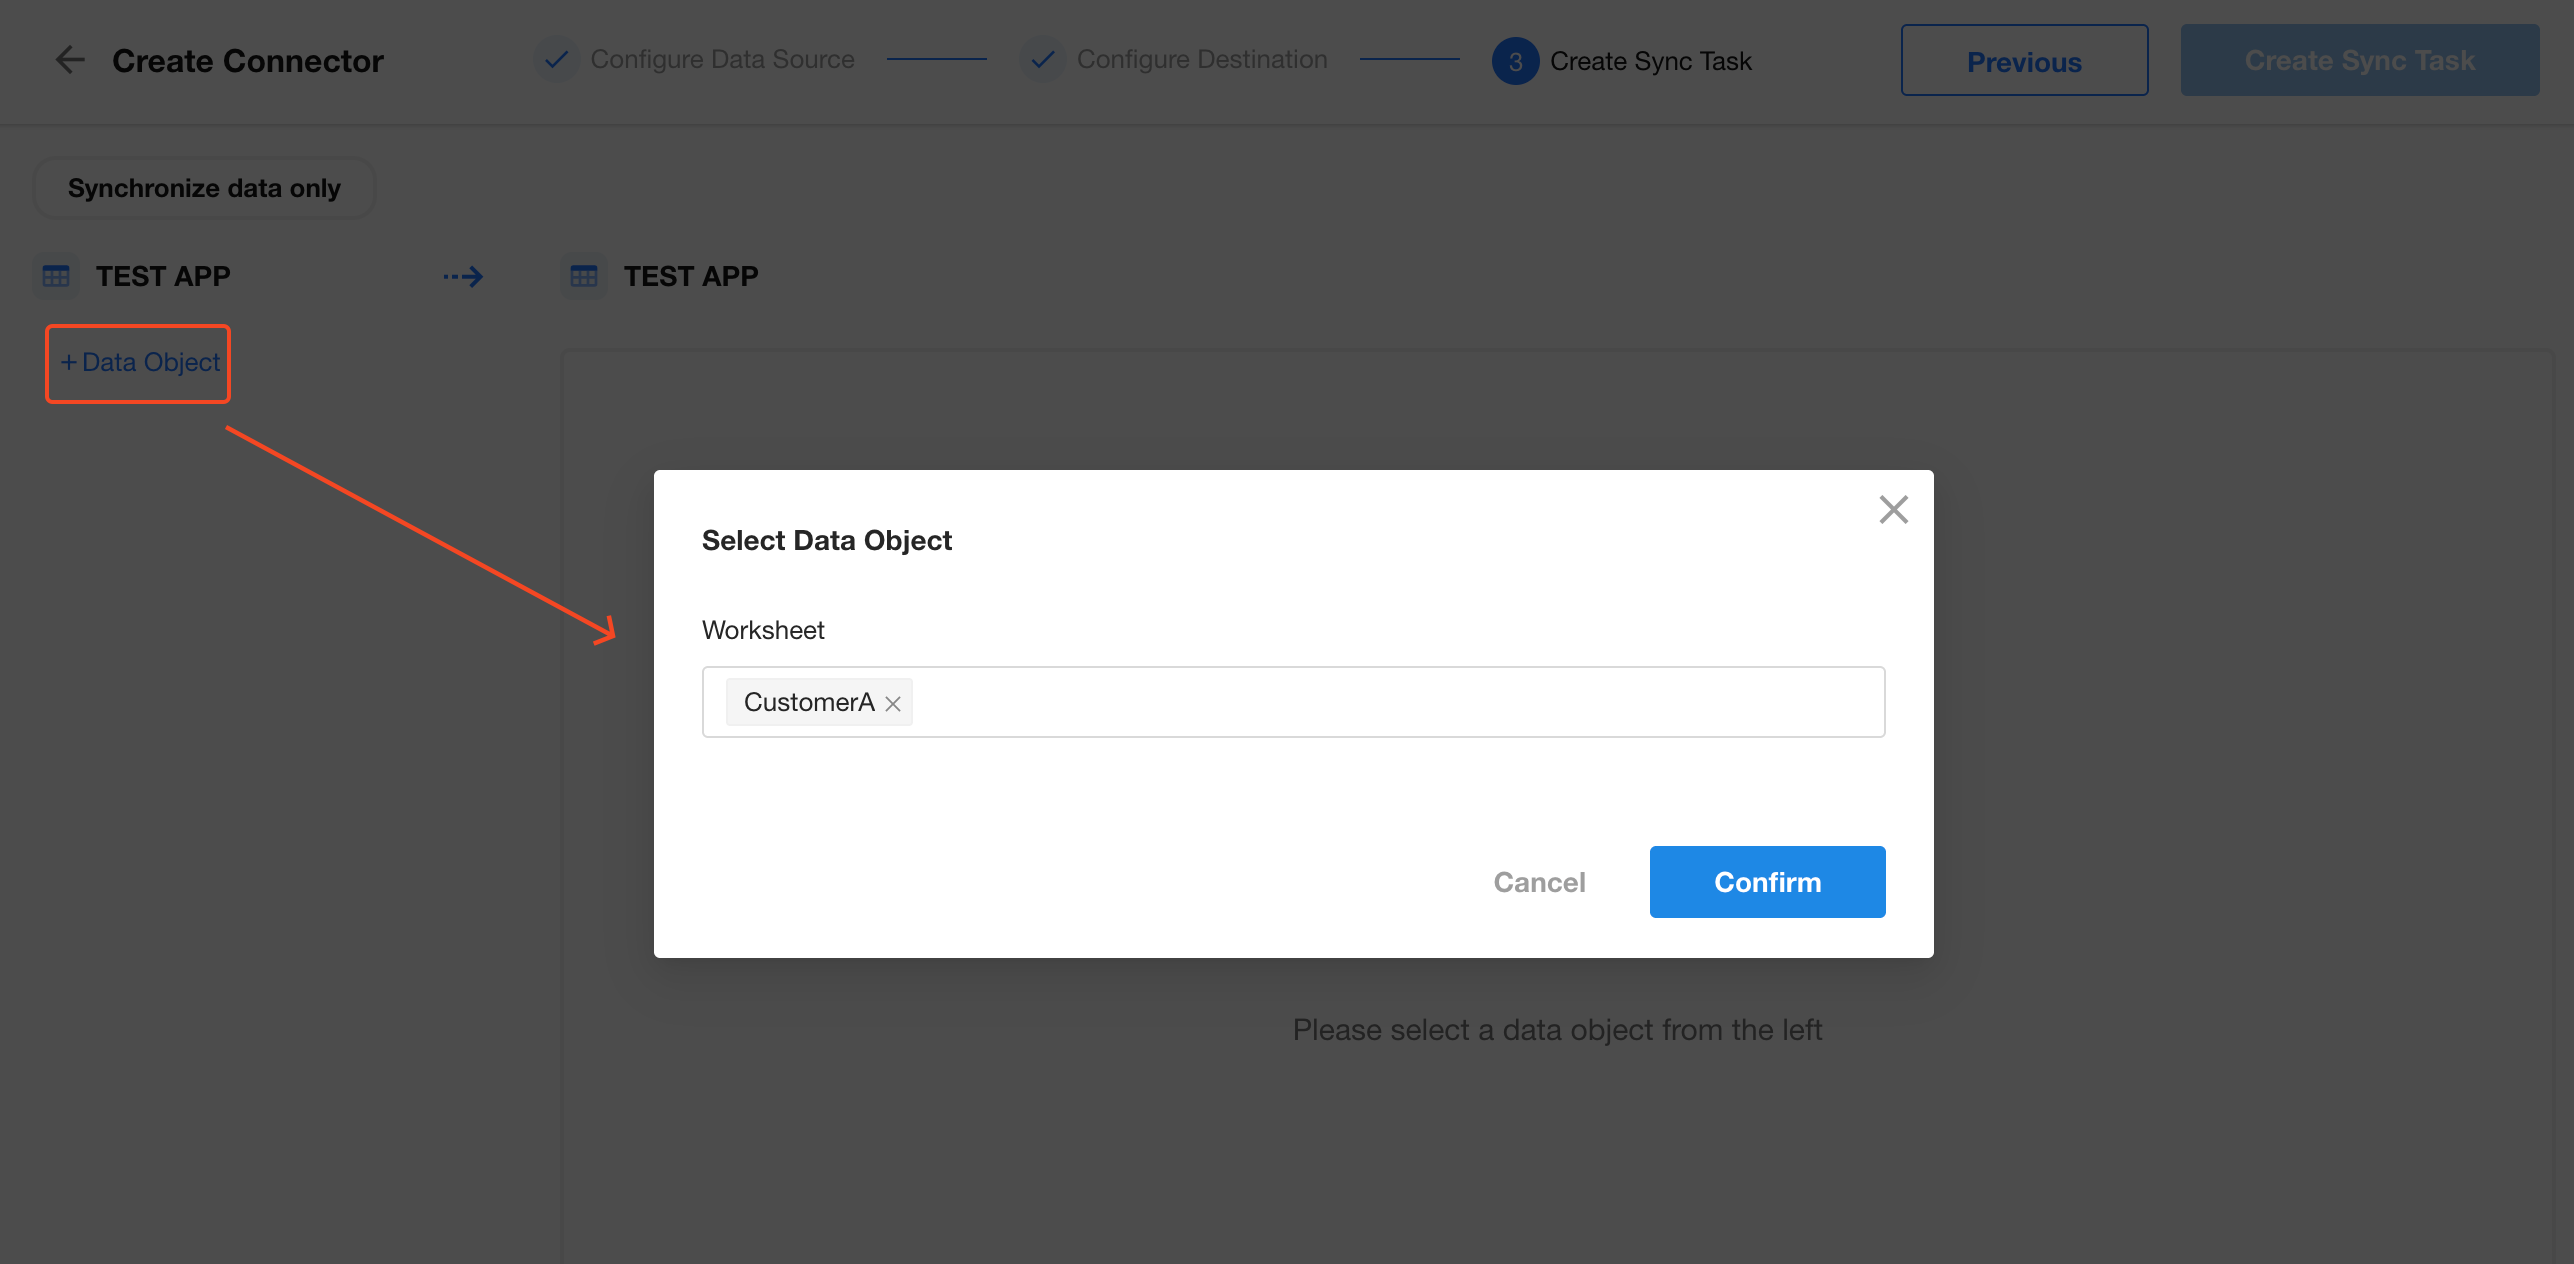
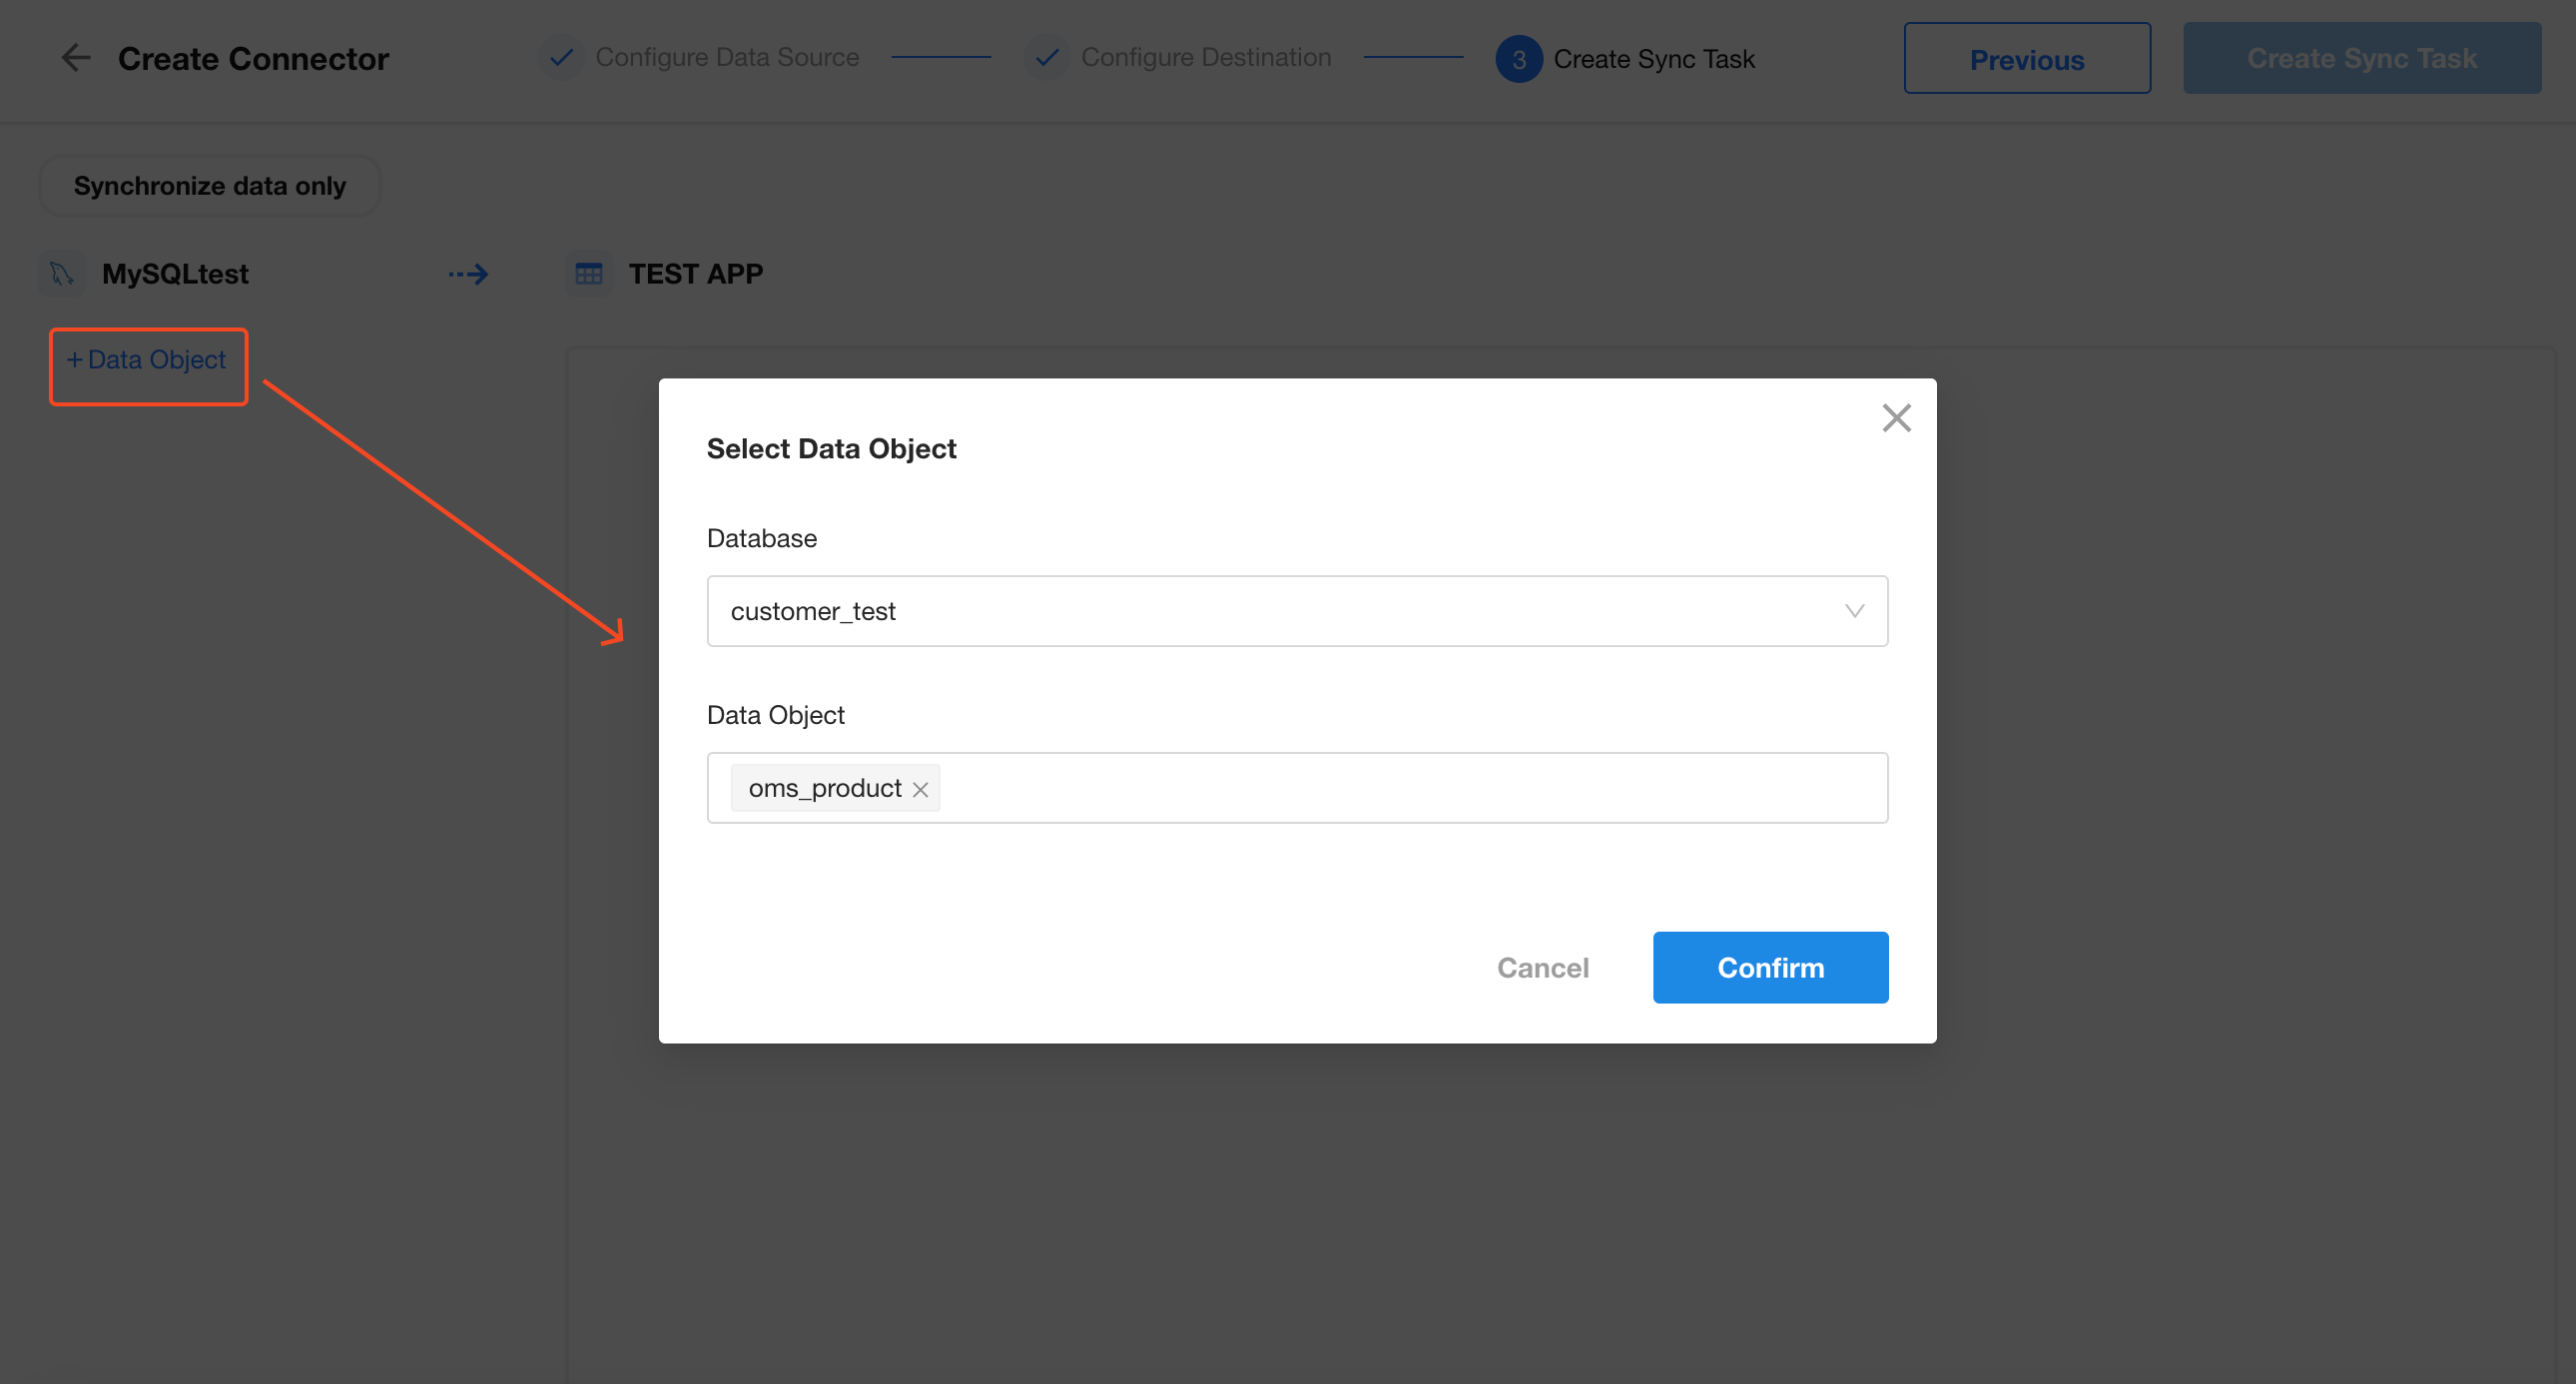
2. Select Source Worksheet(s)
Click + Data Object to choose the worksheet to sync (Customer Worksheet A).
You can select multiple worksheets or click + Data Object again to add more.
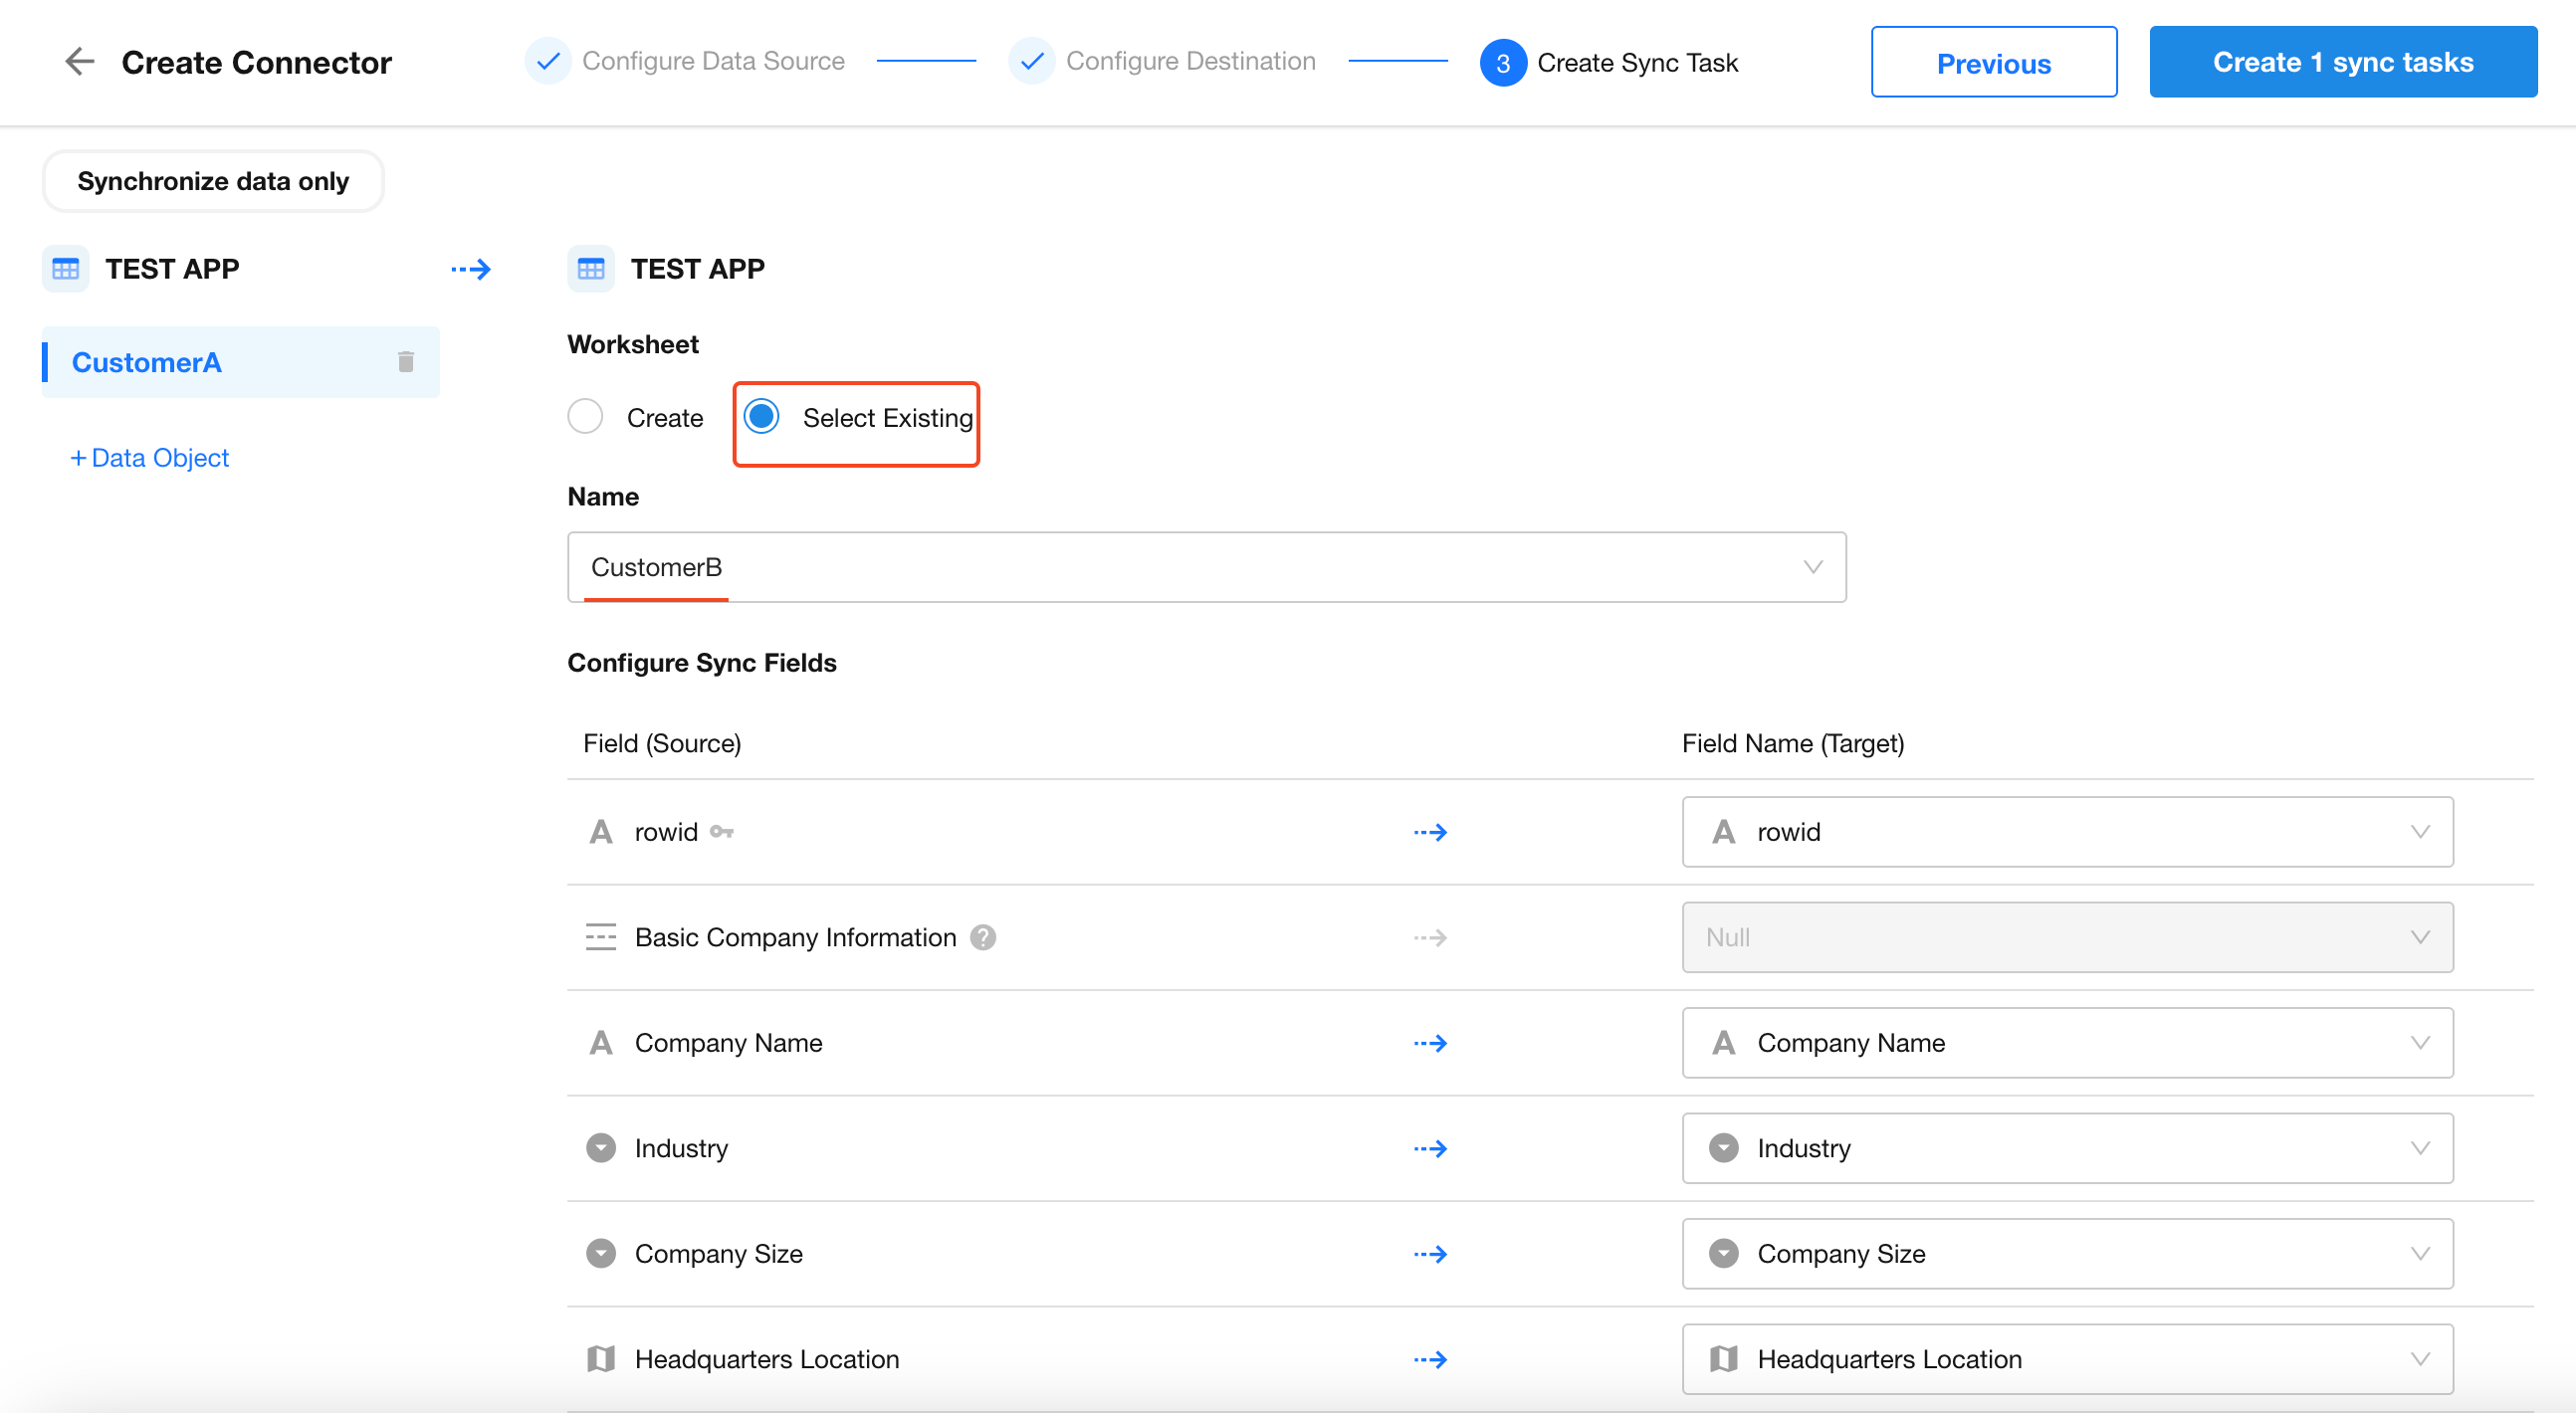
3. Map Fields to Destination Worksheet
Since Customer Worksheet B already exists, select Existing Worksheet.
-
Establish field mappings by selecting corresponding fields, similar to importing Excel data.
Application name, worksheet name or field names containing special characters may prevent selection or cause sync failures. The following characters are not allowed:
~!@#$%^&*()-+=<>?:"|,./;'[]·!¥…()—《》?:“”【】、;‘,。『』「」
Spaces are also not allowed.
4. Configure Duplicate Record Handling
For potential duplicates, designate a matching field. If a record with this value already exists, you can choose to either overwrite or skip it during sync.
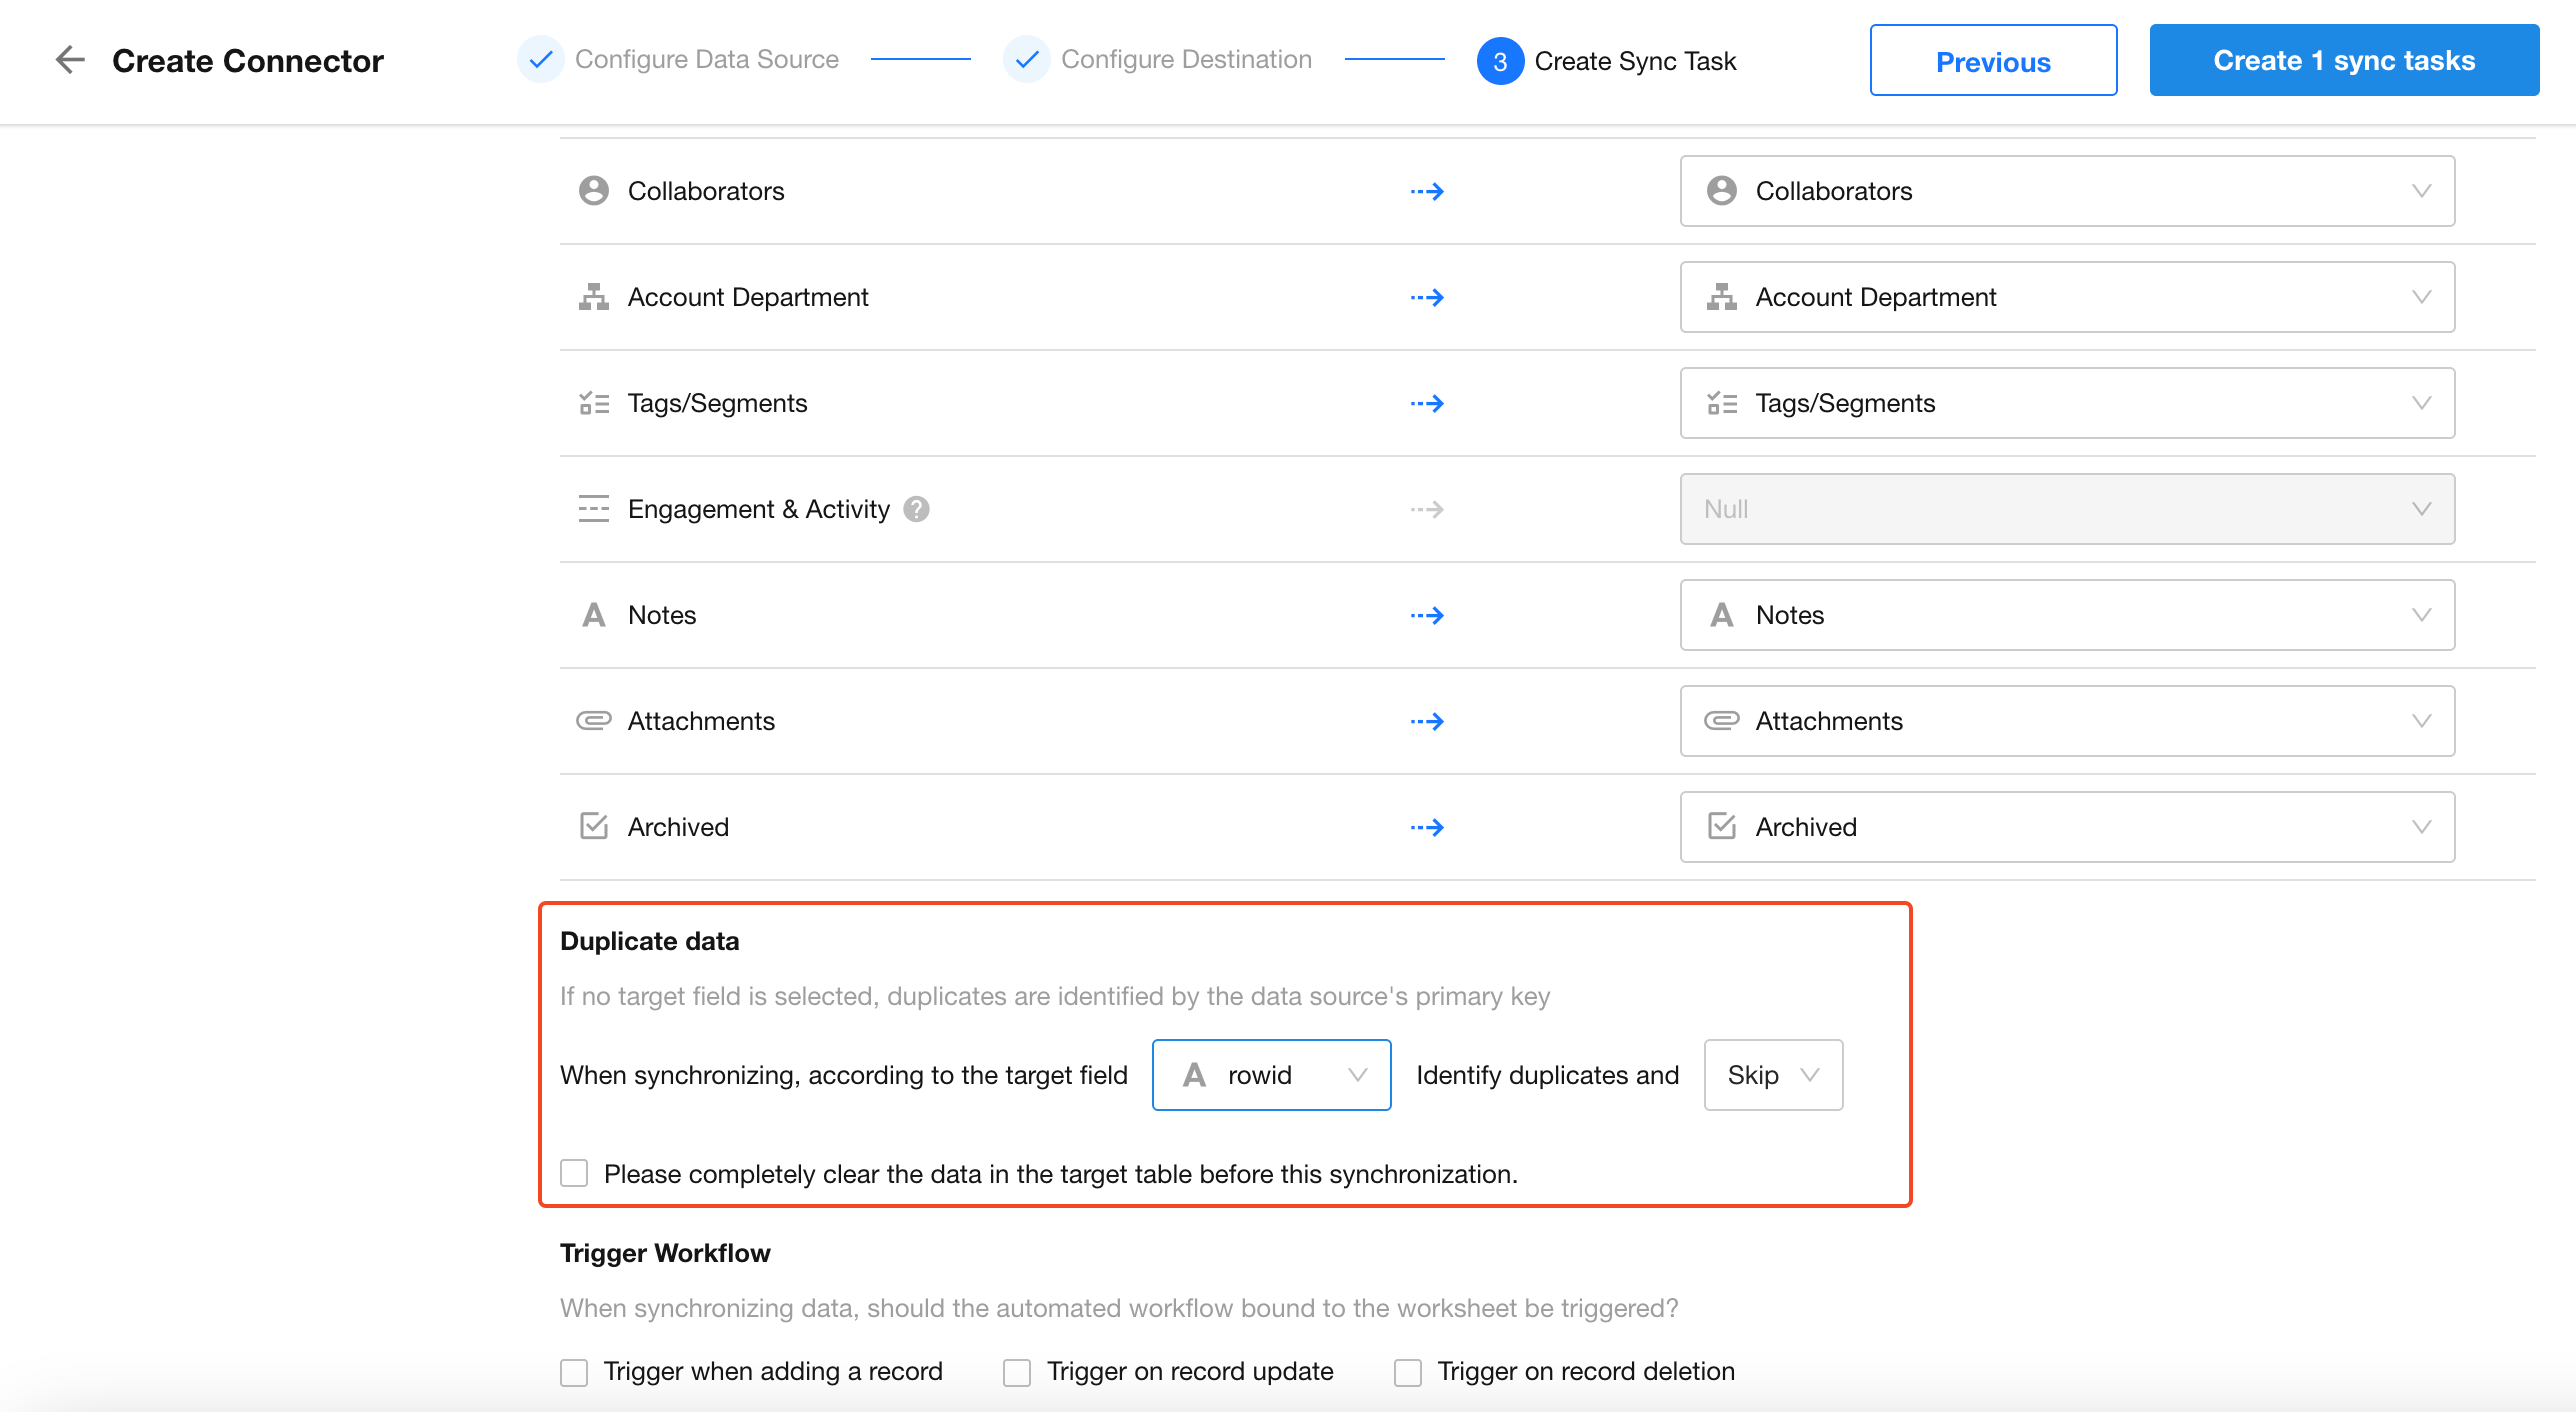
To clear the destination worksheet before the first sync, enable Clear existing data in the target worksheet before syncing.
5. Trigger Workflows on Sync
During sync, records may be added, updated, or deleted. You can configure whether such changes should trigger associated workflows.

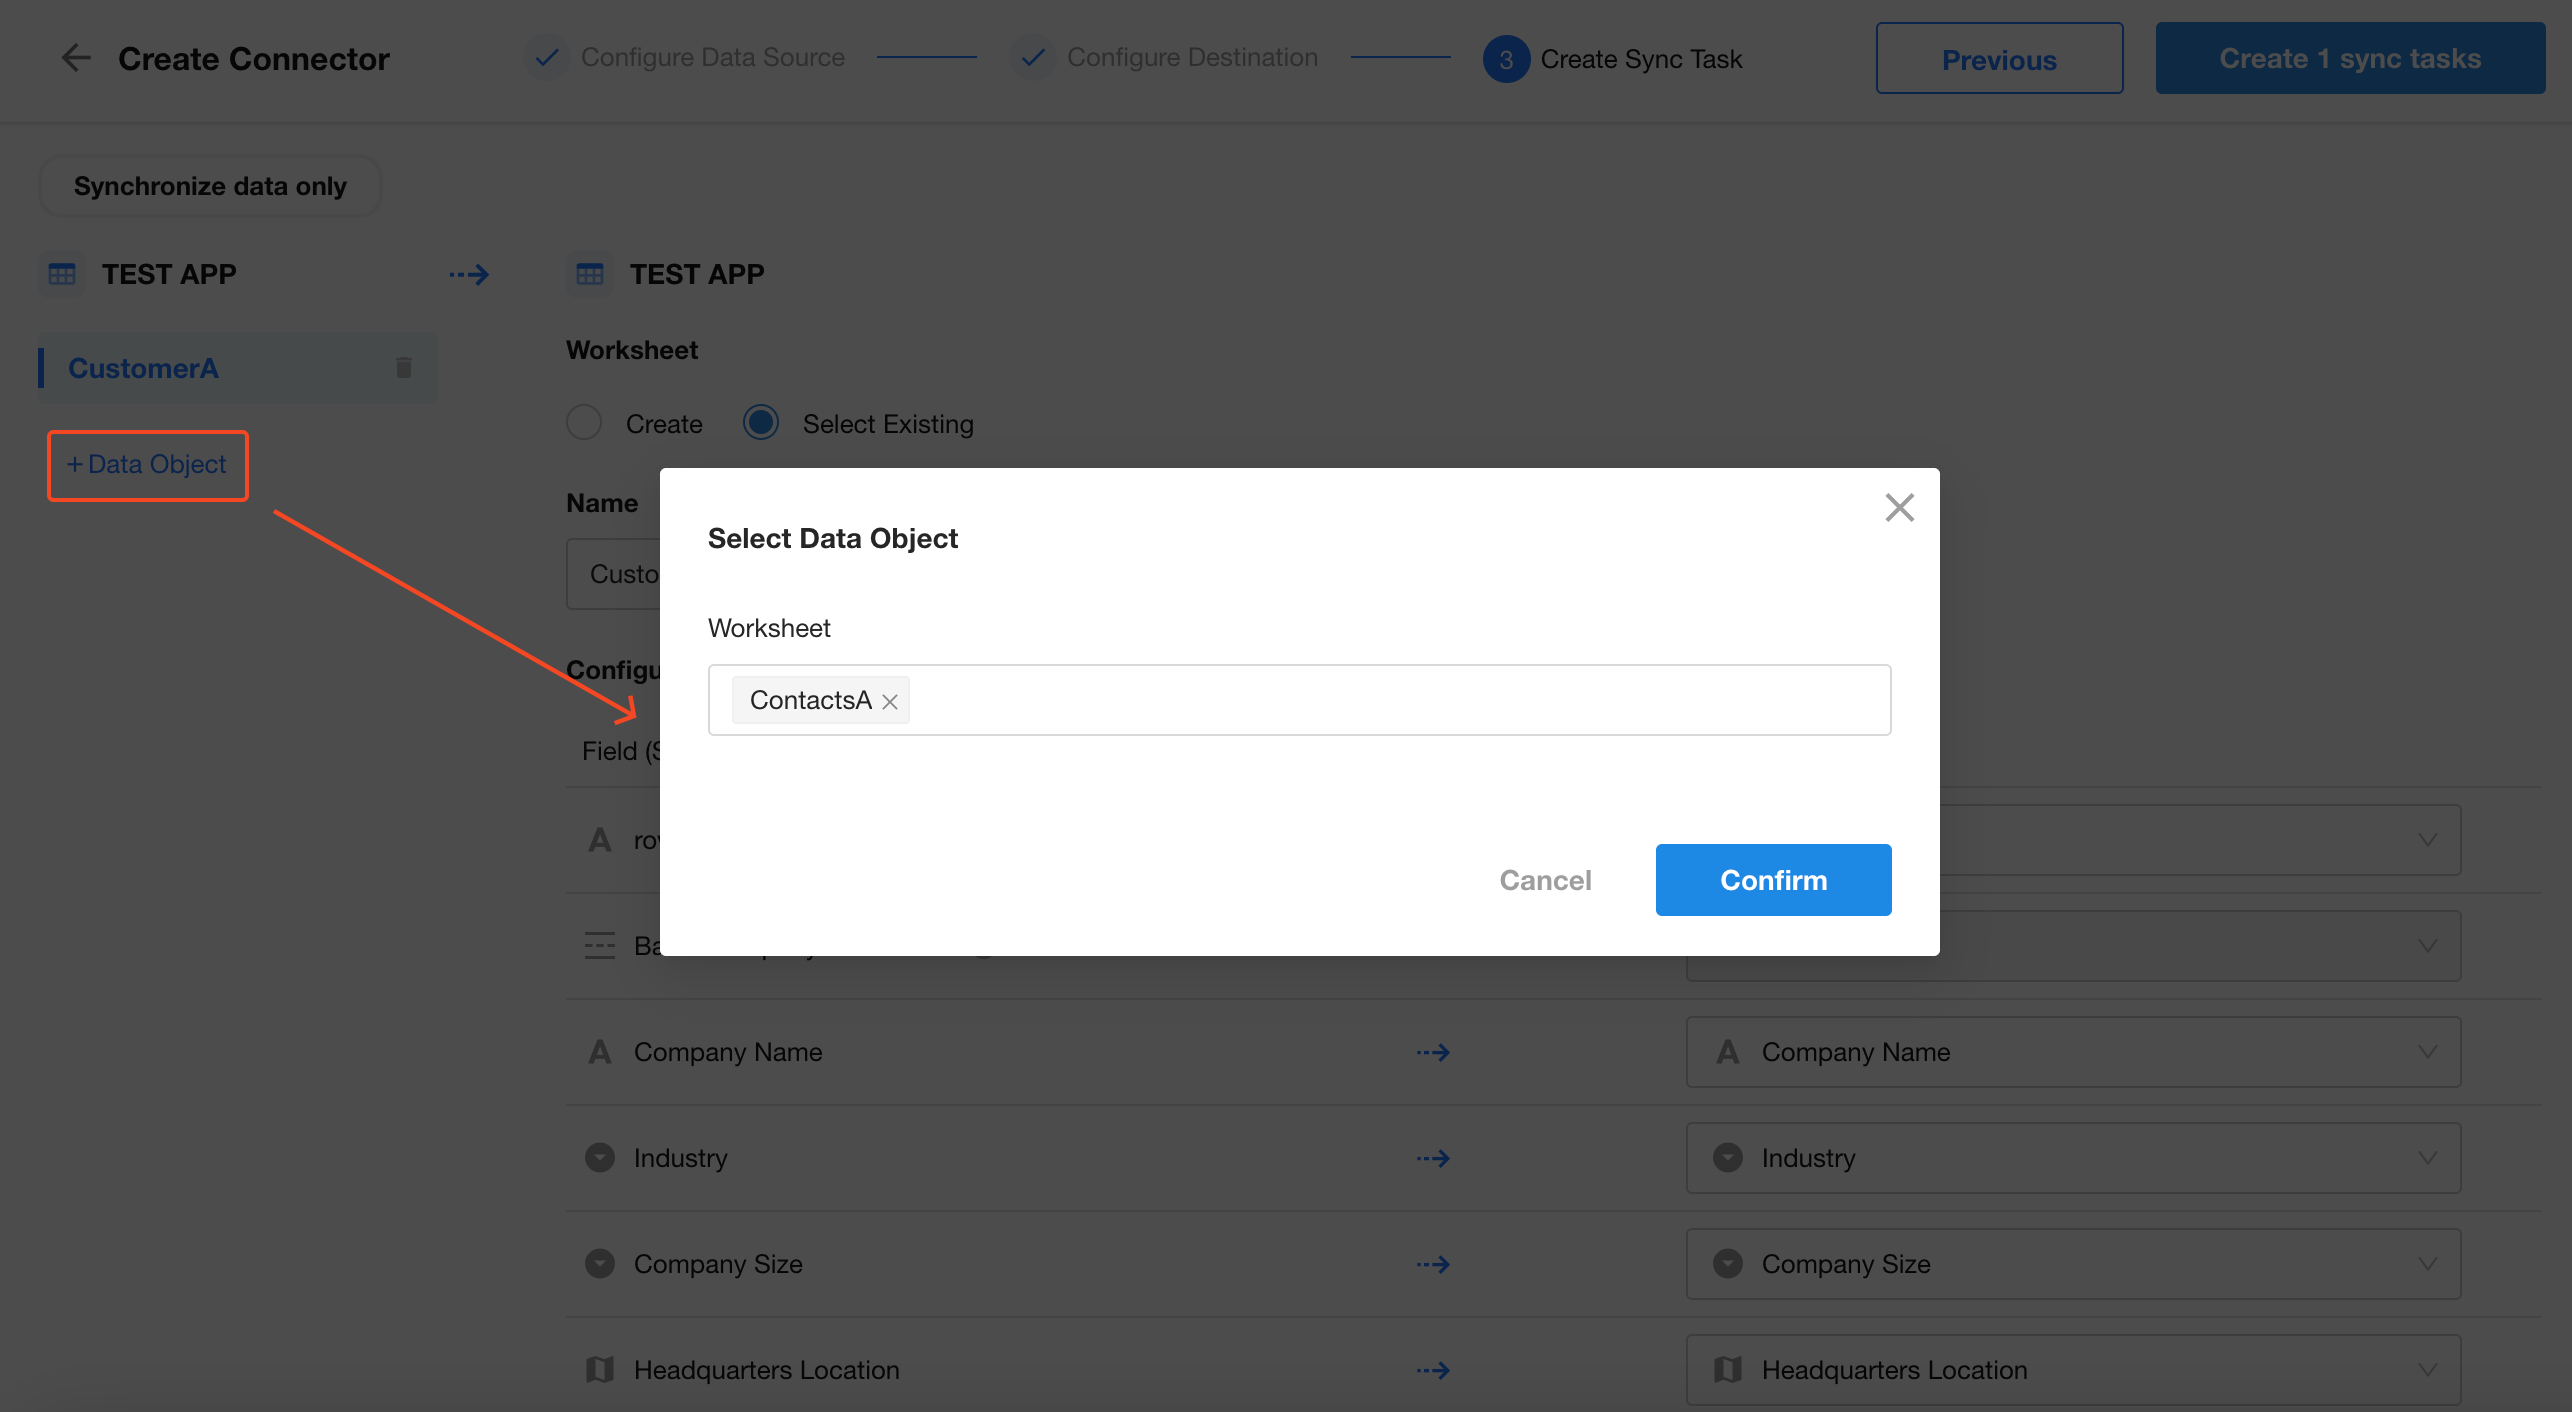
6. Add Contacts Worksheet for Sync
Click + Data Object and select the Contacts worksheet.
Since the destination Contacts worksheet doesn’t exist, choose Create New Worksheet.
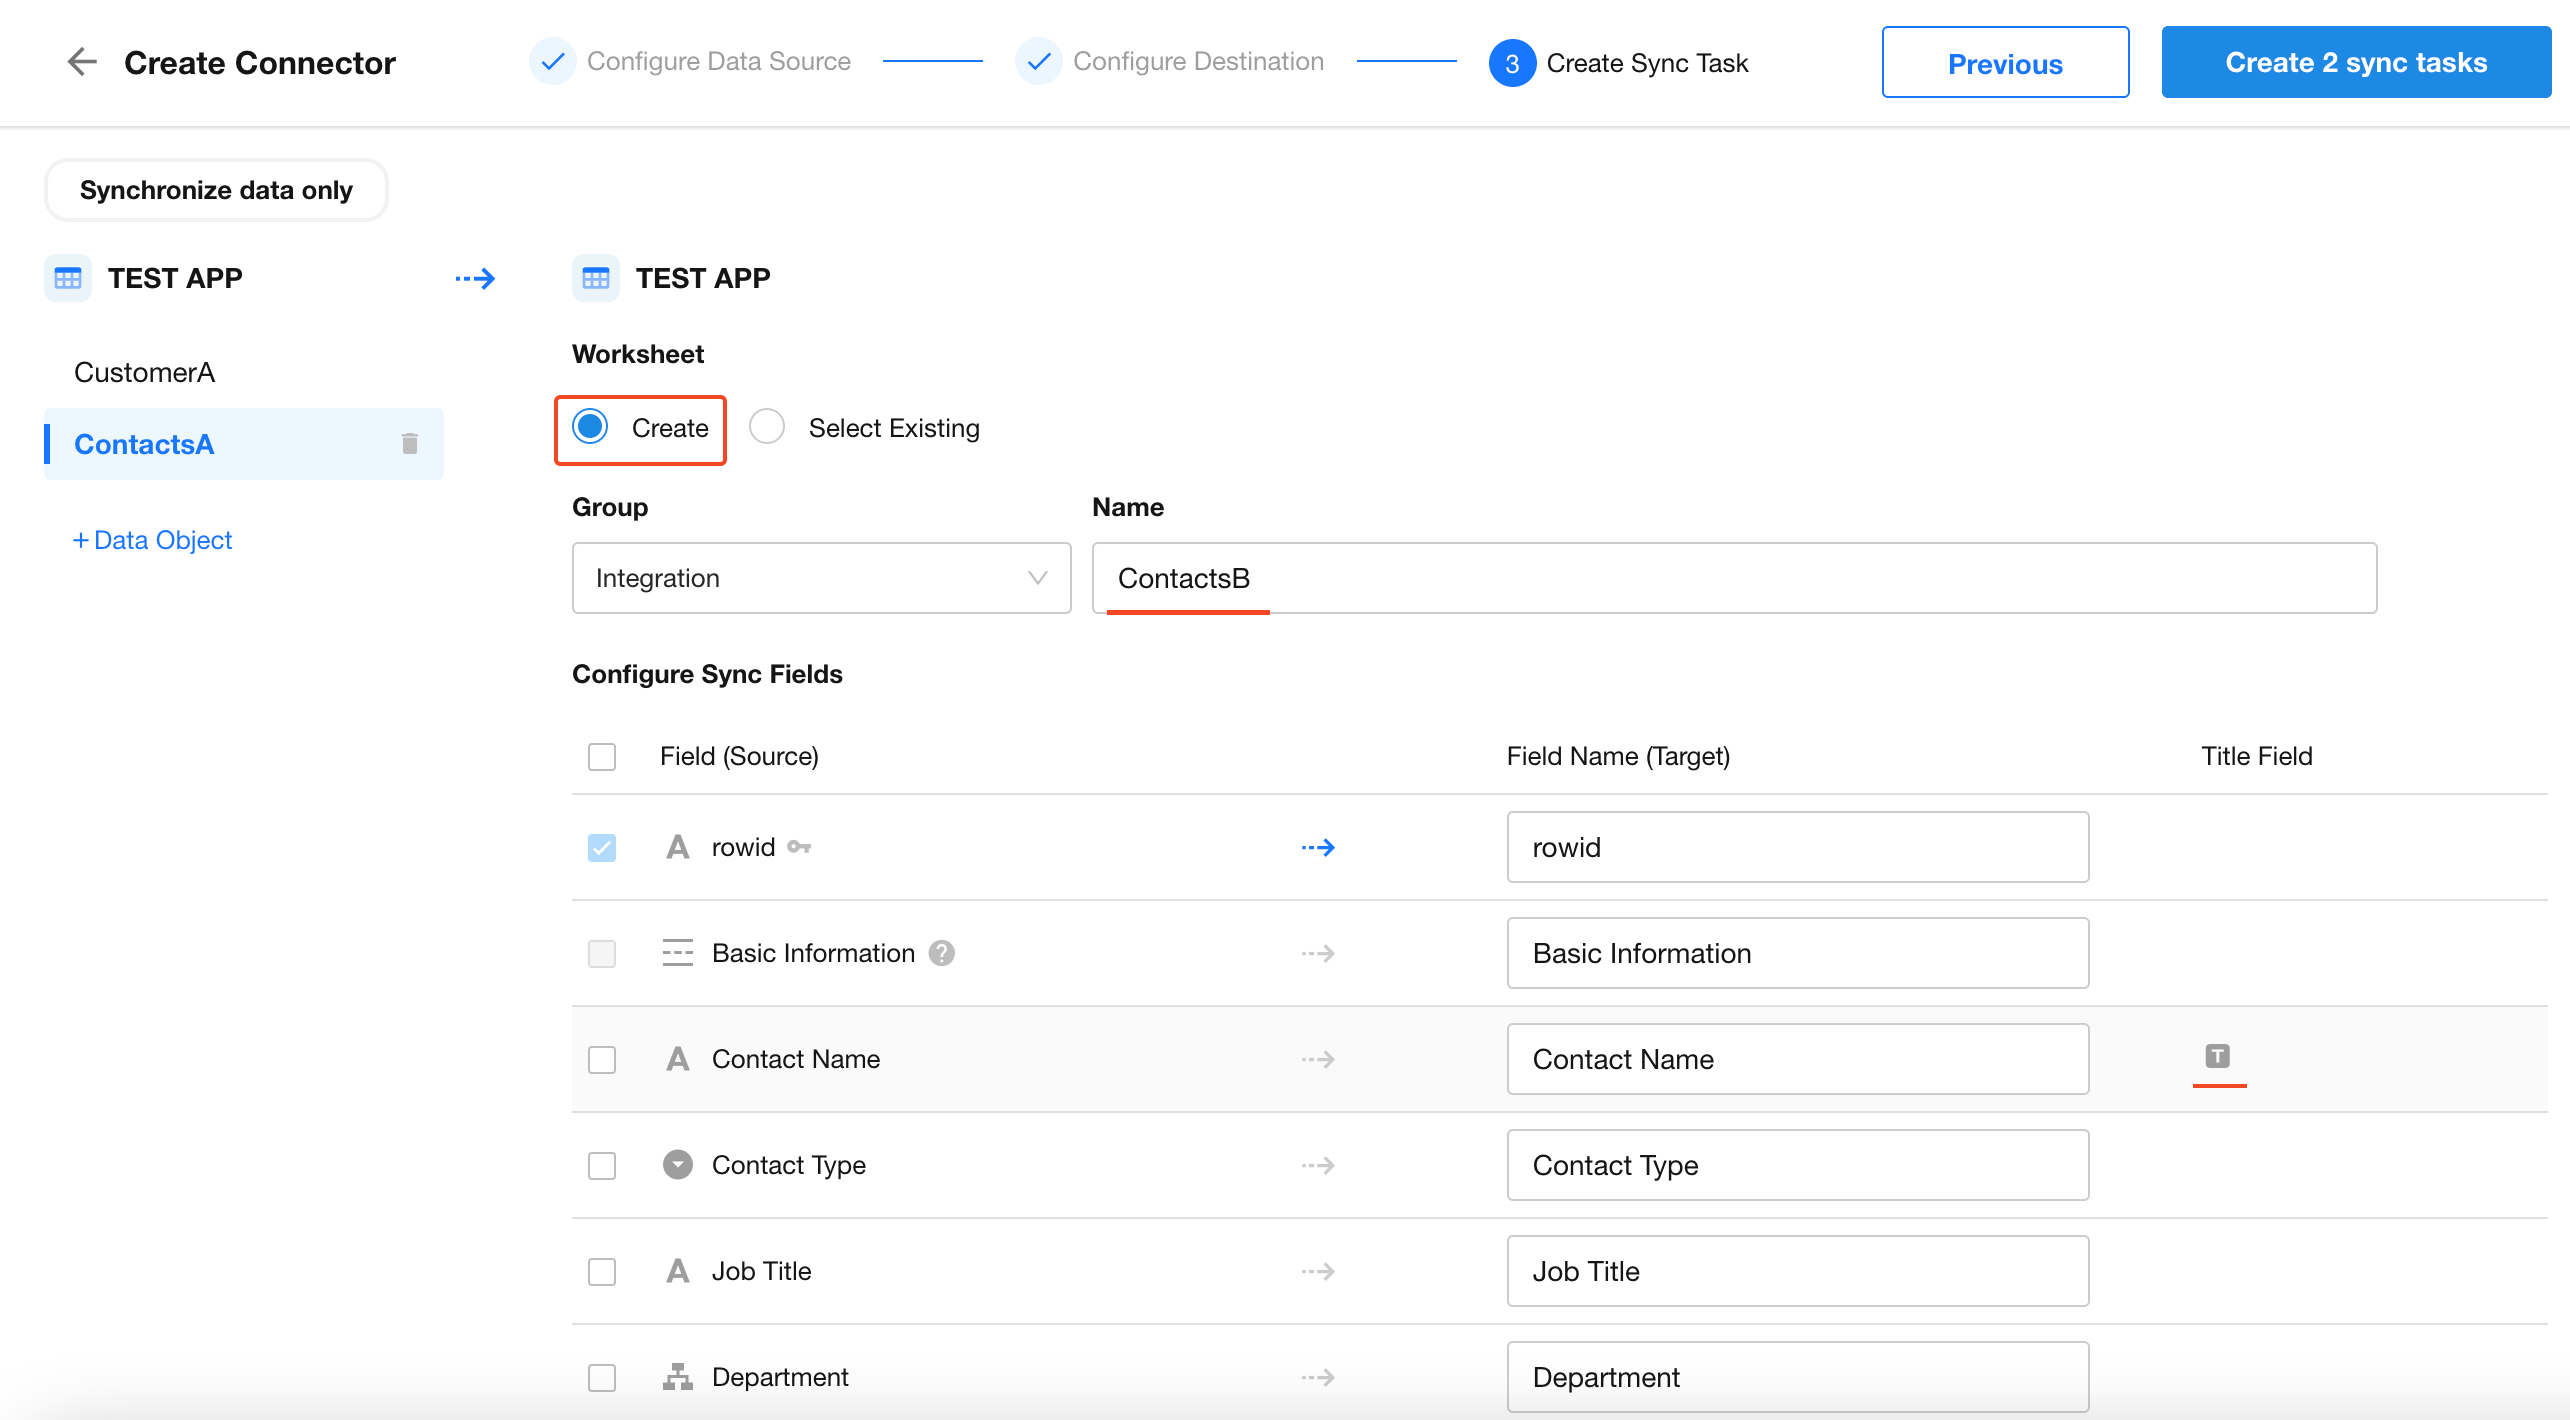
- Confirm the name of the new worksheet
- Select the fields to sync
- Specify field names in the new worksheet
- Designate a title field
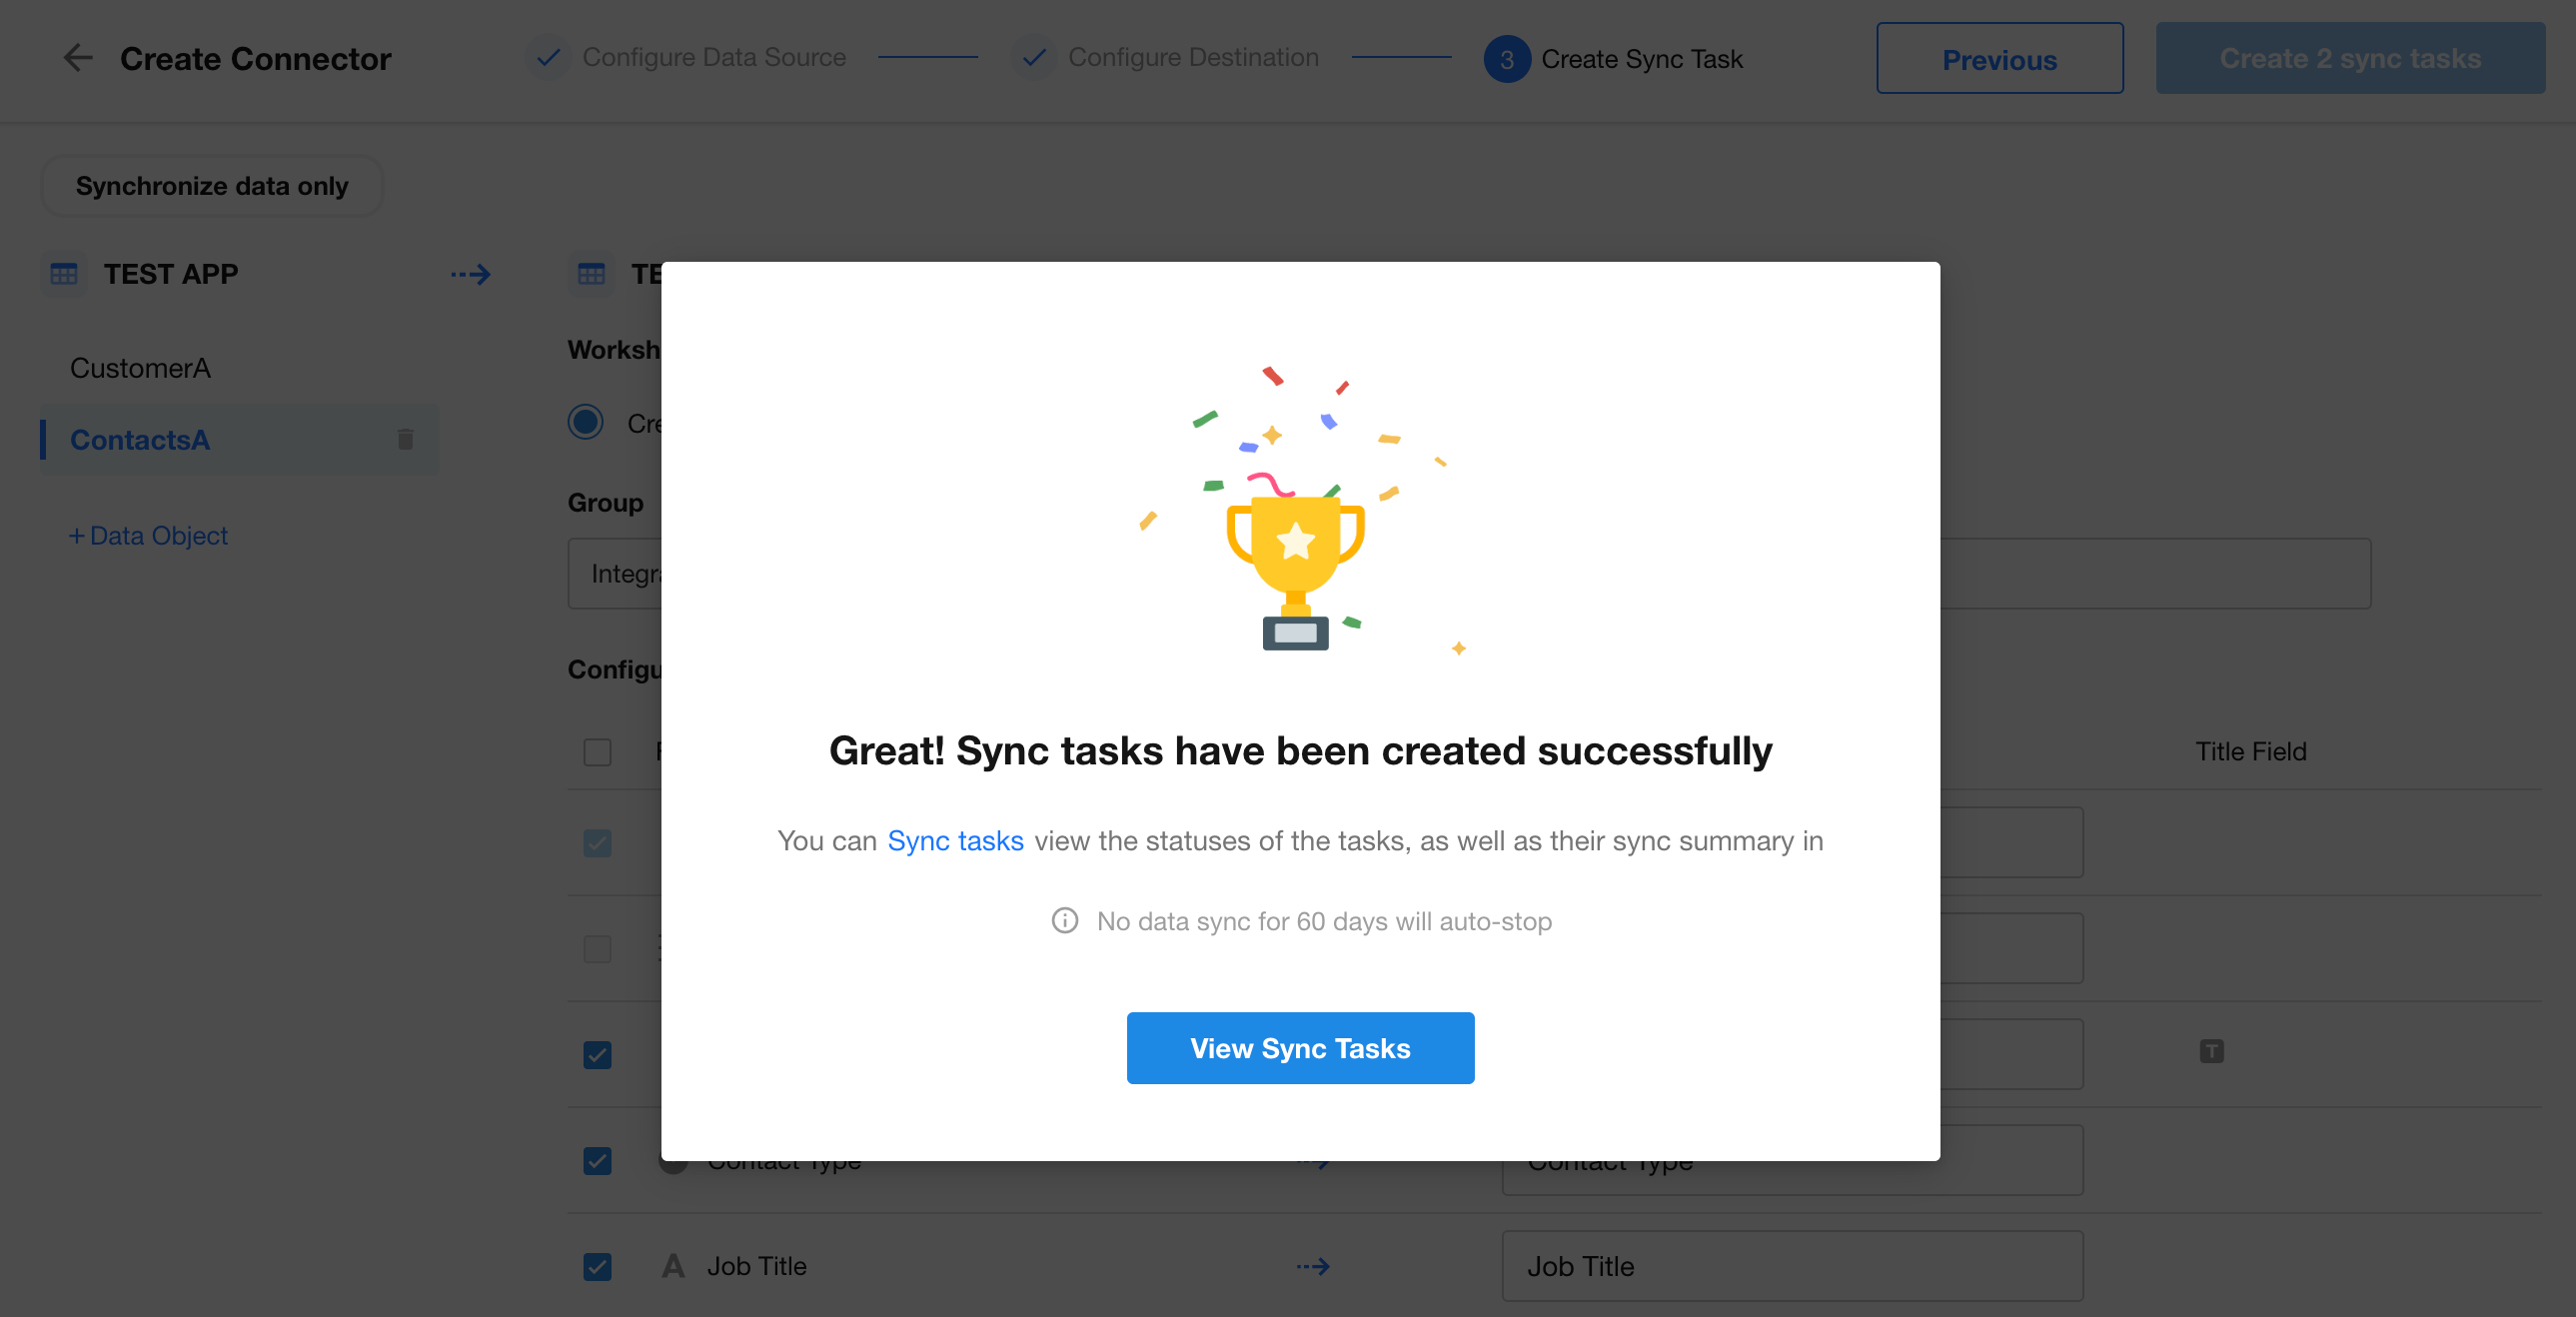
7. Finalize Sync Task Creation
Once all mappings are configured, click Create X Sync Tasks in the top-right corner.
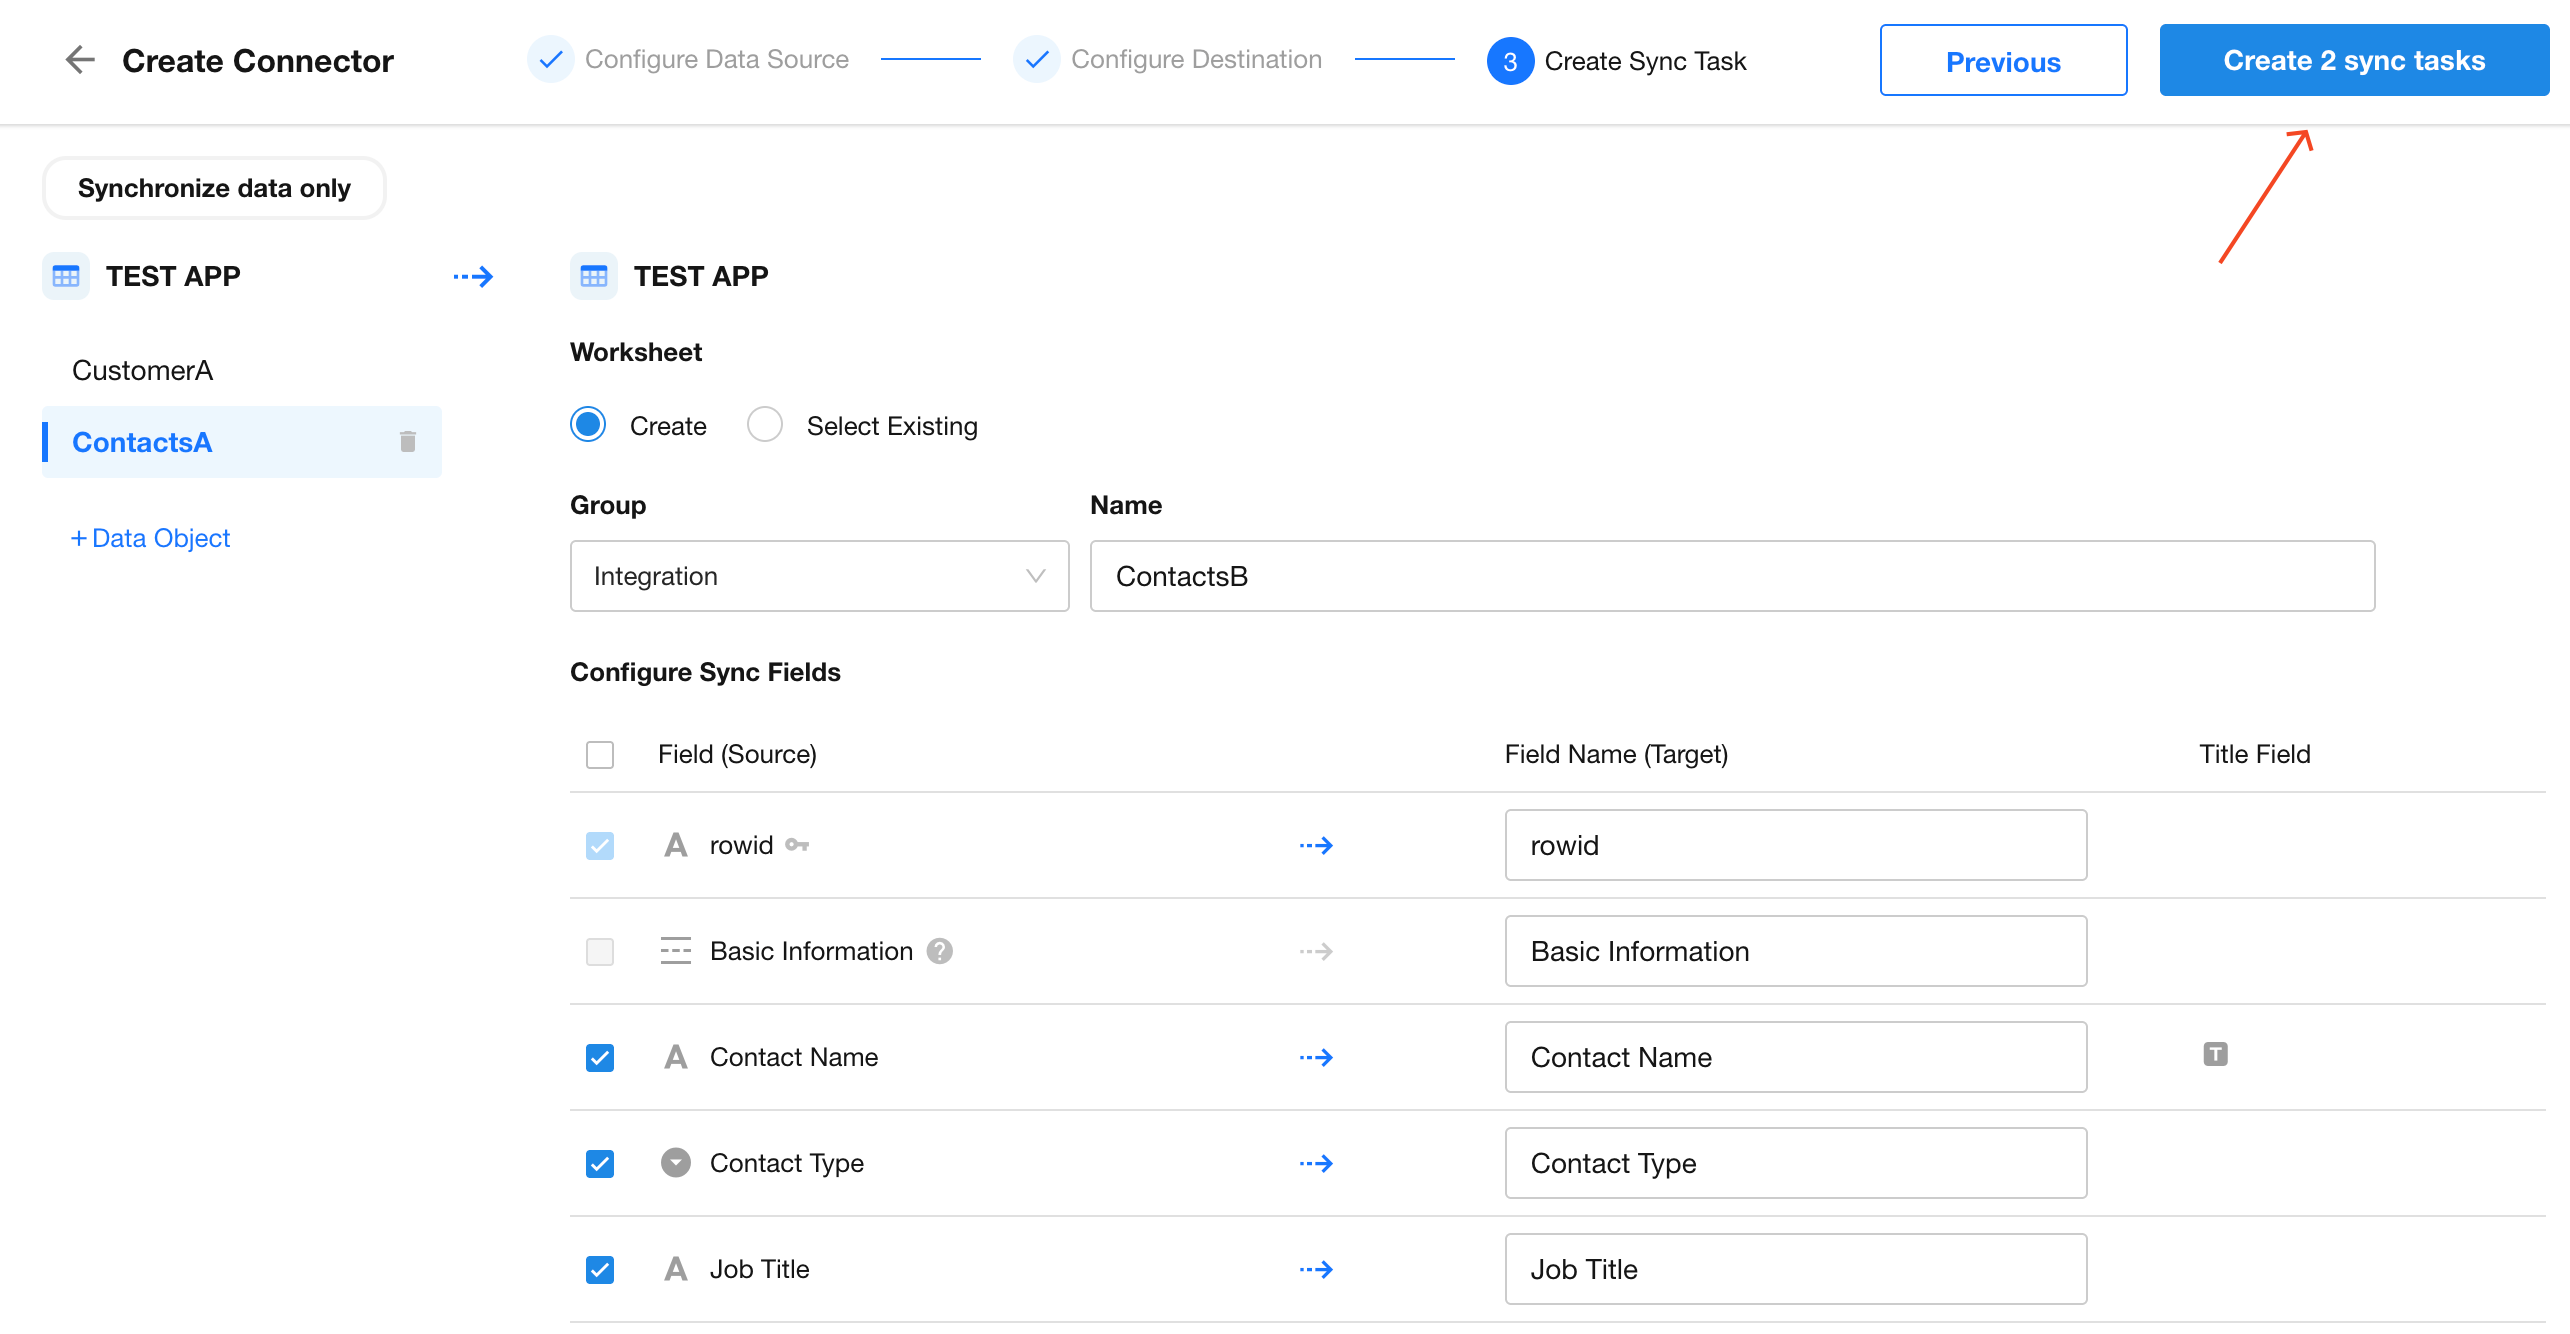
You’ll see a confirmation upon successful creation.
Step 3: Verify Sync Results
Go to Customer Worksheet B and confirm that all data from Customer Worksheet A has been successfully synced.
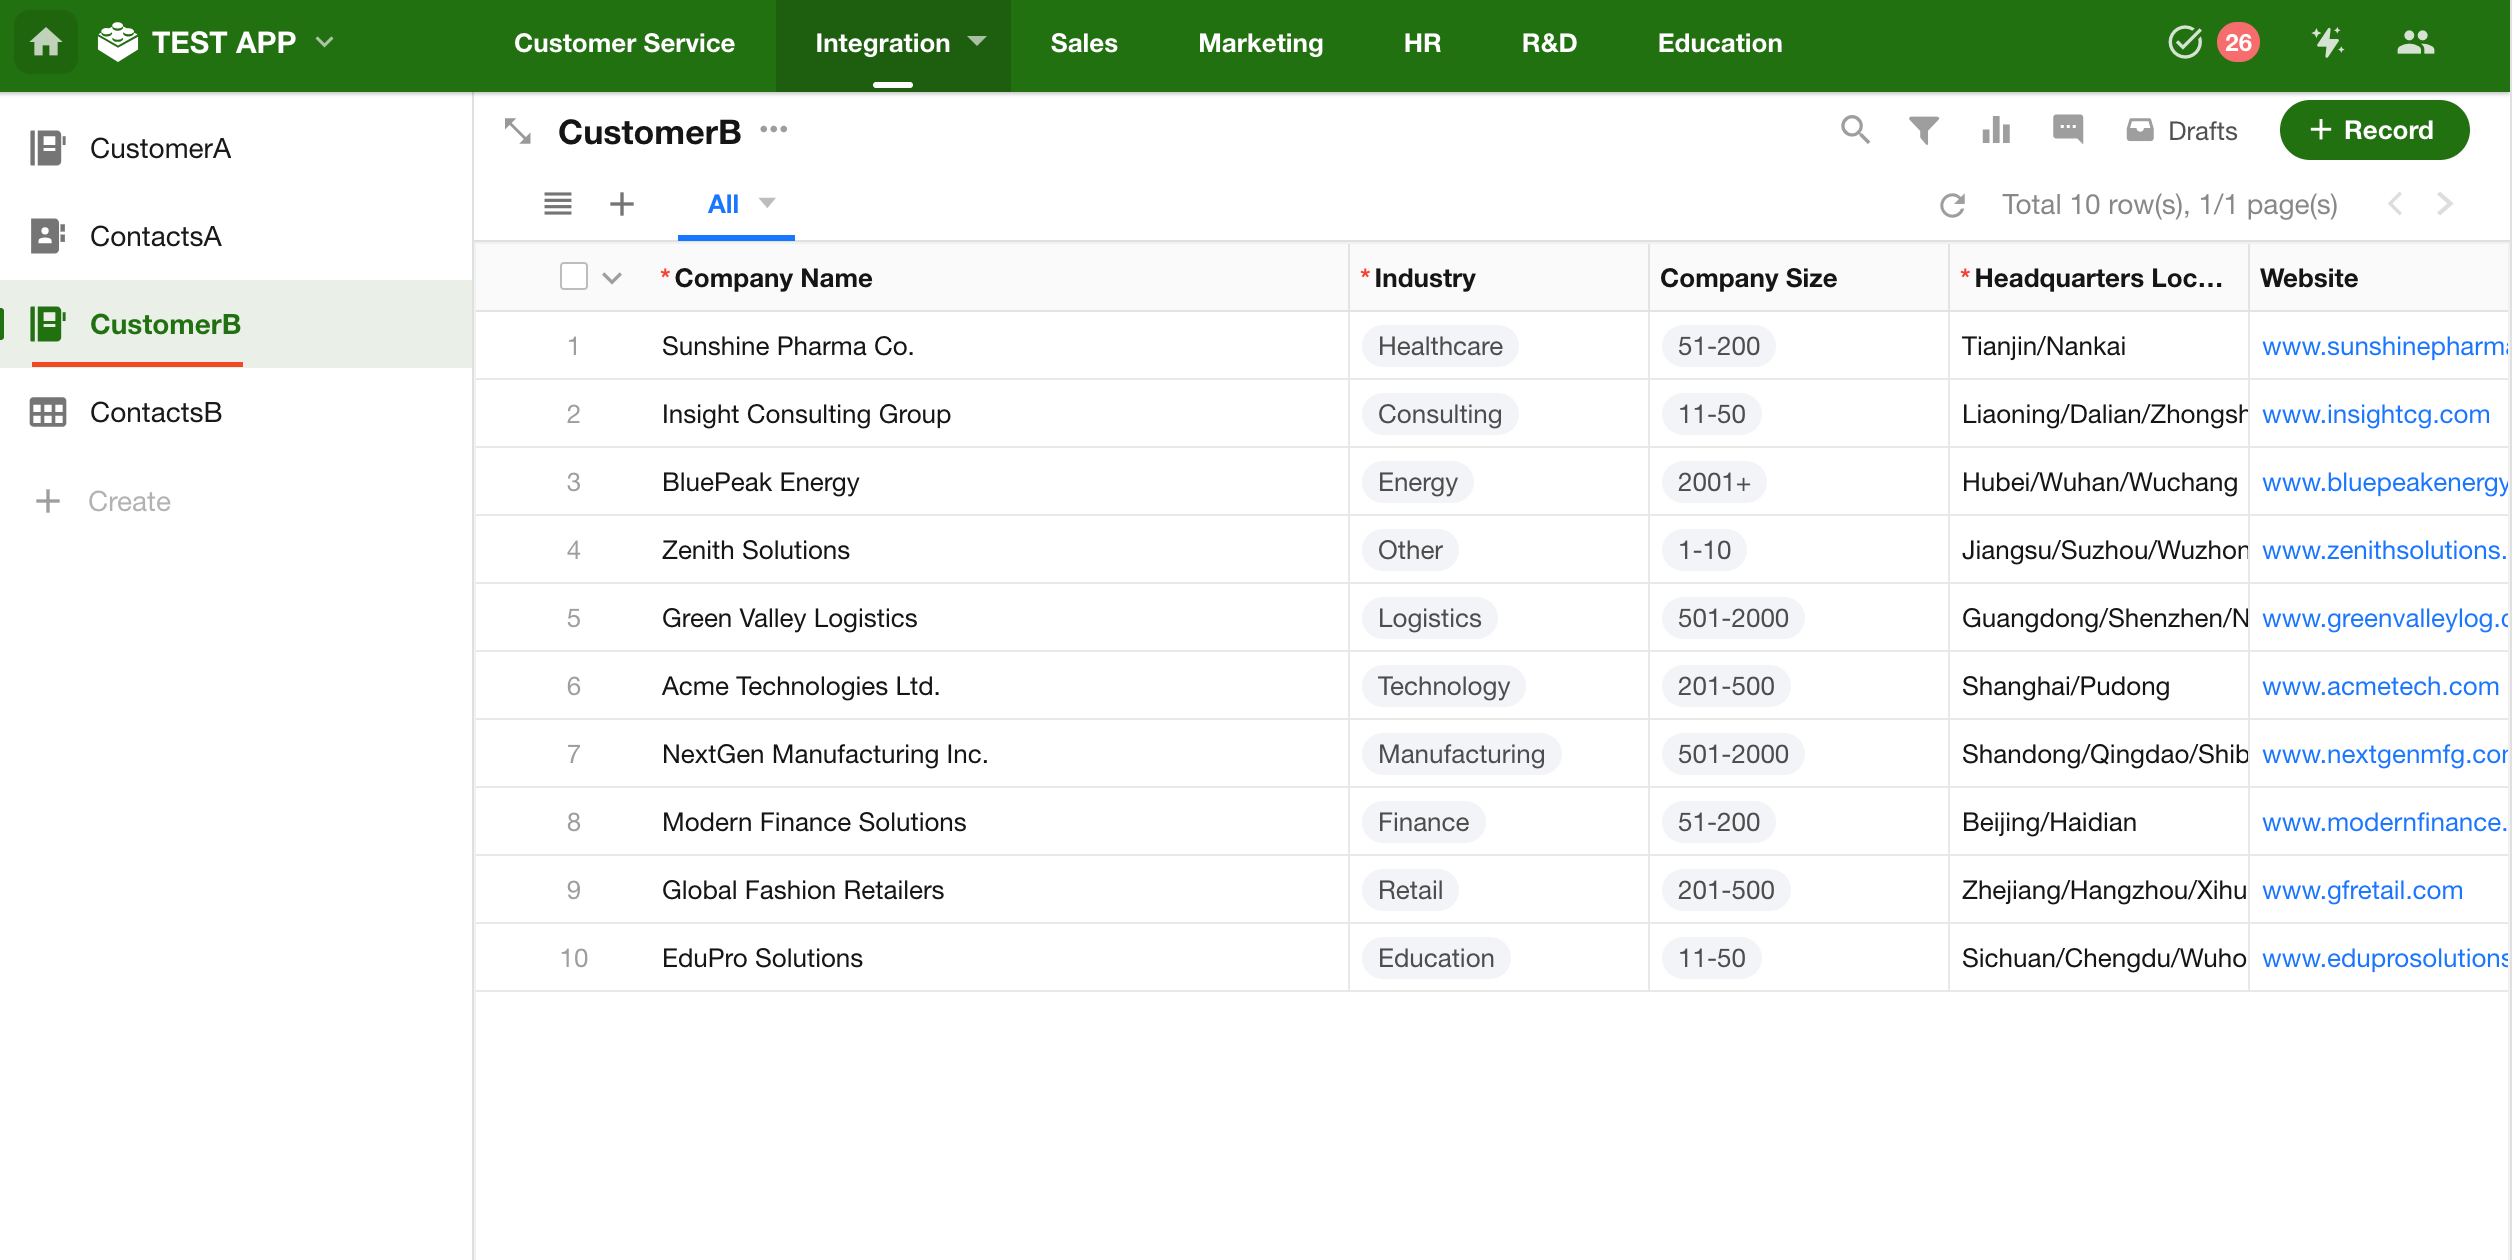
The new Contacts worksheet has also been created and populated automatically.

You can continue modifying data in Customer Worksheet A or add new records, and then verify if the changes are reflected in Customer Worksheet B.
The sync process writes data in batches, not all at once. Tasks are queued for execution. If the system is handling many sync jobs simultaneously, performance may vary.
Scenario 2: Sync MySQL Data to a Worksheet
Step 1: Create a Connector
1. Select Source and Destination Database Types

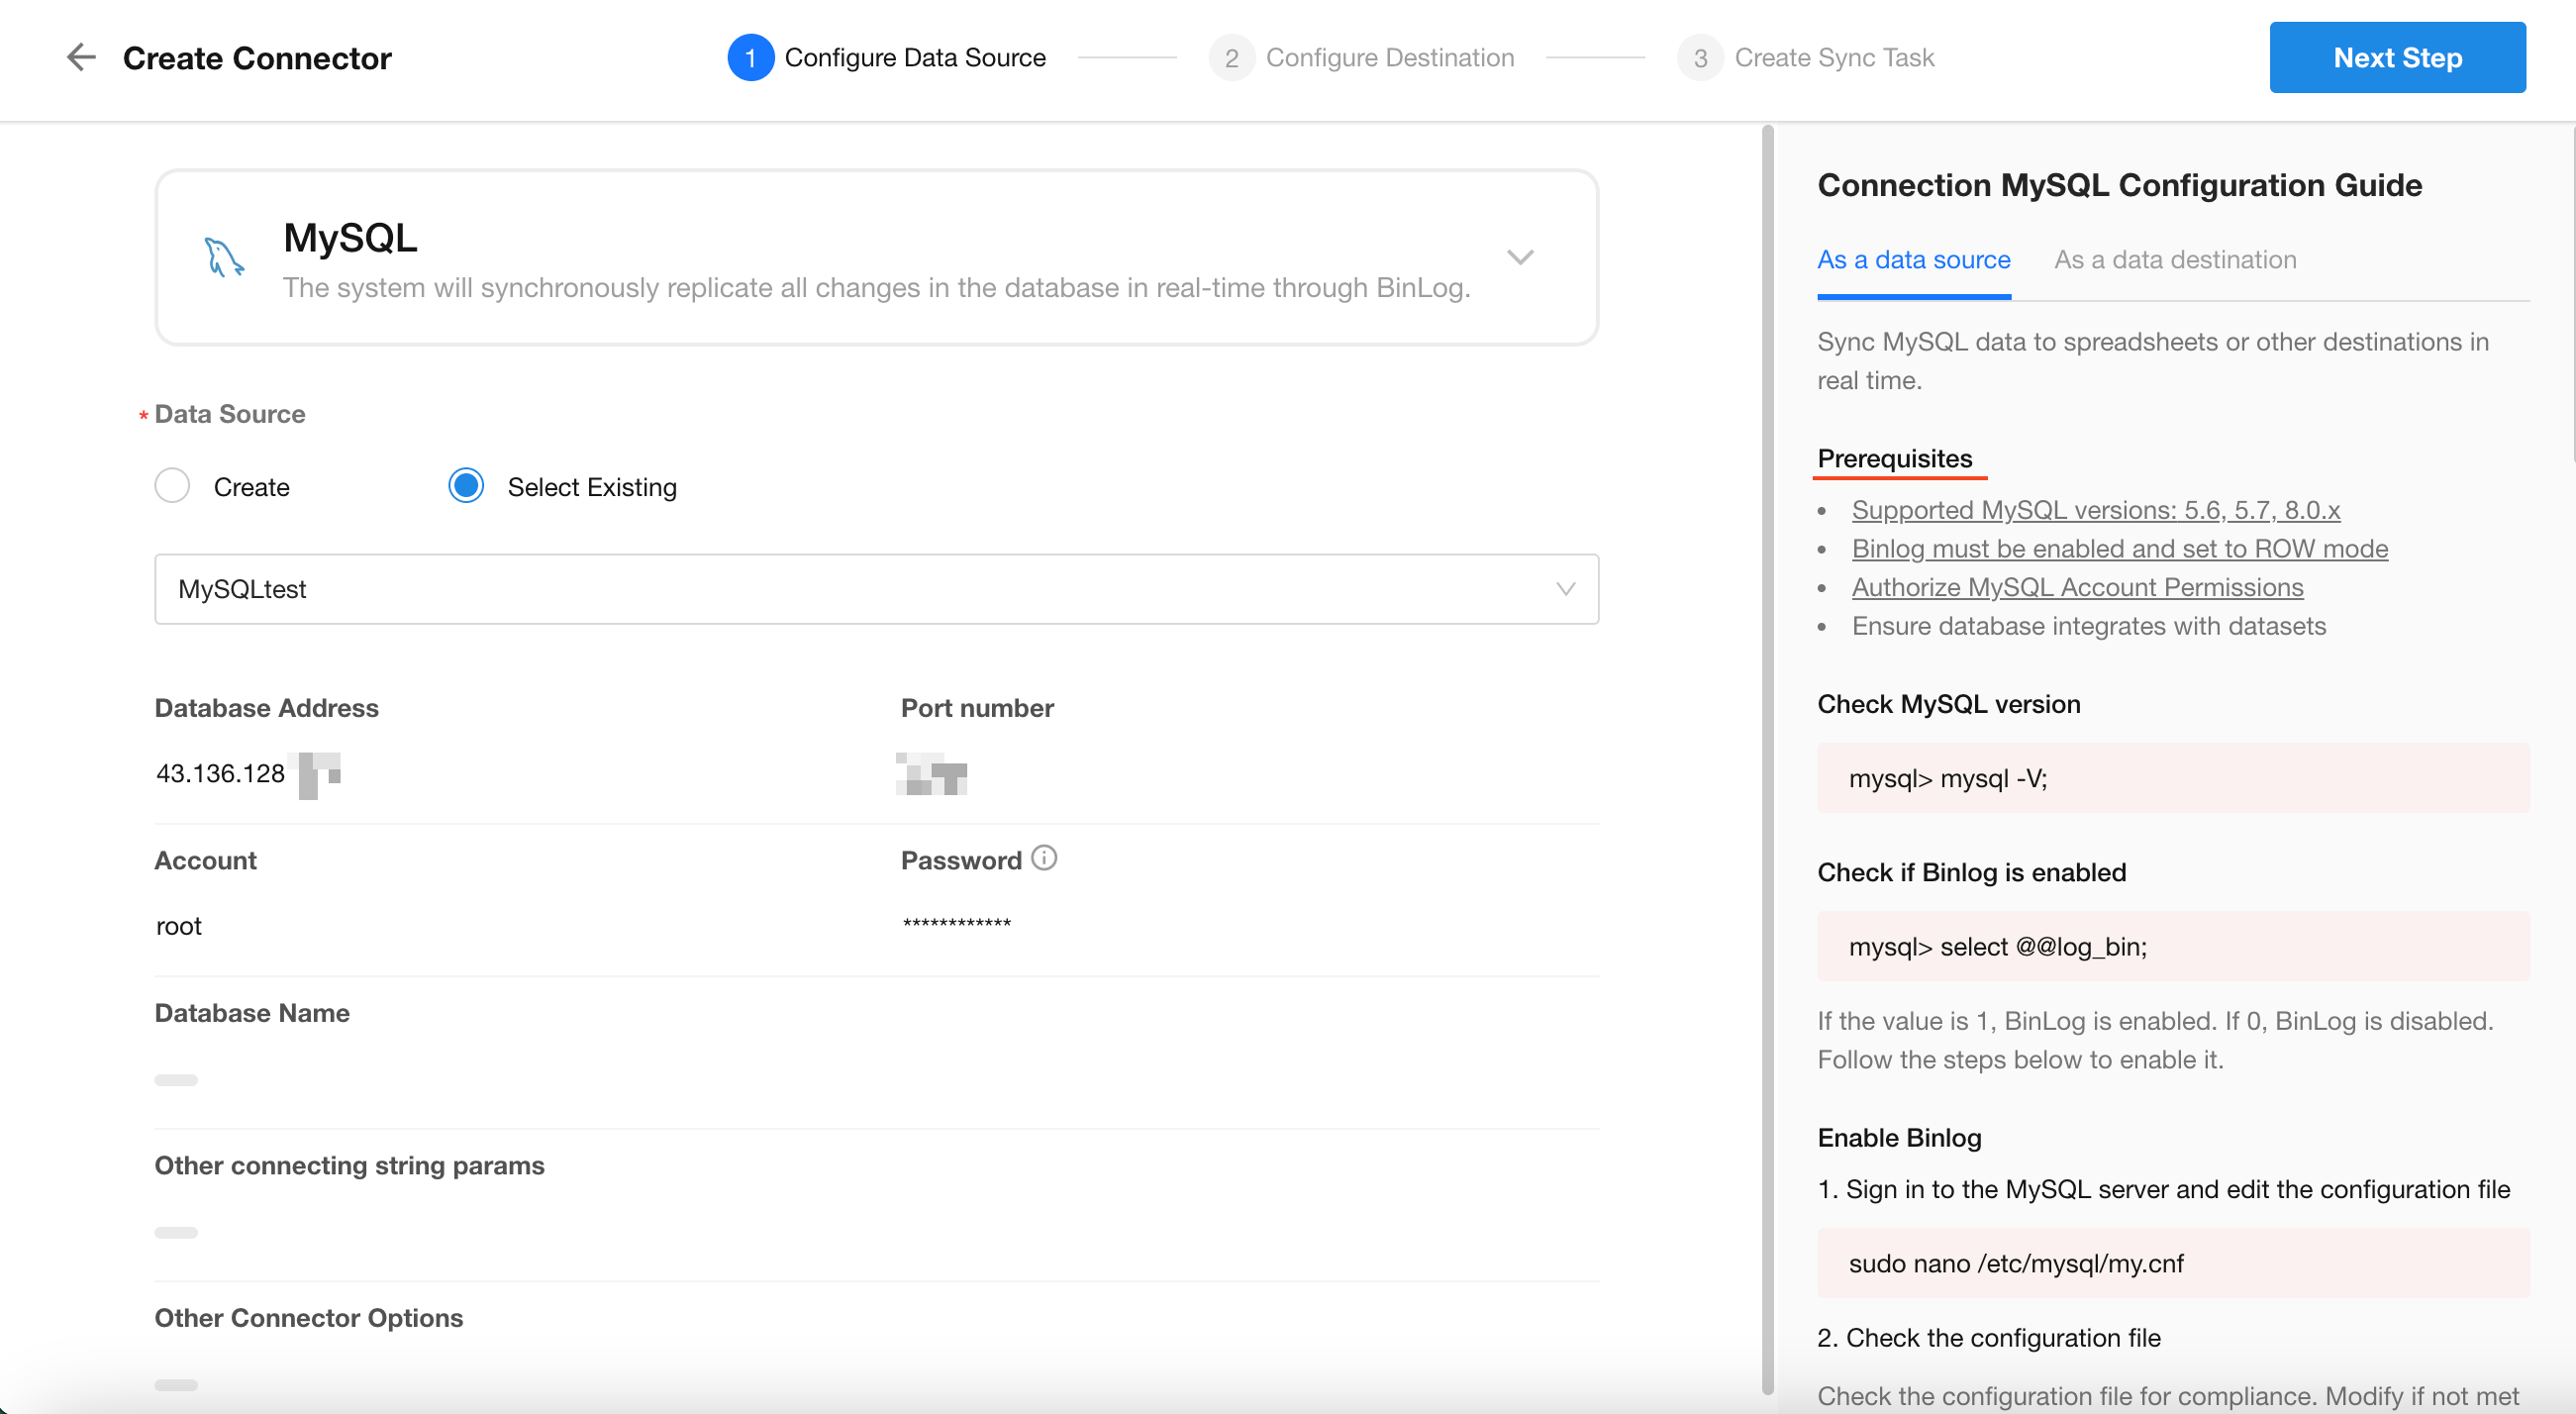
2. Configure Database Connection
To connect to an external database, certain prerequisites must be met—such as database version, access permissions, and IP allowlisting.
A connection guide is provided on the right-hand side with specific instructions. Please follow those steps to ensure a successful connection.
Once prerequisites are met, enter the required database connection information on the left. Click Test Connection, and upon success, click Next in the top-right corner.
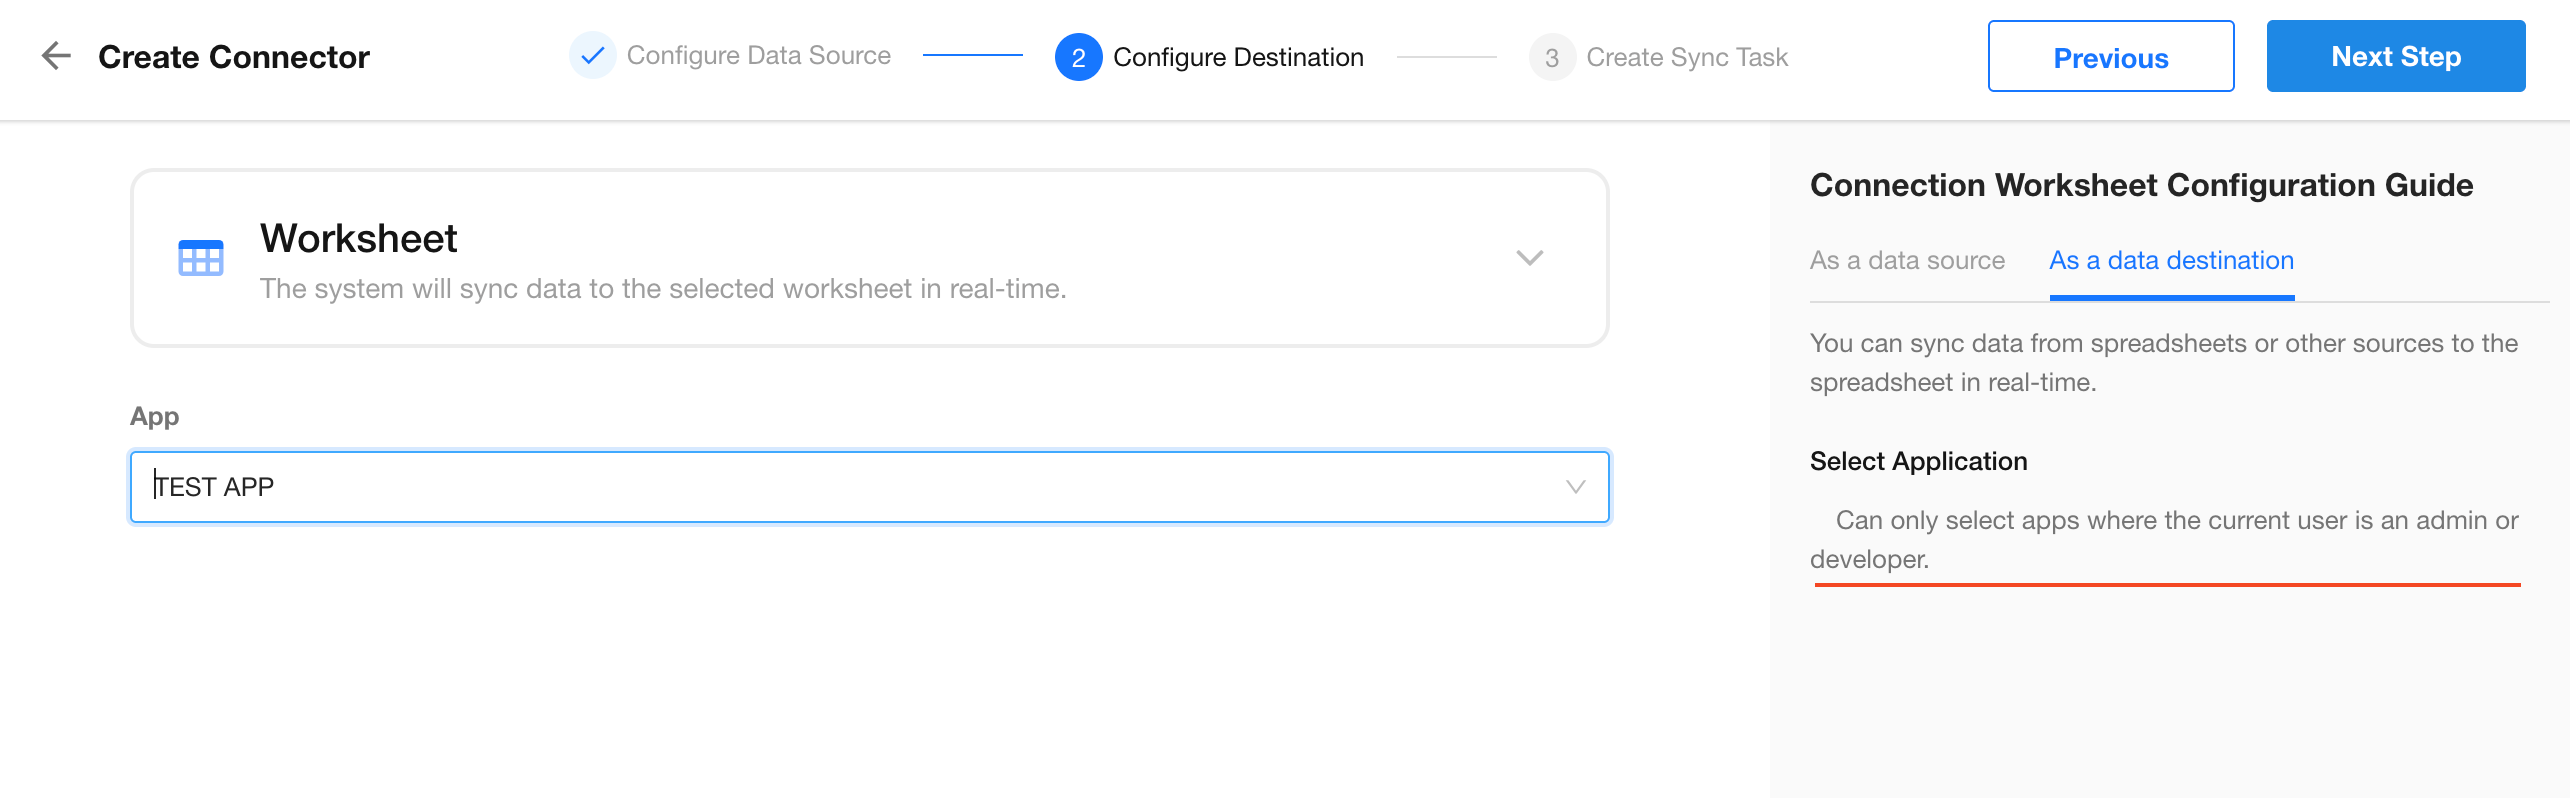
3. Configure Destination Data
Choose the target app where the worksheet will be created or updated. Then, click Next.
Step 2: Create a Sync Task
1. Choose Sync Mode: Sync Data Only

2. Select the Database and Table to Sync
3. Create Destination Worksheet and Configure Field Mapping
- Choose to create a new worksheet and assign it a name
- Select the fields to sync
- Define field names and field types
- Specify the title field

Once everything is configured, click Create X Sync Tasks in the top-right corner.
Syncing to an Existing Worksheet
If you choose to sync data into an existing worksheet, you can identify duplicate records based on a primary key field. When duplicates are detected, you can choose to either overwrite or skip the updates.

4. Verify Sync Results
Open the target app. You should see a new Product Worksheet created and populated with data from MySQL. You can test the sync by editing or adding new records in MySQL and verifying updates in the worksheet.
Analytics and Monitoring
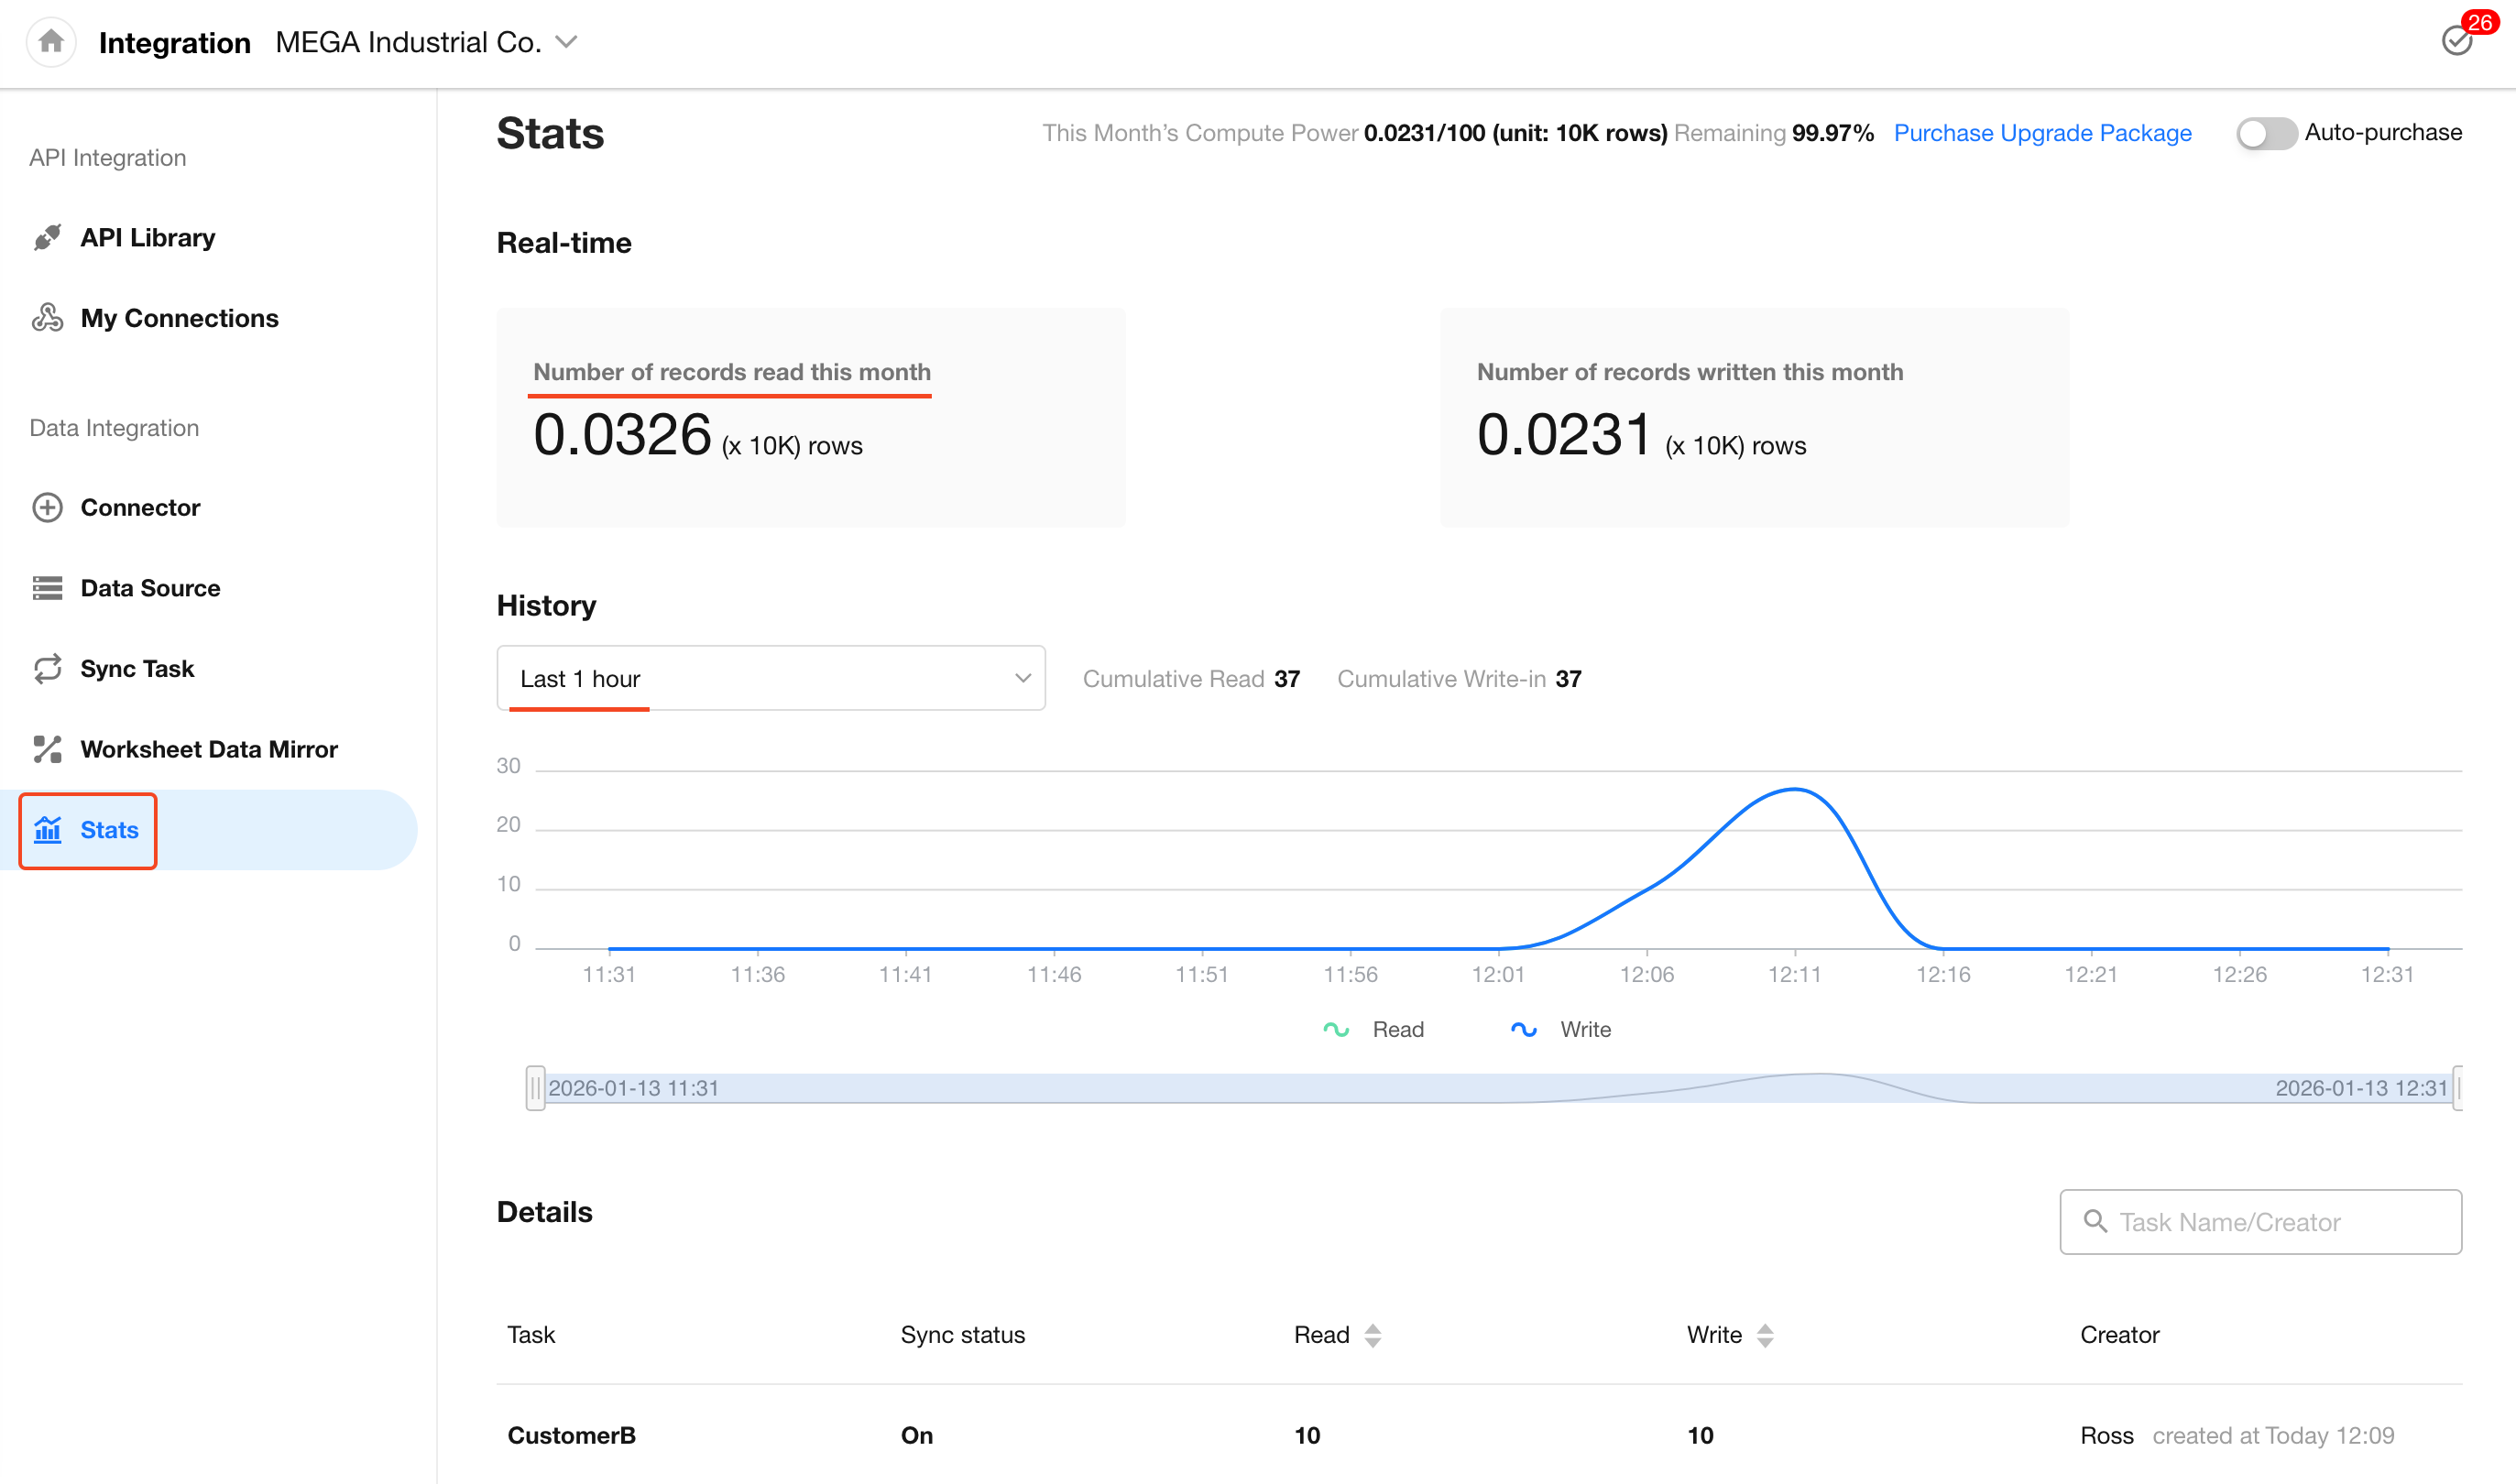
Navigate to the Statistics tab under Data Integration to view real-time data, including:
- Number of records read this month
- Number of records written this month
You can also select a historical time range to view sync volume for the past periods (up to 6 months), along with the associated sync tasks.
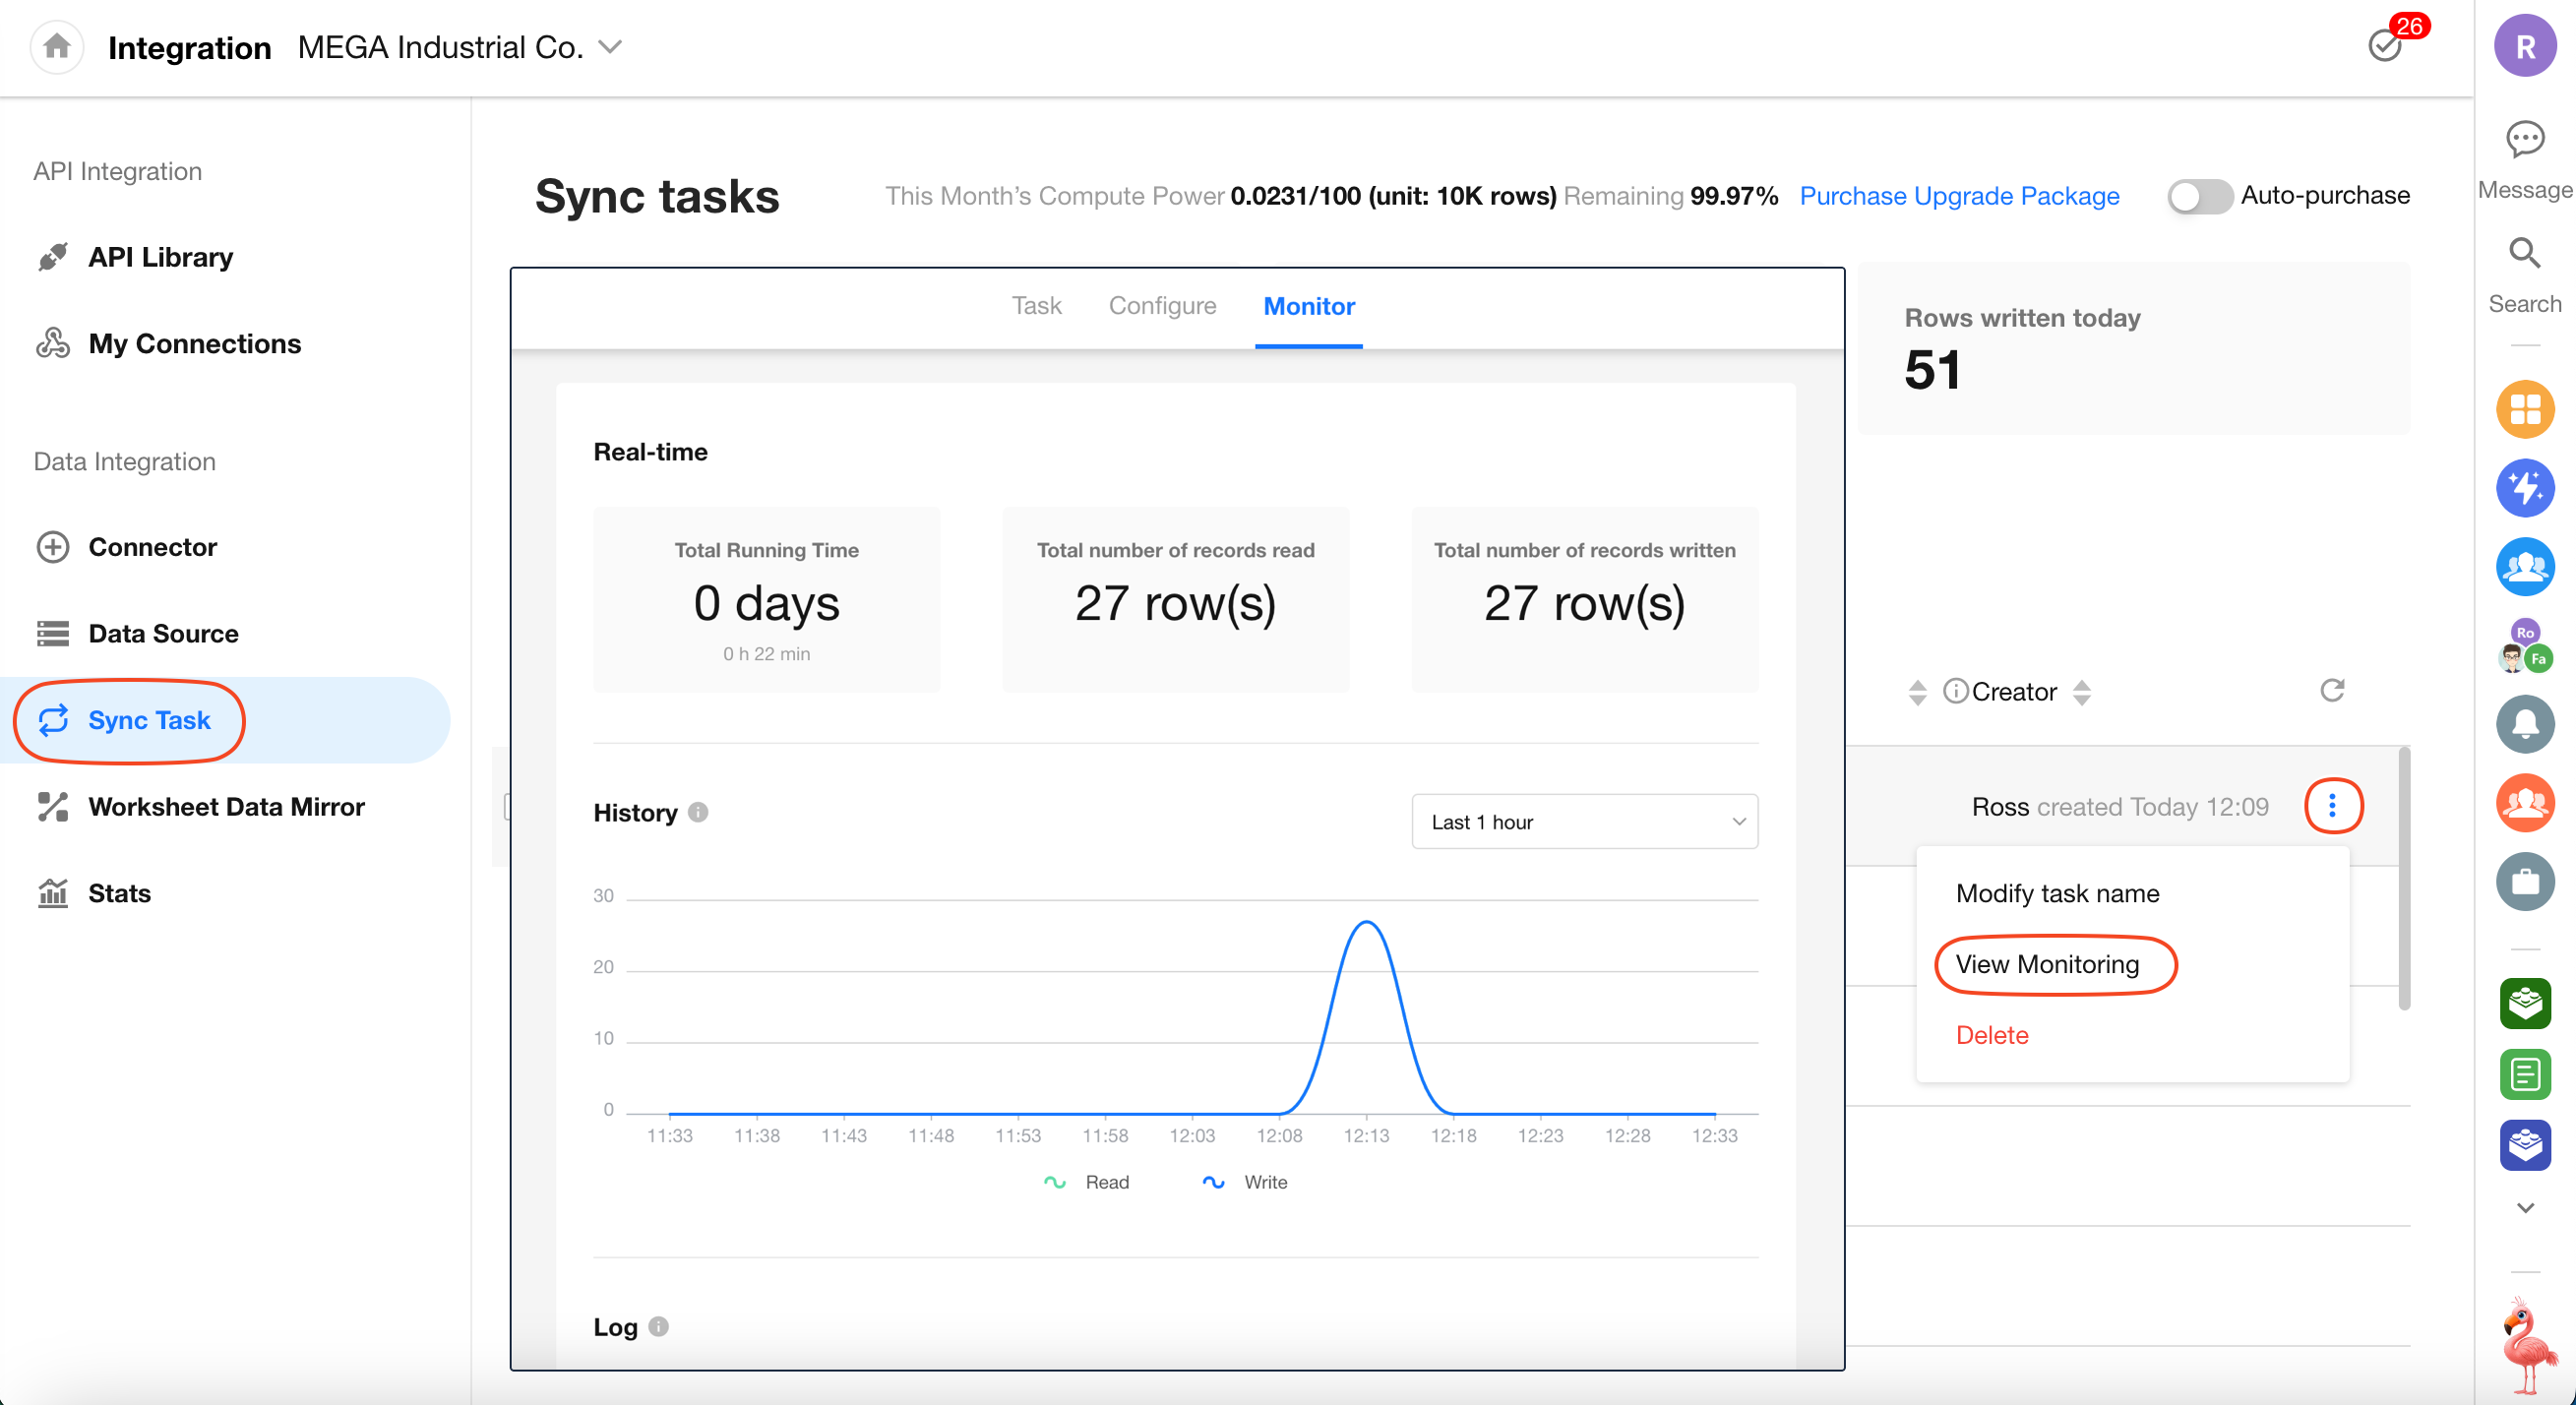
You can monitor each sync task individually to view historical read/write activity and access the task logs.
Was this document helpful?