Introduction to ETL
ETL enhances data integration capabilities, which stands for Extract, Transform, and Load, covering the process of extracting data from a source, data processing and transformations, and finally loading it into another data source.In data integration, in addition to the data source and data destination nodes, we provide four functional nodes, which are described in detail below.
-
Data Source
This node is configured to read data and can contain multiple data source nodes in a single sync task.
-
Data Destination
This node is configured to write data, and only one data destination node can exist in a single sync task.
Filter
If you add this node, it will filter the data during the data synchronization process and then synchronize the filtered data. You can add a "Filter" node between any nodes, with multiple filtering conditions or condition groups.
Note: This feature is only available in the Ultimate Edition.
Add a Filter node:

Configure filtering conditions:

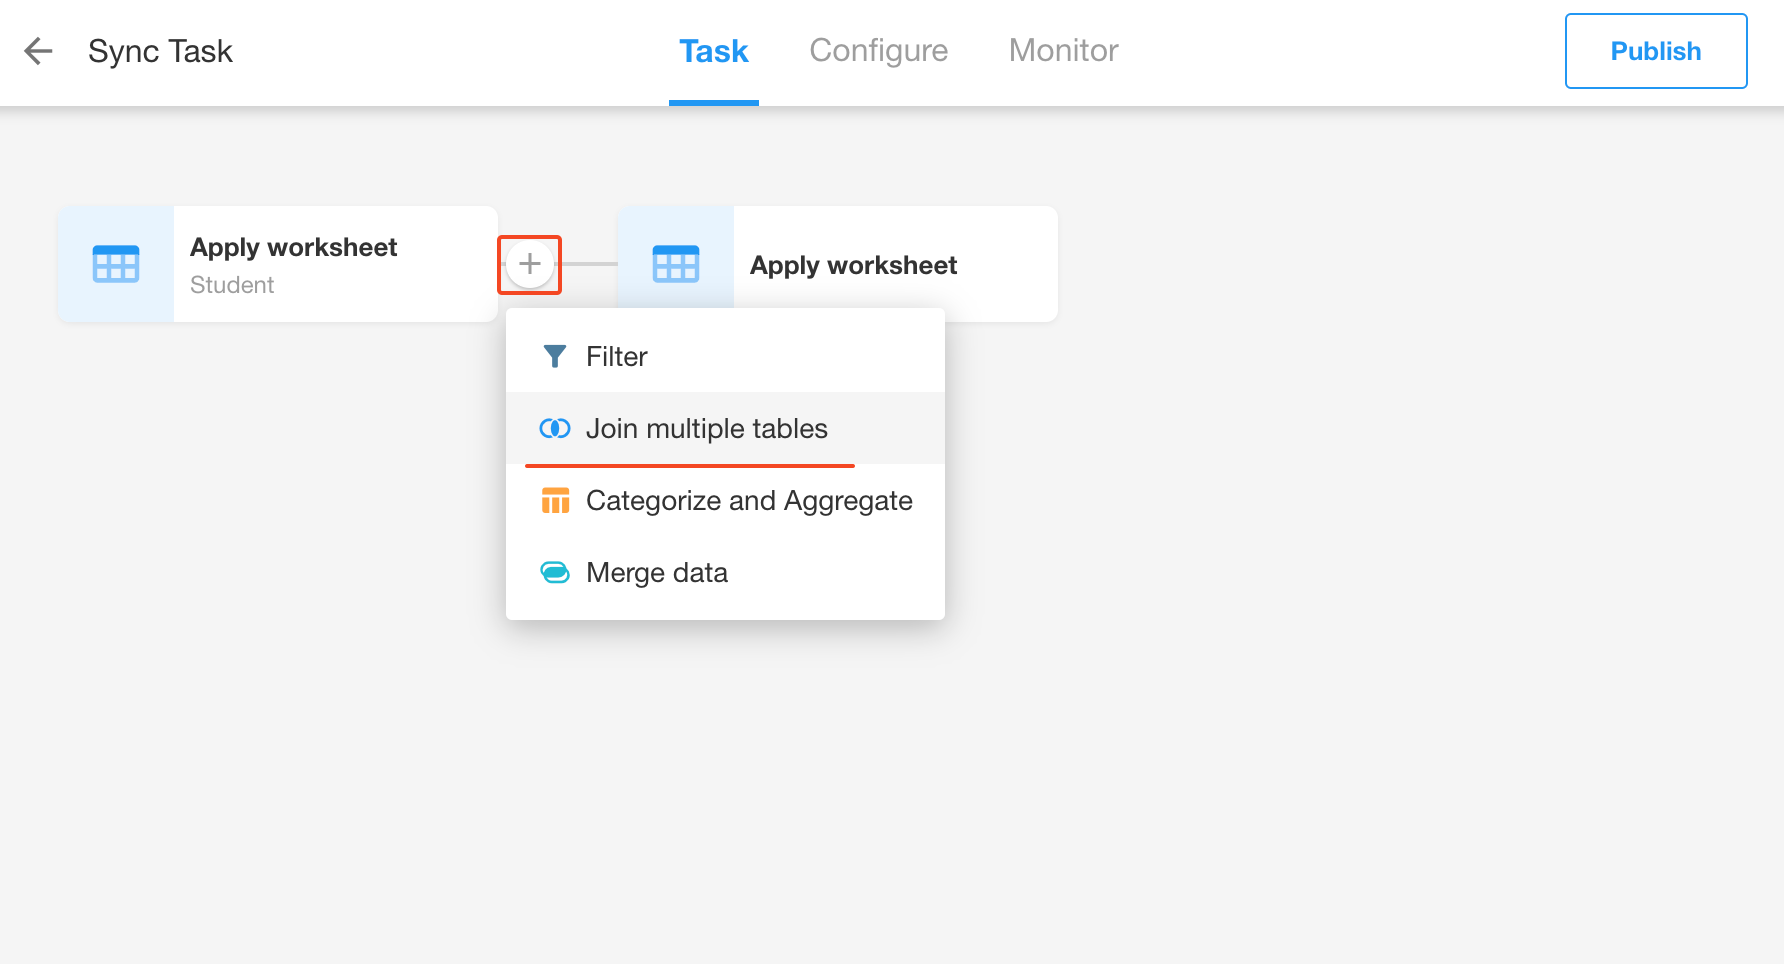
Join Multiple Tables
This node enables multiple table joins between heterogeneous databases, while also supporting connections between HAP and external databases.
Multiple table joins can enhance the interaction and correlation of data between various business systems, making data a truly valuable resource.
-
More comprehensive: Multiple table joins integrate scattered data into a more complete and comprehensive dataset, providing richer and more detailed data information.
-
Multi-dimensional: By setting the relationship between multiple tables, data can be analyzed from different dimensions and perspectives.
Configuration Steps
-
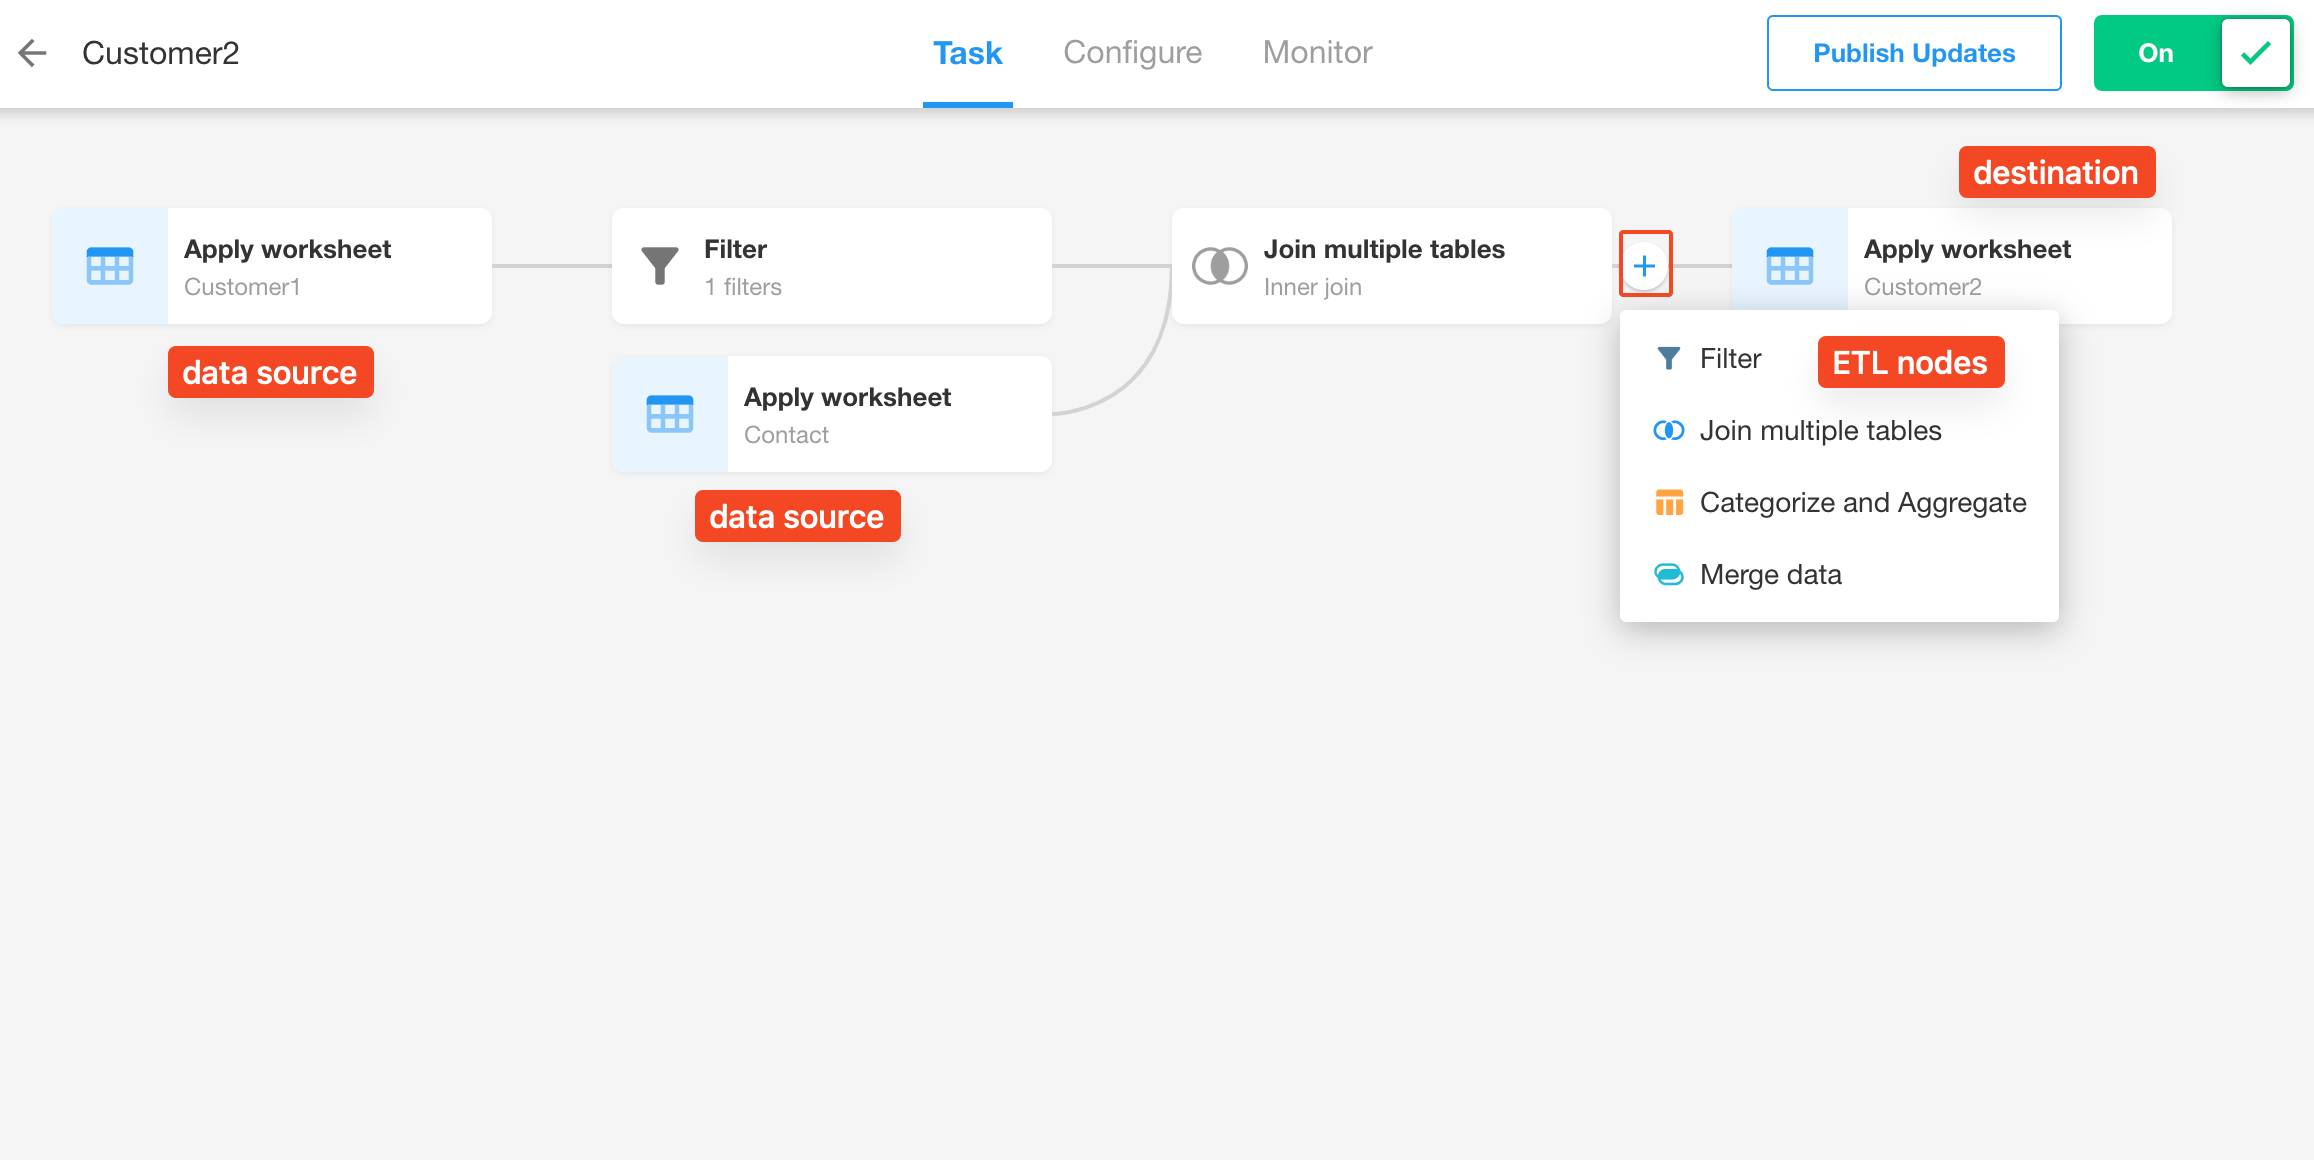
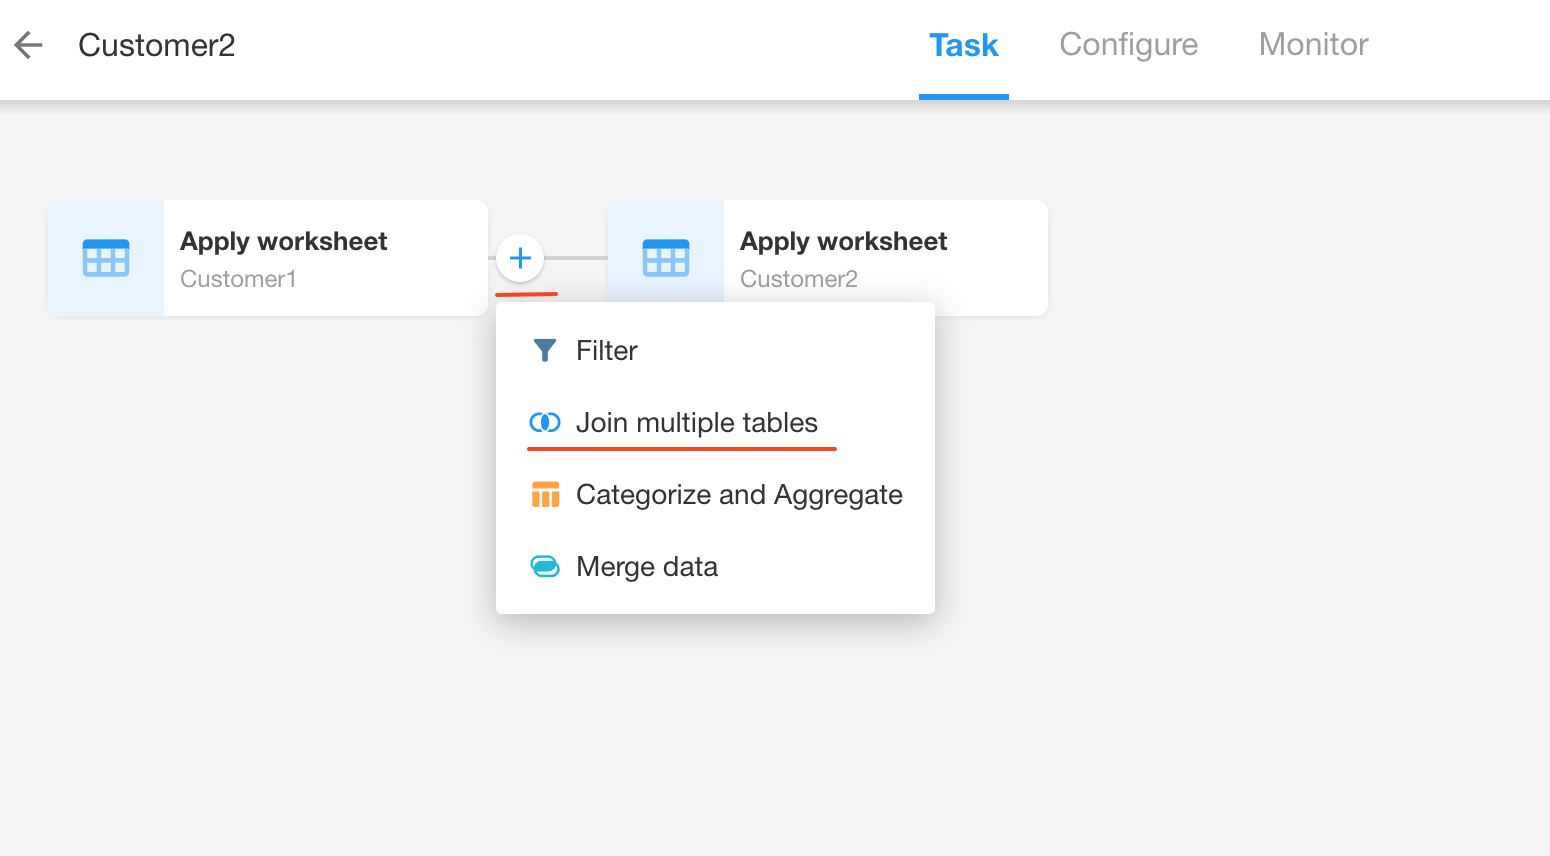
Click any sync task, hover the mouse between two nodes, and then click the [+] button to add a "Join multiple tables" node.
-
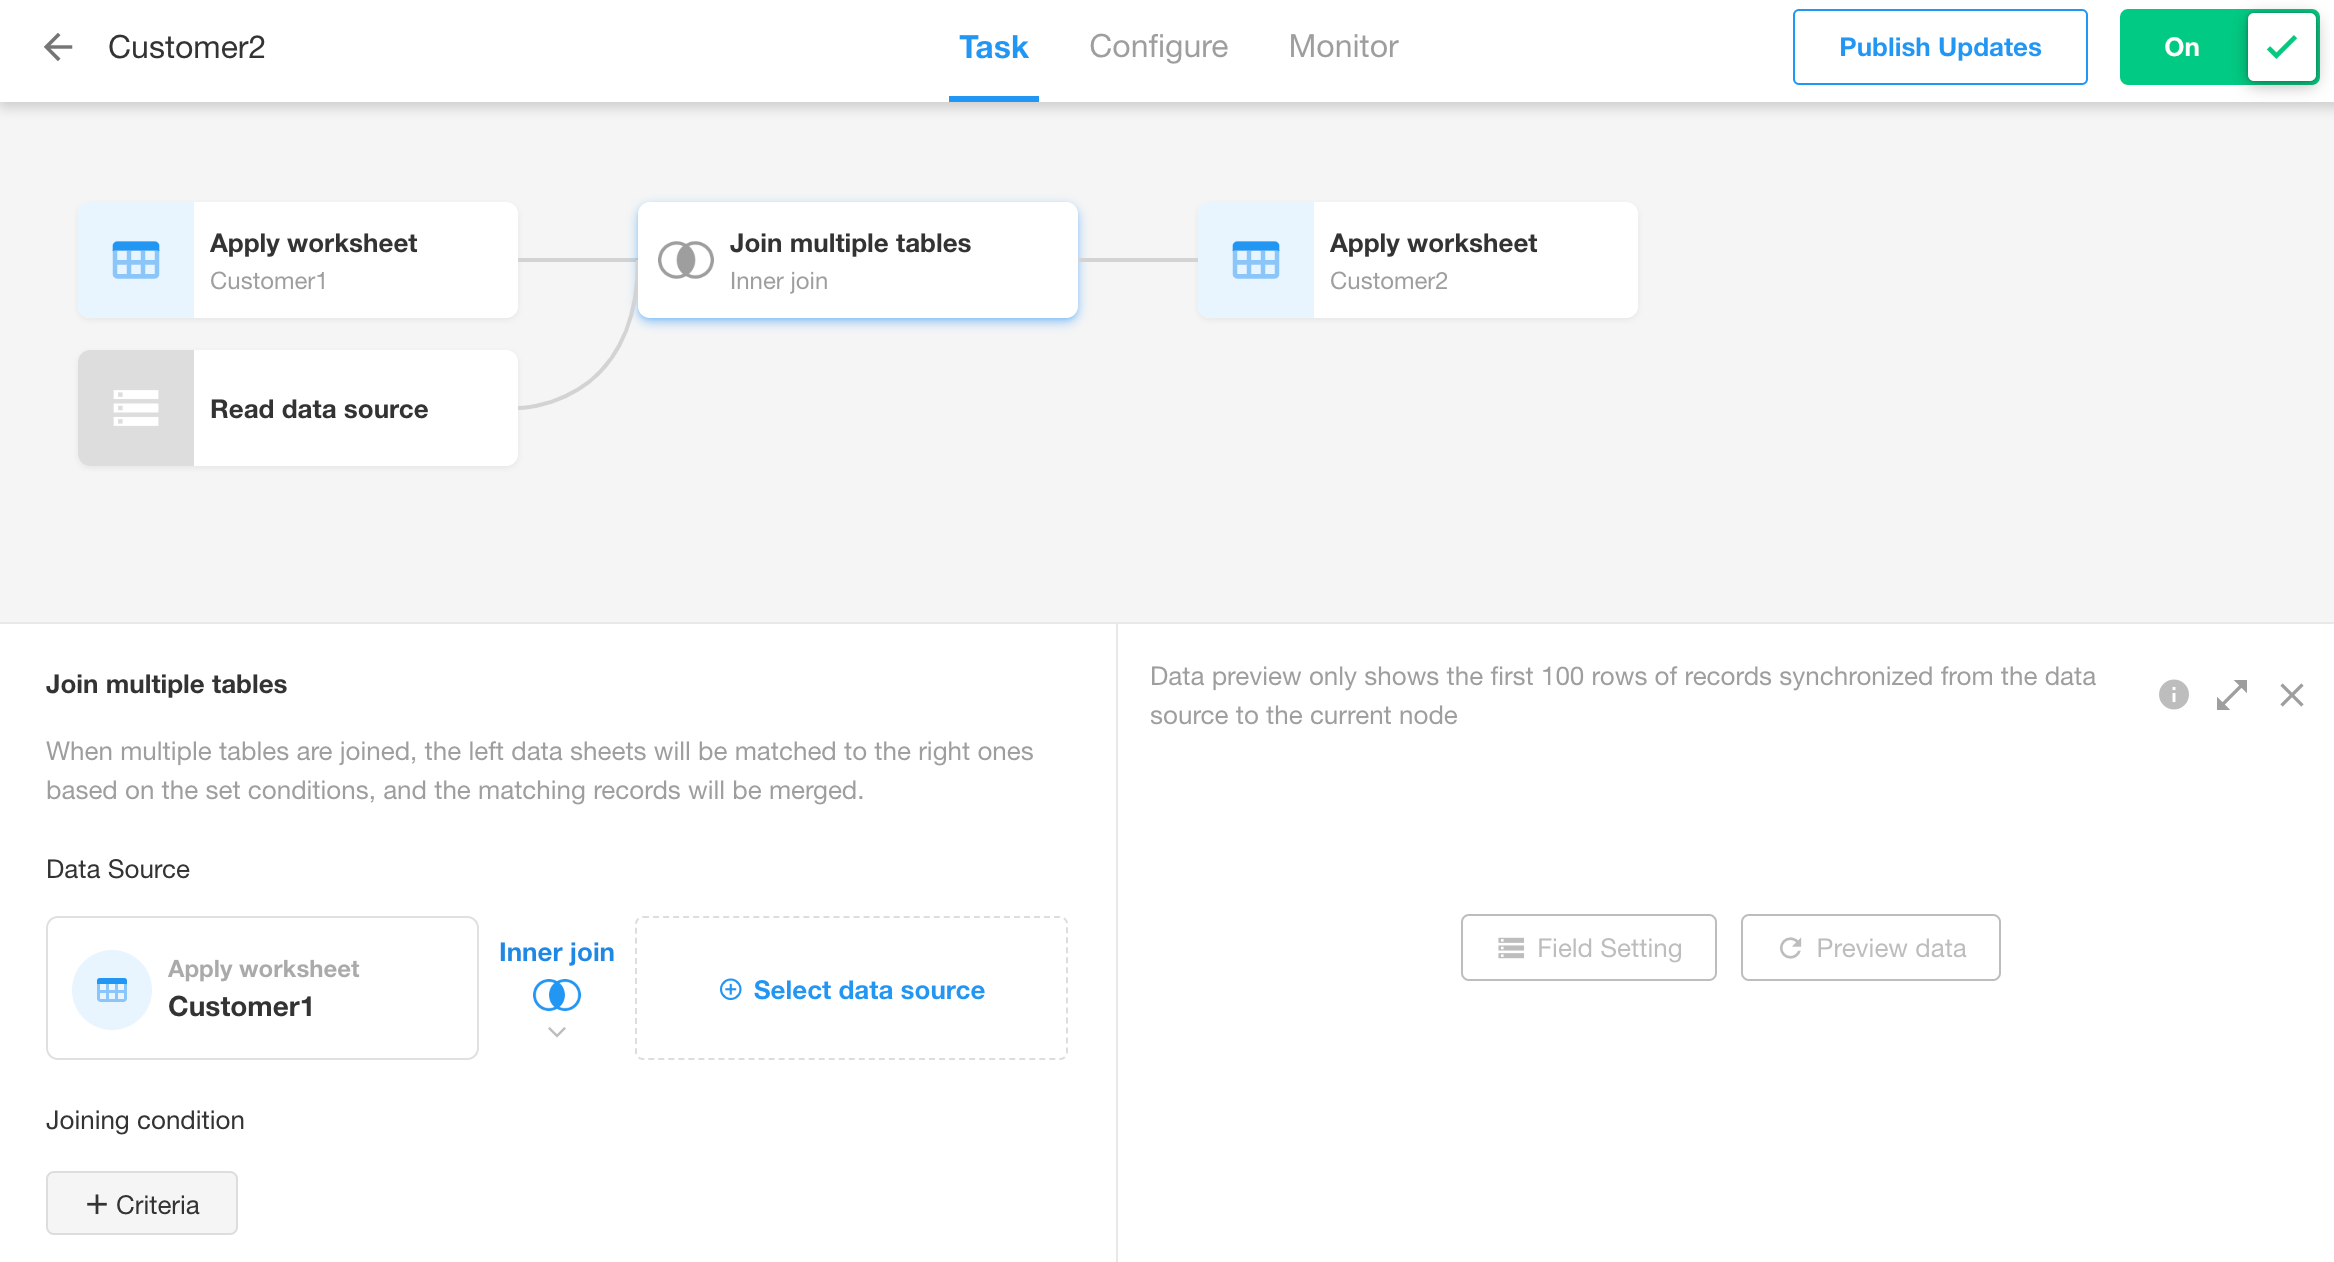
After adding, the "Read data source" and "Join multiple tables" nodes will appear.
-
Read data source: Used to select the data source to be connected, which can be a worksheet or an external database.
-
Join multiple tables: Used to configure the connection method and connection conditions.
-
Configure the multiple table join
First select the data source, then configure the connection conditions in the "Join multiple tables" node.

-
If more tables need to be connected, additional "Join multiple tables" nodes can be added.

Three Types of Joins
-
Inner Join
Inner join is a mapping, only the data that exists in both tables will be displayed.
-
Left Join
Left join displays all data from the left table, and only the data from the right table that is common with the left table. Parts with no corresponding data are shown as NULL.

-
Right Join
It is the reverse of a left join.

Limitations of Multi-table Joins
- Only available in the Ultimate Edition;
- Can add a "Join multiple tables" node between any nodes;
- Cannot add another relationship for the same data source, database, or table;
- If fields overlap between two tables, rename it;
- In field configuration, if it is a database, the primary key column is mandatory; if it is a worksheet, the rowid column is mandatory.
Use Case
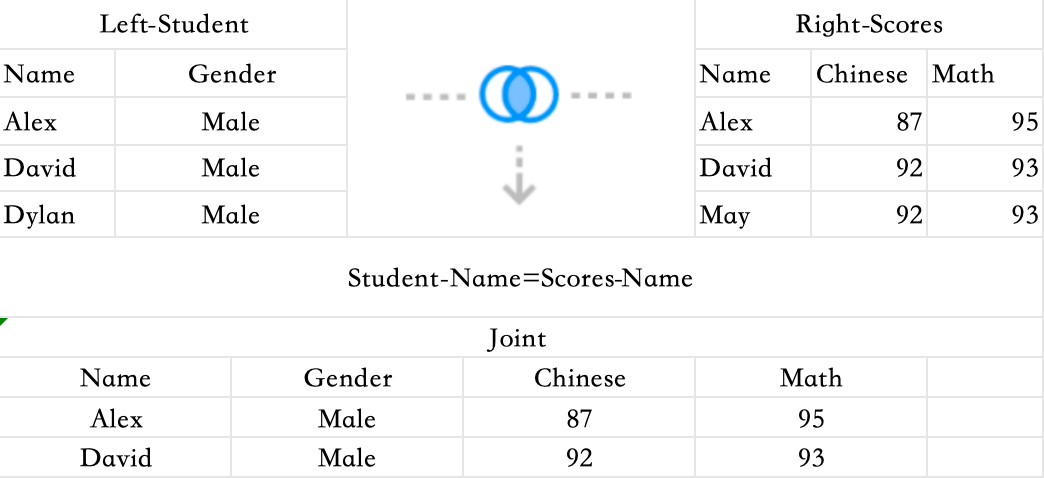
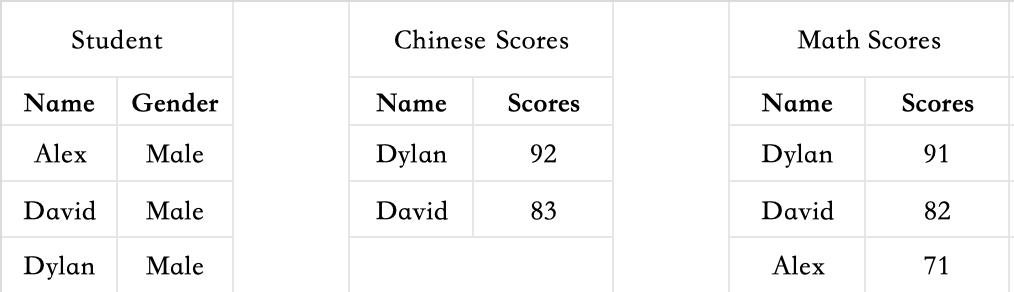
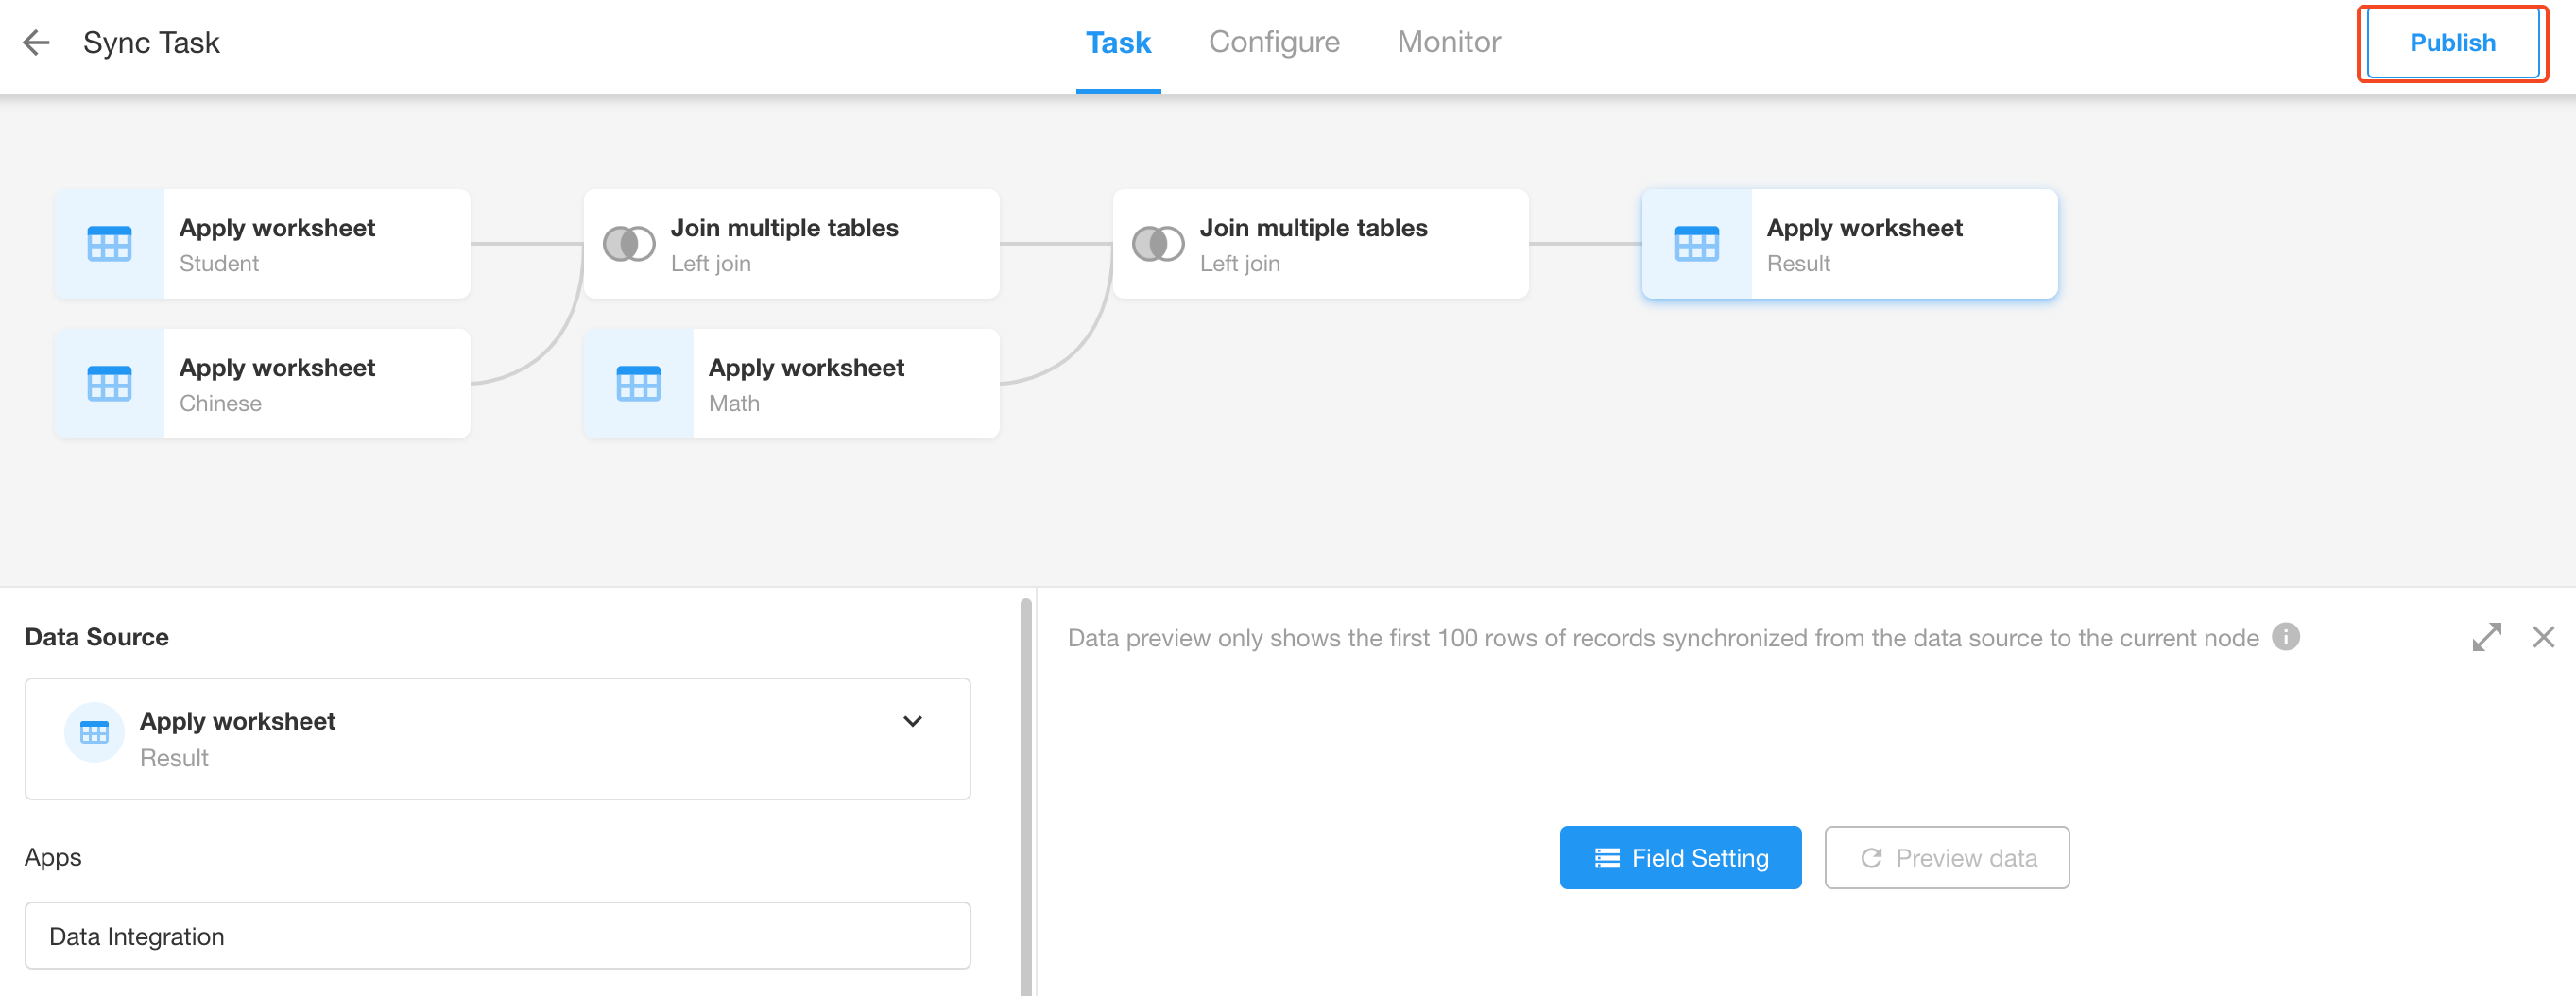
For example, there are currently three worksheets: Student worksheet, Math Scores worksheet, and Chinese Scores worksheet. Now you need to display the scores of the same student for different subjects in one worksheet.
-
Prepare the data.
-
Create a sync task.

-
Configure the data source and destination.
-
Synchronization method: "Require data processing while synchronizing".
Note: If the task is created only for data sync, you can choose "Synchronize data only".
-
Add a "Join multiple tables" node
-
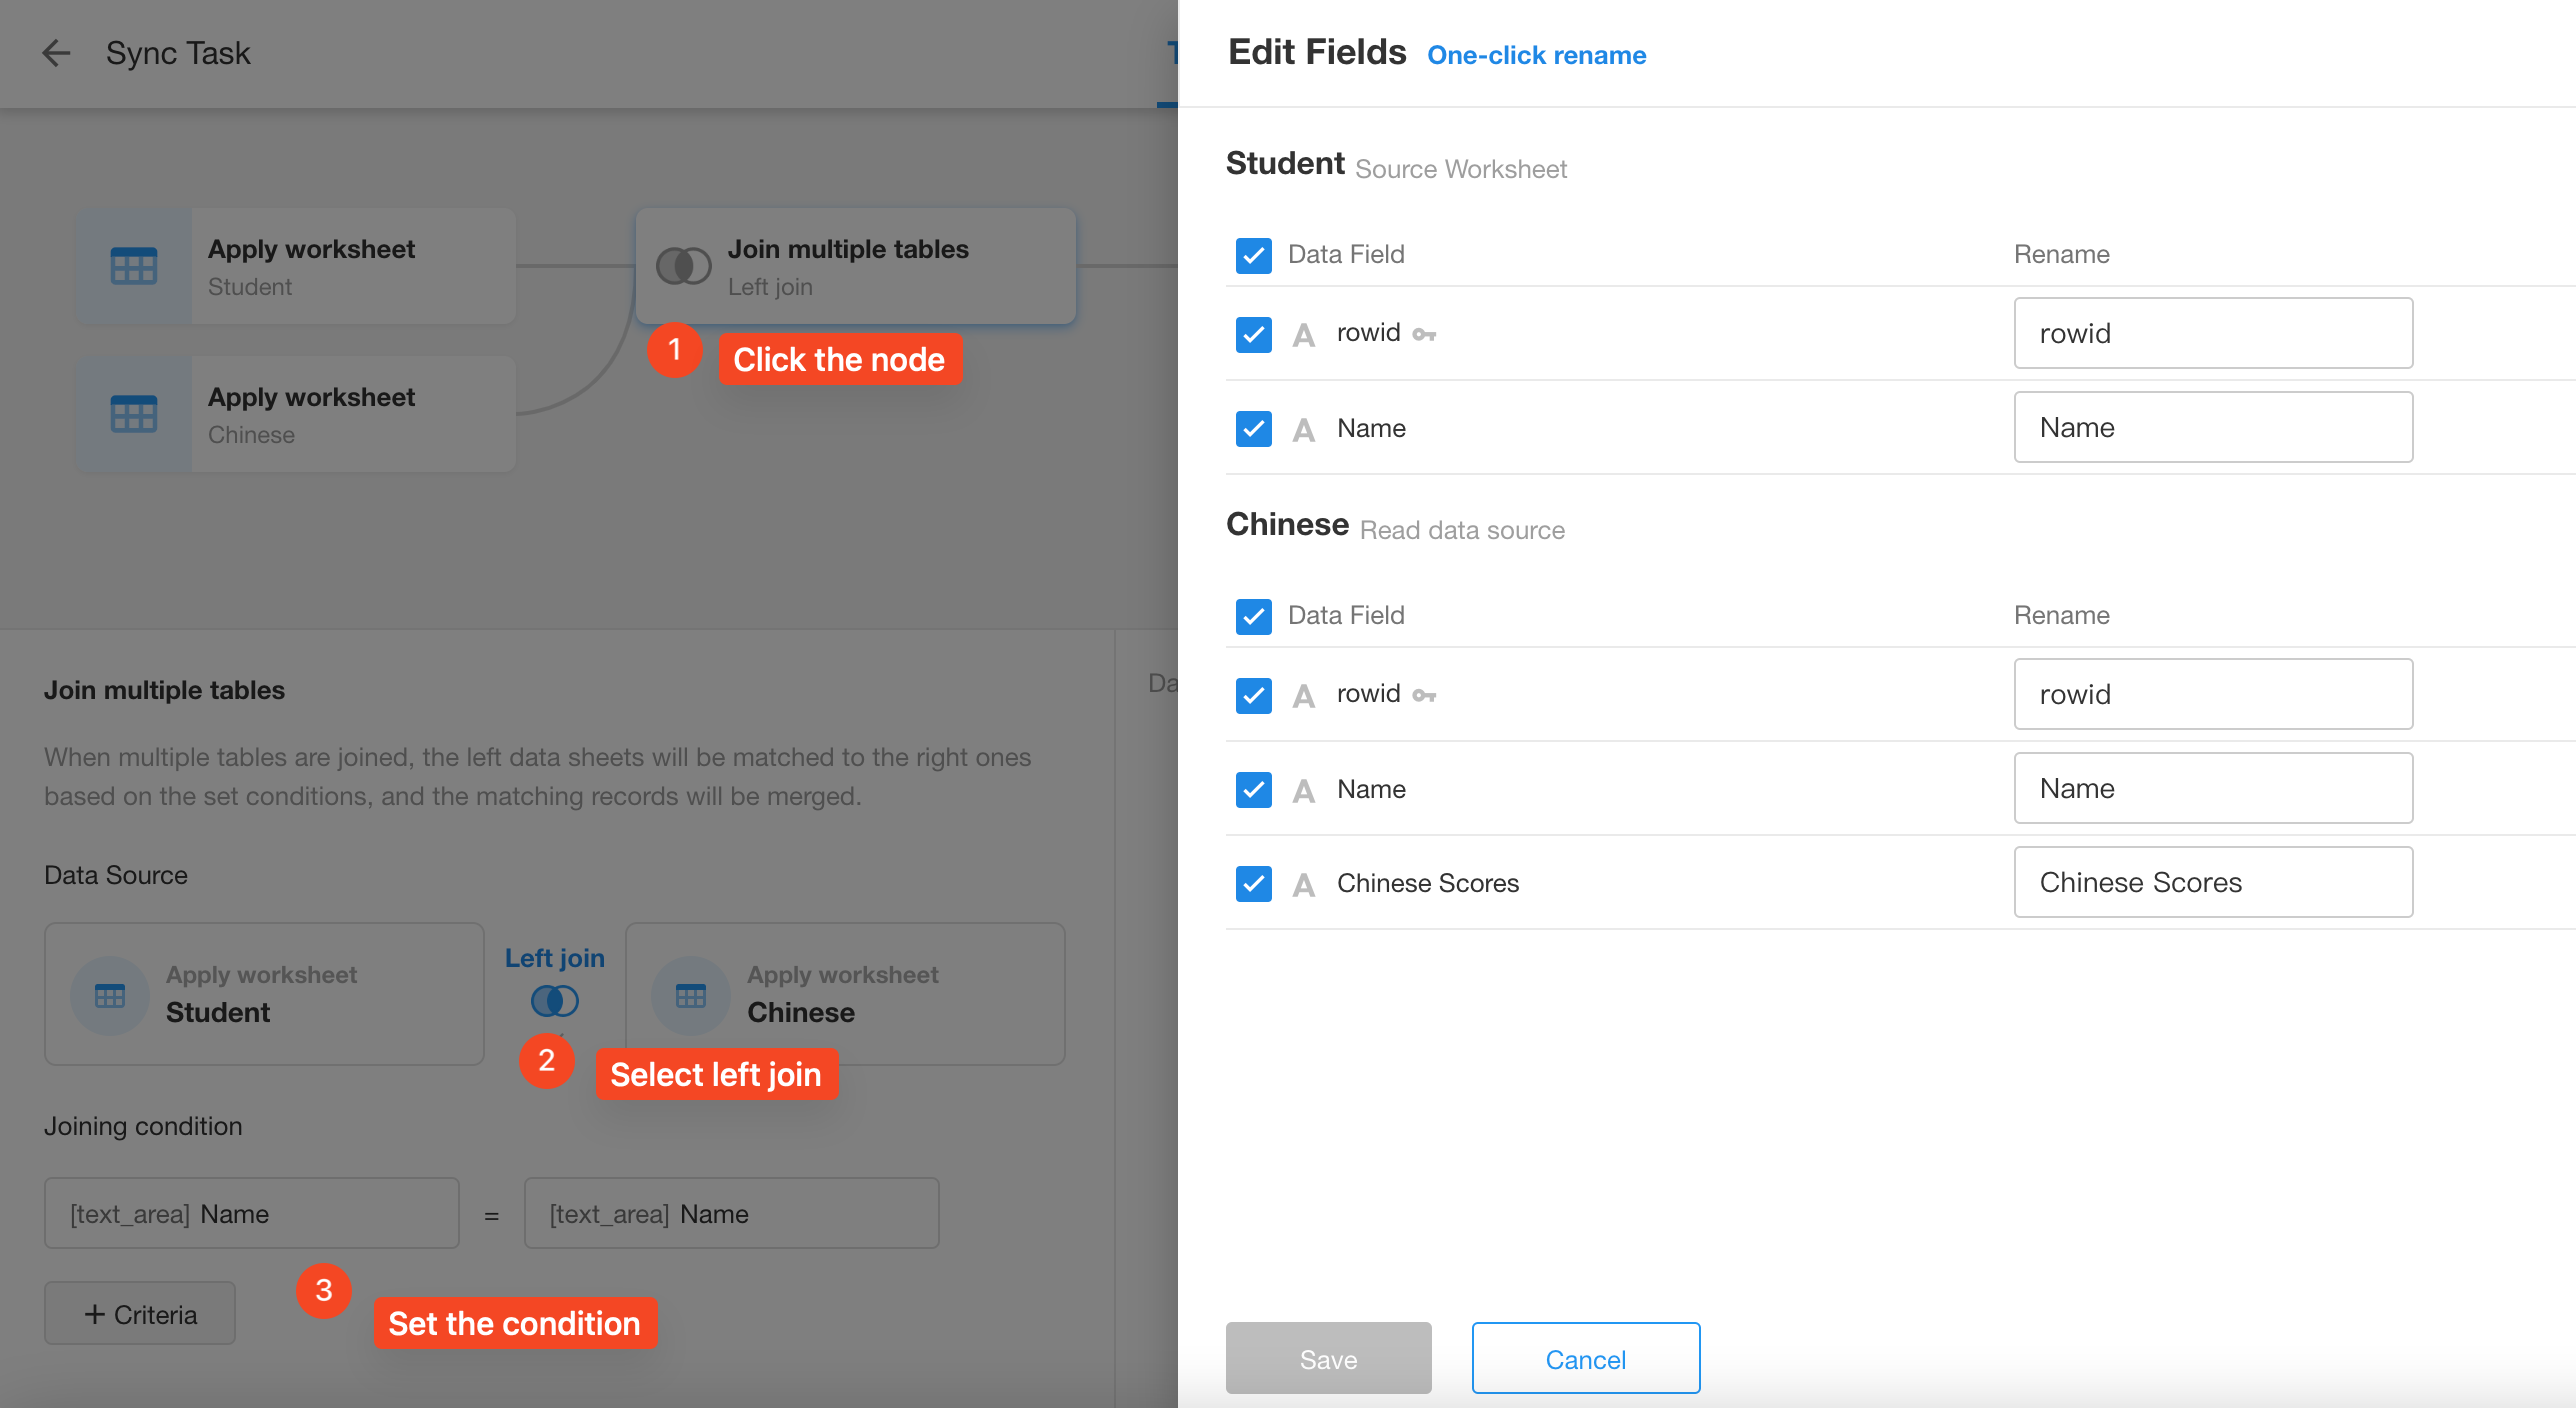
Configure the data source for the multi-table join
After adding the "Join multiple tables" node, two another nodes will appear.
Data source: Configure the second worksheet here, the Chinese Scores worksheet. For the score field, to distinguish the source, rename it to Chinese Scores here.

Join multiple tables: Join the Student worksheet and the Chinese Scores worksheet with a left join because the Student worksheet contains all students, but the Chinese Scores worksheet may not include all students.
-
Join condition: Multiple conditions can be configured, here only Name is selected.
-
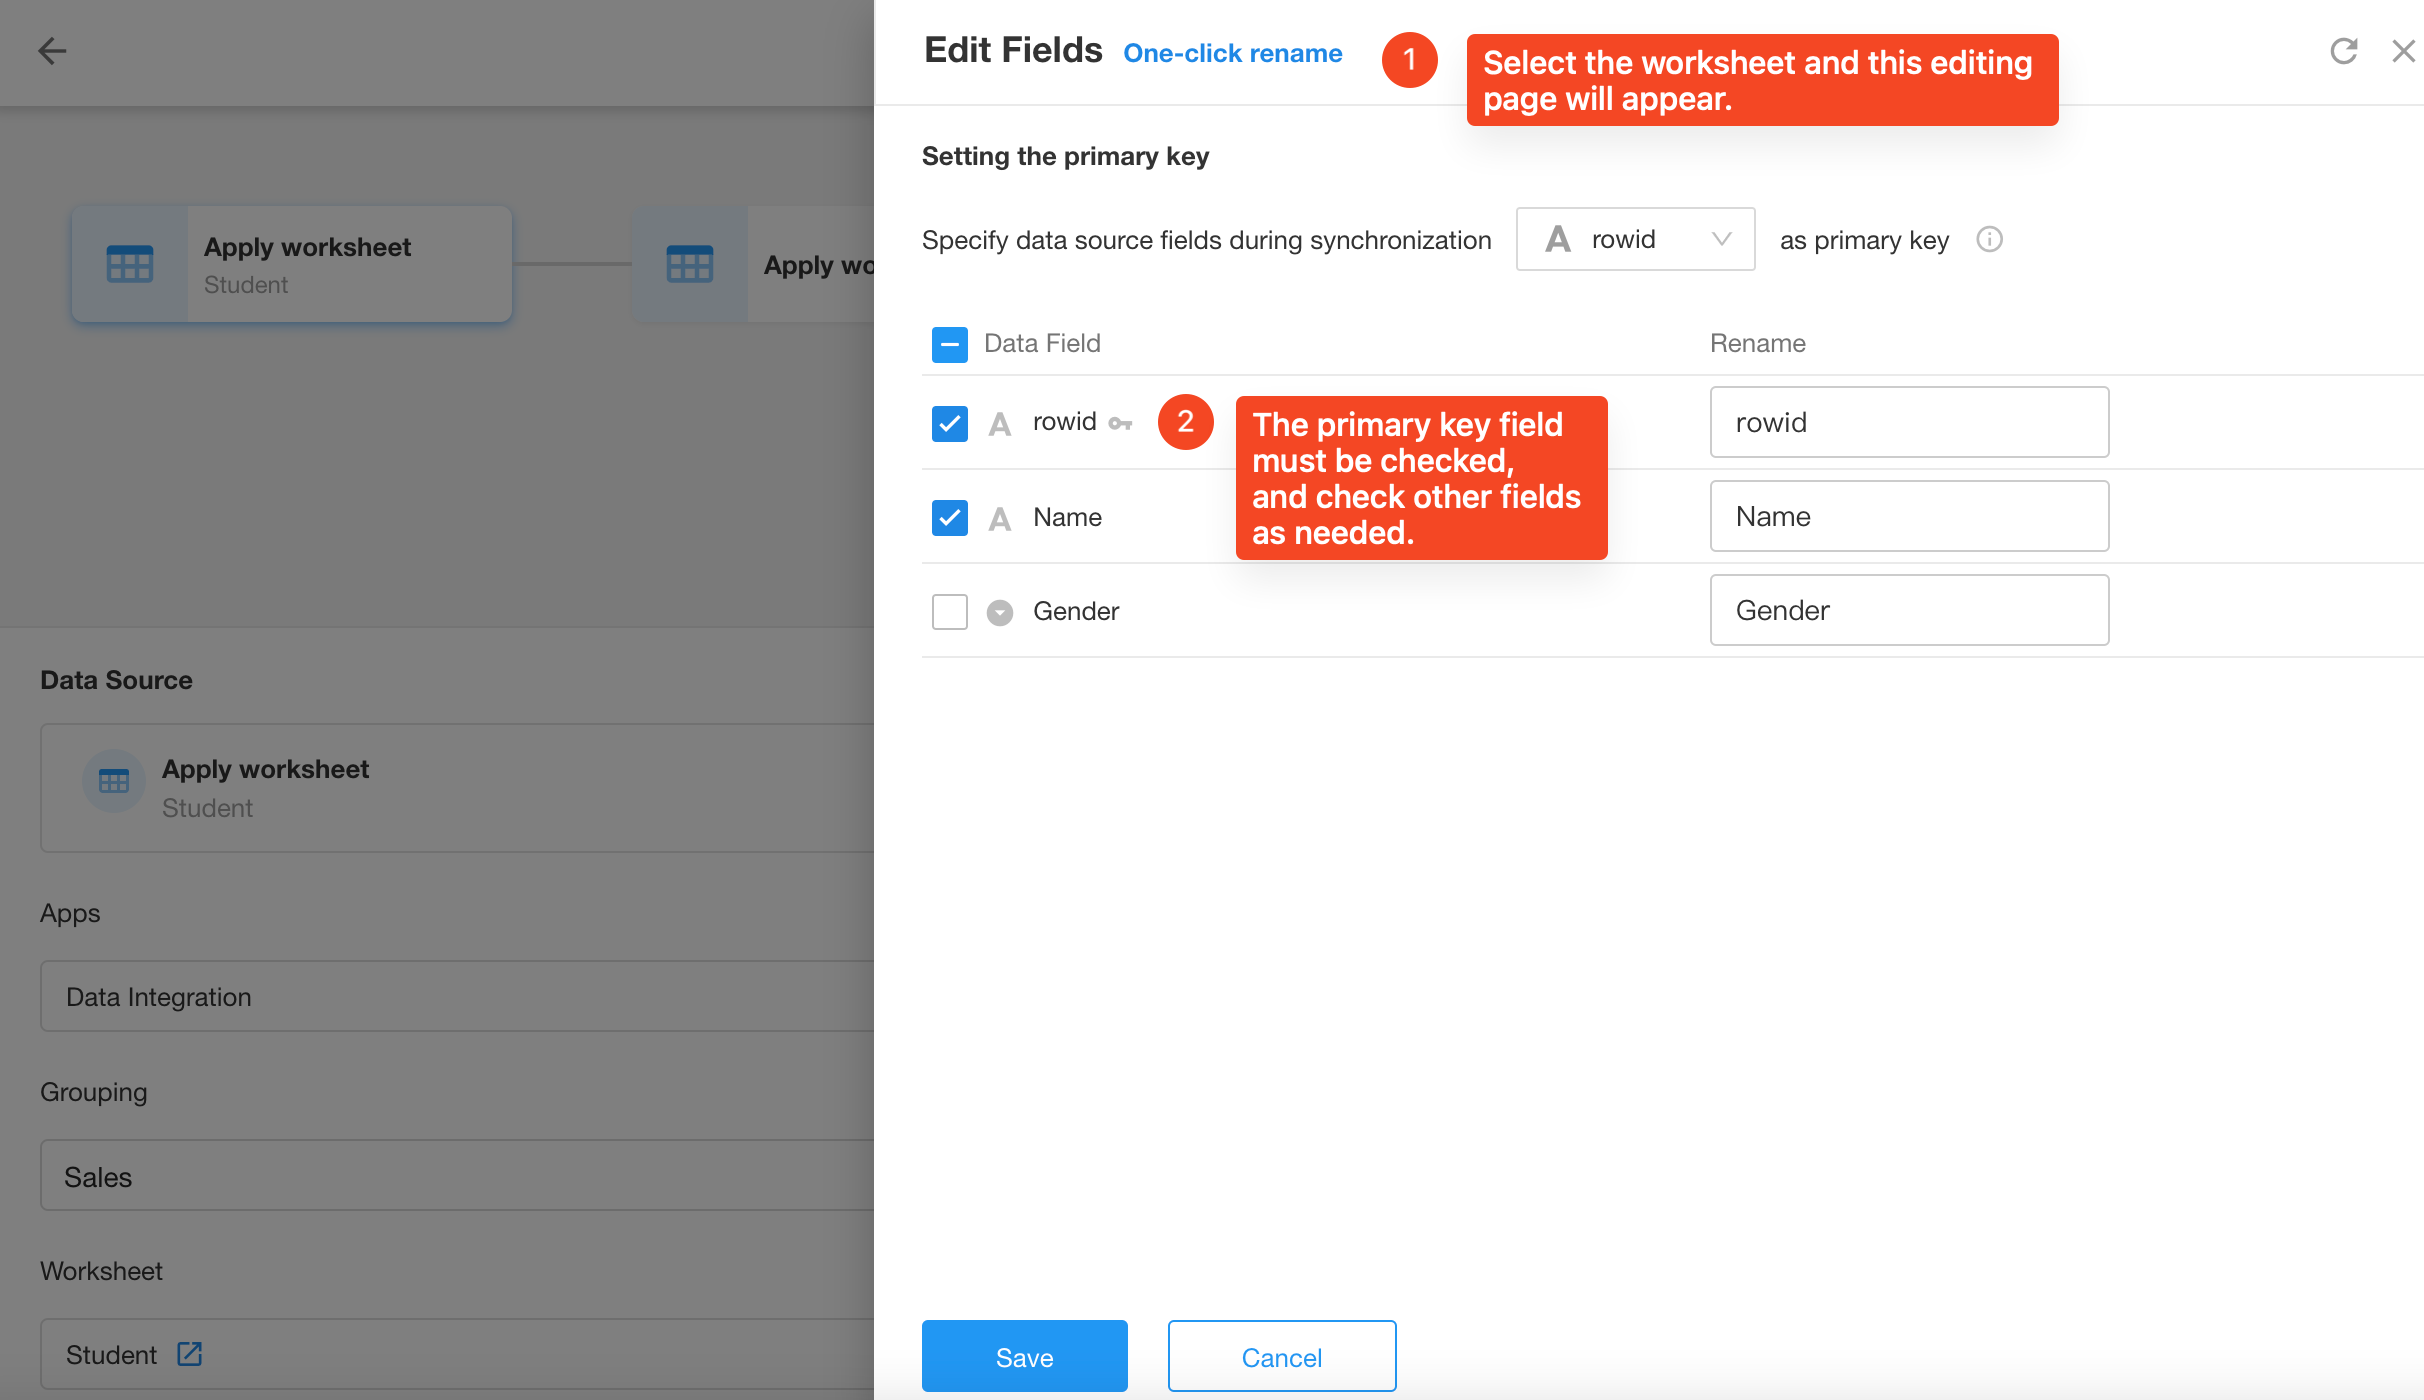
Edit fields: Here you will see the fields from both worksheets. The checked fields here are the ones that can be used in the next node. We do not need the name field from the Chinese Scores worksheet in the next node, so it can be unchecked here.
-
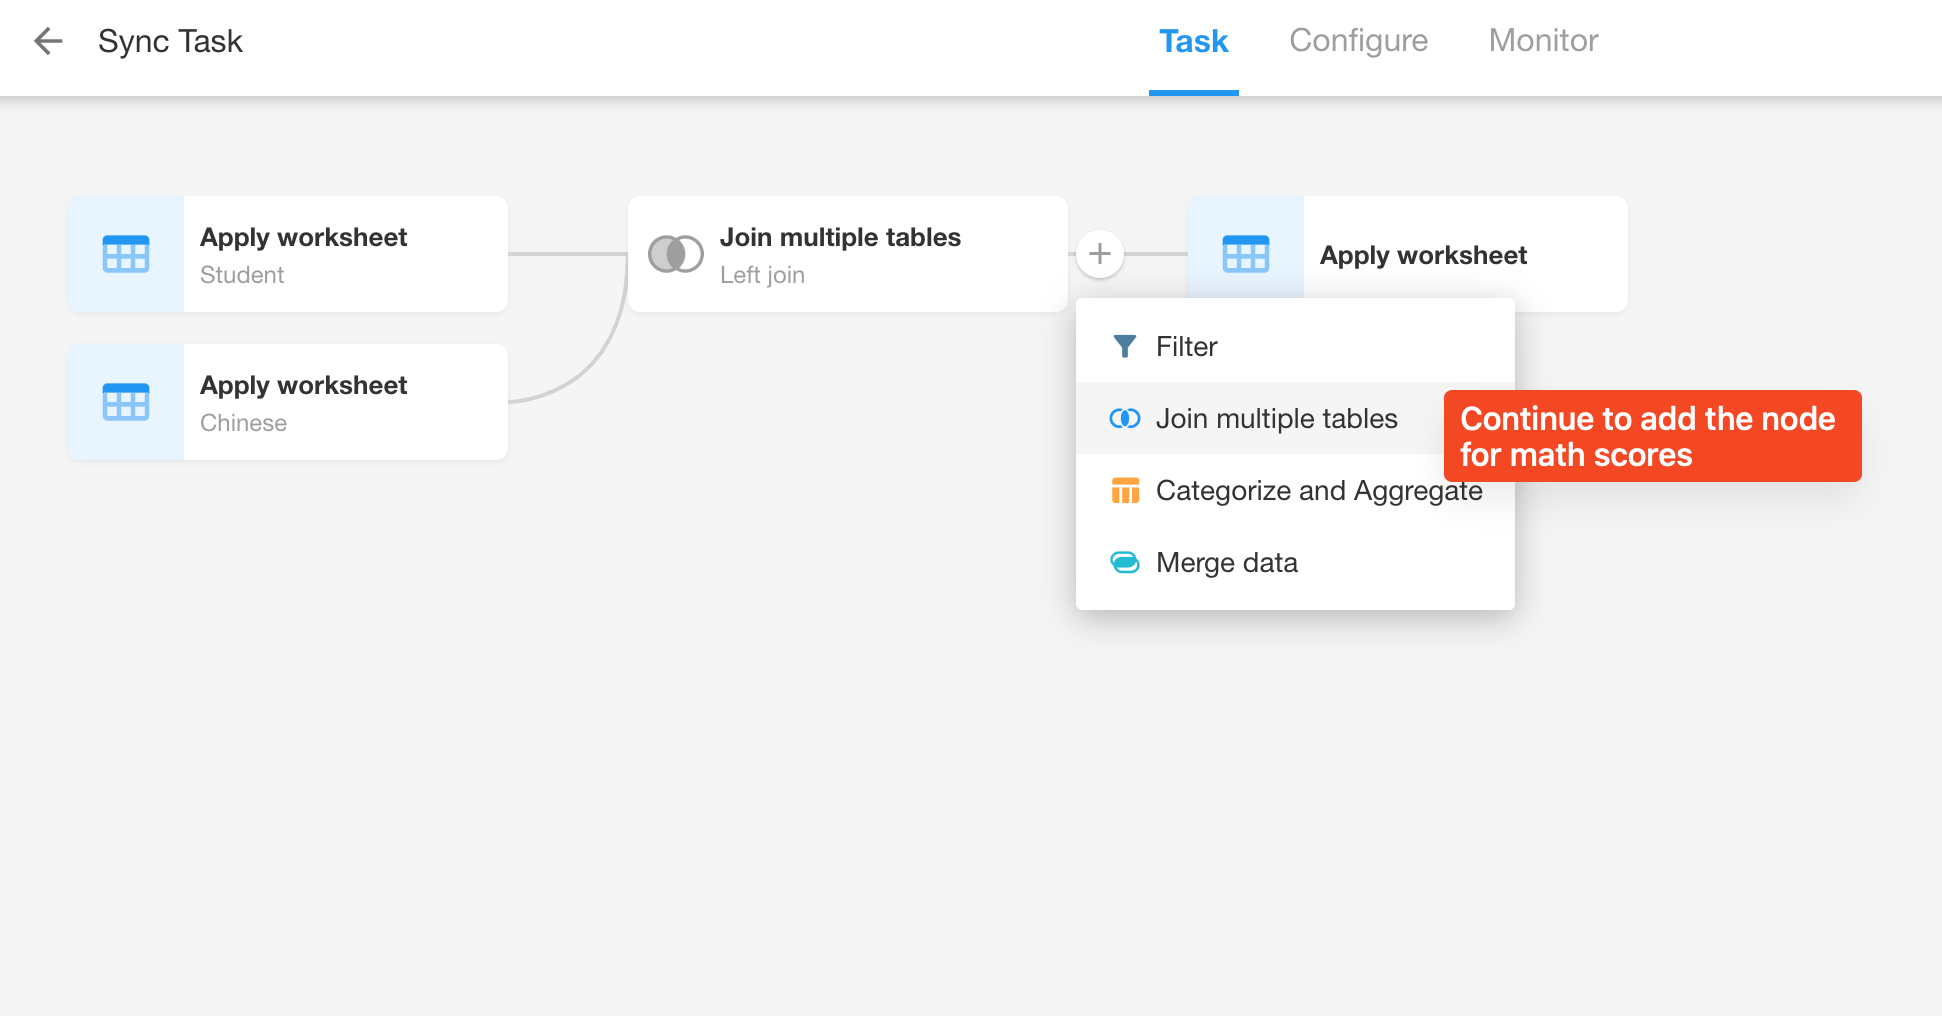
Join the Math Scores worksheet
Add a second "Join multiple tables" node to join the Math Scores worksheet.
-
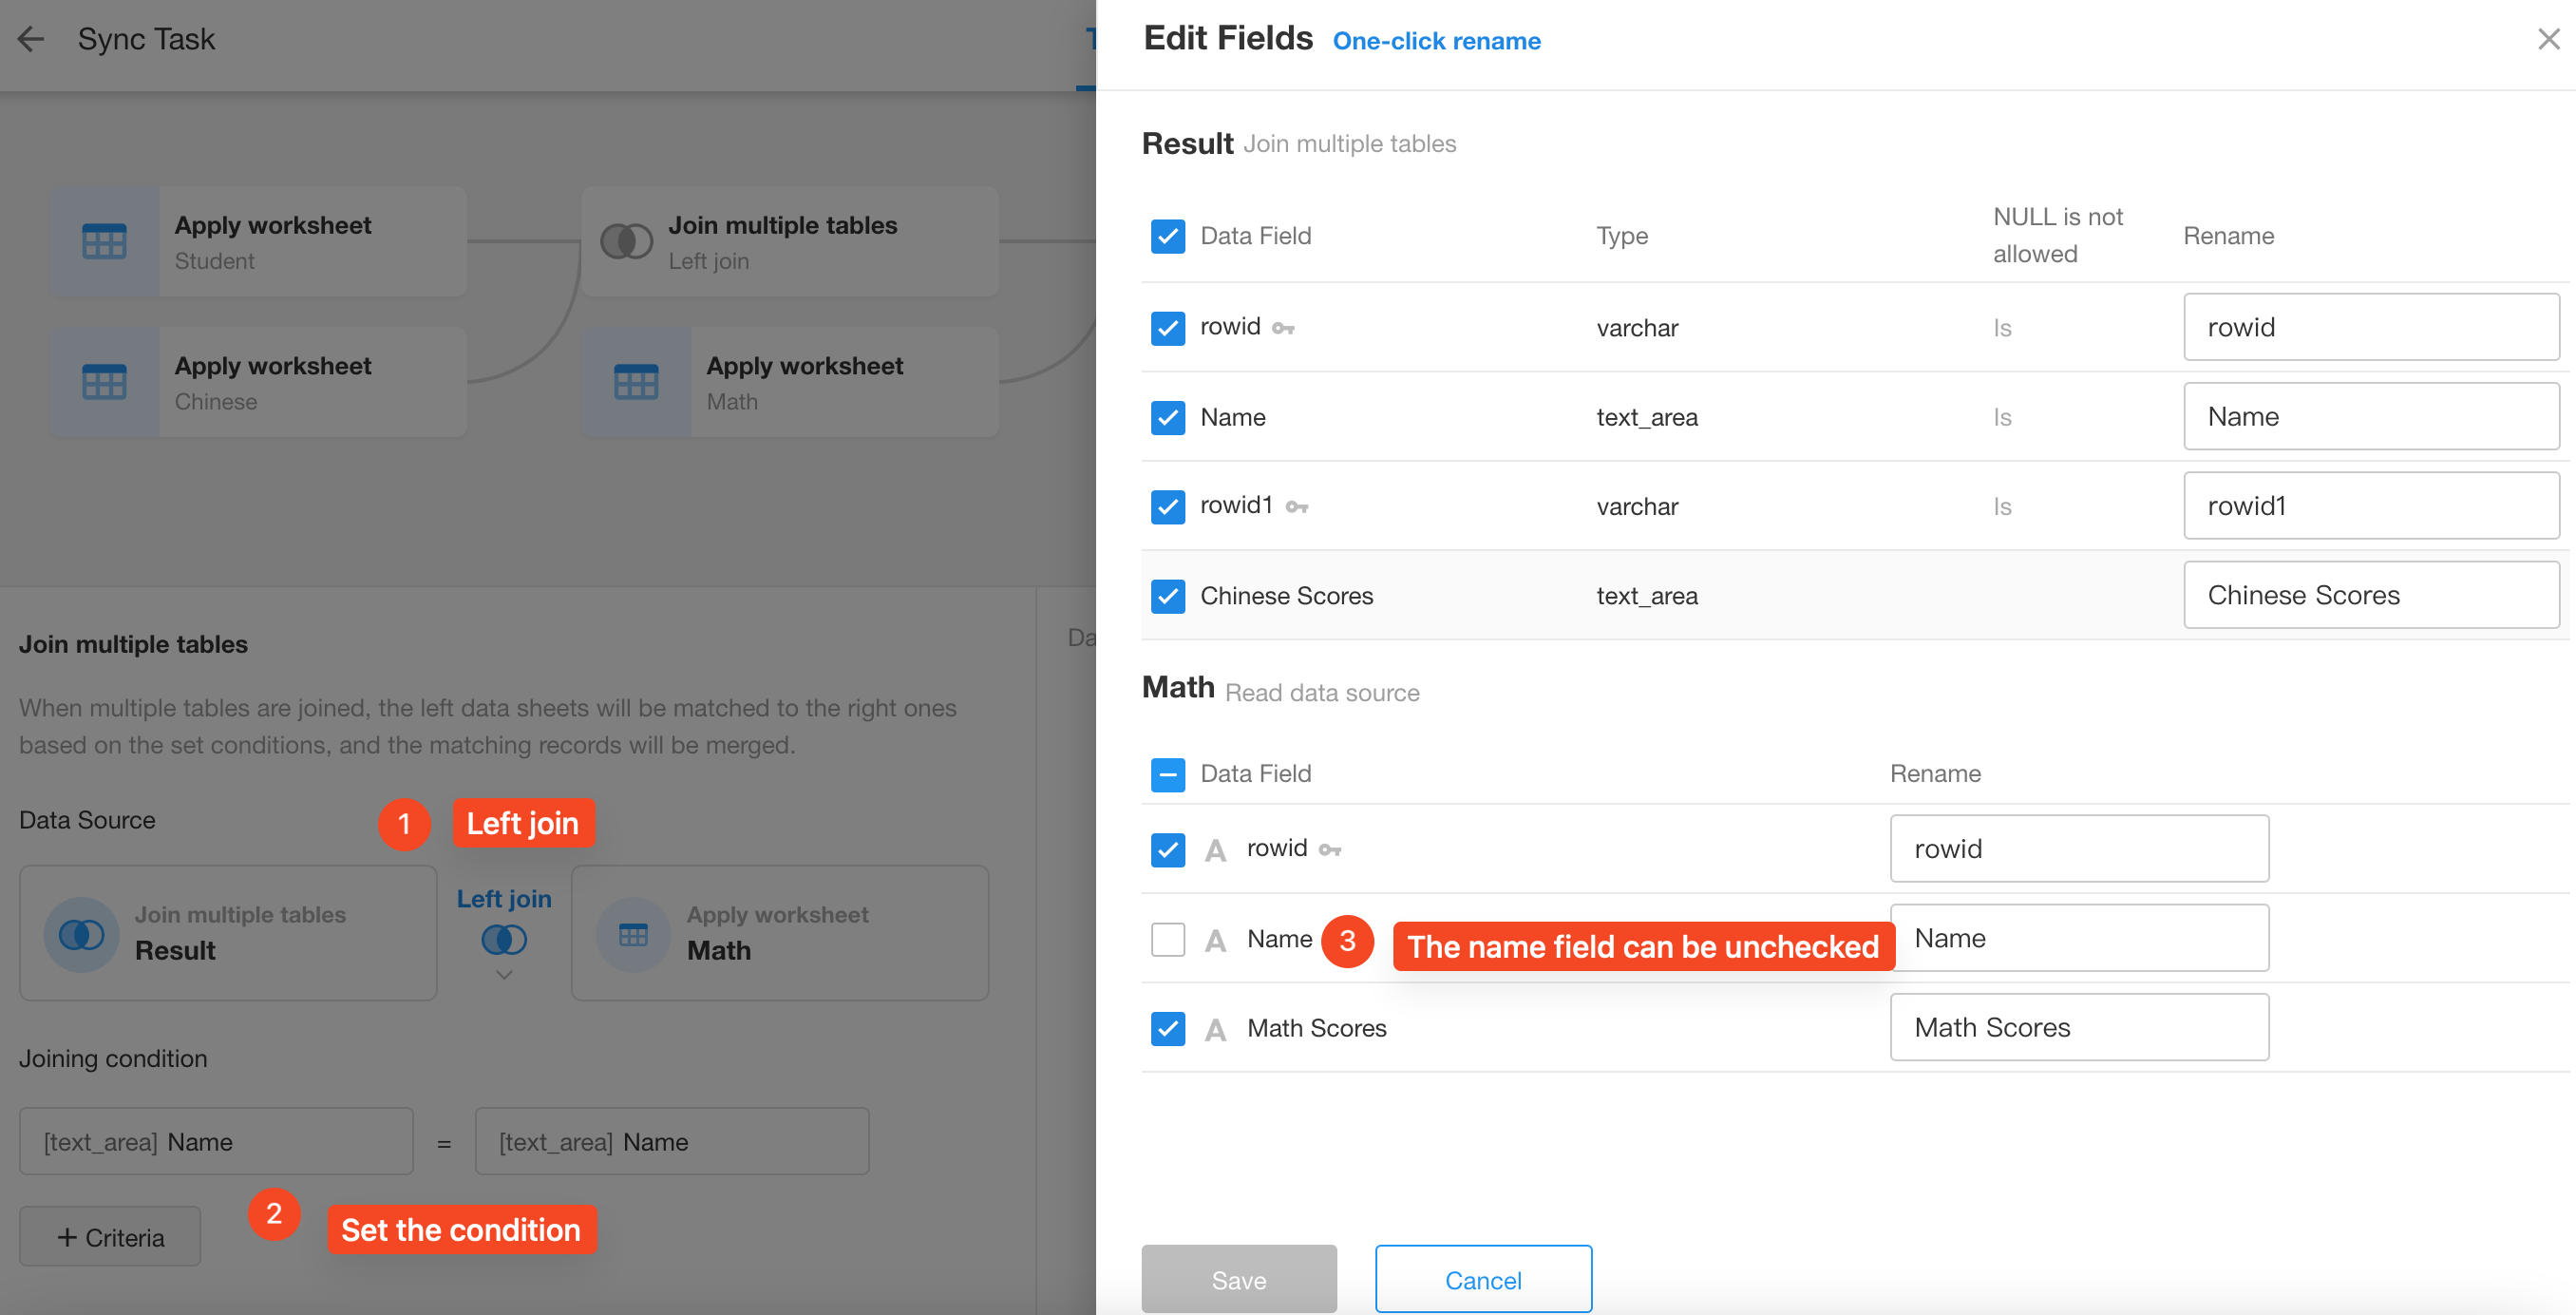
Join type: Left join
-
Join condition: Here, try to select the name field from the Student worksheet because the data in the student worksheet is complete.
-
Edit fields: The name field from the Math Scores worksheet is also unnecessary, so it can be unchecked here too.
-
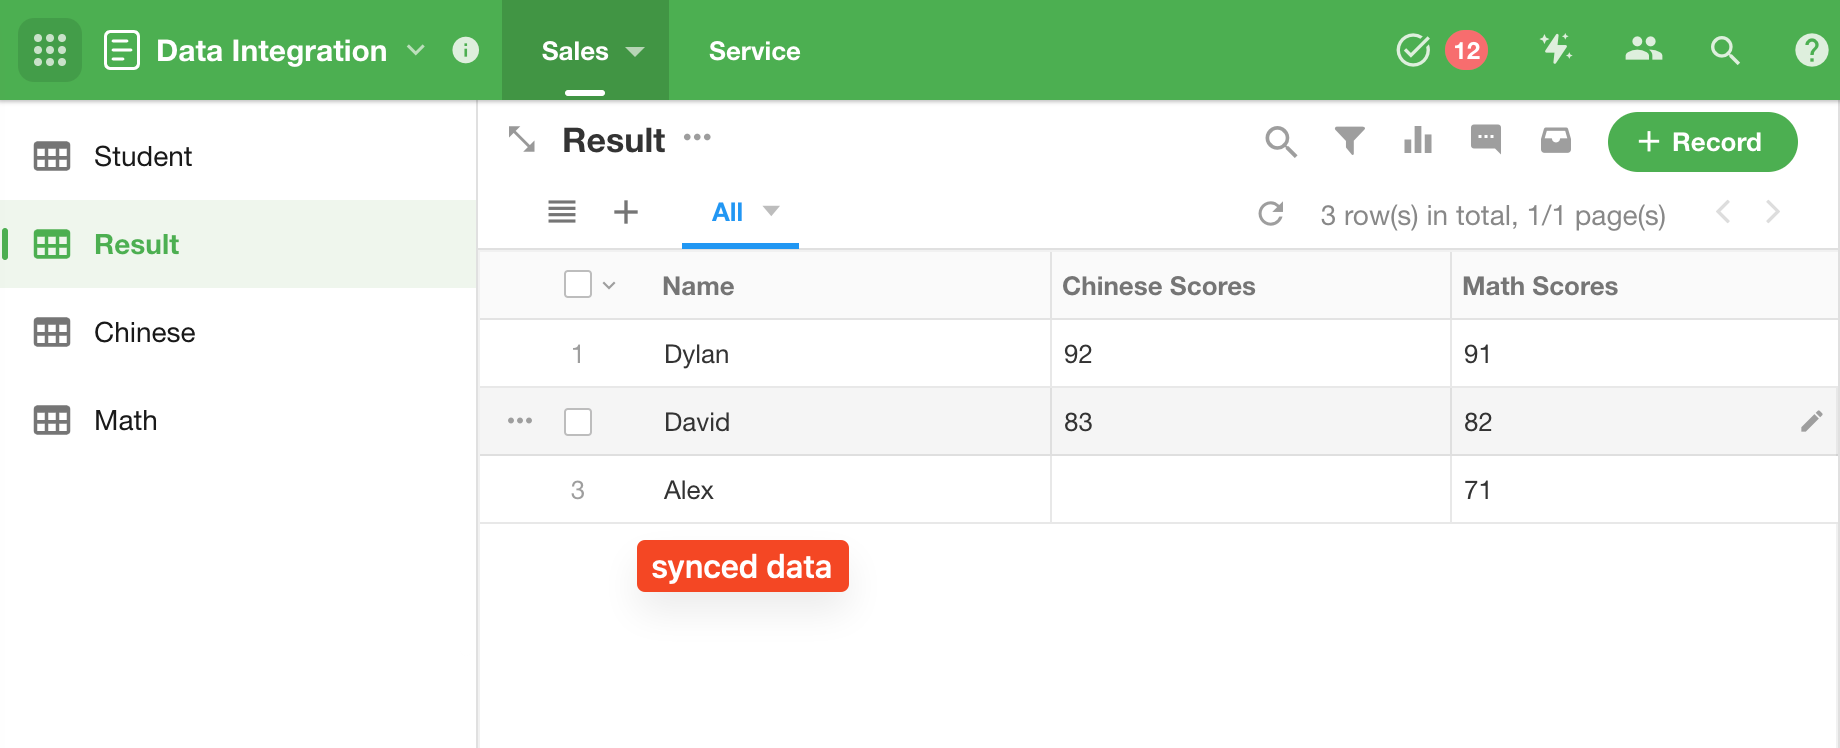
Configure the destination
The Student worksheet, Chinese Scores worksheet, and Math Scores worksheet have been configured as data sources. Now you need to configure the destination table where this data will be written.
For the destination table, you can create a new worksheet or choose an existing one. Here is an example of creating a new worksheet.

-
New worksheet name: Name of the new worksheet in the database or application.
-
Primary key field: Fields with a key symbol after the field name are primary key fields. Since a primary key field is required during the synchronization process, it is mandatory here.

-
Publish the sync task and check.
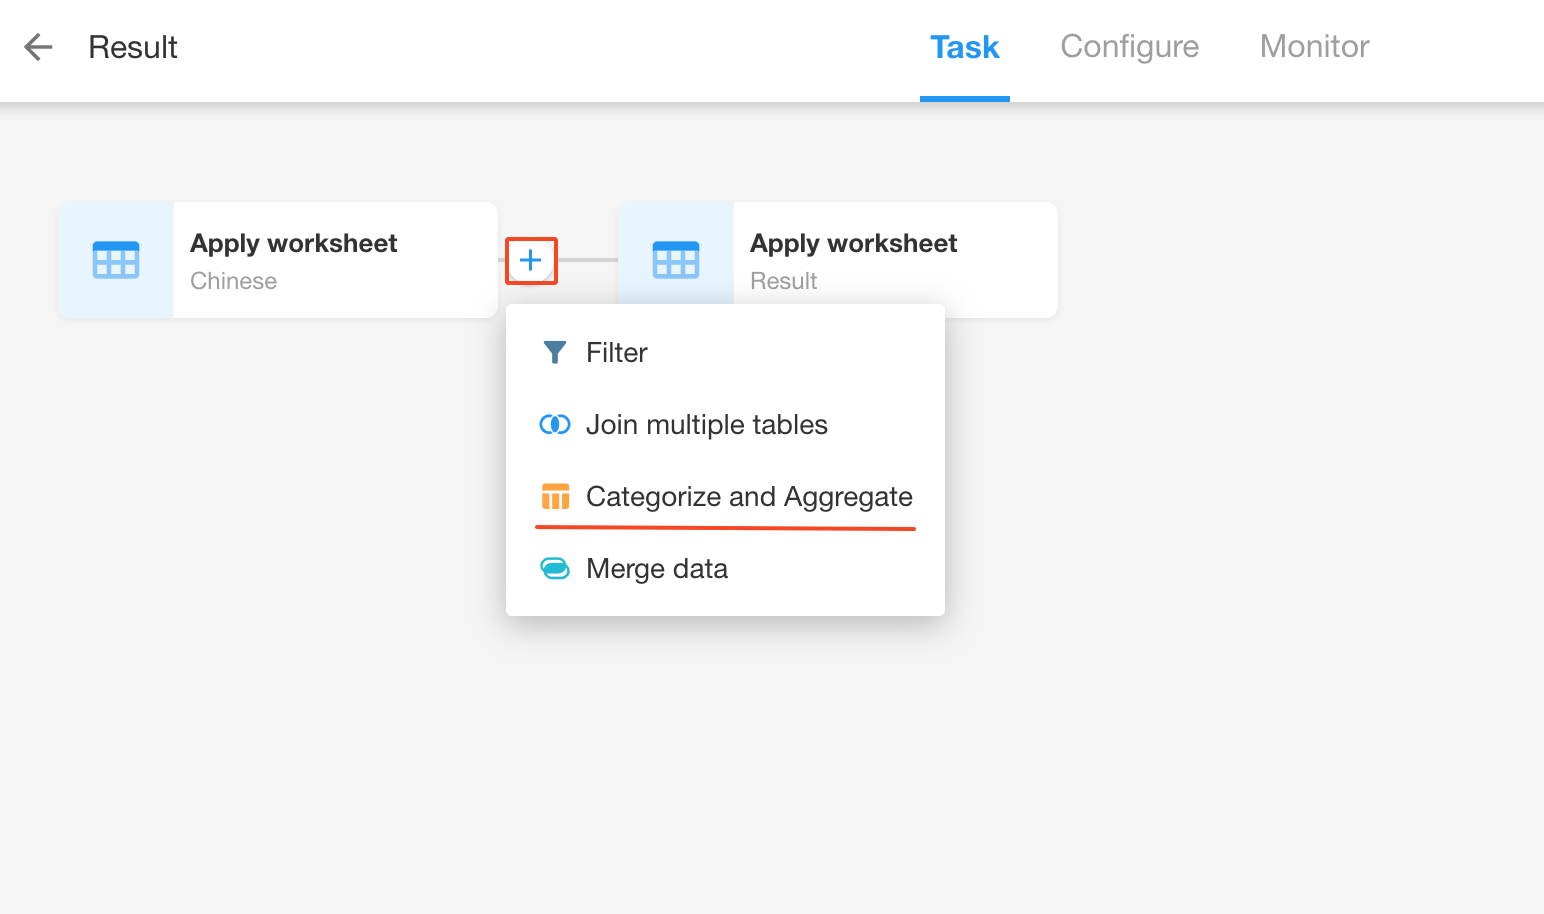
Categorize and Aggregate
It is used for data analysis to help users identify changes and anomalies in the data, thereby monitoring and providing feedback on issues.
Commonly used for:
-
Data analysis and decision-making: Transforming a large amount of raw data into meaningful information to help better understand the data and make informed decisions;
-
Report generation: Conveniently generating reports and visualized data based on category and aggregation results;
-
Monitoring and feedback: With the results of category and aggregation, it helps monitor business and performance indicators, and provide feedback to take timely action.
Configuration Steps
-
Click any sync task, hover the mouse between two nodes, and then click the [+] to add a "Categorize and Aggregate" node.
-
Configure fields.

-
Categorized field: Any field can be selected;
-
Aggregated field: Different functions are supported based on the field types.
-
Text type: Functions for maximum and minimum values;
-
Numeric type (including date): Functions for sum, average, maximum, minimum values;
-
Count: Only row count (*).
-
-
Limitations of Categorize and Aggregate Node
-
Only available in the Ultimate Edition;
-
Only the fields selected as the catogorized fields and aggregated fields will be passed on to the next node;
-
A function must be selected for the aggregated field.
Use Case
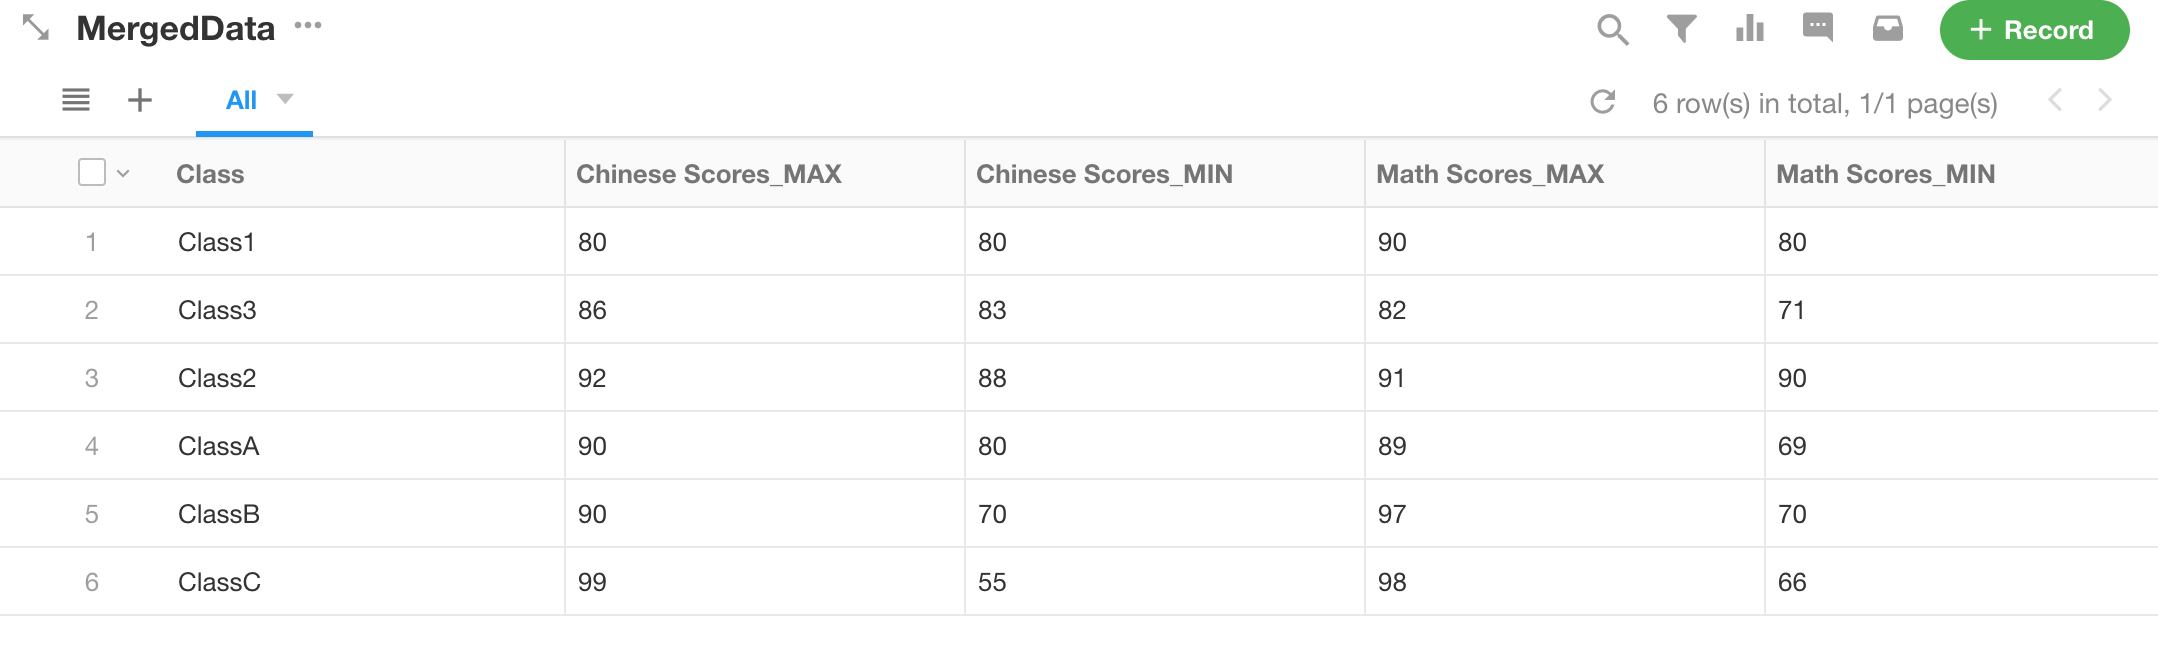
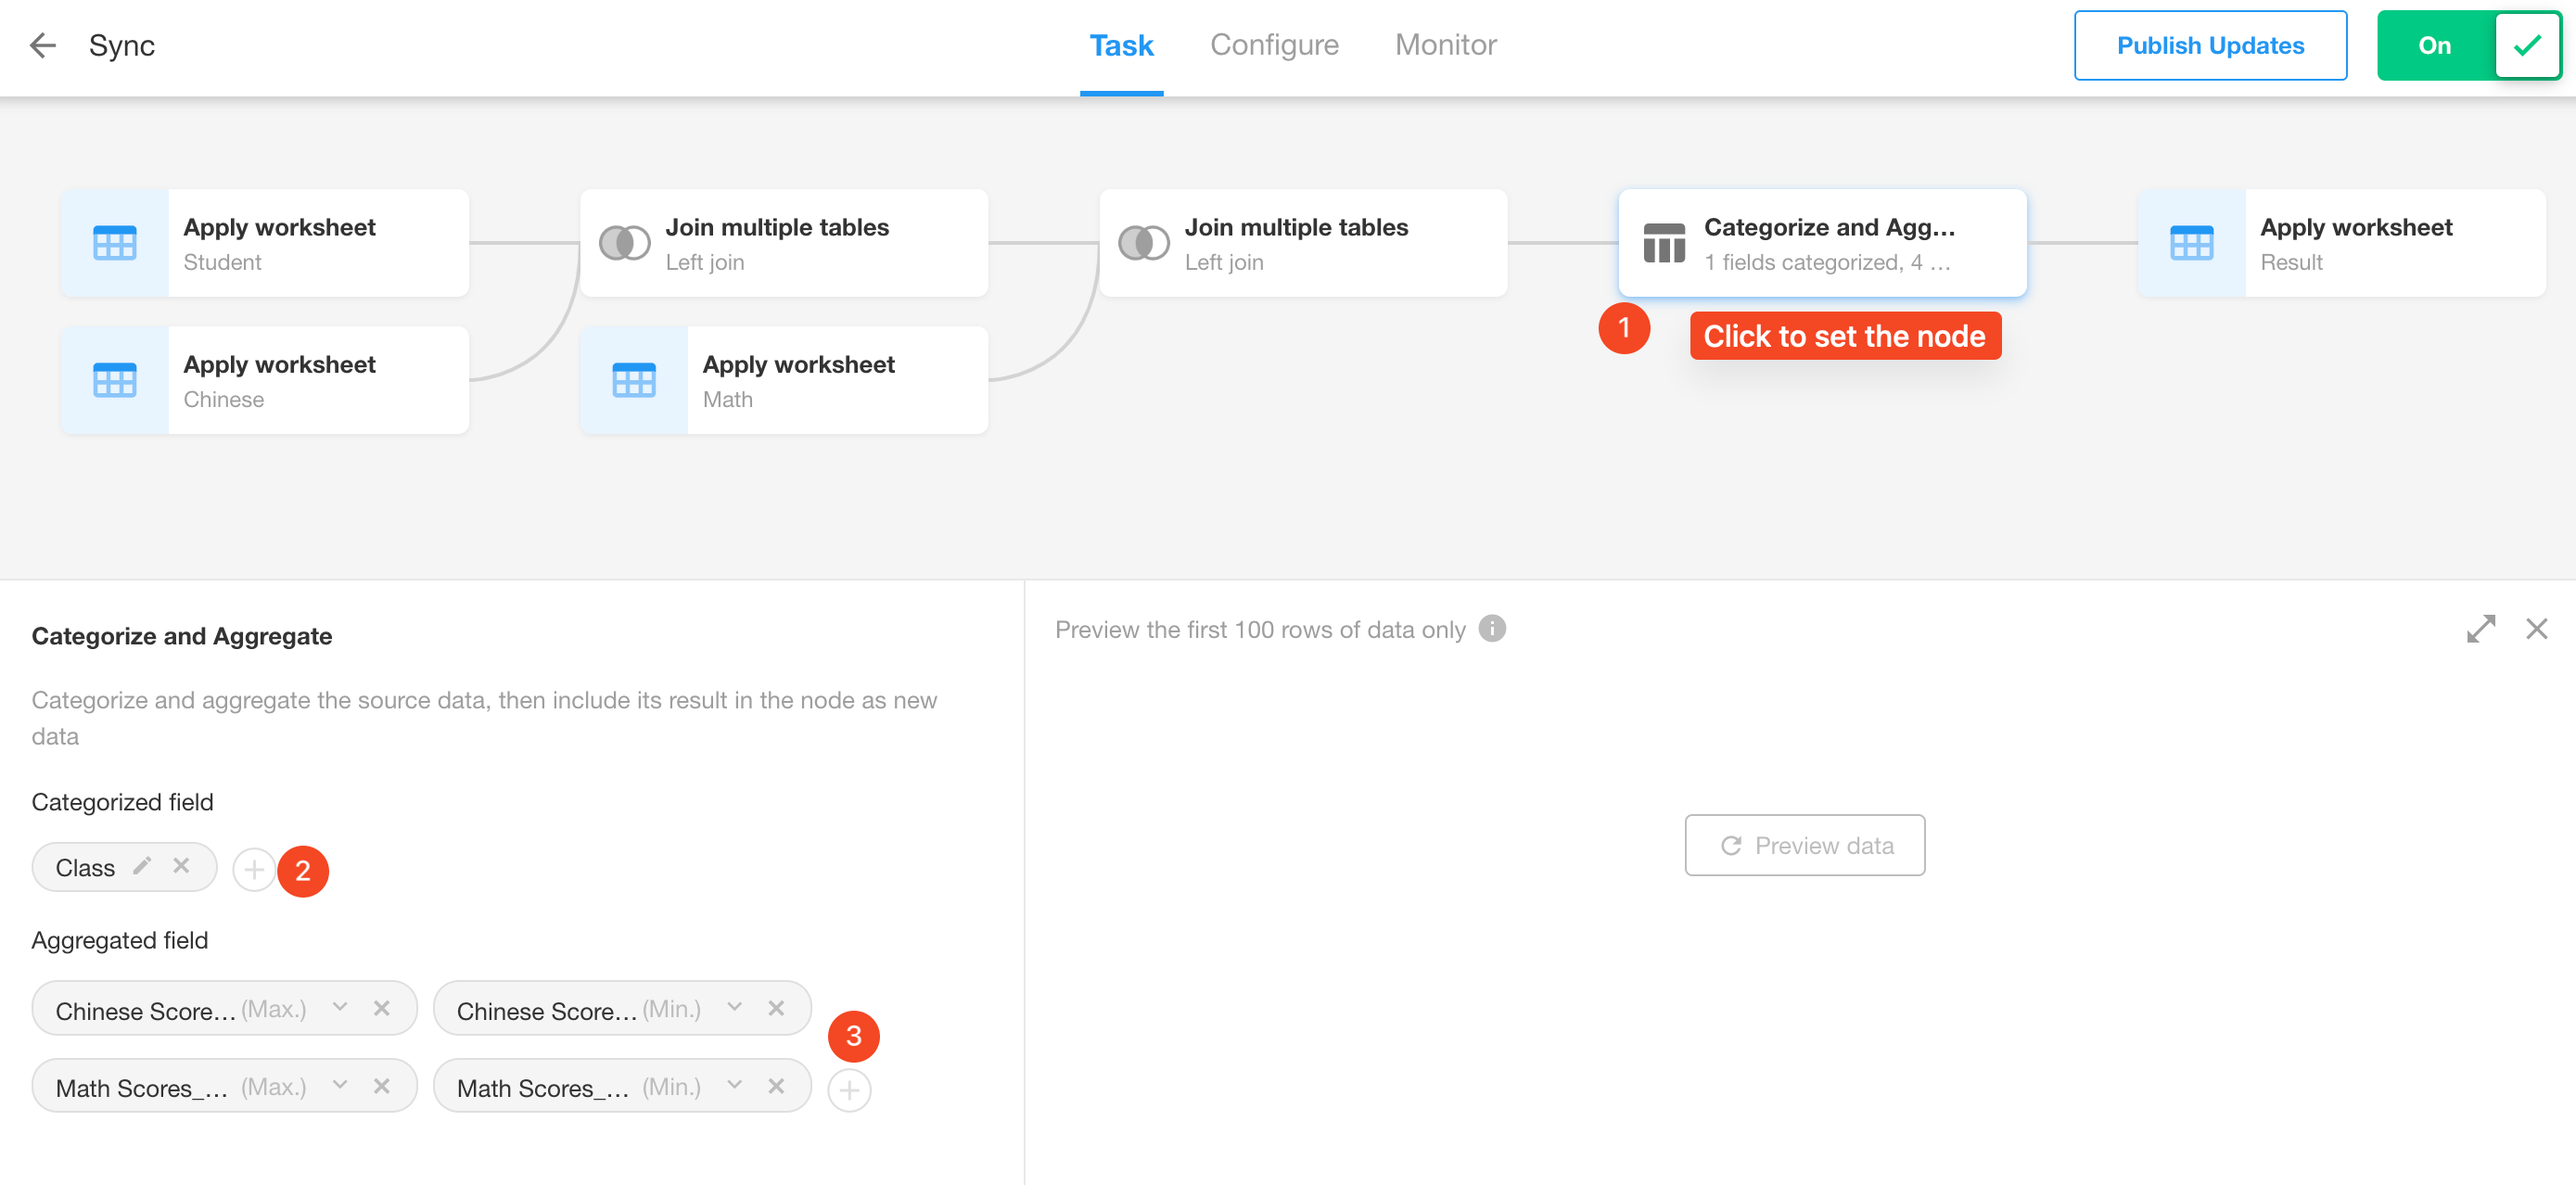
Taking the data from the "Join multiple tables" node mentioned above as an example, add a column for class, and classify and summarize to see the highest, lowest, and average scores for Chinese and Math in different classes.
-
Prepare data.

-
Add a "Categorize and Aggregate" node.

-
Configure the node.
Categorized field: Class
Aggregated field: Choose Chinese and Math scores, and select maximum, minimum, and average values for each.
-
Configure the destination.
Add a new table to store the summarized data.

-
Update and publish the sync task.

Merge Data
With this node, users can merge the results of two tables into one result set, greatly simplifying configuration and improving efficiency.
Configuration Steps
-
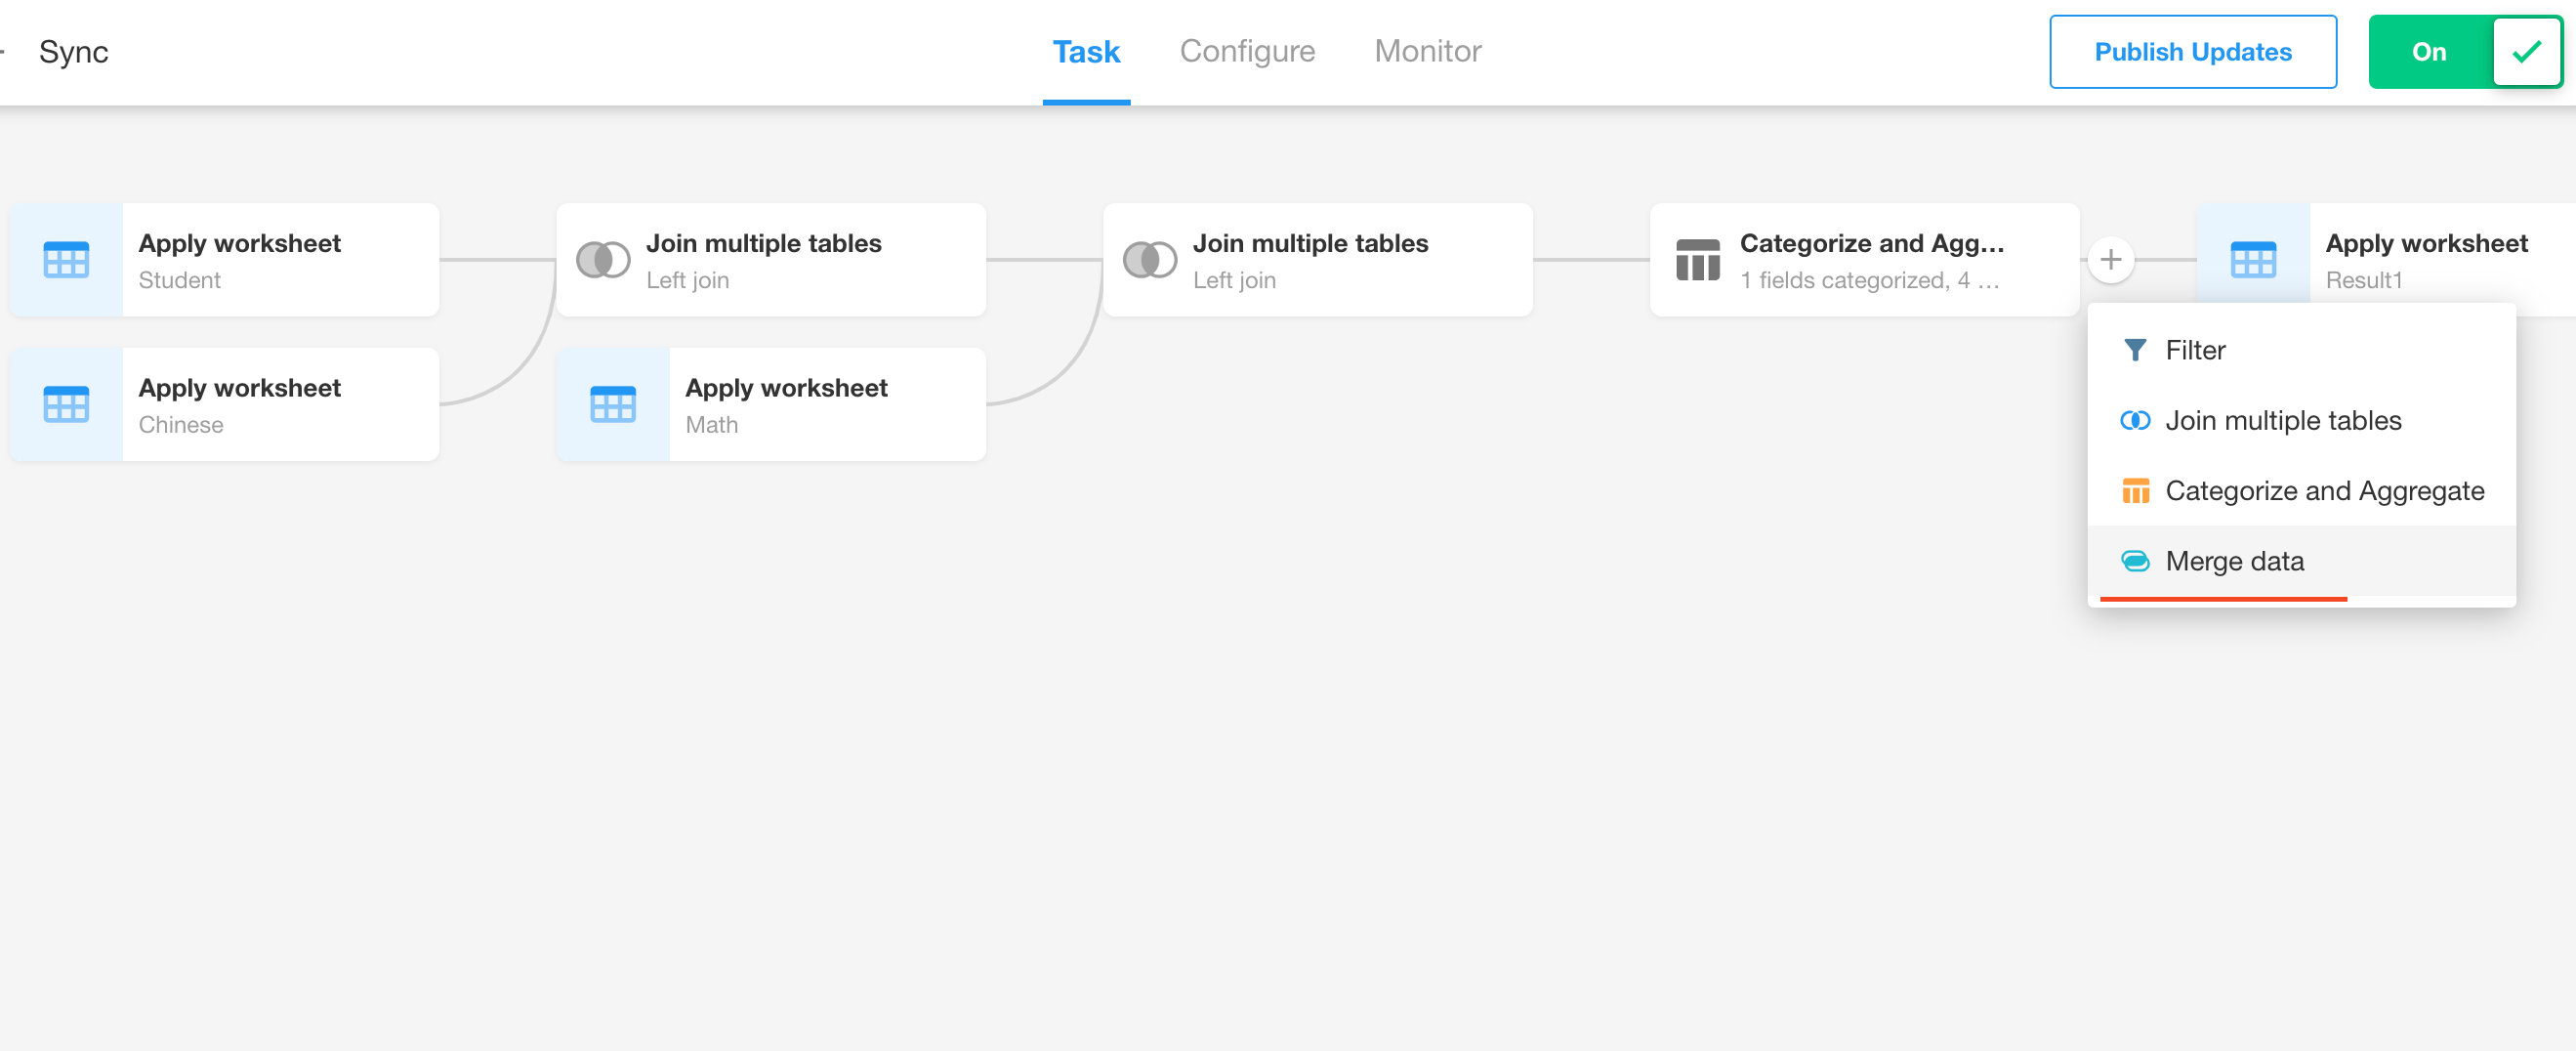
Click any sync task, hover the mouse between two nodes, and click [+] to add a "Merge Data" node.
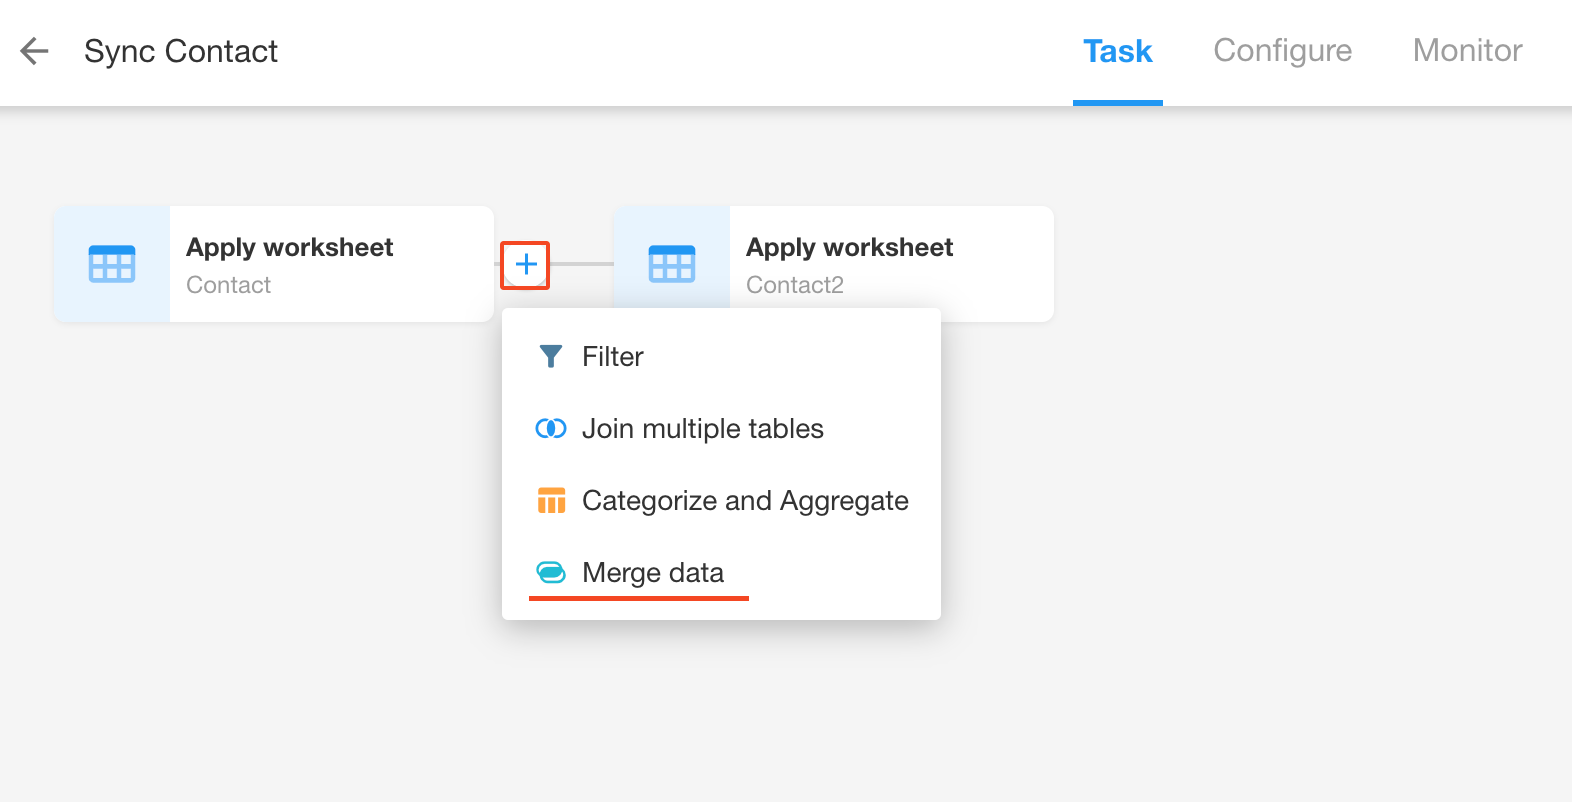
-
After adding, two nodes will appear, "Read Data Source" and "Merge Data".
◦ Read data source: Select the data source that needs to be connected here, which can be a worksheet or an external database.
◦ Merge data: Configure the operation method of merging data here.

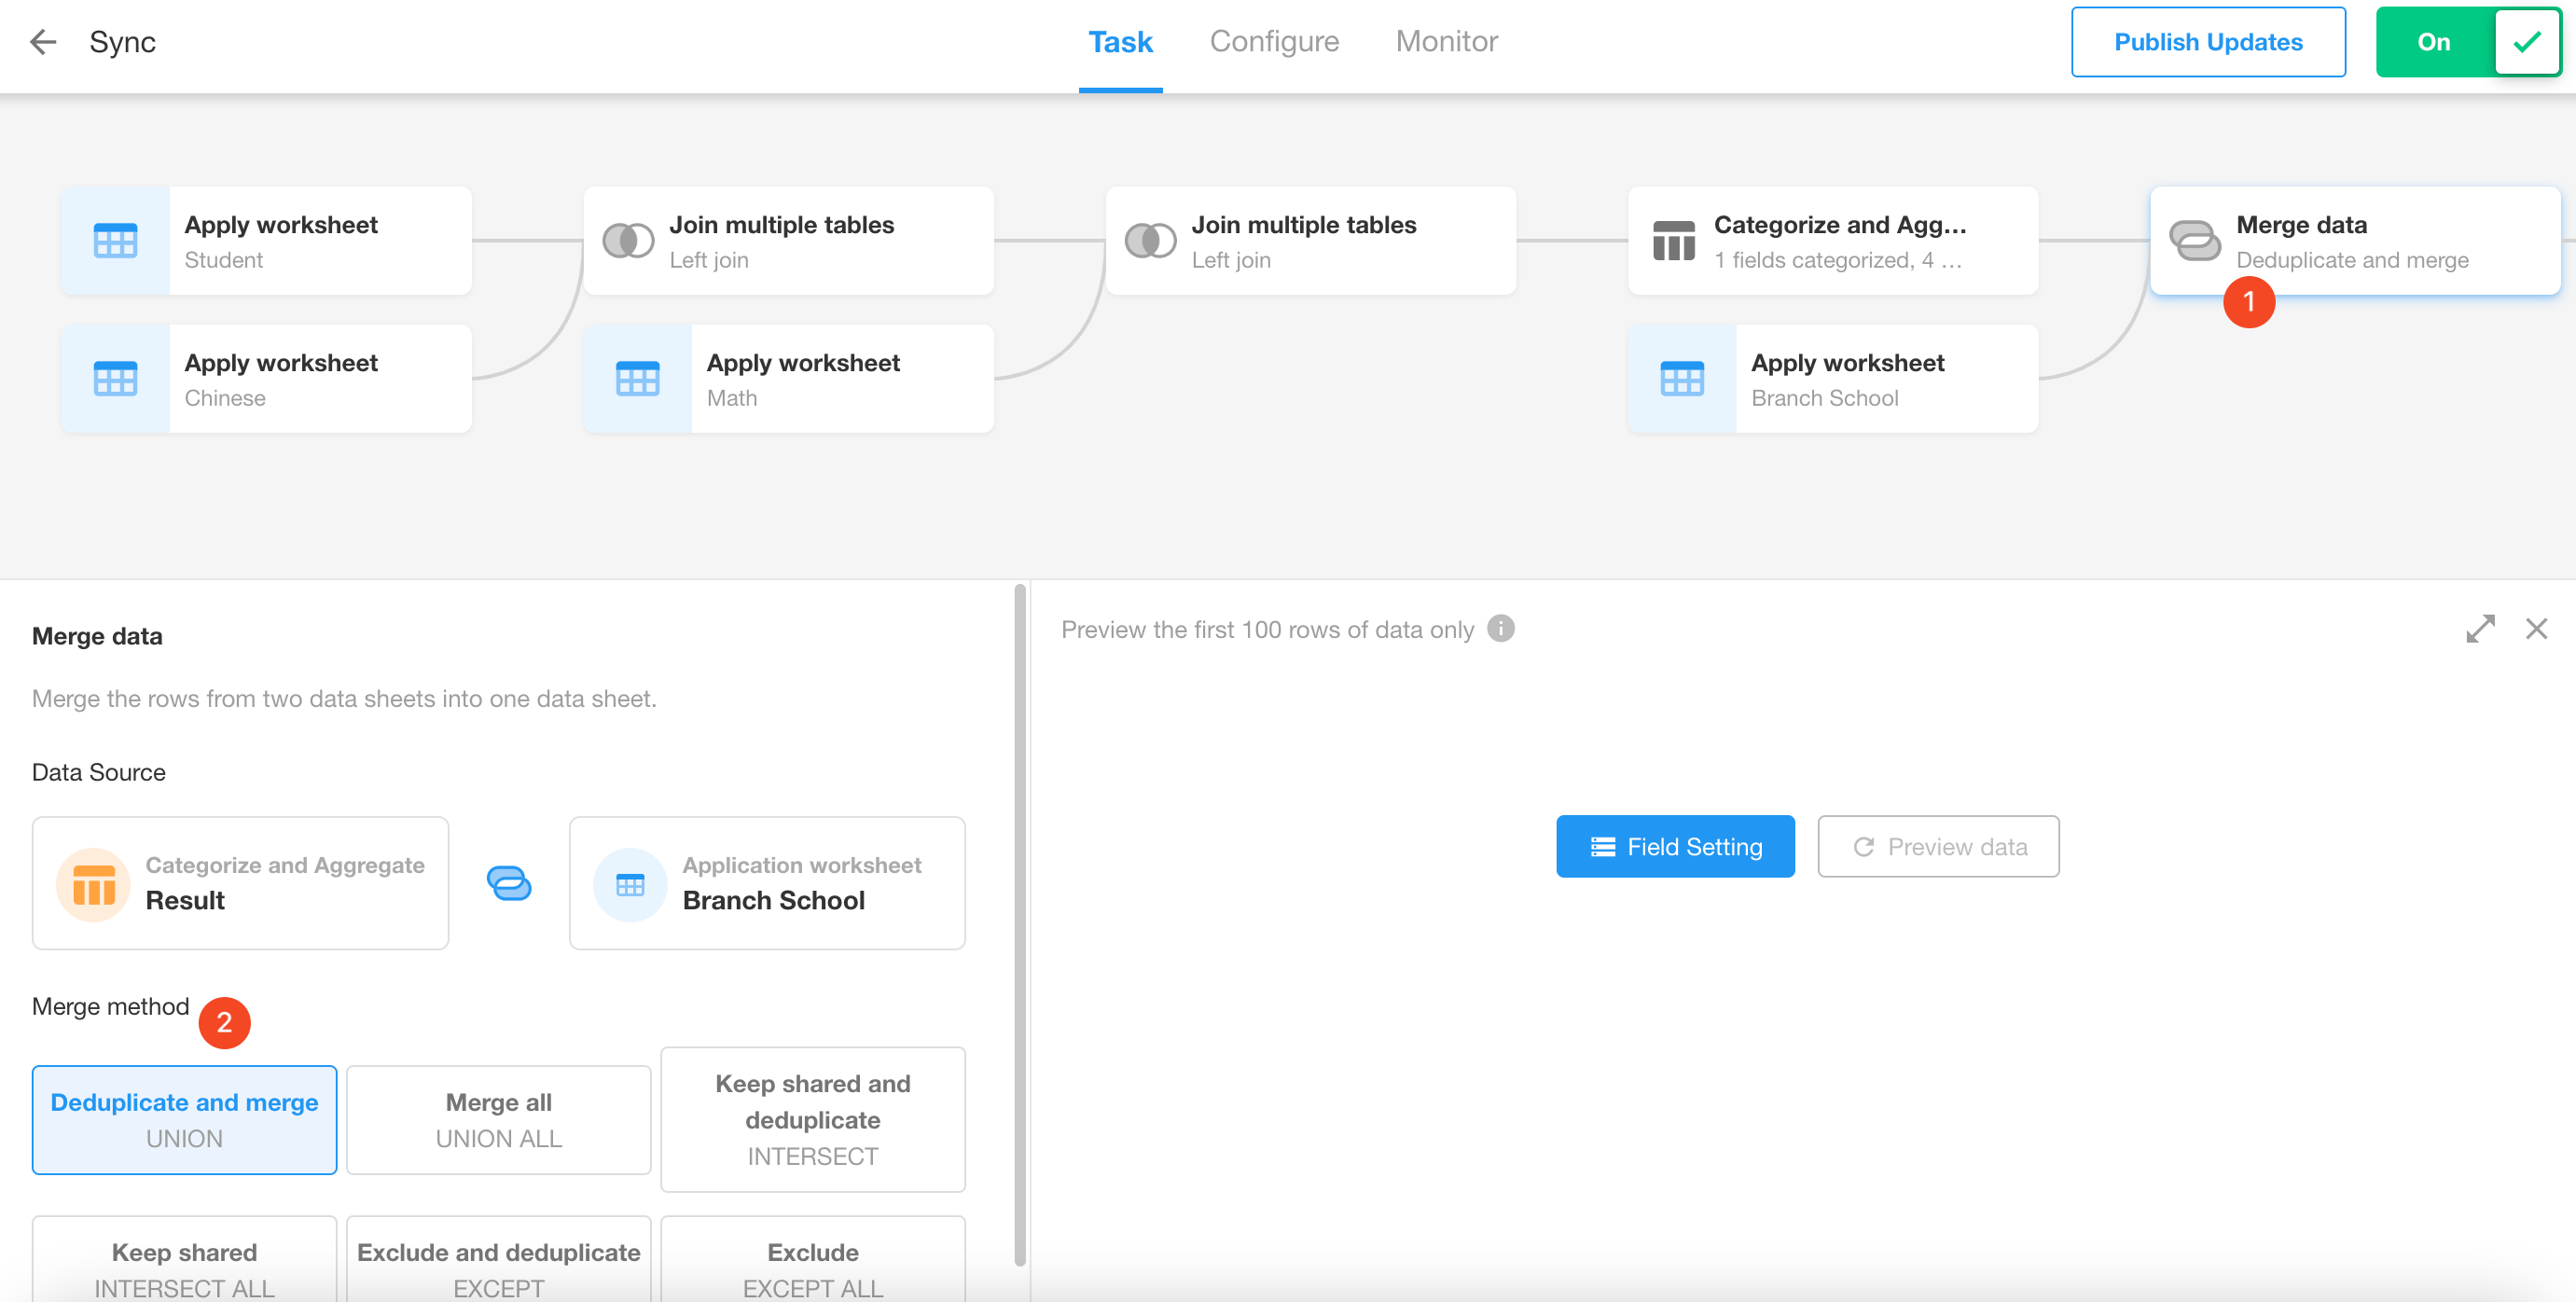
Six supported ways of merging data:
- UNION: Merge data while removing duplicate records from both tables, keeping only unique records;
- UNION ALL: Merge data while keeping all records from both tables;
- INTERSECT: Only records that exist in both tables will be kept, and duplicate records will be removed;
- INTERSECT ALL: Only records that exist in both tables will be kept, without removing duplicate records;
- EXCEPT: Only records that exist in the left table but not in the right table will be kept, and duplicate records will be removed;
- EXCEPT ALL: Only records that exist in the left table but not in the right table will be kept, without removing duplicate records.
Limitations of Merge Data Node
- Only available in the Ultimate Edition;
- Columns will be merged if the fields have the same name and type.
Use Case
Using the data from the "Categorize and Aggregate" node above as an example, merge the data with the data from branch schools.
-
Prepare the data.
Data from the "Categorize and Aggregate" node:
Data from branch schools:

-
Add a "Merge Data" node.
-
Configure the node.
-
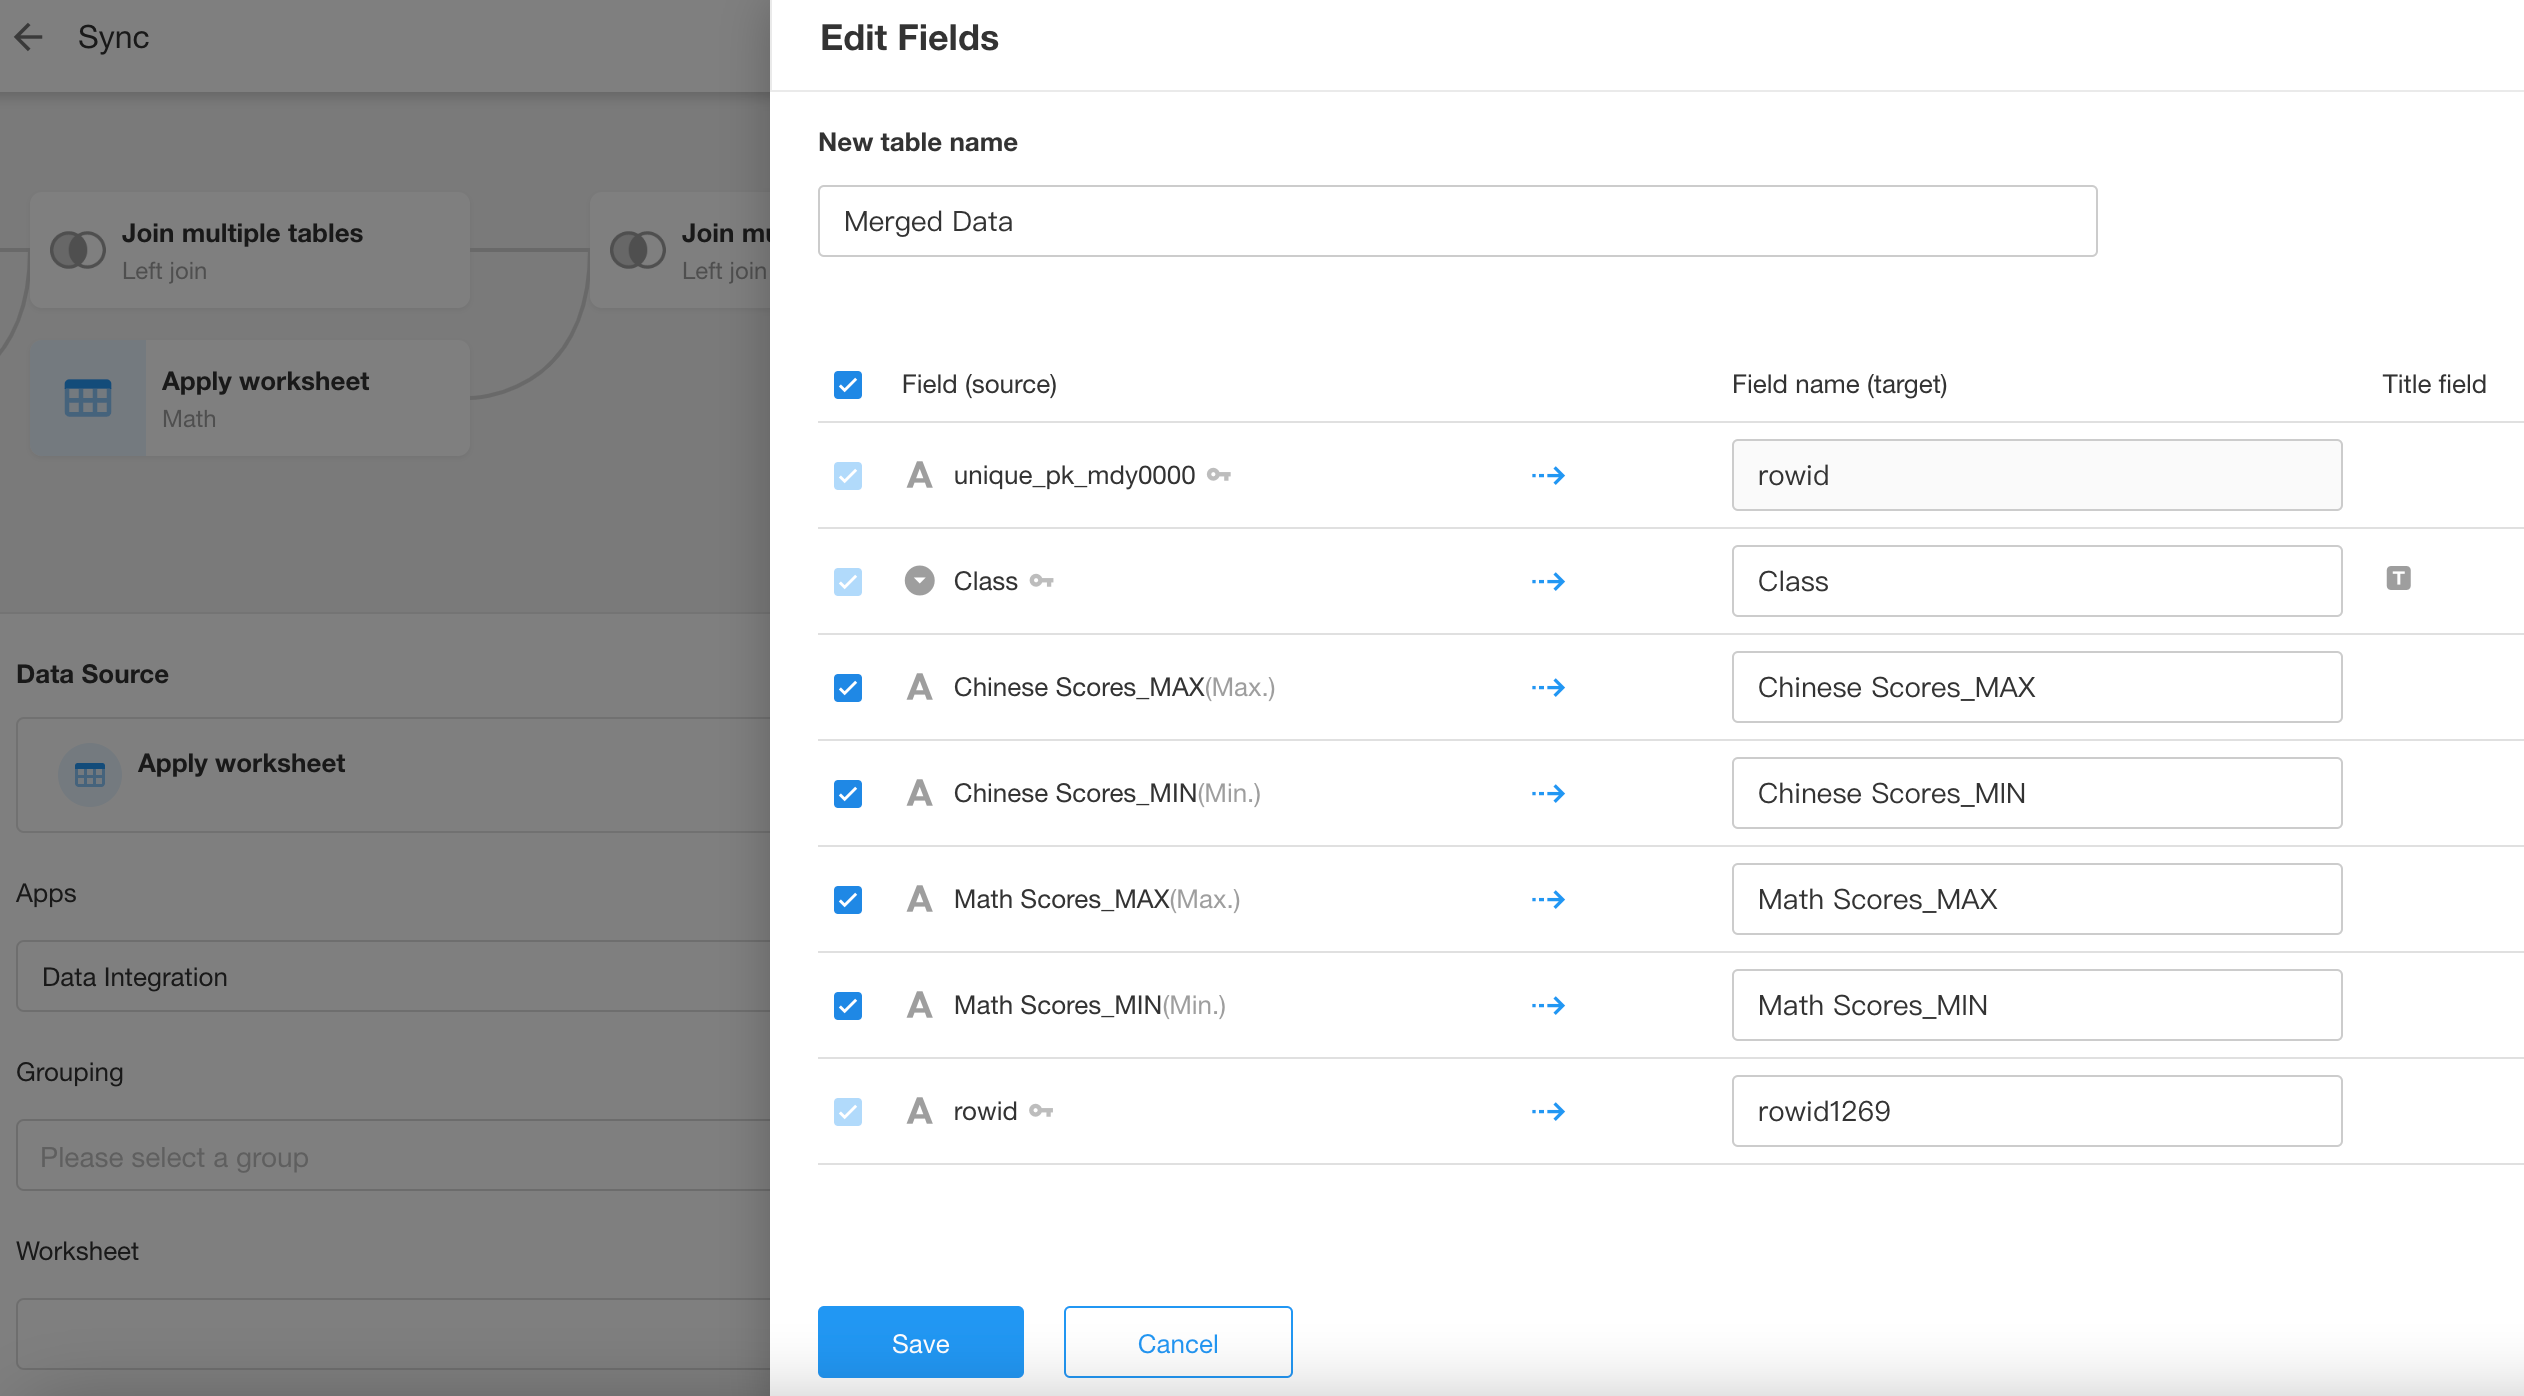
Configure the fields.

-
Create a destination worksheet.
-
Update and publish the sync task.